1
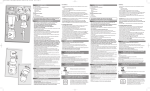
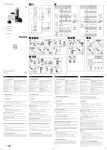
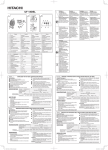
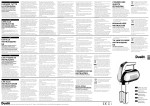
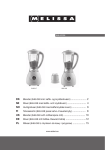
MX-4146
Algemeen
•
•
•
•
•
•
•
•
•
•
•
•
Wees extra voorzichtig wanneer u voedsel klaarmaakt voor baby's, ouderen of zieken. Zorg ervoor dat de
mixerschacht altijd goed gesteriliseerd is. Gebruik het sterilisatiemiddel volgens de aanwijzingen van de
fabrikant van het sterilisatiemiddel.
Raak de messen nooit aan wanneer het apparaat aangesloten is op het stopcontact.
Houd vingers, haar, kleding en andere voorwerpen uit de buurt van de bewegende onderdelen.
Haal na gebruik en voor het vervangen van onderdelen de stekker uit het stopcontact
Mix nooit hete olie of vet.
Laat kinderen of personen met beperkingen de staafmixer niet zonder toezicht gebruiken.
Kijk het apparaat, het snoer en de stekker na op eventuele beschadigingen. Gebruik het apparaat nooit
wanneer het apparaat, het snoer of de stekker beschadigd is. Laat het apparaat nakijken of repareren.
Dompel het motorhuis nooit onder in water en zorg ervoor dat het elektriciteitssnoer of de stekker nooit nat
worden, om elektrische schokken te voorkomen.
Zorg ervoor dat het snoer niet in aanraking komt met hete oppervlakken, en dat het niet naar beneden
hangt zodat een kind eraan kan trekken.
Gebruik geen niet-erkende hulpstukken.
Houd kinderen in het oog en zorg ervoor dat ze niet met het apparaat gaan spelen.
Voorzichtig: laat het apparaat 4 minuten rusten na 30 seconden draaien.
Hakmes
• Raak de scherpe messen niet aan.
• Verwijder het hakmes voordat u de kom leegt.
• Verwijder het deksel pas wanneer het mes helemaal gestopt is.
Belangrijk
• Gebruik bij dikke mengels de staafmixer niet langer dan 30 seconden per vier minuten, anders raakt de
mixer oververhit.
• Gebruik de staafmixer alleen voor het beoogde huishoudelijke doel.
Voordat u de stekker in het stopcontact steekt
• Controleer dat het spanningsniveau van uw elektriciteitsvoorziening overeenkomt met de informatie op het
motorhuis.
Voor het eerste gebruik
• Verwijder alle verpakking en gooi de afdekking van de messen weg.
• Was de onderdelen af: zie 'reiniging'.
Ken uw staafmixer
Staafmixer
a. snelheidstoetsen
b. motorhuis en handgreep
c. mixerschacht (afneembaar)
d. mengbeker
Hakmes
e. deksel hakmolen
f. hakmes
g. mengkom
Garde
h. gardehouder
j. draadgarde
j. accessoirehouder
Gebruik van de staafmixer
• U kunt babyvoedsel, soepen, sauzen, milkshakes en mayonaise mixen.
Mixen in de mengbeker
• Zet de beker op de standaard/deksel. (Hierdoor glijdt de beker niet van het werkoppervlak).
• Vul de beker niet voor meer dan 700ml. (24fl oz)
Mixen in een pan
• Haal de pan van het vuur en laat het licht afkoelen. Anders kan uw staafmixer oververhit raken en kunt u
uzelf branden.
- Plaats de mixerschacht in het motorhuis en draai deze totdat hij vergrendelt
- Steek de stekker in het stopcontact. Plaats het mes in het voedsel voordat u het apparaat inschakelt, om
spatten te voorkomen.
Houd de beker stevig vast. Druk dan op één van de snelheidstoetsen (gebruik stand 1 voor langzamer mixen
en om spatten te verminderen).
• Zorg ervoor dat vloeistof niet boven de bevestiging van het motorhuis en de mixerschacht uitkomt.
• Beweeg het mes door het voedsel en op en neer.
• Als uw mixer verstopt raakt, haal dan de stekker uit het stopcontact voordat u de mixer schoonmaakt.
Haal na gebruik de stekker uit het stopcontact en haal het apparaat uit elkaar.
Gebruik van de hakmolen (indien bijgeleverd)
• U kunt vlees, kaas, groenten, kruiden, brood, koekjes en noten hakken.
• Hak geen harde etenswaren zoals koffiebonen, ijsblokjes, specerijen of chocolade – hierdoor kan het mes
beschadigd raken.
Verwijder eventuele botten en snij het voedsel in blokjes van 1-2 cm.
Zet de mengkom op de standaard/deksel. (Hierdoor glijdt de kom niet van het werkoppervlak.)
Zet het hakmes op de pin in de kom
Voeg het voedsel toe.
Plaats het deksel op de mengkom en draai deze totdat hij vergrendelt.
Plaats het motorhuis op de mengkom, en draai deze totdat hij vergendelt.
Steek de stekker in het stopcontact. Houd de kom stevig vast. Druk dan op snelheidstoets 2.
Haal na gebruik de stekker uit het stopcontact en haal het apparaat uit elkaar.
Mixgids
Voedsel
Vlees
Kruiden
Noten
Kaas
Brood
Hardgekookte
eieren
Uien
Maximum
hoeveelheid
300g(10.5oz)
20g(0.75oz)
200g(7oz)
150g(5oz)
1 snee
2
Benaderde tijd
(in seconden)
10-30
20
30
30
20
5
100g(3.5oz)
10
Gebruik van de garde (indien bijgeleverd)
• U kunt lichte ingrediënten kloppen zoals eiwit, room, instant toetjes, en eieren en suiker voor gebak.
• Klop geen dikkere mengsels zoals margarine en suiker – hierdoor kan de garde beschadigd raken.
Duw de draadgarde in de gardehouder.
Plaats de mixerschacht in de gardehouder en draai deze totdat hij vergrendelt .
Doe het voedsel in een kom.
• Klop niet meer dan 4 eiwitten of 400ml room.
- Steek de stekker in het stopcontact.Begin op stand 1 om spatten te voorkomen. Beweeg de garde met de
klok mee.
• Zorg ervoor dat de vloeistof niet boven de draden van de garde uitkomt.
- Haal na gebruik de stekker uit het stopcontact en haal het apparaat uit elkaar.
Opbergen
- Plaats de accessoirehouder op het deksel (zet het lipje eerst gelijk).
- Plaats het motorhuis erop en draai deze. Plaats de accessoires aan beide kanten in de houder en draai
ze .
Reiniging
• Schakel het apparaat altijd uit en haal de stekker uit het stopcontact voordat u het schoonmaakt.
• Raak de scherpe messen niet aan.
Wees extra voorzichtig wanneer u voedsel klaarmaakt voor baby's, ouderen of zieken. Zorg ervoor dat de
mixerschacht altijd goed gesteriliseerd is. Gebruik het sterilisatiemiddel volgens de aanwijzingen van de
fabrikant van het sterilisatiemiddel.
Sommige etenswaren, zoals eieren of wortels, kunnen het plastic verkleuren. U kunt de verkleuring
verwijderen met een doek met wat plantaardige olie.
*****
Général
•
•
•
•
•
•
•
•
•
•
•
•
Faites particulièrement attention lorsque vous préparez de la nourriture pour les bébés, les personnes
âgées et les malades. Assurez-vous toujours que le mixer est soigneusement stérilisé. Utilisez une
solution de stérilisation en respectant les instructions du fabricant.
Ne touchez jamais les lames lorsque l’appareil est branché.
Gardez les doigts, cheveux, vêtements et ustensiles éloignés des parties mobiles.
Débranchez après utilisation et avant de changer des accessoires.
Ne mixez jamais de graisse ou d’huile chaude.
Ne laissez pas les enfants ou les handicapés utiliser le mixer sans surveillance.
Vérifiez l’appareil, le cordon et la prise à la recherche de dommages éventuels. N’utilisez jamais l’appareil
si celui-ci, le cordon ou la prise sont endommagés. Faites-les vérifier ou réparer à votre revendeur local.
Ne mettez jamais la poignée d’alimentation dans l’eau, et ne laissez jamais la prise ou le cordon être
mouillés, vous pourriez être électrocuté.
Ne laissez jamais le cordon toucher des surfaces chaudes ou pendre là où un enfant pourrait l’attraper.
N’utilisez jamais un accessoire non-autorisé.
Les jeunes enfants doivent être surveillés pour s’assurer qu’ils ne jouent pas avec cet appareil.
Attention : 30 secondes d’utilisation, 4 minutes de pause.
Accessoire hachoir
• Ne touchez pas les lames aiguisées.
• Retirez le hachoir avant de vider le bol.
• Ne retirez jamais le couvercle avant que la lame ne soit complètement arrêtée.
Important
• Pour des mélanges lourds, n’utilisez pas votre mixer pour plus de 30 secondes par période de 4 minutes, il
y a risque de surchauffe.
• Utilisez votre mixer uniquement pour son usage domestique prévu.
Avant de brancher
• Assurez vous que le voltage de votre alimentation est le même que celui indiqué sur la poignée
d’alimentation.
Avant d’utiliser pour la première fois
• Retirez l’emballage et les couvertures des lames.
• Lavez les différentes parties : voir ‘nettoyage’.
Connaître votre mixer
Mixer
a.Boutons de vitesse
b.Poignée d’alimentation
c.Couverture de lame (amovible)
d.Vase à bec
Hachoir
e.Couverture de hachoir
f. Lame de hachoir
g.Bol
Fouet
h.Collier du fouet
i. Fil du fouet
j. Rangement pour accessoires
Pour utiliser le mixer
• Vous pouvez mixer de la nourriture pour bébés, des soupes, des sauces, des milk shakes ou de la
mayonnaise.
Pour mixer dans le vase à bec
• Mettez le socle au bas du vase à bec (cela empêche le vase de glisser sur le plan de travail)
• Ne remplissez pas le vase au dessus de 700ml (24fl oz).
Pour mixer dans le plat
• Retirez le plat du four et laissez le refroidir légèrement. Autrement votre mixer pourrait surchauffer et vous
pourriez être brûlé.
- Placez la poignée d’alimentation dans la hampe, tournez et verrouillez.
- Branchez. Pour éviter les éclaboussures, placez la lame dans la nourriture avant d’allumer.
Tenez le vase en place. Puis pressez un des boutons de vitesses (utilisez la vitesse 1 pour un mixage plus lent
et pour éviter les éclaboussures).
• Ne laissez aucun liquide atteindre le branchement entre la poignée d’alimentation et la hampe.
• Déplacez la lame à travers la nourriture et enfoncez.
• Si votre mixer bloque, débranchez-le avant de retirer ce qui le bloque
Après utilisation, débranchez et démontez.
Pour utiliser le hachoir (si fourni)
• Vous pouvez hacher de la viande, du fromage, des légumes, des herbes, du pain, des biscuits et des noix.
• Ne hachez pas d’aliments durs tels que des grains de café, cubes de glace, épices ou du chocolat – vous
endommagerez la lame.
Retirez tout os et coupez la nourriture en petits cubes de1-2cm.
Mettez le socle sous le bas du bol à hacher (cela empêche le bol de glisser sur le plan de travail)
Mettez la lame hachoir dans la fiche puis dans le bol
Ajoutez la nourriture.
Mettez le couvercle du hachoir, tournez et vérrouillez
Insérez la poignée d’alimentation, tournez et vérrouillez
Branchez. Tenez le bol en place. Puis pressez vitesse 2.
Après utilisation, débranchez et démontez.
Guide de traitement
Nourrriture
Quantité maximum
Viande
Herbes
Noix
Fromage
Pain
Oeufs durs
Oignons
300g(10.5oz)
20g(0.75oz)
200g(7oz)
150g(5oz)
1 slice
2
100g(3.5oz)
Temps approx.
(en secondes)
10-30
20
30
30
20
5
10
Pour utiliser le fouet (si fourni)
• Vous pouvez fouetter des ingrédients légers tells que les blancs d’oeufs, les crèmes, les desserts
instantanés, et les œufs et le sucre pour les crèmes fouettées.
• Ne fouettez pas de mélanges plus lourds comme le sucre et la margarine – vous endommagerez le fouet.
Introduisez le fouet dans le collier du fouet
Mettez la poignée d’alimentation dans le collier du fouet, tournez et verrouillez
Mettez votre nourriture dans un bol.
• Ne fouettez pas plus de 4 blancs d’oeufs ou 400 ml (0.75pt) de crème.
- Branchez. Pour éviter les éclaboussures, commencez en vitesse 1. Bougez le fouet dans le sens des
aiguilles d’une montre.
• Ne laissez pas de liquide atteindre les fils du fouet.
- Après usage, débranchez et démonter.
Rangement
- Ajustez le rangement pour accessoires sur la couverture du hachoir (alignez la fiche d’abord)
- Mettez la poignée d’alimentation sur le haut et tournez. Rangez les accessoires de chaque côté –
abaissez puis tournez
Nettoyage
• Toujours débrancher avant de nettoyer.
• Ne touchez pas aux lames aiguisées.
Faites particulièrement attention lorsque vous préparez de la nourriture pour les bébés, les personnes âgées
ou les malades. Assurez-vous toujours que le mixer est soigneusement stérilisé. Utilisez une solution de
stérilisation en respectant les instructions du fabricant.
Certains aliments, les œufs, les carrotes, peuvent décolorer le plastique. Frotter avec un tissu imbibé d’huile
végétale aide à enlever cette décoloration.
*****
Allgemein
•
•
•
•
•
•
•
•
•
•
•
•
Lassen Sie bitte besondere Vorsicht walten, wenn Sie Speisen für Kinder oder hilfebedürftige Personen
zubereiten. Achten Sie darauf, dass der Handgriff des Mixers stets sterilisiert ist. Benutzen Sie hierzu ein
Sterilisiermittel und beachten Sie die Herstellerhinweise.
Messerwerk während des Betriebs nicht berühren.
Weder Hände noch andere Körperteile oder Utensilien in den Mixer einführen.
Nach Gebrauch und vor den Umbau von Zubehörteilen schalten Sie das Gerät bitte aus und ziehen den
Netzstecker.
Kein heißes Öl oder Fett mixen.
Keine Benutzung durch Kinder oder hilfebedürftige Personen.
Gerät nicht weiterverwenden, wenn es einmal heruntergefallen oder in irgendeiner Weise beschädigt oder
der Netzstecker beschädigt ist. Bitte wenden Sie sich an einen autorisierten Kundendienst.
Gerät, Netzkabel oder -stecker nicht in Waser oder andere Flüssigkeiten eintauchen, Stromschlaggefahr!
Lassen Sie das Netzkabel nicht heiße Flächen berühren oder herunterhängen, wo es von Kindern
heruntergezogen werden kann.
Benutzen Sie nur Original-Zubehörteile.
Beaufsichtigen Sie Kinder, damit diese nicht mit dem Gerät spielen.
Vorsicht: Nutzungsdauer 30 Sekunden, dann 4 Minuten Pause.
Zerkleinerer
• Messerwerk nicht berühren.
• Entnehmen Sie das Messerwerk vor dem Entleeren des Mixers.
• Nehmen Sie den Deckel nicht ab, bevor die Messer zum Stillstand gekommen sind.
Wichtig
• Benutzen Sie den Mixer für zähe Zutaten nicht länger als 30 Sekunden je 4 Minuten, anderenfalls überhitzt
er.
• Dieses Haushaltsgerät ist nicht für gewerbliche Nutzung bestimmt.
Vor Netzanschluss
• Überzeugen Sie sich, dass Ihre Netzspannung mit der Gerätespannung, wie auf dem Typenschild vermerkt,
übereinstimmt.
Vor Erstgebrauch
• Entfernen Sie alle Verpackungsmaterialien und die Schutzkappe für das Messerwerk.
• Waschen Sie alle Zubehörteile gut ab: siehe ‚Reinigung’.
Lernen Sie Ihren Handmixer kennen
Handmixer
a.Geschwindigkeitstasten
b.Motoreinheit
c.Mixerwelle (herausnehmbar)
d.Mixbecher
Zerkleinerer
e.Abdeckung Zerkleinerer
f.Messerwerk
g.Schale
Quirl
h.Quirlmaschette
i. Quirl
j. Aufbewahrung
Bedienungshinweise Handmixer
• Zum Mixen von Babykost, Suppen, Saucen, Milchshakes und Mayonnaise.
Mixen im Mixbecher
• Bringen Sie das Basisgerät unten am Mixbecher an (hierdurch wird vermieden, dass der Mixbecher hin
und her rutscht).
• Füllen Sie nicht mehr als 700ml ein.
Mixen im Kochtopf
• Lassen Sie den Kochtopf mit den Zutaten abkühlen, ansonsten könnte Ihr Mixer überhitzen oder Sie
können sich verbrennen.
- Bringen Sie die Mixerwelle an der Motoreinheit an, rasten Sie diese mit einer Umdrehung ein.
- Stecken Sie den Stecker in die Steckdose. Senken Sie das Messerwerk zunächst in den Topf ab, bevor
Sie das Gerät einschalten, um ein Verspritzen zu vermeiden.
Halten Sie den Mixbecher fest, dann drücken Sie eine der Geschwindigkeitstasten (Stufe 1 für geringe
Geschwindigkeit).
• Achten Sie darauf, den Mixer nicht über die Verbindung zwischen Motoreinheit und Welle einzutauchen.
• Bewegen Sie den Mixer mit Stechbewegungen durch die Speisen.
• Bleibt der Mixer stecken, so ziehen Sie erst den Netzstecker, bevor Sie ihn von der Blockierung befreien.
Nach Gebrauch ziehen Sie den Netzstecker und zerlegen den Mixer.
Bedienungshinweise Zerkleinerer (falls mitgeliefert)
• Zum Zerhacken von Fleisch, Käse, Gemüse, Kräutern, Brot, Keksen und Nüssen.
• Zerkleinern Sie keine harten Zutaten wie Kaffeebohnen, Eiswürfel, Gewürze oder Schokolade, damit
können Sie das Messerwerk beschädigen.
Entfernen Sie Knochen und schneiden Sie die Zutaten in 1 bis 2 cm große Würfel.
Bringen Sie das Basisgerät unten am Mixbecher an (hierdurch wird vermieden, dass der Mixbecher hin
und her rutscht).
Setzen Sie das Messerwerk auf dem Stift in der Schale auf
Fügen Sie die Zutaten hin
Setzen Sie die Abdeckung mit einer Drehbewegung zum Verriegeln auf
Bringen Sie die Motoreinheit an, rasten Sie diese mit einer Umdrehung ein .
Stecken Sie den Stecker in die Steckdose. Halten Sie die Schale fest, dann drücken Sie
Geschwindigkeitstaste 2.
Nach Gebrauch ziehen Sie den Netzstecker und zerlegen den Mixer.
Verarbeitungshinweise
Speisen
Höchstmenge
Fleisch
Kräuter
Nüsse
Käse
Brot
Hartgekochte
Eier
Zwiebeln
300 g
20 g
200 g
150 g
1 Scheibe
2
Zubereitungszeit
(in Sekunden)
10-30
20
30
30
20
5
100 g
10
Bedienungshinweise Quirl (falls mitgeliefert)
• Sie können leichte Zutaten, wie beispielsweise Eiweiß, Sahne, Fertigpuddings und Zucker aufschlagen.
• Schlagen Sie keine zäheren Zutaten wie Margarine und Zucker auf, damit beschädigen Sie den
Schneebesen.
Stecken Sie den Schneebesen in die Manschette ein .
Schließen Sie die Motoreinheit an der Manschette mit einer Drehbewegung zum Verriegeln an .
Geben Sie Ihre Zutaten in eine Schüssel.
• Schlagen Sie nicht mehr als 4 Eiweiß oder 400ml Sahne.
- Stecken Sie den Stecker in die Steckdose. Halten Sie die Schale fest, dann drücken Sie
Geschwindigkeitstaste 1. Bewegen Sie den Schneebesen im Uhrzeigersinn.
• Achten Sie darauf, den Mixer nicht über die Verbindung zwischen Motoreinheit und Schneebesen
einzutauchen.
- Nach Gebrauch ziehen Sie den Netzstecker und zerlegen den Mixer.
Aufbewahrung
- Setzen Sie die Motoreinheit auf der Halterung auf .
- Setzen Sie die Motoreinheit oben auf und rasten Sie diese ein. Bringen Sie die Zubehörteile an den Seiten
an .
Reinigung
• Schalten Sie das Gerät vor dem Reinigen stets aus und ziehen Sie den Netzstecker.
• Berühren Sie keinesfalls das Messerwerk.
Lassen Sie bitte besondere Vorsicht walten, wenn Sie Speisen für Kinder oder hilfebedürftige Personen
zubereiten. Achten Sie darauf, dass der Handgriff des Mixers stets sterilisiert ist. Benutzen Sie hierzu ein
Sterilisiermittel und beachten Sie die Herstellerhinweise.
Einige Zutaten, wie Eier oder Möhren, können zu einer Verfärbung des Kunststoffes führen. Reinigen Sie die
Verfärbung mit etwas Pflanzenöl
*****
General
•
•
•
•
•
•
•
•
•
•
Take special care when preparing food for babies, the elderly and infirm. Always ensure that the hand
blender shaft is thoroughly sterilized. Use a sterilizing solution in accordance with the sterilizing solution
manufacturers instructions.
Never touch the blades while the machine is plugged in.
Keep fingers, hair, clothing, and utensils away from moving parts.
Unplug after use and before changing attachments.
Never blend hot oil or fat.
Don’t let children or infirm people use the hand blender without supervision.
Please check the appliance, cord and plug for possible damages. Never use, when the appliance, cord or
plug is damaged. Get it checked or repaired in your local place.
Never put the power handle in water or let the cord or plug get wet-you could get an electric shock.
Never let the cord touch hot surfaces or hang down where a child could grab it.
Never use an unauthorized attachment.
•
•
Young children should be supervised to ensure that they do not play with this appliance.
Caution: performance 30 seconds, pause 4 minutes.
Chopper attachment
• Do not touch the sharp blades.
• Remove the chopper blade before emptying the bowl.
• Never remove the cover until the blade has completely stopped.
Important
• With heavy mixtures, do not use your hand blender for longer than 30 seconds in any four minutes period-it
will overheat.
• Only use your hand blender for its intended domestic use.
Before plugging in
• Make sure your electricity supply voltage is the same as the one shown on the power handle.
Before using for the first time
• Remove all packaging and throw away the blade covers.
• Wash the parts: see ’cleaning’.
Know your hand blender
Hand blender
a.speed buttons
b.power handle
c.blender shaft (removable)
d.beaker
Chopper
e.chopper cover
f.chopper blade
g.bowl
Whisk
h.whisk collar
i. wire whisk
j.tool tidy
To use the hand blender
• You can blend baby food, soups, sauces, milk shakes and mayonnaise.
For beaker blending
• Put the base/lid on the bottom of the beaker.(This stops the beaker sliding on the worktop.)
• Do not fill the beaker above 700ml(24fl oz).
For saucepan blending
• Take the pan off the heat and let it cool slightly. Otherwise your hand blender could overheat and you could
be burned yourself.
- Fit the power handle inside the blender shaft, turn and lock
- Plug in .To avoid splashing, place the blade in the food before switching on.
Hold the beaker steady. Then press either speed button (use speed 1 for slower blending and to reduce
splashing).
• Do not let liquid get above the join between the power handle and blender shaft.
• Move the blade through the food and use a stabbing action.
• If your blender gets blocked, unplug before clearing
After use ,unplug and dismantle.
To use the chopper (if supplied)
• You can chop meat, cheese, vegetables, herbs, bread, biscuits and nuts.
• Do not chop hard foods such as coffee beans, ice cubes, spices or chocolate-you’ll damage the blade.
Remove any bones and cut food into 1-2cm cubes.
Put the base/lid on the bottom of the chopper bowl.(This stops the bowl sliding on the worktop.)
Fit the chopper blade over the pin in the bowl
Add your food.
Fit the chopper cover, turn and lock
Fit the power handle, turn and lock
Plug in. Hold the bowl steady. Then press speed 2.
After use, unplug and dismantle.
Processing guide
Food
Maximum
Amount
Meat
300g(10.5oz)
Herbs
20g(0.75oz)
Nuts
200g(7oz)
Cheese
150g(5oz)
Bread
1 slice
Hardboiled 2
Approx. time
(in seconds)
10-30
20
30
30
20
5
Eggs
Onions
100g(3.5oz)
10
To use the whisk (if supplied)
• You can whip light ingredients such as egg whites; cream; instant desserts ;and eggs and sugar for
whisked sponges.
• Do not whisk heavier mixtures such as margarine and sugar – you’ll damage the whisk.
Push the wire whisk into the whisk collar
Fit the power handle inside the whisk collar ,turn and lock
Place your food in a bowl.
• Do not whisk more than 4 egg whites or 400ml(0.75pt) cream.
- Plug in .To avoid splashing, start on speed 1. Move the whisk clockwise.
• Don’t let liquid get above the whisk wires.
- After use, unplug and dismantle.
Storage
- Fit the tool tidy onto the chopper cover (line up the tab first)
- Fit the power handle on top and turn. On each side store the attachments – simply lower, then turn
Cleaning
• Always switch off and unplug before cleaning.
• Don’t touch the sharp blades.
Take special care when preparing food for babies, the elderly and infirm. Always ensure that the hand blender
shaft is thoroughly sterilized. Use a sterilizing solution in accordance with the sterilizing solution manufacturers
instructions
Some food, egg. carrot, may discolor the plastic. Rubbing with a cloth dipped in vegetable oil helps remove
discoloring.
*****
Generale
•
•
•
•
•
•
•
•
•
•
•
•
Fare particolare attenzione durante la preparazione di alimenti per neonati, gli anziani e i malati.
Assicurarsi sempre che il frullatore ad immersione sia sterilizzato. Utilizzare uno sterilizzatore rispettando
le istruzioni del produttore.
Non toccare mai le lame se il dispositivo è collegato alla rete.
Tenere le dita, capelli, indumenti e utensili lontani dalle parti movibili.
Scollegare il dispositivo dopo l'uso e prima di sostituire gli accessori.
Non frullare mai olio o grasso caldo.
Non lasciare che bambini o persone malate utilizzano il dispositivo senza controllo.
Controllare se il dispositivo, il cavo o la spina presentano guasti. Non usare mai il dispositivo se il cavo o la
spina sono danneggiati. Farlo controllare da un tecnico.
Non immergere il dispositivo, il cavo o la spina in acqua in quanto si rischia di prendere scosse elettriche.
Far attenzione che il cavo non tocchi superfici calde o sia accessibile a bambini.
Non usare accessori non autorizzati.
I bambini devono essere controllati per assicurare un corretto controllo del dispositivo.
Attenzione: dopo un utilizzo di 30 secondi è necessaria una pausa di 4 minuti.
Accessorio tritatore
• Non toccare le lame taglienti.
• Rimuovere il tritatore prima di svuotare il recipiente.
• Non rimuovere il coperchio se le lame non si sono completamente fermate.
Importante
• In caso di alimenti pesanti, non utilizzare il frullatore ad immersione per più di 30 secondi senza lasciarlo
riposare per un periodo di quattro minuti.
• Utilizzare il frullatore ad immersione solo per utilizzo domestico.
Prima del collegamento alla rete
• Assicurarsi che il voltaggio di rete elettrica sia lo stesso indicato sull'impugnatura del dispositivo.
Al primo utilizzo
• Rimuovere il materiale d'imballaggio.
• Lavare i componenti: vedere ’Pulizia’.
Conoscenza del frullatore ad immersione
Frullatore ad immersione
a.pulsanti velocità
b.impugnatura
c.manico del frullatore (amovibile)
d.bicchiere
Trituratore
e.coperchio del trituratore
f.lama del trituratore
g.recipiente
Frusta
h.collo della frusta
i.cavo frusta
j.utensile
Utilizzo del frullatore ad immersione
• È possibile frullare alimenti pere neonati, zuppe, sughi, frullati e maionese.
Come frullare nel bicchiere
• Mettere la base/coperchio sulla base del bicchiere.(In tal modo il bicchiere si ferma.)
• Non riempire il bicchiere più di 700 ml.
Come frullare in una padella
• Rimuovere la padella dal fuoco e lasciarla raffreddare. Altrimenti il frullatore rischia di surriscaldarsi e
l'utente potrebbe scottarsi.
- Inserire l'impugnatura nel manico del frullatore, girare e bloccare
- Inserire la spina. Per evitare schizzi, immergere il frullatore negli alimenti e poi accenderlo.
Tenere fermo il bicchiere. Poi premere il pulsante velocità (utilizzare velocità 1 per frullare lentamente e ridurre
gli schizzi).
• Far attenzione che liquidi non finiscano sulle giunture tra l'impugnatura e il manico.
• Muovere il frullatore negli alimenti ruotando leggermente.
• Se il frullatore si blocca, tirare la spina.
Dopo l’uso tirare la spina e smontare l'unità.
Come utilizzare il trituratore (se in dotazione)
• È possibile triturare carne, verdure, erbe, pane, biscotti e noccioline.
• Non tritare cibi duri come chicchi di caffè, cubetti di ghiaccio, spezie e cioccolata, si rischia di danneggiare
le lame.
Rimuovere noccioli e tagliare gli alimenti in pezzetti da 1-2cm.
Mettere la base/coperchio sulla base del trituratore.(In tal modo il recipiente si ferma.)
Inserire la lama del trituratore nel recipient
Aggiungere cibo.
Montare il coperchio del trituratore e bloccare
Montare l'impugnatura, girare e bloccare .
Inserire la spina. Tenere fermo il recipiente. Poi premere velocità 2.
Dopo l’uso tirare la spina e smontare l'unità.
Guida indicativa
Alimenti
Massimo
Quantità
Carne
Erbe
Noccioline
Formaggio
Pane
Uova
sode
Cipolle
300g
20g
200g
150g
1 fetta
2
Tempo
approssimativo
(in secondi)
10-30
20
30
30
20
5
100g
10
Come utilizzare la frusta (se in dotazione)
• È possibile frustare ingredienti leggeri come la chiara d'uovo, panna, dessert istantanei e uova e zucchero
per pan di Spagna.
• Non frustare alimenti duri come margarina o burro e zucchero, si rischia di danneggiare la frusta.
Inserire la frusta nell'inserimento frusta
Inserire l'impugnatura nel manico della frusta, girare e bloccare
Inserire cibo nel recipiente.
• Non frustare più di 4 chiare d'uovo assieme o 400 ml di panna.
- Inserire la spina. Per evitare schizzi avviare a velocità 1. Spostare la frusta in senso orario.
• Far attenzione che liquidi non finiscano sul cavo.
- Dopo l’uso tirare la spina e smontare l'unità.
Sistemazione
- Inserire l'utensile nel coperchio del trituratore (allineare prima la linguetta)
- Montare l'impugnatura sulla parte superiore e girare. Sistemare gli accessori ai lati – semplicemente
abbassare e girare
Pulizia
• Spegnere sempre il dispositivo prima di pulire.
• Non toccare le lame taglienti.
Fare particolare attenzione durante la preparazione di alimenti per neonati, gli anziani e i malati. Assicurarsi
sempre che il frullatore ad immersione sia sterilizzato. Utilizzare uno sterilizzatore rispettando le istruzioni del
produttore.
Alcuni alimenti, come uova, carote, potrebbero scolorire la plastica. È possibile rimuovere lo scolorimento con
un panno imbevuto di olio vegetale.
*****
General
•
Extreme el cuidado cuando prepare comida para bebés, ancianos y personas enfermas. Esto significa que
ha de esterilizar la batidora, para lo cual deberá emplear una solución esterilizante siguiendo las
instrucciones de su fabricante.
No toque las cuchillas cuando el aparato esté enchufado.
Mantenga los dedos, el pelo, la ropa y los utensilios lejos de las partes móviles.
Desenchufe después de cada uso y antes de cambiar los accesorios.
No procese aceite caliente.
No deje que niños o personas enfermas usen la batidora sin la supervisión de un adulto.
Compruebe el estado del aparato, el cable y el enchufe.
No utilice el aparato si el cable o el enchufe están dañados, y llévelo a un servicio técnico para que lo
reparen.
• No sumerja la unidad del motor en agua ni deje que el cable o el enchufe entren en contacto con este u
otro líquido o podría sufrir una descarga eléctrica.
• No deje que el cable entre en contacto con superficies calientes ni que cuelgue de forma que un niño
pueda tirar de él.
• No utilice accesorios no autorizados.
• Supervise a los niños para comprobar que no utilizan el aparato como un juguete.
• Advertencia: realice una pausa de 4 minutos cada 30 segundos de funcionamiento.
•
•
•
•
•
•
Utilización de la cuchilla cortadora
• No toque las cuchillas.
• Retire la cuchilla cortadora antes de vaciar el recipiente.
• No retire la tapa hasta que la cuchilla se haya detenido por completo.
Importante
• Cuando bata alimentos duros, haga una pausa de 4 minutos cada 30 segundos de funcionamiento o el
aparato se sobrecalentará.
• La batidora es sólo para uso doméstico.
Antes de enchufar la batidora
• Compruebe que el voltaje de su instalación eléctrica se corresponde con el indicado en la unidad del
motor.
Antes del primer uso
• Retire el embalaje y las cubiertas de las cuchillas.
• Limpie las partes (vea la sección “Limpieza”).
Descripción de los componentes
Batidora
a. botones de velocidad
b. unidad del motor
c. cuchilla batidora (extraíble)
d. vaso
Picadora
e. tapa de la picadora
f. cuchilla picadora
g. recipiente
Montadora
h. unión de la varilla
i. varilla montadora
j. organizador de accesorios
Funciones de la batidora
• Gracias a la batidora podrá preparar deliciosos purés para bebés, sopas, salsas, batidos y mayonesa.
Para batir en el vaso
• Coloque la base antideslizante en el vaso para evitar que se resbale.
• Cuando introduzca los alimentos, no sobrepase los 700 ml.
Para batir en la olla
• Retire la olla del fuego y deje que se enfríe. De lo contrario, la batidora podría sobrecalentarse y usted
podría sufrir quemaduras.
− Introduzca la cuchilla en la unidad del motor y gírela hasta que quede fijada.
− Enchufe la batidora y, para evitar salpicaduras, introduzca la cuchilla en los alimentos antes de ponerla en
funcionamiento.
Sujete la batidora firmemente y pulse el botón de velocidad (use la velocidad 1 para reducir las salpicaduras).
• La mezcla no debe superar la unión entre la unidad del motor y la cuchilla.
• Desplace la cuchilla a través de la mezcla y muévala arriba y abajo.
• Si la batidora se bloquea, desenchúfela antes de limpiarla.
Cuando termine, desenchufe la batidora y desmóntela.
Funcionamiento de la cuchilla picadora (si se incluye)
• Le permite picar queso, verduras, hierbas, pan, galletas y nueces.
• No intente picar alimentos duros, como granos de café, cubitos de hielo, especias o chocolate, o la
cuchilla podría resultar dañada.
Quite los huesos y corte los alimentos en dados de 1-2cm.
Coloque la base antideslizante en el recipiente para picar (de esta forma evitará que se resbale).
Inserte la cuchilla de picar en la ranura del recipiente
Introduzca los alimentos.
Coloque la tapa y gírela hasta que quede fijada en su sitio .
Inserte la unidad del motor y gírela hasta que quede fijada .
Enchufe el aparato, sujete el recipiente firmemente y pulse el botón de velocidad 2.
Cuando termine, desenchufe el aparato y desmóntelo.
Guía de preparación
Alimento
Cantidad máxima
Tiempo aprox.
(en segundos)
Carne
300 g.
10-30
Hierbas
20 g.
20
Nueces
200 g.
30
Queso
150 g.
30
Pan
1 rebanada
20
Huevo duro 2
5
Cebolla
100 g.
10
Funcionamiento de la varilla montadora (si se incluye)
• Le permite montar ingredientes como clara de huevo, nata, postres instantáneos o huevos y azúcar.
• No intente montar combinaciones del tipo de margarina y azúcar o la cuchilla podría resultar dañada.
Introduzca la varilla montadora en la unión .
Inserte la unidad del motor en la varilla montadora y gírela hasta que quede fijada en su sitio .
Introduzca los ingredientes en un recipiente.
• No monte más de 4 claras o 400 ml. de nata.
- Enchufe el aparato y, para evitar salpicaduras, comience en la velocidad 1. Mueva la batidora en círculos
hacia la izquierda.
• El nivel de la mezcla no debe estar por encima de la varilla montadora.
- Cuando termine, desenchufe el aparato y desmóntelo.
Almacenamiento
- Inserte la cuchilla en el recipiente de picar (antes alinee la lengüeta) .
- Introduzca la unidad del motor en el recipiente y coloque los accesorios a ambos lados (bajar y girar) .
Limpieza
• Apague y desenchufe el aparato antes de limpiarlo.
• No toque las cuchillas, pues están muy afiladas.
Preste especial atención cuando prepare comida para bebés, ancianos y personas enfermas. Esto significa que ha de
esterilizar la batidora, para lo cual deberá emplear una solución esterilizante siguiendo las instrucciones de su fabricante.
Determinados alimentos, como huevos y zanahorias, pueden teñir el plástico. Para limpiarlo, frótelo con un trapo
empapado en aceite vegetal.
*****
Noções Gerais
•
•
•
•
•
•
•
•
•
•
•
•
Tenha especial cuidado na preparação de comida para bebés, idosos e pessoas doentes. Certifique-se
sempre de que o eixo da misturadora é cuidadosamente esterilizado. Utilize uma solução de esterilização
em conformidade com as instruções do fabricante da solução.
Nunca toque nas lâminas com o aparelho ligado à tomada.
Mantenha os dedos, o cabelo, a sua roupa e outros utensílios longe das peças móveis.
Desligue a ficha da tomada depois de utilizar o aparelho e antes de trocar os acessórios.
Não misture óleo ou gordura quente.
Não deixe que o aparelho seja utilizado por crianças ou pessoas doentes sem supervisão.
Verifique se o aparelho, o cabo ou a ficha estão danificados. Nunca utilize o aparelho se este estiver
danificado ou se o cabo ou a ficha estiverem danificados. Mande verificar ou reparar o aparelho na loja.
Não coloque o manípulo em água nem deixe molhar o cabo ou a ficha, já que pode sofrer um choque
eléctrico.
Não deixe o cabo tocar em superfícies quentes ou ficar pendurado numa posição em que uma criança o
possa agarrar.
Não utilize nenhum acessório não autorizado.
Deve estar atento às crianças para não deixar que elas brinquem com este aparelho.
Atenção: por cada 30 segundos de funcionamento, deixe repousar o aparelho durante 4 minutos.
Dispositivo de corte
• Não toque nas lâminas afiadas.
• Retire a lâmina de corte antes de esvaziar a taça.
• Não retire a tampa até que a lâmina esteja totalmente parada.
Importante
• Com misturas espessas, não utilize a misturadora mais do que 30 segundos a cada quatro minutos, já que
o aparelho sobreaquece.
• Utilize a misturadora apenas para a utilização doméstica recomendada.
Antes de ligar a ficha
• Certifique-se de que a tensão de alimentação da electricidade é a mesma que é indicada no manípulo.
Antes da primeira utilização
• Retire todos os elementos de acondicionamento e deite ao lixo as coberturas das lâminas.
• Lave todas as peças: ver “limpeza”.
Conheça a sua misturadora
Misturadora
a.botões de velocidade
b.manípulo
c.eixo da misturadora (desmontável)
d.recipiente
Dispositivo de corte
e.tampa
f.lâmina de corte
g.taça
Batedor
h.alça do batedor
i. batedor metálico
j.arrumador de acessórios
Utilização da misturadora
• Pode misturar comida de bebé, sopas, molhos, batidos e maionese.
Para misturar no recipiente
• Coloque a base/tampa por baixo do recipiente (assim o recipiente não desliza no balcão da cozinha).
• Não encha o recipiente acima dos 700 ml (24 fl oz).
Para misturar na panela
• Retire a panela do lume e deixe-a arrefecer ligeiramente. Se não o fizer, a misturadora pode sobreaquecer
e provocar-lhe queimaduras.
- Encaixe o manípulo no eixo da misturadora, rode e fixe a posição
- Ligue a ficha. Para evitar salpicos, coloque a lâmina nos alimentos antes de a ligar.
Segure bem o recipiente. Em seguida, carregue no botão de velocidade (utilize a velocidade 1 para misturas
mais lentas e para reduzir os salpicos).
• Não deixe o líquido chegar à união entre o manípulo e o eixo.
• Desloque a lâmina pelos alimentos com movimentos para cima e para baixo.
• Se a misturadora ficar bloqueada, desligue-a da tomada antes de limpar.
Depois da utilização, desligue o aparelho da tomada e desmonte-o.
Para utilizar o dispositivo de corte (se estiver incluído)
• Pode cortar carne, queijo, vegetais, ervas, bolachas e frutos secos.
• Não corte alimentos duros tais como grãos de café, cubos de gelo, especiarias ou chocolate, já que pode
danificar a lâmina.
Retire quaisquer ossos ou espinhas e corte os alimentos em pequenos cubos de 1-2cm
Coloque a base/tampa por baixo da taça (assim o recipiente não desliza no balcão da cozinha).
Coloque a lâmina de corte sobre o pino na taça
Coloque os alimentos.
Coloque a tampa, rode e fixe a posição
Coloque o manípulo, rode e fixe a posição .
Ligue a ficha. Segure bem a taça. Carregue na velocidade 2.
Depois da utilização, desligue o aparelho da tomada e desmonte-o.
Guia de processamento
Ingrediente Quantidades
Máximas
Carne
Ervas
Frutos
secos
Queijo
Pão
Ovos
Cozidos
Cebolas
300 g (10,5 oz)
20 g (0.75oz)
200 g (7oz)
Tempo
aproximado
(em segundos)
10-30
20
30
150 g (5oz)
1 fatia
2
30
20
5
100 g (3,5oz)
10
Para utilizar o batedor (se estiver incluído)
• Pode bater ingredientes leves tais como claras de ovos, natas, sobremesas instantâneas, bem como ovos
e açúcar para massas.
• Não tente bater misturas mais grossas, tais como margarina e açúcar, já que pode danificar o batedor.
Encaixe o batedor na alça
Coloque o manípulo no interior da alça do batedor, rode e fixe a posição
Coloque os alimentos numa taça.
• Não tente bater mais de 4 claras de ovos ou mais de 400ml (0,75 pt) de natas.
- Ligue a ficha. Para evitar salpicos, comece pela velocidade 1. Desloque o batedor no sentido dos
ponteiros do relógio.
• Não deixe chegar líquido acima dos fios do batedor.
- Depois da utilização, desligue o aparelho da tomada e desmonte-o.
Armazenamento
- Coloque o arrumador de acessórios sobre a tampa do dispositivo de corte (alinhe primeiro a aba)
- Coloque o manípulo no topo e rode-o. Coloque os acessórios dos dois lados – basta fazê-los descer e
rodar
Limpeza
• Desligue sempre a ficha da tomada antes de limpar.
• Não toque nas lâminas afiadas.
Tenha especial cuidado na preparação de comida para bebés, idosos e pessoas doentes. Certifique-se
sempre de que o eixo da misturadora é cuidadosamente esterilizado. Utilize uma solução de esterilização
em conformidade com as instruções do fabricante da solução.
Alguns alimentos como, por exemplo, as cenouras, podem descolorar o plástico. Pode esfregar o plástico
com um pano humedecido em óleo vegetal para remover a descoloração.
*****
•
Aanwijzingen ter bescherming van het milieu
Dit product mag aan het einde van zijn levensduur niet bij het normale huisafval worden gedeponeerd, maar dient bij een speciaal inzamelpunt voor het
hergebruik van elektrische en elektronische apparaten te worden aangeboden. Het symbool op artikel, gebruiksaanwijzing en verpakking attendeert u hier op.
De gebruikte grondstoffen zijn geschikt voor hergebruik. Met het hergebruik van gebruikte apparaten of grondstoffen levert u een belangrijke bijdrage voor de
bescherming van ons milieu. Informeer bij uw lokale overheid naar het bedoelde inzamelpunt.
Renseignements pour la protection de l’environnement
Ce produit ne devrait pas être mis dans les déchets ménager à la fin de son existence mais doit être remis à une point de ralliement pour des produits
électroménager et électronique. Ce symbole sur article, mode d’emploi et boite vous indique ce recyclage. Les matières de cet article sont appropriées pour
recyclage. Par le recyclage des appareils ou de ses matières premières vous contribuez à la protection de notre environnement.
Renseignez-vous auprès les autorités locales pour cet endroit de rassemblement.
Hinweise zum Umweltschutz
Dieses Produkt darf am Ende seiner Lebensdauer nicht über den normalen Haushaltsabfall entsorgt werden, sondern muss an einem Sammelpunkt für das
Recycling von elektrischen und elektronischen Geräten abgegeben werden. Das Symbol auf dem Produkt, der Gebrauchsanleitung oder der
Verpackung weist darauf hin. Die Werkstoffe sind gemäß ihrer Kennzeichnung wieder verwertbar. Mit der Wiederverwendung, der stofflichen
Verwertung oder anderen Formen der Verwertung von Altgeräten leisten Sie einen wichtigen Beitrag zum Schutze unserer Umwelt. Bitte
erfragen Sie bei der Gemeindeverwaltung die zuständige Entsorgungsstelle.
Guidelines for protection of the environment
This appliance should not be put into the domestic garbage at the end of its useful life, but must be disposed of at a central point for recycling of electric and
electronic domestic appliances. This symbol on appliance, instruction manual and packaging puts your attention to this important issue. The materials used
in this appliance can be recycled. By recycling used domestic appliances you contribute an important push to the protection of our environment. Ask your
local authorities for information regarding the point of recollection..
Avvertenza per la tutela dell’ambiente
Come indicato dal simbolo riportato sul prodotto, sulle istruzioni per l'uso oppure sull'imballaggio, una volta terminata la vita utile di questo
prodotto, non smaltirlo nei normali rifiuti domestici, bensì portarlo ad un centro di raccolta per il riciclaggio di apparecchi elettrici ed elettronici.
I materiali sono riutilizzabili in conformità alla loro marcatura. Con il riutilizzo, il ricupero dei materiali oppure altre forme del ricupero di
apparecchi vecchi si contribuisce in modo importante alla tutela del nostro ambiente. Richiedete all’amministrazione comunale i dati relativi
al punto di smaltimento competente.
Indicações para a protecção ambiental
Este produto não pode ser deitado no lixo doméstico normal no final da sua vida útil, tendo de ser colocado num ponto de recolha selectiva para reciclagem de aparelhos
eléctricos e electrónicos. O símbolo apresentado no produto, o manual de instruções ou a embalagem avisam sobre esta situação. Os materiais são
reutilizáveis de acordo com a sua identificação. Através da reutilização, do aproveitamento de materiais ou de outras formas de aproveitamento de
aparelhos antigos, irá contribuir significativamente para proteger o ambiente. Informe-se no seu município para saber qual o ponto de eliminação de
resíduos responsável.
Indicaciones para la protección del medio ambiente
Este producto no debe desecharse con la basura normal una vez finalizada su vida útil, sino que debe depositarse en un punto de recogida selectiva para el
reciclaje de aparatos eléctricos y electrónicos, tal como advierte el símbolo que aparece en el producto, en las instrucciones de uso o en el embalaje. Los
materiales se pueden reutilizar según su clasificación. Al reutilizar los aparatos antiguos, ya sea de forma material o de cualquier otra forma, contribuye de
manera importante a la protección de nuestro medio ambiente. Infórmese en su ayuntamiento sobre los puntos de eliminación de residuos correspondientes.