1
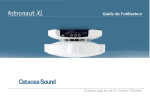
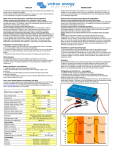
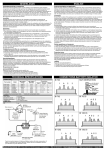
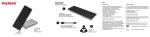
ENGLISH
NEDERLANDS
Productbeschrijving en toepassing
Product description and application
De Sine 12/250 en 24/250 vormen gelijkspanning (accu) om naar een zuivere wisselspanning van
230V/50Hz of 117V/60Hz (model afhankelijk), voor het voeden van kleine 230V/117V apparaten als
labtop‘s, lampjes, het opladen van een mobile telefoon enz. De omvormer dient beschermt te worden
tegen regen, condens, vocht en stof en is derhalve alleen geschikt in droge toepassingen.
The Sine 12/250 and 24/250 convert DC voltage to pure AC sine wave voltage of 230V/50Hz or
117V/60Hz (model dependent) to feed small equipment such as laptops, light bulbs, charging your
mobile phone etc. The inverter should be protected against rain, vapour, moisture and dust and is
therefore only suitable for dry, indoor, applications.
Installatie en gebruiksaanwijziging
Installation and instructions for use
1. Installeer de omvormer in een goed geventileerde ruimte zo dicht mogelijk bij de voedingsbron,
bijvoorbeeld de accu’s. Voor optimale warmte afvoer en ter voorkoming van vochtophoping
adviseren wij de unit met de kabels verticale positie te monteren.
2. De DC aansluiting kan bij de Sine 12/250 middels de sigaretten aansteker stekker (7) gemaakt
worden maar wij adviseren net als bij de 24/250 een vaste aansluiting met kabelogen(8). Sluit de
min kabel (zwart) op de min (-) en de plus kabel (rood) op de plus (+) voedingsbron (accu) aan.
Zorg dat in de DC bekabeling een zekering wordt opgenomen conform in de specificaties
opgegeven waarde.
3. Wisselspanning aansluiting: de apparaten kunnen direct op het Euro stopcontact (6) aangesloten
worden. Indien de apparatuur niet over een Euro stekker beschikt kan de bijgeleverde stekker (5)
worden gebruikt om een verloopsnoer te maken.
4. Na installatie kan de omvormer worden aangezet door de schakelaar (1) op “ON” te zetten. Met de
schakelaar kan de omvormer tevens worden gereset na langdurige overbelasting (zie specificaties)
Indicaties
De omvormer is uitgerust met een LED indicatie (2). Continu groen geeft aan dat de omvormer
normaal functioneert. Indien de LED knippert of van kleur verandert is dit een code voor een situatie
die uw aandacht behoeft, zie de specificaties voor de betekenis van de code.
Instellingen
Links naast de LED bevinden zich twee DIP switches (3 + 4) voor het activeren van optionele functies:
1. Met DIP switch 3 kunt u de AES (Automatic Economy Switch) activeren waardoor in onbelaste
toestand energie bespaard wordt uit de accu. De AES scant of er een apparaat is aangesloten, pas
na detectie van een product schakelt de 230V/117V in. Helaas kunnen niet alle belastingen goed
gedetecteerd worden. U kunt zonder gevaren uitproberen of de AES functie voordeel oplevert.
2. Indien de omvormer onvoldoende vermogen levert kunt u met de high power mode, DIP switch 4,
wat extra vermogen uit de omvormer halen. Deze functie mag alleen gebruikt worden met vaste
aansluiting middels kabelogen. De sigaretten aansteker is NIET geschikt voor hoge vermogens.
Veiligheidsvoorschriften en - maatregelen
1.
2.
3.
4.
Installeer de omvormer volgens de aangegeven instructies.
Gebruik omvormers nooit op een locatie met gas- of stofontploffingsgevaar.
Maak de aansluitingen en beveiligingen overeenkomstig de plaatselijk geldende voorschriften.
Bij verwisseling van de plus- en min draad op de voeding, zal de omvormer zwaar beschadigen.
Controleer daarom of alle verbindingen correct zijn aangesloten voordat u de spanning inschakelt.
Garantiebepalingen
Mastervolt garandeert dat de omvormers zijn gebouwd volgens de wettelijk van toepassing zijnde
normen en bepalingen. Gedurende de productie en voor aflevering zijn alle omvormers uitvoering
getest en gecontroleerd. Wanneer niet volgens de in deze gebruiksaanwijzing gegeven voorschriften,
aanwijzingen en bepalingen wordt gehandeld, kunnen beschadigingen ontstaan en/of het apparaat zal
niet aan de specificaties voldoen. Een en ander kan inhouden dat de garantie komt te vervallen.
De garantie termijn is 2 jaar
Aansprakelijkheid
Mastervolt kan niet aansprakelijk worden gesteld voor:
• Schade ontstaan door het gebruik van de omvormer.
• Eventuele fouten in bijbehorende handleiding en de gevolgen daarvan.
• Ander gebruik geldend als niet conform de bestemming van het product.
1. Install the inverter in a well ventilated room as close as possible to the power source e.g. batteries.
For optimal heat discharge and to prevent moisture accumulation we advise connecting the unit with
the connecting cables in a vertical position.
2. The Sine 12/250 can be connected to the DC using the cigarette lighter plug (7) but we advise to do
the same as for the Sine 24/250 with permanent connections with cable eyes (8). Connect the
minus cable (black) to the minus (-) the plus cable (red) to the plus (+) pole of the power source/
battery. Be sure a DC fuse is integrated in the wiring according to specifications prescribed value.
3. AC voltage: the load can be plugged into the Euro socket (6) directly. If the equipment doesn’t have
an Euro plug the separate provided plug (5) can be used to make an adapter cable.
4. After installation the inverter can be activated by switching the switch (1) to “ON”. This switch has
also a reset function to restart the inverter after extensive overload (see specifications)
Indications
The inverter is equipped with a LED indicator (2). In normal operation the LED will light-up green. If a
situation arises that needs attention the LED will flash or change colour. With the help of the
explanation in the specifications the meaning of the code can be traced.
Settings
Left to the LED two DIP switches (3 + 4) can be found to activate optional functions:
1. With DIP switch 3 the AES (Automatic Economy Switch) can be activated to save energy from the
battery in no load operation. The AES scans the line and when it detects an AC user/ load it
switches on the 230V (or 117V) automatically. Unfortunately not all loads are easy to detect. There
is no risk in trying if the AES function gives you benefit.
2. If there is a power shortage the inverter power can be boosted up a little by switching DIP 4 to high
power mode. This function may only be used with permanent connections with cable eyes. The
cigarette lighter plug is NOT suitable for this high power.
Safety regulations and measures
1.
2.
3.
4.
Install the inverter according to the stated instructions.
Never use inverters at a location where there is danger of gas or dust explosions.
Connections and safety features must be executed according to the locally applicable regulations.
If the plus and minus wires on the power source are exchanged, the inverter will be severely
damaged. Check whether all connections are connected correctly before switching on the power.
Guarantee terms
Mastervolt guarantees that the inverters have been built according to the legally applicable standards
and stipulations. During production and before delivery all inverters were exhaustively tested and
controlled. If you fail to act in accordance with the regulations, instructions and stipulations in this
user’s manual, damage can occur and/or the unit will not fulfil the specifications. This may mean that
the guarantee will become null and void.
The guarantee period is 2 years.
Liability
Mastervolt cannot be held liable for:
• Damage resulting from the use of the inverter.
• Possible errors in the included manual and the consequences of these.
• Use that is inconsistent with the purpose of the product.
MASS SINE INVERTER
SPECIFICATIONS
GENERAL
Model
Article number
Operating temperature
Storage temperature
Noise level
Safety class
Protection degree
Weigth
Dimensions ( HxWxD )
INPUT
Input voltage
Input voltage range
Input current nominal
Input current High power
No load power OFF mode
AES
ON mode
Efficiency max.
Efficiency avg
DC connections
Sine 12/250-230V SINE 24/250-230V Sine 12/250-117V SINE 24/250-117V
26010250
260020250
27010250
270020250
0 °C to 40 °C (derating of 2,5% / °C >40°C)
-20 °C to 70 °C
Temperature and load controlled fan< 50dBA at max power
Class I
IP20
2,7kg
185 x 120 x 73mm
1
2
3/4
12V DC
24V DC
12V DC
24V DC
10-15,5V DC
20-31V DC
10-15,5V DC
20-31V DC
16A
10A
16A
10A
25A
12A
25A
12A
0 mA
0 mA
0 mA
0 mA
<0,5W, 43mA
<0,5W, 21mA
<0,5W, 43mA
<0,5W, 21mA
<2,0W, 165mA
<2,6W, 110mA
<2,0W, 165mA
<2,6W, 110mA
92%
86 %
80cm cable 2,5mm2 with Cigarette lighter plug for 12V models and cable
eyes M8 for 24V models
25A or 30A for
15A or 20A for
25A or 30A for
15A or 20A for
high power
high power
high power
high power
DC Fuse slow blow
(to integrate external)
OUTPUT
Voltage AC
230V pure sine wave
117V pure sine wave
Frequency
50Hz ±0,1Hz
60Hz ±0,1Hz
Rated power
250VA, 200W
200VA
Power P30 @ 25°C amb
Peak load
400VA
Load power factor
All allowed
AC connector
Euro power outlet ICE320 “reverse” with contra Euro plug 250V/ 10A
SAFETY DEVICES
Reverse polarity protection No, There is an internal DC fuse but this will not prevent severe damage
AC overload protection
Yes
AC short circuit protection
Yes
Temperature protection
Yes, by derating the output and shut off at 50°C
POWER AND FAULT INDICATOR
Green continue
The inverter is on, output voltage available
Green flashing
The inverter is in overload mode,
Yellow flashing fast
The inverter is in over temperature alarm, the output power is reduced
Red continue
The inverter is down because of overload, over temp, short circuit or low
battery. It will restart automatically
Red flashing slow
The inverter is permanent down, this happens after 5 attempts to restart.
Reset manually by switching the on/ off switch
COMPLIANCE
CE
LV 73/23/EEC and EMC 89/336/EEG
5
6
7
8
Settings & Connections
1 On / Off switch
2 LED indicator
3 Switch to activate Automatic Economy Switch
4 Switch to activate High Power mode
5 Additional AC plug for euro socket
6 AC euro socket
7 DC connection Sine 12/250 Cigarette lighter plug
8 DC connection Sine 24/250 cable eyes
Mastervolt International B.V.
P.O.Box 22947,
NL-1100 DK Amsterdam,
The Netherlands.
Tel.: +31-20-3422100
Email: info@mastervolt.com
Web: www.mastervolt.com
February 2002
DEUTSCH
FRANÇAIS
Produktbeschreibung und Anwendung
Description et application
Der MASS Sine 12/250 und 24/250 formen 12 oder 24V Batteriespannung um in 230V (oder 117V, je
nach Typ), mit einem stabilen 50 oder 60 Hz Frequenz. Die Wandler sind geeignet zur Speisung von
Notebooks, Lampe, Handy-Lader, usw. Schützen Sie den Wandler gegen Regen, Kondenswasser,
Feuchtigkeit und Staub.
Les convertisseurs Mass Sine 12/250 et 24/250 convertissent la tension CC en tension CA pure
sinusoïdale de 230V/50Hz ou 117V/60Hz (selon le modèle) pour fournir de petits équipements tels
qu’ordinateurs portables, ampoules, téléphone portable etc. Le convertisseur doit être protégé de la
pluie, la vapeur, l’humidité et la poussière et doit donc être utilisé dans des endroits secs, à l’intérieur.
Installation und Gebrauchsanweisung
Installation et mode d’emploi
1. Installieren Sie den Wandler in einem gut belüfteten Raum möglichst nahe bei den Batterien. Im
Hinblick auf eine eventuelle Ansammlung von Feuchtigkeit und für eine optimale Wärmeableitung
empfehlen wir, den Wandler mit den Anschlusskabeln nach unten zu montieren.
2. Der DC Anschluss kann bei dem MASS Sine 12/250 mittels der mitgelieferten
Zigarreteenanzünderstecker (7) gemacht werden. Wir empfehlen jedoch so wie bei dem 24/250
einen Anschluss über Kabelösen (8). Schließen Sie das Minuskabel (schwarz) an den Minuspol (-)
der Batterie an und das Pluskabel (rot) an den Pluspol (+). Die DC Bekablung soll mit einer
Sicherung wie angedeutet unter Specifications geschützt werden.
3. AC Anschluss. Die Verbrauchergeräte können direkt am EURO Steckdose (6) angeschlossen
werden. Eventuell den mitgelieferten Stecker (5) verwenden.
4. Nach Montage kann der Wandler durch Betätigung des Schalters (1) auf “on” angeschaltet werden.
Mit diesem Schalter kann das Gerät auch nach langfristiger Überlast reset werden (Siehe
Specifications).
1. Installer le convertisseur dans une pièce bien ventilée le plus près possible des batteries. Nous
vous conseillons de monter les appareils avec les câbles de connexion vers le bas afin d’éviter une
accumulation d’humidité et de chaleur.
2. Le convertisseur Sine 12/250 peut être connecté au CC en utilisant la prise allume-cigares (7) mais
nous vous conseillons de le connecter comme (8) le Sine 24/250, avec des connexions
permanentes. Connecter le câble négatif (noir) à la borne négative (-) et le câble positif (rouge) à la
borne positive (+) de la batterie. Vérifier qu’un fusible CC est intégré au câblage conformément aux
valeurs spécifiées.
3. Tension CA : l’utilisation peut être connectée directement à la prise Euro (6). Si l’équipement ne
comporte pas de prise Euro, la fiche (5) séparée peut être utilisée pour faire un câble adaptateur.
4. Après l’installation le convertisseur peut être mis en route en positionnant l’interrupteur (1) sur
« on ». L’interrupteur est également doté d’une fonction reset pour redémarrer le convertisseur
après une surcharge importante (voir spécifications).
Anzeigen
Indicateurs
Der Wandler hat eine LED-Anzeige (2). Kontinuierlich grün heißt normaler Betrieb. Sollte der LED
flackern oder von Farbe wechseln, bitte checken Sie den Zustand wie angegeben unter Specifications.
Einstellungen
Links neben der Leuchtdiode ist ein Mäuseklavier (3 + 4) zur Aktivierung optioneller Funktionen.
1. Mit (3) können Sie den AES (Automatic Economy Switch) aktivieren. Weniger Stromverbrauch von
der Batterie wenn nicht belastet. Nicht alle Belastungen erwirtschaften Diesen Vorteil. Bitte
versuchen Sie ob sich dies für Sie lohnt.
2. Sollte der Wandler nicht ausreichend Leistung bringen dann können Sie über (4) den High Power
Mode aktivieren. Hiermit wird die Leistung ca. 50 Watt erhöht. Dies soll jedoch nie mit Benutzung
der Zigarettenanzünderstecker gemacht werden, da diesen Anschluss nicht für höhere Leistungen
geeignet ist.
Sicherheitsvorschriften und -maßnahmen
1. Installieren Sie den Wandler gemäß den genannten Anweisungen.
2. Benutzen Sie den Wandler nie in einer Umgebung, in der die Gefahr einer Gas- oder
Staubexplosion besteht.
3. Anschlüsse und Sicherheitsvorkehrungen müssen den lokalen Vorschriften entsprechend
ausgeführt werden. Durch Verpolung Zerstören Sie den Wandler
4. Kontrollieren Sie, deshalb ob alle Verbindungen korrekt angeschlossen sind, bevor Sie den Wandler
einschalten.
Garantiebestimmungen
Mastervolt garantiert, dass die Wandler unter Einhaltung der gesetzlichen Normen und Bestimmungen
gebaut sind. Bei der Herstellung und vor der Lieferung werden alle Wandler eingehend getestet und
kontrolliert. Wenn die in dieser Gebrauchsanleitung beschriebenen Vorschriften, Anweisungen und
Bestimmungen nicht beachtet werden, können Schäden entstehen und/oder kann das Gerät nicht den
Spezifikationen entsprechen. Das bedeutet, dass die Garantie verfällt.
Die Garantiezeit beträgt 2 Jahre
Le convertisseur est doté d’un indicateur LED (2). En utilisation normale, ce voyant vert est allumé. En
cas de problème, le voyant clignote ou change de couleur. Reportez-vous aux spécifications afin de
déterminer la cause du problème.
Paramètres
Deux cavaliers DIP (3+4) se trouvent à gauche du voyant permettant d’activer les fonctions suivantes :
1. Le cavalier 3 permet d’activer la fonction AES (Automatic Economy Switch) afin d’économiser
l’énergie de la batterie en mode arrêt à vide. L’AES met en route automatiquement le 230 V (ou
117V) lorsqu’il détecte une charge AC. Malheureusement toutes les charges ne peuvent pas être
détectées. Il ne coûte rien d’essayer l’AES de toutes façons.
2. En cas d’insuffisance de puissance, le convertisseur peut être boosté en utilisant le cavalier 4 en
mode forte puissance. Cette fonction ne peut être utilisée qu’avec des connexions permanentes. La
prise allume-cigare n’est pas compatible avec ce mode forte puissance.
Consignes et mesures de sécurité
1. Installer le convertisseur conformément aux instructions indiquées.
2. Ne jamais utiliser les convertisseurs dans un lieu où existe un risque d’explosion de gaz ou de
poussière.
3. Raccordements et sécurisations doivent être effectués conformément à la réglementation locale en
vigueur.
4. En cas d’inversion des connexions positive et négative sur la batterie, le convertisseur peut être
sérieusement endommagé. Vérifier que toutes les connexions sont faites correctement avant de
mettre le convertisseur en marche.
Conditions de garantie
Haftung
Mastervolt certifie que les convertisseurs sont fabriqués conformément aux normes et disposition
légales en vigueur. Tous les convertisseurs sont minutieusement testés et contrôlés pendant leur
production et avant leur livraison. L’utilisation non conforme aux consignes, instructions et dispositions
fournies dans ce manuel d’utilisation peut entraîner des dommages et/ou l’appareil ne répondra pas
aux spécifications. Ce qui peut donner lieu à l’annulation de la garantie.
Le délai de garantie est de 2 ans.
Mastervolt kann nicht haftbar gemacht werden für:
• Durch die Benutzung des Wandlers entstandenen Schaden,
• Eventuelle Fehler in der dazugehörenden Anleitung und die daraus entstehenden Folgen.
• Einen anderen Gebrauch, d.h. einen Gebrauch, der nicht mit der Bestimmung des Produkts
übereinstimmt.
Mastervolt décline toute responsabilité dans les cas suivants :
• Dommage survenu suite à l’emploi du convertisseur
• Eventuelles erreurs dans le manuel correspondant et leurs conséquences
• Utilisation considérée non conforme à celle prévue.
Responsabilité
ESPAÑOL
ITALIANO
Descrizione del prodotto e applicazioni
Descripción del producto y aplicaciones
Messa in opera e istruzioni per l'uso.
Instalación e instrucciones de uso
Gli inverter Sine 12/250 e 24/250, convertono la tensione DC in AC sinusoidale pura a 230V/50Hz o
117V/60Hz (secondo modello) per alimentare piccole utenze come laptops, luci, caricabatterie per
cellulari, ecc.. Gli inverter devono essre protetti dalla pioggia, vapori, salmastro e polvere, e installati
all’interno il luoghi asciutti.
1. Installare l’inverter in un'area ben ventilata il più vicino possibile alle batterie. Consigliamo di
montare le unità in verticale, con i cavi di collegamento rivolti verso il basso. Ciò evita l'accumulo di
umidità e agevola la dispersione del calore.
2. Il Sine 12/250 può essere collegato alla presa accendisigari (7), ma consigliamo di installarlo, come
il 24/250 con le connessioni fisse a capicorda (8). Il cavo negativo (-), nero, va collegato al polo
negativo della batteria ed il cavo positivo (+), rosso, al polo positivo. Assicurarsi che la linea sia
protetta da un fusibile di adeguata taratura.
3. Tensione AC: il carico può essere collegato direttamente alla presa Euro (6). Se l’utenza non ha
una presa Euro, può essere installata (5) usando l’adattatore fornito di serie.
4. Dopo l’installazione, l’inverter può essere acceso ponendo l’interruttore (1) in “ON”. L’interruttore ha
anche una funzione “reset” per riavviare l’inverter in caso di blocco per sovraccarico (vedi
specifiche).
Indicazioni
L’inverter è dotato di un indicatore luminoso a LED (2). In condizioni normali il LED è verde. In caso di
condizioni critiche, che richiedono attenzione, il LED lampeggia o cambia colore. Nelle specifiche si
può indiviare il codice che indica il tipo di guasto
Settaggi
A sinistra del LED si trovano due DIP switch (3+4) per attivare funzioni optional.
1. Con il DIP switch 3 si attiva la funzione AES (Automatic Economy Switch) per ridurre l’autoconsumo
dalle batterie a vuoto. La AES controlla la linea e quando un carico AC viene inserito eleva
automaticamente la tensione a 230V (o 117V). Non tutti i carichi sono facilmente induviduabili. La
funzione AES viene usata solo se ci sono effettivi benefici.
2. In caso di carichi con spunti, con il DIP switch 4 si può elevare la potenza per brvi periodi. Questa
funzione può essere utilizzata solo con collegamento permanente. Il collegamento con la presa
accendisigari NON può sopportare spunti di potenza.
Prescrizioni e misure di sicurezza
1. Effettuare la messa in opera in osservanza alle istruzioni fornite.
2. Non utilizzare mai l’inverter in presenza di gas o in aree a rischio di esplosione.
3. I collegamenti ed i dispositivi di protezione devono essere realizzati in conformità alle norme
localmente vigenti.
4. In caso di inversione della polarità dovuta allo scambio dei cavi sulla batteria, l’inverter può essere
gravemente danneggiato. Verificare che tutti i collegamenti siano stati effettuati correttamente prima
di accendere l’inverter.
Garanzia
La Mastervolt garantisce che gli inverter di sua produzione sono stati costruiti secondo le norme e
disposizioni applicabili. Durante la produzione e prima della consegna, tutti gli inverter sono sottoposti
a severi test e collaudi. Il non attenersi alle prescrizioni, istruzioni e disposizioni riportate nella
presente guida, può causare danneggiamenti e/o la mancata rispondenza degli apparecchi alle
specifiche, circostanze che possono causare il decadere del diritto alla garanzia.
La garanzia ha una validità di 2 anni.
Responsabilità
La Mastervolt declina ogni responsabilità per:
• Danni derivanti dall'utilizzo dell’inverter.
• Eventuali errori o omissioni nelle istruzioni per l'uso e le conseguenze che ne derivano.
• Un utilizzo del prodotto non conforme allo scopo previsto.
Mastervolt International B.V.
P.O.Box 22947,
NL-1100 DK Amsterdam,
The Netherlands.
Los inversores Sine 12/250 y 24/250 convierten el voltaje CC en una tensión senoidal pura de
230V/50Hz o 117V/60Hz (dependiendo de los modelos), para hacer funcionar ordenadores portátiles,
bombillas o bien cargar teléfonos móviles. Deben de ser protegidos contra la lluvia, la condensación,
la humedad y el polvo. Por lo tanto, sólo se pueden utilizar en espacios interiores y secos.
1. Instale el inversor en un espacio bien ventilado, lo más cerca posible de las baterías. Aconsejamos
montar las unidades con los cables de conexión hacia abajo, a fin de evitar una posible
acumulación de humedad y procurar una disipación de calor óptima.
2. El inversor senoidal Sine 12/250 se puede conectar a la batería mediante el enchufe de un
encendedor (7). Sin embargo, aconsejamos utilizar conexiones permanentes con terminales (8) tipo
ojo para el Sine 24/250. Conecte el cable negativo (negro) al polo negativo (-) de la batería. El
cable positivo (rojo) debe ir conectado al polo positivo (+) de la batería. Asegurése de proteger el
cableado de la corriente continua (CC) con un fusible, tal como se indica en este manual de
instrucciones
3. Voltaje CA: se puede conectar la carga directamente, a través del euroconector (6). Si el aparato
no dispone de este enchufe, se podrá utilizar el conector suministrado con el inversor adaptándole.
4. Después de instalar el inversor, se podrá poner en marcha, apretando el interruptor en “ON”. Este
interruptor permite también hacer un reset para volver a poner en marcha el inversor después de
una sobrecarga importante (ver especificaciones).
Indicaciones
El inversor está equipado con un testigo luminoso tipo LED (2), que se encenderá de color verde en
funcionamiento normal. En caso de situación anormal el testigo luminoso empezará a parpadear o
cambiar de color. Para conocer el código de error, refiérese a las especificaciones, donde encontrará
la lista de códigos de errores.
Ajustes
A la izquierda del testigo LED, encontrará 2 pins de ajustes (3+4) que le permitirá activar las
siguientes funciones opcionales:
1. El pin 3 activa el sistema AES (Sistema de Ahorro de Energía), para ahorrar energía de la batería
cuando no hay ninguna carga. El sistema AES escanea periódicamente la línea CA para detectar si
hay cargas conectadas. En este caso, pasa automáticamente a 230V (o 117V). Sin embargo, todas
las cargas no son fáciles de detectar.
2. En caso de bajada de voltaje, se puede incrementar la potencia del inversor, ajustando el pin 4 al
modo de más potencia. Esta función sólo puede utilizarse con conexiones permanentes. En este
caso, no se puede utilizar el enchufe de encendedor.
Prescripciones y medidas de seguridad
1. Instale el inversor según las instrucciones indicadas.
2. No utilice nunca un inversor en un recinto con peligro de presencia de gas o explosiones de polvo.
3. Las conexiones y medidas de seguridad siempre se deben de llevar a cabo de acuerdo con la
normativa vigente en el país en cuestión.
4. Al invertir las conexiones positiva y negativa de la batería, se puede dañar gravemente el inversor.
Compruebe que todas las conexiones sean las adecuadas antes de poner en marcha el inversor.
Garantía
Mastervolt garantiza que los inversores senoidales están construidos conforme a las normas y
disposiciones legales vigentes. Durante la fabricación y antes de su entrega todos los inversores han
sido sometidos a diversos controles y pruebas. Si al utilizar el inversor no se respetan las
prescripciones, indicaciones y disposiciones recogidas en este manual, puede producirse daños en el
mismo y/o el aparato no cumplirá las especificaciones indicadas, lo cual puede implicar la anulación
de la garantía. La garantía tiene un periodo de validez de 2 años.
Responsabilidad
En ningún caso Mastervolt asumirá responsabilidad alguna derivada de:
• Daños producidos por el uso del inversor senoidal.
• Eventuales errores en el manual de instrucciones correspondiente y sus posibles consecuencias.
• Cualquier uso del producto distinto de aquellos para los que está destinado
Tel.: +31-20-3422100
Email: info@mastervolt.com
Web: www.mastervolt.com
February 2002