1
sTFTJDtrR
nÄ/ox
A77
SLIDE.O-MATIC
ffiffiffi$ffiruuruffiffieruLffi*ä#ru#
ffiff3ffiffiffiäruffi &ruffiKffi#ffi$ffiruffi
M&ffiffiffi ffi"mwffiLffi$
SLIDE-O_MATIC
Bed ienu ngsan leitu ng
D e zur Diaschau gehörende Tonspur ernschl essllch Kommentar muss auf Spur'1 des Tonbandes bereits vorliegen.
Die möglichen Auf nahmeverfahren sind in der Bedienungsanle tung zum Tonbandgerär A-|f (siehe auch TRICKTECHNIK) beschrieben.
Die fo genden Nummern bezlehen sich auf die in der Bedienungsanleitung des Tonbandgerätes beschriebenen Bedie
nu
ngse le
mente.
An
-
Slide-O-Matic die Taste CODE drücken und Autnahmeregler @ so einstellen, dass clas VU-Meter
A9 5 dB anzeigt.
Taste CODE loslassen.
Tonbandgerät ln.Aufnahmefun(tion durch Drücken der
Taster PiAY @) rno BEC €3 sranen.
Zurn Zeitpunkt eines gewünschten Diawechsels die Taste
CODF am Slioe-O-Matic betät;gen.
1.4. Auto mat ische
Anschluss des Slide-O-Matic an Tonbandgerät und Projektor
BL
z
i
ndstecker
ii
,on
an A77
Fernsteuerbuchse
ab-
ehen
-
S ide O-Matic-Kabel REMOTE CONTFOL in Fernsteuer'
-
B indstecknr ,l7j')
buchse
R
(25,1
slsiPsn
\oaer
auf
Fernbedrenung)
Stecker
El\IOTE aufstecken
S deOMetic-Kabel AUX lNPUTll an entsprechende
3. - , 2] C.l ll d-(c^'esspn
S ide-O'M-atic-Kabel OUTPUT CH
CH I I am Tonbandgerät stecken
Slide-O-lvatic Schaltkabel
ll in
mit Projektor
Buchse
@f
gemäss Herste
lerangaben verbinden
Die Abgabe der Scha timpu se erfoigt zv,rischen dem
gelb/grünen und dem roten Draht (Arbeitskontakt).
SolL ein Dlawechse unabhängig von den Automatikfunk
t onen erfolgen, ist die Taste SLIDE am Slide-O-Matic
d
zu
rüc ken.
1.
Für stationäre REVOX-HiFi-Anlagen mit
2. Für Tonbandgeräte 477 mit eingebauten Endverstärkern
und angeschlossenen Lautsprechern
Um dem Slide-O Matic elnen definierten Pegel für die Steuerimpulse anbieten zu können, sind beim internen Verstärkerbetrieb des Tonbandgerätes verschiedene Bedienungsänder-ungen gegenüber Betrieb mit externem Verstärker not'
wend ig.
2.7. Setzen der Dia-lmpulse
Das auf Spur 1 mit der Tonspur versehene Band in das Ton-
bandgerät einlegen.
Aufnahmevorwahltaste 135) dr,i"k"n
separatem
A-'no'-re.ornarl oye (p?
Regrer
1.1. Allgemeines
Kanäle sind durch einen schwachen Steg verbunden. Dieser
Steg ist durchzutrennen, damit jeder Stecker einzein eingesieckt werden kann.
1.2. Verbindung Tonbandgerät
-
Verstärker
Die Buchse OUTPUT Q9 at I cles Tonbandgeräres wird
mit denn Verstärker (Tonbandbuchse) CH I verbunden. Als
Betrlebsarrenschalter (an REVOX A7B
Crl . or rger.
(O ) in Stel ung
mussoLSge orte (ei1
VOLUIVE 1J aui S c 'ung 6 oder höher
-Wiedergabe-Funktions-Schalter
STE
-
Verbindungskabe ist der Typ REVOX C2C oder, wenn der
Verstärker mit DIN-Buchsen ausgerüstet ist, Typ NW(A)C
zu verwenden.
ia- Vo rfüh ru ng
'ühr urg se D51I;t;g db.
Stereoverstärker und Lautsprecherpaar
Zur Verbindung zwischen Tonbandgerät A77 und Stereo'
verstärker verwendet man R EVOX Kabel mit CinchSteckern. Die Ummante ung des Steckers für die beiden
D
Nach erfolgter Aufnahme der Dia-lmpulse wird das Band
zrrJckgespu r.
- Auf nahmevorwahltaste (35) auslosen
Ohne weitere Veränderungen ist die Diaschau vorführbereit.
Setzt man die Dia-Kassette neu in den P,lEektor e n, so
läuft - nach Drücken der Taste PLAY 12! - die Vor-
-
R
EO
@ in
Stellung
R^gler BAI ANCE @ N"rerrslellung
Vor/Hinterbandschalter (1 4) n Stellung NAB (TAPE)
Aufnahmeregler LEVEL (-5) geschlossen
Lingangswahiscnal er
n Ste .ung I ll
Qf
ALf ndl--prtrgle' LFVt L (i r erwa Stetlung 2 tYor^ n.
stellung)
Eingangswah schalter (B) n Steltung aUX
An S ide-O-Matic die Taste CODE drücken und Auf-
,-}
nal-lmeregler l7r so einste en, dass das VU-Meter
(34' 5 dB anze qt.
Tai-re CODE loslassen.
Tonbandgerät in Aufnahmefunktion durch Drücken der
Tasten PLAY @) ,",r REC f)
. a "r
Zum Zeitpunkt eines gewünschten D a-Wechsels d e Taste
CODE drücken.
1.3. Setzen der Dia-lmpulse
Das aui Sou' 1 mit der Tonspur versehene Band in das Ton-
:.
bandgerät
eoerr
- Au'nar-a.c.,rah:es.€ G l.rcken
L.
, :.t- c:'L 32 muss älSocrclS.€r
'' "'.
- /O l lJ\4F 1 'l vo. a rid oren
Wiedergabe-Funk-iions-Scha r",
@ in
D.g
Se n
Stellung
Auto mat isc he D ia- Vorführu ng
Nach erfolgter Aufnahme der Dia lmpulse wird das Band
zurückgespuit.ner externe Lautsprecher wird an Buchse
SPEAKERS 26 LEFT angqchlossen.
- Aufnahmevorwahltaste 135| drücken
2. 2-
-
STE R EO
+"qler
@, in
Steltun-q
NAB (TApE)
-
Aa . 1-. ,oO Ar LLVF _ lr qa., h Oqctrn
Erroar!s.,iahrschartel, i6,Eiienis
Auinahmeregter LEVEi
.t*u Ste lung
-
Eingangswah
1o u19
!U)
schalter (ä-) in Srel!ung AUX
Wredergabe-Funkridis'Scha
ter (Z) in Steltung
STE
REO
BALANCf 6S) in M:trenste luno
Vor/Hinterbandscf'aiär
Aufnahmevorwahltqlte i32,) drticken
Regler VOLUlVE (l) vo-iaufdrehen
2
(Vorein-
-
Reqlc' BATANCF (O
rensrer,Jng
'l]1' i^ S e'urq l\PUT
Vo'/H rt.'oanos"h"iLe _(i4
Eingangswah schalter (6)]r Stettung t tt
Aufnahmereg er LEVEL tf in Stellung 6
f ,^qano.wan -r o rer (d-)lrtrt,-ng It- Aufnahmeregler LEVE L (t rege t Wiedergabelautstärke
(mit
3. Für Tonband geräte A77 in Kofferausführung
einge
4' Löschen von Steuer'lmpulsen
bauten Endverstärkern und Lautsprechern)
mlt dem TonFür den Betrieb des Slide-O'Matic zusammen
Hlnwelse tn
die
gelten
Kofferausführung
in
OandWrät A77
machen' ist
zu
unhörbar
K;p.ä Ü* dle Diaschaltimpulse
in die
unbeschalteter DIN-Lautsprecherstecker
ein
iedoch
'Buchse
sLecken
zt'
BIGHT
SPFAKEBS Qq
mit
a;ll ;rt TonbandgerFin Kofferausführung zusammen
ierstärker betrieben werden' ist am TonJ\nu^
der versenk'
"n"rr",
LunJg.rat dre Taste SPEAKEFS OFF {unter
Slide[ur"n <tupp") zu drÜcken' Für den Betrreb mit dem
l
Kap
in
'
Hrnweise
gelten
die
O-Matic
gelöscht
Sollen - evtl. versehentlich - gesetzte lmpulse
kurz vor diesen
bis
Band
dem
mit
man
fährt
so
*urOan,
lmpuls.
- Au{nahmevorwähllasle QQ aruct<en
(Taste
ausgelöst sein.)
Aufnahme starten (Taste PLAY
REC f23) drücken)
- Band auf
geim
ÜOYrfal-rren des Steuerimpulses
::\
Q;)
muss
@
und
wird dieser gelöscht'
be'
Dan n"r"n lmpuls, wie unter "setzen der Dia-lmpulse"
schrieben, an der gewünschten Stelle setzen
SLIDE-O-MATIC
Operating I nstructions
pulses
1.3. Recording of synchronizing
is intended
is assumed that the final sound track' which
track 1
to u"aotpunV the slide show, is already recorded on
It
inal-mix
of the tape. The various methods of producing a f(See
also
ur. d"r"rlu.d in the A77 operating instructions
Load tne nEVOX A77 tape recorder
contains the final sound mix on track
Press record preselcc
lh" totto*ing lndex
-
struct
- Trrn
special recording techniques.)
numbers are with reference to the
rnoperating conlrols as described in the A77 operatrnll
I
o ns.
Connecting the Slide-O-Matic
-
to
the tape recorder and pro-
-
'o:ocLer 2-ir
Connect Sl de-O $ar c cabt" RtIVO lt
cable
Äe insert prus €D on top of the Slide-O-Matic
plug or, wheä uieO, connect remote control unit instead
phono
Conn".t Slide-O Matic cable AUX INPUT ll to
/<:'
socket iZ /
Connect-Slrde-O-MatLc cable OUTPUT
ll to
phono
,ocket 6Ö)
in
Connu"Xt'oe-O-[\,4at;c projector-cable lo oroiecror
instructions
manutacturers
proiector
conformity wlth
For rnost projector models the switching pulses to act-
and
vate a slide change appear between the yellow-green
red wire (normallY open contact)
lf a slide change is required independently of automattc
actlvätion, press button SLIDE on the Slide-O-N'4atic'
a permanently installed REVOX HiFi
and
music system with separate stereo power amplifier
1. Slide-show using
loudspeakers
Q) äust
stereo/mono mode
- Turn
IEFTO
We recommend to use REVOX cables for all interconnections requirecl between the recorder and stereo amplifier'
These stereo cables are equipped with 2 molded phono
plugs which are held together by a flexible plastic bridoe
The bridge may be cut to obtain two separate plugs if single
plug connection is required.
1.2- lnterconnections between tape recorder and amplifier
Provide a sinqle connection from the socket OUTPUT
6ö CH I ot lhe 'ape recorde" ro Lhe amp'rria's TAPE
CFi tNpuf ov using a REVOX tvoe C2C 'nte'connetrino
use
cable. If the amplifier is equipped with a DIN socket
selector
cable tvpe NW(A)C Turn the stereo/mono mode
pos
rron
CH
10
AiB)
REVOX
tn"
on
i
I
be in its released
selector
@ to
S
(! to it'
- Äojurtpor.ntiometer BALANCE
monitor
- Turn
(TAPE)
selector
disc
KeeP Potentiometer LEVEL
clockwise)
-
@ to
(5)
open
position
center posi'
Position NAB
closed (fu1lY counter
-
posilion
Tl'e inpur seleclor (9) 'nav b?!ft in anv
approxr'
Open potentiometer-LEVEL (, to position 2
-
Turn input selector [B) to position AUX'
poOn the Slide-O-Matic-P1qss button CODE and adjust
matelv
t"ntior"'"r. I tVf t (Z) to eIt3in o oellection oI
5 dB on tre vu.nerer"Q9
Release button CODE.
-
-
Starr Ai
7 ldpe e.orcle'-l'r tne record;gqmode by pre's
PLAY €1) and REC Q9 '
Wheiever a slide change iäesired push th-e button CODE
Ing The buTtons
on the Slide-O'lvlatic
1.4. Presentation with automatic slide change
Rew;no rhe comole,ed rs6er6ing 16 its st9]
-
Release record preselector
button Qp by pushtng
again.
AftJr re-inserting the slide
1.1. General
@
5B
VoLUME @ to its fullv
t Ion
Bemove dummy prus @ from the remote control
socket cf the A77 recorder
t it
l
-
ton
posirion (crockwise)
jector
-
lor ou
Record preselector Outton
position
-po..n,iometer
with the tape that
1
cassette
into the projector' the
complete show is ready for agqmatic presentation
comTnence, Press bLlltoq
tt
To
PLAY (2,
with
2. Slide presentation using REVOX A77 tape recorder
loudspeakers
external
and
power
amplifiers
built-in
to obtain synchronizing pulses at a level which
Slide-O-Matic operation, several settings of
reliable
ensures
ln
order
the operating controls differ from those requlred for
a
is used'
system set-ut ln which an external power amplifier
2.1. Recording of synchronizing pulses
Load the REVOX A-71 ftpe recorder with the täpe that
contains the final sound mix on track 1.
Press record pre5e,ecro'
Orrlon.
()
Q) must 6e in its released
- Open potentiometer VOLUIVE @ to position 6 or
higher
'i:
- Turn stereo/mono mode sel'eoor @ to posit on
Record preselector button
STERTO
Adjust potentiometer BALANCE
-
Turn monitor selector @ to gqsition NAB (TAPE)
Keep potentiometer LEVEL (p.) closed (fully counter
-
(p to it, center pos -
tl on
clockwise)
'-6 ro po11o^ I l'
Open potenL omeler LTVEL ,]Z) ro position 2 approx
Turn nout selpcror
-
Tlr^ rrori'or .elector '4
Input
z->,
-
mately
Turn input se'ecto. (B to pos tion AUX
On the Slide-O-Matic -press the button CODE and adjust
potentiometer LEVE L (7]r to obtaln a def lection of
-5 dB on the VU-meter g!
Release button CODE.
Starr 477 rdpe recoToe' ia the recqlding mode bv press
ins butrons PLAY Q, and REC Q9
Push button CODE on the Slide-O-l\,4atic whenever a slide
se
ector i1 | remains
o
@,
remains n its center
oo:r-io' \PL
np-ostt on
l-
I
|
- Turr polentiom"ie' LAVFL 17 to po"i on 6
ll-r
- lu.n;nput selector (p ro og;qior
/15 s used to adiust
potentiometer
LEVE-'
-The
the
playback volume
posiL'on
-
-
posi r'on
-
'',
-
The potentlometer BALANCE
-
3. Slide presentation using REVOX A77 tape recorder in
carrying case (with built-in power amplifiers and loudspeakers)
When using an A7'7 tape recorder with bui t-in speakers,
proceed in accordance with the instructions given in section 2. To prevent acoustlc reproduction of the synchron
izing pulses from channel ll, insert an empty DlN speakerplug into the socket SPEAKERS @ R GHT in order to
mute that loudspeaker.
For situations in which the ,A77 tape recorder wtih bui t-in
speakers is to be used in conlunction with an external
power amplifiet the built-in speakers must be disab ed by
pushing the button SPEAKERS OFF (located on the lefthand side behlnd the hinged lid). For S ide-O-lVatic operation proceed in accordance with the instructlons given n
section 1.
.
change is desired.
2.2. Automatic slide presentation
Rewind the tape to its beginning. After the recording o{
synchronizlng pulses has been completed, connect the exrernd roudspeakp'to socket SPEASqRS(2O I EFT
Press record p e)Fleclo, bultor
Qll
Press tecord prg5e'cr'6' b r--o.
Q?
- Turn
(J to rts fullv
-
@
potentiometer VOLUI\lE
position (clockwise)
The stereo/mono mode selector
STE R EO
open
remains in position
4. Repositioning (erasure) of synchronizing pulses
To erase an incorrectly positioned sync pu se, wlnd the tape
to a point just prior to that pulse (allow for disp acement
between playback and erase heads by w nding the tape
backwards a sufficient length).
Press record preselector button (35) (button rQ? must
be in its released position)
Start A77 recorder rn the recordtlg mode by pressing the
bur ons Ptav i] ard REC 23
The sync pulse will get wiped out as it passes over the erase
head. To record the new pulse, proceed as per the instruction under the heading "recording of synchronizing pulses".
-
SLIDE_O-MATIC
Mode d'emploi
Le commentaire du montage audio-visuel doit se trouver sur
1a p ste I de Ia bande. Les diffdrents procddds d'enregrstre-
Le contact permettant le changement de vue, s'6tablit
par les fils rouqe et jaune/vert.
Pour changer une vue inddpendamment du systÖme automatique, appuyer sur Ia touche SLIDE du Sllde O-Matic.
ment sont ddcrits au chapitre B EFFETS SPECIAUX du
1. lnstallation
mode d'emploi 477.
Les index num6riques suivants, se rapportent aux organes
de commande du mode d'emploi 477.
fixe REVOX HiFi
avec amplificateur et
haut-parleurs s6par6s
1.1. Gönöralitös
Raccordement du
-
SI
ide-O-Matic
iiche court-ci rcLii fÄ du A7l
En{oncer la frche du cäble REMOTE CONTFOL dans
Fe.iir-e!- :e
orise
6d
'nemeil
par dessus la
Raccorder le cäble
cH ll)
fiche @)
AUX
INPU-T
ll
ä la prise
la
@) tnUx
Raccorder le cäble'OUTPUT ll ä la prise @ (OUTPUT
CH II)
Pour le raccordement du cäble de commande du SlideO-Matic ä votre projecteur, consulter le mode d'emploi
de ce dernier.
Pour e raccordement ä votre amplificateur st6r6ophonique,
utiliser les cäbles REVOX ä fiches cinch. Ces cäb es st6r6o
phoniques comportent ä chaque ext16mitd deux fiches, re
ll6es entre elles par un petit pont se ddtachant facllement
pour l'utilisation individuelle de chaque fiche.
1.2. lnterconnexions entre le magnötophone et l'amplificateur
Raccorder la sortie OUTPUT CH 1 @ du magndtophone,
ä l'entr6e magn6tophone CH ll de l'amplificateur. Utiliser e
cäble REVOX C2C ou NW(A)C si l'amplificateur est 6quip6
d'une prise 5 pöles.
l\,4ettre le sölecteur du mode de reproduction ( @ pour te
BEVOX A7B) s.rr la position CH l.
Codry da imp.tlsions 6e cantff*arl@
Placer dans le magnÖtc"r::-)- a ai':J? caacc-:a-:
1.3,
piste
I
2 frt*antett a'n ?Lioratt qüe ü ffra aa'ge 6i.Ei&,{'sllgrl
:-=::?S -3-: :-: l=::--=-li
-:-=5 =-':::.':-:-i-:r' ta rebcalnag€. Raccg4e'- l3 1a-I-par;eüf exierne ä la
prise SPEAKERS LEFT e9
2
:-- :
le commentaire eVou ia musique.
G
.
- Enloncer la louche de presÖlection d'erregisLren'enr @
- La touche de pr6s6lectlon d'enregistrement Q2) doit
6ire relächde
- Tourner le potentiomÖtre VOLUME-(f au maximum
reproduction (J) sur STEREO
- Sdlecteur du mode depcsirion
nSldiane- BALANCE 13 en
. Co'nmJtateuilecture/di.ect 1{) sur NAB
le potentiomötre d'enregistrement LEVEL
- Tourner
a-\
\lbi au mtntmum
- Le-selecteur d'entr6e (o) n'"tt pas en fonction et peut
rester sur n'imporle ouelle posiLion
-
-
Enfoncer la touche de pr6s6lection d'enreglstrement @
Enfoncer la touche de pr6s6lection d'e2legistrement Qf
Tourner le potentiomötre VOLUME;.1 1) au maximum
Sdtecteur du mode de reproduction 12Ysur STEREO
BALANCE ('1 3) en Posilion mddiane
- öo -' t, ,u ,"rXctu reld irect 14-' su' \ P UT
- 56lecteur d'entröe @ sur l'li-- Tourner le potenaiomötre d'enregistrement LEVEL
@ tuto
^
- Sdl-ecterr d'enr.ee 8) su' rt-l
- Le potentiomötre d'enregistrement LEVEL @ OOt..
|
,.1
mine le niveau d'öcoute
- Tourner le potentiomötre d'enregistrement LEVEL
(7)
-
-
sur 2 environ Q'6röglage)
SdiEcteurd'entr6e Cq AUX
Presser la touche C0DE du Slide-Q-Matic et tourner
polenliomötre d'enregislrement Q) irsou'ä ce qJe
le
'e
VU.möLre Q! indique -5 dB
Belächer la touche CODE.
Ddmarrer en enregistrement en appulant simultanÖment
sur es Lou.hes PLAY 21 er RLC 23
Pour un changement d-vue, presser'lä touche CODE du
Slide-O-Matic.
1.4. Prösentation automatique du montage audio-visuel
Aprös l'enregistrement des impulsions de commande, effec-
tuer le rebobinage.
Libörer la touche de pr6s6lection d'enregistrement @
La bande est alors pr6te pour la prÖsentation du montage
audio-visuel. Remettre le magasin de diapositives au döbut
dans le projecteur et presser la touche PLAY Q1l du ma-
-
gn6tophone.
2. Magn6tophone A77 6quip6 d'amplificateurs de puissance
reli6s ä des haut-parleurs s6par6s
Pour obtenir des impulsions de commande d'un niveau d6Öquipd d'amplificateurs de puissance
nöcessite une maniöre diff6rente de proc6der.
fini, le magndtophone
2.1. Codage des impulsions de commande
Placer dans le magn6tophone la bande comportant sur a
piste I le commentaire et/ou la musique. (Les indications en
rouge ci-dessous ne sont pas valables pour la prdsentation
automatique du montage audio-visuel.)
Enfoncer la touche de pres6lection d'enregistrement @
- La touche de pr6s6lection d'enregistrement Q2) doit
6tre reläch6e
-
Tourner le potentiomötre VOLUMEJ I sur 6 ou plus
Selocteur du qlooe de reproductior^ (!-sur STTRFO
BALANCE (3) en position mldiane
Commutateuilecture/d'rect @ sur NAB
Tou rner le potentiomötre d'enregistrement LEV E L
(5) au minimum
Sdläcteur d'entr6e
[Q sur l-ll
- Tourner le potentiomÖtre d'enregistrement LEVEL
(z) ,rr 2 environ (qr6r6glage)
- Sdläcteur d'entr6e LB) AUX
et tourner le
- Presser la touche CODE du Slide-Q'Matic
potentromötre d'enregistrement (f juscu'ä ce que le
VU-mötre @+) lnoique -s oe.
Belächer la torche CODE.
-
Ddmarrer en enregistretlent en appugtnt simuJtandment
surres Louches PLAY (4) et REc C)
Pour le changement de vue, presser la touche CODE du
Slide-O-Matic.
3. Magn6tophone A77 en version valise (6quip6 d'amplificateurs de puissance et d'haut-parleurs)
Pour l'utilisation du Slide-O-Matic avec le magn6tophone
A77 en version valise, se r6f6rer au chapitre 2. Afin de
rendre inaudibles les impulsions de commande, enfoncer
ure Iiche hau L-parle91 D I N non reliÖe dans la prise
SPEAKEBS RIGHT q9
Si le magn6tophone in version valise est raccordd ä un
amplificateur söparö, enloncer la touche SPEAKEFS OFF
(sous le cache escamotable). Pour l'utilisation avec le SlideO-Matic, se r6f6rer au chaPitre 1.
4. Effacement des impulsions de commande
Pour effacer une impulsion de commande, repdrer sa position sur la bande et placer-lä juste avant le bloc des tötes.
la touclle de prös6lection d'enregistrement
- Enfoncer
(ta toucrre
Qf oolt ötre reläch6e)
Q|
- Ddliarrer en enrJgistrement (touches PLAY @ et
BEC 89 enfoncdes)
Par un nouveau passage de la bande, l'impulsion de commande est ainsi effacde. Pour l'enregistrement d'une nouvelle impulsion se r6f6rer au chapitre "Codage des impulsrons de commande".
SLIDE
+{
ec,oo
lrrzo
l\l+
U
,o(
2
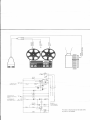
to REVOX A77
OUTPUT CH II
ll clo
ä-
3,3k
I N 4443
,.'n
:5
1o BEVOX 477
REMOTE CONIROL
(Pin 7)
to REVOX A77
AUX INPUT CH II
llca
lOUTPUT
CODE
B
3,3
k
1,,
I
Projektor
To the proiector
Vers le proiecteur
t-
33t
l!cr
Printed in Switzerland 18.128.1 015
by Wl LLI STUDER