1
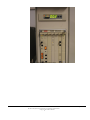
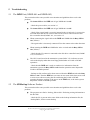
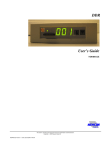
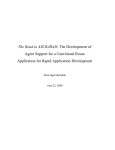
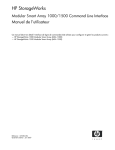
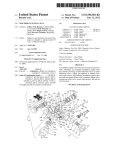
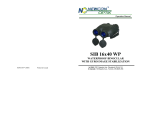
DDR
User’s Guide
ND040012E
We reserve all rights in this document and in the information contained therein.
Copyright
2010 Newcon Data AB
ND040012E Version: 1.2 Date: 01.02.2010 17:22:00
Use of DANGER, WARNING, CAUTION, and NOTE
This publication includes DANGER, WARNING, CAUTION, and NOTE information
where appropriate to point out safety related or other important information.
DANGER
Hazards which could result in severe personal injury or death
WARNING
Hazards which could result in personal injury
CAUTION
Hazards which could result in equipment or property damage
NOTE
Alerts user to pertinent facts and conditions
Although DANGER and WARNING hazards are related to personal injury, and
CAUTION hazards are associated with equipment or property damage, it should be
understood that operation of damaged equipment could, under certain operational
conditions, result in degraded process performance leading to personal injury or death.
Therefore, comply fully with all DANGER, WARNING, and CAUTION notices.
TRADEMARKS
Registrations and trademarks used in this document include:
Microsoft, Windows, Windows XP, Windows 2000, Windows Vista and Windows 7, are
all registered trademark of Microsoft Corporation.
ABB, MasterView, SuperView and TESSELATOR are registered trademarks of ABB
Asea Brown Boveri Ltd.
NOTICE
The information in this document is subject to change without notice and should not be
construed, as a commitment by Newcon Data AB. Newcon Data AB assumes no
responsibility for any errors that may appear in this document.
In no event shall Newcon Data AB be liable for direct, indirect, special, incidental or
consequential damages of any nature or kind arising from the use of this document, nor
shall Newcon Data AB be liable for incidental or consequential damages arising from use
of any software or hardware described in this document.
This document and parts thereof must not be reproduced or copied without Newcon Data
AB’s written permission, and the contents thereof must not be imparted to a third party nor
be used for any unauthorized purpose.
The software described in this document is furnished under a license and may be used,
copied, or disclosed only in accordance with the terms of such license.
Copyright
Newcon Data AB 2010
All rights reserved.
Newcon Data AB
Flottiljgatan 61
S-721 31 Västerås, Sweden
Phone:
Fax:
Technical Support:
Company web site:
Product web site:
+46 21 800303
+46 21 800304
tessem@newcon.se
http://www.newcon.se/
http://www.tessem.nu/
Page 2 of 25
We reserve all rights in this document and in the information contained therein.
Copyright
2010 Newcon Data AB
Contents
1
Page
Introduction ......................................................................................................................................................... 4
1.1
Purpose ........................................................................................................................................................ 4
1.2
References ................................................................................................................................................... 4
1.2.1
Documents ............................................................................................................................................ 4
1.2.2
General ................................................................................................................................................. 4
2
General Description ............................................................................................................................................. 5
2.1
3
Overview...................................................................................................................................................... 6
The DDR Unit ...................................................................................................................................................... 9
3.1
Overview...................................................................................................................................................... 9
3.2
Memory Handling .................................................................................................................................... 10
3.3
Connections ............................................................................................................................................... 11
3.3.1
The NDDD 002 Unit .......................................................................................................................... 11
3.4
Strapping ................................................................................................................................................... 11
3.5
NDDD 001 - Installation and Operation ................................................................................................. 13
3.6
NDDD 002 - Installation and Operation ................................................................................................. 16
4
Backup of SD Memory Card ............................................................................................................................. 21
5
Troubleshooting ................................................................................................................................................. 22
6
7
5.1
The DDR Unit (NDDD 001 and NDDD 002) .......................................................................................... 22
5.2
The SDBackup Software Product ............................................................................................................ 22
How to Report Errors ........................................................................................................................................ 24
6.1
The DDR Unit (NDDD 001 and NDDD 002) .......................................................................................... 24
6.2
The SDBackup Software Product ............................................................................................................ 24
Technical Data ................................................................................................................................................... 25
7.1
The DDR Unit ........................................................................................................................................... 25
7.1.1
Technical Specification ...................................................................................................................... 25
7.2
The SDBackup Software Product ............................................................................................................ 25
7.2.1
General Software and Hardware Requirements.................................................................................. 25
Page 3 of 25
We reserve all rights in this document and in the information contained therein.
Copyright
2010 Newcon Data AB
1 Introduction
1.1 Purpose
The purpose of this document is to give an overview of the product DDR (Disk Drive
Replacement) which is a replacement for the old 5.25” floppy disk drives DSMD 113 and
DSMD 110 used in the ABB Master systems. The product uses a flash memory for
storage (SD card). An installed DDR will be handled as a normal floppy disk drive by the
ABB Master system.
This document shall also be an aid for users when use and install the DDR product.
1.2 References
1.2.1 Documents
Document
Identity
Version
SDBackup Release Notes
ND040013E
1.1
ABB MasterView 850/1 User’s Manual
7650 129-201
1.2.2 General
This document is valid for the DDR of type NDDD 001 and NDDD 002.
Page 4 of 25
We reserve all rights in this document and in the information contained therein.
Copyright
2010 Newcon Data AB
2 General Description
This document describes the product DDR (Disk Drive Replacement) which is a
replacement for the old 5.25-inch floppy disk drives DSMD 113 and DSMD 110 used in
the ABB Master systems. The product uses a flash memory for storage (SD card). An
installed DDR will be handled as a normal floppy disk drive by the automation system.
The product DDR is fully compatible with ABB Master system using the DSMD 113 or
DSMD 110 floppy disk drive, for example the MasterView product family 810/830/850
and also MasterPiece 200, MasterAid 214/215 and TESSELATOR 8400/9800. The unit
can also be used in a standard PC and MasterAid 220.
Figure 1 The DDR unit of type NDDD 002 mounted in a MasterView 830 cabinet.
Page 5 of 25
We reserve all rights in this document and in the information contained therein.
Copyright
2010 Newcon Data AB
2.1 Overview
The following DDR products are available:
NDDD 001, a circuit board mounted unit for 19-inch rack.
NDDD 002, a frame mounted unit for small cabinet.
SDBackup, a PC software product for backups of the SD memory card directly to
a PC hard drive.
NDDD 001
The DDR unit of type NDDD 001 replaces the floppy disk drive DSMD 113, the entire
circuit board, used in for example the standard MasterView 850 or 19-inch rack based
MasterView 810/830. The DDR unit is mounted on a 19-inch circuit board.
NOTE: Removing the old DSMD 113 unit and installing the new DDR unit can be done without
switching the power off on the Master system.
Figure 2 The DDR unit of type NDDD 001.
Page 6 of 25
We reserve all rights in this document and in the information contained therein.
Copyright
2010 Newcon Data AB
NDDD 002
The DDR unit of type NDDD 002 replaces the floppy disk drive in a small cabinet based
system, for example MasterView 810/830. The DDR unit is mounted on a frame.
Figure 3 The DDR unit of type NDDD 002.
SDBackup
The PC software product SDBackup allows easy backups of the SD memory card
directly to a PC hard drive. The backup can later be restored to a SD memory card.
The product SDBackup works with any PC compatible SD card device handling 1 Gbyte
SD memory card on Microsoft Windows 7/Vista/XP/2000.
The program reads data from the SD card and stores disk files in the backup folders on the
hard drive. The data can be later be restored to the SD card or copied to another SD card.
The created files are on binary format, not possible to edit by the user.
Page 7 of 25
We reserve all rights in this document and in the information contained therein.
Copyright
2010 Newcon Data AB
Figure 4 The SDBackup software product.
Page 8 of 25
We reserve all rights in this document and in the information contained therein.
Copyright
2010 Newcon Data AB
3
The DDR Unit
3.1 Overview
The DDR unit uses a flash memory for storage (1 Gbyte SD memory card), mounted in
the front of the unit. The SD memory card has the capacity of storing data corresponding
to a maximum of 200 diskettes (1.44 MB format). When installed the DDR unit will be
handled as a normal disk drive by the ABB Master system, with the “Active Disk”
indicated on the display on the front of the unit.
NOTE: Changing SD memory card in the DDR unit can be done with the power on!
The SD card used in the DDR is pre-formatted at delivery with the capacity of storing data
corresponding to a maximum of 200 diskettes (1.44 MB format).
NOTE: Only use pre-formatted SD card delivered from us in the DDR unit!
The built-in Step Up and Step Down buttons on the front of the DDR unit are used to
change the “Active Disk”. At power on disk 001 will always be activated. By pressing the
Step Up and Step Down buttons simultaneous, disk 200 is selected. Keeping one of the
buttons pressed increases the speed of selection.
On the front of the unit are also two LED’s located, the Status LED and the Busy LED.
Status LED
The Status LED is indicating the operation status of the DDR unit. The following
indications are present:
Green: Indicates normal operation.
Red: Indicates an error on the SD card or the DDR unit.
Off : Indicates that the unit has no power.
Busy LED
The Busy LED is indicating the access status of the DDR unit. The following indications
are present:
On (Yellow): Indicates busy status. The DDR unit is busy at the moment for
example by reading/writing information from/to the SD memory card.
Off : Indicates ready status. The DDR unit is ready to send/receive information
from the ABB Master system.
IMPORTANT: Do not ever make any floppy disk operations in the automation system,
DUMP, LOAD etc, when the Busy LED is On!
IMPORTANT: Do not ever remove the SD card from the DDR unit when the Busy
LED is On! Wait until it is Off before removing the SD card, otherwise the DDR unit can
enter an error state which later causes read or write errors when accessing the SD card.
Page 9 of 25
We reserve all rights in this document and in the information contained therein.
Copyright
2010 Newcon Data AB
Status LED
Busy LED
Active Disk display
SD memory card
Step Up
button
Step Down
button
Figure 5 The front of the DDR unit.
3.2 Memory Handling
The DDR unit uses the following two types of memories:
SD card memory: Stores permanent data on maximum 200 disks. Each disk
represents a floppy disk (1.44 MB format) in the Automation system.
RAM memory: The built-in RAM in the DDR unit is loaded with data from the
“Active Disk” on the SD card:
- When a DDR disk is activated with the step buttons.
- When mounting the SD card.
- At power on.
The RAM memory is the working memory. No disk operations in the ABB Master system
can be handled correctly before the RAM is loaded and Busy LED on the DDR unit is
Off. When data in the ABB Master system is written to the DDR it will first pass through
the RAM memory and then be written to the SD card.
IMPORTANT: Remember not to force any operations, always wait until the Busy LED
on the DDR unit is Off before performing next step!
NOTE: It takes around 30 seconds to transfer the data from/to the SD card. During this operation the
Busy LED on the DDR unit is On (Yellow).
NOTE: The position of the write-protect switch on the SD card is not detected by the DDR unit. The
SD card is always writable.
NOTE: The SD card cannot be read directly by any PC, because there is no file system present on
the card. A special program SDBackup has to be used to make backup images on the PC. See
section 4.
Page 10 of 25
We reserve all rights in this document and in the information contained therein.
Copyright
2010 Newcon Data AB
NOTE: Never format the SD card in a PC before using it in the DDR unit! The SD card will then be
unusable!
NOTE: Only use pre-formatted SD cards delivered from us in the DDR unit!
NOTE: Never remove the SD card from the DDR unit when the Busy LED on is On (Yellow)!
3.3 Connections
3.3.1 The NDDD 002 Unit
Mount the signal interface adaptor on the DDR unit according to the Figure 6.
NOTE: The position of the yellow dot on the interface adaptor and on the DDR unit!
Figure 6 DDR connections for unit of type NDDD 002.
3.4 Strapping
The Figure 7 shows the strapping of the DDR unit when used in an ABB MasterView
810/830/850 system, default at delivery.
Page 11 of 25
We reserve all rights in this document and in the information contained therein.
Copyright
2010 Newcon Data AB
Figure 7 DDR strapping for use in ABB MasterView.
The Figure 8 shows the strapping of the DDR unit when used in a PC (MasterAid 220).
Figure 8 DDR strapping for use in PC.
Page 12 of 25
We reserve all rights in this document and in the information contained therein.
Copyright
2010 Newcon Data AB
3.5 NDDD 001 - Installation and Operation
We recommend the procedure described in step 1 – step 5 below, to transfer the system
information from floppy disks used in a 19-inch based ABB Master system, for example a
MasterView 850, to a SD card using the DDR of type NDDD 001.
NOTE: The DDR unit can also, as an option, be delivered with a pre-programmed SD memory card
containing a copy of the MasterView system software and data from your 5.25-inch floppy disks!
Please contact us!
CAUTION: Be very carefully when performing operation inside the MasterView rack
with the power on!
1. Switch the system power on.
2. Load the MasterView system information from the 5.25-inch floppy disks using
the LOAD button on the DSPC 171 CPU board.
3. Carefully remove the old DSMD 113 floppy unit from the 19-inch rack with the
system power on, see Figure 9. Do not touch any other circuit boards in the rack!
Figure 9 Remove the old DSMD 113 unit from the MasterView rack.
4. Gentle insert the new NDDD 001 circuit board with the DDR unit into the 19inch rack with the system power on, see Figure 10. Do not touch any other circuit
boards in the rack! The Status LED on the DDR unit shall be On (Green). Wait
until the Busy LED on the DDR unit is Off (approx. 30 sec).
Page 13 of 25
We reserve all rights in this document and in the information contained therein.
Copyright
2010 Newcon Data AB
Figure 10 Insert the new NDDD 001 circuit board to the MasterView rack.
5. The DDR unit is now ready to use. Use the Step Up and Step Down buttons on
the DDR unit to select the “Active Disk”. Use the LOAD and DUMP buttons on
the DSPC 171 CPU board to perform the system load or dump operations!
IMPORTANT: Remember not to force any operation always wait until the Busy LED is
Off before performing next step! So when storing information on the SD card it can take
up to 30 seconds until the DDR is ready for the next step of the operation after that the
STATUS display on the DSPC 171 CPU has indicated to take the step, see Figure 11.
Page 14 of 25
We reserve all rights in this document and in the information contained therein.
Copyright
2010 Newcon Data AB
Figure 11 The NDDD 001 unit is busy, Busy LED in On.
Page 15 of 25
We reserve all rights in this document and in the information contained therein.
Copyright
2010 Newcon Data AB
3.6 NDDD 002 - Installation and Operation
We recommend the procedure described in step 1 – step 11 below, to transfer the system
information from floppy disks used in a small cabinet based automation system, for
example a MasterView 810/830, a SD card using the DDR of type NDDD 002.
NOTE: The DDR unit can also be delivered with a pre-programmed SD memory card containing a
copy of the MasterView system software and data from your 5.25-inch floppy disks! Please contact
us!
NOTE: The information in a running MasterView 810/830 system can be stored on a SD card
without switching the power off on the MasterView system, if the DDR unit is using an external
power supply not located in the MV810/830 system! Useful if the old 5.25-inch floppy disk drive is
broken! Step 1 & 3, described below, can then be made later when the information has been stored
on the SD card!
CAUTION: Be very careful when performing operation inside the MasterView cabinet
with the power on!
1. Mount the signal interface adaptor on the DDR unit, see section 3.3.1.
2. Switch the system power off.
3. Remove the covering side plates on the MasterView cabinet.
4. Connect the power cables of the new DDR unit to the screw terminals according
to Figure 12.
Figure 12 The 0V and +5V power screw terminals in the MasterView cabinet.
Page 16 of 25
We reserve all rights in this document and in the information contained therein.
Copyright
2010 Newcon Data AB
5. Switch the system power on.
6. Load the MasterView system information from the floppy disks using the LOAD
button on the DSPC 171 CPU board.
7. Remove the power cable and the signal cable from the old DSMD floppy unit in
the MasterView 810/830 cabinet, see Figure 13.
Figure 13 The cable connections to the old DSMD floppy unit.
8. Remove the old DSMD floppy unit from the cabinet.
Page 17 of 25
We reserve all rights in this document and in the information contained therein.
Copyright
2010 Newcon Data AB
Figure 14 Remove the old DSMD floppy unit in the MasterView cabinet.
9. Mount the DDR unit inside the MasterView cabinet.
10. First, connect only the power cable, see step 3, to the DDR unit according to
Figure 15. The Status LED on the DDR unit shall be On (Green). If not check
the power cables, see step 3. Wait until the Busy LED on the DDR unit is Off
(approx. 30 sec).
Figure 15 Connect the power cable to the DDR unit.
Page 18 of 25
We reserve all rights in this document and in the information contained therein.
Copyright
2010 Newcon Data AB
11. Second, connect the signal cable to the DDR unit according to Figure 16. If the
Busy LED on the DDR unit is On (Yellow), the signal cable is incorrectly
connected! Turn the contact to the other direction!
Figure 16 Connect the signal cable to the DDR unit.
12. The DDR unit is now ready to use. Use the Step Up and Step Down buttons on
the DDR unit to select the “Active Disk”. Use the LOAD and DUMP buttons on
the DSPC 171 CPU board to perform the system load or dump operations!
IMPORTANT: Remember not to force any operation always wait until the Busy LED is
Off before performing next step! So when storing information on the SD card it can take
up to 30 seconds until the DDR is ready for the next step of the operation after that the
STATUS display on the DSPC 171 CPU has indicated to take the step, see Figure 17.
Page 19 of 25
We reserve all rights in this document and in the information contained therein.
Copyright
2010 Newcon Data AB
Figure 17 The NDDD 002 unit is busy.
Page 20 of 25
We reserve all rights in this document and in the information contained therein.
Copyright
2010 Newcon Data AB
4
Backup of SD Memory Card
The PC software product SDBackup is available as an option to the DDR unit, which
allows easy backups of the SD memory card directly to a PC hard drive. The backup can
later be restored to a SD memory card.
The software product SDBackup runs on a standard PC under the Microsoft Windows 7,
Windows Vista, Windows XP or Windows 2000 operating systems. The program works
with any PC compatible SD card device handling 1 Gbyte SD memory cards.
SDBackup reads data from SD cards and stores "diskettes" in the backup folders on the
hard drive. The data can later be restored to the SD card or copied to another SD card. The
created files are on binary format, not possible to edit.
Figure 18 The SDBackup software.
For information about how to install the SDBackup program, see the document
“SDBackup Release Notes”. The document can be downloaded from our product web site
at, http://www.tessem.nu, see the Download section.
For more detailed information about how to use the SDBackup program, see the built-in
Help Application.
Page 21 of 25
We reserve all rights in this document and in the information contained therein.
Copyright
2010 Newcon Data AB
5
Troubleshooting
5.1 The DDR Unit (NDDD 001 and NDDD 002)
This section describes some possible error situations and guidelines how to solve the
problem.
The Status LED on the DDR unit of type NDDD 002 is Off?
- Check the power cables, see section 3.6
The Status LED on the DDR unit of type NDDD 001 is Off?
- Check if the circuit board is correctly inserted in the 19-inch rack. Is correct slot
used and check that the X2 contact of the circuit board is connected to the disk
drive controller board, DSMC 112, see section 3.5.
When connecting the signal cable to the DDR unit NDDD 002 the Busy LED is
On (Yellow)?
- The signal cable is incorrectly connected! Turn the contact to the other direction!
When inserting the DDR unit NDDD 001 in the 19-inch rack the Busy LED is
On (Yellow)?
- Check that the X2 contact is connected to the disk drive controller board, DSMC
112, see section 3.5.
The CPU circuit board in the automation system (DSPC 171) indicates an error
code on the display rather than next floppy disk number at LOAD or DUMP
operation?
- Check that the DDR unit is ready to send/receive information from the
automation system; the Busy LED is Off when the operation starts! Repeat the
LOAD or DUMP operation.
- Perhaps an SD card has earlier been removed from the DDR unit when the Busy
LED was On? Then the DDR unit can enter an error state which later causes read
or write errors when accessing the SD card during the LOAD or DUMP
operation. Requires toggling of the power on the DDR unit, or the entire system.
Repeat the LOAD or DUMP operation.
5.2 The SDBackup Software Product
This section describes some possible error situations and guidelines how to solve the
problem.
The program can’t find a “backup_diskxxx.ddr” file during writing information to
the SD card?
- Check the file is present in the same folder as the backup information file, the
“backup.BSD”, for the current backup.
Page 22 of 25
We reserve all rights in this document and in the information contained therein.
Copyright
2010 Newcon Data AB
- If the name on the ".BSD" file has been changed by the user, the same changes
must be made on all the ".ddr" files!
SD card unit error when reading from or writing to SD card?
Check that the SD card is mounted in the card device.
Page 23 of 25
We reserve all rights in this document and in the information contained therein.
Copyright
2010 Newcon Data AB
6 How to Report Errors
6.1 The DDR Unit (NDDD 001 and NDDD 002)
If an error is detected should a written report be generated as soon as possible! Please be as
specific as you can be about the problem you are experiencing; what kind of error, its
nature and the circumstances when it was discovered. Serial number, system configuration,
photo, and description of the command sequences related to the error should, if possible,
be included in the report.
The following information is required when reporting errors:
System Problem Report (SPR) describing the problem.
An empty template (DDRSPR.doc) can be downloaded from our product web site
at, http://www.tessem.nu, see the Download section.
Photos of the faulty unit installed in the system etc.
Send a mail with all the necessary information to Technical Support at tessem@newcon.se
6.2 The SDBackup Software Product
If an error is detected should a written report be generated as soon as possible! Please be as
specific as you can be about the problem you are experiencing; what kind of error, its
nature and the circumstances when it was discovered. System messages, printouts, screen
dumps related to the error should, if possible, be included in the report.
The following information is required when reporting errors:
System Problem Report (SPR) describing the problem.
An empty template (SDBackupSPR.doc) is included in the folder:
“…\SDBackup”
Hardcopy or screen dumps of the program window and any eventually presented
dialog boxes.
Send a mail with all the necessary information to Technical Support at tessem@newcon.se
Page 24 of 25
We reserve all rights in this document and in the information contained therein.
Copyright
2010 Newcon Data AB
7 Technical Data
7.1 The DDR Unit
7.1.1 Technical Specification
Part number
Interface
Capacity
Environmental
Dimensions
Weight
Power Voltage
Typical Current Consumption
System Requirements
Warranty
Supported SD Memory Cards
900057
34 pin floppy interfaces
200 x 1.44Mbyte (HD format) diskettes
Operating temperature 8 C to 50 C
143 x 103 x 27 mm
0.5 kg
DC 4.6 to 5.3 V
300 mA
ABB MasterView 810/830/850
One-year limited
1 Gbyte SD card, part no. 900054.
Each DDR unit is delivered with one SD card.
7.2 The SDBackup Software Product
7.2.1 General Software and Hardware Requirements
The SDBackup runs on any PC capable of supporting the Microsoft Windows 7, Windows
Vista, Windows XP or Windows 2000 operating system. The SDBackup product requires
the following:
Operating system:
- Windows 7
- Windows Vista, Service Pack 1.
- Windows XP Professional or Home Edition, Version 2002, Service Pack 1 or 2.
- Windows 2000, Version 5.00.2105, Service Pack 2, 3 or 4.
PC equipment requirements: Standard requirements for Windows 7, Windows
Vista, Windows XP or Windows 2000. The SDBackup product itself requires
around 8 MB RAM.
SD card device: Capable to handle 1 Gbyte SD memory cards.
Page 25 of 25
We reserve all rights in this document and in the information contained therein.
Copyright
2010 Newcon Data AB