1
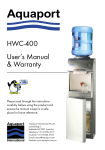
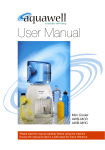
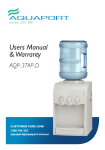
USER’S
MANUAL
Desktop
Cooler
& Filter
Water
Dispenser
NOTE:
Read this manual in detail
before using this machine.
Keep this manual in a safe
place for future reference
User Manual
Identification .........................................................1
Operating Steps ...................................................2
Attention...............................................................3
Cleaning ...............................................................4
Warranty...............................................................5
FUNCTION OF DUO - HWC-500
This product is capable of serving hot & cold water all day long, which
could be used for tea, coffee and juices. In addition it has the ability to
filter water rapidly.
Produced with advanced technology and assembled with high quality
materials, this product is safe and hygienic, it works fast but consumes
little energy, it is also small and beautiful.
User Manual
Identification
Desktop Cooler & Filter Water Dispenser - HWC-500
No
PART NAME
1 Bottle Supporter/Tank Cover
2
Water Tank
3
Cooling Light
4
Heating Light
5
Cold Water Tap
6
Hot Water Tap
7
Front Shell
8
Excess Water Tray
No
9
10
11
12
13
14
15
16
PART NAME
Drip Tray
Upper Cover
Charcoal Filter
Rear Shell
Heating Switch Red
Cooling Switch Green
Power Supply Cord
Opening of Hot Water
NOTE:
This machine is suitable for bottles of 1/2 litre to 23 litres and use
of tap or spring water.
This units operating temperature is from 10˚C-38˚C with relative
humidity not higher than 90%.
1
User Manual
Operating Steps
In the case bottled water is used, please operate
according to the following instructions.
1. Vertically insert the bottle into the bottle
supporter on top of the machine, the spike will
pierce the bottle cap, then open the red tap
until water runs out.
3 Connect the plug to the wall power socket and
turn on, then turn on the heating switch and
cooling switch and the machine will operate.
When the cooling and heating light goes out
the water is at correct temperature.
4. When the bottle is empty, pull it out vertically
and replace with another bottle of water.
In the case tap water is used, please operate
according to the following instructions.
1. Remove the bottle supporter by turning to
unlock and remove.
2. Pour tap water (drinkable) into the water tank
directly, then put the tank cover on. Open the
red tap until water runs out.
3 Connect the plug to the wall power socket and
turn on, then turn on the heating switch and
cooling switch and the machine will operate.
When the cooling and heating light goes out
the water is at correct temperature.
4. Refill the water when the water tank becomes
low.
2
User Manual
1. Keep this machine in a dry and cool place and avoid
direct sunlight. Never put the machine on paper or
foam, which may store water and cause creepage.
Never put anything flammable beside this machine.
2. NEVER turn on the heating switch before the
water runs out from the red tap, otherwise the
machine could be damaged.
3. The air exhaust pipe must be assembled in the
correct position, otherwise water temperature of the
water tank may become too high and influence the
normal operation of the machine.
Attention
1
2
3
4. Never pour hot water into the water tank, otherwise
the water dispenser could be deformed.
5. In the case the hot or cold water is not needed for
a prolonged period, turn off the heating & cooling
switches in order to conserve energy.
6. In the case you won’t be using this machine for a
long period, turn off the heating & cooling switches,
unplug this machine from the power socket and drain
the water tank through the opening.
4
5
7. This machine must be connected with an earthed
socket and reliable creepage protection switch.
6
8. Clean the outside of the machine by wiping it with a
clean dry cloth. Never use harsh, abrasive or organic
solvents on the machine or any of it’s parts. Never
disassemble or touch the inside of the machine, this
could result in electric shock.
7
9. Never unplug by pulling the power cord as it will
cause cord damage. Always turn on/off the machine
by switching the heating or cooling switches on the
machine.
8
9
3
User Manual
Cleaning
Switch off the power supply and unplug the power cord from the
wall socket before following the instructions below.
Cleaning & Draining:
1. The machine was disinfected before departing from the factory.
Cleaning the dispenser prior to installing a full bottle of water for the
first time, is required.
2. Before cleaning, make sure the power switch is off and the cord is
unplugged.
• Vertically insert the bottle into the supporter on top of the machine.
• Open the taps, let about 1 litre of water flow out into a container.
• Remove the water bottle from the dispenser.
• Place a large bucket beneath the drain outlet. Remove the drain
cover and allow water to drain.
• After draining, replace the drain cover.
Attention:
The machine heats water to a temperature of approximately 90˚C, it
can cause severe burns. Please operate the machine carefully.
Sanitation:
The machine should be sanitized with disinfectant commonly bought
from a supermarket. Follow the instructions outlined for use of the
disinfectant and thoughly flush the machine as per the cleaning and
draining instructions above, after disinfection. Generally this should
be done every 3 months.
To Remove Mineral Deposits:
Mix 4 litres of water with 200g citric acid crystals, pour into machine
and make sure the water can flow out of the hot tap. Switch on the
power and heat for about 10 minutes. 30 minutes later, drain off the
liquid and clean the machine with water 2 to 3 times. Generally this
should be done every 3 months. Never disassemble the machine by
yourself to avoid damaging the machine.
4
User Manual
Warranty
Your 12 Month Replacement Warranty & Registration
The Home Water & Cooler Company warrants this appliance to the first
purchaser as follows and subject to the stated conditions:
Any fault in the appliance occurring with in the first twelve months from
the date of purchase (3 months commercial use) will be repaired or the
unit will be replaced at our discretion.
Conditions of this Warranty
1. This appliance must be installed in accordance with the User’s Manual.
2. The Warranty extends only to repairing or replacing any component that proves to be
defective in material or workmanship.
3. The Warranty does not cover defects occasioned by misuse, alterations or accident.
4. In the unlikely event of malfunction of our product please email our customer service
department for advice on info@homewatercoolerco.com.au or take it to your nearest
Service Centre. Alternatively, simply return the faulty appliance to your place of
purchase, along with your purchase receipt.
Thank you for your custom and we hope our product provides many
years of fault free operation. To enable us to register your warranty and
provide service should a problem occur, we recommend you fill out the
section below and return it to us immediately.
WARRANTY & SERVICE REGISTRATION FORM
For enquiries or further information on our products, please contact us:
The Home Water & Cooler Company.
Web: www.homewatercoolerco.com.au Email: info@homewatercoolerco.com.au
Contact Name: ____________________________________________________________________
Phone: ______________________Fax: ______________________ Mobile: _____________________
Address: ___________________________________________ Email: __________________________
Country: ______________________________________________ Post Code: __________________
MODEL NUMBER: ________________________ SERIAL NUMBER: __________________________
Date of Purchase: _________________ Purchase From: _____________________________________
Private or Commercial use: ___________________________________________ If commercial state
Company Name: ___________________________________________________________________
5
Home Water Cooler Company
www.homewatercoolerco.com.au
info@homewatercoolerco.com.au
Tel: (Australia) 08 8354 2488
Tel: (Outside Australia) +61 8 8354 2488