1
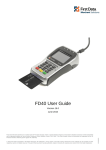
Pogo>® Card Reader
User Guide v1.0
First Data Merchant Solutions is a trading name of First Data Europe Limited, a private limited company incorporated in England (company number 02012925) with a registered
address at Janus House, Endeavour Drive, Basildon, Essex, SS14 3WF. First Data Europe Limited is authorised and regulated by the UK Financial Conduct Authority (FCA register
No. 582703).
First Data Europe Limited has appointed FDR Limited as payment and collection agent for the services provided under your Merchant Agreement. FDR Limited is a company
incorporated in the State of Delaware, United States, under registration number 22692 35, registered in England as a branch of an overseas company with limited liability (company
number FC015955) and branch number BR001147, whose registered office in the United Kingdom is at Janus House, Endeavour Drive, Basildon, Essex, SS14 3WF.
© 2014 First Data Corporation. All Rights Reserved. All trademarks, service marks, and trade names referenced in this material are the property of their respective owners.
1
Table of Contents
Table of Contents ............................................................................................................................. 2
1 Introduction ................................................................................................................................... 3
2 Features ....................................................................................................................................... 4
3 Operating the card reader ............................................................................................................. 5
3.1 Introduction ............................................................................................................................. 5
3.2 Power and charging ................................................................................................................ 5
3.2.1 Turning the card reader ON .............................................................................................. 5
3.2.2 Turning the card reader OFF ............................................................................................ 5
3.2.3 Sleep ................................................................................................................................ 5
3.2.4 Charging the Battery ......................................................................................................... 6
3.2.5 Low Battery ....................................................................................................................... 6
3.2.6 Battery usage guidelines ................................................................................................... 6
3.3 Bluetooth ................................................................................................................................. 7
3.3.1 Start up ............................................................................................................................. 7
3.3.2 Ready To Pair: .................................................................................................................. 7
3.3.3 Ready To Connect ............................................................................................................ 7
3.3.4 Connected ........................................................................................................................ 8
3.4 Transaction mode.................................................................................................................... 9
3.4.1 PIN Entry .......................................................................................................................... 9
3.4.2 PIN OK ............................................................................................................................. 9
3.4.3 PIN Incorrect ..................................................................................................................... 9
3.4.4 Last Try............................................................................................................................. 9
3.5 Card reader maintenance ...................................................................................................... 10
3.5.1 Security Check ................................................................................................................ 10
3.5.2 Software Update ............................................................................................................. 10
3.6 Error states............................................................................................................................ 11
3.6.1 System Tampered........................................................................................................... 11
3.6.2 Ready To Install .............................................................................................................. 11
4 Revive™ ..................................................................................................................................... 12
4.1 Power up as normal .............................................................................................................. 12
4.2 System restore ...................................................................................................................... 12
4.3 Total Factory reset ............................................................................................................. 13
2
1 Introduction
This document provides general information about the operation of the Pogo> card reader and gives
detailed instructions to be used as the basis for device setup and troubleshooting. The intention is to
convey all necessary information about the operation of the card reader in one document.
This document does not cover any operations which are controlled by third-party applications (either
those running on the card reader or those running on the smart device).
If there is a fault with your card reader and this is covered under the Pogo> Guarantee we will
replace it free of charge. Please contact us on telephone number 01268 820 500 (Lines open 8am 9pm, Monday to Saturday) quoting Pogo> as your reference.
.
3
2 Features
Ref
1
2
3
4
5
6
7
8
Feature
Swipe Card Slot
LED Display
Power Button
Revive™ Button
Enter Key
Cancel Key
Clear Key
Smart Card Slot
9
Charging LED
10
USB Connector
Function
Reads magnetic stripe cards (stripe facing away from user)
Display instructions for user
Used to power the card reader on and off and enter sleep mode
Pin-hole reset button used to activate the Revive feature
Confirms actions including PIN entry
Cancels actions including PIN entry
Removes the last PIN digit entered
Reads chip cards (chip facing up and towards the reader)
Red LED above Micro-USB connector – indicates unit is
charging
USB Micro-B receptacle - used for charging / file transfer
4
3 Operating the card reader
3.1 Introduction
This section covers the basic operation and use of the card reader. This covers power on and off
charging, basic Bluetooth connection, transaction PIN entry and card reader maintenance.
3.2 Power and charging
3.2.1 Turning the card reader ON
To power up, the operator must push the power button or plug the card reader into a USB power
source. The power-up sequence starts with the display of the boot logo whilst the card reader starts
up. Once the card reader is ready to use, the Bluetooth icon will start to flash or stay solid at the top
left corner of the display depending on whether the card reader has been paired with any smart
device. The battery status indicator will be loaded on the top right corner of the display.
When the card reader is powering up.
When the card reader is ready to use.
3.2.2 Turning the card reader OFF
To switch off a card reader the operator must press and hold the power button until the display
shows “Shutting Down” and the display turns off. Once off, the card reader will not react to any key
presses, except Power button and the ReviveTM switch.
3.2.3 Sleep
The card reader can be put into sleep mode. In this mode the card reader's power consumption is
very low (and Bluetooth is switched off), but when it is woken it will be ready to use within a few
seconds. The card reader will enter sleep mode if the power button is briefly pressed, or after a
period of inactivity.
The card reader will wake on any of the following activities:
•
•
•
•
Any key press
USB charge cable inserted
Smart-Card inserted
Magnetic Stripe Card swiped
5
3.2.4 Charging the Battery
The card reader is fitted with an internal rechargeable battery which cannot be removed or replaced.
This battery should be charged for at least 3 hours when using the card reader for the first time or if
the card reader has not been used for a long time.
The battery is charged by plugging the card reader into either a computer or external USB wall
adapter using the USB lead provided. Charging via a USB wall adaptor is faster but the adaptor
must be capable of supplying at least 850mA (1A recommended).
When the unit is charging and running normally the charging icon ( ) will be displayed in the top right
hand corner of the display The battery status icon will also indicate the real time battery power.
3.2.5 Low Battery
If the battery power goes below the configured Low Battery Threshold, the low battery warning
screen will be displayed. If the battery power goes below a critical level the card reader will sleep
until the charge has increased above this level.
3.2.6 Battery usage guidelines
•
•
•
Keep the battery well-charged and do not let it discharge completely.
Charge at normal room temperature (charging is disabled outside the range 0°C-45°C).
Keep the card reader away from heat sources (such as heaters or direct sun-light)
6
3.3 Bluetooth
3.3.1 Start up
Once the card reader is ready to use, the Bluetooth icon and the battery status indicator will be
displayed at left and right top corners of the display respectively and the card reader enters one of
the following modes:
•
•
Ready To Pair
Ready to Connect
3.3.2 Ready To Pair:
If the card reader has never been paired with any Bluetooth device previously, the card reader starts
in Ready To Pair mode. The Bluetooth icon will be flashing once per second. In this mode the card
reader will be discoverable by other Bluetooth devices. The remote Bluetooth device can now pair
with the card reader. The card reader will remain in this state until the remote Bluetooth device
successfully completes the pairing process, at which point it will drop to Ready To Connect mode.
For most modern smart devices the numeric comparison pairing method will be used. This involves
both devices displaying the same random number. The user should check that these numbers
match and if so confirm on both devices. For the Miura card reader the green tick key is used for
this. For older Bluetooth devices, PIN pairing may be used. If the user is prompted for a Bluetooth
PIN during the pairing process, it will be the last 6 digits of the card reader's serial number.
3.3.3 Ready To Connect
If the card reader has previously been paired with a Bluetooth device, and the pairing information is
still available in the card reader, it will start in Ready To Connect mode. In this mode the card
reader will allow connections with the paired Bluetooth device and will not be discoverable by other
Bluetooth devices. In this state the Bluetooth icon will stay solid.
To activate the Ready To Pair mode press and hold the ENTER(✔) key until the Bluetooth Icon
starts to flash. Once pairing is complete the old pair will be removed (this is the only way to remove
old pairs).
To exit Ready To Pair mode without making a new pair, press the CANCEL(X) key. The card
reader will also exit Ready To Pair after a configurable time-out.
7
3.3.4 Connected
The card reader enters Connected mode once a Bluetooth connection is established with an
application on the smart device.
8
3.4 Transaction mode
3.4.1 PIN Entry
If the card reader is expecting PIN entry from the user, the instructions will be displayed. Once PIN
entry is complete, the user should press ENTER(✔) key to continue.
During PIN entry the user can press CLEAR (←) to delete the previous digit or CANCEL(X) to
delete all the digits and re-start PIN entry. Pressing CANCEL(X) when no digits are entered will
cancel the PIN entry.
3.4.2 PIN OK
If the PIN is correct, the card reader will display “PIN OK”.
3.4.3 PIN Incorrect
If the PIN is incorrect the card reader will display “INCORRECT PIN” for 2 seconds and request for
Pin entry again.
3.4.4 Last Try
If the user is attempting last try for Pin entry, the card reader will indicate “ENTER PIN: (Last Try)”.
Note: The Pin Entry instruction are language dependent and will change depending on the language
configured. The Language can be configured from the application on the smart device.
9
3.5 Card reader maintenance
3.5.1 Security Check
The card reader automatically performs a full security check every 24 hrs. The card reader can be
configured by the application to trigger this security test when the card reader is idle. During this
time the Bluetooth will be switched off. The files that failed the security check will be removed from
the card reader.
3.5.2 Software Update
The software on the card reader can be updated by the application on the smart device. The
software update will be transferred to the card reader over the Bluetooth, once this is complete the
software update will start. The card reader will indicate if a software update is in progress and will
report success/failure. If the software update fails, the operator has to acknowledge the failure by
pressing ENTER(✔) to proceed further. In the unlikely event that a software update fails, a Factoryreset (see ReviveTM section) may be required to make the card reader operational.
Software update in progress. The card reader will display the success or failure message
accordingly.
10
3.6 Error states
3.6.1 System Tampered
If the card reader identifies a tamper, the card reader will immediately close the Payment application
aborting any transaction in progress. The tamper state is indicated on the display. A Tampered card
reader should be returned for investigation.
3.6.2 Ready To Install
The card reader will be in Ready To Install state if no application has been installed or has been
deleted. A card reader in Ready to Install state should be returned for investigation.
11
4 Revive™
Miura products include a ReviveTM feature which is activated using a pin-hole reset switch, this is
situated next to the power button. See Card Reader Features section 2 point 4. Pressing the
Revive™ button will trigger a hardware reset, and the card reader will display the Revive Menu. This
is best done when there is no external power applied, if external power has been applied the card
reader will request to disconnect the external power. The end-user should use this feature if the
card reader is running but is “locked up” and not responding to the power button.
The Revive™ Menu has three options, namely:
•
•
•
Power up as Normal
System Restore
Total Factory Reset
4.1 Power up as normal
Selecting this option will reboot the card reader resulting in a complete hardware and software reset.
4.2 System restore
The “System Restore” option will restore the card reader to an earlier point in time. If the card reader
becomes unresponsive to power button or is not running as expected and the 1st option in the
revive menu was unsuccessful in recovering the card reader the “System Restore” option can be
used. The card reader requires the operator to confirm the “System Restore” selection in order to
avoid unintentional system restoration.
Confirmation of the “System Restore“ action.
“System Restore” in progress.
The card reader will display the success or failure message for the System Restore. If the system
Restore process fails, the operator has to acknowledge the failure by pressing the ENTER(✔) key.
In the unlikely event that a system restore fails, the card reader may be in an unusable state. The
operator should then try “Total Factory Reset” to recover the card reader, in section 4.3.
12
4.3 Total Factory reset
The “Total Factory Reset” option allows the end-user to reset all software and configuration back to
the state it was in when the card reader left the factory. This feature should be used if there are any
issues with the card reader operation which could not be solved by a Reboot or “System Restore”.
Following a successful “Total Factory Reset”, the user will need to repeat the pairing process, and
the controlling application on the smart device will need to perform any software configuration and
key injection required. The card reader requires the operator to confirm the “Total Factory Reset”
selection in order to avoid unintentional factory reset operation.
Confirmation of the “Total Factory reset” action.
Factory Reset in progress.
The card reader will accordingly display the success or failure message for the Total Factory Reset.
If the Total factory reset process fails, the operator has to acknowledge the failure by pressing the
ENTER(✔) key. If the factory reset fails the card reader has to be returned for further investigation.
13