1
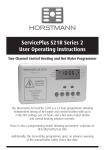
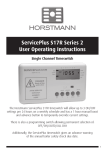
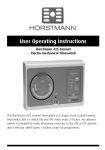
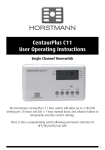
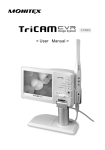
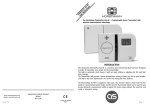
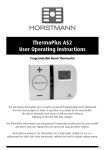
CentaurStat 1 User Operating Instructions Central Heating Programmable Room ThermoStat The Horstmann CentaurStat 1 is a programmable room thermostat that provides precise temperature control from a single point with up to 6 different temperature settings possible over a 24 hour cycle. Temporary temperature adjustments can be made by means of the temperature override buttons on the front of the unit. 1 The CentaurStat 1 Programmable ThermoStat The simple instructions contained in this user guide are designed to help with the programming and operation of the unit. 1 7 8 2 11 9 10 Located under flap 4 5 3 1 2 3 4 5 6 7 8 9 10 11 2 SET indicator SET positions SET button OVERRIDE (MINUS) button OVERRIDE (PLUS) button ENTER button Time or current temperature display Target temperature System ON symbol PM indicator (no display for AM) Temperature lock symbol 6 Manual Overrides Target Temperature Override Ensure the SET indicator is in the normal RUN position Use the PLUS and MINUS buttons to increase or decrease settings The CentaurStat will operate on this new setting until the next time period Where an override temperature has been set, this altered setting will remain until the next time and temperature setting is reached. Target Temperature Lock The temperature lock facility allows you to ‘lock in’ the target or override temperature of the current heating period. With the SET indicator in the RUN position press the ENTER button. The temperature lock symbol will appear on the right hand side of the display. All control buttons other than the ENTER button will be inoperative. The locked temperature will now override all other temperature settings until the lock is cancelled. To cancel the temperature lock, and return to normal settings, simply press the ENTER button. If an override temperature had been set before the lock was activated, the altered setting will remain until the next switching period is reached. 3 Setting the Time of Day Press the SET button until SET indicator is next to clock position on the display Use the PLUS and MINUS buttons to adjust the time Press ENTER Press the SET button until SET indicator is returned to the RUN position When setting the time or altering the temperature settings, if a period exceeding 65 seconds is allowed to elapse between button presses then the CentaurStat will automatically return to the run position. Any alterations made since the last press of the ENTER button will not be recognised. Time and Temperature Settings The CentaurStat 1 has six temperature settings per 24 hours. These all have different start times and temperature settings. The default factory settings are shown opposite. Should you want to alter these default times and temperatures, proceed as per the instructions on page 5. DEFAULT SETTINGS Period Times 1 6:00am 2 8:30am 3 11:30am 4 1:30pm 5 5:00pm 6 10:00pm Display Features The CentaurStat has two user displays, by pressing the PLUS and MINUS buttons simultaneously, the user can toggle between either Display 1 or Display 2. Display 1 - Shows current time and target temperature 4 Display 2 - Shows current and target temperature Temps. 20ºC 18ºC 20ºC 18ºC 21ºC 15ºC Changing the Times and Target Temperatures Press the SET button until SET indicator is next to the PROG position The time setting for the 1st period will now flash. Use the PLUS and MINUS buttons to alter the start time if required Press ENTER The target temperature setting for the 1st period will now flash. Use the PLUS and MINUS buttons to alter the target temperature if required Press ENTER Repeat for remaining 5 time and temperature periods Press the SET button until the SET indicator is returned to the RUN position 5 Reducing the Number of Time and Temperature Settings To reduce the number of temperature settings available in a day from six to four, proceed as follows: Set the 3 and 4 period temperatures to the same temperature as set on period 2. Periods 1 and 2 will now operate as normal. For two settings per day, set the temperature on periods 2, 3, 4 and 5 to the same temperature as set on period 1. For one setting per day use the Target Temperature Lock procedure located on page 3 of this user guide. Battery Replacement Your CentaurStat is battery operated. The batteries supplied with the unit should last for approximately two years. When the batteries are nearing the end of their life a BATTERY LOW symbol will flash on the display (see diagram opposite). Isolate any external electricity supply to your CentaurStat before replacing the batteries Press the RELEASE BUTTON on the right hand side of the unit and swing the front cover away from the mounting plate by gently pulling on the right. Remove the old batteries (with the batteries removed your CentaurStat will retain its programme for approximately five minutes) and replace them with three new AA size alkaline batteries, ensure they are fitted correctly as shown on the label positioned between the battery terminals (see diagram). Once batteries have been fitted, offer the left hand side of the unit up to the mounting plate ensuring that the two guide lugs are fitted into the corresponding slots in the side of the mounting plate. Now swing the right hand side of the CentaurStat up against the mounting plate until the release button clicks into place. After a few seconds the display will automatically return to your CentaurStat. PLEASE NOTE: If the battery fitting time has exceeded five minutes some time and temperature adjustment may be necessary, please refer to the relevant sections located on page 4 and 5 of this user guide. 6 Resetting the CentaurStat Electronic equipment can in some circumstances be affected by electrical interference. If the programmer’s display becomes frozen or scrambled; or if you wish to revert back to the default time settings please use the following procedure. Lower the flap and press the SET and ENTER buttons together, release the buttons and the CentaurStat will return to preset factory default time settings. Service and Repair This product is NOT user serviceable. Please do not dismantle the unit. In the unlikely event of a fault developing please refer to the RESETTING THE CENTAURSTAT section of this user guide located above. If this fails to resolve the problem please contact a local heating engineer or a qualified electrician. Battery Replacement Diagrams: 7 What is a programmable room thermostat? ... an explantion for householders. A programmable room thermostat is both a programmer and a room thermostat. A programmer allows you to set ‘ON and OFF’ time periods to suit your own lifestyle. A room thermostat works by sensing the air temperature, switching on the heating when the air temperature falls below the thermostat setting and switching it off once the set temperature has been reached. So, a programmable room thermostat lets you choose what times you want the heating to be on, and what temperature it should reach while it is on. It will allow you to select different temperatures in your home at different times of the day (and days of the week) to meet your particular needs. Turning a programmable room thermostat to a higher setting will not make the room heat up any faster. How quickly the room heats up depends on the design of the heating system, for example, the size of the boiler and radiators. Neither does the setting affect how quickly the room cools down. Turning a programmable room thermostat to a lower setting will result in the room being controlled at a lower temperature, and saves energy. The way to set and use your programmable room thermostat is to find the lowest temperature settings that you are comfortable with at the different times you have chosen, and then leave it alone to do its job. The best way to do this is to set low temperatures first, say 18ºC and then turn them up by one degree each day until you are comfortable with the temperatures. You won’t have to adjust the thermostat further. Any adjustments above these settings will waste energy and cost you more money. If your heating system is a boiler with radiators, there will usually be only one programmable room thermostat to control the whole house. But you can have different temperatures in individual rooms by installing thermostatic radiator valves (TRVs) on individual radiators. If you don’t have TRVs, you should choose a temperature that is reasonable for the whole house. If you do have TRVs, you can chose a slightly higher setting to make sure that even the coldest room is comfortable, then prevent any overheating in other rooms by adjusting the TRVs. The time on the programmer must be correct. Some types have to be adjusted in spring and autumn at the changes between Greenwich Mean Time and British Summer Time. You may be able to temporarily adjust the heating programme, for example, ‘Override’, ‘Advance’ or ‘Boost’. These are explained in the manufacturer’s instructions. Programmable room thermostats need a free flow of air to sense the temperature, so they must not be covered by curtains or blocked by furniture. Nearby electric fires, televisions, wall or table lamps may prevent the thermostat from working properly. Email: sales@horstmann.co.uk Website: www.horstmann.co.uk Horstmann Controls Limited, Bristol BS4 1UP 8 Leaflet number P82161 – Issue 2