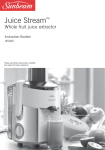
Download Sunbeam Juicer JE9000 User's Manual


Transcript
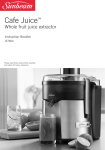
Slow Juicer
Juice Extractor
Instruction Booklet
JE9000
Please read these instructions carefully
and retain for future reference.
Contents
Safety Precautions for your Slow Juicer
1
Features of your Slow Juicer
2
Helpful Hints for Slow Juicing
4
A Guide to the Benefits of Juicing
5
Assembling your Slow Juicer
7
Operating your Slow Juicer
9
Disassembling your Slow Juicer
10
Care and Cleaning
11
Troubleshooting Guide
12
Recipes13
Important instructions – retain for
future use.
Sunbeam’s Safety Precautions
SAFETY PRECAUTIONS FOR YOUR SUNBEAM
SLOW JUICER.
• Do not put fingers or other objects into the feed
chute whilst juicer is in operation.
• Do not push fruit or vegetables into the feed chute
with your fingers, always use the food pusher
provided.
• If any fruit or vegetables become lodged in the feed
chute, use the pusher, turn the juicer into reverse,
or turn off the juicer, remove the plug from the
power outlet and disassemble to remove the lodged
fruit or vegetables.
• Do not use if the juicing screw is damaged.
• Do not juice stone fruits unless seeds and/or stones
have been removed.
• Ensure the juicer is correctly and completely
assembled before turning the appliance ‘On’.
• Always operate the juicer on a flat level surface.
• Do not operate for more than 3½ minutes at a time
when juicing heavy loads use
.
• Switch off the juicer and disconnect from power
supply before handling or changing parts that move
during use.
Sunbeam is very safety conscious when designing and
manufacturing consumer products, but it is essential
that the product user also exercise care when using
an electrical appliance. Listed below are precautions
which are essential for the safe use of an electrical
appliance:
• Read carefully and save all the instructions
provided with an appliance.
• Always turn the power off at the power outlet before
you insert or remove a plug. Remove by grasping
the plug - do not pull on the cord.
• Turn the power off and remove the plug when the
appliance is not in use and before cleaning.
• Do not use your appliance with an extension cord
unless this cord has been checked and tested by a
qualified technician or service person.
• Always use your appliance from a power outlet of
the voltage (A.C. only) marked on the appliance.
• This appliance is not intended for use by persons
(including children) with reduced physical, sensory
or mental capabilities, or lack of experience and
knowledge, unless they have been given supervision
or instruction concerning use of the appliance by a
person responsible for their safety.
• Children should be supervised to ensure that they
do not play with the appliance.
• The temperature of accessible surfaces may be
high when the appliance is operating.
• Never leave an appliance unattended while in use.
• Do not use an appliance for any purpose other than
its intended use.
• Do not place an appliance on or near a hot gas
flame, electric element or on a heated oven.
• Do not place on top of any other appliance.
• Do not let the power cord of an appliance hang
over the edge of a table or bench top or touch any
hot surface.
• Do not operate any electrical appliance with a
damaged cord or after the appliance has been
damaged in any manner. If damage is suspected,
return the appliance to the nearest Sunbeam
Appointed Service Centre for examination, repair or
adjustment.
• For additional protection, Sunbeam recommend
the use of a residual current device (RCD)
with a tripping current not exceeding 30mA in
the electrical circuit supplying power to your
appliances.
• Do not immerse the appliance in water or any other
liquid unless recommended.
• Appliances are not intended to be operated by
means of an external timer or separate remote
control system.
• This appliance is intended to be used in
household and similar applications such as: staff
kitchen areas in shops, offices and other working
environments; farm houses; by clients in hotels,
motels and other residential type environments;
bed and breakfast type environments.
If you have any concerns regarding the performance and use of your appliance,
please visit www.sunbeam.com.au or contact the Sunbeam Consumer Service Line.
Ensure the above safety precautions are understood.
1
Features of your Slow Juicer
Food pusher
Fruit & vegetable feed chute
The 70mm curved chute can take some
whole fruit and vegetables reducing the
amount of preparation required.
Juicer cover
Juicing bowl
Pulp spout
Juicing screw
Presses and squeezes fruit and vegetables to
break down and extract juice.
Juicing spout
1 litre pulp container
1 litre juice container
Smoother juice attachment
Place onto the juice container before juicing
for extra smooth juice.
2
Filter basket
Fine stainless steel mesh separates
the juice from the pulp.
2 way control switch
Off/On/Reverse control switch for precise
direction control.
280 watt motor
Optimised for maximum juice extraction and
supplies the necessary power to juice even
the toughest fruit and vegetables.
Non-slip feet
Heavy-duty non-slip feet ensure the slow
juicer remains stable and prevents slipping
on the bench top during use.
Cleaning brush
Narrow bristles to clean all parts of the filter
basket and a thin handle to remove excess
pulp from the pulp spout.
3
Helpful Hints for Slow Juicing
Important: For best juicing results, feed fruit
and vegetables slowly into the food chute to
allow maximum juice extraction and performance.
Preparing Fruit and Vegetables
Wash all fruit and vegetables well before
juicing. There is no need to peel vegetables
that have a thin skin but a light scrub will
help rid any dirt that may be stuck on or any
waxy coatings.
Peel fruit and vegetables that have a thick
skin such as melons, pineapple and some
citrus fruits.
Nutrition Tip: Leave the skin on lemons and
limes when juicing for increased flavour and
nutritional value.
Juice only the freshest of fruit and vegetables
to get the most juice from them and the best
flavours.
Nutrition Tip: Chop and prepare fruit and
vegetables just before juicing to retain more
nutrients.
Cut large pieces of fruit, such as melon and
apples into large long wedges.
Some seeds from citrus fruits can be bitter
so you may want to remove some of the seeds
for a less bitter juice.
Remove seeds and stones from fruit such
as mangoes, papaya and stone fruit. This
will prevent the slow juicer from becoming
damaged.
4
Juicing techniques
When juicing different fruit and vegetables,
the order in which they are juiced can affect
juice yield. For maximum juice extraction
juice the softer fruit or vegetables first
followed by the harder fruit or vegetables.
When juicing leafy greens such as kale or
fresh herbs, add between other fruit and
vegetables for maximum yield. If only using
a small quantity, add at the same time as
another piece of fruit or vegetable.
Leafy greens and fibrous vegetables such
as celery and rhubarb should be chopped
into 3cm pieces before juicing.
Hard vegetables such as carrots should be
chopped into thin strips for best results.
When juicing bananas, add as the first or
second ingredient. The nectar of the banana
will remain inside the filter basket and as
the remaining fruit is added into the slow
juicer, they will release the banana nectar
throughout the rest of the juice.
When juicing small fruit such as grapes or
strawberries, add the fruit in handfuls rather
than one at a time, this will maximise the
amount of juice extracted.
Be aware that beetroot stains all other fruit
and vegetables. If juicing several different
juice combinations, juice the drink with the
beetroot last, so as not to stain the other
drinks.
A Guide to the Benefits of Juicing
Benefits
KJ per 100g
Fruit / Vegetable
Source of
Apples
Carotenes, pectin, potassium, May help in the treatment vitamin C and dietary fibre, of constipation.
energy giving carbohydrates.
150kj/100g
Apricots
Beta-carotene, iron, vitamin C, High in natural sugars for energy.
dietary fibre.
280kj/100g
Banana
Potassium, carbohydrates, Provides sustained energy.
dietary fibre, vitamin B6, vitamin C. 225kj/100g
Beetroot
Folate, potassium, leafy tops are rich The folate is excellent for
in beta carotene, calcium and iron. healthy cells.
120kj/100g
200kj/100g
Blueberries
Carotenoids, vitamin C.
Antibacterial.
Capsicum
High in vitamin C, beta carotene.
1 red capsicum has enough vitamin C 135kj/100g
to meet the daily needs of 10 people.
Carrots
Beta carotene, folate, dietary fibre.
May help with night vision.
100kj/100g
Celery
Only small amounts of vitamins and minerals.
Helps to clean mouth and teeth.
50kj/100g
Cherries
Very high in vitamin C, dietary fibre.
May help to stabilise the heartbeat and also keeps the skin healthy.
170kj/100g
Cucumber
Only small amounts of vitamins and minerals.
May help with flatulence.
30-50kj/100g
Fennel
Beta carotene, folate.
Fennel seeds are good for digestion. 50kj/100g
Ginger
Aids in digestion and is good for
nausea and improves circulation.
Grapefruit
Rich in vitamin C, fibre, bioflavenoids. Pink grapefruit contains Lycopene 110kj/100g
which is an anti-cancer agent and
may reduce the risk of prostate cancer.
Honeydew Melon
Vitamin C, small amounts of carotenoids.
May stimulate the kidneys to help
function better.
Kiwi Fruit
Beta carotene, vitamin C, bioflavenoids, dietary fibre.
Helps in digestion and cleansing
of the skin.
Lemon
Bioflavenoids, limonene, pectin, vitamin C.
The pectin may help reduce
blood cholesterol.
95kj/100g
Lime
Bioflavenoids, limonene, pectin, vitamin C.
The pectin may help reduce
blood cholesterol.
90kj/100g
Mandarins
Vitamin C, beta carotene, folate, 130kj/100g
180kj/100g
Vitamin C helps build the
165kj/100g
immune system
5
A Guide to the Benefits of Juicing (continued)
Fruit / Vegetable
Source of
Mango
Beta carotene, potassium, flavenoids Easy to digest.
and other antioxidants.
Benefits
Mint
Antispasmodic volatile oils, Aids digestion.
flavenoids, menthol.
Oranges
High in vitamin C, fibre, beta carotene, flavenoids, thiamine, pectin, folate.
Papaya
Protective carotenoids, rich in Helps digest proteins.
vitamin C, fibre, rich in papain.
Parsley
Vitamin C, iron.
Pawpaw
Helps digest proteins.
Beta carotene, flavenoids, magnesium, rich in papain.
Peaches
Good source of vitamin C, dietary fibre, beta carotene.
Easy to digest and works as a gentle 130kj/100g
laxative.
Pears
Very good source of dietary fibre.
Provide a quick source of energy.
Pineapple
Vitamin C, dietary fibre, beta carotene. Helps to digest protein.
160kj/100g
Plums
Vitamin E, potassium, beta carotene, May help to retard the effects
malic acid. of wrinkling.
110-155kj/100g
Raspberries
High in dietary fibre, excellent source Helps in treating constipation.
of vitamin C, some folate.
110kj/100g
Rockmelons
Excellent source of vitamin C, beta carotene, carotenoids.
Spinach
Zeaxanthin, vitamin C, beta carotene, Helps in keeping eyes healthy
folate, dietary fibre.
in the elderly.
235kj/100g
Excellent for healthy skin and helps 100kj/100g
the body’s defences against bacterial
infections.
160kj/100g
Excellent for fresh breath.
163kj/100g
190kj/100g
May help in the prevention of cancer 90kj/100g
and heart disease.
Strawberries
Vitamin C, dietary fibre, some folate. Helps to absorb iron better after eating meat.
6
KJ per 100g
65kj/100g
80kj/100g
Tomatoes
Rich in lycopene, vitamin C, and small amounts of vitamin E, folate, dietary fibre.
May help reduce the risk of prostate 55kj/100g
cancer in men.
Watercress
Vitamin C & E, folate, beta carotene, Thought to have cancer fighting
iron.
properties.
72kj/100g
Watermelon
Carotenoids, beta carotene, vitamin C, May stimulate the kidneys to help
dietary fibre.
function better.
95kj/100g
Assembling your Slow Juicer
Before Use
After unpacking your slow juicer, we
recommend that you disassemble the unit
before using for the first time. Wash all parts
except the motor base in hot soapy water.
Rinse and dry immediately.
Important: Always ensure your slow juicer is
unplugged from the power outlet when not
in use, during assembly or whilst removing
parts.
1.Set the motor base on a dry, level surface
and place the juicing bowl onto the top of
the motor base. Rotate clockwise and lock
into place – figure 1.
2.Place the juicing screw into the centre of
the juicing bowl and push down until firmly
in place – figure 2.
Figure 2
3.Place the filter basket over the juicing
screw and into the juicing bowl and twist
until firmly locked into place – figure 3.
Figure 1
Figure 3
7
Assembling your Slow Juicer (continued)
4.Place the juicer cover onto the juicing bowl
and rotate clockwise until firmly locked in
place – figure 4.
6.Take the food pusher and slide down into
the feed chute – figure 6.
Figure 4
5.Place the juice container under the circular
juice spout and the pulp container under
the rectangular pulp spout – figure 5.
Figure 5
8
Figure 6
Operating your Slow Juicer
Note: Slow juicer should be completely
assembled before use using directions on
page 7.
1.Ensure the control switch on the juicer is
in the ‘Off’ position and insert the power
cord into a 230-240V AC power outlet and
turn the power ‘On’.
2.Clean and chop fruit and vegetables ready
for juicing.
Note: The feed chute allows some whole
fruit and vegetables to be juiced however
some fruit and vegetables may require other
preparation before juicing, such as peeling
and removing stones.
3.Ensure that the juicer has been assembled
correctly and all parts are firmly in place.
The juicer will not operate if it has not
been correctly assembled.
4.Place the juice container under the juice
spout and pulp container under the waste
pulp spout.
Important: If the juicing screw becomes
jammed and the juicer stop operating, press
the control switch to the ‘Off’ position. After
the juicer has come to a complete stop,
select ‘Reverse’ at the bottom of the control
switch until the food becomes dislodged.
Then press control switch back to the ‘On’
position.
7.Filtered juice from the fruit and vegetables
will flow from the juice spout and waste
pulp will be collected from the pulp spout.
8.Immediately after use, slowly pour a glass
of water down the feed chute to help clean
your juicer. Ensure that the pulp and juice
containers are positioned to collect the
waste water. This process can also be used
in between juices to flush the slow juicer.
9.When juicing is complete ensure that the
slow juicer is switched ‘Off’ and unplugged
from the power outlet.
5.Select ‘On’ with the control switch by
pushing the top of the switch.
Important: Do not operate for more than 3½
minutes at a time when juicing heavy loads
or continuously for more than 15 minutes.
Important: Do not use the slow juicer
for extended periods without inserting
ingredients as this can damage the juicer.
6.With the juicer in operation, place the fruit
and vegetables into the feed chute. Using
the pusher, slowly guide the fruit and
vegetables down the feed chute and onto
the juicing screw.
Tip: For maximum juice extraction, allow the
juicing screw to pull the food down into the
juicer and gently use the food pusher when
required.
9
Disassembling your Slow Juicer
1.Turn the power ‘Off’ at the power outlet
and unplug the cord.
2.Remove the pulp and juice collectors.
3.Remove the juicing cover by turning anticlockwise to unlock the lid – figure 1.
Figure 1
10
4.Turn the juicing bowl anti-clockwise to
unlock and lift off the motor base for
cleaning – figure 2.
Figure 2
Note: If the juicing bowl is difficult to remove
from the motor base, first remove the filter
basket and juicing screw before removing the
juicing bowl.
Care and Cleaning
Note: Ensure that the slow juicer is
unplugged from the power outlet prior to
cleaning.
Important: Do not place any part of the slow
juicer in the dishwasher.
Quick Clean
Between juices or immediately after juicing
pour 1 glass of water down the feed chute
of the juicer while turned on. Ensure that
the juice and pulp containers are in place to
collect the waste water.
Full Clean
Disassemble the slow juicer and place all
removable parts aside, see ‘Disassembling
your Slow Juicer’ on page 10.
Rinse the juicing bowl, juicer cover, food
pusher, juicing screw, pulp and juice
containers under running water and wash
with warm, soapy water. Rinse well.
Using the cleaning brush supplied, hold the
filtering basket under running water and
brush the outside of the basket first. Then
with the basket still under running water,
brush the inside of the basket to remove the
pulp.
To clean the motor base
Clean the motor base of the slow juicer using
a damp soft sponge with mild detergent and
wipe over the appliance.
Important: Never immerse the motor base in
water or any other liquid.
11
Troubleshooting Guide
12
Problem
Possible Cause
What to do
Juicer will not start when
switched ‘On’.
The juicer hasn’t been
assembled correctly.
See ‘Assembling your Slow
Juicer’ on page 7.
The motor appears to
struggle/cut out during use.
Too much food being juiced
at once.
Feed food into the chute
slower and use smaller size
pieces.
Food is clogging the juicing
screw.
Turn the slow juicer to the off
position and wait until juicer
stops. Select the ‘Reverse’
position on the control switch
until blockage is cleared.
The pulp appears to be very
wet.
Large amounts of fibrous
fruit and vegetables have
caused excess pulp to build
up in the filtering basket.
Stop juicing, disassemble
the slow juicer and clean
the filtering basket using
the cleaning brush provided.
See ‘Disassembling your
Slow Juicer’ and ‘Care and
Cleaning’ sections. When
resume juicing feed food
slowly into the feed chute.
Juice comes out from the top
of the juice bowl.
Too much food being juiced
at once.
Feed food into the chute
slower and use smaller size
pieces.
Less juice is coming out from Large amounts of fibrous
the juice spout.
fruit and vegetables have
caused excess pulp to build
up in the filtering basket.
Stop juicing, disassemble
the slow juicer and clean
the filtering basket using
the cleaning brush provided.
See ‘Disassembling your
Slow Juicer’ and ‘Care and
Cleaning’ sections.
The slow juicer motor will not The motor has been
start.
overloaded.
Unplug the slow juicer and
allow to cool for 30 minutes
before using again.
Recipes
Wash all fruit and vegetables well before
juicing. Only remove the skin from the fruit
and vegetables when advised to do so. Cut
fruit and vegetables to a size that will fit
easily into the chute of the slow juicer. Try
to avoid cutting fruit and vegetables too far
in advance of the actual juicing time as this
will reduce the nutrient levels.
Perfectly Pink
Serves 2
Zinger Juice
Serves 2
2 celery sticks, roughly chopped
1 beetroot, peeled
1 lemon
2 apples
Feed the fruit and vegetables through the
slow juicer in the order that they are written. Stir juice before serving.
1 celery stick, roughly chopped
Gazpacho Juice
Serves 2
1 rhubarb stick, roughly chopped
½ red capsicum
6 mint leaves
¼ watermelon, skin removed
½ green capsicum
Feed the fruit and vegetables through the
slow juicer in the order that they are written. Stir juice before serving.
1 celery stick, roughly chopped
Blue Be You
Serves 2
1 cup blueberries, fresh or frozen
1 pear
2 sprigs parsley
4 basil leaves
1 garlic clove
4 tomatoes
Feed the fruit and vegetables through the
slow juicer in the order that they are written. Stir juice before serving.
1 stick rhubarb, roughly chopped
1 kiwi
2 apples
Feed the fruit and vegetables through the
slow juicer in the order that they are written. Stir juice before serving.
Green Machine
Serves 2
1 spinach leaf, roughly chopped
6 mint leaves
½ pineapple, skin removed
½ lime
¼ cup coconut water
Feed the fruit and vegetables through the
slow juicer in the order that they are written. Stir juice before serving.
13
Recipes (continued)
Sunburst
Serves 2
Using the dry pulp from the Tropical Sunrise
Juice you can make these muffins;
¼ pineapple, skin removed
Tropical Muffins
Makes 12
3 carrots
1 beetroot
3 cups self- raising flour, sifted
Feed the fruit and vegetables through the
slow juicer in the order that they are written. Stir juice before serving.
½ cup sugar
1 egg, beaten
Tropical Sunrise
Serves 2
All the pulp from the Tropical Sunrise Juice
1 banana, skin removed
½ cup coconut flesh or shredded coconut
½ teaspoon allspice
1 pear
½ cup fresh dates
6 mint leaves
½ pineapple, skin removed
Feed the fruit and vegetables through the
slow juicer in the order that they are written. Stir juice before serving.
14
¼ cup oil
1 ½ cups milk
1.Pre-heat the oven to 180°C. Grease a 12
capacity large muffin pan.
2.In a large bowl combine the flour and
sugar.
3.In a separate bowl, combine the rest of the
ingredients until well blended.
4.Using a wooden spoon, fold the wet mix
through the flour trying to combine all
ingredients within 8 stirs of the wooden
spoon.
5.Spoon the mix into the muffin pans to the
top. Bake for 20 minutes or until done.
Recipes (continued)
Ginger Blast
Serves 2
Green Magic
Serves 2
4 carrots
2 apples
6 brazil nuts
½ cucumber
3cm piece ginger
4 kale leaves, roughly chopped
1 apple
1 lime
Feed the fruit and vegetables through the
slow juicer in the order that they are written. Stir juice before serving.
2 spinach leaves , roughly chopped
Kick Start
Serves 2
1 beetroot
1 kiwi
Feed the fruit and vegetables through the
slow juicer in the order that they are written. Stir juice before serving.
1 sprig parsley
Joint Greaser
Serves 2
10cm piece of sweet potato
3 carrots
3 carrots
2 sprigs parsley
½ lemon
1 celery stalk, roughly chopped
Feed the fruit and vegetables through the
slow juicer in the order that they are written. Stir juice before serving.
1 tablespoon olive oil
Mexican Jump
Serves 2
1 green apple
8 sprigs coriander
1 red chilli
1 stalk broccoli
4 asparagus spears
1 apple
Feed the fruit and vegetables through the
slow juicer in the order that they are written. Stir juice before serving.
2 cucumbers
Almost Licorice
Serves 2
1 lime
2 apples
Feed the fruit and vegetables through the
slow juicer in the order that they are written. Stir juice before serving.
8 mint leaves
3 cm piece ginger
½ fennel bulb
Feed the fruit and vegetables through the
slow juicer in the order that they are written. Stir juice before serving.
15
Recipes (continued)
Berry Me
Serves 2
Pink Tart
Serves 2
2 cups blueberries, fresh or frozen
¼ pineapple, skin removed
2 kiwis
3 plums, pitted
10 mint leaves
1 red grapefruit, peeled
16 strawberries
Feed the fruit and vegetables through the
slow juicer in the order that they are written. Stir juice before serving.
Feed the fruit and vegetables through the
slow juicer in the order that they are written. Stir juice before serving.
Freshen Up
Serves 2
Breakfast Juice
Serves 2
3 oranges, p eele d
1 fennel bulb
½ rockmelon, skin removed
1 pear
2 carrots
2 apples
1 lime
2cm piece of ginger
Feed the fruit and vegetables through the
slow juicer in the order that they are written. Stir juice before serving.
1 celery stick, roughly chopped
1 orange, peeled
Feed the fruit and vegetables through the
slow juicer in the order that they are written. Stir juice before serving.
Cold Booster
Serves 2
2 apples
Grape It
Serves 2
3 kale leaves, roughly chopped
¼ pineapple, skin removed
1 kiwi
¼ red cabbage
2 oranges, p eele d
1½ cups red grapes
Feed the fruit and vegetables through the
slow juicer in the order that they are written. Stir juice before serving.
2 carrots
Feed the fruit and vegetables through the
slow juicer in the order that they are written. Stir juice before serving.
16
3 sprigs parsley
Recipes (continued)
Lychee Delight
Serves 2
Use the pulp from the Minty Berry Juice to make
this cheesecake
2 pears, cut in half
Berry No Bake Cheesecake
Serves 8
¼ pineapple, skin removed
8 lychees, fresh or tinned
1 packet sweet biscuits, crushed
½ lemon
125g butter, melted
Feed the fruit and vegetables through the
slow juicer in the order that they are written. Stir juice before serving.
Filling:
Vege Patch
250g cream cheese
395g can condensed milk
¹⁄³ cup fresh lemon juice
Serves 2
All the pulp from the Minty Berry Juice
2 carrots
1cm piece ginger
1.Line a 25cm spring form cake pan with
baking paper.
2.Combine the biscuits and butter and press
crumb into the base of the cake pan.
Allow to set in refrigerator for 1 hour.
3.In a food processor, combine all the filling
ingredients and process for 2 minutes.
4.Pour filling over the crumb base, spoon
juice extraction pulp over the top of the
cheese cake filling and using a butter
knife, swirl berry mix through the cheese
cake filling.
5.Allow to set in the refrigerator for 2 hours
or overnight.
1 beetroot
2 apples
Feed the fruit and vegetables through the
slowjuicer in theorderthatthey arewritten. Stir juice beforeserving.
Minty Berry
Serves 2
2 cups blueberries, fresh or frozen
2 kiwis
8 mint leaves
1 cup raspberries
1 apple
Feed the fruit and vegetables through the
slow juicer in the order that they are written.
Stir juice before serving.
17
Recipes (continued)
Chocolate Ginger Beetroot Cake
Serves 10-12
2 cups self raising flour
¾ cup dark cocoa
2 teaspoons ground cinnamon
300g beetroot pulp
2 teaspoons grated ginger
300g unsalted butter, softened to room
temperature
2 cups caster sugar
2 teaspoons vanilla extract
5 large eggs
150mls milk
Chocolate icing:
250g unsalted butter, softened to room
temperature
1 cup icing sugar
100g dark chocolate, melted
1.Preheat the oven to 170°C. Grease and
line the base and sides of a 28cm spring
form pan with baking paper.
2.Sift the flour, cocoa and cinnamon
together. Fold through the beetroot and
ginger.
3.Cream the butter, sugar and vanilla for 5
minutes, or until light and fluffy, regularly
scrape down the sides of the bowl with a
spatula.
4.Add the eggs one at a time, beating
thoroughly in between each egg.
18
5.Fold the flour and beetroot mixture into the
egg mixture alternatively with the milk until
well combined.
6.Pour batter into prepared cake pan. Bake
for 50 to 55 minutes or until cake is firm
to the touch and slightly pulling away
from the sides of the pan. Cool completely
before icing.
7.For the icing, beat butter until pale and
fluffy; slowly add icing mixture whilst still
beating. Fold through melted chocolate
until well blended. Spread evenly over
cake.
Notes
Notes
12 Month Warranty
This Sunbeam product is covered by a 12 month replacement or repair
warranty, which is in addition to your rights under the Australian Consumer
Law (if your product was purchased in Australia) or New Zealand Consumer
Guarantees Act (if your product was purchased in New Zealand).
Should you experience any difficulties with your
product during the warranty period, please contact
our customer service line for advice on 1300 881 861
in Australia, or 0800 786 232 in New Zealand.
Alternatively, you can send a written claim to
Your warranty does not:
• cover freight or any other costs incurred in
making a claim, consumable items, accessories
that by their nature and limited lifespan require
periodic renewal (such as filters and seals) or any
consequential loss or damage; or
Sunbeam to:
• cover damage caused by:
Australia
- power surges, power dips, voltage supply problems,
or use of the product on incorrect voltage;
Units 5 & 6, 13 Lord Street
Botany NSW 2019 Australia
New Zealand
26 Vestey Drive
Mt Wellington, Auckland New Zealand
Upon receipt of your claim, Sunbeam will seek to
resolve your difficulties or, if the product is defective,
advise you on how to obtain a replacement or refund.
To assist us in managing warranty claims, we
recommend you register your product as soon as
practicable after purchase by creating a MySunbeam
account on our website and send a copy of your
original receipt to Sunbeam.
In order to make a claim under our warranty, you must
have the original proof of purchase documentation for
the product and present it when requested .
Should your product develop any defect within
12 months of purchase because of faulty materials
or workmanship, we will replace or repair it, at our
discretion, free of charge. A product presented for
repair may be replaced by a refurbished product
of the same type rather than being repaired.
Refurbished parts may be used to repair the product.
Our replacement or repair warranty only applies
where a defect arises as a result of faulty material
or workmanship during the warranty period. Your
warranty does not cover misuse or negligent handling
(including damage caused by failing to use the
product in accordance with this instruction booklet),
accidental damage, or normal wear and tear.
- servicing or modification of the product other than
by Sunbeam or an authorised Sunbeam service
centre;
- use of the product with other accessories,
attachments, product supplies, parts or devices
that do not conform to Sunbeam specifications; or
- exposure of the product to abnormally corrosive
conditions; or
• extend beyond 3 months if the product is used
in commercial, industrial, educational or rental
applications.
The benefits given to you by our warranty are in addition
to other rights and remedies under law in relation to the
product.
In Australia our goods come with guarantees that cannot
be excluded under the Australian Consumer Law. You are
entitled to a replacement or refund for a major failure
and for compensation for any other foreseeable loss or
damage. You are also entitled to have the goods repaired
or replaced if the goods fail to be of acceptable quality
and the failure does not amount to a major failure.
Our goods also come with guarantees that cannot be
excluded under the New Zealand Consumer Guarantees
Act.
If your warranty claim is not accepted, we will inform
you and if requested to do so by you, repair the
product provided you pay the usual charges for such
repair. You will also be responsible for all freight and
other costs.
Should your product require repair or service after the
warranty period, contact your nearest Sunbeam service
centre. For a complete list of Sunbeam’s service
centres, visit our website or call our customer service
line for advice on 1300 881 861 in Australia,
or 0800 786 232 in New Zealand.
Need help with your appliance?
Contact our customer service team or visit
our website for information and tips on
getting the most from your appliance.
In Australia
Visit www.sunbeam.com.au
Or call 1300 881 861
In New Zealand
Visit www.sunbeam.co.nz
Or call 0800 786 232
is a registered trademark.
Made in China.
Due to minor changes in design or otherwise,
the product may differ from the one shown in this leaflet.
© Copyright. Sunbeam Corporation Limited 2013.
ABN 45 000 006 771
Units 5 & 6, 13 Lord Street
Botany NSW 2019 Australia
Level 6, Building 5
Central Park
660-670 Great South Road
Greenlane Auckland
New Zealand
Sunbeam Corporation is a division of GUD Holdings Ltd.
9/13