1
3
Enjoy
Register your product and get support at
www.philips.com/welcome
HTS3011
Start disc playback
Listen to radio
A Press ç to open the disc tray.
A Press RADIO.
The display panel will show “AUTO INSTALL ....
PRESS PLAY”.
B Press u.
All the available radio stations with strong reception
signal will be stored automatically.
1
2
3
Note This feature is only available for the first time
setup. If you wish to reinstall all the radio stations,
press and hold REPEAT (PROGRAM) until ‘START’
appears on the display panel.
B
C
D
E
Place a disc with the disc label facing up.
Press ç to close the disc tray.
Playback starts automatically.
If the disc menu appears on the TV, use
keys or the numeric keypad to select an option in
the menu and press OK to start playback.
F Press to stop playback.
Note When you press u button,
playback resumes from where it last stopped.
To start playback from the beginning, you
have to press .
C Once complete, use íë keys or numeric keypad
(0-9) to select a preset radio station.
D To delete a preset radio station, press and hold x
until “FM X DELETED” appears.
Experience surround sound
A Press SURROUND to switch between MultiChannel, Stereo sound or Party sound.
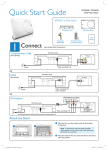
Connect
Set up
Enjoy
Quick Start Guide
B Press SOUND MODE +- to select a preset
digital sound effect.
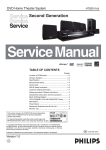
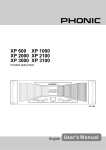
What’s in the box?
Main Unit
1 center, 2 front, 2 rear speakers
and subwoofer
Need help?
Remote Control
and 2 batteries
Composite
video cable
FM wire antenna
User
Manual
User Manual
See the user manual that came with your Philips DVD Home Theater System.
2008 C Philips Consumer Electronics
A Division of Philips Electronics North America Corp
P.O. Box 671539 Marietta, GA 30006-0026
All rights reserved.
Printed in China
hts3011_37_qsg_eng3_final809.ind1 1
2008-02-26 1:51:03 PM
1
A
Connect
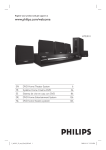
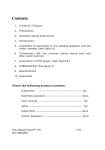
Placement
2
C
Proper speakers system placement is important to
ensure optimum sound performance.
Set up
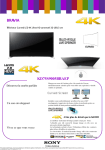
Connect the speakers and subwoofer
Connect the various colored cables from the speakers
and subwoofer to the same colored jacks at the rear of
the main unit.
D
Connect the radio antenna and
power cable
Keep the antennas away from the electronic devices to
prevent unwanted interference.
A
Finding the viewing channel
A Press STANDBY-ON on the main unit to turn it
on.
B Turn on the TV. Use the TVs remote control to
select the correct viewing channel.
SUBWOOFER
REAR
LEFT
FRON
T
LEFT
CEN
TER
REAR
RIGHT
A
FRONT CENTER
B
FRON
T
RIGHT
SUBW
OOFER
FRONT
RIGHT
FRONT
LEFT
REAR
RIGHT
FM antenna
Main Unit (Front)
REAR
LEFT
A Connect the FM antenna (supplied) to the inner pin
of the FM 75 socket. (For some models, it has
been connected in the factory.) Extend the wire for
optimum reception.
A Place the center speaker above or close to the TV.
B Place the subwoofer on the floor, at least one metre
away from the TV.
B Connect the power cable from the main unit to the
C Place the front speakers at equal distances from the
AC power outlet.
B
TV.
D Place the rear speakers at the back or beside the
listening position.
B
Note To search for the correct viewing channel,
press the Channel Down button on the TVs remote
control repeatedly (or AV, SELECT, ° button) until
you see the Video In channel. If you are using a RF
modulator, set the TV to channel 3 or 4.
E
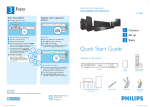
Connect the main unit to TV
Main Unit (rear)
Television (rear)
Connect audio output from TV
(optional)
To hear the TV audio through this unit, use a red and
white audio cables (not supplied) to connect the AUDIO
IN-AUX jacks on the main unit to the AUDIO OUT
jacks on your TV.
Select the display language on the
screen
A Press OPTIONS.
The { General Setup } appears.
B Press
.
General Setup
Disc Lock
VIDEO IN
(CVBS)
Display Dim
OSD Language
Screen Saver
AUDIO
OUT
Sleep
English
Français
Español
DivX(R) VOD Code
VIDEO IN
(CVBS)
AUDIO OUT
AUDIO
OUT
Press OPTIONS to exit menu
AUDIO IN
TV (rear)
C Use
Y
Main Unit (rear)
D Use
keys to select a language option in the
menu and press OK to confirm.
Main Unit (rear)
z Use the supplied composite video cable to connect
the CVBS jack on the main unit to the VIDEO IN
jack on your TV.
Note It is important to connect the main unit
directly to your TV.
hts3011_37_qsg_eng3_final809.ind2 2
keys to select { OSD Language } and press
.
Note When watching the TV programs, you can
press AUX repeatedly on the remote control until
‘AUX 1’ or ‘AUX 2’ is displayed to get the sound
output from the speakers.
E Press OPTIONS to exit.
Note The language set here is only for the menus
that are shown on the TV while operating this Home
Theater system, not for the DVD disc menu.
There are various setup options (Audio Setup, Video
Setup, Preferences) available on this Home Theater
System. Refer to the user manual for more information.
2008-02-26 1:51:06 PM