1
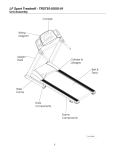
Life Fitness Sport, Essential, and Bally's Consumer Treadmills
Bushing Replacement
Service Kit: HEA-BUSHINGKIT
HEA-BUSHINGKIT consists of:
• Bushing Spacer #HEA50720 (2)
• Track Slider #HEA50714 (2)
• Connection Tube Bushing #HEA50708 (2)
• Tie Wraps (2)
The nitrogen gas shocks aid only in folding the unit. These shocks must be removed with the unit on its side and in
the folded position.
1. Pull the Release Handle, which is on the left rear of the unit, and unfold the unit.
2. If the unit power cord is unplugged, then plug in the power cord, and then turn ON the unit.
3. At the Control Console, set the unit elevation to zero.
4. With the elevation at zero, shut OFF the unit, and then unplug the AC power cord from the wall and the unit and
set it aside.
5. Remove four Phillips screws from the motor cover and lift off the motor cover.
6. Fold the unit back up.
IMPORTANT: Care must be taken to avoid damaging the unit or the floor before proceeding to the next step.
7. With sufficient protective covering on the floor and the unit in the folded position, tilt the unit over on its right
side so that the Release Handle is
exposed and easily accessible.
NOTE: THE UNIT MUST BE IN THE
FOLDED POSITION WITH SHOCKS
FULLY EXTENDED BEFORE
ATTEMPTING TO REMOVE SHOCKS.
8. The shocks aid only in ease of folding
the unit. These shocks must be
removed with the unit on its side in
the folded position. Before removing
the shocks, note that the rod end
connects to the pivoting brace while
the cylinder end connects to the main
frame. Remove the nuts (13mm) at
both ends of the shock and lift off the
shock from the threaded mounting
posts. It may be necessary to apply
some additional folding pressure to
the unit to release each shock from
its mountings.
Hardware
9. With the shocks removed and the
unit still on its right side, pull the
Release Handle and unfold the unit, and then upright the unit.
Shocks Hardware
1
ASSY INSTRUCTIONS, KIT, FT BUSHING 77650901
BUSHING REPLACEMENT - CONTINUED
10. Remove the bolts and L-Brackets
from the bottom of the uprights, then
lower the uprights against the deck
and disconnect the Console Wiring
Harness Connector on the left side,
and then set the uprights aside.
L-Brackets
Wiring Harness Connector
Unit Inverted on Supports
11. Using two pieces of wood blocks
4”x4”x30”, turn the unit upside
down against the wooden blocks as
shown.
Note: Make sure that treadmill is stable
on the supports.
Supports
12. Remove the two screws securing the grounding
strap.
Ground Strap
2
ASSY INSTRUCTIONS, KIT, FT BUSHING 77650901
BUSHING REPLACEMENT - CONTINUED
Bolt
Rubber Stops
In U-Channels
Pivot
Bracket
13. Remove the bolts(6mm), nuts(13mm), and bushings on both sides of incline pivoting brace.
14. Remove the retaining bolts(5mm) and rubber stops at the ends of the U-Channels.
15. Cut the tie wraps securing the Console Cable along side of the base frame.
16. Slide the base frame
forward just enough to
allow replacement of Track
Sliders, Bushing Spacers,
and Connection Tube
Bushings.
Base Frame
Connection Tube Bushing
17. Install new kit components
and re-assemble in reverse
order of removal.
Track Slider
Bushing Spacer
3
ASSY INSTRUCTIONS, KIT, FT BUSHING 77650901