Transcript
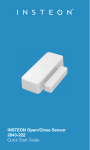
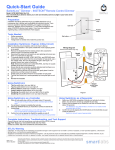
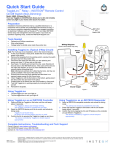
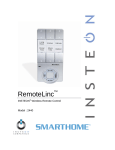
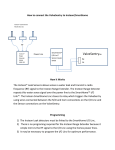
Quick-Start Guide
TM
I/O Linc – INSTEON Telephone Alert Kit
Model: 73210
Telephone Alert of INSTEON Activity
Power Supply
Connection
Wire
Phone Dialer
Introduction
I/O Linc – INSTEON Telephone Alert Kit enhances your INSTEON network by using a
phone dialer along with an I/O Linc to immediately notify you and/or neighbors and loved
ones via telephone and/or cell phone that there is something happening at your home
requiring your attention. Recipients of the automated phone call will hear a user recorded
message identifying the concern. By linking an INSTEON motion sensor, door/window,
and/or leak/flood sensor to the I/O Linc, the phone dialer can call you if any unauthorized
movement, door/window activity or a leak takes place. Any device that transmits an
INSTEON signal can be used to trigger the I/O Linc - INSTEON Telephone Alert Kit to call
out simply by linking the devices together.
Items you will Need
1)
Wire stripping tool
Phone Cord
Set Button / Status LED
Screw Terminals
I/O Linc (screwdriver
included)
I/O Linc’s Screw Terminals
5V
5
Volts
GND
Sense
N/C
N/O
Ground
Sensor
Input
Normally
Closed
Normally
Open
Common
Switches
between N/O
and N/C
Using an INSTEON Device to Trigger a Telephone Alert
1)
2)
Follow Phone Dialer’s User’s Instructions on Installation and Programming (disregard instructions referring to other Skylink products)
Plug your I/O Linc into an un-switched outlet near your Phone Dialer
I/O Linc’s Status LED will turn on
3)
Remove the pre-stripped plastic insulation from included connection wire
4)
Insert one of connection wire’s stripped leads into I/O Linc’s N/C terminal (see Figure 1)
5)
Insert connection wire’s other stripped lead into I/O Linc’s Common terminal (see Figure 1)
6)
Open Phone Dialer’s cover and insert connection wire into Phone Dialer’s N.C. terminals (remove existing metal jumper). Close Phone Dialer’s cover.
Link INSTEON Controller/Sensor to I/O Linc
7)
Press & hold the Set button on the INSTEON device you want to trigger a telephone alert
Controller’s Status LED will begin blinking
8)
Press & hold I/O Linc’s Set button until it beeps (about 3 seconds)
I/O Linc will beep once again to confirm linking; Controller’s LED will stop blinking
Set I/O Linc into Momentary Mode
9)
Press & hold I/O Linc’s Set button until it beeps (about 3 seconds)
10) Press & hold I/O Linc’s Set button until it beeps (about 3 seconds)
11) Press & hold I/O Linc’s Set button until it beeps (about 3 seconds)
I/O Linc’ Status LED will stop blinking
12) Press & hold I/O Linc’s Set button until it beeps (about 3 seconds)
13) Press & hold I/O Linc’s Set button until it beeps (about 3 seconds)
14) Press & hold I/O Linc’s Set button until it beeps (about 3 seconds)
I/O Linc’ Status LED will stop blinking
15) Test by turning your INSTEON Controller/Sensor On or Off
Phone Dialer will call according to its programming in step 1 in response to INSTEON On and Off commands
Wiring I/O Linc to Phone Dialer
Phone
Dialer
N.C.
Terminals
N/C / Common
Terminals
Figure 1
Questions?
Click: For Advanced Features and X10 compatibility, refer to I/O Linc’s Owner’s Manual:
http://wiki.smarthome.com/index.php?title=I/O_Linc_-_INSTEON_Low_Voltage_/_Contact_Closure_Interface_Owner%27s_Manual
Call: Friendly tech support @ 1-800-SMARTHOME (800-762-7846)
Page 1 of 1
Rev. 04-06-2009
SmartLabs Limited Warranty – SmartLabs warrants to original consumer of this product for a
period of 2 years from date of purchase, this product will be free from defects in material &
workmanship & will perform in substantial conformity with its owner's manual. Warranty shall
not apply to defects caused by misuse or neglect.
U.S. Patent No. 7,345,998, International patents pending ©Copyright 2009
SmartLabs, 16542 Millikan Ave., Irvine, CA 92606, 1-800-SMARTHOME (800-762-7846)
Connection
Wire