1
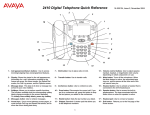
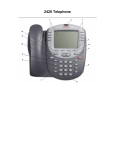
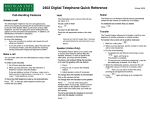
2410 Digital Telephone Quick Reference
2
16-300134, Issue 1, June 2004
3
1
1
18
4
5
6
17
7
8
16
9
15
10
14
11
13
12
1 – Call appearance/feature buttons: For accessing
incoming/outgoing lines and programmed features.
7 – Hold button: For placing calls on hold.
13 – Volume control buttons: For adjusting speaker,
handset, headset, or ringer/button click volume
depending on which component is in use.
2 – Display: This area shows status for the call
appearances, information for a call, information
provided by the Avaya call server, and the Home,
Speed Dial, Call Log, and Options screens.
8 – Transfer button: For transferring calls.
14 – Mute button: For turning off the microphone.
When the Mute feature is active, the associated
lamp turns on and the person at the other end of
the call cannot hear you.
3 – Message lamp: This lamp is lit when a message has
arrived in your voice mailbox.
9 – Conference button: For conferencing calls.
15 – Headset button: For activating a headset
connected to the 2410 headset jack.
4 – Softkeys: Allows you to perform specific functions.
The functions available and the corresponding softkey
labels change according to the screen displayed.
To initially view softkey labels, press any softkey.
10 – Drop button: Disconnects the current call. If you
are on a conference call, press this button to drop
the last person you added to the conference.
16 – Speaker button: For accessing the built-in
speakerphone. The lamp associated with this
button turns on when the speaker is active.
5 – Messages button: For retrieving messages.
11 – Redial button: Dials the last number you dialed.
17 – Headset jack: For connecting a headset.
6 – Arrow keys: For moving between screen pages,
cycling through Call Log and Speed Dial entries, and
to move the cursor during data entry.
12 – Dialpad: Standard 12-button pad for dialing
telephone numbers.
18 – Exit button: Returns you to the first page of the
Home screen.
1
Call-Handling Features
Answer a call
When a call arrives at your 2410 telephone, you hear a
ringing tone, and a blinking bell icon appears on the
associated call appearance. In addition, call identification
information is displayed.
To answer an incoming call
Do one of the following:
•
If you are not active on another call, answer the call
using your handset, headset, or speakerphone (see
“Speakerphone”).
•
If you are active on a call already, place the active call
on hold (see “Hold”), and then answer the incoming
call.
•
If the call appearance for the ringing call is not
displayed on the current Home screen page, use
and
to switch between the pages. Use
to return to Page 1 of the Home screen. When you
locate the call appearance for the ringing call, press
the corresponding call appearance button.
Make a call
You can make calls from the 2410 telephone using a variety
of methods.
To make a call manually
1. Go off hook using the handset, headset, or speaker.
2. When you hear dial tone, enter the extension or
telephone number using the dialpad.
If you are calling an external number, be sure to
include the required code (for example, “9”) to access
an outside line.
To have the 2410 telephone make a call automatically
Do one of the following:
•
•
•
Press
to have the 2410 telephone dial the last
number that you dialed.
Access the Call Log and initiate a call to a specific
entry. See “Make a Call from the Call Log.”
Access the Speed Dial List in your personal directory
and initiate a call to a specific entry.
Redial
Hold
The Hold feature puts a call on hold until you
can return to it.
The Redial (or Last Number Dialed) feature automatically
redials the last number you dialed.
To put a call on hold
To redial the last number that you dialed
Press
Press
.
To return to the held call
Press the call appearance button of the held
call.
Note: Your system manager may have
administered the Unhold feature. In this
case, you can return to the held call by
pressing
.
Speakerphone
The two-way built-in speakerphone allows you
to make and answer calls without lifting your
handset. Keep in mind that two-way
speakerphones may not operate satisfactorily
in every environment (such as in very noisy
locations).
To make or answer a call without lifting the
handset, or to use the speakerphone with
any feature
1. Press
.
2. Make or answer the call, or access the
selected feature.
3. Adjust speakerphone volume if
necessary.
To change from speakerphone to handset
Pick up the handset and talk.
To change from handset to speakerphone
1. Press
.
2. Hang up the handset.
To change from headset to speakerphone
Press
.
To mute a speakerphone call
Press
.
To end a speakerphone call
Press
again.
2
.
Transfer
The Transfer feature allows you to transfer a call from your
telephone to another extension or outside number.
To transfer the current call to another extension
1. While on a call, press
.
2. When you hear dial tone, dial the number to which the
call is to be transferred.
3. Do one of the following:
• To transfer the call without announcing it, press
again, and hang up.
The transfer is complete.
• To announce the call before transferring it, wait for
the called party to answer. Go to Step 4.
4. When the called party answers, announce the call.
(If the line is busy or if there is no answer, press
. Then, you can return to the held call by
pressing its call appearance button.)
5. Press
transfer.
again and hang up to complete the
Note: Your system manager may have administered the
Transfer-on-Hang-up feature. In this case, you can
transfer a call by pressing
, dialing the number
to which the call is to be transferred, and then hanging
up. To cancel an attempted transfer, press the original
call appearance. If your system has auto-hold
activated, use
to cancel a transfer so that the
potential transfer recipient is not left on hold.
Personalized Settings
Conference
The Conference feature allows you to conference up to six
parties (including yourself) on a call.
To add another party to a call
1. Press
.
2. When you hear dial tone, dial the number of the
person you want to add to the call.
3. Wait for an answer.
4. To add the person to the call, press
again.
(If the called party does not answer or does not want
to join the conference, press
.) Then, you can
return to the held call by pressing its call appearance
button.
5. Repeat Steps 1 through 4 for additional conference
connections.
To add a held call to an active call
1. Press
.
2. When you hear dial tone, press the call appearance
button corresponding to the held call.
3. Press
again.
To remove the last person added to the conference call
1. Make sure that the conferenced call appearance is
selected.
2. Press
.
Getting Messages
Message
Your Message lamp turns on when a caller has left a
message for you. Press
and follow the prompts.
to retrieve your messages,
Note: Certain features must be programmed by your
system manager to activate the
button.
Please see your system manager if the message
button is not working properly.
Visual Ring
Call Appearance/Button Labels
Edit Labels
The Visual Ring option on the Options screen
allows you to choose a visual alert for
incoming calls. When you enable this option,
the telephone rings and the lamp above the
2410 display area flashes when an incoming
call arrives. By default, the Visual Ring option
is disabled.
To set the Visual Ring option
1. From the Home screen, press the
Option softkey.
The Options screen is displayed.
2. Press the Visual Ring feature button.
The Visual Ringing Alert screen is
displayed.
3. Press the Yes/No softkey (or press the
button to the right of the setting) to
indicate whether you want Visual Ring
enabled.
4. Press the Save softkey.
You will hear a confirmation tone.
You can change the labels of the call appearance/feature
buttons on your telephone. These new labels are stored in
your 2410 telephone.
To edit call appearance/feature button labels
1. From the Home screen, press the Label softkey.
The Label Action screen is displayed.
2. Press the Edit softkey.
The Label Select screen is displayed. You can use
and
to locate the label you want to edit.
3. Press the feature button on the 2410 telephone
corresponding to the label you want to edit.
The Label Edit screen is displayed. The New Label
field displays the current customized label (if any),
and the System Label field displays the system label.
4. Using the dialpad, edit the label. You can enter up to
13 characters. By default the first letter appears in
uppercase, and the following characters appear in
lowercase.
5. When finished, press the Save softkey.
View the System Labels
Ring Pattern
The Ring Pattern option on the Options screen
allows you to choose a personalized ringing
pattern for your telephone. You can choose
from among eight different patterns.
To select a personalized ringing pattern
1. From the Home screen, press the
Option softkey.
The Options screen is displayed.
2. Press the Ring Pattern feature button.
The Select Ring screen with the current
ring pattern is displayed.
3. Use
and
or the dialpad to cycle
through the ringing patterns.
4. To save the selected ringing pattern,
press the Save softkey.
You will hear a confirmation tone.
Note: If you go off-hook or receive a call
during selection, the process is
canceled and you must start again.
3
To view the call appearance/feature button labels on the
call processing system
1. From the Home screen, press the Label softkey.
The Label Action screen is displayed.
2. Press the Inspect softkey.
The Label Select screen is displayed showing the
system labels for the 2410 telephone.
3. Use
and
to scroll through the pages.
4. When you finished, press the Done softkey.
Restore the System Labels
To restore the system labels for all buttons
1. From the Home screen, press the Label softkey.
The Label Action screen is displayed.
2. Press the Restore softkey.
The Label Restore screen is displayed.
3. Press the Erase softkey.
The Confirm Erase prompt is displayed.
4. Press the Erase softkey.
Speed Dial/Personal Directory
Add a Speed Dial Entry
You can store up to 48 personal speed dial entries in the
2410 telephone. When the maximum number of entries is
stored, you must delete existing entries before the 2410
telephone allows you to enter new ones.
To add speed dial entries to your personal directory
1. From the Home screen, press the SpDial softkey.
The Speed Dial screen is displayed.
2. Press the Add softkey.
The Edit Name screen is displayed with the Name
field underscored.
Note: If the directory is full, a message is displayed
indicating that your Speed Dial list is full. You
must delete an existing entry before a new
entry can be added.
3. Using the dialpad, enter the name for your speed dial
entry. You can enter up to 13 characters. By default,
the first letter you enter appears in uppercase, and
the following characters appear in lowercase.
4.
5.
6.
7.
Note: You can use the Case softkey to switch
between uppercase and lowercase. You can
use the Space softkey to insert a space
between first and last names. After you enter
a space, the next character will be an
uppercase letter, and the following characters
in that word will appear in lowercase. If you
are entering special characters, you can use
the * (star) key to cycle through the period
and star characters. You can also use the #
(pound) key to cycle through the hyphen and
pound characters.
When you are done entering a name, press the
feature button to the left of the Number field (Edit
Number screen) to advance to that field.
Using the dialpad, enter the telephone number for this
speed dial entry. You can enter numbers up to 20
characters long, including special characters.
When you are done entering the telephone number,
press the Save softkey to save your entry.
You will hear a confirmation tone.
Repeat Steps 2 through 6 for additional entries.
Call Log
Make a call from a Speed Dial
To make a call to a directory entry using
the Speed Dial feature
1. From the Home screen, press the
SpDial softkey.
The Speed Dial screen is displayed.
2. Press the feature button for the entry
you want to call. (If the entry is not
displayed on the current page, use
and
to cycle through the
entries.)
The 2410 telephone dials the number.
Edit a Speed Dial Entry
To edit a stored speed dial entry
1. From the Home screen, press the
SpDial softkey.
The Speed Dial screen is displayed.
2. Press the Edit softkey.
3. Press feature button corresponding to
the entry you want to edit.
4. Using the dialpad, enter the name for
your speed dial entry. You can enter up
to 13 characters. By default, the first
letter you enter appears in uppercase,
and the following characters appear in
lowercase.
5. When you are done editing the name,
press the feature button to the left of the
Number field (Edit Number screen) if
you want to change the number.
Otherwise, go to Step 7.
6. Using the dialpad, enter the telephone
number for this speed dial entry. You
can enter numbers up to 20 characters
long, including special characters.
7. When you are done making changes,
press the Save softkey to save your
entry.
8. Repeat Steps 3 through 7 for additional
entries.
View the Call Log
To view the list of all calls recorded in the Call Log
1. From the Home screen, press the Log softkey.
The Call Log Summary screen is displayed.
2. Use
and
to scroll through the Call Log
Summary pages.
3. To view information about a specific entry, press the
button corresponding to the entry.
The Call Log Detail screen for this entry is displayed.
4. Press
to return to the Home screen.
Make a Call from the Call Log
To make a call from an entry in the Call Log
1. From the Home screen, press the Log softkey.
The Call Log Summary screen is displayed.
2. Use
and
to scroll through the Call Log
Summary pages.
3. When you locate an entry you want to call, press the
button corresponding to that entry.
The Call Log Detail screen for this entry is displayed.
4. Press the Call softkey to make the call.
Note: You can make calls directly to extensions using this
method. To call outside numbers, go off-hook and
dial the necessary code (for example, “9” for a local
or seven-digit call or “9” and “1” for a 10-digit call).
Then, press the Call softkey to make the call.
Save a Call Log Entry to a Speed Dial
To save an entry in the Call Log to your Speed Dial List
1. From the Home screen, press the Log softkey.
The Call Log Summary screen is displayed.
2. Use
and
to scroll through the Call Log
Summary pages.
3. When you locate an entry you want to save, press the
button corresponding to that entry.
The Call Log Detail screen for this entry is displayed.
4. Press the Save softkey.
The Edit Name screen is displayed.
5. Make any changes, and then press the Save softkey
to save the entry to the Speed Dial List.
4