1
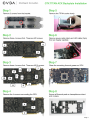
VEA. | Intelligent Innovation GTX TITAN ACX Backplate Installation
Step 1 Step 5
Remove 2 screws from the bracket. Remove the TITAN cooler slowly.
|
Step 2 Step 6
Remove these 4 screws first. These are M2 screws. Remove power cable (4pin) and LED cable (2pin)
from pin header carefully.
Step 3 Step 7
Remove these 4 screws first. These are M2.5 screws. Clean the remaining thermal grease on GPU.
—
AS EE
ze = т
Step 4 Step 8
Ensure all thermal pads on baseplate are intact
and in place.
Page 1
DVS Intelligent Innovation GTX TITAN ACX Backplate Installation
Step 9 Step 12
Assemble the baseplate on PCB and apply thermal Plug in the ACX cooler power to the 4pin header.
grease to the GPU.
et | Re o
\\, o “>
EE!
Ss
Step 10
Step 13
Install the M2 screws.
Install the 4 screws surrounding the GPU.
(NOTE: the 2 screws removed from bracket are
no longer used)
Step 11
Install the M2.5 screws.
Step 14
Install card and game on!
ИТ 4
IIA
| yy, A о
A в”
Раде 2
