1
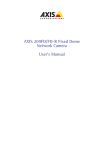
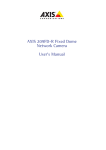
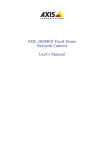
Lens Replacement - Instructions
Instructions
Follow these instructions to replace the lens. In order to set the focus and position the lens, the camera must be
connected to the network. For instructions, please refer to the Installation Guide supplied with the camera.
Follow the instructions below to replace the lens
on the following models :
•
•
•
•
•
•
•
•
•
AXIS M3011
AXIS 209FD
AXIS 209FD-R
AXIS 209FD-R M12
AXIS 209MFD
AXIS 209MFD-R M12/SPLIT
AXIS 209MFD-R
AXIS 209MFD-R M12
AXIS 209MFD-R M12/SPLIT
ENGLISH
Important!
Detaching/attaching the lens with force may cause irreparable damage to the lens holder, no force is needed.
Fig.1a
Camera unit - AXIS 209FD
Fig.1b
Camera unit - AXIS M3011
installed in ceiling
Ceiling
Dome cover
Dome cover
Note: Applies to P/N 0283-00X-08 or higher
P/N is located on the product label
Replace the lens
Follow these instructions to replace the lens:
1. Remove the dome cover, see FIG.1a and FIG.1b.
2. Unlock the lens lock screw by turning it 180°, counter-clockwise (Fig. 2).
3. Rotate the lens counter-clockwise to detach it (Fig. 2).
4. Carefully attach the new lens and be sure to insert it gently, no force is
needed.
Fig.2
Lens
holder
Lens
Set the focus
Lens lock screw
In order to set the focus and position the lens, the camera must be connected to the network. For instructions, please
refer to the Installation Guide supplied with the camera. After installation, follow the instructions below:
Note: Due to the dome’s refraction, the image might appear slightly out of focus once the dome has been placed. To
compensate, focus on an object slightly closer than the intended area.
E.g. for AXIS 209MFD 16MM lens, rotate approximately 270 degrees counter-clockwise before attaching the dome.
1. Open the camera’s Live View page in a web browser.
2. To adjust the focus, manually rotate the lens until the image on the Live View page is satisfactory.
3. Gently lock the lens by turning the lens lock screw approximately 180° clockwise, until it clicks in place.
Lens Replacement - Instructions
Position the lens
1. Open the Live View page in a web browser.
2. Checking the image in the Live View page, carefully move the lens to the desired position.
ENGLISH
Replace the dome cover
1. Attach the dome cover.
2. Using the supplied allen/hex key, gently tighten the 4 screws (Fig. 1a/1b).
The installation of the lens is now complete. For more information on the functionality of the network camera, please
refer to the user documentation available from the Axis web site at www.axis.com or from the AXIS Network Camera CD
supplied with the camera.
Important!
Attaching the lens with force may cause damage to the lens holder.
Part no. 34588