Transcript
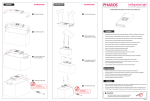
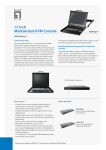
IW-R100 Chassis Quick Reference
Major Components
Installing CD-ROM
Top Cover
3.Slide the CD-ROM from one
side.
4.Put down the latch to secure
the CD-ROM.
2
1U Form Factor Power Supply
4
1
1.Remove the blank
5.25” bay cover by two
screws on the top.
2.Move up the latch to
open position.
Card Retainer
Full PCI Card holder
Modularized Middle System Fan
Support 2 x 3.5”
Internal HDD
Standard 5.25” bay for External Drive
3
Installing PCI Riser Card
1
Front Panel Controls and Indicators
D.Power LED
E.Failure LED
F.LAN1 & LAN2 LED
A.USB Port
B.System Reset Button
C.HDD Activity LED
G D C
F
1
E B
G.Power Switch
2
1
A
Reset
2
1.Attach with two screws to fix PCI
riser card on PCI retainer.
2.Insert the PCI card if require.
3.Insert the PCI riser card assembly
into chassis. Make sure PCI riser
card is installed on M/B well.
3
1
2
Reset
Rear Window Configuration
Power Supply AC Inlet
1 PCI Slot
Installing Fan Module & Power Supply
1
Ventilation Holes
I/O Shield
2
3
Top Cover Opening
CAUTION
ss
Pre
en
Op
This unit must be operated
with the chassis
TOP COVER installed to
ensure proper cooling.
ss
Pre
se
Clo
Installing Fan Module
1.Put the fan module on the fan holder
(make sure the wiring is clipped within
the small open-round).
2.Put the cable down to the fan cage and
the wiring should go through the front
opening.
3.Move the fan assembly to the proper
position.Installing
Power Supply
2
- Standard PSU
1.Fix the bracket on PSU by fasten
screws on the bottom chassis
with two screws.
2.Slide down the PSU.
3.Attach the PSU rear with two
screws.
I/O Shield Assembly
Installing Hard Drive
1
4
2
4
3
3
1.Insert the hard drive
on the tray.
2.Attach with four screws
to fix HDD.
3.Put the hard drive
assembly on the bottom
and move forward for
fixing.
4.Attach with one screw
to ensure HDD is secured.
1.Put the I/O Shield inside
the chassis to attach on
the rear windows.
2.Attach with two screws
to fix I/O Shield.
1
2
1