1
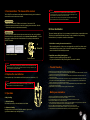
Introduction
A. Hardware Installation
Congratulations on your purchase of the most innovative mini wireless mouse. With an
incredible sensitivity to surface details and high tracking speed than other mice, the mouse
can track reliably even on tricky polished or wood-grain surfaces. It offers even more
advance that will make you more productive and more comfortable.
1. Insert the batteries
Safety Notice
This product complies with IEC 60825-1, Class I laser product.
a. Remove the battery compartment cover on the bottom case of the mouse.
b. Fit in the batteries accordingly to the diagram indicated in the battery cabinet.
c. Close the battery compartment cover properly.
d. Make sure the Power on-off swich on the bottom of the mouse is ON.
e. The Low Power LED on the wheel bar will blink 3 seconds if the mouse power is on.
The product complies with FCC and CE rules.
Battery compartment cover
Please DO NOT direct the
laser beam at anyone's eyes.
A wrong battery placement
may cause batteries overheat.
Features
2.4GHz Wireless laser mouse
Using state-of-art technology. High tracking speed and sensitivity.
Up to 10m effective working distance
USB Nano transceiver
Longer battery life
4 Directional Scrolling
Auto-Link, Plug and Play! No need to set the channel ID.
800/1600 DPI adjustable button
Internet Forward & Backward button
Battery indicator
Power on/ off switch
Back & Forward buttons
Stylish and modern shape with comfort grip
The unit offers a strong power saving management. Once the mouse accesses the sleeping mode, " to click any
button of the mouse" is compulsory to wake it up.
Power on/off:
There is a Power on/off switch designed to save the batteries power while non-usage of a longer period.
User can push DPI button to change the resolution. The LED on wheel bar will be flashed when dpi has been
sucessfully swithced.
2. Connect the receiver
a. Turn on your PC.
b. Connect the receivere to USB port on PC
Mouse
Wheel button
Dpi button
Low power indicator
Battery cover
Receiver release
button
2 * AAA batteries
Receiver
Receiver
ID reset button
Power on/off switch
PC
USB port
Press the receiver
release button
3. Communication : The mouse & the receiver
Note
The 4-Way scrolling function is only effective under successful installation of the
original mouse driver. The driver is an optional item included in the package or it can
be downloaded from the website of your local brand vendor.
The 2.4Ghz RF mouse features a dual-way transmission technology which enables the
mouse and the receiver auto-communication.
To function the 4-way scrolling in some applications in Window VISTA such as Word,
Excel, PowerPoint and etc., the driver should be installed.
A. Auto-link mode
1. Make sure the Power On-Off Switch on the bottom of the mouse is ON.
2. Operate the mouse, and cursor's movement is mapping mouse movement. Now the
mouse and the receiver is auto-linked successfully.
B. Manual mode
If you find the communication channel does not connect well, you can use the software
connection tool to re-connect the mouse & receiver to reset a new channel ID. You are
able to get the software from the included diskette of the package or download from
GIGABYTE website.
2
1
3
ID links OK!
Execute ID connection software
B. Driver Installation
The mouse features plug & play. It is not necessary to install the driver to operate the mouse.
The driver is an optional item included. However, In order to make the 4-way scrolling
function effective, you required to install the software driver.
1. Un-install or removing the current mouse driver
Before installing the driver of the mouse, we suggest that you check if any other mouse
driver installed in your system. If yes, in order not to make conflict, please un-install or
remove that driver before installing the mouse.
2. Install the mouse 4-Way Scrolling driver
a.Select setup.exe to install the driver from the CD.
b.or you can download the 4-Way Scrolling driver from vendor's website.
Press ID reset button
Note
While the mouse is working, if encountering any interference, the mouse and the receiver will
automatically source out and transfer to another free channel. During the transferring, the
cursor movement may have a second delay.
4. Replace the new batteries
Please replace a pair of new batteries and follow the previous instructions. (2, 3)
Note
The red LED on the scroll wheel is the low batteries power indicator. It indicates that
batteries inside the mouse are needed to be replaced.
◎
Trouble Shooting
a. Make sure you have connected the receiver correctly to the computer's USB port.
b. For the best performance, we suggest you to locate the receiver with a distance from other electrical devices, such as the
computer, the computer monitor or external storage drives.
c. Make sure you have set the communication between the receiver and the mouse. Refer to the Communication :The
mouse and the receiver
d. If you find the communication channel does not connect well. You can use the software connection tool to re-connect
the mouse & receiver to reset a new channel ID. You are able to get the software from the included diskette of the
package or download from your local brand vendor's website.
e. Some system devices might conflict with the mouse. Confirm the IRQ/address settings of these devices for conflicts,
and change the settings as required.
f. Make sure that you are not working the mouse on glossy or reflective surfaces.
Battery use reminders
5. Operation
◎
4-Way Scrolling:
1. Remove worn-out batteries from equipment immediately and dispose of promptly.
2. Keep all batteries (used or new) out of the reach of children.
3. To have the batteries with a regular check and replace new batteries if not used for a long time.
4. Never dispose of batteries in fire, as they could explode.
5. Always replace all the batteries at the same time. Mixing old and new batteries or mining types (such as alkaline with
zinc carbon) will reduce overall performance and could cause leakage or rupture.
6. Do not mix different types of batteries (e.g. Ni MH, NiCd, alkaline, and etc) in the mouse.
7. Remove batteries from the electrical device if the device is not going to be used for a long time.
8. If the performance of the batteries decreases substantially, it is time to replace the batteries.
a. Vertical Scrolling
Roll wheel up to scroll up; roll wheel down to scroll down.
b. Horizontal Scrolling
Hold the wheel to left to scroll left; hold the wheel to right to scroll
right. Release wheel to stop scrolling function.