1
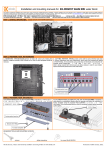
Aqua
RXRX
series
-R2
Aqua
series
-R2
Aqua RX series -R2
UFO CPU Waterblock
User's Manual
P/N:CL-W0092
2006
All in one CPU Liquid Cooling
2006.08
O4554D
Aqua
RXRX
series
-R2
Aqua
series
-R2
Limited Liability
These warranties replace all other warranties, expressed or implied including,
but not limited to, the implied warranties of merchantability and fitness for a
particular purpose.
Thermaltake disclaims all other warranties, expressed or implied including,
without limitation, implied warranties of merchantability and fitness for a particular
purpose.
Some jurisdictions do not allow the exclusion of implied warranties so this
limitation may not apply to you. All expressed and implied warranties are limited in
duration to the limited warranty period. No warranties apply after that period, some
jurisdiction do not allow limitation on how long an implied warranty lasts, so this
limitation may not apply to you.
Limitations of liability, Thermaltake's responsibility under this, or any other
warranty, implied or expressed, are limited to repair or replacement, as set forth
above. These remedies are the sole and exclusive remedies for any breach of
warranty. Thermaltake is not responsible for direct, special, incidental, or
consequential damages resulting from any breach of warranty or under any other
legal theory including, but not limited to, lost profits, downtime, goodwill, damage
to or replacement of equipment and property, and any cost of recovering,
reprogramming, or reproducing any program or data stored in or used with a
system containing Thermaltake product. Some jurisdictions do not allow the
exclusion or limitation of incidental or exclusions may not apply to you.
Extent of limited warranty, Thermaltake does not warrant that your product will
be free from design defects or errors known as "ERRATA". Current characterized
errata are available upon request. This limited warranty does not cover any costs
relating to removal or replacement of any part that is soldered or otherwise affixed
to your system's motherboard. This limited warranty does not cover damages due
to external causes, including accidental, problems with electrical power, usage not
in accordance with product instructions, misuse, neglect, alteration, repair,
improper installation, or improper testing. Nor is Thermaltake held liable for any
bodily damage that may result during the installation, maintenance, repair, or is
otherwise associated with this product, Thermaltake is free from any legal actions
that may result in death, pain and anguish, or any other form of personal damage
that may occur by purchasing this product.
You, the buyer, agree to this warranty and its term set within its expressed and
implied limited warranty. This limited warranty gives you specific legal rights, and
you may also have other right that varies from jurisdiction to jurisdiction.
All in one CPU Liquid Cooling
Aqua
RXRX
series
-R2
Aqua
series
-R2
Contents
Warning
Before installing Thermaltake Aqua RX series-R2
, we strongly suggest you to read the manual thoroughly
>> Specification & Components
01
>> Installation Steps
02
>> Connector Installation
03
>> Waterblock Installation
- Intel P4 LGA775
- AMD K8
- AMD AM2
03
and make sure all components are included in the
package. Please do follow the installation guide stepby-step.
Improper installation may cause serious damage
to the system as well as to the water cooling unit.
Thermaltake will not responsible for any damages
due to incorrect installation and incorrect usage of
>> Upgrade the BigWater series with
the Aqua RX series-R2
03
06
11
13
this product.
>> FA Q
All in one CPU Liquid Cooling
14
Aqua
RXRX
series
-R2
Aqua
series
2.Installation Steps
1.Specification & Components
CL-W0092
Material
Copper & Acrylic
106 mm(L) X 82 mm(W) X 70 mm(H)
Quick install
connector
For 6.4mm ID (1/4") tubing
For 9.5mm ID (3/8") tubing
Weight
557(g)
Clips for - Intel P4 LGA775
- AMDK8
- AMD AM2
UFO waterblock
J
I
1.Components Check
2.Install Connector
C
B
A
3.Install Waterblock
Intel P4 LGA775 P.03
AMD K8 P.06
AMD AM2 P.1 1
F
D
E
A. Metal H-type clip
B. Insulator
C. Cushion
D. 50mm Screws
E. 38mm Screws
In order to ensure convenience and safety
during installation, we strongly recommend
you to follow the following procedures.
P/N
Dimension
-R2
G
F. Red washers
G. White washers
H. Stand offs
I. Thumb nuts
J. Thermal compound
All in one CPU Liquid Cooling
H
4.Installation Complete
6.4mm,ID(1/4")
quick connector x2
9.5mm,ID(3/8")
quick connector x2
Aqua
RXRX
series
-R2
Aqua
series
-R2
3. Connector Installation
There are two types of quick connectors (6.4mm [1/4"] ID and 9.5mm [3/8"] ID).
You can apply to the situation that fits your liquid cooling system .
The following diagrams are 9.5mm ID (3/8") quick connector.
Tear off the tape on the
back of the insulator (B)
and place it on the metal
H-type clip(A).
NOTE:
Before installing, please make sure that the connectors are tightened properly.
Secure both quick connectors onto
the waterblock.
Installation complete
4. Waterblock Installation
4-1 Secure the Waterblock on CPU (Intel LGA775)
Note: Placing the cushion onto the
motherboard with the adhesive will
prevent you from removing the cushion
in the future. If you are planning to
remove the cushion for future use,
please don't remove the protective
tape.
Combine the insulator(B)
and the cushion (C) using
the adhesive. Stick the metal H-type
clip(A) with the insulator and cushion (BC).
Tear off the protective layer to adhere
it onto the motherboard.
Attach H-type
clips(including ABC)on
the back side of
motherboard.
I
Intel LGA 775
Motherboard
Components for LGA 775:
A
D
C
B
F
J
I
A. Metal H-type clip
B. Insulator
C. Cushion
D. 50mm screws
F. Red washers
H. Stand offs
I. Thumb nuts
J. Thermal compound
H
All in one CPU Liquid Cooling
H
F
Insert the screws (D) into the
four holes as shown in the photo.
C
B
A
D
Put the washers(F)
along the screws to
prevent the electric
current.
Aqua
RXRX
series
-R2
Aqua
series
-R2
4-2 Secure the Waterblock on CPU (AMD K8)
Put the stand offs(H)
along the screws(D) to fix
the screws on the
motherboard.
With thread
Without thread
Check Your Back Plate!
If your Motherboard includes:
A. Mounting holes with threadthe installation is the same with the
K8 Standard installation(4.2.1).
B. Mounting holes without threadthe installation is the same with
following(4.2.2).
4-2.1 Install by back plate for motherboard
Apply a thin layer of
thermal compound(J) onto the
processor.
(Standard installation)
E
AMD K8
Motherboard
Place waterblock on the processor
through the screws(D) as shown on photo.
Components for K8:
E. 38mm screws
J. Thermal compound
E
Tighten the thumb
nuts(I) to the screws as
shown to fix the waterblock
on motherboard.
Remove the retention frame
from motherboard.
All in one CPU Liquid Cooling
Aqua
RXRX
series
-R2
Aqua
series
-R2
4-2.2 Install by clips bundled in package
Apply a thin layer of thermal
compound(J) onto the processor.
I
AMD K8
Motherboard
C
Place waterblock on the processor
B
A
J
I
D
G
H
Components for K8:
A. Metal H-type clip
B. Insulator
C. Cushion
D. 50mm screws
G. White washers
H. Stand offs
I. Thumb nuts
J. Thermal compound
H
G
C
B
A
Secure the waterblock
on the motherboard
by using screws(E)
D
Remove the retention
module from the motherboard.
Remove the back plate on
back side of motherboard.
Tear off the tape on the back of the
insulator (B) and place it
on the metal H-type clip(A).
All in one CPU Liquid Cooling
Aqua
RXRX
series
-R2
Aqua
series
Note: Placing the cushion onto the
motherboard with the adhesive will
prevent you from removing the cushion
in the future. If you are planning to
remove the cushion for future use,
please don't remove the protective tape.
-R2
Apply a thin layer of thermal compound(J)
onto the processor.
Combine the insulator (B)
and the cushion (C) using
the adhesive. Stick the metal H-type
clip(A) with the insulator and cushion (BC).
Tear off the protective layer to adhere
it onto the motherboard.
Attach H-type
clips(including ABC)on the back
side of motherboard.
Insert the screws(D) into the
two holes as shown in the photo.
Put the washer(G) along
the screws to
prevent the electric
current.
Put the stand offs(H) along
the screws(D) to fix the
screws on the
motherboard.
All in one CPU Liquid Cooling
Place waterblock on the processor
through the screws(D) as shown on photo.
Tighten the thumb
nuts(I) to the screws as
shown to fix the waterblock
on motherboard.
Aqua
RXRX
series
-R2
Aqua
series
-R2
4-3. Secure the Waterblock on CPU (AMD AM2)
E
AMD AM2 motherboard
Place waterblock on the processor.
Components for AMD AM2:
J
E. 38mm screws
J. Thermal compound
Secure the waterblock on the
motherboard by using screws(E).
E
Remove the retention frame
from motherboard.
Apply a thin layer of thermal
compound(J) onto the processor.
All in one CPU Liquid Cooling
Aqua
RXRX
series
-R2
Aqua
series
5.Upgrade the BigWater series with the Aqua RX series-R2
You can apply the Aqua RX Series-R2 to fit into any Thermaltake liquid
cooling system. Please visit our website at www.thermaltake.com
-R2
6.FAQ
Q: How do I uninstall the Aqua RX series-R2?
A : There are no special procedures to remove the Aqua RX series-R2.
Please reverse the steps found in processor installation guide.
Q: Can I add another liquid cooling upgrade kits on my
liquid cooling system?
A : Yes, there are three major category in Thermaltake. Please visit our
website at www.thermaltake.com
Q: I'm running low on coolant. What's happening and
what can I do?
A: The coolant evaporates naturally and the coolant gets more
Liquid Flow System
concentrated. For best performance and safety, we highly recommended
to use Thermaltake coolant and replace the coolant every 3-6 months. If
you do not have extra coolant, please purchase more from Thermaltake.
All warranty is voided if you are using coolants of other brands or noncoolant and have damaged your liquid cooling system.
Aqua RX
Series-R2
120mm Radiator
All in one CPU Liquid Cooling