1
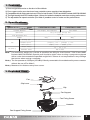
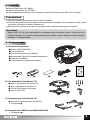
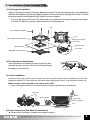
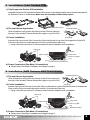
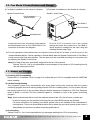
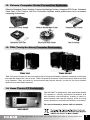
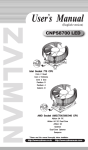
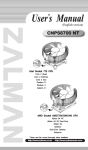
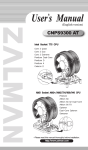
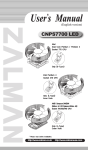
(English version)
CNPS7500 LED
Intel Socket 775 CPU
Core 2 Duo
Pentium D
Pentium 4
Celeron D
Intel Socket 478 CPU
Pentium 4
Celeron D
Celeron
AMD Socket AM2/
754/939/940 CPU
Athlon 64
Athlon 64 X2 Dual-Core
Athlon 64 FX
Opteron
Dual-Core Opteron
Sempron
* Please read this manual thoroughly before installation.
http://www.zalman.co.kr
http://www.zalmanusa.com
1. Features
1) Does not generate noise or vibration in Silent Mode.
2) Pure copper and/or pure aluminum base materials ensure excellent heat dissipation.
3) Compatible with all single and dual core CPUs for Intel Socket 775/478 and AMD Sockets AM2/754/939/940.
4) The high intensity blue LED installed silent 110mm fan inside the heatsink maximizes cooling performance.
5) The adjustable fan speed controller (Fan Mate 2) enables control of noise and fan performance.
2. Specifications
Model
Spec.
Heatsink Material
CNPS7500-AlCu LED
CNPS7500-Cu LED
Pure Copper, Pure Aluminum
Pure Copper
Dimensions
121(L) X 121(W) X 67(H) mm
3,500 ㎠
Heat Dissipation Area
500g
Weight
Rotation Speed
Noise Level
Fan Mate 2
848g
(1)
2 Ball-Bearing
Bearing Type
Fan
(1)
(2)
(3)
1,150rpm ± 10% ~ 2,300rpm ± 10%
17dBA ± 10% ~ 32dBA ± 10%
Output Voltage
5V ~ 11V ± 2%
Allowable Power
6W or lower
Note (1) The maximum weight for a cooler is specified as 450g for Intel Socket 775/478 and AMD
Sockets AM2/754/939/940. Special care should be taken when moving a computer equipped
with a cooler that exceeds the specified weight limit. Zalman is not responsible for any damage
that occurs when moving a computer.
Note (2) The fan operates at 2,550rpm (34.5dBA) if directly connected to the motherboard’s power connector
without the use of Fan Mate 2.
Note (3) Measured 1m distance away from source.
3. Exploded View
Fan
Clip Lever
Clip
Fan Support
Fan Fixing Screw
Heatsink
Fan Support Fixing Screw
※
The specifications of any product may change without prior notice to improve performance.
1
4. Patents
Korean Patent Reg. No. 389257
Korean Design Reg. No. 327440-3
Patent applications pending in over 20 nations around the world including USA, EU, and Japan.
Precautions
1) Use and keep the product away from the reach of children.
2) Check the components list and condition of the product before installation. If any problem is found, contact
your place of purchase to obtain a replacement.
3) Excessive force exerted on the fan may damage the fan, resulting in damage to the system.
Disclaimer)
Zalman Tech Co., Ltd. is not responsible for any damages due to external causes, including but not
limited to, improper use, problems with electrical power, accident, neglect, alteration, repair, improper
installation, or improper testing.
5. Components
1) Common Components
❶ Cooler (CNPS7500 LED)
❷ Thermal Grease
❸ Fan Speed Controller (Fan Mate 2)
❹ Double-sided Tape (for Fan Mate 2 attachment)
❺ Cable for Fan Mate 2
❻ User’s Manual (in English and Korean)
❶
❷
❸
❹
❺
❻
2) Components for Intel Socket 775
❼ One (1) Clip Support for Socket 775
❽ One (1) Backplate for Socket 775
❾ Four (4) Clip Support Fixing Bolts
❿ One (1) Clip Lever
❾
❼
❽
❿
3) Components for Intel Socket 478
One pair of Clip Supports for Socket 478
Component ❿
4) Component for AMD Socket AM2/754/939/940
Component ❿
※
The specifications of any product may change without prior notice to improve performance.
2
6. Compatible CPUs
1) All CPUs conforming to Intel Socket 775 platform
Caution)
① No motherboard components with a height greater than
39mm, as well as the PSU, disk drives, VGA card, and
RAM should be present within a 61mm radius from the
center of the CPU.
37mm
61mm
2) All CPUs conforming to Intel Socket 478 platform
Caution)
① As shown in Figure 2, a motherboard that is not compliant with the "10.2mm motherboard component height
restriction" standard, introduced by Intel, may create interference between components and the clip of
CNPS7500 LED. Please do not install the CNPS7500 LED if this interference is observed.
② No motherboard components with a height greater than 39mm, as well as the PSU, disk drives, VGA card,
and RAM should be present within a 61mm radius from the center of the CPU.
10.2mm motherboard component height restriction
Clip
Motherboard Component
Figure 1
Compatible
Motherboard Component
Clip Support for Socket 478
Figure 2
Not Compatible
3) All CPUs conforming to AMD Sockets AM2/754/939/940 platform
Caution)
① No motherboard components with a height greater than 39mm,
as well as the PSU, disk drives, VGA card, and RAM should
be present within a 61mm radius from the center of the CPU.
31mm
61mm
※
The specifications of any product may change without prior notice to improve performance.
3
7. Installation (Intel Socket 775)
1) Clip Support Installation
Align the Clip Support for Socket 775 and the Backplate for Socket 775 with the mounting holes on the motherboard
and fasten them together using the Clip Support Fixing Bolts. The Lever Slot on the Clip Support for Socket 775 should
be properly oriented on the hinged side of the Socket Lever when installing.
※ If a Lug of Clip Support for Socket 775 interferes with any motherboard components, install the Clip Support
for Socket 775 with the Lug facing a different direction to avoid interference.
Lug
Clip Support Fixing Bolt
Lug
Clip Support for Socket 775
Socket Lever Hinge
Lever Slot
Socket Lever
Motherboard
Lever Slot
Backplate for Socket 775
2) Thermal Grease Application
Thermal Grease
Clear off particles or any residue from the top of the CPU then
spread a generous amount of the included Thermal Grease
thoroughly on top of the CPU.
CPU (IHS)
3) Cooler Installation
Insert the Clip Lever into the Clip. Connect the Clip's Lug Slot with the Arrow marked Lug of the Clip
Support for Socket 775. Press onto the Clip Lever when aligning the Lever's Lug Slot and the other Lug.
Make sure the cooler installed on the center of the CPU.
※ Using a flat-head screwdriver is recommended for easier installation and uninstallation.
Clip Lever
Driver
Clip’s Lug Slot
Clip Lever
Lever’s Lug Slot
Lug
Clip
Arrow marked Lug
4) Power Connection (Fan Mate 2 Connections)
◆ Please refer to Fan Mate 2 Installation and Usage on page 6.
※
The specifications of any product may change without prior notice to improve performance.
4
8. Installation (Intel Socket 478)
1) Clip Support for Socket 478 Installation
Assemble one pair of Clip Supports for Socket 478 as shown in the diagrams below, then insert the assembly into
the Retention Frame on motherboard. Make sure the assembly remains firmly in place.
Retention Frame
2) Thermal Grease Application
Thermal Grease
Clear off particles or any residue from the top of the CPU then spread a
thin layer of the included Thermal Grease thoroughly on top of the CPU.
3) Cooler Installation
CPU (IHS)
Insert the Clip Lever into the Clip. Connect the Clip's Lug Slot with a Lug of the Clip Support for Socket 478.
Press onto the Clip Lever when aligning the Lever's Lug Slot and the other Lug.
※ Using a flat-head screwdriver is recommended for easier installation and uninstallation.
Clip Lever
Driver
Clip’s Lug Slot
Clip Lever
Lever’s Lug Slot
Lug
Lug
Clip
4) Power Connection (Fan Mate 2 Connections)
◆ Please refer to Fan Mate 2 Installation and Usage on page 6.
9. Installation (AMD Sockets AM2/754/939/940)
Thermal Grease
1) Thermal Grease Application
Clear off particles or any residue from the top of the CPU then spread a
thin layer of the included Thermal Grease thoroughly on top of the CPU.
2) Cooler Installation
CPU (Lid)
Insert the Clip Lever into the Clip. Connect the Clip's Lug Slot with a Lug of the Retention Frame on motherboard.
Press onto the Clip Lever when aligning the Lever's Lug Slot and the other Lug.
※ Using a flat-head screwdriver is recommended for easier installation and uninstallation.
Clip Lever
Driver
Clip’s Lug Slot
Clip Lever
Lever’s Lug Slot
Clip
Lug
Lug
Retention Frame
3) Power Connection (Fan Mate 2 Connections)
◆ Please refer to Fan Mate 2 Installation and Usage on page 6.
※
The specifications of any product may change without prior notice to improve performance.
5
10. Fan Mate 2 Installation and Usage
1) Fan Mate 2 Installation on the Inside of a System
2) Fan Mate 2 Installation on the Outside of a System
Double - sided Tape
Speed Control Knob
Fan Connector
(CNPS7500)
Fan Mate 2
6-Pin Connector
Motherboard
Connect the two 3-pin connectors of the cable to
the Motherboard and to the CNPS7500’s Fan
Connector as shown in the diagram.
Pull the 6-Pin Connector out of the system
through the back and connect it to Fan Mate 2,
which should be installed on the case using the
included Double-sided Tape.
◆ The fan operates in Silent Mode when the Speed Control Knob of Fan Mate 2 is fully turned in the
counter-clockwise direction. The fan operates in Normal Mode when the Speed Control Knob of Fan Mate 2
is fully turned in the clock-wise direction. The fan speed can be controlled according to user preference
by adjusting the Speed Control Knob.
Note) Fan Mate 2 has been specifically designed for the fan of this product.
Zalman Tech Co., Ltd. is not responsible for any damages to the system or CPU resulting from its
use with other types of fans.
11. Notes on Usage
1) Checking CPU Compatibility
Please refer to “Compatible CPUs” on page 3 to confirm that your CPU is compatible with the CNPS7500
before installing.
2) Caution During Booting
The computer system may automatically shut down when booting the computer after the system
monitoring program outputs a warning stating that the CPU fan is rotating slowly. In such a case, fully turn
the Speed Control Knob in the clockwise direction before rebooting to disable the ‘CPU Fan Detected’
option in BIOS, or set the CPU fan’s rotational speed to 1,150rpm or lower in the system monitoring
program.
Note) Some motherboards fail to boot if the rotational speed of the CPU fan is below a certain rpm.
However, booting can be possible even at low fan rpm if the BIOS settings are updated.
For more information on updating your BIOS, please refer to the website of the motherboard’s
manufacturer. There are motherboards which fail to detect the rpm while operating the cooler in
Silent Mode, but this does not affect computing performance.
3) Overclocking
Zalman Tech Co., Ltd. is not responsible for any damages resulting from CPU Overclocking.
※
The specifications of any product may change without prior notice to improve performance.
6
12. Zalman Computer Noise Prevention Systems
Zalman's Noiseless Power Supplies, Fanless Northbridge Coolers, Heatpipe HDD Cooler, Noiseless
Case Fans, VGA Coolers, and Fan Controllers facilitate stable performance and a noiseless
computing environment.
Noiseless Power Supply
Noiseless Case Fan
Fanless Northbridge Cooler
Heatpipe HDD Cooler
Ultra Quiet VGA Cooler
Fan Controller
13. TNN (Totally No Noise) Computer Enclosures
TNN 300
TNN 500AF
TNN Computer Enclosures are the world’s first environment-friendly noiseless computer enclosures
that operate without the use of a fan. TNN Computer Enclosures use the aluminum enclosure itself
as a heatsink. They are ideal for environments that require silence, as well as for home theatre
systems and multi-media systems.
14. Home Theatre PC Enclosures
The HD160XT is designed for ultra quiet home theatre
PC operation, utilizing optimized ventilation and
anti-vibration reinforcements, making it ideal for
environments that require silence such as living
rooms, bedrooms, educational facilities, and offices.
For more information, please visit our website.
HD160XT
※
The specifications of any product may change without prior notice to improve performance.
7