1
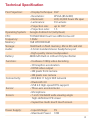
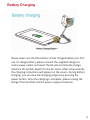
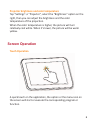
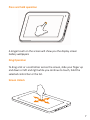
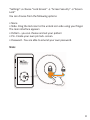
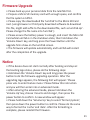
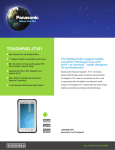
lumiTab
7” Android Tablet with In-built Projector
Introduction
Thank you for purchasing Promate lumiTab – a 7” Android Tablet
with an In-built Projector. The lumiTab offers an amazing tablet
experience with extraordinary features. It is the World’s First
Android Tablet with an In-built Projector. Sharing multimedia has
never been easier. With lumiTab, you can enjoy interactive games,
process important documents, read e-books with your family,
make presentations, mirror and control your laptop PC, listen to
music or even play videos or movies. All of this happens with the
freedom of displaying everything in widescreen, by using its one
button projection system. All you have to do is just point the
lumiTab to any plain open space or a wall and view your tablet
screen on a bigger display. Perfect for wide scale viewing, Powered
with Dual core processor which supports the latest Android 4.2
platform (Jelly Bean), with evolved UI and innovative projection
quality. The advanced DLP technology delivers an incredibly sharp
1080p HD image. Slim and fast, the lumiTab is equipped with full
Google Mobile apps and services such as Gmail, Google Maps,
Google Talk, Google Search and Youtube.
Packaging Contents
• lumiTab
• Stand
• AC power charger
• Screen protector
• Pouch
• Micro-USB Sync cable
• User Guide
• Warranty card
1
Appearance and Interface Description
Focus Slider
Projector Switch
Power Button
Volume Up
Volume Down
Front Camera
Microphone
DC Charge Input
3.5mm Audio Jack
Micro SD Card Slot
OTG-USB
Mini HDMI slot
Speaker
Rear Camera
Power Button: Long press to turn On/Off. Short press for
Hibernating/Awakening
Volume Plus: Increase the volume
Volume Minus: Decrease the volume
Projector Switch: Turn on/off the projector
Focus Slider: Adjust the projection focus
2
Technical Specification
Pico Projection:
Operating System:
CPU:
Frequency:
Memory:
Storage:
Audio:
Battery:
Function:
Connectivity:
Sensor:
Screen:
Power Supply:
• Display Technique: DLP
• Resolution:
WVGA (854x480)
• Illuminant:
LED, 20,000 hours life span
• Luminance:
35 Lumens
• Projection size:
up to 100”
• Projection ratio:
1.5
Google Android 4.2 (Jelly Bean)
TI OMAP4460 Dual Core ARM Cortex-A9
1.5Ghz
1GB LPDDRII RAM
16GB built-in flash memory; Micro SD card slot
• 3.5mm standard stereo headphone port
• High-quality stereo loudspeakers
4800mAh Built-in Lithium Polymer Batter
• Hardware 1080p video decoding
• 3D Graphics acceleration
• HDMI video output
• 2M pixels front camera
• 2M pixels rear camera
• IEEE 802.11 b/g/n Wifi network
• Bluetooth 4.0
• USB 2.0 High-speed OTG support
• Three-axis accelerometer
• Microphone
• 7-inch 1024x600 wide viewing angle
high-definition IPS screen
• Capacitive multi-touch touch screen
• Input Voltage:
• Maximum Power:
5V
10W
3
Battery Charging
Battery Charging Diagram
Please make sure that the battery is fully charged before your first
use. To charge battery, please connect the supplied charger to
mains power outlet, and insert the DC jack end into the charge
interface of lumiTab. Switch On the AC mains. After a few seconds,
the charging instructions will appear on the screen. During battery
charging, you can view the charging progress by pressing the
power button. Once the charging is complete, please unplug the
charger from lumiTab and the power supply connection.
4
Turning the device On/Off
Hold down the power button until the Promate logo appears on
the screen. Wait for a few seconds, after the system startup is
complete then enter into the main interface.
Hibernate
Once booted up, a short press of power button will put the
lumiTab to hibernate state. During hibernation, lumiTab’s screen
will turn off and enter into the standby condition, where it will
consume only a small amount of power. Another short press of
power button will bring the lumiTab out of hibernation and you
can continue with your operation.
Shutdown and forced shutdown
If you are not using the lumiTab for several days, we recommend
you to shut down the machine. Hold down the power button for
two seconds, and select "Power off" from the pop-up window
"Tablet options" to completely shut down the lumiTab.
In case of a system crash where the lumiTab stops responding to
commands, please hold down the power button for 10 seconds or
more and select “Reboot” from the pop-up window to force shut
down.
Instructional Usage
Projection
Turn on the projector switch. Adjust the focus slider to get the
sharpest projection images. (The best projection distance is about
160cm.)
During projection, short press the power button to turn off screen
to extend the battery life.
5
Projector brightness and color temperature
Tap “Settings”→ “Projector”, select the “Brightness” option on the
right, then you can adjust the brightness and the color
temperature of the projection.
When the color temperature is higher, the picture will turn
relatively cool white. When it’s lower, the picture will be warm
yellow.
Screen Operation
Touch Operation
A quick touch on the application, the option or the menu icon on
the screen will start or execute the corresponding program or
function.
6
Press and hold operation
A longer touch on the screen will show you the display screen
Gallery wallpapers
Drag Operation
To drag a list or a control bar across the screen, slide your finger up
and down or left and right while you continue to touch, hold the
selected control bar or the list.
Screen Unlock
7
“Settings”→ choose “Lock Screen” → “Screen Security” →”Screen
Lock”
You can choose from the following options:
• None
• Slide- Drag the lock icon to the unlock icon side using your finger.
The main interface appears
• Pattern - you can choose and set your pattern
• Pin- Create your own pin lock- screen.
• Password - You are able to amend your own password.
Slide:
?
AM
08:59
Fri. November 30
8
Slider Shortcuts
Go to Settings→ Lock Screen→ Slider Short Cuts→ Touch the circle
and you will have to drag the circle to assign a shortcuts.
1
2
To display the pre-installed applications, tap the icon “
” that is
located at the top right corner or center of the main interface
screen. Touch the application icon in the list to select and start any
specific application.
Connecting to your Computer
You can connect your lumiTab to a computer (plug and play) with
Windows Vista, 7 and 8 operating system using the supplied
Micro-USB sync and charge cable. The connection may take a few
minutes. Once they are connected, lumiTab storage and the file in
the TF Card are accessed through the file explorer.
If your computer operating system is Windows XP, please install
Windows Media Player 11 in your system.
9
Reboot your computer after installation. Connect lumiTab to the
computer using the USB data link cable. Open "My Computer " to
view lumiTab storage disk icon and the files.
For Mac OS, an additional software installation is required for
lumiTab to be recognized by the system. The application is
available for download at the following location:
http://www.android.com/filetransfer/
Inserting a Micro SD card
Using a Micro SD Card allows you to import files, download
applications and play stored media. Insert a Micro SD Card
(supports up to 32GB) into the top SD Card Slot. You will hear a
click when the card is inserted properly.
Firmware Upgrade
Promate Technologies will occasionally release the firmware
updates/upgrades for lumiTab to incorporate new functionalities
or to fix known bugs. To get lumiTab’s latest firmware and know
the upgrading way, please visit our official website:
http://www.promate.net
10
Firmware Upgrade
• Please back up your personal data from the lumiTab first.
• Prepare a Micro SD memory card with enough space, and confirm
the file system is FAT32.
• Please copy the downloaded file 'lumiTab' to the Micro SD Card
root. (using browser or third party download software to download
this file, might add suffix to the downloaded file, such as lumiTab.zip'.
Please change the file name into 'lumiTab'.)
• Please ensure the battery power is enough, and insert the Micro SD
Card while lumiTab is in the shutdown state, then hold down the
'Volume Down' key, and long press the Power Button until the
upgrade hints show on the lumiTab screen.
• The firmware will update automatically, and lumiTab will restart
after the completion of the upgrade.
Notice
• If the device does not start normally after booting and stays at
the booting logo status, please do the following steps:
• Hold down the 'Volume Down' key and long press the power
button to do the firmware upgrading operation. After the
upgrading logo appears, the following hint will appear: 'Please
press vol+ to enter feature menu'. Please follow this instruction
and you will then enter into an advanced mode.
• After entering the advanced mode, please hold down the
'Volume Up' key, choose 'mounts and storage', then press the
power button to confirm. A new window will appear.
• Please hold down the 'Volume Up' key to select 'format /system',
then press down the power button to confirm. Please do the same
way to format the 'cache' and 'data'. After the formatting is
complete, please reinstall the firmware.
11
Precautions
Please read this User Guide carefully before using the product.
The contents herein may be changed to deliver the better services
to the end-user. To keep the perfect performances of the product,
never use it in cold, hot, dusty or moistened areas or places,
especially in the following conditions:
• Moist or underwater conditions.
• Conditions near the heater or high-temperature service.
• Conditions with direct sunshine.
• Conditions with apt falling.
• Never dismantle the product without due permission, otherwise
it may nullify the warranty clauses.
Notes
• The Micro USB port is used primarily to connect USB storage
devices.
• Inserting a Micro SD Memory Card helps add additional storage
capacity, for importing files, downloading applications, taking
pictures, reading books and playing stored media. To protect your
SD card’s files and directory structure integrity, it should be un
mounted before removed. To do this, tap Menu > Settings > SD
card & device storage > and under SD card tap Unmount SD card.
• The Mini HDMI port is an “OUT” port designed to output to
HDMI devices.
• The software on your tablet is updated frequently to ensure your
tablet is always optimized. Make sure to check for and run
updates.
This User Guide is subject to change without any prior notice, and
should be used as a reference
12