1
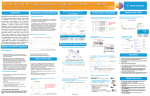
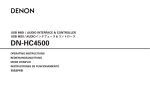
Visiosonic
™
Professional DJ Products
Made by Pro DJs for Pro DJs ™
Space Opera
™
QUICK START MANUAL
Visiosonic, Ltd
http://www.visiosonic.com
Safety Information
CAUTION
RISK OF ELECTRIC SHOCK
DO NOT OPEN
CAUTION: TO REDUCE THE RISK OF ELECTRIC SHOCK, DO NOT
REMOVE ANY COVER. NO USER SERVICEABLE PARTS INSIDE.
REFER SERVICING TO QUALIFIED SERVICE PERSONNEL ONLY.
The lightning flash with arrow symbol within the equilateral
triangle is intended to alert the user to the presence of uninsulated “dangerous voltage” within the product’s enclosure
that may be of sufficient magnitude to constitute a risk of
electric shock to persons.
The exclamation point within the equilateral triangle is intended to
alert the user to the presence of important operating and maintenance
(servicing) instructions in the literature accompanying this appliance.
CAUTION
FOR USA & CANADIAN MODELS ONLY
TO PREVENT ELECTRIC SHOCK, DO NOT USE THIS (POLARIZED
PLUG WITH AN EXTENSION CORD, RECEPTACLE OR OTHER
OUTLET UNLESS THE BLADES CAN BE FULLY INSERTED TO
PREVENT BLADE EXPOSURE.
WARNING: To reduce the risk of fire or electric shock, do not expose this appliance to
rain or moisture. Electrical equipment should NEVER be kept or stored in a damp
environment.
LINE VOLTAGE SELECTION
115V
The desired voltage can be set with the Voltage
Switch located on the back panel of the Mini Tower
unit by using a screw driver.
230V
.
Copyright © 2000 Visiosonic, Ltd. All Rights Reserved. All Trademarks are owned by their respective companies.
1
Getting Started
™
Congratulations …
on receiving the Space Opera and the PCDJ™ Digital 1200sl™ MP3 system for professional
DJs. We at Visiosonic would like to thank you for purchasing this incredible system which offers
the latest technology that empowers DJs like never before.
This booklet is designed to give you quick-start assistance in setting up your Space Opera.
Read this entire booklet and follow the required steps. You’ll have the system up and running in
just a short time. After you’ve completed the Quick Start Manual, proceed to the PCDJ Digital
1200sl User’s Manual to learn how to utilize all of the many great features that are now
available to the professional DJ.
List of Contents
! 1
-
Gibraltar Road Systems Rack Unit
! 5
-
Brackets
! 1
-
Mini Tower
! 2
-
Audio Cables/RCA™
! 2
-
Stereo Audio Cables
! 1
-
Korg™ Kaoss Pad
! 1
-
Numark® SM1 Mixer
! 1
-
Windows® 98 CD Packet
! 1
-
Sound Blaster Live!™ Installation CD
! 1
-
ASUS ME-99 USER’S MANUAL 1.03
! 1
-
PCDJ Digital 1200sl Software program
! 1
-
PCDJ Digital 1200sl User’s Manual
2
Setting Up
Connecting up your Space Opera system is very simple. Just follow the steps, that begin on page 5, and refer to the diagrams as needed.
Space Opera Connection Diagram
(Rear view)
USB Keyboard
Kaoss Pad
Mouse
Pro SM-1
(Left) Stereo Line In
Monitor
(Right) Stereo Line In
(Left) Line Out
(Right) Line Out
To Computer’s USB Jack
(Left) Line In
(Right) Line In
(Left) Main Out
(Right) Main Out
(Left) Stereo Line In
(Right) Stereo Line In
To Computer’s Mouse Jack
To Source (Board Monitor, Amp, etc.)
To Soundcard
To Soundcard
(Black Jack)
(Green Jack)
3
Mini Tower Diagram
(Rear View)
USB
(Un i ve rs a l S e ri a l Bus )
Voltage Switch
Power Switch
Power In
Mouse (green)
USB Keyboard
(teal)
Serial (Comm) Port 1
Printer / LP 1 (pink)
(blue)
Video Output to Monitor
Exhaust
Fan
Phone (to wall jack)
Line (to phone jack)
Sound Blaster Sound Card
(Black) Line Out Jack - Back
(Green) Line Out Jack - Front
Ventilation
Grill
4
Setup Procedure
NOTE: The Exhaust Fan and Ventilation Grill exist on your Mini Tower to keep the equipment from
overheating. Their cooling purpose is very important to the safety, longevity and performance of the unit.
Make sure these items are never blocked and can always receive ample fresh air.
Your Space Opera system comes with instructional booklets for certain items in the system. First
take out the Gibraltar Road Systems rack unit assembly instructions booklet and assemble the rack.
Then follow the steps below.
STEP 1. After you have properly assembled the Gibraltar rack unit, place the five brackets on the
horizontal bar of the Gibraltar stand, spacing them far enough apart to enable all five electronic
devices to fit one next to another.
FYI: The electronic devices (monitor, Pro SM-1, mouse, Kaoss Pad and USB keyboard) have plates
affixed to their bottom side. The protruding shafts are designed to fit into the brackets’ vices.
STEP 2. Set the shafts, one at a time, in the vices of the brackets. Make sure to tighten each vice
so that the electronics will not fall if bumped or jolted.
STEP 3. Set the Power Switch to the OFF (O) position in the back of the Mini Tower.
STEP 4. Connect your monitor’s cord to the (blue) “Video Output to Monitor” socket in the
Mini Tower.
STEP 5. Connect your mouse’s cord to the (green) mouse socket in the Mini Tower.
STEP 6. Connect your USB (Universal Serial Bus) keyboard’s cord to the USB 1 socket in the
Mini Tower.
STEP 7. Take one of the audio (RCA to 1/8” stereo) cables supplied and place the left and right
RCA plugs into the left and right jacks of Channel 1 of the Numark Pro SM-1.
NOTE: The Sound Blaster Liver! sound card has “front” and “back” (green and black) Line Outs to
help you configure your entire setup with consistency. If you cross the wires at the sound card, the
outputs would be crossed in the speakers and the Numark Pro SM-1.
STEP 6. Then put the 1/8” male mini-stereo plug of the same cable into the (green) Line Out
jack of the Sound Blaster Live! sound card. This is the front Line Out.
5
STEP 7. Take the other audio (RCA to 1/8” stereo) cable supplied and place the left and right
RCA plugs into the left and right jacks of Channel 3 of the Numark Pro SM-1.
NOTE: As the Numark Pro SM-1 has four channels, the cords coming from the front and back
Line Out jacks of the sound card can be connected to any two channels of your choice.
STEP 8. Then put the 1/8” male mini-stereo plug into the (black) Line Out jack of the Sound
Blaster Live! sound card. This is the back Line Out.
STEP 9. Take an audio cable (RCA to RCA plugs) and put the left and right plugs of one end
into the Main Out jacks of the Numark Pro SM-1 mixer.
STEP 10. Then connect the left and right RCA plugs of the other end of this cable into the Left
and right Line In jacks of the Kaoss Pad.
STEP 11. Take another audio cable (RCA to RCA plugs) and put the left and right plugs of one
end into the Line Out jacks of the Kaoss Pad.
STEP 12. Then connect the left and right RCA plugs of the other end of this cable into your
source (amplifier, board mixer, etc.) inputs
STEP 11. Now connect the female end of the Mini Tower’s power cord into the “Power In”
socket. Check the voltage setting on the back of your Mini Tower to verify it is in the proper
setting (see NOTE below). Plug it into a wall socket and you’re ready to go.
NOTE: The Space Opera you received is designed to work with either 110 or 220 voltage. It comes
preset for the 110 voltage use. If you require 220 voltage, you can change the setting in the Voltage
Switch by using a screwdriver and switching the setting from “115” to “230”. Make sure the power is
disconnected before changing the settings.
A Final Note
Now that you have successfully connected up your Space Opera, it’s time to move to the PCDJ
Digital 1200sl User’s Manual and begin learning how to utilize this powerful MP3 system. Also, refer to
the information provided by the manufacturers of the electronic devices as needed.
Make sure that you fill out your License and mail it back to Visiosonic right away.
If you have any questions that need addressing at this point, you can speak to a Visiosonic
Support Representative toll free at: 877-778-4746 or e-mail to: support@visiosonic.com with your detailed
question. The response time for e-mail is usually within one working day.
6