Transcript
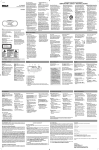
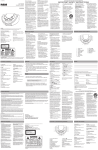
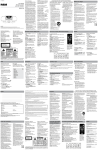
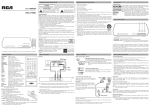
v1.0 (EN/F)
FCC information
user manual
guide de l’utilisateur
RCD179
PRESET/FOLDER
SD/MMC
Note: Look in the battery compartment to find the AC power cord.
Remarque : Regardez dans le compartiment des piles pour trouver le cordon
d’alimentation CA.
EN/F
It is important to read this instruction prior to using your new product for the first time.
Nous vous recommandons de lire ce manuel d’instructions avant d’utiliser votre
nouveau produit pour la première fois.
Technical information
For your records
Product: Portable CD PLL Radio
Cassette Recorder
Brand: RCA
Model: RCD179
Power Supply: 120V ~ 60Hz
Power Consumption: 15 Watts
Unit Size ( H x W x D inches):
6.2 x 14.7 x 10.2
Weight: 5.77 lbs
CD player: Response curve (+/- 2dB):
60Hz to 20 kHz
Rating Plate: Look for it at the
bottom of the set.
In the event that service should be
required, you may need the model
number. In the space below, record
the date and place of purchase:
Model No.
Date of Purchase
Place of Purchase
CLASS 1 LASER PRODUCT
LASER KLASSE 1
APPAREIL A LASER DE CLASSE 1
LUOKAN 1 LASERLAITE
KLASS 1 LASERAPP ARAT
Service information
This product should be serviced
only by those specially trained in
appropriate servicing techniques.
For instructions on how to obtain
service, refer to the warranty
included in this Guide.
344A2555-0001
CAUTION
THE LIGHTNING
FLASH AND
ARROWHEAD WITHIN
THE TRIANGLE IS A
WARNING SIGN
ALERTING YOU OF
"DANGEROUS
VOLTAGE" INSIDE THE
PRODUCT.
RISK OF ELECTRIC SHOCK
DO NOT OPEN
CAUTION: TO REDUCE THE
RISK OF ELECTRIC SHOCK,
DO NOT REMOVE COVER (OR
BACK). NO USERSERVICEABLE PARTS INSIDE.
REFER SERVICING TO
QUALIFIED SERVICE
PERSONNEL.
THE EXCLAMATION
POINT WITHIN THE
TRIANGLE IS A
WARNING SIGN
ALERTING YOU OF
IMPORTANT
INSTRUCTIONS
ACCOMPANYING
THE PRODUCT.
This device complies with part 15 of
the FCC Rules. Operation is subject
to the following two conditions: (1)
This device may not cause harmful
interference, and (2) this device must
accept any interference received, including interference that may cause
undesired operation.
This equipment has been tested and
found to comply with the limits for
a Class B digital device, pursuant to
part 15 of the FCC Rules. These limits
are designed to provide reasonable
protection against harmful interference in a residential installation.
This equipment generates, uses and
can radiate radio frequency energy
and, if not installed and used in accordance with the instructions, may
cause harmful interference to radio
communications.
However, there is no guarantee
that interference will not occur in a
particular installation. If this equipment does cause harmful interference to radio or television reception,
which can be determined by turning
the equipment off and on, the user
is encouraged to try to correct the
interference by one or more of the
following measures:
– Reorient or relocate the receiving
antenna.
– Increase the separation between
the equipment and receiver.
– Connect the equipment into an outlet on a circuit different from that
to which the receiver is connected.
– Turns the unit on / off.
BAND/MODE – Select radio mode or a CD playback
mode.
PRESET/FOLDER
– Accesses preset radio
channels. Selects folders on mp3 disc, memory card
or USB device.
VOLUME +/– – Adjusts volume.
EQ/BASS – Selects among sound effects; press and
hold to turn DBBS on/off. (same function as EQ/
DBBS)
SOURCE – selects an input source (e.g. CD, radio).
PROG – Sets radio preset channels and enters program mode. (same function as PROGRAM)
/
– selects tracks/files and radio frequencies.
– starts or pauses playback.
– stops playback.
Select radio mode
Card mode
Preset EQ
settings:
Rock, Jazz,
Pop, Classic
USB
Press
ON / STANDBY to turn on
the unit.
Press SOURCE until RADIO mode
is selected.
VOLUME
Select radio band
Press BAND / MODE to select
between FM and AM band.
WMA
FOLDER
Digital
Bass Boost
System
Random
Playback
WARNING : MAINS PLUG IS USED
A S DISCONNEC T DE VICE AND IT
SHOULD REMAIN READILY OPERABLE
DURING INTENDED USE. IN ORDER TO
DISCONNECT THE MAINS PLUG FROM
MAINS COMPLETELY, THE MAINS
PLUG SHOULD BE DISCONNECTED
FROM THE MAINS SOCKET OUTLET
COMPLETELY.
IMPORTANT SAFETY INSTRUCTIONS
Some of the following information may not apply to your particular product; however, as with
any electronic product, precautions should be observed during
handling and use.
• Read these instructions.
• Keep these instructions.
• Heed all warnings.
• Follow all instructions.
• Do not use this apparatus near
water.
• Clean only with dry cloth.
• Do not block any ventilation
openings. Install in accordance
with the manufacturer’s instructions.
• Do not install near any heat
sources such as radiators, heat
registers, stoves, or other apparatus (including amplifiers)
that produce heat.
• Do not defeat the safety
purpose of the polarized or
grounding-type plug. A polarized plug has two blades with
one wider than the other. A
grounding type plug has two
blades and a third grounding
prong. The wide blade or the
third prong is provided for
your safety. If the provided
Extend or reposition the
antenna for better FM
reception. Rotate the
unit for better AM reception.
Tuning to a station
• Press
to tune down radio
frequency.
• Press
to tune up radio
frequency.
•
•
Battery power
You can insert 6 D-sized alkaline
batteries (not supplied) and you
can take your stereo just about
anywhere. Open the battery
compartment door on the back of
the unit by pressing down on the
arrow and pulling out the cover.
Insert batteries in the battery
compartment.
•
•
Useful advice
• Do not use your system immediately after transporting it
from a cold place to a warm
place, as condensation may
cause the system to malfunction. If moisture forms inside
this system, it may not operate properly. To correct the
problem, turn off the power
and wait about 30 minutes for
moisture to evaporate.
• This system is fitted with a
laser. To avoid accidents, it is
Setting preset stations
manually
1. In radio mode, press BAND /
MODE to select radio band.
2. Press
/
to select the station to save as a preset station.
3. Press PROGRAM. Program icon
flashes.
4. Press
PRESET/FOLDER
repeatedly to assign the preset
station number.
5. Press PROGRAM to confirm.
Program icon stops flashing.
6. Repeat steps 2 to 5 to set additional preset stations.
There are 10 preset locations for FM band and
10 preset location for
AM band on this unit.
Using presets
Press and hold
/
to automatically tune to
the next station.
1. Press BAND / MODE to select
between bands.
2. Press
PRESET/FOLDER
repeatedly to access the
desired preset stations.
CD player
USB and memory card
Displaying program list
In program stop mode, press
and hold PROGRAM for about 3
seconds to display the program
list.
Playing mp3 files stored
on USB device or memory
card
Auxiliary input
1. Connect the auxiliary device to
the AUX IN jack with an audio
cable (not provided).
2. Press SOURCE until the
indicator “
” lights on
the display.
3. Start playback from the
auxiliary device.
4. Adjust the auxiliary device to
mid-range volume and adjust
the the master volume by
pressing
VOLUME .
• Do not turn the volume of the
auxiliary device too high as this
may affect the sound quality.
• For other playback operations,
control them on your auxiliary
device.
Cleaning the exterior
Cleaning CDs
• Disconnect the system from AC
power before cleaning the exterior
of the unit with a soft dust cloth
• Clean the exterior with a soft clean
cloth or slightly moistened chamois
leather. DO NOT use solvents as it
may cause damage to the unit.
•
• Do not touch the signal surfaces.
Hold CDs by the edges, or by one
edge and the hole.
• Do not affix labels or adhesive tapes
to the label surfaces. Do not scratch
or damage the label.
• CDs rotate at high speeds inside
the player. Do not use damaged
(cracked or warped) CDs
• Make sure CDs are stored in their
original case after use. Keep them
away from damp, humid or abnormally heated places.
CD lens care
• When your CD lens gets dirty it can
also cause the system to output
poor sound quality. To clean the
lens you will need to purchase a
CD lens cleaner which can maintain
the output sound quality of your
system. For instructions on cleaning
the CD lens, refer to the ones accompanying the lens cleaner.
•
•
•
Important Battery Precautions
• Any battery may present a risk
of fire, explosion, or chemical
burn if abused. Do not try to
charge a battery that is not
intended to be recharged, do
not incinerate, and do not
puncture.
• Non-rechargeable batteries,
such as alkaline batteries, may
leak if left in your product for
a long period of time. Remove
the batteries from the product
if you are not going to use it
for a month or more.
• If your product uses more
than one battery, do not mix
types and make sure they are
inserted correctly. Mixing types
or inserting incorrectly may
cause them to leak.
• Discard any leaky or deformed
battery immediately. They
may cause skin burns or other
personal injury.
• Batteries shall not be exposed
to excessive heat such as sunshine, fire or the like.
• Please help to protect the
environment by recycling or
disposing of batteries according to federal, state, and local
regulations.
•
•
to be dismantled by qualified
technicians only.
Never leave the tray open
as dust could cover the laser
lens and/or the tray could be
bumped into accidentally.
Do not place the system near
wet areas such as bathrooms
and pool side. Avoid storing
the system at humid places or
near abnormally heated areas.
Power is continuously supplied
to the system. To disconnect
power completely, unplug the
mains plug from the power
outlet.
Ensure minimum distance
around the apparatus for sufficient ventilation. The ventilation should not be impeded
by covering the ventilation
openings with items, such as
newspaper, etc.
No naked flame source, such
as lighted candles, should be
placed on the apparatus.
Attention should be paid to
environment aspects of battery
disposal.
Headset safety
• Have a BlastJust Not in your
eardrums! Make
sure you turn down
the volume on the
unit before you put on headphones. Increase the volume
to the desired level only after
headphones are in place.
• Do not play your headset at
high volume. Hearing experts
warn against extended highvolume play.
• If you experience ringing in
your ears, reduce volume or
discontinue use.
• You should use with extreme
caution or temporarily
discontinue use in potentially
hazardous situations.
Even if your headset is an
open-air designed to let you
to hear outside sounds, do not
turn up the volume so high
that you are unable to hear
what is around you.
ON / STANDBY – Turns the unit
on / off.
PRESET/FOLDER
– Accesses
preset radio channels; selects
folders on mp3 disc, memory card
or USB device.
SOURCE – Selects among radio,
tape, CD, AUX, USB and Card
modes.
TRACK / TUNE
/
– Tunes
up or down radio frequency (radio
mode); searches/ skips track/file
backward or forward (CD/Card/
USB mode).
STOP – Stops playback.
PLAY / PAUSE
– Starts or
pauses playback.
PROGRAM – Sets radio preset
channels (radio mode); enters program mode (CD/Card/USB mode).
BAND / MODE – Selects radio
band (radio mode); selects among
playback modes (repeat 1 / repeat
all / random) (CD/Card/USB mode).
EQ / DBBS – Press to select among
sound effects (Flat / Rock / Jazz
/ Pop / Classic); press and hold
to turn DBBS (digital bass boost
system) On/Off.
VOLUME
– Adjusts volume.
PUSH OPEN – Opens the CD door.
PUSH TO CLOSE – Push to close
the CD door.
AUX IN – Connects external
device with an audio cable (not
provided).
PHONE – connects headphone.
– connects USB device.
SD/MMC - connects SD/MMC
memory card.
Cassette Player
REC – Starts tape recording.
PLAY – Starts tape playback.
REW – Rewinds tape.
FWD – Fast forwards tape.
STOP/EJECT – Stops tape playback, winding or recording, opens
cassette door.
PAUSE – Pauses tape playback.
This unit is compatible
with audio CD-R/RW discs.
Notes on CD-R/RW
• Do not affix any type of labels
to either side (recordable or
labeled side) of a CD-R/RW disc
as this may result in the unit
malfunctioning.
• To avoid damages to the CD-R/
RW disc, do not open the disc
compartment door while the
disc is being read.
• Playback capability for CD-RW
discs may vary due to variations in the quality of the CDRW disc and the recorder used
to create the disc.
Loading disc
1. Press the PUSH OPEN button
to slide disc tray out.
2. Place a disc on the disc tray
with the label side facing up.
3. Push the disc tray back in.
The total number of tracks on the
disc can be read from display.
Play and pause
1. In stop mode, press
to
begin CD playback.
2. During CD playback, press
to pause playback. Press again
to resume.
Skip and search
mp3 playback
This player can play mp3 files
storead on a CD.
Selecting CD mode
When the unit is on, press SOURCE
until CD mode is selected.
1. Press
/
to skip to the
previous or next track respectively.
2. Press and hold
/
to
search quickly current track
backward or forward respectively.
When mp3 disc is loaded and
playback is in progress:
PRESET/FOLDER
1. Press
to show the current folder
number.
2. Press
PRESET/FOLDER
to
select another folder. Playback
will start automatically from
the first track of the selected
folder.
Stop playback
Press
to stop playback.
Play mode
Press BAND / MODE to select
among playback mode (repeat
current track / repeat all /
random). Selection made is
indicated by icons on display.
Programming
1. In stop mode, press PROGRAM
to enter program setting mode.
The program location and program icon flash on the display.
2. Press
/
to select the
track you want to program.
• For mp3 disc, press
PRESET/
FOLDER
to first select the
desired folder before selecting
a track.
3. Press PROGRAM again to confirm your selection and access
the next program location.
4. Repeat steps 2 to 3 to program
to a maximum of 20 tracks.
5. Press
in program mode
to start program playback
(PROGRAM indicator lights on
the display).
• Press to return to stop
mode.
When mp3 disc is loaded and
playback is stopped:
1. Press
PRESET/FOLDER
to
select a folder.
2. Press
to start playback
Tape player
Troubleshooting tips
Programming
Playing a tape
Recording to tape
Refe to “Programming” in the
“CD player” section for details.
1. When the unit is on, press
SOURCE until TAPE mode is
selected. The tape indicator
“
” lights on the display.
2. Press STOP/EJECT to open the
tape deck door.
3. Insert a tape into the door and
push the door closed.
4. Press REW or FWD to wind
the tape to the desired starting position. Press STOP/EJECT
to stop winding.
5. Press PLAY to start playback.
• Press PAUSE to pause playback
(press again to release the button to resume playback).
• Press STOP/EJECT to stop
playback.
1. Insert a tape into the deck.
2. Press SOURCE (CD, Radio, USB,
AUX or Card)
• Refer to relevant sections in
this user manual to select the
file, track, program or radio
station to be recorded.
3. Start playback of the desired
file, track or program.
4. Press REC and PLAY together
to begin recording.
5. Press PAUSE or STOP to pause or
stop the recording respectively.
1. Connect the USB device or
SD/MMC memory card to the
corresponding connection slot
on the front of the unit.
2. Press SOURCE until the
indicator "
" (for USB
mode) or "
" (for Card
mode) lights on the display.
3. Press
to start playback
from the USB device or SD/
MMC memory card.
/
to skip to
4. Press
the previous or next file
respectively.
• If folders exist, press
PRESET/FOLDER
to show
the current folder number.
Press
PRESET/FOLDER
to
select another folder. Playback
will start automatically from
the first track of the selected
folder.
5. Press and hold
/
to search quickly current
file backward or forward
respectively.
6. Press to stop playback.
from the first track of the
selected folder.
• Be sure to slide the
cassette into the tape
slot on the door.
Do not place the tape
directly onto the tape
mechanism.
• For better recording
quality, use normal bias
tape (Type I) only.
System doesn’t turn on
• Unplug the unit for a moment,
and then plug it back in.
• Check the outlet by plugging
in another devices.
No sound
• Adjust volume setting.
• Make sure you’ve selected the
correct function.
Poor radio reception
• Adjust the antenna for better
reception.
• Try turning off electrical appliances near the unit, such as
hair dryers, vacuum cleaners,
or fluorescent lights.
CD doesn’t play
• Make sure you’ve put a CD in
the tray.
• Make sure the CD’s label is facing up.
• Try another CD.
• Make sure that Pause mode is
not activated.
• Make sure CD function is
selected.
scratches, or other damage.
• Check for vibration or shock
that may affect the unit; move
the set if necessary.
Remote control does not work
• Check that battery is properly
installed.
• Replace weak battery.
• Point the remote directly at
the unit’s front panel.
• Remove any obstacles between
the remote and the unit.
ESD Remark:
In case of misfunction due to
electrostatic discharge just reset
the product (disconnect and
reconnect of the power source
may be required) to resume
normal operation.
CD sound skips
• Clean the CD.
• Check CD for warping,
Limited warranty
More information
Handling CDs
•
plug is damaged, liquid has
been spilled or objects have
fallen into the apparatus, the
apparatus has been exposed
to rain or moisture, does not
operate normally, or has been
dropped.
• IF YOUR PRODUCT OPERATES
ON BATTERIES, adhere to the
following precautions:
A. Any battery may leak
electrolyte if mixed with a different battery type, if inserted
incorrectly, or if all batteries
are not replaced at the same
time.
B. Any battery may leak electrolyte or explode if disposed
of in fire or an attempt is
made to charge a battery not
intended to be recharged.
C. Discard leaky batteries
immediately. Leaking batteries can cause skin burns or
other personal injury. When
discarding batteries, be sure to
dispose of them in the proper
manner, according to provincial and local regulations.
General controls (Main unit)
Shows radio frequency, radio preset location, folder number, CD track
number, CD program location, playback time, current mode, etc.
Clearing program list
Your program will be erased:
• once you open the disc
compartment door, or,
• press while the program
playback is stopped.
•
plug does not fit into your
outlet, consult an electrician
for replacement of the obsolete outlet.
Protect the power cord from
being walked on or pinched
particularly at plugs, convenience receptacles, and the
point where they exit from the
apparatus.
Only use attachments/accessories specified by the manufacturer.
Use only with the
cart, stand, tripod, bracket, or
table specified by
the manufacturer,
Portable Cart
or sold with the
Warning
apparatus. When
a cart is used, use caution
when moving the cart/apparatus combination to avoid injury
from tip-over.
Unplug this apparatus during
lightning storms or when unused for long periods of time.
Refer all servicing to qualified
service personnel. Servicing is
required when the apparatus
has been damaged in any way,
such as power-supply cord or
CD player
PROG
Repeat mode
REPEAT 1 - repeat current track
REPEAT ALL - repeat whole disc
CAUTION: TO PREVENT ELECTRIC
SHOCK, MATCH WIDE BLADE OF
PLUG TO WIDE SLOT, FULLY INSERT.
Plug the power supply cord into
the AC power jack on the back of
the unit, and into an AC power
supply outlet that accepts the plug
supplied with your unit.
Radio
File type (mp3/WMA)
The AC power plug is
polarized (one blade is
wider than the other)
and only fits into AC
power outlets one way.
If the plug won’t go
into the outlet completely, turn the
plug over and try to insert it the
other way. If it still won’t fit, contact
a qualified electrician to change the
outlet, or use a different one. Do not
attempt to bypass this safety feature.
AC power
General controls (Remote & Display)
Remove the plastic tab
from the battery
compartment before
first use. One button
type battery (CR2025) is
required.
For your safety
• Never open the cabinet under
any circumstances. Any repairs
or internal adjustments should
be made only by a trained
technician.
• Do not touch the player with
wet hands. If any liquid enters
the player cabinet, take the
player to a trained technician
for inspection.
• This compact disc player uses
a laser to read the music on
the disc. The laser mechanism
corresponds to the cartridge
and stylus of a record player.
Although this product incorporates a laser pick-up lens, it is
completely safe when operated
according to directions.
• The apparatus shall not be exposed to dripping or splashing
and that no objects filled with
liquids, such as vases, shall be
placed on the apparatus.
DO NOT EXPOSE THIS PRODUCT TO RAIN OR MOISTURE.
+
This product complies with DHHS
Rules 21 CFR Subchapter J. Applicable at the date of manufacture.
Safety precautions
WARNING: TO PREVENT FIRE OR ELECTRICAL SHOCK HAZARD,
EQ
BASS
WARNING: Changes or modifications
to this unit not expressly approved by
the party responsible for compliance
could void the user's authority to
operate the equipment.
PLEASE READ AND SAVE THIS FOR FUTURE REFERENCE
Before you begin
SEE MARKING ON BOTTOM / BACK OF PRODUCT
BAND/
MODE
– Consult the dealer or an experienced radio/TV technician for help.
Dirty CDs can cause poor sound
quality. Always keep CDs clean by
wiping them gently with a soft
cloth from the inner edge toward
the outer perimeter.
• If a CD becomes dirty, wet a soft
cloth in water, wring it out well,
wipe the dirt away gently, and then
remove any water drops with a dry
cloth.
• Do not use record cleaning sprays or
antistatic agents on CDs. Also, never
clean CDs with benzene, thinner, or
other volatile solvents which may
cause damage to disc surface.
Cassettes
• To protect your
recordings
from accidental
erasure on one
or both sides
of your cassette, snap out the tab
at the top of the cassette. If you
decide later to record on the tape,
seal the hole with a piece of adhesive tape. (Refer to diagram)
AVC MULTIMEDIA (“AVC”) makes the following limited warranty. This limited
warranty extend to the original consumer purchaser and is limited to non-commercial
use of the product.
violation of instructions provided with the product, or to product which has been
altered or modified without authorization of AVC, or to products or parts thereof
which have had the serial number removed or changed.
One Year Parts & Labor Warranty
AVC products purchased in the United States are warranted to be free from defects in
materials or workmanship for a period of one year from the date of their original retail
purchase. If the unit fails to conform to this warranty, we will service the product using
new or refurbished parts and products, at AVC’s sole discretion.
Out of Warranty
All warranties implied by state law, including the implied warranties of merchantability
and fitness for a particular purpose, are expressly limited to the duration of the
limited warranties set forth above. With the exception of any warranties implied by
state law as hereby limited, the foregoing warranty is exclusive and in lieu of all other
warranties, guarantees, agreements and similar obligations of manufacturer or seller
with respect to the repair or replacement of any parts. In no event shall AVC be liable
for consequential or incidental damages.
M odel no. ..............................................................................
During a period of one year from the effective warranty date, AVC will provide,
when needed, service labor to repair a manufacturing defect at its designated
Service Center. To obtain warranty service in the Untied States, you must first call our
Customer Support Center at 1-866-444-5746 or 1-800-252-6123, during the
hours listed in the box on the right. The determination of service will be made by
AVC Customer Support. PLEASE DO NOT RETURN YOUR UNIT TO AVC WITHOUT
PRIOR AUTHORIZATION. New or remanufactured replacements for defective parts or
products will be used for repairs by AVC at its designated Service Center for one year
from the effective warranty date. Such replacement parts or products are warranted
for an additional one year from the date of repair or replacement. The Customer
will be required to ship the unit to the Service Center indicated at the time Customer
Support is contacted to make the necessary repairs. The customer is responsible for all
transportation charges to the service facility.
Packaging and Shipping Instruction
When you send the product to the AVC service facility you must use the original carton box
and packing material or an equivalent as designated by AVC.
LIMITED WARRANTY
• Quit Slacking - A little bit of slack
in your tapes can cause scratches
on the tape, or worse yet, the tape
could break. If you notice some
slack in the tape, use a pencil to
tighten it up before you insert it.
Important:
Also keep your "Bill of Sale" as proof of purchase.
Your Responsibility
1) You must retain the original sale receipt to provide proof of purchase.
2) These warranties are effective only if the product is purchased and operated in
the U.S.A. or Canada.
3) Warranties extend only to defects in material or workmanship, and do not extend
to any product or parts which have been lost or discarded, or damage to product
or parts caused by misuse, accident, improper operation or maintenance, or use in
No person, agent, distributor, dealer or company is authorized to change, modify or
extend the terms of these warranties in any manner whatsoever. The time within action
must be commenced to enforce any obligation of AVC arising under the warranty or
under any statute, or law of the United States or any state thereof, is hereby limited
to one year from the date of purchase. This limitation does not apply to implied
warranties arising under state law.
This warranty gives you specific legal rights and you may also have other rights, which
may vary, from state to state. Some states do not allow limitation on how long an
implied warranty lasts, when an action may be brought, or the exclusion or limitation
of incidental or consequential damages, so the above provisions may not apply to you.
For more information on other products and services, please visit our web site at
www.1800customersupport.com/RCA
In the event your product requires repair after the limited warranty period
has expired, please contact our Customer Support Center at 1-866-444-5746,
1-800-252-6123 or www.1800customersupport.com/RCA
Hours: Monday–Thursday: 9am–7pm, Friday: 9am–5pm,
Saturday: 9am–NOON Eastern time.
Important:
You are responsible for any transportation, shipping or insurance relative to the
return of product to our Product Returns Center.
Product name ...................................................................................
Type of set .................................................................................
Serial no. ..................................................................................
Invoice no. ........................................................................
Date purchased ..........................................................................
Dealer name ..........................................................................
FOR SERVICE AND REPAIR, PLEASE VISIT
www.1800customersupport.com/RCA
Specifications and external appearance are subject to change without
notice.
IMPORTER
AVC Multimedia,
170 Esna Park, Unit 6, Markham,
Ontario L3R 1E3 Canada
© 2008 AVC Multimedia
http: //www.1800customersupport.com/RCA
http: //www.rcaaudiovideo.com