1
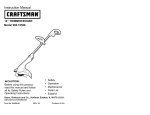
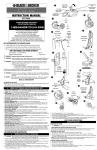
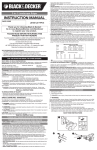
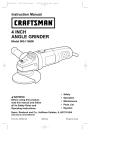
Instruction Manual
14” WEEDWACKER ELECTRIC
DUAL LINE TRIMMER
Model 74528
CAUTION:
Before using this product,
read this manual and follow
all its Safety Rules and
Operating Instructions.
•
•
•
•
•
Safety
Operation
Maintenance
Parts List
Español, p. 12
Sears, Roebuck and Co., Hoffman Estates, IL 60179 U.S.A.
www.sears.com/craftsman
Form No. 581180-02 Rev. 1
FEB. ‘ 04
Printed in Czech Republic
TRIMMER / EDGER DIAGRAM
Main Handle - 2
Power cord - 4
Trigger Lever - 1
Cable Restraint - 3
Secondary Handle - 5
Line Storage Pouch - 14
Handle Knob - 6
Spool Storage Position - 16
Tube - 15
Cable Storage Hooks - 8
Adj. Knob - 7
Guard - 10
Line Trimming Blade - 11
Heavy Duty
Line Cassette - 25
Head - 9
Spool Housing - 12
Cutting Line - 13
SEARS WARRANTY
FULL ONE YEAR WARRANTY ON CRAFTSMAN TRIMMER
If this Craftsman product fails due to a defect in material or workmanship within one
year from the date of purchase, return it to your nearest Sears store or Craftsman
outlet to have it replaced free of charge.
This warranty applies only while this trimmer / edger is used in the United States.
This warranty gives you specific legal rights, and you may also have other rights which
vary from state to state.
Sears, Roebuck and Co., Dept. 817WA, Hoffman Estates, IL 60179
WARNING: IMPORTANT SAFETY WARNINGS AND
INSTRUCTIONS
SAVE THESE INSTRUCTIONS
WARNING: When using electric
gardening appliances, basic safety
precautions should always be followed
to reduce risk of fire, electric shock, and
personal injury, including the following:
TO REDUCE RISK OF INJURY:
• Before any use, be sure everyone using
this tool reads and understands all safety
instructions and other information
contained in this manual.
• Save these instructions and review
frequently prior to use and in instructing
others.
READ ALL INSTRUCTIONS.
GENERAL SAFETY WARNINGS AND INSTRUCTIONS FOR
ALL TOOLS
• ALWAYS WEAR EYE PROTECTION –
Wear safety spectacles or goggles at
all times when this tool is plugged in.
• GUARD – Do not use this tool without
guard attached.
• DRESS PROPERLY – Do not wear
loose clothing or jewelry. They can be
caught in moving parts. Rubber gloves
and substantial rubber soled footwear
are recommended when working
outdoors. Don’t operate the tool when
barefoot or wearing open sandals.
Wear long pants to protect your legs.
Wear protective hair covering to contain
long hair.
• NYLON LINE – Keep face, hands and
feet clear of rotating nylon line at all
times.
• THE ROTATING LINE PERFORMS A
CUTTING FUNCTION – Use care
when trimming around screens and
desirable plantings.
2
• KEEP ALL BY-STANDERS AWAY – At
a safe distance from work area,
especially children.
• IMPORTANT – When being used as an
Edger, stones, pieces of metal and
other objects can be thrown out at high
speed by the line. The tool and guard
are designed to reduce the danger.
However, the following special
precautions should be taken:
• MAKE SURE that other persons and
pets are at least 100 feet away.
• TO REDUCE THE RISK of rebound
(ricochet) injury, work going away from
any nearby solid object such as wall,
steps, large stone, tree, etc. Use great
care when working close to solid objects
and where necessary, do edging or
trimming by hand.
• AVOID ACCIDENTALLY STARTING –
Don’t carry plugged-in tool with finger on
trigger.
• DO NOT FORCE THE TOOL – At a rate
faster than the rate at which it is able to
cut effectively.
• USE THE RIGHT TOOL – Do not use
this tool for any job except that for
which it is intended.
• DON’T OVERREACH – Keep proper
footing and balance at all times.
• DON’T ABUSE CORD – Don’t yank
cord from power supply. Keep cord from
heat, oil, and sharp edges.
• DAMAGE TO UNIT – If you strike or
become entangled with a foreign object,
stop tool immediately, unplug, check for
damage and have any damage repaired
before further operation is attempted.
Do not operate with a broken hub or
spool.
• DAMAGE TO CORD – Keep power
cord away from rotating line. If you
damage the cord, unplug it from the
power supply before moving the tool or
examining the damage. A damaged cord
must be replaced before further use.
• DISCONNECT TOOL – When not in
use, when replacing line, or prior to
cleaning.
• AVOID DANGEROUS
ENVIRONMENTAL CONDITIONS – Do
not use electric tools in damp or wet
locations. Follow all instructions in this
Instruction Manual for proper operation
of your tool. Don’t use the tool in the rain.
• DO NOT OPERATE portable electric
tools in gaseous or explosive
atmospheres. Motors in these tools
normally spark, and the sparks might
ignite fumes.
• STORE IDLE TOOLS INDOORS –
When not in use, tools should be stored
indoors in a dry, locked-up place out of
reach of children.
• GROUND FAULT CIRCUIT
INTERRUPTER (GFCI) protection
should be provided on the circuits or
outlets to be used for the gardening
appliance. Receptacles are available
having built in GFCI protection and may
be used for this measure of protection.
• SECURE EXTENSION CORD using the
cord retainer shown in Figure 4.
• STAY ALERT – Watch what you are
doing. Use common sense. Do not
operate tool when you are tired.
• MAINTAIN APPLIANCES WITH CARE
– Follow instructions for lubricating and
changing accessories. Inspect extension
cords periodically and replace if damaged.
Keep handles dry, clean and free from
oil and grease.
• CHECK DAMAGED PARTS – Before
further use of the appliance, a guard or
other part that is damaged should be
carefully checked to determine that it
will operate properly and perform its
intended function. Check for alignment
of moving parts, binding of moving
parts, breakage of parts, mounting, and
any other condition that may affect its
operation. A guard or other part that is
damaged should be properly repaired or
replaced by a qualified service facility
unless otherwise indicated elsewhere in
this manual.
WARNING: When servicing double
insulated tools, USE ONLY IDENTICAL
REPLACEMENT PARTS. Replace or
repair damaged cords.
WARNING: To prevent electrical shock
hazard, use only with an extension
cord suitable for outdoor use. Always
connect extension cords to a fused line
or one protected by a circuit breaker.
• EXTENSION CORDS. Make sure your
extension cord is in good condition. When
using an extension cord, be sure to use
one heavy enough to carry the current
your product will draw. An undersized
extension cord will cause a drop in line
voltage resulting in loss of power and
overheating. The table below shows the
3
correct size to use depending on cord
length and nameplate ampere rating. If
in doubt, use the next heavier gauge.
The smaller the gauge number, the
heavier the cord. To reduce the risk of
disconnection of the appliance from the
extension cord during operation, use the
extension cord retainer described in this
manual.
Minimum Gage for Extension Cords (AWG)
120 VAC Tools
Total Cord Length 0-25 26-50 51-100 105-150
Amp Rating AWG AWG AWG AWG
More than 0
18
16
16
14
Not More than 6
More than 6
18
16
14
12
Not More than 10
More than 10
16
16
14
12
Not more than 12
More than 12
14
12
Not
Not more than 16
Recommended
WARNING:
Outdoor use extension cords:
To reduce the risk of electric shock, use
only with an extension cord intended for
outdoor use, such as an extension cord of
type SW-A, SOW-A, STW-A, STOW-A,
SJW-A, SJOW-A, SJTW-A, or SJTOW-A.
IMPORTANT WARNINGS FOR STRING TRIMMERS
• Do not bump the feed head against the
ground - it will disrupt the feed mechanism.
• Angle tool slightly (5˚ to 10˚) when
trimming.
• Always use the cord retainer.
• Wear long pants and substantial
footwear to protect yourself from injury
caused by flying debris. This is
especially important when edging with
the appliance.
• The guard must be installed before
trimming or edging - if not, the motor
will overheat.
• When replacing the AFS outfeed line,
use only .060” diameter TWISTED line
- otherwise the unit will not function
properly.
• When replacing the HDL fixed line use
only Craftsman line item #85876.
SAFETY WARNINGS
DOUBLE INSULATION
blade is wider than the other). This
equipment must be used with a suitable
3 wire outdoor extension cord. Polarized
connections will fit together only one
way. Make sure that the receptacle end
of the extension cord has large and small
blade slot widths. If the plug does not fit
fully into the extension cord, reverse the
plug. If it still does not fit, obtain a
suitable extension cord. If the extension
cord does not fit fully into the outlet,
contact a qualified electrician to install the
proper outlet. Do not change the tool plug
or extension cord in any way.
NOTE: This symbol denotes Double
Insulation. Double insulated tools are
constructed throughout with two
separate layers of electrical insulation or
one double thickness of insulation
between you and the tool’s electrical
system. Tools built with this insulation
system are not intended to be grounded.
As a result, your tool is equipped with a
two prong plug which permits you to use
extension cords without concern for
maintaining a ground connection.
NOTE: Double insulation does not take
the place of normal safety precautions
when operating this tool. The insulation
system is for added protection against
injury resulting from a possible electrical
insulation failure within the tool.
REPLACEMENT PARTS: When
servicing all tools, USE IDENTICAL
REPLACEMENT PARTS.
SPECIFIC WARNING
WARNING: Some dust created by this
product contains chemicals known to the
State of California to cause cancer, birth
defects or other reproductive harm.
Some examples of these chemicals are:
• compounds in fertilizers
• compounds in insecticides, herbicides
and pesticides
• arsenic and chromium from
chemically treated lumber
To reduce your exposure to these
POLARIZED PLUGS
Repair or replace damaged cords.
To reduce the risk of electric shock, this
equipment has a polarized plug (one
4
State of California to cause cancer, and
birth defects or other reproductive harm.
Wash hands after handling.
chemicals, wear approved safety
equipment such as dust masks that are
specially designed to filter out microscopic
particles.
WARNING: This product contains
chemicals, including lead, known to the
SAVE THESE INSTRUCTIONS
ASSEMBLY INSTRUCTIONS
ASSEMBLY
1
WARNING: To avoid serious injury,
make sure that the tool is switched off
and unplugged before assembly.
FITTING THE GUARD (FIG. 1)
• Remove the screw (17) from the guard
(10).
• Place the guard onto the tool as shown.
• Firmly press the guard until it snaps
into place.
• Secure the guard with the screw.
17
10
2
WARNING: To avoid serious injury,
never use the tool unless the guard is
properly fitted.
FITTING THE SECONDARY HANDLE (FIG. 2)
• Place the handle (5) on the tool as
shown.
• Adjust the handle to the most
comfortable position. Use the markings
as a guide.
• Pass the bolt (6) through the secondary
handle and the main handle.
• Screw the bolt into the far side of the
secondary handle. Do not overtighten
the bolt.
5
6
3
28
14
16
STORING THE CASSETTE NOT IN USE
(FIG. 3)
The tool has two cutting system cassettes:
• AFS: Autofeed System twin line for
light trimming and edging.
• HDL: Heavy Duty Line cutting system
for more overgrown areas.
19/25
RELEASING THE CUTTING LINE
For shipment purposes, the cutting line is
taped to the spool housing.
• Remove the tape holding the cutting
line (13) to the spool housing (12).
The cutting system cassette not in use
can be stored in the position provided (16).
• Align the tabs on the cassette with the
cut outs (28) at the underside of the
handle.
• Push the cassette into the handle until
it snaps securely into place.
CONNECTING THE TOOL (FIG. 4)
• Connect the female plug of a suitable
extension cord to the power inlet (4).
• Loop the cord through the cord
restraint (3).
• Insert the plug into a receptacle.
STORING THE HEAVY CUTTING LINE (FIG. 3)
• The unit is supplied with several pieces
of spare heavy cutting line.
• The extra pieces of heavy cutting line
can be stored securely in the recess in
the handle (14).
5
WARNING:
Outdoor use extension cords:
To reduce the risk of electric shock, use
only with an extension cord intended for
outdoor use, such as an extension cord
of type SW-A, SOW-A, STW-A, STOW-A,
SJW-A, SJOW-A, SJTW-A, or SJTOW-A.
4
4
3
OPERATING INSTRUCTIONS
CAUTION: To avoid tool damage, let
the tool work at its own pace. Do not
overload.
SETTING THE TOOL TO TRIMMING OR
EDGING MODE (FIG. 5, 6 & 7)
The tool can be used in trimming mode
as shown in Fig. 5 or in edging mode to
trim overhanging grass along lawn edges
and flower beds as shown in Fig. 6.
CAUTION: To avoid tool damage, do
not use the heavy duty cutting system
for edging.
TRIMMING MODE (FIG. 5 & 6)
For trimming, the trimmer head should be
in the position shown in Fig. 5. If it is not:
• Depress the adjustment button (7).
• Rotate the head (9), while releasing the
button.
• When the head is in position, the
button will lock into place.
Note: The head will only rotate in one
direction.
EDGING MODE (FIG. 6)
For edging, the trimmer head should be
in the position shown in Fig. 6. If it is not:
• Depress the adjustment button (7).
• Rotate the head (9), while releasing the
button.
• When the head is in position, the
button will lock into place.
Note: The head will only rotate in one
direction.
CAUTION: To avoid tool damage, do
not use the heavy duty cutting system
for edging.
5
10°
6
7
15
7
9
• Depress the adjustment button (7).
• Gently pull the tube (15) in or out of the
motor housing (9) to the desired height,
while releasing the button.
• When the tube is in position, the button
will lock into place.
SWITCHING ON AND OFF
• To switch the tool on, squeeze the
trigger lever (1).
• To switch the tool off, release the
trigger lever.
WARNING: To avoid serious injury,
never attempt to lock the
trigger lever in the on position.
ADJUSTING THE HEIGHT OF THE
TOOL (FIG. 7)
This tool has a telescopic mechanism,
allowing you to set it to a comfortable
height. There are three height settings.
To adjust the height setting, proceed as
follows:
HINTS FOR OPTIMUM USE
GENERAL
• In order to achieve optimum cutting
results, only cut dry grass.
6
TRIMMING
• Hold the tool as shown in Fig. 5.
• Gently swing the trimmer from side to side.
• When cutting long grass, work in
stages from the top. Take small cuts.
• Keep the tool away from hard objects
and delicate plants.
• If the tool starts running slowly, reduce
the load.
EDGING
Optimum cutting results are achieved on
edges deeper than 2 inches.
• Do not use the tool to create edges. To
create edges, use an edging spade.
• Guide the tool with edge guide on hard
surface as shown in Fig. 6.
• To make a closer cut, slightly tilt the tool.
MAINTENANCE
WARNING: To avoid serious injury,
switch off and unplug the tool before
performing any maintenance.
Your tool has been designed to operate
over a long period of time with a minimum
of maintenance. Continuous satisfactory
operation depends upon proper tool care
and regular cleaning.
• Regularly clean the ventilation slots in
your tool using a soft brush or dry cloth.
• Regularly clean the cutting line and
spool using a soft brush or dry cloth.
• Regularly use a blunt scraper to remove
grass and dirt from the underneath of
the guard.
FITTING A NEW SPOOL OF AFS
CUTTING LINE (FIG. 8 & 9)
Complete cassettes containing a spool of
cutting line are available from your
Craftsman dealer (item no. 85878).
• Unplug the tool.
• Depress the tabs (18) and remove the
cassette (19) from the cassette housing
(12) in the trimmer head. Fig. 8.
• Grasp empty spool (20) with one hand
and cassette with other hand and pull
spool out from cassette. If lever in base
of cassette becomes dislodged, replace
in correct position before inserting new
spool into cassette.
• Remove any dirt and grass from the
cassette and housing.
• Take the new spool and push it onto
the boss (Fig. 9) in the cassette. Rotate
the spool slightly until it is seated.
• Unclip the end of one of the cutting lines
and guide the line into one of the eyelets
(21). Fig. 9. The line should protrude
approx. 4-3/8 in. from the cassette.
• Unclip the end of the other cutting line
and guide the line into the other eyelet.
The line should protrude approx.
4-3/8 in. from the cassette.
• Align the cassette tabs (18) with the
slots (22) in the housing. Fig. 8.
• Push the cassette onto the housing
until it snaps securely into place.
CAUTION: To avoid tool damage, If
the cutting lines protrude beyond the
trimming blade (11), cut them off so
that they just reach the blade.
8
20
19
18
19
12
22
11
20
9
21
Boss
18
Lever
21
19
WINDING NEW LINE ONTO AN EMPTY
SPOOL (FIG. 10 &11)
You may wind new cutting line onto an
empty spool. Replacement packs of
0.050” cutting line are available from your
Craftsman dealer.
• Remove the empty spool from the tool
as described above.
• Remove any remaining cutting line
from the spool.
• First wind new line onto the
uppermost part of the spool.
- Feed 3/4 inch of cutting line into one
of the line anchoring slots.
- Wind the cutting line onto the spool in
the direction of the arrow on the spool.
Make sure to wind the line on neatly
and in layers. Do not criss-cross.
Fig. 10.
- When the wound cutting line reaches
the recesses (24), cut the line. Fig. 11.
7
- Temporarily park the line in the holding
slots (23) on one side of the spool as
shown in the inset in Fig. 11.
• Repeat the above procedure for the
second cutting line on the lower
section of the spool.
• Fit the spool onto the tool as described
in Fitting a New Spool of Cutting Line.
FITTING THE HDL CASSETTE (FIG. 12)
Your trimmer is shipped with the AFS
cassette installed. To fit the HDL (Heavy
Duty Line) cassette, proceed as follows:
• Unplug the tool.
• Keep the tabs (18) depressed and
remove the AFS cassette (19) from the
cassette housing (12) in the trimmer
head. Fig. 8.
• Make sure a piece of heavy cutting line
is correctly fitted to the HDL cassette,
as described in Fitting a New Piece of
Heavy Duty Cutting Line below. Fig. 12.
• Align the tabs on the HDL cassette
with the slots (22, Fig. 8) in the
cassette housing.
• Push the HDL cassette into the housing
until it snaps securely into place.
CAUTION: Before you begin trimming,
only use the appropriate type of
Craftsman cutting line. Ensure that
cutting line is present in both sections
of the spool. Fig. 9.
10
FITTING A NEW PIECE OF HEAVY
DUTY CUTTING LINE (FIG. 12)
Replacement pieces of heavy duty
cutting line are available from your
Craftsman dealer (item. no. 85876). To fit
a new piece of cutting line, proceed as
follows:
• Unplug the trimmer from its power
source.
• Depress the tabs (28) and remove the
HDL cassette (25) from the cassette
housing (12, Fig. 8) in the trimmer
head.
• Remove the used piece of line from
the cassette.
• Remove any dirt and grass from the
cassette and housing.
• Thread a new piece of line (26)
through the holes in each side of the
cassette.
• Place the metal ferrule (27) in position
as shown.
• Align the cassette tabs with the slots
(22, Fig. 8) in the housing.
• Push the cassette onto the housing
until it snaps securely into place.
11
24
23
23
12
25
28
27
26
8
TROUBLESHOOTING
If your tool does not seem to operate
properly, follow the instructions below. If
this does not solve the problem, please
contact your nearest Sears Parts & Repair
Center.
WARNING: To avoid serious injury,
switch off and unplug the tool before
performing any maintenance.
Tool runs slowly
• Check that the cassette housing (12)
can rotate freely. Carefully clean it if
necessary.
• Check that the cutting line does not
protrude more than 4-3/8 in. from the
cassette. If it does, cut it off so that it
just reaches the line trimming blade.
Automatic line feed does not work
• Keep the tabs depressed and remove
the cassette from the cassette housing
in the trimmer head.
• Pull the cutting line until it protrudes
4-3/8 in. from the cassette. If
insufficient cutting line is left on the
spool, install a new spool of cutting
line.
• Align the tabs on the cassette with the
cut outs in the housing.
• Push the cassette onto the housing
until it snaps securely into place.
• If the cutting line protrudes beyond the
trimming blade, cut it off so that it just
reaches the blade.
If the automatic line feed still does not
work or the spool is jammed, try the
following suggestions:
• Carefully clean the cassette and
housing.
• Remove the spool and check if the
lever in the cassette can move freely.
• Remove the spool and unwind the
cutting line, then wind it on neatly
again. Replace the spool into the
cassette.
9
Parts Page
10
Diagram
11
DIAGRAMA DE LA PODADORA/ORILLADORA
Mango principal - 2
Cable de alimentación - 4
Palanca tipo gatillo - 1
Sujetador del cable - 3
Bolsa de almacenamiento de la línea - 14
Mango secundario - 5
Perilla de ajuste del mango - 6
Posición de almacenamiento
del carrete - 16
Tubo - 15
Ganchos para almacenamiento del cable - 8
Botón de ajuste - 7
Protector- 10
Cuchilla podadora de línea - 11
Caja protectora
del motor (cabeza) - 9
Línea de corte para
trabajos pesados - 25
Caja protectora del
carrete - 12
Línea de corte - 13
GARANTÍA SEARS
GARANTÍA COMPLETA POR UN AÑO PARA LA PODADORA CRAFTSMAN
Si este producto Craftsman presenta fallas debido a material o mano de obra
defectuosos, durante el transcurso del primer año a partir de la fecha de compra,
devuélvalo a la tienda Sears o Craftsman más cercana para que se lo reemplacen sin
costo alguno.
Esta garantía es válida solamente si esta podadora/orilladora se utiliza en los Estados
Unidos.
Esta garantía le otorga derechos legales específicos y otros derechos que pueden
variar dependiendo del estado.
Sears, Roebuck and Co., Dept. 817WA, Hoffman Estates, IL 60179
ADVERTENCIA: INSTRUCCIONES Y ADVERTENCIAS
DE SEGURIDAD IMPORTANTES
ADVERTENCIA: Siempre que utilice
GUARDE ESTAS INSTRUCCIONES
aparatos eléctricos de jardinería debe
seguir ciertas precauciones básicas de
seguridad, entre las que se encuentran
las siguientes, a fin de reducir los
riesgos de incendio, choque eléctrico y
lesiones corporales.
PARA REDUCIR EL RIESGO DE LESIONES:
• Antes de cualquier uso, asegúrese que
cualquier persona que vaya a utilizar
esta herramienta lea y comprenda todas
las instrucciones de seguridad y demás
información contenida en este manual.
• Conserve estas instrucciones y repáselas
con frecuencia antes de usar la
herramienta y al instruir a otras personas.
LEA TODAS LAS INSTRUCCIONES.
ADVERTENCIAS E INSTRUCCIONES GENERALES
DE SEGURIDAD PARA TODA HERRAMIENTA
• UTILICE SIEMPRE PROTECCIÓN
OCULAR – Utilice lentes o gafas de
seguridad siempre que esta herramienta
esté enchufada.
• PROTECTOR – No utilice esta herramienta
si no tiene instalado el protector.
• VÍSTASE DE MANERA ADECUADA –
No se vista con prendas sueltas ni
artículos de joyería. Estos pueden quedar
atrapados en las piezas móviles. Se
recomienda el empleo de guantes de
goma y de calzado resistente con suela
de goma cuando trabaje a la intemperie.
No opere la herramienta con los pies
descalzos o con sandalias abiertas.
Utilice pantalones largos para proteger
sus piernas. Cúbrase el cabello si lo tiene
largo.
12
• LÍNEA DE NYLON – Conserve la cara,
las manos y los pies alejados de la línea
de nylon giratoria en todo momento.
• LA LÍNEA DE GIRATORIA EFECTÚA
UNA FUNCIÓN DE CORTE – Tenga
cuidado cuando recorte alrededor de
biombos y plantas que desea conservar.
• CONSERVE ALEJADOS A
ESPECTADORES - A una distancia segura
del área de trabajo. Especialmente a los
niños.
• IMPORTANTE – Cuando utilice la unidad
como orilladora, tenga cuidado ya que la
línea puede despedir piedras, piezas de
metal y otros objetos a alta velocidad. La
herramienta y el protector están
diseñados para disminuir este peligro. Sin
embargo, debe tomar las siguientes
precauciones especiales:
• ASEGÚRESE que otras personas y
mascotas estén a por lo menos 30,5
metros (100 pies) de distancia.
• PARA REDUCIR EL RIESGO de
lesiones causadas por rebote, trabaje
desde cualquier objeto sólido como un
muro, escalones, piedras grandes,
árboles, etc., hacia afuera Tenga mucho
cuidado cuando trabaje cerca de este
tipo de objetos y, cuando sea necesario,
orille o pode a mano.
• EVITE EL ENCENDIDO ACCIDENTAL No transporte la unidad enchufada con el
dedo en el gatillo.
• NO FUERCE LA HERRAMIENTA - A una
velocidad mayor a la que utiliza para
cortar con eficacia.
• EMPLEE LA HERRAMIENTA
ADECUADA - No utilice esta herramienta
en tareas para las que no fue diseñada.
• NO SE SOBREEXTIENDA – Conserve
siempre el equilibrio y los pies bien apoyados.
• NO MALTRATE EL CABLE - No tire del
cable para desconectarlo de la toma de
corriente. Consérvelo alejado de calor,
grasas y cantos afilados.
• DAÑOS A LA UNIDAD - Si golpea la
unidad o ésta se atasca con algún objeto
extraño, apáguela inmediatamente,
desenchúfela y verifique si se produjeron
daños. Si los hay, haga reparar la unidad
antes de intentar volver a usarla. No la
utilice si el carrete o el cubo se rompen.
• DAÑOS AL CABLE - Conserve alejado
al cable de la línea giratoria. Si daña el
cable eléctrico, desconéctelo de la toma
de corriente antes de mover la unidad o
examinar el daño. El cable dañado debe
reemplazarse antes de usar de nuevo la
herramienta.
• DESCONECTE LA HERRAMIENTA Cuando no la use, cuando cambie la
línea o antes de limpiar la unidad.
• EVITE CONDICIONES AMBIENTALES
PELIGROSAS - No utilice herramientas
eléctricas en lugares húmedos o mojados.
Siga todas las instrucciones contenidas
en este manual para el funcionamiento
adecuado de su herramienta. No utilice la
unidad bajo la lluvia.
• NO OPERE herramientas eléctricas
portátiles en atmósferas gaseosas o
explosivas. Los motores de estas
herramientas producen chispas en
condiciones normales y estas chispas
pueden provocar la ignición de los gases.
• GUARDE SUS HERRAMIENTAS BAJO
TECHO CUANDO NO LAS EMPLEE –
Las herramientas que no se emplean
deben guardarse bajo techo en un lugar
seco y bajo llave, fuera del alcance de
los niños.
• Se debe proteger los circuitos o tomas de
corriente a ser utilizados para el aparato
de jardinería con INTERRUPTORES DE
CIRCUITO EN CASO DE FALLAS DE
CONEXIÓN A TIERRA (GFCI). Existen
tomas de corriente con protección GFCI
integrada y se pueden utilizar para esta
medida de seguridad.
• ASEGURE EL ALARGADOR con el
sujetador de cable ilustrado en la Figura 4.
• ESTÉ ALERTA - Concéntrese en lo que
esté haciendo. Utilice el sentido común.
No opere la herramienta cuando esté
cansado.
• CUIDE SUS APARATOS - Siga las
instrucciones de lubricación y cambio de
accesorios. Revise sus alargadores
periódicamente y cámbielos si están
dañados. Conserve los mangos secos,
limpios y libres de aceite y grasa.
• REVISE LAS PARTES DAÑADAS. Antes
de seguir empleando cualquier aparato,
es indispensable revisar con mucho
cuidado para determinar si un protector u
otra parte dañada podrá operar de la
manera adecuada para cumplir con su
función. Revise las partes móviles para
ver que estén bien alineadas, no
trancadas ni rotas ni montadas una sobre
otra o que presenten cualquier otra
condición que pudiera afectar su
operación. Un protector u otra parte
dañada debería repararse debidamente o
cambiarse en un centro de servicio
calificado, a menos que se indique otra
cosa en este manual.
13
ADVERTENCIA: Cuando efectúe servicio
a herramientas con doble aislamiento,
UTILICE UNICAMENTE REPUESTOS
ORIGINALES. Repare o reemplace
cables dañados.
ADVERTENCIA: Para evitar el riesgo de
choque eléctrico, utilice solamente con
un alargador para uso a la intemperie.
Conecte siempre los alargadores a una
línea protegida por un fusible o por un
interruptor de circuito.
• ALARGADORES. Asegúrese que su
alargador esté en buenas condiciones.
Cuando utilice un alargador, asegúrese
de que tenga el calibre necesario para
soportar la corriente que su unidad
requerirá. Un alargador con calibre
insuficiente ocasionará una caída en el
voltaje de la línea, causando pérdida de
potencia y sobrecalentamiento. La tabla
que sigue muestra el calibre correcto
para emplearse dependiendo de la
longitud del cable y el amperaje
señalado en la placa de identificación.
Si tiene alguna duda, utilice el calibre
superior siguiente. Mientras menor sea
el número del calibre, mayor será su
capacidad. Para reducir el riesgo de que
el aparato se desconecte del alargador
durante la operación, utilice el sujetador
de cable que se describe en este manual.
ADVERTENCIA: Extensiones para
uso a la intemperie:
Para reducir los riesgos de choque
eléctrico, únicamente utilice
alargadores fabricados para trabajo a
la intemperie, como los tipos SW-A,
SOW-A, STW-A, STOW-A, SJW-A,
SJOW-A, SJTW-A ó SJTOW-A.
Calibre mínimo para alargadores (AWG)
Herramientas a120 VCA
Longitud total
del cable
0-7,6 7,6-15,2 15,2-30,5 30,5-45,7
Amperaje
AWG AWG
AWG
AWG
Más de 0
18
16
16
14
No más de 6
Más de 6
18
16
14
12
No más de 10
Más de 10
16
16
14
12
No más de 12
Más de 12
14
12
No se
No más
Recomienda
de 16
ADVERTENCIAS IMPORTANTES PARA ORILLADORAS DE LINEA
• El protector debe instalarse antes de
podar u orillar - de lo contrario, el
motor se sobrecalentará.
• Cuando cambie la línea de alimentación
AFS, utilice sólo línea TORCIDA de
1,65 mm (0.060 pulg.) de diámetro - de
otra manera, la unidad no funcionará
adecuadamente.
• Cuando cambie la línea fija HDL, use
sólo línea Craftsman, artículo
no. 85876.
• No golpee la cabeza de alimentación
contra el suelo pues afectará al
mecanismo de alimentación.
• Incline la unidad ligeramente (5° a 10°)
cuando pode.
• Utilice siempre el sujetador de cable.
• Vista pantalones largos y calzado
resistente para protegerse de lesiones
ocasionadas por objetos despedidos.
Esto es de especial importancia
cuando orille con el aparato.
ADVERTENCIAS DE SEGURIDAD
DOBLE AISLAMIENTO
NOTA: Este símbolo indica doble
aislamiento. Las herramientas con doble
aislamiento están construidas con dos
capas diferentes de aislamiento eléctrico
o una capa de aislamiento de espesor
doble entre usted y el sistema eléctrico de
la herramienta. Las herramientas con
doble aislamiento no necesitan
conectarse a tierra. Como resultado, su
herramienta está equipada con un
enchufe de dos patas que le permite
utilizar alargadores sin preocuparse de
mantener la conexión a tierra.
NOTA: El doble aislamiento no reemplaza
las precauciones normales de seguridad
cuando se opere la herramienta. El
sistema de aislamiento le proporciona
protección adicional contra las lesiones
resultantes de posibles fallas en el
aislamiento eléctrico de la herramienta.
REPUESTOS: EMPLEE REPUESTO
ORIGINALES cuando haga servicio a
toda herramienta.
ENCHUFES POLARIZADOS
Cambie o repare cables dañados.
Este equipo cuenta con un enchufe
polarizado (con una pata más ancha que
la otra) para reducir el riesgo de choque
eléctrico. El equipo debe utilizarse con un
alargador adecuado para trabajo a la
intemperie de 3 hilos. Las conexiones
polarizadas solamente pueden ser
conectadas de una manera. Asegúrese
14
que el extremo del alargador que irá
enchufado en la toma de corriente tenga
ranuras con anchos grandes y pequeños.
Si el enchufe no entra completamente al
alargador, inviértalo. Si aún así no entra,
consiga un alargador adecuado. Si el
alargador no entra por completo a la toma
de corriente comuníquese con un
electricista calificado para que le instale
la toma de corriente adecuada. Por ningún
motivo altere el enchufe o el alargador en
ninguna manera.
ADVERTENCIA ESPECÍFICA
ADVERTENCIA: Parte del polvo
originado por este producto contiene
químicos que en el estado de California
se consideran como causantes de
cáncer, defectos congénitos u otros
daños reproductivos. Algunos ejemplos
de estos químicos son:
• compuestos en fertilizantes
• compuestos en insecticidas,
herbicidas y pesticidas
• arsénico y cromo de madera tratada
químicamente
Para reducir su exposición a estos
químicos, utilice equipo de seguridad
aprobado como máscaras contra polvo
diseñadas específicamente para filtrar
partículas microscópicas.
ADVERTENCIA: Este producto
contiene químicos, incluyendo plomo,
que en el estado de California se
consideran como causantes de cáncer,
defectos congénitos u otros daños
reproductivos. Lave sus manos después
de manejarlo.
GUARDE ESTAS INSTRUCCIONES
INSTRUCCIONES DE ENSAMBLAJE
ENSAMBLAJE
ADVERTENCIA: Para evitar causar
lesiones graves, asegúrese que el
conmutador de la herramienta esté
apagado y que el cable esté
desenchufado antes de ensamblar la
herramienta.
INSTALACIÓN DEL PROTECTOR (FIG.1)
• Quite el tornillo (17) del protector (10).
• Coloque el protector en la herramienta,
como aparece ilustrado.
• Presione firmemente sobre el protector
hasta que encaje en su sitio.
• Asegure el protector con el tornillo.
ADVERTENCIA: Para evitar causar
lesiones graves, nunca utilice esta
herramienta si el protector no está
debidamente instalado.
INSTALACIÓN DEL MANGO
SECUNDARIO (FIG. 2)
• Coloque el mango (5) en la
herramienta, como aparece ilustrado.
• Ajuste el mango a la posición más
cómoda. Utilice las marcas como guías.
• Pase el perno (6) por el mango
secundario y el mango principal.
• Atornille el perno en el otro extremo
del mango secundario. No ajuste el
perno demasiado.
ALMACENAMIENTO DEL CASSETTE
QUE NO ESTÁ EN USO (FIG. 3)
La herramienta tiene dos cassettes de
corte:
• AFS: Línea doble con sistema de
autoalimentación, para cortes ligeros y
orillado.
1
17
10
2
5
6
3
28
14
16
19/25
15
CONEXIÓN DE LA HERRAMIENTA
(FIG. 4)
• Conecte el enchufe hembra de un
alargador apropiado a la entrada de
corriente (4).
• Enrolle el cable en el sujetador del
cable (3).
• Inserte el enchufe en la toma de corriente.
ADVERTENCIA:
Alargadores para el exterior:
Para reducir el riesgo de descargas
eléctricas, use sólo con un alargador
apropiado para uso en el exterior, tales
como los de tipo SW-A, SOW-A,
STW-A, STOW-A, SJW-A, SJOW-A,
SJTW-A ó SJTOW-A.
• HDL: Sistema de corte para trabajo
pesado, para aquellas áreas que
requieren más corte.
El cassette de corte que no esté en uso
puede ser almacenado en el lugar
proporcionado (16).
• Alinee las lengüetas del cassette con
los orificios (28) que se encuentran en
la parte inferior del mango.
• Empuje el cassette en el mango hasta
que encaje firmemente en su sitio.
ALMACENAMIENTO DE LA LÍNEA DE
CORTE PARA TRABAJO PESADO
(FIG. 3)
• La unidad viene con varias piezas de
líneas de corte adicionales.
• Las piezas adicionales de línea de
corte para trabajo pesado pueden
almacenarse en forma segura en la
hendidura del mango (14).
LIBERACIÓN DE LA LÍNEA DE CORTE
Para su transporte, la línea de corte
viene pegada con cinta adhesiva a la
caja protectora del carrete.
• Quite la cinta adhesiva que sujeta la
línea de corte (13) a la caja protectora
del carrete (12).
4
4
3
INSTRUCCIONES DE OPERACIÓN
PRECAUCIÓN: Para evitar causar
daños a la herramienta, deje que esta
haga su trabajo a su propia velocidad.
No sobrecargue la unidad.
MODALIDAD DE PODADO U
ORILLADO (FIG. 5, 6 y 7)
Esta herramienta puede utilizarse en
modalidad de podado, como lo muestra
la Fig. 5 ó de orillado para podar pasto
que sobresalga de los bordes del jardín
y de jardineras, como lo muestra la Fig. 6.
PRECAUCIÓN: Para evitar causar
daños a la herramienta, no utilice el
sistema de corte para trabajo pesado
cuando orille.
MODALIDAD DE PODADO (FIG. 5 y 6)
Para podar, el cabezal de corte debería
encontrarse en la posición ilustrada en la
Fig. 5. Si no lo está,
• Presione el botón de ajuste (7).
• Gire el cabezal (9), al tiempo que
suelta el botón.
• Cuando el cabezal esté en posición, el
botón encajará en su sitio.
Nota: El cabezal sólo gira en una
dirección.
MODALIDAD DE ORILLADO (FIG. 6)
Para orillar, el cabezal de corte debería
encontrarse en la posición ilustrada en la
5
10°
Fig. 6. Si no lo está,
• Presione el botón de ajuste (7).
• Gire el cabezal (9), al tiempo que
suelta el botón.
• Cuando el cabezal esté en posición, el
botón encajará en su sitio.
Nota: El cabezal sólo gira en una
dirección.
PRECAUCIÓN: Para evitar causar
daños a la herramienta, no utilice el
sistema de corte para trabajo pesado
cuando orille.
AJUSTE DE LA ALTURA DE LA
HERRAMIENTA (FIG. 7)
Esta herramienta tiene un mecanismo
telescópico que le permite fijarla a una
altura de mayor comodidad para usted.
Existen tres configuraciones de altura.
Para ajustar la altura, siga los siguientes
pasos:
16
• Presione el botón de ajuste (7).
• Suavemente deslice el tubo (15) hacia
adentro o afuera de la caja protectora
del motor (9) hasta que quede a la
altura deseada, al tiempo que suelta el
botón. Cuando el tubo esté en
posición, el botón encajará en su sitio.
ENCENDIDO Y APAGADO
• Para encender la herramienta, apriete
la palanca tipo gatillo (1).
• Para apagar la herramienta, suelte la
palanca tipo gatillo.
ADVERTENCIA: Para evitar causar
lesiones graves, nunca trate de dejar
bloqueada la palanca tipo gatillo en la
posición encendida.
CONSEJOS PARA SU USO ÓPTIMO
GENERAL
• Para poder lograr resultados óptimos
en sus cortes, no corte pasto mojado.
PODADO
• Sostenga la herramienta como lo
muestra la Fig. 5
• Oscile la cortadora suavemente, de
lado a lado.
• Cuando corte pasto largo, trabaje en
etapas empezando por las puntas.
Haga cortes pequeños.
6
7
15
7
9
• Mantenga la herramienta alejada de
objetos duros y de plantas delicadas.
• Si la herramienta empieza a disminuir
su velocidad de operación, reduzca la
carga.
ORILLADO
Los mejores resultados de corte se
logran en bordes de más de 5 cm (2
pulg.) de profundidad.
• No use la herramienta para crear
bordes. Para crear bordes use una
pala de orillado.
• Guíe la herramienta con la guía de
orilla sobre una superficie dura, como
se muestra en la Fig. 6.
• Para hacer un corte más apegado al
suelo, incline ligeramente la
herramienta.
MANTENIMIENTO
ADVERTENCIA: Para evitar causar
lesiones graves, apague y desenchufe
la herramienta antes de realizar
cualquier tipo de mantenimiento.
Su herramienta ha sido diseñada para
que opere por períodos largos de tiempo
necesitando sólo un mínimo de
mantenimiento. Su operación
satisfactoria depende del cuidado debido
y la limpieza de la herramienta.
• Limpie en forma regular las rejillas de
ventilación en su herramienta usando
una escobilla suave o un paño seco.
• Limpie en forma regular la línea de
corte y el carrete con una escobilla
suave o un paño seco.
• Utilice en forma regular un raspador
romo para quitarle el pasto y la tierra a
la parte inferior del protector.
INSTALACIÓN DE UN NUEVO
CARRETE DE LÍNEA AFS DE CORTE
(FIG. 8 y 9)
Podrá encontrar cassettes completos con
un carrete de línea de corte en su
distribuidor Craftsman (artículo no. 85878)
• Desenchufe la herramienta.
• Presione las lengüetas (18) y quite el
•
•
•
•
•
17
cassette (19) de la caja protectora del
cassette (12) en el cabezal de corte.
Fig. 8
Tome el carrete vacío (20) con una
mano y el cassette con la otra y tire
del carrete para sacarlo del cassette.
Si la palanca de la base del cassette
se sale, póngala de regreso en la
posición correcta antes de insertar el
carrete nuevo en el cassette.
Quite cualquier tierra y pasto que
pueda encontrar en el cassette y su
caja protectora.
Tome el carrete nuevo y empújelo en
el cubo (Fig. 9) del cassette. Gire
ligeramente el carrete hasta que esté
debidamente asentado.
Desenganche el extremo de una de las
líneas de corte y guíe la línea por uno
de los ojetes (21). Fig. 9. La línea
debería sobresalir aproximadamente
11 cm (4-3/8 pulg.) del cassette.
Desenganche el extremo de la otra
línea de corte y guíe la línea por el
otro ojete. La línea debería sobresalir
aproximadamente 11 cm (4-3/8 pulg.)
del cassette.
• Alinee las lengüetas del cassette (18)
con las ranuras (22) de la caja
protectora. Fig. 8.
• Empuje el cassette en la caja
protectora hasta que encaje en su sitio.
PRECAUCIÓN: Para evitar causar
daños a la herramienta, recorte las
líneas de corte si estas sobresalen más
allá de la cuchilla de corte (11), de
modo que apenas alcancen la cuchilla.
ENROLLADO DE UNA LÍNEA NUEVA
EN UN CARRETE VACÍO (FIG. 10 Y 11)
Puede enrollar una línea nueva de corte
en un carrete vacío. Podrá encontrar
paquetes de línea de corte de 0,13 cm
(0,050 pulg.) en su distribuidor Craftsman.
• Quite el carrete vacío de la herramienta,
como se describe más arriba.
• Quite cualquier pedazo de línea de
corte que quede en el carrete.
• Primero enrolle la línea nueva en la
parte superior del carrete.
- Inserte 1,9 cm (3/4 pulg.) de la línea
de corte en una de las ranuras de
anclaje de la línea.
- Enrolle la línea de corte en el cassette
en la dirección de la flecha que
aparece en el carrete. Asegúrese de
enrollar la línea en forma ordenada,
por capas. No entrecruce. Fig. 10.
- Cuando la línea de corte enrollada
alcance las hendiduras (24), corte la
línea. Fig. 11.
- Use las ranuras de sujeción (23)
para temporalmente fijar la línea en
un lado del carrete, como se muestra
en el recuadro de la Fig. 11.
• Repita el procedimiento señalado
arriba para la segunda línea de corte
de la sección inferior del carrete.
• Ponga el carrete en la herramienta,
como se describe en la sección
‘Instalación de un nuevo carrete de
línea de corte.
PRECAUCIÓN: Antes de comenzar a
cortar, use sólo el tipo apropiado de
línea de corte Craftsman. Asegúrese
que la línea de corte esté presente en
ambas secciones del carrete. Fig. 9.
8
20
19
19
18
12
22
20
9
21
18
Cubo
Palanca
21
19
10
11
24
INSTALACIÓN DEL CASSETTE HDL
(FIG. 12)
Su cortadora viene con el cassette AFS
instalado. Para instalar el cassette HDL
(Línea para trabajo pesado), siga los
siguientes pasos:
• Desenchufe la herramienta.
• Presione y sostenga las lengüetas (18)
mientras saca el cassette AFS (19) de
23
18
23
la caja protectora del cassette (12) en
el cabezal de corte. Fig. 8.
• Asegúrese que una pieza de la línea de
corte para trabajo pesado esté
debidamente insertada en el cassette
HDL, como se describe en ‘Instalación
de una pieza nueva de línea de corte
para trabajo pesado’, más abajo. Fig. 12.
• Alinee las lengüetas del cassette HDL
con las ranuras (22, Fig. 8) de la caja
protectora del cassette.
• Empuje el cassette HDL en la caja
protectora hasta que encaje firmemente
en su sitio.
12
25
28
27
INSTALACIÓN DE UNA PIEZA NUEVA
DE LÍNEA DE CORTE PARA TRABAJO
PESADO (FIG. 12)
Podrá encontrar repuestos de línea de
corte para trabajo pesado en su
distribuidor Craftsman (artículo no. 85876).
Para insertar una nueva pieza de línea de
corte, haga lo siguiente:
• Desenchufe la podadora de su fuente
de alimentación eléctrica.
• Presione las lengüetas (28) y quite el
cassette HDL (25) de la caja protectora
del cassette (12, Fig. 8) en el cabezal
de corte.
• Quite la pieza usada de la línea del
cassette.
• Quite cualquier tierra y pasto que
pueda encontrar en el cassette y su
caja protectora
• Enhebre una nueva pieza de línea (26)
por los orificios a cada lado del
cassette.
• Coloque la contera de metal (27) en la
posición indicada.
• Alinee las lengüetas del cassette con
las ranuras (22, Fig. 8) de la caja
protectora.
• Empuje el cassette en la caja
protectora hasta que enganche
firmemente en su sitio.
26
Si la herramienta anda demasiado lenta
• Revise que la caja protectora del cassette
(12) pueda girar libremente. Límpiela
con mucho cuidado si es necesario.
• Revise que la línea de corte no
sobresalga más de 11 cm (4-3/8 pulg.)
del cassette. Si sobresale más, córtela
de modo que apenas alcance la cuchilla
podadora de línea.
Si la alimentación automática de la
línea no funciona
• Mantenga presionadas las lengüetas y
saque el cassette de la caja protectora
del cassette en el cabezal de la
cortadora.
• Tire de la línea de corte hasta que
sobresalga 11 cm (4-3/8 pulg.) del
cassette. Si queda poca línea de corte
en el carrete, instale un carrete nuevo
de línea de corte.
• Alinee las lengüetas en el cassette con
los orificios de la caja protectora.
• Empuje el cassette en la caja
protectora hasta que encaje firmemente
en su sitio.
• Si la línea de corte sobresale más allá
de la cuchilla podadora, recórtela de
modo que apenas alcance la cuchilla.
Si la alimentación automática de la línea
aún no funciona o si el carrete está
trancado, pruebe alguna de las siguientes
sugerencias:
• Limpie cuidadosamente el cassette y la
caja protectora.
• Quite el carrete y revise si la palanca
del cassette se puede mover
libremente.
• Quite el carrete y desenrolle la línea de
corte, luego enróllela nuevamente, en
forma ordenada. Vuelva a poner el
carrete en el cassette.
RESOLUCIÓN DE PROBLEMAS
Si su herramienta no pareciera estar
funcionando debidamente, siga las
instrucciones de más abajo. Si esto no
resuelve el problema, por favor póngase
en contacto con su Centro de Repuestos
y Reparaciones Sears más cercano.
ADVERTENCIA: Para evitar causar
lesiones graves, apague y desenchufe
la herramienta antes de realizar
cualquier tipo de mantenimiento.
19
Get it fixed, at your home or ours!
Your Home
For repair - in your home - of all major brand appliances,
lawn and garden equipment, or heating and cooling systems,
no matter who made it, no matter who sold it!
For the replacement parts, accessories and
ownerís manuals that you need to do-it-yourself.
For Sears professional installation of home appliances
and items like garage door openers and water heaters.
1-800-4-MY-HOME®
Anytime, day or night
(U.S.A. and Canada)
www.sears.ca
(1-800-469-4663)
www.sears.com
Our Home
For repair of carry-in products like vacuums, lawn equipment,
and electronics, call or go on-line for the nearest
Sears Parts and Repair Center.
1-800-488-1222 Anytime, day or night (U.S.A. only)
www.sears.com
To purchase a protection agreement (U.S.A.)
or maintenance agreement (Canada) on a product serviced by Sears:
1-800-827-6655 (U.S.A.)
Para pedir servicio de reparación
a domicilio, y para ordenar piezas:
1-888-SU-HOGARSM
1-800-361-6665 (Canada)
Au Canada pour service en français:
1-800-LE-FOYERMC
(1-800-533-6937)
www.sears.ca
(1-888-784-6427)
© Sears, Roebuck and Co.
® Registered Trademark / TM Trademark / SM Service Mark of Sears, Roebuck and Co.
® Marca Registrada / TM Marca de Fábrica / SM Marca de Servicio de Sears, Roebuck and Co.
MC
Marque de commerce / MD Marque déposée de Sears, Roebuck and Co.
20