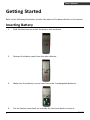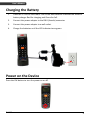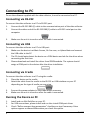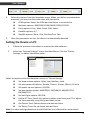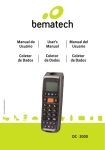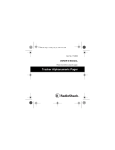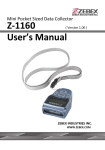
1
Portable CCD Data Collector Z-2130 User’s Manual ( Version 1.1) ZEBEX INDUSTRIES INC. WWW.ZEBEX.COM ZEBEX INDUSTRIES INC. Revision History Changes to the original manual are listed below: Version Date Description of Version 1.0 April. 07, 2011 Initial release 1.1 January. 15, 2013 Added USB connection section Data Collector Series User’s Manual Version 1.0 04/07/2011 Important Notice No warranty of any kind is made in regard to this material, including, but not limited to, implied warranties of merchantability or fitness for a particular purpose. We are not liable for any errors contained herein or incidental or consequential damages in connection with furnishing, performance or use of this material. No part of this document may be reproduced, transmitted, stored in a retrieval system, transcribed, or translated into any language or computer language in any form or by any means electronic, mechanical, magnetic, optical, chemical, manual or otherwise, without express written consent and authorization. We reserve the right to make changes in product design without reservation and without notification. The material in this guide is for information only and is subject to change without notice. All trademarks mentioned herein, registered or otherwise, are the properties of their various respective owners. Copyright © 2013. All rights reserved. Guidance for Printing This manual is in A5 size. Please double check your printer setting before printing it. i Z-2130 Table of Contents IMPORTANT NOTICE................................................................................................. I INTRODUCTION....................................................................................................... 1 Features ........................................................................................................... 1 PC SYSTEM REQUIREMENT ........................................................................................ 1 PACKAGE CONTENTS................................................................................................. 1 OVERVIEW .............................................................................................................. 2 GETTING STARTED................................................................................................... 3 INSERTING BATTERY ................................................................................................. 3 CHARGING THE BATTERY ........................................................................................... 4 POWER ON THE DEVICE ............................................................................................ 4 CONNECTING TO PC ................................................................................................. 5 Connecting via RS-232 ..................................................................................... 5 Connecting via Cradle ...................................................................................... 5 Running the Device on PC ............................................................................... 5 Setting the Device on PC.................................................................................. 6 USING THE DATA COLLECTOR.................................................................................. 7 SCAN AND KEYING IN DATA (VIA KEYPAD) ..................................................................... 7 Scanning the Barcode Data.............................................................................. 7 Keying in Data via keypad ................................................................................ 8 PROGRAM INSTRUCTIONS.......................................................................................... 9 Working with Menus ....................................................................................... 9 Menu Description ............................................................................................ 9 Run Task......................................................................................................... 10 Task Utility ..................................................................................................... 11 Setup.............................................................................................................. 13 Upload............................................................................................................ 20 Z-2130 ii USER’S MANUAL Introduction Upgraded for better performance, Z-2130 now includes a 32-bit CPU and a new scan engine. Built for mobility and durability, Z-2130 is the most smartly designed device for all data collecting applications. Features Convenient on-handed operation. Ergonomic and modern cellular phone styling. PC System Requirement Windows XP Service Pack 2 or above. Microsoft Internet Explorer 5.01 or later. Microsoft Framework 2.0. Disk Space Requirements: 280 MB (x86), 610 MB (x64). Package Contents Items contain in the package may vary depending on the model of the data collector. Portable CCD Collector 1 RS-232/USB Docking Cradle Rechargeable Batteries RS-232 DB9 (F) Cable AC Adapter Z-2130 USER’S MANUAL Overview Refer to the following illustrations to familiarize yourself with the data collector. Scan Window LED Indicator LCD Screen Scan Button Battery Lock Keypad Battery Compartment Communication Port Description LCD Screen Scan Button LED Indicator Keypad Communication Port Scan Window Battery Lock Battery Compartment Z-2130 Function Display various data when a program is being run The trigger of barcode reading Indicates the status of battery charge : Red for battery just on charging and Green for full A total of 26 keys are provided to the power and other function keys Connect to communicate with PC Emits a red beam for barcode reading Secures the battery compartment Batteries are stored here 2 USER’S MANUAL Getting Started Refer to the following illustrations to learn the basics of the data collector in this section. Inserting Battery 3 1. Slide the lock lever to unlock the battery lock as shown. 2. Remove the battery cover from the data collector. 3. Make sure the polarity is correct and insert the 3 rechargeable batteries. 4. Put the battery cover back on and slide the lock lever back to secure it. Z-2130 USER’S MANUAL Charging the Battery 1. Place the Z-2130 on the cradle. LED on the data collector indicates the status of battery charge: Red for charging and Green for full. 2. Connect the power adapter to the DB-9 (female) connector. 3. Connect the power adapter to a wall outlet. 4. Charge the batteries until the LED indicator turns green. Power on the Device Press the PW button to turn the power on or off. Z-2130 4 USER’S MANUAL Connecting to PC To use the software supplied with the data collector, it must be connected to a PC. Connecting via RS-232 To connect the data collector to a PC via RS-232 port: 1. Connect the RS-232 DB9 (F) cable to the communication port of the data collector. 2. Connect the other end of the RS-232 DB9 (F) cable to a RS-232 serial port on the computer. 3. Make sure the unit is turned on after the cable is connected. Connecting via USB To connect the data collector to a PC via USB port: 1. Make sure the device is at Main Screen, On line scan, or Upload data and connect the USB cable to the PC. 2. The PC should auto-detect the device as a COM device and ask for the driver when connecting the first time. 3. Please download and install the driver from ZEBEX website. The system should assign a COM port to the device after the driver installation. Connecting via Cradle To connect the data collector to a PC using the cradle: 1. Place the device on the cradle. 2. Attach the cable from the cradle to the RS-232 or USB interface on your PC depending on the type of cradle you are using. 3. 4. Connect the power adapter to the cradle when necessary. Make sure the unit is turned on after the cable is connected. Running the Device on PC 1. 2. 3. 5 Install and run WinTaskGen on your PC. For USB connections, please install and run the virtual COM port driver. Check “Define comport long parameters” checkbox on top if necessary. Extra options appear as shown below when you check this option. Z-2130 USER’S MANUAL 4. Select the options from the dropdown menu. When you define communication protocols, you must set the same value with the device. 5. COM options: Select the COM port the device is connected to. Baudrate options: 4800,9600,19200,38400,57600,115200. Parity options: Even, Mark, None, Odd, Space. DataBits options: 8,7. StopBits options: None, One, OnePointFive, Two. After the parameters are set, the device is automatically detected. Setting the Device on PC 1. Follow the previous instructions to connect the data collector. 2. Select the “Remote Settings” tab on the Main Menu. Click the “Device Settings“ to obtain the device status. Select the options from the dropdown menus in “Device Settings.” Set beep volume options: Quiet, Low, Medium, Loud. Set auto power off options: Disable, 10mins, 15mins, 20mins, 30 mins. Set power up scan options: OFF/ON. Set date format options: MM/DD/YY, DD/MM/YY, MM/DD/YYYY, DD/MM/YYYY. Set back light options: OFF/ON. Follow PC Time: Check this option to obtain time from your PC or adjust the time manually using the up and down arrow. Get Device Time: Obtain device now date and time. Set Device Time: Set up device date and time. Note: For other settings please see the WinTaskGen User’s Manual for more details. Z-2130 6 USER’S MANUAL Using the Data Collector Refer to the following section to learn how to use the data collector. Scan and Keying in Data (via keypad) There are 26 keys on the data collector. You can use the PW button to power on or off and the rest for data input or for function control. Scanning the Barcode Data 7 1. In the Run Task menu, press and hold the orange SCAN button. A light beam will be activated and shoot out from the window at the lower front end of the data collector. Please see the Run Task section in the User’s Manual for more details. 2. Aim the beam at the barcode to be scanned. A beep will be given and the beam will disappear if the data scanned has been successfully decoded by the data collector. The decoded message will then be displayed in the LCD. 3. The scanned data will be stored as soon as the SCAN button is released, and the next barcode is ready to be scanned. Z-2130 USER’S MANUAL Keying in Data via keypad Inputting Numerical Data To input numerical data, press the corresponding keys. To save the input data, press Enter after the data is input. To delete the data, press CLR. Inputting an alphabetical character To input an alphabetical character, first find the appropriate key. The following table displays the numerical keys and their corresponding alphabetical characters. Press the key, and the numerical character corresponding to the key will be displayed. Pressing M2 will turn the character into the first alphabetical one. Pressing M2 each time will turn the character into the next one. Eventually it turns back into the numerical character. For example, To input “M”, press “5” and then M2. To input “N”, press “5” and M2 twice. To input “o”, press “5” and M2 six times. Pressing M2 once more will turn “o” back into “5”. Keep pressing M2 until the desired character is approached. Press the symbols are available for data inputting as shown below on the table: Numeric Key 7 8 9 4 5 6 1 2 3 0 Z-2130 A D G J M P S V Y ( B E H K N Q T W Z @ Corresponding Characters C a b F d e I g h l j k O m n R p q U s t X v w , y z ) c f i l o r u x ; 8 USER’S MANUAL Program Instructions Working with Menus Press M2 at the main screen after power on to go to the System Menu. Press the left or right arrow buttons to move the cursor to the desired option. Press M1 to go to the previous screen. Press M2 or Enter or the number button corresponding to the option to select the option. System Menu Menu Description Menu Run Task Task Utility Setup Upload 9 Description Select this option to start recording data. You can scan barcodes or enter the data manually. Select this option to: 1. View the file status. 2. Format. 3. Delete Data. 4. Delete Task. Select this option for: 1. Basic Setup. 2. System Setup. 3. Barcode Setup. Select this option to: 1. Upload Data. 2. Delimiter Set 3. Upload Device. Z-2130 USER’S MANUAL Run Task Select “1. Run Task” from the “System Menu” to open Run Task menu. The following screen appears: In the Run Task menu you can: Press the SCAN key to read barcode data. Key in data manually using keypad. Press F3 to insert a blank in between digits or texts you entered by keypad. Press F4 to delete the character or number you entered by keypad. Press F6 to view the Record screen as shown below: Current data is displayed here The current record number and field number Key promptings or description about the file currently used. <CURRENT REC.> will be displayed for end of file and <<TOP OF FILE> for beginning of the file. In the Record screen you can: Press M1 to exit. Press the left arrow button to view the previous record; press the right arrow button to view the next record. Press M2 to edit record. To edit data, use the arrow keys to move to the desired field and press F3 to insert or F4 to delete then use the keypad to enter the new data. Z-2130 10 USER’S MANUAL Press F6 to view the Help menu. You can also use the following functions: -Press F1 to view last 10 records. -Press F2 to view next 10 records. -Press F3 to inert records. -Press F4 to delete records. -Press F5 to jump to records. Task Utility Select “2.Task Utility” from the “System Menu” to open Task Utility menu. The following screen appears: Status 1. Select “System Menu>2.Task Utility>1.Statu” to view file status. 2. Number of records will display on the screen. Format 1. Select “System Menu>2.Task Utility>2.Format” to set the data format. 2. Instruction screen appears. Press any key to enter the setup screen. 3. Set the Total field No by entering a number (Maximum=16). Press Enter to confirm. 4. To set the Input Device, press the left or right arrow buttons to select from the following options and press Enter to confirm: 11 Scan Only: Input by scanning barcodes only. Keyin + Scan: Input by key in and scanning barcodes. Keyin Only: Input by key in only. Z-2130 USER’S MANUAL 5. Set the field length by entering the minimum and maximum field length from 1 to 32. Press Enter to confirm. 6. Set the Prompt by entering a message. 16 maximum characters are allowed. Press Enter to confirm. 7. Enter Field Editing to prompt how many kinds of character you can use, and what they are. For example, if the data you are going to input in a certain field contains 4 alphabetical characters, of which the first one is an upper case character and the others lower case ones, you input “ulll.” Please see the following table for symbols you can use. Editing Meaning n number 0 ~ 9 and + , d number 0 ~ 9 a all Alpha characters A ~ Z , a ~ z u upper case Alpha characters A ~ Z l Lower case Alpha character a ~ z c Full ASCII characters p printable ASCII characters, ASCII code(32 - 127) * Remove control character The characters represented by ”*”, such as the check character(s) in the barcodes, will be deleted when the data is stored. Characters other than the symbols mentioned above (n, d, a, u, l, c, p, *) will be regarded as format symbols. 8. Continue from the previous step when necessary; press the left or right arrow buttons to select the Insert to Data options. This option is to specify if the format symbols such as “/” should be stored as a part of the data to be input in the field. For example, “123110” input as a “date” will be displayed as 12/31/10 if you check this option. Display Only: Display special characters only . Yes. Add it: Add special characters to data. 9. At the Delay(1/1000sec) screen, enter the time delay in milliseconds for scans. Maximum=32767. 10. Select the Time stamp to use: Z-2130 None: No time stamp. Short: Short time stamp. Long: Long time stamp. 12 USER’S MANUAL Delete Data 1. Select “System Menu>2.Task Utility>3.Delete Data” to delete all the stored data. 2. Press M2 to select Y or N to delete Freetask and press Enter to confirm. Delete Task 1. Select “System Menu>2.Task Utility>4.Delete Task” to delete all the stored Tasks. 2. Press M2 to select Y or N to delete Task and press Enter to confirm. Select 3 to delete all the stored data. Select 4 to delete all the stored Tasks. Setup Select “3. Setup” from the “System Menu” to open the Setup menu. The following screen appears: Basic Setup Select “System Menu>3.Setup>1.Basic Setup”. The following options appear: BackLit &. LCD 1. Select “System Menu>3.Setup>1.Basic Setup>1.BackLit &. LCD” to enter the setup. 2. Press the left or right arrow buttons to turn back light on or off. Press Enter to confirm. 3. Use the left or right arrow buttons to adjust the value for LCD contrast and press Enter to confirm. Z-2130 13 USER’S MANUAL Beep Volume 1. Select “System Menu>3.Setup>>1.Basic Setup>2.Beep Volume” to enter the setup. 2. Press the left or right arrow buttons to change the volume to Loud, Medium, Low, or Quiet. Press Enter to confirm. Auto Power Off 1. Select “System Menu>3.Setup>>1.Basic Setup>3.Auto Power Off” to enter the setup. 2. Press the left or right arrow buttons to change the time. Press Enter to confirm. System Setup Select “System Menu>3.Setup>2.System Setup” to open System Setup menu. The following options appear: Communication Select “System Menu>3.Setup>2.System Setup>1.Communication” to enter the setup. The following options appear: Comm. Paramter Select “System Menu>3.Setup>2.System Setup>1.Communication>1Comm. Paramter” to set the Baud Rate, Parity Check, Data Bits, and Stop Bit of the data collector. Use the left or right arrow buttons to change the value and Press M1 to exit when you are done. Z-2130 Baudrate options: 4800,9600,19200,38400,57600,115200. Parity Check: Even, Mark, None, Odd, Space. Data Bits options: 8,7. Stop Bits: None, One, OnePointFive, Two. 14 USER’S MANUAL On Line Upload 1. Select “System Menu>3.Setup>2.System Setup>1.Communication>2.On Line Upload” to turn this function on or off. Use the left or right arrow buttons to change the value and press Enter to confirm. This function allows the input data to be sent out via the RS-232 port immediately and when the Free Task is executed, it allows the data to be sent out via the communication port at the moment the data occurs and is stored up in each field. 2. When this function is set to “ON”, use the left and right arrow buttons to select a parity characters as the Delimiter: None, ,, ;, Space, CRLF, CR, and LF. The selected character will be transmitted out after each data is uploaded. 3. Scan Data screen appears. Press the SCAN button to scan a barcode. The scanned data will be uploaded via the communication port to the host. Timeout Value Select “System Menu>3.Setup>2.System Setup>1.Communication>3Timeout Value” to set the timeout value. Use the left or right arrow buttons to change the value. System Timer 1. Select “System Menu>3.Setup>2.System Setup>2.System Timer” to enter the setup. 2. Follow the format shown to enter the date and press M1. 3. Follow the format shown to enter the time and press Enter to confirm. ID/PW/DataMode Select “System Menu>3.Setup>2.System Setup>3.ID/PW/DateMode” to enter the setup. The following options appear: Device ID 1. Select “System Menu>3.Setup>2.System Setup>3.ID/PW/DateMode>1.Device ID” to enter the setup. 2. Device ID is displayed. Press Enter to input new or edit existing ID. A password maybe required to change the ID. 15 Z-2130 USER’S MANUAL Password 1. Select “System Menu>3.Setup>2.System Setup>3.ID/PW/DateMode>2.Password” to enter the setup to set your password. 2. Enter the password if a password had already been set and press Enter. 3. Enter the new password and press Enter. 4. Enter the new password again to reconfirm and press Enter. Date Mode 1. Select “System Menu>3.Setup>2.System Setup>3.ID/PW/DateMode>3.Date Mode” to enter the setup. 2. Use the left or right arrow buttons to change the date mode: MM/DD/YYYY, DD/MM/YYYY, MM/DD/YY, or DD/MM/YY. Press Enter to confirm. Barcode Setup Select “System Menu>3.Setup>3.Barcode Setup” to open Barcode setup. The following options appear: Basic Setup Select “System Menu>3.Setup>3.Barcode Setup>1.Basic Setup” to enter the setup. The following options appear: EAN/UPC 1. To turn this symbology on or off, use the left or right arrow buttons to change the value and press Enter to confirm. 2. When EAN/UPC is set to “ON”, pressing M2 will lead to more options: UPC-A Digits: 11, 12, 13. UPC-E Digits: 6, 7, 8. UPC-E to UPC-A: On, Off. UPC/EAN ADD 5: No Send, Send. UPC/EAN ADD 2: No Send, Send. Select the appropriate parameters and press Enter to setup the next symbology. Z-2130 16 USER’S MANUAL Code 39 1. To turn this symbology on or off, use the left or right arrow buttons to change the value and press Enter to confirm. 2. When Code 39 is set to “ON”, pressing M2 will lead to more options: Code 39 ST/SP: Send, No Send. Code 39 CKD: Send, No Send. Italian Pharmac: On, Off. Pharmac. Add 'A': No Add, Add or No Add. Select the appropriate parameters and press Enter to setup the next symbology. Full ASCII Code 3 To turn this symbology on or off, use the left or right arrow buttons to change the value and press Enter to setup the next symbology. Codabar 1. 2. To turn this symbology on or off, use the left or right arrow buttons to change the value and press Enter to confirm. When Codabar is set to “ON”, pressing M2 will lead to more options: Codebar CDV: On, Off. Codebar ST/SP: Send, No Send. Codebar CKD: Send, No Send. Select the appropriate parameters and press Enter to setup the next symbology. ITF 25 1. 2. To turn this symbology on or off, use the left or right arrow buttons to change the value and press Enter to confirm. When ITF 25 is set to “ON”, pressing M2 will lead to more options: Codebar CDV: On, Off. ITF 25 CKD: Send, No Send. ITF 25 Length: Enter length 2 to 64 for the Min/Max length. Select the appropriate parameters and press Enter to setup the next symbology. 17 Z-2130 USER’S MANUAL Code 128 1. 2. To turn this symbology on or off, use the left or right arrow buttons to change the value and press Enter to confirm. When Code 128 is set to “ON”, pressing M2 will lead to more options: Enable EAN 128: On, Off. Code 128 Length: Enter length 1 to 64 for the Min/Max length. Select the appropriate parameters and press Enter to setup the next symbology. Code 93 To turn this symbology on or off, use the left or right arrow buttons to change the value and press Enter to exit. Advanced Setup Select “System Menu>3.Setup>3.Barcode Setup>2.Advanced Setup” to enter the setup. The following options appear: CPC 25 1. To turn this symbology on or off, use the left or right arrow buttons to change the value and press Enter to confirm. 2. When CPC 25 is set to “ON”, pressing M2 will lead to more options: CPC 25 CDV: On, Off. CPC 25 CKD: Send, No Send. CPC 25 Length: Enter length 1 to 64 for the Min/Max length. Select the appropriate parameters and press Enter to setup the next symbology. EAN to ISBN/ISSN To turn this symbology on or off, use the left or right arrow buttons to change the value and press Enter to setup the next symbology. EAN-13 digits To set the digits, press the left or right arrow buttons to change the value to 12 or 13 and press Enter to setup the next symbology. Z-2130 18 USER’S MANUAL EAN-8 digits To set the digits, press the left or right arrow buttons to change the value to 7 or 8 and press Enter to setup the next symbology. IATA Code To turn this symbology on or off, use the left or right arrow buttons to change the value and press Enter to setup the next symbology. Codabar ST/SP To set the parameters, press the left or right arrow buttons to change the value to“ABCD” or “a/t, b/n, c/*, d/e” or “DC1, DC2, DC3, DC4” and press Enter to go back to the Barcode Setup screen. Pre/Postamble 1. Select “System Menu>3.Setup>3.Barcode Setup>3.Pre/Postamble” to enter the setup. 2. Select to “Enable” or “Disable” for Get Barcode Type. When enabled, the barcode type ID code will be added in front of every data stored. Press Enter to confirm. 3. Select “Disable”, “Beep1”, “Beep2”, “Beep3” for Scan TimeOut Beep. Press Enter to confirm. 4. Enter the Preamble characters you want to add to the recorded data in the Pre field. It will be added to the front of the recorded data and after the barcode ID code if it is added. Press Enter to confirm. 5. Enter the Posamble characters you want to add to the recorded data in the Pos field. Press Enter to confirm. It will be added to the back of the recorded data. For example: the EAN 13 Barcode type ID code is “->10”, the Preamble “123”, and the Postamble “999”. Suppose a barcode representing “0028200106605” is scanned and decoded, and the data gets stored and uploaded, what is going to be displayed on the host screen will be “->101230028200106605999”. 19 Z-2130 USER’S MANUAL Upload Select “4. Upload” from the “System Menu” to open the Upload menu. The following screen appears: Upload Data 1. Select “System Menu>4.Upload>1.Upload Data” to enter the upload data screen. 2. The name of the file is displayed on the screen. Press M2 to select Y or N for data upload. Press Enter to confirm. 3. If there is another file to be uploaded, its name will then be displayed on the screen. Repeat the above procedure to choose and confirm. 4. Ready to upload screen appears. Press Enter to begin upload. Delimiter Set 1. Select “System Menu>4.Upload>2.Delimiter Set” to enter the setup screen. 2. Select a parity characters as the Field Delimiter: None, ,, ;, Space, CRLF, CR, and LF. 3. Select a parity characters as the Record Delimiter: None, ,, ;, Space, CRLF, CR, and LF. 4. To decide whether the Upload Header is to be uploaded, press the left or right arrow buttons to change the value to On or Off. Press Enter to confirm. Z-2130 20 USER’S MANUAL Upload Device 1. Select “System Menu>4.Upload>3.Upload Device” to enter the setup screen. 2. Use the left or right arrow buttons to select the device for uploading: RS-232 or USB. 3. Make sure the device is connected to the PC and press Enter to begin uploading. 21 Z-2130