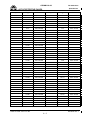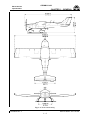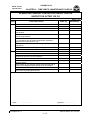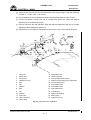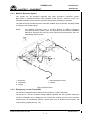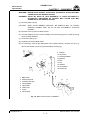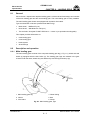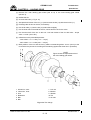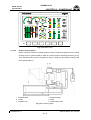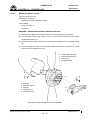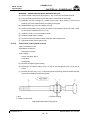
1
CR-MM-1-0-00
PS-28 Cruiser / SportCruiser
MAINTENANCE MANUAL
Copy No.:
Revision No.: 1
i
Date of issue: 2011-07-08
CR-MM-1-0-01
INTENTIONALLY LEFT BLANK
Date of issue: 2011-07-08
ii
Revision No.: 1
CR-MM-1-0-00
PS-28 Cruiser / SportCruiser
MAINTENANCE MANUAL
PS-28 Cruiser / SportCruiser aircraft is designed and manufactured by
Czech Sport Aircraft a.s.
Na Záhonech 1177/212, 686 04 Kunovice
Czech Republic
www. czechsportaircraft.com; office@czechsportaircraft.com
Fax: +420 576 519 394, Phone: +420 576 514 034 (Sales Dept.)
Revision No.: 1
iii
Date of issue: 2011-07-08
CR-MM-1-0-01
INTENTIONALLY LEFT BLANK
Date of issue: 2011-07-08
iv
Revision No.: 1
CR-MM-1-0-00
PS-28 Cruiser
SportCruiser
RECORD OF REVISIONS
Rev.
No.
Revision name
Formal correction,
supplementation of engine Rotax
912 S, supplementation of
chapter General Safety
Information;
supplementation of parts with life
limitation, revision of inspections
tasks and lubrication chart;
supplementation of aileron rod
sealing;
change of control surface
deflections;
supplementation of BRS and
ELT;
check after shimmy occurrence;
1
change of fuel quantity sensor
type, supplementation of fuel
filter cleaning;
supplementation of engine Rotax
912 S, SR3000 propeller and
appropriate maintenance
practices
supplementation of fuses,
change of battery type;
chapter rename,
supplementation of typical
instrument panels and COMM /
NAV equipment description and
maintenance practices
Changed pages
Issue date
Date and
signature
2011-07-08
2011-07-08
Konečný
i to iv, 0-1, 03 to 0-6,
1-1, 1-3 to 1-6, 1-8,
1-9
2-1 to 2-16
4-6, 4-7,
6-27,
7-1 to 7-12,
8-1, 8-12 to 8-15, 8-17
to 8-23,
9-1, 9-5, 9-8, 9-12
10-1 to 10-40
11-2, 11-6, 11-7, 1111, 11-12
12-1 to 12-30,
Date of issue: 2011-07-08
Revision No.: 1
0-1
PS-28 Cruiser
CR-MM-1-0-00
SportCruiser
Rev.
No.
Revision name
RECORD OF REVISIONS
Changed pages
Revision No.: -
Issue date
Date and
signature
Date of issue: 2011-03-08
0-2
CR-MM-1-0-00
PS-28 Cruiser
SportCruiser
LIST OF EFFECTIVE PAGES
Chapter
Page
Date
Chapter
Page
Date
Title
Page
i
ii
iii
iv
2011-07-08
2011-07-08
2011-07-08
2011-07-08
3
RoR
RoR
0-1
0-2
2011-07-08
2011-03-08
LoEP
LoEP
LoEP
LoEP
0-3
0-4
0-5
0-6
2011-07-08
2011-07-08
2011-07-08
2011-07-08
3-1
3-2
2-3
3-4
3-5
3-6
3-7
3-8
3-9
3-10
2011-03-08
2011-03-08
2011-03-08
2011-03-08
2011-03-08
2011-03-08
2011-03-08
2011-03-08
2011-03-08
2011-03-08
4
4-1
4-2
4-3
4-4
4-5
4-6
4-7
4-8
4-9
4-10
4-11
4-12
2011-03-08
2011-03-08
2011-03-08
2011-03-08
2011-03-08
2011-07-08
2011-07-08
2011-03-08
2011-03-08
2011-03-08
2011-03-08
2011-03-08
5
5-1
5-5
5-3
5-4
5-5
5-6
5-7
5-8
5-9
5-10
5-11
5-12
2011-03-08
2011-03-08
2011-03-08
2011-03-08
2011-03-08
2011-03-08
2011-03-08
2011-03-08
2011-03-08
2011-03-08
2011-03-08
2011-03-08
1
1-1
1-2
1-3
1-4
1-5
1-6
1-7
1-8
1-9
1-10
2011-07-08
2011-03-08
2011-07-08
2011-07-08
2011-07-08
2011-07-08
2011-03-08
2011-07-08
2011-07-08
2011-03-08
2
2-1
2-2
2-3
2-4
2-5
2-6
2-7
2-8
2-9
2-10
2-11
2-12
2-13
2-14
2-15
2-16
2011-07-08
2011-07-08
2011-07-08
2011-07-08
2011-07-08
2011-07-08
2011-07-08
2011-07-08
2011-07-08
2011-07-08
2011-07-08
2011-07-08
2011-07-08
2011-07-08
2011-07-08
2011-07-08
Date of issue: 2011-07-08
Revision No.: 1
0-3
CR-MM-1-0-00
PS-28 Cruiser
SportCruiser
LIST OF EFFECTIVE PAGES
Chapter
Page
Date
Chapter
Page
Date
6
6-1
6-2
6-3
6-4
6-5
6-6
6-7
6-8
2011-03-08
2011-03-08
2011-03-08
2011-03-08
2011-03-08
2011-03-08
2011-03-08
2011-03-08
7
7-9
7-10
7-11
7-12
2011-07-08
2011-07-08
2011-07-08
2011-07-08
8
8-1
8-2
2011-07-08
2011-03-08
6-9
6-10
6-11
6-12
6-13
6-14
6-15
6-16
6-17
6-18
6-19
6-20
6-21
6-22
6-23
6-24
6-25
6-26
6-27
6-28
6-29
6-30
6-31
6-32
2011-03-08
2011-03-08
2011-03-08
2011-03-08
2011-03-08
2011-03-08
2011-03-08
2011-03-08
2011-03-08
2011-03-08
2011-03-08
2011-03-08
2011-03-08
2011-03-08
2011-03-08
2011-03-08
2011-03-08
2011-03-08
2011-07-08
2011-03-08
2011-03-08
2011-03-08
2011-03-08
2011-03-08
8-3
8-4
8-5
8-6
8-7
8-8
8-9
8-10
8-11
8-12
8-13
8-14
8-15
8-16
8-17
8-18
8-19
8-20
8-21
8-22
8-23
8-24
2011-03-08
2011-03-08
2011-03-08
2011-03-08
2011-03-08
2011-03-08
2011-03-08
2011-03-08
2011-03-08
2011-07-08
2011-07-08
2011-07-08
2011-07-08
2011-03-08
2011-07-08
2011-07-08
2011-07-08
2011-07-08
2011-07-08
2011-07-08
2011-07-08
2011-03-08
7-1
7-2
7-3
7-4
7-5
7-6
7-7
7-8
2011-07-08
2011-07-08
2011-07-08
2011-07-08
2011-07-08
2011-07-08
2011-07-08
2011-07-08
9-1
9-2
9-3
9-4
9-5
9-6
9-7
9-8
9-9
9-10
9-11
9-12
2011-07-08
2011-03-08
2011-03-08
2011-03-08
2011-07-08
2011-03-08
2011-03-08
2011-07-08
2011-03-08
2011-03-08
2011-03-08
2011-07-08
7
9
Revision No.: 1
Date of issue: 2011-07-08
0-4
CR-MM-1-0-00
PS-28 Cruiser
SportCruiser
LIST OF EFFECTIVE PAGES
Chapter
Page
Date
Chapter
Page
Date
10
10-1
10-2
10-3
10-4
10-5
10-6
10-7
10-8
10-9
10-10
10-11
10-12
10-13
10-14
10-15
10-16
10-17
10-18
10-19
10-20
10-21
10-22
10-23
10-24
10-25
10-26
10-27
10-28
10-29
10-30
10-31
10-32
10-33
10-34
10-35
10-36
10-37
10-38
10-39
10-40
2011-07-08
2011-07-08
2011-07-08
2011-07-08
2011-07-08
2011-07-08
2011-07-08
2011-07-08
2011-07-08
2011-07-08
2011-07-08
2011-07-08
2011-04-08
2011-07-08
2011-07-08
2011-07-08
2011-07-08
2011-07-08
2011-07-08
2011-07-08
2011-07-08
2011-07-08
2011-07-08
2011-07-08
2011-07-08
2011-07-08
2011-07-08
2011-07-08
2011-07-08
2011-07-08
2011-07-08
2011-07-08
2011-07-08
2011-07-08
2011-07-08
2011-07-08
2011-07-08
2011-07-08
2011-07-08
2011-07-08
11
11-1
11-2
11-3
11-4
11-5
11-6
11-7
11-8
11-9
11-10
11-11
11-12
2011-03-08
2011-07-08
2011-03-08
2011-03-08
2011-03-08
2011-07-08
2011-07-08
2011-03-08
2011-03-08
2011-03-08
2011-07-08
2011-07-08
12
12-1
12-2
12-3
12-4
12-5
12-6
12-7
12-8
12-9
12-10
12-11
12-12
12-13
12-14
12-15
12-16
12-17
12-18
12-19
12-20
12-21
12-22
12-23
12-24
12-25
12-26
12-27
2011-07-08
2011-07-08
2011-07-08
2011-07-08
2011-07-08
2011-07-08
2011-07-08
2011-07-08
2011-07-08
2011-07-08
2011-04-08
2011-07-08
2011-07-08
2011-07-08
2011-07-08
2011-07-08
2011-07-08
2011-07-08
2011-07-08
2011-07-08
2011-07-08
2011-07-08
2011-07-08
2011-07-08
2011-07-08
2011-07-08
2011-07-08
Date of issue: 2011-07-08
Revision No.: 1
0-5
CR-MM-1-0-00
PS-28 Cruiser
SportCruiser
LIST OF EFFECTIVE PAGES
Chapter
Page
Date
Chapter
Page
Date
12
12-28
12-29
12-30
2011-07-08
2011-07-08
2011-07-08
16
16-1
16-2
2011-03-08
2011-03-08
13
13-1
13-2
13-3
13-4
2011-03-08
2011-03-08
2011-03-08
2011-03-08
17
17-1
17-2
17-3
17-4
17-5
17-6
2011-03-08
2011-03-08
2011-03-08
2011-03-08
2011-03-08
2011-03-08
14
14-1
14-2
14-3
14-4
2011-03-08
2011-03-08
2011-03-08
2011-03-08
15
15-1
15-2
15-3
15-4
15-5
15-6
15-7
15-8
15-9
15-10
15-11
15-12
15-13
15-14
15-15
15-16
15-17
15-18
15-19
15-20
15-21
15-22
15-23
15-24
2011-03-08
2011-03-08
2011-03-08
2011-03-08
2011-03-08
2011-03-08
2011-03-08
2011-03-08
2011-03-08
2011-03-08
2011-03-08
2011-03-08
2011-03-08
2011-03-08
2011-03-08
2011-03-08
2011-03-08
2011-03-08
2011-03-08
2011-03-08
2011-03-08
2011-03-08
2011-03-08
2011-03-08
Revision No.: 1
Date of issue: 2011-07-08
0-6
CR-MM-1-0-00
PS-28 Cruiser
SportCruiser
CHAPTER 1 – GENERAL
Chapter 1
- General..................................................................................... 1-1
Chapter 2
- Limitations / Maintenance checks......................................... 2-1
Chapter 3
- Fuselage .................................................................................. 3-1
Chapter 4
- Wing ......................................................................................... 4-1
Chapter 5
- Tail unit .................................................................................... 5-1
Chapter 6
- Control system........................................................................ 6-1
Chapter 7
- Equipment ............................................................................... 7-1
Chapter 8
- Landing gear ........................................................................... 8-1
Chapter 9
- Fuel system ............................................................................. 9-1
Chapter 10
- Power unit.............................................................................. 10-1
Chapter 11
- Electrical system................................................................... 11-1
Chapter 12
- Instruments and Avionics .................................................... 12-1
Chapter 13
- Venting / Heating................................................................... 13-1
Chapter 14
- Airplane handling.................................................................. 14-1
Chapter 15
- Airplane repairs..................................................................... 15-1
Chapter 16
- Wiring diagrams.................................................................... 16-1
Chapter 17
- Appendices............................................................................ 17-1
Date of issue: 2011-07-08
Revision No.: 1
1-1
PS-28 Cruiser
CR-MM-1-0-00
SportCruiser
CHAPTER 1 – GENERAL
INTENTIONALLY LEFT BLANK
Revision No.: -
Date of issue: 2011-03-08
1-2
CR-MM-1-0-00
PS-28 Cruiser
SportCruiser
CHAPTER 1 – GENERAL
Contents
1.1
Introduction ............................................................................................................ 1-4
1.2
Airplane Classification ........................................................................................... 1-4
1.2.1
Power Unit ................................................................................................ 1-4
1.2.2
Main Technical Data ................................................................................. 1-5
1.3
Airplane Manufacturer and Type Certificate Holder .............................................. 1-7
1.4
Chapter Order........................................................................................................ 1-7
1.4.1
Page Numbering....................................................................................... 1-7
1.5
Warnings, Cautions and Notes.............................................................................. 1-7
1.6
General Safety Information.................................................................................... 1-8
1.7
Definitions and Abbreviations ................................................................................ 1-9
Date of issue: 2011-07-08
Revision No.: 1
1-3
PS-28 Cruiser
CR-MM-1-0-00
SportCruiser
1.1
CHAPTER 1 – GENERAL
Introduction
In accordance with requirements of the ASTM LSA regulations, the Czech Sport Aircraft a.s.,
as manufacturer of PS-28 Cruiser / SportCruiser airplane, provides information on maintaining
airworthiness of the PS-28 Cruiser / SportCruiser airplane. Information is also contained in the
following manuals issued by airplane manufacturer or by manufacturers of equipment used on
the airplane:
•
Pilot Operating Handbook
•
Maintenance Manual
•
Illustrated Parts Catalog
•
Operator's Manual for ROTAX Engine Type 912 Series
•
Maintenance Manual for ROTAX Engine Type 912 Series
•
Technical description and operation instructions for the propeller
This Maintenance Manual contains information on airplane maintenance including description
of airplane structure and function.
1.2
Airplane Classification
PS-28 Cruiser / SportCruiser airplane is two-seat, single engine, low-wing, all-metal airplane
with fixed three-wheel landing gear.
The airplane is designed for basic and advanced training and for leisure time flying.
1.2.1 Power Unit
Power unit consists of:
•
Four-stroke, four-cylinder engine with opposite pistons Rotax 912 S / 912 ULS with max.
continuous power of 69 kW (92.5 hp) at 5 500 RPM.
•
Three-blade, ground adjustable propeller or
•
Two-blade, ground adjustable propeller or
•
Two-blade, in flight adjustable propeller.
Revision No.: 1
Date of issue: 2011-07-08
1-4
CR-MM-1-0-00
PS-28 Cruiser
SportCruiser
CHAPTER 1 – GENERAL
1.2.2 Main Technical Data
Wing
•
Span………………………………………………….. ... 8.600 m
•
Area........................................................................... 12.3 m
•
MAC .......................................................................... 1500 mm
2
(28.22 ft)
(132.3 sq.ft)
(59.1 in)
•
Wing loading ............................................................. 49 kg/m
•
2
(4.31 sq.ft)
2
(7.0 sq.ft)
•
2
Aileron area............................................................... 0.40 m
Flap area ................................................................... 0.65 m
(10.0 lb/sq.ft)
Fuselage
•
Length………………………………………………….. 6.620 m
(21.78 ft)
•
Width ......................................................................... 1.280 m
(50.4 in)
•
Height………………………………………………… ... 2.315 m
(7.60 ft)
•
Cockpit width............................................................. 1.170 m
(46 in)
Horizontal tail unit
•
•
•
Span..........................................................................2.930 m
(9.61 ft)
2
(23.7 sq.ft)
2
(8.6 sq.ft)
HTU area................................................................... 2.2 m
Elevator area............................................................. 0.8 m
Vertical tail unit
•
•
•
Height........................................................................ 1.07 m
2
VTU area................................................................... 1 m
(3.51 ft)
(10.7 sq.ft)
2
Rudder area .............................................................. 0.4 m
(4.3 sq.ft)
Landing gear
•
Wheel track ............................................................... 1.520 m
(4.98 ft)
•
Wheel base ............................................................... 2.070 m
(6.79 ft)
•
Nose landing gear wheel diameter ........................... 343 mm
(13.5 in)
•
Main landing gear wheel diameter............................ 343 mm
(13.5 in)
Date of issue: 2011-07-08
Revision No.: 1
1-5
PS-28 Cruiser
CR-MM-1-0-00
SportCruiser
CHAPTER 1 – GENERAL
Fig. 1-1: Three-view drawing
Revision No.: 1
Date of issue: 2011-07-08
1-6
CR-MM-1-0-00
SportCruiser
CHAPTER 1 – GENERAL
1.3
PS-28 Cruiser
Airplane Manufacturer and Type Certificate Holder
Czech Sport Aircraft a.s.
Na Záhonech 1177/212, 686 04 Kunovice
Czech Republic
www.czechsportaircraft.com; office@czechsportaircraft.com
Fax: +420 576 519 394, Phone: +420 576 514 034 (Sales Dept.)
1.4
Chapter Order
Chapters in this manual are ordered in ascending sequence from No. 1. Every chapter
describes one system or assembly.
1.4.1 Page Numbering
Example:
1.5
Warnings, Cautions, and Notes
WARNING:
MEANS THAT NON-OBSERVATION OF THE CORRESPONDING
OPERATING
INSTRUCTION,
INSPECTION
OR
MAINTENANCE
PROCEDURE CAN LEAD TO INJURY OR DEATH OF PERSONS.
CAUTION:
MEANS THAT NON-OBSERVATION OF THE CORRESPONDING
OPERATING
INSTRUCTION,
INSPECTION
OR
MAINTENANCE
PROCEDURE CAN LEAD TO DAMAGE OR DESTRUCTION OF DEVICE.
NOTE:
Means that the corresponding operating instruction,
maintenance procedure is considered to be important.
Date of issue: 2011-03-08
inspection
or
Revision No.: 1-7
PS-28 Cruiser
CR-MM-1-0-00
SportCruiser
1.6
CHAPTER 1 – GENERAL
General Safety Information
Safety must be considered the first priority when performing maintenance or service on an
aircraft or part. To minimize the risk to both yourself and others, begin by thinking through
each task that is to be performed before starting any work. Using common sense, think of
ways to avoid these hazards. Be sure to also use the right tool for the task at hand and to use
the proper personal protective equipment. Such equipment may include, but is not limited to:
•
Eye protection – safety glasses, goggles, and face shield
•
Gloves
•
Hearing protection – ear plugs or muffs
•
Apron
•
Protective footwear with non-slip soles
Some other general rules to follow are:
•
Prior to performing maintenance or repair always disconnect the negative (-) battery cable
from the battery.
•
During all service and repair work beware of activating the BRS rocket (if installed).
•
Never leave the ignition switch or the master switch turned on when the engine is not
running. While running the engine on the ground, keep away from the propeller.
•
Remove any loose clothing, such as neckties and scarves. Tuck in your shirt and secure
any long hair to prevent them from becoming tangled in power tools.
•
Remove all jewelry. Not only can items such as rings, watches, and necklaces become
caught in rotating tools, they can also conduct electricity and may cause a short circuit.
This could result in burns or damage to electrical circuits.
•
Aviation gasoline is also highly flammable. When working with the fuel system, always
work in a well-ventilated environment. Any nearby source of ignition such as sparks or an
open flame can result in a fire or explosion. Keep all ignition sources away. Always ground
the airframe to a suitable earth ground during fueling/defueling operations to reduce the
risk of a static discharge ignition source.
•
When working with the landing gear, always support the aircraft properly with jacks. Do
not work underneath the aircraft unless it is properly supported.
Revision No.: 1
Date of issue: 2011-07-08
1-8
CR-MM-1-0-00
SportCruiser
CHAPTER 1 – GENERAL
1.7
PS-28 Cruiser
Definitions and abbreviations
ACCU
Accumulator
ALT
Altimeter
ATC
Air Traffic Control
bar
Pressure unit (1 bar = 14.5037 psi)
BEACON
Anti-collision beacon
°C
Temperature in degree of Celsius (1°C = (°F - 32) / 1.8)
CAS
Calibrated Airspeed
COMM
Communication transmitter
EFIS
Electronic Flight Instrument System
ELT
Emergency Locator Transmitter
EMS
Engine Monitoring System
°F
Temperature in degree of Fahrenheit (1°F = (°C x 1.8) + 32)
ft
foot / feet (1 ft = 12 in = 0.3048 m = 304.8 mm)
ft/min
Vertical speed in feet per minute
GPS
Global Positioning System
hp
Power unit (1 hp = 0.7457 kW)
HTU
Horizontal Tail Unit
IAS
Indicated Airspeed
IC
Intercom
IFR
Instrument Flight Rules
in
inch (1 in = 25.4 mm)
ISA
International Standard Atmosphere
KCAS
Calibrated Airspeed in knots
kg
kilogram (1 kg = 2.2046 lb)
knot
Speed in NM per hour
KIAS
Indicated Airspeed in knots
km/h
Speed in kilometer per hour
knot
Speed in NM per hour
kW
Power unit (1 kW = 1.341 hp)
I
liter (1 l = 0.22 UK gal = 0.264 US gal)
lb
pounds (1 lb = 0.4536 kg)
lbf
force unit (1 lbf = 4.45 N)
LoEP
List of Effective Pages
m
meter (1 m = 1000 mm = 3.28 ft = 39.37 in)
mm
millimeter (1 mm = 0.03937 in)
MAC
Mean Aerodynamic Chord
Date of issue: 2011-07-08
Revision No.: 1
1-9
CR-MM-1-0-00
PS-28 Cruiser
SportCruiser
CHAPTER 1 – GENERAL
max.
maximum
min.
minimum or minute
mph
Speed in statute miles per hour
N
Newton - force unit (1 N = 0.225 lbf)
NM
Nautical Mile (1 NM = 1852 m)
OAT
Outside Air Temperature
OFF
System is switched off or control element is in off-position
ON
System is switched on or control element is in on- position
POH
Pilot Operating Handbook
psi
Pressure unit - pounds per square inch (1 psi = 0.0689bar)
RoR
Record of Revisions
rpm
revolutions per minute
sec.
second
SM
Statute Mile (1SM = 1.609 m)
US gal
US gallon (1 US gal = 0.83 UK gal = 3.785 l)
V
Volt
VFR
Visual Flight Rules
VMC
Visual Meteorological Conditions
VSI
Vertical Speed Indicator
VTU
Vertical Tail Unit
VA
Maneuvering airspeed
VFE
Maximum flap extended speed
VNE
Never exceed speed
VNO
Maximum structural cruising speed
VSO
Stall speed with wing flaps in extended position
VS1
Stall speed with wing flaps in retracted position
VX
Best angle of climb speed
VY
Best rate of climb speed
XPDR
Secondary radar transponder
TSN
Time since new
TSO
Time since overhaul
FH
Flight hour
Cycle
Flight
Revision No.: -
Date of issue: 2011-03-08
1 - 10
CR-MM-1-0-00
CHAPTER 2 – TIME LIMITS / MAINTENANCE CHECKS
PS-28 Cruiser
SportCruiser
Contents
2.1
General .................................................................................................................. 2-2
2.2
Airframe life limitation ............................................................................................ 2-2
2.3
Aircraft parts life limitation...................................................................................... 2-2
2.4
Ordering spare parts.............................................................................................. 2-2
2.5
Terms and list of aircraft regular maintenance works............................................ 2-2
2.6
2.5.1
General ..................................................................................................... 2-2
2.5.2
Tables of inspection tasks ........................................................................ 2-3
Lubrication chart .................................................................................................. 2-13
Date of issue: 2011-07-08
Revision No.: 1
2-1
CR-MM-1-0-00
PS-28 Cruiser
SportCruiser
2.1
CHAPTER 2 – TIME LIMITS / MAINTENANCE CHECKS
General
This chapter contains information about:
• airframe life limitations
• aircraft parts life limitations
• terms and list of aircraft regular maintenance works
• lubrication chart
2.2
Airframe life limitation
Initial airframe life is 5000 FH.
2.3
Aircraft parts life limitation
ITEM
1
2
3
REPLACE
2000 FH
OVERHAUL
X
Klassic 170/3/R
propeller
Sensenich
2A0R5R70EN
propeller
SR3000/2W
propeller
5
6
7
8
BRS rocket
BRS parachute
Flexible fuel lines
Flexible oil lines
9
Battery
11
2.4
Engine
4
10
INTERVAL
NOTES
See OM for Engine
Type 912 Series
No specified overhaul
time
No specified overhaul
time
1500 FH
12 years
25 years
5 years
5 years
At capacity
drop below
80%
X
X
X
X
5 years
X
5 years
X
ELT main unit
battery
ELT remote unit
battery
See OM Electrical
adjustable aircraft
propeller SR 3000
X
Every 6 years repack
X
Ordering spare parts
Order spare parts through the Airplane failures card - see Section 17.4.
2.5
Terms and list of aircraft regular maintenance works
2.5.1 General
Authorization to perform Time Limits/Maintenance Checks and Inspections:
Repairman (LS-M) or Mechanic (A&P)
Maintenance system serves to maintain flight airworthiness of the PS-28 Cruiser /
SportCruiser airplane.
Maintenance system is composed of special and scheduled inspections, which must be
performed at least in the following intervals:
Revision No.: 1
Date of issue: 2011-07-08
2-2
CR-MM-1-0-00
CHAPTER 2 – TIME LIMITS / MAINTENANCE CHECKS
CAUTION:
PS-28 Cruiser
SportCruiser
THE INTERVALS OF ENGINE INSPECTIONS AND THE LIST OF WORKS
ARE SHOWN IN THE MAINTENANCE MANUAL (LINE MAINTENANCE)
FOR INSTALLED ENGINE. THE INTERVALS OF PROPELLER
INSPECTIONS AND THE LIST OF WORKS ARE SHOWN IN
INSTALLATION AND OPERATION INSTRUCTIONS FOR THE INSTALLED
PROPELLER. IF THE PERIODICAL INSPECTION IS PERFORMED
BEFORE REACHING THE SPECIFIED TIME INTERVAL, THEN THE
FOLLOWING INSPECTION MUST BE PERFORMED AT THE LATEST
WITHIN THE SPECIFIED TIME INTERVAL FROM THIS INSPECTION (E.G.
IF THE FIRST 100-FH INSPECTION IS PERFORMED AFTER 87 FH THEN
THE FOLLOWING 100-FH INSPECTION MUST BE PERFORMED AT THE
LATEST AFTER 187 FH).
(a) Preflight inspection is performed within the scope given in the POH, Section 4.
(b) Special propeller inspection after first 5 and 50 FH (see Installation and Operating
Instructions for installed propeller).
NOTE:
To be performed with a newly installed propeller or with the propeller that
was dismantled and reinstalled on the airplane.
(c) Special engine inspection after the first 25 FH.
CAUTION:
INSPECTION AFTER THE FIRST 25 FH TO BE PERFORMED WITH THE
NEW ENGINE OR WITH THE ENGINE AFTER OVERHAUL.
(d) Scheduled inspection after 25, 50 FH - inspection of engine and appropriate propeller.
(e) Scheduled inspection after 100+5 FH - airframe and propeller inspections, engine
inspection according to maintenance system, which is described in Maintenance Manual
(Line Maintenance) for installed engine.
CAUTION:
100-FH LIMIT CAN BE EXCEEDED MAX. BY 5 FH PROVIDING THAT THIS
EXCEEDING WILL BE JUST TO FINISH FLIGHT WHICH STARTED
BEFORE REACTING 100-FH TERM OR FOR FLIGHT WITH THE
PURPOSE TO REACH A PLACE WHERE THE INSPECTION WILL BE
CARRIED OUT. OPERATION TIME, WHICH EXCEEDED 100-FH
INTERVAL, MUST BE INCLUDED AS A TIME FLOWN FOR
DETERMINATION OF THE NEXT 100-FH INSPECTION.
(f) Scheduled annual inspection contains works of 100-FH inspection and other specified
works (inspections of airframe, engine and propeller).
2.5.2 Tables of inspection tasks
Tables of inspection tasks include the list of all works, which are performed during inspection.
Number of chapter is indicated in the first column of this Maintenance Manual where you can
also find more detailed information for performing individual works.
The description of works, which are performed during inspection, is indicated in the second
column.
CAUTION:
ALL DEFECTS FOUND OUT DURING AIRCRAFT INSPECTIONS MUST
BE ELIMINATED!
Date of issue: 2011-07-08
Revision No.: 1
2-3
CR-MM-1-0-00
PS-28 Cruiser
SportCruiser
CHAPTER 2 – TIME LIMITS / MAINTENANCE CHECKS
SPECIAL INSPECTION AFTER
FIRST 5 AND 25 FH
Aircraft S/N:
…………………
TSN (FH):
…………
Registration mark:
…………………
TSN (cycles):
…………
Page: 1 of 1
Chpt.
Prescribed works
Made by
10
Engine and propeller
List of performed operations for engine is shown in
Maintenance Manual (Line Maintenance) for ROTAX
Engine Type 912 Series (MML-912).
List of performed operations for the propeller is shown
in Installation and Operating Instructions for installed
propeller.
Remove and check engine cowlings for evident signs of
heat damage or cracks.
Inspect and check tightening and securing bolts on the
engine brackets and the engine mount.
Check the engine mount for occurrence of cracks.
Check the exhaust system (and its attachment) for
occurrence of cracks on the exhaust system and welds
(see 10.4.5).
Remove and clean the fuel filter screen inserted in
gascolator.
Fuel system – visual check of tightness.
Oil system – visual check of tightness.
Cooling system – visual check of tightness.
Checked by
Notes:
Date:
…………………
Signature:…………………
Revision No.: 1
Date of issue: 2011-07-08
2-4
CR-MM-1-0-00
PS-28 Cruiser
CHAPTER 2 – TIME LIMITS / MAINTENANCE CHECKS
SportCruiser
SCHEDULED INSPECTION AFTER
25 AND 50 FH
Aircraft S/N:
…………………
TSN (FH):
…………
Registration mark:
…………………
TSN (cycles):
…………
Page: 1 of 1
Chpt.
Prescribed works
Made by
10
Engine and propeller
List of performed operations for engine is shown in
Maintenance Manual (Line Maintenance) for ROTAX
Engine Type 912 Series (MML-912).
List of performed operations for the propeller is shown
in Installation and Operating Instructions for installed
propeller.
Remove and check engine cowlings for evident signs of
heat damage or cracks.
Inspect and check tightening and securing bolts on the
engine mount and the engine brackets.
Check the engine mount for occurrence of cracks.
Check the exhaust system (and its attachment) for
occurrence of cracks on the exhaust system and on
welds (see 10.4.5).
Remove and clean the fuel filter screen inserted in
gascolator. (see 9.5.3).
Checked by
Notes:
Date:
…………………
Signature:…………………
Date of issue: 2011-07-08
Revision No.: 1
2-5
CR-MM-1-0-00
PS-28 Cruiser
SportCruiser
CHAPTER 2 – TIME LIMITS / MAINTENANCE CHECKS
SCHEDULED ANNUAL PERIODICAL INSPECTION OR
INSPECTION AFTER 100 FH
Aircraft S/N:
…………………
TSN (FH):
…………
Registration mark:
…………………
TSN (cycles):
…………
Type of inspection:
…………………
Page: 1 of 7
Chpt.
Prescribed works
Made by
Checked by
General
Check the aircraft’s logbooks for condition and check if all
prescribed records are current (airplane log book, engine log
book, propeller log book, and etc.).
Check the remaining service life of life limited items.
Check that the replacement or overhaul of life limited parts
has been in accordance to their specified intervals.
Assure that replacements of these parts are performed in
appropriate intervals.
Check all issued Airworthiness Directives for their
accomplishment.
Check all aircraft, engine and propeller service bulletins for
their accomplishment.
Clean the cockpit carefully.
Clean the aircraft’s exterior, engine and propeller carefully.
Check all exterior and interior markings and placards for their
condition (legibility, placement and security).
Remove and/or open all required covers and hatches.
Jack and support the aircraft.
3
Fuselage
Visually check surface condition including fiberglass parts loosened rivets, deformation, cracks and some other damage.
Check condition of fuselage-wing and fuselage-stabilizer
fairings.
Check condition of foot rests.
Check condition and attachment of the tailskid.
Check condition and attachment of the towing gear (if
installed); check for free travel of the control lever.
Check condition and attachment of the canopy frame.
Check condition of the canopy plexiglass and fixed windows
(scratches, cracks, silvering).
Check condition and function of canopy gas struts.
Check attachment and function of the sunshield.
Check condition of the canopy control including canopy lock.
Check condition and adjustment of terminal switches.
Check condition of rubber sealing of the canopy.
Revision No.: 1
Date of issue: 2011-07-08
2-6
CR-MM-1-0-00
PS-28 Cruiser
CHAPTER 2 – TIME LIMITS / MAINTENANCE CHECKS
SportCruiser
SCHEDULED ANNUAL PERIODICAL INSPECTION OR
INSPECTION AFTER 100 FH
Page: 2 of 7
Chpt.
4
Prescribed works
Made by
Checked by
Wing
Visually check surface condition - loosened rivets,
deformation, cracks and some other damage.
Check play in the wing attachments.
Check condition of antislip strips.
Check condition of the wing lockers.
Check condition and attachment of the wing tips.
Aileron
Visually check surface condition - loosened rivets,
deformation, cracks and some other damage.
Check for free travel.
Check hinges.
Check for securing control links.
Check condition and attachment of the trim tab (right aileron only).
Flap
Visually check surface condition - loosened rivets,
deformation, cracks and some other damage.
Check for free travel.
Check hinges.
Check condition of the control rods and actuator.
5
Tail Unit
HTU
Visually check surface condition - loosened rivets,
deformation, cracks and some other damage.
Check horizontal stabilizer attachment and securing.
Check elevator attachment and securing.
Check condition and attachment of elevator tips.
Check free travel of the elevator.
Check condition of stop (elevator fully deflected down).
Check condition and attachment of the trim tab.
Check trim tab actuator connector for connection and
securing.
Check condition and attachment of the balance tab.
Check condition and securing of the elevator control rod and
the trim tab control actuator.
VTU
Visually check surface condition - loosened rivets,
deformation, cracks and some other damage.
Check attachment and securing of the rudder lower hinge.
Date of issue: 2011-07-08
Revision No.: 1
2-7
PS-28 Cruiser
SportCruiser
CR-MM-1-0-00
CHAPTER 2 – TIME LIMITS / MAINTENANCE CHECKS
SCHEDULED ANNUAL PERIODICAL INSPECTION OR
INSPECTION AFTER 100 FH
Page: 3 of 7
Chpt.
Prescribed works
5
Tail Unit (continued)
Check for free travel of the rudder.
Check condition of the stops on the vertical fin.
Check attachment and securing of rudder cables.
Check run cables over pulleys, securing of the pulleys.
6
Control
Aileron and Elevator Control
Check for free travel of control (see 6.4.2).
Check plays (see 6.4.1).
Check securing of links.
Check condition of the stops.
Made by
Checked by
Rudder Control
Check free play of control (see 6.4.2).
Check plays (see 6.4.1).
Check securing of links.
Check condition and attachment of pedal springs.
Check condition and tension of cables (see 6.4.5).
Check adjustment of pedals and full deflections in all position.
Flap Control
Check for free travel of the control lever.
Check securing of links.
Check condition of control actuator and position indicator.
Control of the Pitch and Roll Trim Tab
Check condition of the control actuators and position indicators.
Check plays (see 6.4.1).
Check securing of links.
Check trim tab neutral position adjustment.
7
Equipment
Check cleanness and condition of upholstery.
Check condition of seats.
Check condition, damage, function and attachment of safety
harnesses and straps in baggage compartment.
Check condition and attachment of ELT.
Check attachment and security of BRS parachute container and
rocket.
Check security and routing of airframe BRS bridles
Revision No.: 1
Date of issue: 2011-07-08
2-8
CR-MM-1-0-00
PS-28 Cruiser
SportCruiser
CHAPTER 2 – TIME LIMITS / MAINTENANCE CHECKS
SCHEDULED ANNUAL PERIODICAL INSPECTION OR
INSPECTION AFTER 100 FH
Page: 4 of 7
Chpt.
Prescribed works
7
Equipment (continued)
Check attachment, security and routing of BRS activating
handle.
Check attachment of egress cover.
8
Landing Gear
Main Landing Gear
Check condition of landing gear legs and attachment points.
Check attachment of the wheel axis.
Remove and disassemble wheel, clean and lubricate the
bearings; reassemble it and install back.
Check condition, wear and inflation of tires.
Check condition of the wheel disk for occurrence of cracks.
Check securing of bolts.
Check wheel for free rotation.
Check condition and attachment of wheel fairings.
Check function of brakes and parking brake.
Check condition and attachment of brake hoses.
Check visually (using mirror) the condition and wearing of brake
pads (minimum admissible thickness of brake pad is 2.5 mm)
and brake disc.
Check brake fluid leakage - brake fluid hoses, brake pumps,
brake cylinders. Replenish brake fluid as needed (see 8.5.4).
Exchange brake fluid - applied for annual inspection only (see
8.5.4).
Made by
Checked by
Nose Landing Gear
Check condition and attachment points of landing gear leg in
fuselage.
Check of the landing leg tube and fork for cracks.
Remove and disassemble wheel, clean and lubricate the
bearings; reassemble it and install back.
Check condition, wear and inflation of tire.
Check condition of wheel disk and for occurrence of cracks.
Check securing of bolts.
Check for free travel of wheel rotation.
Check of friction shock absorber, check friction torque; as
necessary tighten the nut (see 8.4.2).
Check condition and attachment of wheel fairing.
Check depression of nose wheel absorber (see 8.4.1).
Date of issue: 2011-07-08
Revision No.: 1
2-9
PS-28 Cruiser
SportCruiser
CR-MM-1-0-00
CHAPTER 2 – TIME LIMITS / MAINTENANCE CHECKS
SCHEDULED ANNUAL PERIODICAL INSPECTION OR
INSPECTION AFTER 100 FH
Page: 5 of 7
Chpt.
Prescribed works
9
Fuel System
Drain fuel tanks and gascolator (see 9.5.2).
Remove and clean or replace the fuel filter screen inserted in
gascolator (see 9.5.3).
Check condition and integrity of fuel pumps and hose sleeves in
the engine compartment.
Check fuel selector valve for attachment, function and
arrestment.
Visually check for fuel system tightness.
Check of condition and function of filler caps.
Check tightness and condition of fuel pump for occurrence of
cracks on the pump body (see 9.4.2).
Visual check for impurities in the tank.
Check the fuel tank’s vent for its condition (assure that the vent
tube is not clogged).
10
Engine and Propeller
List of performed operations for engine is shown in Maintenance
Manual (Line Maintenance) for ROTAX Engine Type 912 Series
(MML-912).
List of performed operations for the propeller is shown in
Installation and Operating Instructions for installed propeller.
Remove and check engine cowlings for evident signs of heat
damage or cracks.
Check attachment of the propeller and propeller spacer.
Check condition of the firewall and equipment on firewall.
Inspect and check for tightening and securing the bolts on the
engine brackets and the engine mount.
Check the engine mount for cracks.
Check the exhaust system (and its attachment) for cracks on
the exhaust system and on welds (see 10.4.5).
Check condition and attachment of the airbox.
Check condition and cleanness of the air filter.
Check for leak of fluids.
Check function and condition of throttle and choke controls.
Revision No.: 1
Made by
Checked by
Date of issue: 2011-07-08
2 - 10
CR-MM-1-0-00
PS-28 Cruiser
CHAPTER 2 – TIME LIMITS / MAINTENANCE CHECKS
SportCruiser
SCHEDULED ANNUAL PERIODICAL INSPECTION OR
INSPECTION AFTER 100 FH
Page: 6 of 7
Chpt.
Prescribed works
11
Electrical System
Check attachment and condition of battery.
Check level of battery charge.
Perform battery capacity test- applied for annual inspection
only.
Check condition, attachment and integrity of wiring.
Check condition and securing of plug/socket outlets.
Check condition of switches, fuses and circuit breakers.
Check condition of the landing light.
Check condition of the position lights.
12
Instruments and Avionics
Check general condition and attachment of the instrument panel.
Check condition and attachment of instruments.
Check condition and attachment of the pitot tube.
Check cleanness of air inlet holes of pitot tube.
Check attachment and securing of hoses to the instruments.
Check for pitot-static system tightness (see 12.4.1) (with 2
years periodicity).
Visually check condition of navigation and communication
instruments.
12
Instruments and Avionics (continued)
Perform compensation of magnetic and EFIS compass (every
two years).
Check condition of COMM, ELT, XPDR, NAV antennas and OAT
probe.
Heating and Ventilation System
Check cleanness and passage of air inlet holes.
Check line and integrity of the heating and ventilation system
hoses.
Check condition and attachment of the heat exchanger.
Check of functionality of rod and flap.
Check for corrosion.
Check for hard handling.
13
All
Date of issue: 2011-07-08
Made by
Checked by
Revision No.: 1
2 - 11
CR-MM-1-0-00
PS-28 Cruiser
SportCruiser
CHAPTER 2 – TIME LIMITS / MAINTENANCE CHECKS
SCHEDULED ANNUAL PERIODICAL INSPECTION OR
INSPECTION AFTER 100 FH
Page: 7 of 7
Chpt.
Prescribed works
Made by
Checked by
Operational and Functional Tests
Check the function of the interior and exterior lighting.
Check the function of the canopy closed signalization.
Check the function of the flap control actuator including
signalization.
Check the function of the roll and pitch control actuators
including signalization.
Check function of navigation and communication instruments
- in accordance with all valid and applicable regulations applied for annual inspection only.
ELT - perform a functional test according to the applicable
regulations
Check function of the signalling / warning lights.
Check all instruments for their function.
Close up Tasks
Lubricate all items according to the lubrication chart.
Install and close all covers and hatches.
Lower the aircraft.
Carry out an engine performance check and verify the
engine’s power.
After engine run-up, test and visually check the fuel and oil
system for leakage and their security of all components.
Check the removal of all detected defects.
Fill out the required logbook entries.
Notes:
Date:
…………………
Signature:…………………
Revision No.: 1
Date of issue: 2011-07-08
2 - 12
CR-MM-1-0-00
PS-28 Cruiser
SportCruiser
CHAPTER 2 – TIME LIMITS / MAINTENANCE CHECKS
2.6
Unit
Engine
Lubrication chart
Area of lubrication
After first
25 FH
Every
100 FH
Every
500 FH
X
X
X
LPS
X
X
X
LPS
Throttle control cable on the inlet into
terminal (in the engine compartment).
Choke control cable on the inlet into
terminal (in the engine compartment).
Lubricant
Nose
landing
gear
Landing gear leg in the area of
mounting (lubricator) and the axis of
rotation (do not lubricate the friction
areas).
X
X
X
AeroShell
Grease 22
Main
landing
gear
Brake pad pins.
X
X
X
LPS3
Date of issue: 2011-07-08
Revision No.: 1
2 - 13
CR-MM-1-0-00
PS-28 Cruiser
SportCruiser
Unit
Ailerons
CHAPTER 2 – TIME LIMITS / MAINTENANCE CHECKS
After first
25 FH
Every
100 FH
Every
500 FH
Hinges.
X
X
X
Rod end bearings of the control tubes.
-
-
X
Two-arm control levers in the
fuselage.
-
-
X
Bell cranks in the wings.
-
-
X
Hinges.
X
X
X
Rod end bearings on actuator.
-
-
X
Elevator hinges.
X
X
X
Rod end bearing of the elevator
control tubes.
-
-
X
Area of lubrication
Flaps
HTU
Revision No.: 1
Lubricant
AeroShell
Grease 22
AeroShell
Grease 22
AeroShell
Grease 22
AeroShell
Grease 22
AeroShell
Grease 22
AeroShell
Grease 22
AeroShell
Grease 22
AeroShell
Grease 22
Date of issue: 2011-07-08
2 - 14
CR-MM-1-0-00
PS-28 Cruiser
SportCruiser
CHAPTER 2 – TIME LIMITS / MAINTENANCE CHECKS
Unit
VTU
Trim
and
balance
tabs
Aileron,
elevator
control
After first
25 FH
Every
100 FH
Every
500 FH
Rudder hinges.
X
X
X
Cable shackles on the rudder control
cables.
X
X
X
Tabs hinges.
X
X
X
LPS1
Rod end on actuators.
X
X
X
AeroShell
Grease 22
All movable links in the cockpit.
-
-
X
AeroShell
Grease 22
Area of lubrication
Date of issue: 2011-07-08
Lubricant
AeroShell
Grease 22
AeroShell
Grease 22
Revision No.: 1
2 - 15
CR-MM-1-0-00
PS-28 Cruiser
SportCruiser
Unit
Rudder
control
Towing
gear
CHAPTER 2 – TIME LIMITS / MAINTENANCE CHECKS
After first
25 FH
Every
100 FH
Every
500 FH
All movable links in the cockpit.
-
-
X
Cable shackles of rudder control.
X
-
X
Control cable on the inlet into
terminal, control lever
X
X
X
LPS
Tow hook
X
X
X
AeroShell
Grease 22
Area of lubrication
Revision No.: 1
Lubricant
AeroShell
Grease 22
AeroShell
Grease 22
Date of issue: 2011-07-08
2 - 16
CR-MM-1-0-00
SportCruiser
CHAPTER 4 - WING
4.2.4
PS-28 Cruiser
Fuel tanks
Fuel tanks are of welded all-metal structure consisting of aluminum sheet metal skin (1, Fig. 45) and two ribs (2). There are on each tank filler neck (3), fuel quantity sensor (4), venting tube
(5), finger screen (6) and drain valve (7).
1
2
3
4
Metal skin
Rib
Filler neck
Fuel quantity sensor
5 Venting tube
6 Finger screen
7 Drain valve
Fig. 4-5: Fuel tank, right
4.2.5
Wing lockers
Wings are equipped with wing locker (7, Fig. 4-2) placed between ribs No.4 and 5 behind main
spar. Capacity of each wing locker is 20 kg (44 lbs). Access doors installed on piano hinge are
locked per quick fasteners.
4.3
Removal / Installation
4.3.1
Wing removal
Type of maintenance: heavy
Authorization to perform:
-
Repairman (LS-M) or Mechanic (A&P).
Tools needed:
-
wrench size 7/16 in, 1/2 in
-
Phillips PH2 screwdriver
-
cutting pliers
-
hammer
(a) Remove the seats and access cover plates on the seats floor.
(b) Disconnect whole 6 nuts from the attachment bolts on the main spar and remove 6 bolts.
(c) Disconnect aileron control push rod on the control lever in fuselage behind the seats.
Date of issue: 2011-03-08
Revision No.: 4-5
PS-28 Cruiser
CR-MM-1-0-00
SportCruiser
CHAPTER 4 - WING
(d) Remove cover (11, Fig. 4-7) on the bottom wing root.
(e) Disconnect rear attachment bolts on rear spar.
(f) The first person will hold the wing on the wing tip,
(g) One person hold the wing on the winglet side, the second person by the root on the
leading edge side remove first bottom attachment bolt from the main spar, the third person
by the root on the trailing edge.
(h) Release the wing by slight lifting the wing tip upwards.
(i) By pulling the wing in direction from the fuselage, disconnect the outer wing from the
fuselage.
(j) Move the wing about 300 mm (12 in) out from the fuselage and disconnect fuel lines,
cable plugs, aileron rod sealing, sockets of electrical systems and on left wing also pitotstatic tubes.
(k) Position the disconnected wing in such a way that its damaging cannot occur.
4.3.2
Wing installation
Type of maintenance: heavy
Authorization to perform:
-
Repairman (LS-M) or Mechanic (A&P).
Tools needed:
-
wrench size 7/16 in, 1/2 in
-
Phillips PH2 screwdriver
-
pliers
-
hammer
Install the wing according to the following procedure:
(a) Before installation clean the attachments and bolts of the outer and center wing from dirt.
Preserve bolts and attachments by means of lubricating grease.
(b) Set the wing about 300 mm (12 in) to the fuselage side. The first person will hold the wing
on the wing tip, the second person near the root on the leading edge and the third person
near the root on the trailing edge.
(c) Connect wiring.
(d) Connect fuel hoses and pitot-static hoses on the left wing; attach the aileron rod sealing.
(e) Set the outer wing carefully with the wing attachments on the center wing so that the
attachments on the wing and on the fuselage are concentric and flap control pin placed in
the flap guiding plate.
(f) The person keeping the wing on the leading edge will insert the first bolt into the upper
main attachment (the bolt head is in flight direction) and shift it by means of slight
hammering to the stop (shifting can be facilitated by slight moving the wing tip up and
down). Then insert the bolts into the lower main attachment and shift them by slight
hammering to the stop.
Revision No.: 1
Date of issue: 2011-07-08
4-6
CR-MM-1-0-00
PS-28 Cruiser
SportCruiser
CHAPTER 4 - WING
(g) Attach the bolt and nut into the rear attachment of the wing and tight it with the tightening
moment 11 – 16 Nm (100 – 140 inch.lb).
(h) Put the washers on all of 6 attachment bolts of the wing and screw the nuts on them.
(i) Connect the aileron control push rod on control lever behind the seats and perform
tightening up to the tightening torque.
(j) Perform check the trim tab operation, flaps and ailerons deflections (see 6.4.3), possibly
adjusting of theirs deflections (see 6.4.4).
(k) Install access cover plates on the seats floor and access cover on the bottom wing root.
1
2
3
4
5
6
7
8
9
10
11
12
13
Wing, left
Bolt (6 pcs.)
Nut (6 pcs.)
Washer (10 pcs.)
Bolt
Nut
Washer
Bolt
Nut
Washer
Fuel hose
Hose connector
Hose clamp
14
15
16
17
18
19
20
21
22
23
24
25
Pitot static hose
Hose connector
Fuel quantity sensor wiring
Aileron trim tab wiring (only right side)
Position light wiring
Front attachment
Front attachment
Rear attachment
Control lever
Aileron rod sealing
Bush (2 pcs.)
Cable tie (2 pcs.)
Fig. 4-6: Wing removal / installation
Date of issue: 2011-07-08
Revision No.: 1
4-7
CR-MM-1-0-00
PS-28 Cruiser
SportCruiser
4.3.3
CHAPTER 4 - WING
Wing flap removal
Type of maintenance: line
Authorization to perform:
-
Repairman (LS-M) or Mechanic (A&P)
Tools needed:
-
wrench size 7/16 in
(a) Open the flap (1, Fig, 4-7) in full position.
(b) Unscrew the nuts (5), remove the washers (6), bolts (4) and disconnect both flap hinges;
remove the washers (7).
(c) Carefully remove the flap (1) from the wing.
(d) Store the removed flap on a safe place and prevent it from damage.
1
2
3
4
5
6
Wing flap
Inner flap hinge
Outer flap hinge
Bolt
Nut
Washer
7
8
9
10
11
Washer
Wing inner flap hinge
Wing outer flap hinge
Control pin
Rear attachment cover
Fig. 4-7: Wing flap removal / installation
Revision No.: -
Date of issue: 2011-03-08
4-8
CR-MM-1-0-00
PS-28 Cruiser
SportCruiser
CHAPTER 6 – CONTROL SYSTEM
6.4.3
Checking control surface deflections
Control surface deflections of PS-28 Cruiser / SportCruiser are shown in the following table:
15° ± 1° up
15° ± 1° down
30° ± 2° right
30° ± 2° left
24° ± 2° up
24° ± 2° down
Aileron
Rudder
Elevator
Wing flap
0° to 30° ± 1°
Difference between L/R flap deflections
± 0.5°
22° ± 2° up
28° ± 2° down
25° ± 2° up
19° ± 2° down
20° ± 2° up
Elevator trim tab
Elevator balance tab
Aileron trim tab
20° ± 2° down
Tab. 6-1: Deflections of control surfaces
For measuring deflections use protractor with deflecting pointer that will be attached to an
appropriate control surface by means of the clamp.
Measuring aileron deflections
(a) Attach the protractor with the deflecting pointer on the upper skin of the aileron by means
of the clamp.
(b) Set the aileron to neutral position.
(c) Set the protractor to 0° - starting value for measuring.
(d) Deflect aileron to the lower (possibly upper) extreme position and read the deflection value.
(e) Check deflection values according to the Tab. 6-1.
Measuring wing flap deflections
(a) Attach the protractor with the deflecting pointer on the upper flap skin by means of the
clamp.
(b) Set the wing flap to the 0°position.
(c) Set the protractor to 0° - starting value of measuring.
(d) Extend the flaps by means of the flap actuator to individual positions and read the
deflection.
(e) Check deflection values according to the Tab. 6-1.
Date of issue: 2011-07-08
Revision No.: 1
6 - 27
PS-28 Cruiser
CR-MM-1-0-00
SportCruiser
CHAPTER 6 – CONTROL SYSTEM
Measuring elevator deflections
(a) Set the protractor with the deflecting pointer on the trailing edge of the elevator by means
of the clamps.
(b) Set the elevator to neutral position.
(c) Set the protractor to 0° - starting value of measuring.
(d) Deflect the elevator to extreme positions by means of the control stick and read the
deflection.
(e) Check values of deflections according to the Tab. 6-1.
Measuring rudder deflections
The airplane manufacturer uses a special jig for measuring rudder deflections that is slid on
the vertical tail unit and it is possible directly to read the rudder deflection. If you do not have
this special jig, use the alternative procedure:
(a) Set the rudder to neutral position.
(b) Put the rod to the trailing edge of the rudder and mark the lower margin of the rudder
trailing edge.
(c) Deflect the rudder to extreme positions and with the rule measure distance from the sign to
the lower margin of the rudder trailing edge.
(d) Calculate angle and compare it with the value mentioned in the Tab. 6-1.
Measuring trim tab deflections
(a) Set the protractor with the deflecting pointer to the trailing edge of the trim tab by means of
the clamp.
(b) Set the trim tab to neutral position.
(c) Set the protractor to 0° - starting value of measuring.
(d) By means of the trim control actuator deflect the trim tab to extreme positions and read the
deflection.
(e) Check values of deflections according to the Tab. 6-1.
Revision No.: -
Date of issue: 2011-03-08
6 - 28
CR-MM-1-0-00
PS-28 Cruiser
SportCruiser
CHAPTER 7 – EQUIPMENT
Contents
7.1
General .................................................................................................................. 7-2
7.2
Description and operation...................................................................................... 7-2
7.3
7.4
7.2.1
Seats ..................................................................................................... 7-2
7.2.2
Safety harnesses................................................................................... 7-2
7.2.3
Ballistic Recovery System ..................................................................... 7-3
7.2.4
Emergency Locator Transmitter ............................................................ 7-3
Removal / Installation ............................................................................................ 7-4
7.3.1
Seats removal........................................................................................ 7-4
7.3.2
Safety harnesses removal..................................................................... 7-4
7.3.3
Safety harnesses installation................................................................. 7-4
7.3.4
BRS parachute removal ........................................................................ 7-5
7.3.5
BRS parachute installation .................................................................... 7-7
7.3.6
BRS rocket removal............................................................................... 7-7
7.3.7
BRS rocket installation .......................................................................... 7-9
7.3.8
ELT antenna removal ............................................................................ 7-9
7.3.9
ELT antenna installation...................................................................... 7-10
Check / Adjustment.............................................................................................. 7-11
7.4.1
7.5
Checking of safety harnesses ............................................................. 7-11
Exchanges / Service information ......................................................................... 7-11
7.5.1
Cleaning seat covers and upholstery .................................................. 7-11
7.5.2
ELT main unit / remote unit battery replacement ................................ 7-11
Date of issue: 2011-07-08
Revision No.: 1
7-1
CR-MM-1-0-00
PS-28 Cruiser
SportCruiser
7.1
CHAPTER 7 – EQUIPMENT
General
This is a two-seat cockpit with the side-by-side seat arrangement. The seats are fixed; the
rudder control pedals are adjustable. The seats are equipped with safety harnesses. The
baggage compartment is located behind the seats and is equipped with straps.
The equipment of PS-28 Cruiser / SportCruiser airplane includes:
•
seats
•
safety harnesses
•
Ballistic Recovery System
•
Emergency Locator Transmitter.
7.2
Description and operation
7.2.1
Seats
Seats (1, Fig. 7-1) of the PS-28 Cruiser / SportCruiser airplane are fixed and are equipped
with upholstered cushions attached on Velcro. The seat backs (2) are attached to the
bulkhead No. 4 per piano hinge.
NOTE
For clearness is not displayed
the instrument panel and the
canopy.
1 Seat
2 Seat back
3 Safety harnesses
Fig. 7-1: PS-28 Cruiser cockpit
7.2.2
Safety harnesses
Seats are equipped with safety harnesses (3, Fig. 7-1). Safety harnesses consist of two lap
belts, two shoulder belts and a safety harness lock. Length of the lap belts and the shoulder
belts is adjustable.
Revision No.: 1
Date of issue: 2011-07-08
7-2
CR-MM-1-0-00
PS-28 Cruiser
SportCruiser
CHAPTER 7 – EQUIPMENT
7.2.3
Ballistic Recovery System
The aircraft can be equipped (optional) with BRS emergency parachute system.
BRS utilize a manually activated, solid propellant rocket motor to extract a round, nonsteerable parachute and recover the aircraft in life-threatening emergency situations.
The parachute with harnesses and the rocket are installed aft of the firewall. Activating handle
is located on the middle channel.
NOTE:
For detailed information refer to Owner's Manual for BRS-6 Emergency
Parachute Recovery Systems (Doc. No. 020000-03) and Parachute Installation
Manual for the BRS-1350 onto the Czech Sport Aircraft SportCruiser (Doc. No.
020016-PM), latest revision.
1 Parachute
2 Harnesses
3 Rocket
4 Rear attachment cable
5 Handle
Fig. 7-2: BRS scheme
7.2.4
Emergency Locator Transmitter
The aircraft is equipped with the AK-451 ELT Emergency Locator Transmitter.
The AK-451 ELT is micro controller based, batteries operated and self contained equipment.
The ELT is designed only for emergency use. The AK-451 consists of an ELT main unit with a
mounting tray, an aircraft-fixed antenna, remote switch unit, an audible buzzer monitor, and
interconnecting cables (see Fig. 7-6).
Date of issue: 2011-07-08
Revision No.: 1
7-3
CR-MM-1-0-00
PS-28 Cruiser
SportCruiser
CHAPTER 7 – EQUIPMENT
The ELT main unit is mounted in baggage compartment, remote switch unit with the buzzer is
mounted on the right instrument panel; the ELT antenna is installed on the upper part of the
fuselage.
NOTE:
For detailed information refer to Installation and Operation Manual for Model AK451-( ) Series, (Doc. No. IM 451), latest revision.
7.3
Removal / Installation
7.3.1
Seats removal
(a) Remove the seats from the Velcro
(b) Unscrew the seats together with the piano hinge.
(c) Seat back is not removable.
7.3.2
Safety harnesses removal
Type of maintenance: line
Authorization to perform:
-
Sport pilot or higher
Tools needed:
-
wrench size 1/2 in
(a) Unscrew the nut (4, Fig. 7-4), remove the washer (5), bolt (3), the bushing (2) and
disconnect the shoulder belts bracket (1) from the attachment bracket in baggage
compartment.
(b) Remove the bolt (3), the bushing (2), the washer (5) (only at outer lap belt attachment)
and disconnect the lap belt bracket (1) from the attachment point on the fuselage / central
console side.
7.3.3
Safety harnesses installation
Type of maintenance: line
Authorization to perform:
-
Sport pilot or higher
Tools needed:
-
wrench size 1/2 in
(a) Gradually put the bushing (2, Fig. 7-4), lap belt bracket (1), the washer (5) (only at outer
lap belt attachment) on the bolt (3); screw the bolt into the attachment point on the
fuselage / central console side.
(b) Put the bushing (2) and shoulder belts bracket (1) on the bolt (3), insert the bolt into the
attachment bracket in baggage compartment, insert the washer (5), screw and tighten the
nut (4).
Revision No.: 1
Date of issue: 2011-07-08
7-4
CR-MM-1-0-00
PS-28 Cruiser
SportCruiser
CHAPTER 7 – EQUIPMENT
1 Attachment bracket
2 Bushing
3 Bolt
4 Nut
5 Washer
Fig. 7-3: Safety harnesses removal / installation
7.3.4
BRS parachute removal
Type of maintenance: heavy
Authorization to perform:
-
Repairman (LS-M) or Mechanic (A&P)
Tools needed:
-
screwdriver, Philips screwdriver
-
wrench size No.7
-
cutting pliers, pliers
-
Allen wrench size 1/8 in, 1/4 in
Date of issue: 2011-07-08
Revision No.: 1
7-5
PS-28 Cruiser
CR-MM-1-0-00
SportCruiser
CHAPTER 7 – EQUIPMENT
WARNING: UNAUTHORIZED PERSONNEL SHOULD NOT ATTEMPT TO MODIFY,
REPAIR, OR DISASSEMBLE BRS SYSTEM AT ANY TIME. DURING ALL
SERVICE WORK BEWARE OF ACTIVATING THE BRS ROCKET!
NOTE:
BRS parachute must be removed from the aircraft for repacking. This
service date is printed on placards located on the side of centre panel and
on the parachute.
(a) Carefully unglue the cover over parachute on the canopy fixed frame.
(b) Remove both instrument panels and disconnect all cable and pitot-static connection.
(c) Remove COMM/NAV equipment from the centre panel and disassemble it.
(d) Pull open the front flap of the parachute (1, Fig. 7-4) and expose the small link;
unscrew the link nut and disconnect the rocket lanyards (5).
(e) Carefully remove the BRS rocket (see 7.3.6).
(f) Cut-off cable ties (4) securing link (3) to the tray.
(g) Unscrew the link (3) nut and disconnect the loop of the main brindle (6).
(h) Disengage all four Velcro retaining straps.
(i) Carefully remove parachute (1) from the tray (2).
(j) Repack the parachute by the authorized person.
1 Parachute
2 Tray
3 Link
4 Cable tie
5 Rocket lanyards
6 Main bridle loop
Fig. 7-4: BRS parachute removal / installation
Revision No.: 1
Date of issue: 2011-07-08
7-6
CR-MM-1-0-00
SportCruiser
CHAPTER 7 – EQUIPMENT
7.3.5
PS-28 Cruiser
BRS parachute installation
Type of maintenance: heavy
Authorization to perform:
-
Repairman (LS-M) or Mechanic (A&P)
Tools needed:
-
screwdriver, Philips screwdriver
-
wrench size No.7
-
cutting pliers, pliers
-
Allen wrench size 1/8 in, 1/4 in
WARNING: UNAUTHORIZED PERSONNEL SHOULD NOT ATTEMPT TO MODIFY,
REPAIR, OR DISASSEMBLE BRS SYSTEMS AT ANY TIME. DURING
ALL SERVICE WORK BEWARE OF ACTIVATING THE BRS ROCKET!
(a) Install the parachute – see Parachute Installation Manual for the BRS-1350 onto the
Czech Sport Aircraft SportCruiser (Doc. No. 020016-PM), points 2.8 to 2-17, and 3-5
to 3.11.
(b) Install the BRS rocket (see 7.3.7)
(c) Assemble centre panel and install COMM/NAV equipment.
(d) Connect all cable and pitot-static connection and install both instrument panels.
(e) Glue (by means of the Emfimastic PU 50 sealant) the cover over parachute on the
canopy fixed frame.
(f) Perform pitot-static leak test (see Chapter 12.4.1) and check correct function
appropriate instruments and systems.
7.3.6
BRS rocket removal
Type of maintenance: heavy
Authorization to perform:
-
Repairman (LS-M) or Mechanic (A&P)
Tools needed:
-
screwdriver, Philips screwdriver
-
cutting pliers, pliers
-
Allen wrench size 1/8 in, 1/4 in
WARNING: UNAUTHORIZED PERSONNEL SHOULD NOT ATTEMPT TO MODIFY,
REPAIR, OR DISASSEMBLE BRS SYSTEM AT ANY TIME. DURING ALL
SERVICE WORK BEWARE OF ACTIVATING THE BRS ROCKET!
NOTE:
BRS rocket motor must be replaced by its date of expiry. This service date is
printed on placards located on the side of centre panel and on the rocket.
(a) Carefully unglue the cover over parachute on the canopy fixed frame.
(k) Pull open the front flap of the parachute (16, Fig. 7-5) and expose the small link;
unscrew the link nut and disconnect the rocket lanyards (2).
(b) Cut-off cable ties securing lanyards.
Date of issue: 2011-07-08
Revision No.: 1
7-7
CR-MM-1-0-00
PS-28 Cruiser
SportCruiser
CHAPTER 7 – EQUIPMENT
WARNING: NEVER POINT ROCKET AT ANYONE. ACCIDENTAL ACTIVATION MAY
CAUSE DEATH OR SERIOUS INJURY!
ASSEMBLY MUST BE DONE IN THIS SEQUENCE. IF DONE INCORRECTLY,
ACCIDENTAL DISCHARGE OF ROCKET MAY OCCUR AND MAY
CAUSE DEATH OR SERIOUS INJURY!
(c) Remove plastic cap (6).
CAUTION:
KEEP ALLEN WRENCH VERTICAL. BE CAREFUL NOT LO "LEVER"
WRENCH AGAINST SIDE, SO AS TO NOT ACCIDENTLY ACTIVATE
ROCKET!
(d) Remove screw (7) with 1/8 Allen wrench.
(e) Unscrew adapter (4) from rocket. Carefully remove housing (3) from rocket by turning
entire housing assembly.
(f) Loose set screws (10).
(g) Carefully remove the BRS rocket.
(h) As necessary, remove right side panel of the middle channel, unscrew the nut (14),
remove the washer (15), bolt (13) and activation housing (3).
9 Bracket
10 Set screw
11 Rocket pedestal
12 Bracket
13 Bolt
14 Nut
15 Washer
For information:
16 Parachute
1
2
3
4
5
6
7
8
BRS rocket
Rocket lanyards
Activation housing
Cone adapter
Steel cable
Plastic cap
Screw
Star washer
Fig. 7-5: BRS rocket removal / installation
Revision No.: 1
Date of issue: 2011-07-08
7-8
CR-MM-1-0-00
SportCruiser
CHAPTER 7 – EQUIPMENT
7.3.7
PS-28 Cruiser
BRS rocket installation
Type of maintenance: heavy
Authorization to perform:
Repairman (LS-M) or Mechanic (A&P)
-
Tools needed:
-
screwdriver, Philips screwdriver
-
cutting pliers, pliers
-
Allen wrench size 1/8 in, 1/4 in
WARNING: UNAUTHORIZED PERSONNEL SHOULD NOT ATTEMPT TO MODIFY,
REPAIR, OR DISASSEMBLE BRS SYSTEM AT ANY TIME. DURING ALL
SERVICE WORK BEWARE OF ACTIVATING THE BRS ROCKET!
(a) Carefully unglue the cover over parachute on the canopy fixed frame.
(b) As necessary, install the activation housing (3) to the middle channel; fasten handle
by means of the bolt (13), washer (15) and nut (14); install right side panel of the
middle channel.
(c) Route the housing in a gentle arc to the base on the rocket. The housing cable should
have no abrupt bends.
(d) Install the rocket – see Parachute Installation Manual for the BRS-1350 onto the
Czech Sport Aircraft SportCruiser (Doc. No. 020016-PM), points 3.1 to 3-11.
(e) Connect the activation housing to the rocket - see Parachute Installation Manual for
the BRS-1350 onto the Czech Sport Aircraft SportCruiser (Doc. No. 020016-PM),
points 5.1 to 5-7.
(f) Glue (by means of the Emfimastic PU 50 sealant) the cover over parachute on the
canopy fixed frame.
7.3.8
ELT antenna removal
Type of maintenance: line
Authorization to perform:
-
Repairman (LS-M) or Mechanic (A&P)
Tools needed:
-
wrench No. 3/4 in
(a) Remove the circular cover on the aft wall of the baggage compartment.
(b) Set the MASTER BAT switch to OFF.
(c) Disconnect the connector (2, Fig. 7-6) from the antenna.
(d) Unscrew the nut (5), remove the washer (6) and the antenna (4).
(e) Install the protective cover on the antenna connector.
Date of issue: 2011-07-08
Revision No.: 1
7-9
CR-MM-1-0-00
PS-28 Cruiser
SportCruiser
7.3.9
CHAPTER 7 – EQUIPMENT
ELT antenna installation
Type of maintenance: line
Authorization to perform:
-
Repairman (LS-M) or Mechanic (A&P)
Tools needed:
-
wrench No. 3/4 in
(a) Remove the protective cover from the antenna connector.
(b) Insert the antenna (4, Fig. 7-6) to the hole in the fuselage upper part (7).
(c) Insert the washer (6), screw and tighten the nut (5) to between 25 to 30 inch lbs.
(d) Connect the connector (2) to the antenna (4).
(e) Install the circular cover on the aft wall of the baggage compartment.
(f) Do an operational test.
1
2
3
4
ELT main unit
Cable connector
Mounting tray
ELT antenna
5 Nut
6 Lockwasher
For information:
7 Fuselage upper part
Fig. 7-6: ELT antenna removal / installation
Revision No.: 1
Date of issue: 2011-07-08
7 - 10
CR-MM-1-0-00
PS-28 Cruiser
SportCruiser
CHAPTER 7 – EQUIPMENT
7.4 Check / Adjustment
7.4.1
Checking of safety harnesses
Check harnesses surface for any damages. Check the lock system function. Check the
attachment points of shoulder and side harnesses for any damages or corrosion.
7.5 Exchanges / Service information
7.5.1
Cleaning seat covers and upholstery
(a) Take upholstery and covers out of the airplane.
(b) Brush impurities, possibly clean with warm water with addition of a suitable detergent.
(c) Before reinstalling upholstery and seats in the airplane, let it thoroughly dry.
7.5.2
ELT main unit / remote unit battery replacement
NOTE:
The battery pack has a 5 years useful life or batteries must be replaced when the
transmitter has been in use for more than one cumulative hour. This service date
is printed on placards located on ELT main unit.
For battery replacement refer to Installation and Operation Manual for Model AK-451-( )
Series, (Doc. No. IM 451), latest revision.
Date of issue: 2011-07-08
Revision No.: 1
7 - 11
PS-28 Cruiser
CR-MM-1-0-00
SportCruiser
CHAPTER 7 – EQUIPMENT
INTENTIONALLY LEFT BLANK
Revision No.: 1
Date of issue: 2011-07-08
7 - 12
CR-MM-1-0-00
CHAPTER 8 – LANDING GEAR
PS-28 Cruiser
SportCruiser
Contents
8.1
General .................................................................................................................. 8-2
8.2
Description and operation...................................................................................... 8-2
8.2.1
Main landing gear .................................................................................. 8-2
8.2.1.1
8.2.2
Nose landing gear ................................................................................. 8-3
8.2.2.1
8.2.3
8.3
8.4
8.5
Nose landing gear wheel ................................................... 8-4
Brake system......................................................................................... 8-6
8.2.3.1
8.2.4
Main landing gear wheel .................................................... 8-3
Parking brake..................................................................... 8-6
Wheel fairings........................................................................................ 8-6
Removal / Installation ............................................................................................ 8-7
8.3.1
Removal of main wheel fairing .............................................................. 8-7
8.3.2
Installation of main wheel fairing ........................................................... 8-7
8.3.3
Removal of main landing gear wheel .................................................... 8-8
8.3.4
Installation of main landing gear wheel ................................................. 8-9
8.3.5
Removal of nose wheel fairing .............................................................. 8-9
8.3.6
Installation of nose wheel fairing ......................................................... 8-10
8.3.7
Removal of nose landing gear wheel .................................................. 8-11
8.3.8
Installation of nose landing gear wheel ............................................... 8-12
8.3.9
Removal of the main landing gear leg................................................. 8-12
8.3.10
Installation of the main landing gear leg.............................................. 8-13
8.3.11
Removal of nose landing gear leg....................................................... 8-14
8.3.12
Installation of nose landing gear leg.................................................... 8-14
8.3.13
Removal of brake pumps .................................................................... 8-15
8.3.14
Installation of brake pumps ................................................................. 8-15
Check / Adjustment.............................................................................................. 8-17
8.4.1
Check of nose landing gear shock absorber ...................................... 8-17
8.4.2
Check of nose landing gear after shimmy occurrence ........................ 8-17
Changes / Service information............................................................................. 8-18
8.5.1
Tire change.......................................................................................... 8-18
8.5.2
Change of nose landing gear shock absorber dumping elements...... 8-20
8.5.3
Change of brake lining ........................................................................ 8-22
8.5.4
Refilling / exchanging brake fluid......................................................... 8-24
Date of issue: 2011-07-08
Revision No.: 1
8-1
CR-MM-1-0-00
PS-28 Cruiser
SportCruiser
8.1
CHAPTER 8 – LANDING GEAR
General
PS-28 Cruiser / SportCruiser airplane landing gear is of three-wheel fixed design and consists
of the main landing gear and the nose landing gear. The nose landing gear is freely rotatable.
The main landing gear wheels are equipped with hydraulic disc brakes.
Type and dimension of wheels (manufacturer Matco mfg):
•
Main wheel - MHE51CZ (5 in)
•
Nose wheel - WHLNW51CC.75R (5 in)
•
Tire and tube - Goodyear FLIGHT SPECIAL II – 5.00-5 in (or equivalent aircraft grade).
This chapter provides information on:
•
main landing gear
•
nose landing gear
•
brake system
•
wheel fairings
8.2
Description and operation
8.2.1
Main landing gear
The main landing gear consists of the composite landing gear leg (1, Fig. 8-1), wheel axle and
wheel (2) equipped with the disc brake (3). The landing gear legs are inserted in the gear
channel under the seats, where they are attached by two bolts (5) and stirrup (6).
1 Main landing gear leg
2 Wheel
3 Disc brake
4 Wheel fairing
5 Bolt
6 Stirrup
Fig. 8-1: Main landing gear, right
Revision No.: -
Date of issue: 2011-03-08
8-2
CR-MM-1-0-00
CHAPTER 8 – LANDING GEAR
8.3.7
PS-28 Cruiser
SportCruiser
Removal of nose landing gear wheel
Type of maintenance: line
Authorization to perform:
-
Sport pilot or higher
Tools needed:
-
wrench size 1 1/8 in
-
pliers
(a) Jack and support the airplane (see 14.2).
(b) Disassemble wheel fairing (see 8.3.6).
(c) Remove the cotter pin (6, Fig. 8-9) securing nut (4) on wheel axle (2) – on one side only.
(d) Remove the nut (4), washer and tow bracket (8) from wheel axle (2).
(e) Release the wheel axle (2) from the wheel (1), bushings (3) and the wheel fork eyes (8).
1
2
3
4
5
6
7
8
Nose landing gear wheel
Wheel axle
Bushing
Nut
Washer
Cotter pin
Tow bracket
Wheel fork
Fig. 8-9: Nose landing gear wheel removal / installation
Date of issue: 2011-03-08
Revision No.: 8 - 11
PS-28 Cruiser
CR-MM-1-0-00
SportCruiser
8.3.8
CHAPTER 8 – LANDING GEAR
Installation of nose landing gear wheel
Type of maintenance: line
Authorization to perform:
-
Sport pilot or higher
Tools needed:
-
wrench size 1 1/8 in
-
pliers
(a) Clear the wheel axle (2, Fig. 8-9) of impurities and grease it slightly.
(b) From one side shift the axle (2) into the wheel fork eye (8).
(c) Gradually put first bushing (3), nose wheel (1) and second bushing (3) on the wheel axle
(2) and tow bracket (7) according to the figure.
(d) From one side install washer (5), screw nut (3) - set the tow brackets (7) so that the axes
of holes for bolts fastening fairings were horizontally; tighten nut (3).
(e) Check for free turning of the nose wheel (turning must be continual without catching).
(f) Secure the nut (3) with the new cotter pin (6).
(g) Install wheel fairing (see 8.3.6).
8.3.9
Removal of the main landing gear leg
Type of maintenance: heavy
Authorization to perform:
-
Repairman (LS-M) or Mechanic (A&P).
Tools needed:
-
wrench size 9/16 in, 1/2 in
(a) Jack and support the airplane (see 14.2).
(b) Remove appropriate seat (see 7.3.1).
(c) Disconnect the brake line.
(d) Unscrew the nuts (8, Fig. 8-10), and remove the washers (9) and bolts (7).
(e) Unscrew the nuts (4), and remove the washers (5) and tube (3); remove the spacer (10).
(f) Remove the landing gear leg (1) from the chamber (6) and put it on a suitable place.
Revision No.: 1
Date of issue: 2011-07-08
8 - 12
CR-MM-1-0-00
PS-28 Cruiser
SportCruiser
CHAPTER 8 – LANDING GEAR
NOTE
For clearness is not displayed
the channel cover.
1
2
3
4
5
Main landing gear leg
Main gear attachment
Tube
Locknut
Washer
6 Chamber
7 Bolt
8 Locknut
9 Washer
10 Spacer
Fig. 8-10: Main landing gear leg removal / installation
8.3.10 Installation of the main landing gear leg
Type of maintenance: heavy
Authorization to perform:
-
Repairman (LS-M) or Mechanic (A&P).
Tools needed:
-
wrench size 9/16 in, 1/2 in
(a) Check outer surface of the composite landing gear leg (1, Fig. 8-10) for occurrence of
cracks and whether the axle connection is not damaged before installing the landing gear
leg.
(b) Insert the landing gear leg (1) with the spacer (10) into the chamber (6) in attachment
channel on fuselage and fit the leg in main gear attachment (2).
(c) On the main gear attachment bolts (2) install the tube (3), washers (5), and slightly tighten
the nuts (4).
Date of issue: 2011-07-08
Revision No.: 1
8 - 13
PS-28 Cruiser
CR-MM-1-0-00
SportCruiser
CHAPTER 8 – LANDING GEAR
(d) Insert the bolts (7) through spacer (10), chamber (6) and leg (1), install the washers (9)
and tighten nuts (8; 4).
(e) Connect the brake lines.
(f) Install seat.
(g) Fill brake system with brake liquid and air-bleed it (see 8.5.4).
8.3.11 Removal of nose landing gear leg
Type of maintenance: heavy
Authorization to perform:
-
Repairman (LS-M) or Mechanic (A&P).
Tools needed:
-
wrench size 1/2 in, No.17
(a) Jack and support the airplane, (see 14.2).
(b) Remove the lockwire from the bolts (6, Fig. 8-11),
(c) Remove the bolts (6) and washers (7).
(d) Remove the tube (5) from the leg bracket (9).
(e) Remove the cotter pin (9), unscrew the nut (3), remove washers (4), bolt (2) and
disconnect the shock absorber (8) from the bracket on the nose gear leg (1).
(f) Remove the gear leg (1) from the fuselage and put it on a suitable place.(d)
8.3.12 Installation of nose landing gear leg
Type of maintenance: heavy
Authorization to perform:
-
Repairman (LS-M) or Mechanic (A&P).
Tools needed:
-
wrench size 1/2 in, No.17
(a) Check the welds of the gear leg for occurrence of cracks and corrosion and whether the
bearings are not damaged before installing the gear leg.
(b) Insert the gear leg (1, Fig, 8-11) into the bracket (9).
(c) Insert the tube (5) to the hole in the bracket (9).
(d) Screw the bolts (6) with the nuts (7) to the tube; tighten the bolts slightly; secure bolts with
the lockwire.
(e) Put the lower end of the shock absorber (8) to the bracket on the nose gear leg (1); install
the bolt (2) with the nut (3) and washers (4), secure the nut with the new cotter pin (9).
Revision No.: 1
Date of issue: 2011-07-08
8 - 14
CR-MM-1-0-00
CHAPTER 8 – LANDING GEAR
PS-28 Cruiser
SportCruiser
8.4 Check / Adjustment
8.4.1
Check of nose landing gear shock absorber
(a) Several times hoist and lower the nose landing gear of the airplane.
(b) Measure value of absorber and nose landing gear compression according to Fig. 8-13.
Perform measuring in vertical direction between the bottom of the engine cowl and the
lower shock absorber attachment. The minimum value is 50 mm (2 in). If this value is
lower than change the dumping elements (see 8.5.2).
Fig. 8-13: Check of nose landing gear shock absorber
8.4.2
Check of nose landing gear leg after shimmy occurrence
(a) Remove the nose wheel fairing (see 8.3.5).
(b) Remove the nose wheel (see 8.3.7).
(c) Remove the cover (7, Fig. 8-14) and unload nose landing gear.
(d) Check condition of the fork, leg, and shock absorber for cracks (see Fig. 8-14). Use
magnifying glass.
(e) Check tire worn and specified inflation (1.2 + 0.1 bar (17.4 + 1.5 psi)).
CAUTION:
(f)
DO NOT EXCESS SPECIFIED TIRE PRESSURE OVERPRESSURED TIRE
CAUSED SHIMMY.
Check condition of spring washers (3). Keep washers free of lubricants. Remove cotter
pin (6), loose nut (5) and clean washers (2; 3; 4) if necessary, use some solvent for
degreasing.
(g) Attach spring scale (10) to fork.
(h) Torque castellated nut (5) so a constant force of 8-10 kg is required to rotate nose wheel
fork.
(i)
Install new cotter pin (6).
(j)
As necessary, grease the axle per grease nipple.
Date of issue: 2011-07-08
Revision No.: 1
8 - 17
CR-MM-1-0-00
PS-28 Cruiser
SportCruiser
CHAPTER 8 – LANDING GEAR
(k) Install the cover (7), nose wheel (see 8.3.8) and nose wheel fairing (see 8.3.6).
1
2
3
4
5
Spindle
Friction washer
Spring washer
Thrust ring
Nut
6
7
8
9
10
Cotter pin
Cover
Bolt
Washer
Spring scale
Fig. 8-14: Check of nose landing gear leg after shimmy occurrence
8.5 Changes / Service information
8.5.1
Tire change
Type of maintenance: line
Authorization to perform:
-
Sport pilot or higher
Tools needed:
-
wrench size 1/2 in
-
Allen wrench size 1/4 in
(a) Jack and support the airplane (see 14.2).
(b) Remove the wheel fairing (see 8.3.1).
Revision No.: 1
Date of issue: 2011-07-08
8 - 18
CR-MM-1-0-00
PS-28 Cruiser
SportCruiser
CHAPTER 8 – LANDING GEAR
(c) Remove the main landing gear wheel (see 8.3.3) or the nose landing gear wheel
(see 8.3.5).
(d) Deflate the tire.
(e) Unscrew the bolts (1, Fig. 8-15).
(f) Set apart both halves of the rim (1; 2) and remove the tire (10) with the air tube (11).
(g) Exchange the air tube or the tire, if necessary.
(h) Put the air tube (11) into the tire (10) and inflate it slightly.
(i) Put the inner tube on that half of the rim, which has the hole for the valve.
(j) Put the other half of the rim on this unit. Join both halves of the rim with bolts – torque
value 11.3 Nm (100 in lbs).
(k) Inflate tires to the prescribed pressure:
- nose wheel 1.2 + 0.1 bar (17.4 + 1.5 psi)
- main wheel 1.8 + 0.2 bar (26.1 + 2.9 psi)
(l) Mark position of the rim and the tire by redline overreaching about 10 mm (3/8 in) to the
rim and the tire (serves for checking the tire slewing against the wheel rim in operation).
NOTE
Figure shows the replacement tire of
the main landing gear wheel.
1
2
3
4
5
6
Wheel rim, outer
Wheel rim, inner
Hub
Brake disc
Bolt
Bolt
7 Lock nut
8 Washer
9 Washer
10 Tire
11 Air tube
Fig. 8-15: Tire change
Date of issue: 2011-07-08
Revision No.: 1
8 - 19
PS-28 Cruiser
CR-MM-1-0-00
SportCruiser
8.5.2
CHAPTER 8 – LANDING GEAR
Change of nose landing gear shock absorber dumping elements
Type of maintenance: heavy
Authorization to perform:
-
Repairman (LS-M) or Mechanic (A&P).
Tools needed:
-
wrench size 1/2 in
(a) Jack and support the airplane (see 14.2).
(b) Remove the cotter pin (10, Fig. 8-16), unscrew the nut (13), remove the washers (12), bolt
(11) and disconnect tube (1) from the bracket (2) on the nose gear leg.
(c) Remove the cotter pin (10), unscrew the nut (9) and remove the washers (8; 6; 7; 5).
(d) Turn the tube (1) forward and remove tube (1), dumping elements (2) and washers (3).
(e) As needed, remove the cotter pins (15), push out the tube (14) and remove profile (18)
and case (19).
(f) Replace damaged dumping elements (3).
(g) Gradually put on the tube (1) shock absorbers (2), washers (3) and insert tube into the
hole on the tube (14) according to the figure.
(h) Gradually install on the tube end (1) washers (5; 7; 6; 8), screw and tighten the nut (9);
secure it with the new cotter pin (10).
(i) Put the lower end of the tube (1) to the bracket (16); install the bolt (11) with the nut (13)
and washers (12), secure nut with the new cotter pin (10).
(j) Lower the airplane on jacks.
Revision No.: 1
Date of issue: 2011-07-08
8 - 20
CR-MM-1-0-00
SportCruiser
CHAPTER 8 – LANDING GEAR
1 Tube
2 Shock absorber
3 Washer
4 Washer
5 Washer
6 Washer
7 Rubber washer
8 Washer
9 Nut
10 Cotter pin
PS-28 Cruiser
11
12
13
14
15
16
17
18
19
Bolt
Washer
Nut
Tube
Cotter pin
Nose leg bracket
Bracket
Profile
Case
Fig. 8-16: Change of the dumping elements in the nose landing gear
Date of issue: 2011-07-08
Revision No.: 1
8 - 21
CR-MM-1-0-00
PS-28 Cruiser
SportCruiser
8.5.3
CHAPTER 8 – LANDING GEAR
Change of brake lining
Type of maintenance: line
Authorization to perform:
-
Sport pilot or higher
Tools needed:
-
wrench size 7/16 in
-
drill # 25
-
electric drill
-
brake relining tool, pneumatic press
CAUTION:
EXCHANGE ALWAYS BOTH BRAKE PADS!
(a) Jack and support the airplane (see 14.2).
(b) Remove the main landing gear wheel (see 8.3.3).
(c) Remove the caliper from the wheel by removing the two bolts (1, Fig. 8-17) that hold in on.
(d) Remove old linings (4) by drilling the crimped side of the rivet (Do not use punch and
hammer). Using a # 25 drill (0.1495 in. diameter), drill through rivet taking care to avoid
damaging the rivet hole.
(e) After drilling crimped edge off rivets, lift old lining and remaining rivet pieces from the
brake shoe.
(f) Inspect the brake shoe (2; 3) for any bending or other damage that may have occurred
during service. A shoe with more than 0.010 in bend should be replaced. Inspect rivet
holes to ensure that no damage has occurred during removal.
(g) Using a brake relining tool or pneumatic press, replace the lining using brass rivet (5).
(h) Insert the brake disc and screw them with the caliper.
(i) Reinstall the main landing gear wheel (see 8.3.4).
(j) Check the brake function.
1
2
3
4
5
Revision No.: 1
Bolt
Movable brake shoe
Stationary brake shoe
Lining
River
Date of issue: 2011-07-08
8 - 22
CR-MM-1-0-00
CHAPTER 8 – LANDING GEAR
NOTE:
PS-28 Cruiser
SportCruiser
The lining requires replacement when the wear indicator is no longer visible.
Fig. 8-17: Change of brake lining
Date of issue: 2011-07-08
Revision No.: 1
8 - 23
CR-MM-1-0-00
PS-28 Cruiser
SportCruiser
8.5.4
CHAPTER 8 – LANDING GEAR
Refilling / exchanging brake fluid
Draining brake fluid from brake system
Type of maintenance: line
Authorization to perform:
-
Sport pilot or higher
Tools needed:
-
wrench size 7/16”
(a) Disconnect the brake hose from the brake cylinder and let brake fluid drain into the
previously prepared can.
(b) You can accelerate brake fluid draining by compressing the relevant brake pedal.
Filing brake fluid into brake system
NOTE:
Brake fluid used by aircraft manufacturer is shown in Section 17.5.
(a) Fix the aircraft with help wedges.
(b) Release the parking brake.
(c) Bleed the hose of the filling equipment and connect it to the filling hole of the left wheel
brake.
(d) Unscrew the plug of the left brake cylinder with reservoir using the socket wrench.
(e) Slowly fill the brake system with hydraulic fluid.
(f) Repeatedly push the brake pedal.
(g) Check the brake hose from the point of view of occurrence of bubbles.
(h) Continuous occurrence of bubbles indicates a failure of the filling equipment.
(i) After the reservoir is filled up to the filler hole – stop the filling through closing of the filling
valve of the filling equipment.
(j) Disconnect the hose of the filling equipment.
(k) Suck off 20 ml of hydraulic fluid using the syrette.
(l) Screw down the closing plug using the socket wrench.
(m) Repeat the same procedure for the right brake cylinder.
(n) Check the proper resistance of pedals.
(o) Pull the parking brake.
By this way, both wheels must be braked equally.
(p) Remove the wedges.
Refilling brake fluid into brake system
For the refilling – use the procedure for filling (see above).
Revision No.: -
Date of issue: 2011-03-08
8 - 24
CR-MM-1-0-00
PS-28 Cruiser
SportCruiser
CHAPTER 9 – FUEL SYSTEM
Contents
9.1
General .................................................................................................................. 9-2
9.2
Description and operation...................................................................................... 9-3
9.3
9.4
9.5
9.2.1
Fuel storage........................................................................................... 9-3
9.2.2
Fuel distribution ..................................................................................... 9-3
9.2.3
Indication of fuel quantity and pressure................................................. 9-4
Removal / Installation ............................................................................................ 9-5
9.3.1
Fuel tank removal .................................................................................. 9-5
9.3.2
Fuel tank installation.............................................................................. 9-6
9.3.3
Removal of the finger screen ................................................................ 9-6
9.3.4
Installation of the finger screen ............................................................. 9-7
9.3.5
Fuel level sender removal ..................................................................... 9-7
9.3.6
Fuel level sender installation ................................................................. 9-8
9.3.7
Fuel drain valve removal ....................................................................... 9-9
9.3.8
Fuel drain valve installation. .................................................................9-10
Check / Adjustment…………………………………..…………………………………9-10
9.4.1
Checking fuel system tightness…………………………………………....9-10
9.4.2
Fuel pump check…………………………………………………………….9-10
Exchanges / Service information………………………………………………………9-11
9.5.1
Fuel tank filling……………………………………………………………….9-11
9.5.2
Draining fuel system………………………………………………………...9-11
9.5.3
Fuel filter cleaning………………………………………………………......9-12
Date of issue: 2011-07-08
Revision No.: 1
9-1
CR-MM-1-0-00
PS-28 Cruiser
SportCruiser
9.1
CHAPTER 9 – FUEL SYSTEM
General
The fuel system (see Fig. 9.1) is used for storing fuel in the airplane and its delivering to the
engine. The fuel system of PS-28 Cruiser / SportCruiser airplane consists of the following
parts: two fuel tanks, fuel tubing, selector valve, gascolator, mechanical fuel pump (located on
the engine), electrical fuel pump, fuel quantity sensor, fuel flow-meter, fuel pressure sensor
1
2
3
4
5
Fuel tank, left
Fuel tank, right
Filler cap
Fuel quantity sensor
Finger screen
6 Fuel selector valve
7 Gascolator
8 El. fuel pump
9 Fuel pressure sensor
10 Fuel flow meter
11 Mech. fuel pump
12 Carburetor, left
13 Carburetor, right
14 Restrictor jet
and drain valves of the fuel tanks.
Fig. 9-1: Fuel system layout
Revision No.: -
Date of issue: 2011-03-08
9-2
CR-MM-1-0-00
PS-28 Cruiser
SportCruiser
CHAPTER 9 – FUEL SYSTEM
Fig. 9-4: Float mechanism
9.3
Removal / Installation
9.3.1 Fuel tank removal
Type of maintenance: heavy
Authorization to perform:
Repairman (LS-M) or Mechanic (A&P)
Tools needed:
-
wrench size No. 8, 1/2 in,
-
screwdriver
-
drill diam. 3.2 mm (1/8 in), 4.1 mm (5/32 in)
-
electric drill
-
cutting pliers, pliers
(a) Disconnect the battery.
(b) Drain fuel from the fuel system by the tank drain valve.
(c) Unscrew the filler cap.
(d) Remove the wing (see 4.3.1) and put it on the table.
(e) Drill out the top half of the leading edge skin.
(f) Disconnect wiring from fuel quantity sensor.
(g) Disconnect fuel line.
(h) Carefully remove the tank and store it. Seal the tank holes as needed.
Date of issue: 2011-07-08
Revision No.: 1
9-5
CR-MM-1-0-00
PS-28 Cruiser
SportCruiser
CHAPTER 9 – FUEL SYSTEM
9.3.2 Fuel tank installation
Type of maintenance: heavy
Authorization to perform:
-
Repairman (LS-M) or Mechanic (A&P)
Tools needed:
-
wrench size No. 8, 1/2 in,
-
screwdriver
-
riveting pliers
-
cutting pliers, pliers
(a) Remove any hole seals from the tank.
(b) Set the tank to the position between the ribs No.4 and 6a. Before installing the tank, check
the cork bands for completeness and damage. Change them, if needed.
(c) Connect fuel quantity sensor wire, insert the finger screen – use LOCTITE 565 or
equivalent sealant.
(d) Close the leading edge skin on the wing and fit it to the spars and ribs per clecos each
second hole through of securing harnesses.
(e) Rivet the skin on the ribs and spar.
(f) Screw back filler cap - use silicon to make connection of filler cap flange and wing skin
watertight.
(g) Install the wing (see 4.3.2).
(h) Check the fuel system (see 9.4.1).
(i) Connect the battery ground.
9.3.3 Removal of the finger screen
Type of maintenance: line
Authorization to perform:
-
Repairman (LS-M) or Mechanic (A&P)
Tools needed:
-
screwdriver
-
socket wrench 11/16 inch
NOTE:
The finger screen is located in the root tank rib.
(a) Drain fuel from the fuel system.
(b) Remove the wing (see 4.3.1).
(c) Remove the hose clamp (3, Fig. 9-5) and disconnect the fuel hose (4).
(d) Remove the finger screen (2).
Revision No.: -
Date of issue: 2011-03-08
9-6
CR-MM-1-0-00
PS-28 Cruiser
SportCruiser
CHAPTER 9 – FUEL SYSTEM
9.3.4 Installation of the finger screen
Type of maintenance: line
Authorization to perform:
-
Repairman (LS-M) or Mechanic (A&P)
Tools needed:
-
Screwdriver
-
Socket wrench 11/16 inch
(a) Screw the finger screen (2, Fig. 9-5) into the root tank rib – use LOCTITE 565 or
equivalent sealant on finger screen thread.
(b) Connect fuel hose (4) on the finger screen; tighten the hose clamp (3).
(c) Install the wing (see 4.3.2).
(d) Check fuel system tightness (see 9.4.1).
1
2
3
4
Fuel tank
Fingers screen
Clamp
Fuel hose
Fig. 9-5: Finger screen removal / installation
9.3.5 Fuel quantity sensor removal
Type of maintenance: line
Authorization to perform:
-
Sport pilot or higher
Tools needed:
-
electric drill
-
drill diam. 3.2 mm (1/8 in)
-
screwdriver
-
cutting pliers, pliers
(a) Remove (drill off) the fuel quantity cover plate (6, Fig. 9-6).
(b) Disconnect fuel level sender wire (5).
(c) Unscrew bolts (3), remove washers (4) and fuel quantity sensor (1) and gasket (2).
Date of issue: 2011-03-08
Revision No.: 9-7
CR-MM-1-0-00
PS-28 Cruiser
SportCruiser
1
2
3
4
CHAPTER 9 – FUEL SYSTEM
Fuel quantity sensor
Gasket
Bolt
Washer
5 Wire
6 Cover plate
7 Rivet
Fig. 9-6: Fuel quantity sensor removal / installation
9.3.6 Fuel quantity sensor installation
Type of maintenance: line
Authorization to perform:
-
Sport pilot or higher
Tools needed:
-
Phillips PH2 screwdriver
-
riveting pliers (riveter)
-
cutting pliers, pliers
Revision No.: 1
Date of issue: 2011-07-08
9-8
CR-MM-1-0-00
CHAPTER 9 – FUEL SYSTEM
9.5
PS-28 Cruiser
SportCruiser
Exchanges / Service information
9.5.1 Fuel tank filling
CAUTION:
WHEN FILLING FUEL IN THE AIRPLANE, USE ONLY APPROVED KINDS
OF FUEL MENTIONED IN THIS MANUAL IN 10.2.1, IN THE POH
SECTION 2.4, IN THE ROTAX OPERATOR’S MANUAL SECTION 10.2.2
FUEL, IN THE ROTAX SERVICE INSTRUCTIONS SI-912-016. SAFETY
INSTRUCTIONS FOR FILLING FUEL INTO THE AIRPLANE TANKS
(a) The fuel tanks can be filed with fuel only by persons who are fully instructed and
familiarized with safety instructions.
(b) It is prohibited to fill the fuel tank:
•
during rain and storm
•
in a closed space
•
when the engine is operating or with electric system switched on.
(c) A person filling the fuel tank must not be wearing polyester clothing or any clothing from a
material which creates static electricity.
(d)
It is prohibited to smoke or handle with open fire.
Procedure of fuel tank filing
(a) Ground the airplane. The airplane ground point is located on the nose landing gear leg.
(b) Open the fuel tank filler cap.
(c) Fill necessary quantity of fuel.
CAUTION:
WHEN FILLING FUEL INTO THE AIRPLANE, AVOID THE CONTACT OF
FUEL WITH THE AIRPLANE SURFACE – IT WOULD CAUSE DAMAGE TO
SURFACE TREATMENT OF THE AIRPLANE.
(d) When the airplane is filled with fuel, wipe the filler neck of the rest of fuel and close the
fuel neck filler cap.
(e) Remove conductive interconnection between the filling device and the airplane.
(f) Sludge the fuel tank.
9.5.2 Draining fuel system
Perform draining the fuel tanks and gascolator after every filling the tank with fuel before the
first flight of the day. The fuel tank draining points are on bottom side of the wings and on the
firewall.
Draining procedure
(a) Open the drain valve by pressing up.
(b) Drain required quantity of fuel.
NOTE:
Draining serves for elimination of impurities and sediments from fuel. Drain
so long unless clean fuel flows from the drain valve.
(c) Close the drain valve by releasing pressure.
(d) Check the purity of drained fuel (sediment, water).
Date of issue: 2011-03-08
Revision No.: 9 - 11
PS-28 Cruiser
CR-MM-1-0-00
SportCruiser
9.5.3
CHAPTER 9 – FUEL SYSTEM
Fuel filter cleaning
Perform fuel filter cleaning at each scheduled maintenance or signs of irregular engine
running.
Cleaning procedure
(a) Move the fuel selector valve to the OFF position.
(b) Use the drain valve to drain the existing fuel from the gascolator bowl.
(c) Remove the lockwire from nut (3. Fig. 9-8).
(d) Loose the nut (3) and remove the gascolator bowl (4) and the gasket (5).
(e) Use a small pointed tool to lift the edge of the filter screen (6) and carefully remove it for
cleaning.
(f) Clean the filter screen (6) by washing in fuel, or it can be blown off using an air line;
inspect bowl (4) and clean if required.
(g) Carefully install the filter screen (6) to the gascolator body, insert the gasket (5) and the
gascolator bowl (4); make sure to correct installation.
(h) Tighten the nut (3) and secure it by lockwire.
(i) Move the fuel selector valve to LEFT / RIGHT position; check the gascolator for fuel leak.
1
2
3
4
5
6
Gascolator body
Stirrup
Nut
Gascolator bowl
Gasket
Filter screen
Fig. 9-8: Fuel filter cleaning
Revision No.: 1
Date of issue: 2011-07-08
9 - 12
CR-MM-1-0-00
CHAPTER 10 – POWERPLANT
PS-28 Cruiser
SportCruiser
Contents
10.1 General ................................................................................................................ 10-3
10.2 Description and operation.................................................................................... 10-3
10.2.1
10.2.2
Engine ................................................................................................. 10-3
10.2.1.1
Engine mount................................................................... 10-4
10.2.1.2
Engine cowling................................................................. 10-4
10.2.1.3
Engine control .................................................................. 10-5
10.2.1.4
Engine instruments .......................................................... 10-5
10.2.1.5
Engine cooling system ..................................................... 10-6
10.2.1.6
Engine lubrication system................................................ 10-7
10.2.1.7
Engine air inlet system..................................................... 10-7
10.2.1.8
Exhaust system................................................................ 10-8
10.2.1.9
Ignition system ................................................................. 10-9
Propeller ............................................................................................ 10-10
10.3 Removal / Installation ........................................................................................ 10-12
10.3.1
Removal of the engine from the airplane .......................................... 10-12
10.3.2
Installation of the engine on the airplane .......................................... 10-13
10.3.3
Klassic 107/3/R propeller removal..................................................... 10-15
10.3.4
Klassic 107/3/R propeller installation ................................................ 10-16
10.3.5
2A0R5R70EN propeller removal ....................................................... 10-17
10.3.6
2A0R5R70EN propeller installation................................................... 10-19
10.3.7
SR 3000 propeller removal................................................................ 20-21
10.3.8
SR 3000 propeller installation ........................................................... 20-22
10.3.9
Air intake system removal ................................................................. 10-23
10.3.10
Air intake system installation ............................................................. 10-24
10.3.11
Exhaust system removal ................................................................... 10-24
10.3.12
Exhaust system installation ............................................................... 10-26
10.3.13
Oil cooler removal.............................................................................. 10-26
10.3.14
Oil cooler installation ......................................................................... 10-27
10.3.15
Water cooler removal ........................................................................ 10-24
10.3.16
Water cooler installation .................................................................... 10-30
10.3.17
Throttle and choke levers removal .................................................... 10-30
10.3.18
Throttle and choke levers installation ................................................ 10-31
10.3.19
Carburetors heating knob removal .................................................... 10-32
10.3.20
Carburetors heating knob installation................................................ 10-33
Date of issue: 2011-07-08
Revision No.: 1
10 - 1
PS-28 Cruiser
SportCruiser
CR-MM-1-0-00
CHAPTER 10 – POWERPLANT
10.4 Check / Adjustment............................................................................................ 10-34
10.4.1
Engine test......................................................................................... 10-34
10.4.2
Adjusting throttle control.................................................................... 10-36
10.4.3
Adjusting choke control ..................................................................... 10-36
10.4.4
Adjusting carburetor heating control.................................................. 10-36
10.4.5
Checking exhaust system ................................................................. 10-37
10.5 Exchanges / Service information ....................................................................... 10-37
10.5.1
Exchange / Refilling oil ...................................................................... 10-37
10.5.2
Exchange / Refilling cooling liquid..................................................... 10-38
10.5.3
Exchange / Check of oil filter............................................................. 10-39
10.5.4
Exchange / Check of air filter ............................................................ 10-39
Revision No.: 1
Date of issue: 2011-07-08
10 - 2
CR-MM-1-0-00
PS-28 Cruiser
SportCruiser
CHAPTER 10 – POWERPLANT
10.1
General
Standard power unit of PS-28 Cruiser airplane is the ROTAX 912 S engine and
- Woodcomp Klassic 170/3/R ground adjustable 3-blade propeller.
Standard power unit of SportCruiser airplane is the ROTAX 912 ULS engine and
- Woodcomp Klassic 170/3/R ground adjustable 3-blade propeller or
- Sensenich 2A0R5R70EN ground adjustable 2-blade propeller or
- Woodcomp SR 3000/2W electrical adjustable 2-blade propeller.
10.2
Description and operation
10.2.1
Engine
The engine ROTAX 912 S / 912 ULS is a four-stroke, four-cylinder, opposed - cylinder
engine, central cam shaft and OHV - mechanism with maximal power of 73.5 kW (98.6
HP) at 5 800 rpm.
Technical data of the engine:
Engine manufacturer:
Bombardier-Rotax GmbH
Engine type:
ROTAX 912 S; 912 ULS
Power:
max. take-off
73.5 kW
(98.6 hp)
max. continuous
69.0 kW
(92.5 hp)
max. take-off
5 800 rpm max. 5 minutes
max. continuous
5 500 rpm
idle
1 400 rpm
Cylinder head temperature:
max.
135°C
(275°F)
Oil temperature:
max.
130°C
(266°F)
optimum operation
90 - 110°C
(190 - 230°F)
max.
7 bar
(102 psi)
min.
0.8 bar
(12 psi)
optimum operation
2 - 5 bar
(29 - 73 psi)
max.
0.4 bar
(5.8 psi)
min.
0.15 bar
(2.2 psi)
RPM:
Oil pressure:
Fuel pressure:
Coolant type:
(refer to the Rotax Operator’s Manual, Section 10.1.2 Operating Speeds and Limits, and
Section 10.2.1 Coolant; the Rotax Installation Manual, Section 12 Cooling System; the
Rotax Service Instruction SI-912-016)
In principle, 2 different types of coolant are permitted:
- Conventional coolant based on ethylene glycol
- Waterless coolant based on propylene glycol
WARNING: THE COOLANT CONCENTRATE (PROPYLENE GLYCOL) MAY NOT BE
MIXED WITH CONVENTIONAL (GLYCOL/WATER) COOLANT OR WITH
ADDITIVES!
NON OBSERVANCE CAN LEAD TO DAMAGES TO THE COOLING
SYSTEM AND ENGINE!
Date of issue: 2011-07-08
Revision No.: 1
10 - 3
CR-MM-1-0-00
PS-28 Cruiser
SportCruiser
CAUTION:
CHAPTER 10 – POWERPLANT
THE CONVENTIONAL GLYCOL/WATER COOLANT REDUCE TO APPLY
MAXIMUM PERMISSIBLE COOLANT EXIT TEMPERATURE.
Type of coolant used by aircrafts manufacturer is shown in Section 17.5.
Fuel type:
MOGAS (EN228 Super or EN 228 Super plus with max. 5% ethanol blend, min RON 95;
ASTM D4814, min. AKI 91); AVGAS (100LL; ASTM D910; ASTM D7547).
(refer to the Rotax Operator’s Manual, Section 10.2.2 Fuel, Rotax Service Instructions
SI-912-016)
Oil type:
(refer to the Rotax Operator’s Manual)
10.2.1.1
Engine mount
The engine mount serves for mounting the power unit to the airplane. It is welded from
4130 steel tubes and is attached to the firewall and to the engine by means of bolts. The
engine mount is installed on the firewall by four attachments. The scheme of engine
mount attachment to the firewall and to the engine is shown in the Fig. 10-1.
1 Firewall
2 Engine mount
3 Attachment bolt
4 Nut
Fig. 10-1: Engine mount
10.2.1.2
Engine cowling
The engine cowling (Fig. 10-2) consists of two parts: upper cowling and lower cowling.
The upper cowling (1) is attached by means of quick fasteners (4) to the firewall and to the
lower cowling (2). Unlock the quick fasteners by turning the bolt by 90° counter-clockwise.
The access cover (5), which is located on the upper cowling on the left in front of the
firewall enables to check oil quantity in the oil tank without removing the upper cowling.
The lower cowling (2) is attached by means of quick fasteners (4) to the firewall and to the
upper cowling (1). In the front part of the lower cowling (2), there is an oval hole (3) for air
Revision No.: 1
Date of issue: 2011-07-08
10 - 4
CR-MM-1-0-00
PS-28 Cruiser
SportCruiser
CHAPTER 10 – POWERPLANT
inlet to the radiator. In the bottom part of the lower cowling (2), there is a hole for air inlet
to the oil cooler. On the left side in the lower cowling (2) there is a hole (6) for air inlet to
the air filter to the engine inlet system.
1
2
3
4
Upper engine cowling
Lower engine cowling
Air inlet hole for radiator
Quick fasteners
5
6
7
8
Access cover
Air inlet hole for engine inlet system
Landing light
Air inlet hole for cylinder cooling
Fig. 10-2: Engine cowling
10.2.1.3
Engine control
Engine power is controlled by means of the throttle control lever which is positioned on the
middle channel between the seats and which controls engine power from idle up to max.
take-off power. Engine power control lever is mechanically connected (by cable) to the
carburetors.
If the control lever is fully pushed, this position corresponds to max. take-off power of the
engine. If the control lever is fully pulled, this position corresponds to idle. Changes in the
engine power setting can be made by moving of the control lever forward and backward.
10.2.1.4
Engine instruments
Engine parameters (RPM, CHT, EGT, oil pressure and temperature, fuel pressure,
manifold pressure) are displayed either on the EMS or on the classical analog
instruments. A typical example of the EMS display is shown in the Figure 10-3.
Date of issue: 2011-07-08
Revision No.: 1
10 - 5
PS-28 Cruiser
SportCruiser
CR-MM-1-0-00
CHAPTER 10 – POWERPLANT
Fig. 10-3: EMS D-120
10.2.1.5
Engine cooling system
Engine cooling is combined, cylinder heads are liquid cooled, and cylinders are air cooled.
Cooling circuit of cylinder heads is made as a closed system containing the pump (5, Fig.
10-4), expansion tank (4) with the pressure cap (3), cooler (2), thermostatic valve (6) and
the overflow bottle (1).
1 Overflow bottle
2 Cooler
3 Pressure cap
4 Expansion tank
5 Pump
6 Thermostatic valve
Fig. 10-4: Cooling system
Revision No.: 1
Date of issue: 2011-07-08
10 - 6
CR-MM-1-0-00
SportCruiser
CHAPTER 10 – POWERPLANT
10.2.1.6
PS-28 Cruiser
Engine lubrication system
Engine lubrication system is made with the dry sump. Engine lubrication system is
equipped with the mechanically driven oil pump (3, Fig. 10-5) with oil filter (6) which
ensures oil supply from the oil tank (4) located on the firewall through the thermostatic
valve (9) and the oil cooler (5) to the lubricated points on the engine. The oil pump is
equipped with the pressure relief valve (1) and with the oil pressure sensor (2). The oil
tank is ventilated by venting (7), which is connected to hose and is led under the airplane.
Oil pressure and temperature are indicated either on the EMS or on the classical analog
instruments.
1
2
3
4
5
Pressure relief valve
Oil pressure sensor
Oil pump
Oil tank
Oil cooler
6
7
8
9
Oil filter
Oil tank venting
Oil temperature sensor
Thermostatic valve
Fig. 10-5: Oil cooling system
10.2.1.7
Engine air inlet system
Engine air inlet system ensures supply of sufficient air volume to the engine. Air is
supplied to the engine by the NACA type inlet (left on the engine cowling) through the air
filter (4, Fig. 10-6) to the airbox (1). Heated air from the heat exchanger (2), which is
attached to the exhaust (3), is controlled by flaps in the airbox. The heating control flaps is
controlled by CARB HEAT knob (8) on the instrument panel.
Date of issue: 2011-07-08
Revision No.: 1
10 - 7
PS-28 Cruiser
CR-MM-1-0-00
SportCruiser
1
2
3
4
CHAPTER 10 – POWERPLANT
Airbox
Heat exchanger
Exhaust
Air filter
5
6
7
8
Oil cooler
Water cooler
CABIN HEATING knob
CARB HEAT knob
Fig. 10-6: Air inlet system
10.2.1.8
Exhaust system
Exhaust system of PS-28 Cruiser / SportCruiser airplane consist of four exhaust tubes (1,
Fig. 10-7) which lead exhaust gases from individual cylinders to the muffler (2). The
muffler serves at the same time as a silencer. Exhaust gases are led from there by the
exhaust tube (3) down the airplane.
On the muffler there is a heat exchanger (5) from which is taken the warm air for the
carburetor preheating and for the cockpit.
The whole exhaust system is manufactured by welding from the stainless steel sheet.
Revision No.: 1
Date of issue: 2011-07-08
10 - 8
CR-MM-1-0-00
SportCruiser
CHAPTER 10 – POWERPLANT
1 Exhaust tube
2 Muffler
3 Outlet exhaust tube
PS-28 Cruiser
4 Spring
5 Heat exchanger
6 Spring
Fig. 10-7: Exhaust system
10.2.1.9
Ignition system
The engine is equipped with the double contactless ignition system. Every ignition circuit
has its source of energy, control unit, 2-ignition coils and 4-spark plugs. It is fully
independent on the other circuit and battery. High voltage current is distributed to the
spark plugs by means of high voltage cables. The sequence of individual cylinder ignition
of the engine is as follows: 1-4-2-3.
Ignition circuits are controlled by the keyed ignition switch on the instrument panel.
Positions of ignition switch:
OFF
R
L
BOTH
START
Engine ignition of
Only ignition circuit B on
Only ignition circuit A on
Both circuits on
Both circuits on and the starter is running up the engine
Fig. 10-8: Ignition selection switch
Date of issue: 2011-07-08
Revision No.: 1
10 - 9
PS-28 Cruiser
CR-MM-1-0-00
SportCruiser
10.2.2
CHAPTER 10 – POWERPLANT
Propeller
The Woodcomp Klassic is a three-blade ground adjustable composite propeller designed
for the airplanes with piston engines with power up to 75 kW (100 hp) and max. propeller
speed up to 2 600 rpm.
The Woodcomp SR 3000 is a two-blade electrically operated in flight adjustable propeller
of mixed structure designed for the airplanes with piston engines with power up to
85.8 kW (115 hp) and max. propeller speed up to 2 650 rpm.
The angle of blade setting is adjusted by a servomotor controlled from the cockpit and it
can be adjusted smoothly in the range from the minimum (fine) angle intended for take-off
up to the maximum (coarse) angle. The propeller can operate with either of manual control
or with automatic control as a constant speed propeller (see Fig. 10-9).
The Sensenich propeller is a two-blade ground adjustable composite propeller designed
for the airplanes with piston engines with power up to 85.8 kW (115 hp) and max.
propeller speed up to 2 600 rpm.
The leading edge of the propeller blades is protected from damaging side by polyurethane
tape (Woodcomp) and co-cured bonded stainless steel (Sensenich). The propeller surface
is provided with a sprayed-on coat of resistant polyurethane varnish. The composite
propeller spinner is a part of the propeller.
The propeller is attached to the engine by means of bolts.
Technical data of the propellers:
Woodcomp propellers
Propeller manufacturer:
Woodcomp s.r.o.
Propeller type:
Klassic 170/3/R
Max. speed:
2 600 rpm
Diameter:
1.72 m
Pitch setting:
17.5° ± 0.5°
Propeller type:
SR 3000/2W
Max. speed:
2 650 rpm
Diameter:
1.70 m
Range of setting:
12°
(68 in)
(67 in)
Sensenich propeller
Propeller manufacturer:
Sensenich Propeller Manufacturing Co., Inc.
Propeller type:
2A0R5R70EN
Max. speed:
2 600 rpm
Diameter:
1.78 m
Revision No.: 1
(70 in)
Date of issue: 2011-07-08
10 - 10
CR-MM-1-0-00
CHAPTER 10 – POWERPLANT
PS-28 Cruiser
SportCruiser
Fig. 10-9: SR 3000 propeller control scheme
Date of issue: 2011-07-08
Revision No.: 1
10 - 11
PS-28 Cruiser
CR-MM-1-0-00
SportCruiser
CHAPTER 10 – POWERPLANT
10.3
Removal / Installation
10.3.1
Removal of the engine from the airplane
Type of maintenance: heavy
Authorization to perform:
-
Repairman (LS-M) or Mechanic (A&P).
Tools needed:
-
wrench size No.8, No.9, 3/8”, 7/16”, 9/16”
-
Allen wrench size No.4
-
screwdriver
-
cutting pliers, pliers
-
Cobra pliers (for clamps)
(a) Remove engine cowling.
(b) Disconnect and remove the battery (see 11.3.2).
(c) Remove the propeller (see 10.3.3 or 10.3.5 or 10.3.7).
(d) Disconnect all electrical system wires and bonding between the engine mount and the
firewall.
(e) Shut the fuel selector valve (possibly drain fuel from the fuel installation).
(f) Drain oil from the engine (see 10.5.1) and cooling liquid (see 10.5.2).
(g) Disconnect hoses of the oil and the cooling system.
(h) Remove the oil cooler (see 10.3.13) and the water cooler (see 10.3.15).
(i) Disconnect control of carburetors and carburetors heating.
(j) Remove air intake (see 10.3.9).
(k) Remove the exhaust system (see 10.3.11).
(l) Blind all the holes on the engine so that no debris can get into the engine.
(m) Cut of the wire securing the screw heads (3, Fig. 10-10).
(n) Remove screws (3) and washers (4) attaching the engine to the engine mount (4).
(o) Take the engine (1) away from the engine mount by the crane or with help 2 assistants.
(p) Store the removed engine on a safe place on a suitable support and prevent it from
damage.
Revision No.: 1
Date of issue: 2011-07-08
10 - 12
CR-MM-1-0-00
SportCruiser
CHAPTER 10 – POWERPLANT
1 Engine
2 Bolt
PS-28 Cruiser
4 Washer
4 Engine mount
Fig. 10-10: Engine removal / installation
10.3.2 Installation of the engine on the airplane
Type of maintenance: heavy
Authorization to perform:
-
Repairman (LS-M) or Mechanic (A&P).
Tools needed:
-
wrench size No.8, No.9, 3/8”, 7/16”, 9/16”
-
Allen wrench size No.4
-
screwdriver
-
cutting pliers, pliers
-
Cobra pliers (for clamps)
Date of issue: 2011-07-08
Revision No.: 1
10 - 13
CR-MM-1-0-00
PS-28 Cruiser
SportCruiser
CHAPTER 10 – POWERPLANT
(a) Put the engine (1, Fig. 10-10) on the engine mount (4) by the crane or with 2
assistants and attach it by the screws (3) with washers (4). Tighten up to a torque of
11 - 16 Nm (100 – 140 inch lb).
(b) Secure the screw heads (3) by lockwire (see 15.8.2).
(c) Install the exhaust system (see 10.3.12).
(d) Connect wiring according the wiring diagrams (see Wiring Manual).
(e) Install the oil cooler (see 10.3.14).
(f) Install the water cooler (see 10.3.16).
(g) Connect and secure oil system hoses.
(h) Connect and secure fuel system hoses.
(i) Install air intake of the engine (see 10.3.10).
(j) Connect control cable of the carburetors preheating flap.
(k) According to the Fig. 10-10 connect control cables of the throttle and the choke on the
carburetors control levers. Adjust throttle control (see 10.4.2) and the choke (see
10.4.3).
1 Carburetor, left
2 Airbox
3 Throttle control cable
4 Choke control cable
5 Throttle control lever
6 Choke control lever
Fig. 10-11: Throttle and choke control connection
(l) Connect the air hose from the heat exchanger for heating the airplane cockpit.
(m) Fill the prescribed amount oil and cooling liquid quantity.
Revision No.: 1
Date of issue: 2011-07-08
10 - 14
CR-MM-1-0-00
PS-28 Cruiser
SportCruiser
CHAPTER 10 – POWERPLANT
(n) Check fuel system tightness (see 9.4.1).
(o) Install the propeller (see 10.3.4 or 10.3.6 or 10.3.8).
(p) Install and connect the battery (see 11.3.3).
(q) Install engine cowlings.
(r) Perform engine test (see 10.4.1).
10.3.3
Klassic 170/3/R propeller removal
Type of maintenance: line
Authorization to perform:
Repairman (LS-M) or Mechanic (A&P)
-
Tools needed:
-
wrench size No.13, No. 16 (5/8”)
-
Allen wrench size No. 6
-
screwdriver
-
cutting pliers, pliers
WARNING: ENGINE IGNITION MUST BE SWITCHED OFF!
(a) Disconnect the battery and remove upper line of spark plugs from the engine.
(b) Unscrew the screws (11, Fig. 10-12) with the washers (12) and remove the propeller
spinner (1).
(c) Cut of the lockwire securing the bolt heads (7).
(d) Unscrew and remove the bolts (7) with the washers (10) and take out the propeller
along with spinner flange (9) from the spacer (3).
(e) Put the protective covers on the propeller blades and store the propeller on a safe
place so that no damage can occur.
7
8
9
10
11
12
1
2
3
4
5
6
Bolt (6 pcs.)
Nut (6 pcs.)
Spinner flange
Washers (12 pieces)
Screw (6 pcs.)
Washer (6 pcs.)
Propeller
Propeller spinner
Spacer
Drive bushing (6 pcs.)
Bolt (6 pcs.)
Propeller flange
Fig. 10-12: Klassic 170/3/R propeller removal / installation
Date of issue: 2011-07-08
Revision No.: 1
10 - 15
CR-MM-1-0-00
PS-28 Cruiser
SportCruiser
10.3.4
CHAPTER 10 – POWERPLANT
Klassic 170/3/R propeller installation
Type of maintenance: line
Authorization to perform:
-
Repairman (LS-M) or Mechanic (A&P)
Tools needed:
-
wrench size No.13, No. 16 (5/8”)
-
Allen wrench size No. 6
-
screwdriver
-
cutting pliers, pliers
WARNING: ENGINE IGNITION MUST BE SWITCHED OFF!
(a) Disconnect the battery and remove upper line of spark plugs from the engine.
(b) Check the contacting areas of the spacer propeller shaft flange (3, Fig. 10-12) and the
propeller. Clear of all impurities.
(c) Remove protective covers from the propeller blades and carry out visual check of the
propeller integrity and condition.
(d) Check out possibly adjust the blades pitch of propeller according to the propeller
manual.
NOTE:
Propeller pitch is factory set to 17.5° ± 0.5°.
(e) Attach the propeller (1) and the propeller flange (9) to the spacer (3) on the engine
flange (6) by means of the bolts (7) with washers (10).
(f) Secure the airplane against its movement (see 14.5).
(g) Tighten the bolts (7) using a star pattern (Fig.10-13) with torque 22 Nm (16.2 ft.lb.),
and measure the difference in distance of individual blade tips from marking (see Fig.
10-14).
Fig. 10-13: Bolt tightening sequence
Revision No.: 1
Date of issue: 2011-07-08
10 - 16
CR-MM-1-0-00
CHAPTER 10 – POWERPLANT
PS-28 Cruiser
SportCruiser
(h) The difference can be max. 1.5 mm (0.06 in). Possible bigger differences can be
corrected by repetition the procedure from point (g).
Fig. 10-14: Check of axial propeller running-out
(i) Secure bolt heads (7, Fig. 10-12) by lockwire (see 15.8.2).
(j) Put the propeller spinner (1) on the propeller and attach it with bolts (11) with washers
(12).
(k) Install spark plugs to the engine. Tighten up with torque 20 Nm (15 ft.lb); connect the
battery.
10.3.5
2A0R5R70EN propeller removal
Type of maintenance: line
Authorization to perform:
-
Repairman (LS-M) or Mechanic (A&P)
Tools needed:
-
wrench size No.13, No. 16 (5/8”)
-
Allen wrench size No. 6
-
screwdriver
-
cutting pliers, pliers
Date of issue: 2011-07-08
Revision No.: 1
10 - 17
CR-MM-1-0-00
PS-28 Cruiser
SportCruiser
CHAPTER 10 – POWERPLANT
WARNING: ENGINE IGNITION MUST BE SWITCHED OFF!
NOTE:
For propeller removal two persons are requested.
(a) Disconnect the battery and remove upper line of spark plugs from the engine.
(b) Unscrew the screws (13, Fig. 10-15) and remove the propeller spinner (6).
(c) Hold the blade (5); unscrew and remove the bolts (7), washers (8), hub clamp half (2),
blades (5) and pitch cylinder (3).
(d) Put the protective covers on the propeller blades and store the blades on a safe place
so that no damage can occur.
(e) Unscrew the nuts (16), remove the washers (8) bolts (10), bushings (9; 15), hub
mount half (1), spinner flange (1) and spacer (14).
1
2
3
4
5
6
7
8
Hub mount half
Hub clamp half
Pitch cylinder
Pitch stop
Propeller blade
Propeller spinner
Bolt (6 pcs.)
Lock washer (36 pcs)
9
10
11
12
13
14
15
Locknut (6 pcs.)
Bolt (6 pcs.)
Propeller flange
Spinner flange
Screw (6 pcs.)
Spacer
Drive bushing (6 pcs.)
Fig. 10-15: 2A0R5R70EN propeller removal / installation
Revision No.: 1
Date of issue: 2011-07-08
10 - 18
CR-MM-1-0-00
CHAPTER 10 – POWERPLANT
10.3.6
PS-28 Cruiser
SportCruiser
2A0R5R70EN propeller installation
Type of maintenance: line
Authorization to perform:
-
Repairman (LS-M) or Mechanic (A&P)
Tools needed:
-
wrench size No.13, No. 16 (5/8”)
-
Allen wrench size No. 6
-
screwdriver
-
cutting pliers, pliers
WARNING: ENGINE IGNITION MUST BE SWITCHED OFF!
NOTE:
For propeller removal two persons are requested.
(a) Disconnect the battery and remove upper line of spark plugs from the engine.
(b) Check the contacting areas of the spacer (14, Fig. 10-15), propeller flange (11) and
hub halves (1; 2). Clear of all impurities.
(c) Remove protective covers from the propeller blades and carry out visual check of the
propeller part condition.
(d) Place the spinner flange (12), the hub mount half (1) and spacer (14) on the engine
propeller flange (11) (vertical orientation of the hub is recommended).
(e) Insert drive bushings (15) through the back face of the propeller flange and into the
hub mount half (1). Check for proper bushing and pilot stub fit into the hub mount half.
The hub must sit flush on the mounting flange.
(f)
Place washers (8) on bolts (10) and insert into the mounting holes inside the hub
mount half (1). Place lock washers (8) and nuts (9) on the bolt and tighten the bolts
using a star pattern with torque 22 Nm (16.2 ft.lb) (see Fig. 10-16).
Fig. 10-16: Bolt tightening sequence
Date of issue: 2011-07-08
Revision No.: 1
10 - 19
PS-28 Cruiser
SportCruiser
CAUTION:
CR-MM-1-0-00
CHAPTER 10 – POWERPLANT
THE HUB MUST SIT FLUSH AGAINST THE MOUNTING FLANGE. BOLT
BREAKAGE WILL OCCUR IF NOT FLUSH.
(g) Insert the pitch cylinder (3, Fig. 10-15) into the hub mount half (1), aligning the blade
pin slots with the hub barrels. Each blade has a round side and a flat side, with the
round side facing forward into the wind. Insert one blade (5) at a time into the hub
mounting half (1), taking care to insert the blade pitch pin into the blade pin slot, then
rotating the blade shank fully into the hub.
(h) Place the hub cover half (2) over the blades. Place washers (8) on bolts (7) and insert
into the hub cover half (2). Hands tighten the bolts (7) into the threaded clamp
bushings, taking care to maintain an even gap between hub halves on all sides. Grasp
each blade shank and firmly pull outwards to seat each blade in the hub.
(i) Set blade pitch by grasping each blade shank and twisting the blades in opposite
directions. Align the index mark on the pitch cylinder with the appropriate pitch setting
(1, 2, 5) on the hub, as indicated the propeller manual.
(j) Using a torque wrench and rotating from bolt to bolt, tighten the bolts the bolts using a
star pattern with torque 22 Nm (16.2 ft.lb.) (see Fig. 10-16), Check the blade pitch
setting for rotation away from your desired pitch setting. Once properly torqued, a
small gap may remain between hub halves. Check the propeller blades for track (see
Fig. 10-14). The blades should track within 1/8” (3.175 mm) of each other at the tip.
Setting the pitch accurately is more important than track from blade to blade.
(k) Install spark plugs to the engine. Tighten up with torque 20 Nm (15 ft.lb.); connect the
battery.
(l) Run the propeller for approximately 5 minutes at 50% of the desired rpm. Check the
clamping bolts to see if they have lost torque. If they have, it is because the blades
have firmly seated themselves. Tighten again to the proper torque.
Note:
This torque value should be checked after the first 5 hours of operation and
every 25 hours thereafter.
(m) Put the propeller spinner (6, Fig. 10-15) on the propeller and attach it with bolts (13).
Revision No.: 1
Date of issue: 2011-07-08
10 - 20
CR-MM-1-0-00
PS-28 Cruiser
SportCruiser
CHAPTER 10 – POWERPLANT
10.3.7
SR3000 propeller removal
Type of maintenance: line
Authorization to perform:
-
Repairman (LS-M) or Mechanic (A&P)
Tools needed:
-
wrench size No.13
-
screwdriver
WARNING: ENGINE IGNITION MUST BE SWITCHED OFF!
(f) Disconnect the battery and remove upper line of spark plugs from the engine.
(g) As necessary, unscrew the screws (4, Fig. 10-17) with the washers (5) and remove
the propeller spinner (3).
(h) Unscrew and remove the nuts (8) and take out the propeller from the propeller flange
(9).
(i) Put the protective covers on the propeller blades and store the propeller on a safe
place so that no damage can occur.
6
7
8
9
1
2
3
4
5
Carbon brush housing
Drive bushing (6 pcs.)
Nut (6 pcs.)
Propeller flange
Propeller
Propeller spinner
Slip ring
Screw (8 pcs.)
Washer (8 pcs.)
Fig. 10-17: SR 3000 propeller removal / installation
Date of issue: 2011-07-08
Revision No.: 1
10 - 21
CR-MM-1-0-00
PS-28 Cruiser
SportCruiser
10.3.8
CHAPTER 10 – POWERPLANT
SR3000 propeller installation
Type of maintenance: line
Authorization to perform:
-
Repairman (LS-M) or Mechanic (A&P)
Tools needed:
-
wrench size No.13
-
screwdriver
WARNING: ENGINE IGNITION MUST BE SWITCHED OFF!
(a) Disconnect the battery and remove upper line of spark plugs from the engine.
(b) Check the contacting areas of the propeller flange (9, Fig. 10-17) and the propeller.
Clear of all impurities.
(c) Remove protective covers from the propeller blades and carry out visual check of the
propeller integrity and condition.
(d) Loose the screws of the carbon brush housing flange and shift the carbon brush
housing (6) to its rear position.
(e) Gently push the propeller (1) to the propeller flange (9) by hand and screw the nuts (8).
(f) Secure the airplane against its movement (see 14.5).
(g) Tighten the nuts (7) using a star pattern (see Fig.10-13) with torque 22 Nm (16.2 ft.lb.).
(h) Adjust the carbon brush housing according to Fig. 10-18. Turn the propeller by hand
and check that the carbon brushes seat properly in the centers of the slip ring, and
makes contact with its entire surfaces.
Fig. 10-18: Carbon brush housing adjustment
(i) As necessary, put the propeller spinner (3, Fig. 10-17) on the propeller and attach it
with bolts (4) with washers (5).
(j) Install spark plugs to the engine. Tighten up with torque 20 Nm (15 ft.lb); connect the
battery.
Revision No.: 1
Date of issue: 2011-07-08
10 - 22
CR-MM-1-0-00
CHAPTER 10 – POWERPLANT
10.3.9
PS-28 Cruiser
SportCruiser
Air intake system removal
Type of maintenance: line
Authorization to perform:
-
Sports pilot or higher
Tools needed:
-
wrench size No.8, No.10
-
screwdriver
WARNING: ENGINE IGNITION MUST BE SWITCHED OFF!
(a) Remove the upper engine cowling.
(b) Disconnect the control cable (13, Fig. 10-19) from the air intake changeover lever (14)
and from the holder.
(c) Remove the hose fasteners (4; 5; 16) and disconnect hoses (2; 3), drain hoses (6; 7),
and air hoses (8; 15).
(d) Unscrew nut (12), remove washer (11), silentblock (9), and disconnect the bracket
(10).
(e) Remove the airbox from the engine and store it.
Fig. 10-19: Air intake system removal / installation (page 1 of 2)
Date of issue: 2011-07-08
Revision No.: 1
10 - 23
CR-MM-1-0-00
PS-28 Cruiser
SportCruiser
1
2
3
4
5
6
7
8
CHAPTER 10 – POWERPLANT
Airbox
Hose connecting airbox / carburetor
Hose
Hose clamp
Cable tie
Drain hose
Drain hose
Air hose – cold air
9
10
11
12
13
14
15
16
Silentblock
Bracket
Washer
Nut
Control cable
Air intake changeover lever
Air hose – preheated air
Hose clamp
Fig. 10-16: Air intake system removal / installation (page 2 of 2)
10.3.10
Air intake system installation
Type of maintenance: line
Authorization to perform:
-
Sports pilot or higher
Tools needed:
-
wrench size No.8, No.10
-
screwdriver
WARNING: ENGINE IGNITION MUST BE SWITCHED OFF!
(a) Attach the outlet pipe of the airbox (1, Fig. 10-19) to the hoses (2) on the carburetor
inlet necks; secure it by means of the hose clamps (4).
(b) Fix the airbox by means of the bracket (10), silentblock (9), nut (12) and washer (11)
to the firewall.
(c) Connect the air intake hoses to the airbox (1), one (8) from the air filter on the lower
engine cowling and the other (15) from the heat exchanger; secure them by hose
clamps (4).
CAUTION:
DO NOT CONFUSE THESE HOSES!
(d) Connect drain hoses (6) to the airbox (1) and the drain hoses (7) to the drip trays
under carburetors - lead them on the engine mount in direction down the airplane and
secure them by hose fasteners (5; 16). (fix them by cable ties on the engine mount).
(e) Connect the carburetors control cable of (13) to the lever (14); adjust function of
carburetors heating knob.
(f) Install the upper engine cowling.
10.3.11
Exhaust system removal
Type of maintenance: line
Authorization to perform:
-
Repairman (LS-M) or Mechanic (A&P)
Tools needed:
-
wrench size No.13
-
pliers
-
small wire hook (spring removal/assembly jig)
Revision No.: 1
Date of issue: 2011-07-08
10 - 24
CR-MM-1-0-00
PS-28 Cruiser
SportCruiser
CHAPTER 10 – POWERPLANT
WARNING: ENGINE IGNITION MUST BE SWITCHED OFF!
(a) Remove engine cowlings.
(b) Disconnect air hoses from the heat exchanger (8, Fig. 10-20) (see 10.3.9).
(c) Remove lockwire securing the springs (9).
(d) Remove the springs (9) and dismantle the heat exchanger (8) from the muffler (1).
(e) Remove the springs (6) from the individual exhaust tubes (2; 3; 4; 5) and carefully
remove muffler (1).
(f) Unscrew nut (7) and remove exhaust tubes (2; 3; 4; 5) from the necks on the engine.
1
2
3
4
5
Muffler
Exhaust tube 1
Exhaust tube 2
Exhaust tube 3
Exhaust tube 4
6
7
8
9
Spring
Locknut
Heat exchanger
Spring
Fig. 10-20: Exhaust system removal / installation
Date of issue: 2011-07-08
Revision No.: 1
10 - 25
CR-MM-1-0-00
PS-28 Cruiser
SportCruiser
10.3.12
CHAPTER 10 – POWERPLANT
Exhaust system installation
Type of maintenance: line
Authorization to perform:
-
Repairman (LS-M) or Mechanic (A&P)
Tools needed:
-
wrench size No.13
-
pliers
-
small wire hook (spring removal/assembly jig)
WARNING: ENGINE IGNITION MUST BE SWITCHED OFF!
(a) Install the exhaust tubes (2; 3; 4; 5, Fig. 10-20) to the engine necks.
Mind a proper arrangement, each tube is designed for specific necks.
Screw the nuts (7) on the bolts of the engine exhaust necks, do not tighten the nuts.
(b) Install the muffler (1) to the exhaust tubes (2; 3; 4; 5) and secure the tubes by means
of the springs (6); secure springs with the lockwire (see 15.8.2).
(c) Gradually tighten all nuts (7) of the flanges on the engine necks.
NOTE:
Ensure the sufficient space between the exhaust pipes and the other
installed parts.
(d) Put on muffler (1) heat exchanger (8) and secure it by means of springs (9).
(e) Install air hoses on the heat exchanger (see 10.3.10).
(f) Install engine cowlings.
10.3.13
Oil cooler removal
Type of maintenance: line
Authorization to perform:
-
Sports pilot or higher
Tools needed:
-
wrench size No.19, No.30
WARNING: ENGINE IGNITION MUST BE SWITCHED OFF!
(a) Remove the upper and lower engine cowling.
(b) Drain oil from the oil system (see 10.5.1).
NOTE:
It is also possible to pump oil from the cooler to the oil tank. You can do it by
manual running the engine by means of the propeller, whereas from the oil
tank you will remove the hose leading to the oil cooler.
(c) Remove lockwire securing banjo bolts (6, Fig. 10-21).
(d) Loose hose clamps (9), and disconnect hoses (8) from the banjo fittings (5).
(e) Remove banjo bolts (6), banjo fittings (5), and sealing rings (7) from the oil cooler
necks.
(f) Unscrew nuts (4), remove the upper pairs of washers (2; 3), and cooler (1).
Revision No.: 1
Date of issue: 2011-07-08
10 - 26
CR-MM-1-0-00
PS-28 Cruiser
SportCruiser
CHAPTER 10 – POWERPLANT
10.3.14
Oil cooler installation
Type of maintenance: line
Authorization to perform:
-
Sports pilot or higher
Tools needed:
-
wrench size No.19, No.30
WARNING: ENGINE IGNITION MUST BE SWITCHED OFF!
(a) Set the oil cooler (1, Fig. 10-21) to the bracket (10) and on the cooler necks install the
upper pairs of washers (2; 3), and gradually tight the nuts (4).
(b) Install the banjo fittings (5), screw the banjo bolts (6) with sealing rings (7) and secure
these bolts with the lockwire (see 15.8.2).
(c) Install hoses (8) on the banjo fittings (5) and secure them with hose clamps (9).
(d) Fill the oil system with oil (see 10.5.1) and check oil system tightness.
(e) Install the lower and upper engine cowling.
Fig. 10-21: Oil cooler removal / installation (page 1 of 2)
Date of issue: 2011-07-08
Revision No.: 1
10 - 27
CR-MM-1-0-00
PS-28 Cruiser
SportCruiser
1
2
3
4
5
CHAPTER 10 – POWERPLANT
Oil cooler
Washer
Rubber washer
Nut
Banjo fitting
6
7
8
9
Banjo bolt
Sealing ring
Hose
Hose clamp
Fig. 10-21: Oil cooler removal / installation (page 2 of 2)
10.3.15
Water cooler removal
Type of maintenance: line
Authorization to perform:
-
Sports pilot or higher
Tools needed:
-
wrench size No.10, No.17
-
screwdriver
WARNING: ENGINE IGNITION MUST BE SWITCHED OFF!
(a) Remove the upper and lower engine cowling.
(b) Drain the cooling liquid from the cooling system (see 10.5.2).
(c) Remove the hose clamps (9, Fig. 10-22) and disconnect hoses (10; 12) from the
cooler outlets.
(d) Loose the bolts (7).
(e) Remove four nuts (5), washers (6) and cooler (1).
(f) As necessary, remove the silentblocks (4) from the cooler.
Revision No.: 1
Date of issue: 2011-07-08
10 - 28
CR-MM-1-0-00
SportCruiser
CHAPTER 10 – POWERPLANT
1
2
3
4
5
6
7
Cooler
Lower bracket
Upper bracket
Silentblock
Cap nut
Lock washer
Bolt
PS-28 Cruiser
8
9
10
11
12
13
Washer
Hose clamp
Hose
Tube
Hose
Tube
Fig. 10-22: Water cooler removal / installation
Date of issue: 2011-07-08
Revision No.: 1
10 - 29
PS-28 Cruiser
CR-MM-1-0-00
SportCruiser
10.3.16
CHAPTER 10 – POWERPLANT
Water cooler installation
Type of maintenance: line
Authorization to perform:
-
Sports pilot or higher
Tools needed:
-
wrench size No.10, No.17
-
screwdriver
WARNING: ENGINE IGNITION MUST BE SWITCHED OFF!
(a) As necessary, screw the silentblocks (4, Fig. 10-22) to the cooler.
(b) Put the cooler on the lower (2) and the upper brackets (3).
(c) Install the washers (6), screw and tighten the nuts (5); tighten the bolts (7).
(d) Install hoses (10) on the cooler outlets and secure them with hose clamps (9).
(e) Fill the cooling system with cooling liquid (see 10.5.2) and check system tightness.
(f) Install the lower and upper engine cowling.
10.3.17
Throttle and choke control levers removal
Type of maintenance: line
Authorization to perform:
-
Repairman (LS-M) or Mechanic (A&P)
Tools needed:
-
wrench size No.14
-
Allen wrench size No. 2
-
screwdriver
-
cutting pliers
WARNING: ENGINE IGNITION MUST BE SWITCHED OFF!
(a) Remove the cover (11, Fig. 10-23) from the middle channel.
(b) Remove the upper engine cowling.
(c) Disconnect the throttle (7) and choke (9) cables from carburetor levers (12; 3) and
from the throttle and choke control levers (1).
(d) Unscrew the nuts (5), remove washers (6), bolts (2), bushings (3; 4) and the throttle
control lever witch choke (1) from the middle channel.
Revision No.: 1
Date of issue: 2011-07-08
10 - 30
CR-MM-1-0-00
SportCruiser
CHAPTER 10 – POWERPLANT
1
2
3
4
5
6
7
Throttle control lever with choke
Bolt
Bushing
Bushing
Nut
Washer
Throttle cable
PS-28 Cruiser
8 Throttle bowden
9 Choke cable
10 Choke bowden
For information:
11 Cover
12 Choke lever
13 Throttle lever
Fig. 10-23: Throttle control lever
10.3.18
Throttle and choke control levers installation
Type of maintenance: line
Authorization to perform:
-
Repairman (LS-M) or Mechanic (A&P)
Tools needed:
-
wrench size No.14
-
Allen wrench size No. 2
-
screwdriver
-
cutting pliers
Date of issue: 2011-07-08
Revision No.: 1
10 - 31
CR-MM-1-0-00
PS-28 Cruiser
SportCruiser
CHAPTER 10 – POWERPLANT
WARNING: ENGINE IGNITION MUST BE SWITCHED OFF!
(a) Set the throttle control lever witch choke (1, Fig, 10-23) into the middle channel.
(b) From one side shift the bolts (2) into the holes on the middle channel side.
(c) Gradually put first bushings (3), throttle control lever witch choke (1) and second
bushings (4) on the wheel bolts (2) according to the figure.
(d) Install washers (6), screw and tighten nuts (5).
(e) Connect the throttle (7) and choke (9) cables to the throttle control lever witch choke
(1), and to the carburetor levers (12; 13).
(f) Install the cover (11) on the middle channel.
(g) Install the upper engine cowling.
(h) Check for continuous travel of the throttle and choke control lever.
(i) Adjust the throttle control (see 10.4.2).
10.3.19
Carburetors heating knob removal
Type of maintenance: line
Authorization to perform:
-
Sports pilot or higher
Tools needed:
-
wrench size No.8, No.14
-
screwdriver
-
cutting pliers
(a) Remove the upper engine cowling.
(b) Disconnect the control cable (13 Fig. 10-19) on the changeover lever (14) of the air
intake.
(c) Remove the inner nut (1, Fig. 10-24) and pull out the knob (2) with the flexible housing
(3) from the firewall and instrument panel.
1 Nut
2 Heating control knob
3 Flexible housing
Fig. 10-24: Carburetors heating knob
Revision No.: 1
Date of issue: 2011-07-08
10 - 32
CR-MM-1-0-00
CHAPTER 10 – POWERPLANT
10.3.20
PS-28 Cruiser
SportCruiser
Carburetors heating knob installation
Type of maintenance: line
Authorization to perform:
-
Sports pilot or higher
Tools needed:
-
wrench size No.8, No.14
-
screwdriver
-
cutting pliers
(a) Put the flexible housing (3, Fig. 10-24) with knob (2) into the hole in the instrument
panel and firewall from behind and fasten it from both sides of the instrument panel by
the nuts (6).
(b) Fasten the knob from both sides of the instrument panel by the nuts (1).
(c) Connect the control cable (13 Fig. 10-19) on the changeover lever (14) of the air
intake.
(d) Adjust carburetors heating control (see 10.4.4).
Date of issue: 2011-07-08
Revision No.: 1
10 - 33
CR-MM-1-0-00
PS-28 Cruiser
SportCruiser
CHAPTER 10 – POWERPLANT
10.4 Check / Adjustment
10.4.1
Engine test
CAUTION:
THE PERSON PERFORMING THE ENGINE TEST MUST BE MECHANIC
WITH A VALID CERTIFICATE AND WITH REGISTERED ENGINE TYPE
ROTAX 912 ULS. IN THE COURSE OF THE WHOLE TEST AN AIRCRAFT
MECHANIC WHO IS FAMILIARIZED WITH THE AIRCRAFT TYPE PS-28
CRUISER / SPORTCRUISER MUST BE PRESENT.
(a) Perform the test out of the buildings at the place assigned for performing engine tests
in broad daylight.
(b) Test place must be equipped with extinguisher which is suitable for extinguishing
burning liquids and electrical installation.
(c) Brake the airplane and put the chocks under the landing gear wheels.
(d) Before performing engine test, carry out engine and propeller preflight check in the
range shown in the POH, Section 4.1, and the Rotax Operator’s Manual, Section 10.3.
(e) Start the engine according to the POH, Section 4.2 and the Rotax Operator’s Manual,
Section 10.3.
- activate starter for max.10 sec. only, followed by a cooling period of 2 min.
- as soon as engine runs, adjust throttle to achieved smooth running at
approximate 2 500 rpm
- check if oil pressure has risen within 10 sec. and monitor oil pressure
NOTE:
If oil pressure do not rise within 10 sec. above min. pressure 0.8 bar (12 psi),
switch off the engine. Is admissible max. oil pressure 7 bar (102 psi) for a
short period at cold start. Fuel pressure has been in range from 0.15 to 0.4
bar (2.2 to 5.8 psi).
(f) Engine warm up according to the POH, Section 4.2.3 and the Rotax Operator’s
Manual, Section 10.3.
As soon as oil pressure will be in range from 2 to 5 bar (29 to 73 psi) start warming up
period at 2 000 rpm for approx. 2 minutes, continue at 2 500 rpm, duration depending
on ambient temperature, until oil temperature reaches 50°C (122°F).
(g) Choke – during engine warm up - OFF.
NOTE:Watch engine instruments and record the values of oil pressure, oil temperature
and head cylinder temperature into the Engine test report, see the Tab. 10-1.
(h) Ignition check:
Engine speed....................... 4 000 rpm
Ignition switch ...................... switch from position BOTH to L, record rpm drop
Ignition switch ...................... switch from position BOTH to R, record rpm drop
NOTE:
Rpm drop between position BOTH and L or R must not exceed 300 rpm.
Mutual difference between ignition circuits L and R must not exceed 115
rpm. Write down results into the engine test report, see the Tab. 10-1.
(i) Test of max. rpm on the ground:
Throttle ................................ MAX
NOTE:
Record max. rpm into the engine test report, see the Tab. 10-1.
Revision No.: 1
Date of issue: 2011-07-08
10 - 34
CR-MM-1-0-00
PS-28 Cruiser
SportCruiser
CHAPTER 10 – POWERPLANT
ENGINE TEST REPORT
PS-28 Cruiser /
Registration
SportCruiser
Engine
ROTAX
Type
Activity
Starting up the engine
1.
Min. oil pressure up to 10 sec.
2.
Max. oil pressure*
3.
Min. fuel pressure
Increase rpm as soon as oil pressure
4.
reaches
Warming up the engine at
5.
2 000 – 2 500 rpm
6.
Voltage
Aircraft
Serial No.
912 ULS
Serial No.
Set down values
Measured values
0.8 bar (12 psi)
7 bar (102 psi)
0.15 bar (2.2 psi)
2 bar (29 psi)
smooth running
12.4 – 14.4 V
Engine test
Min. oil temperature
Oil pressure
Max. cylinder head temperature ***
7.
8.
9.
10.
Rpm drop between ignition position
BOTH and L/R at 4000 rpm
11.
12.
13.
Acceleration
Max. rpm on the ground
Idle
50°C (122°F)
2-5 bar (29-73 psi)
135°C (275°F)
max. 300
(115 rpm**)
2 – 3 sec.
5000 rpm
min. 1 400 rpm
Defects:
*
**
During cold start for a short term only
RPM drop between ignition position BOTH and position L or R must not exceed 300 rpm. Mutual difference
between left (L) and right (R) ignition circuit must not exceed 115 rpm.
*** see Rotax Operator’s Manual, Section 10.1.2 Operating speeds and limits, and Section 10.2.1 Coolant;
Rotax Installation Manual, Section 12, Cooling system; Rotax Service Instruction SI-912-016; POH, Section
8, paragraph. 8.5.3, and section 9, Supplement No.02, Type of coolant used in engine.
Complying – Non-complying
Conclusion
Complying if the measured values are not out of the range of the prescribed values.
Elaborated by:
Checked by:
Signature:
Signature:
Date:
Date:
Tab. 10-1: Engine test report
Date of issue: 2011-07-08
Revision No.: 1
10 - 35
CR-MM-1-0-00
PS-28 Cruiser
SportCruiser
10.4.2
CHAPTER 10 – POWERPLANT
Adjusting throttle control
(a) Pull the throttle control to the stop. The throttle lever on the carburetor (5, Fig. 10-10)
must be on the stop. The bowden must be supported in the terminals.
(b) Release the nut on the control lever (5) and take up any slack on the cable and
tighten up the nut.
CAUTION:
CONTROL CABLE SHOULD NOT BE TOO TIGHT FOR THE REASON OF
A POSSIBLE DEFORMATION OF THE CONTROL LEVER ON THE
CARBURETOR.
(c) Check again whether the controller and the lever on the carburetor are on the stops. If
not, perform adjusting by means of adjustable terminals on bowdens.
(d) In order to prevent the bowdens at the carburetor from shifting out from the terminals,
secure the bowdens with lockwire. Mark all bolted joints with red paint.
10.4.3
Adjusting choke control
(a) Set the choke lever to the stops position and put it back about 3 mm (1/8 in). The
lever of choke control on the carburetor (6, Fig. 10-11) must be on the stop. The
bowden must rest on the terminals.
(b) Release the bolt on the lever of choke control (6), slightly loosen the cable and tighten
up the bolt.
(c) Check again if the choke lever and the lever on the carburetor are on the stops. If not,
carry out adjustment by adjustable bowden terminals.
(d) To prevent the bowdens at the carburetor from shifting out of the terminal, secure the
bowdens with lockwire. Mark all bolted joints with red paint.
10.4.4
Adjusting carburetors heating control
(a) Push in the carburetor heating knob to the stop and pull it out by about 3 mm (1/8 in).
The changeover lever (14, Fig. 10-19) on the air intake must be on the stop. The
bowden must rest on the terminal.
(b) Release the bolt on the changeover lever (14), slightly stretch the cable and tighten up
the bolt.
(c) Check again whether the knob and the lever on the air intake are on the stops. If not,
carry out adjustment by adjustable bowden terminals.
(d) To prevent the bowdens from shifting out of the terminal, secure the bowdens with
lockwire. Mark all bolted joints with red paint.
Revision No.: 1
Date of issue: 2011-07-08
10 - 36
CR-MM-1-0-00
CHAPTER 10 – POWERPLANT
10.4.5
PS-28 Cruiser
SportCruiser
Checking exhaust system
WARNING: CHECK OF EXHAUST SYSTEM VERY CAREFULLY. THE BURST OR
LEAKY EXHAUST CAN EXPOSE THE CREW TO DANGER PRESENTED
BY CARBON MONOXIDE OR CAN RESULT IN ENGINE POWER LOSS,
POSSIBLY FIRE.
Check the exhaust system for cracks. Pay special attention to the following areas:
•
muffler in the area of the input and the output pipe and the collector head
•
all welds and their immediate surrounding
•
carefully check all areas showing local overheating caused by exhaust gases
•
remove the heat exchanger and check muffler area located under it
•
check the whole exhaust pipe between the engine and the muffler including its
attachment to the engine
•
check outlet pipe from the muffler
•
check retaining springs for cracks.
10.5 Exchanges / Service information
10.5.1
Exchange / Refilling oil
- refer to the Rotax Maintenance Manual, Chapter 12-00-00, Section 5 Lubrication System.
NOTE:
Recommended kinds of oil are mentioned in the Rotax Operator's Manual,
Section 10.2.3 Lubricants, in the Rotax Service Instructions SI-912-016.
Type of oil used by aircrafts manufacturer is shown in section 17.5 Operating Liquids.
Oil volume
Total oil volume in the lubrication system of Rotax 912 ULS engine is approximately
3.8 litres (1 US gallon).
Check oil volume preferably after running the propeller by hand in the sense of engine
rotation so that oil can fill in the engine space or operate the engine for 1 minute in idle
mode.
WARNING: SWITCH OFF IGNITION BEFORE MANUALLY TURNING THE ENGINE!
The oil tank is located in the engine compartment and oil dipstick is accessible after
opening the lid on the upper engine cowling (see 10.2.1.2). Oil level must lie between min
and max marks (flattening) on the dipstick and must not drop below min mark.
Date of issue: 2011-07-08
Revision No.: 1
10 - 37
CR-MM-1-0-00
PS-28 Cruiser
SportCruiser
CHAPTER 10 – POWERPLANT
1 Oil tank
2 Cap
3 Dipstick
Fig. 10-25: Oil volume check
Oil draining
Drain oil from the oil tank by unscrewing the plug (wrench size No.17) on the lower side of
the oil tank. It is possible to drain oil from the engine after unscrewing the plug in the lower
part of the engine at the hose of the return branch of oil flow. It is recommended to drain
oil immediately after engine test or after finishing the operation when oil is sufficiently hot
and better flows both from the engine and from the tank. Clean the tank before filing it with
new oil - see the Rotax Maintenance Manual.
Refilling oil
Refill oil in the oil tank that is located on the firewall.
Venting of the lubrication system
After short idling, stop engine and replenish oil to max. mark on dipstick. Never overfill
otherwise oil would escape through the vent tube during operation. At oil level inspect, do
not exceed the max. mark.
10.5.2
Exchange / Refilling cooling liquid
- refer to the Rotax Maintenance Manual, Chapter 12-00-00, Section 3, Cooling System.
NOTE:
Recommended types of coolant are shown in the Rotax Operator's Manual,
Section 10.2.1 Coolant, in the Rotax Service Instructions SI-912-016, in the
Rotax Installation Manual, Section 12 Cooling System.
Type of coolant used by aircrafts manufacturer is shown in section 17.5 Operating liquids.
Cooling liquid volume
Total volume of coolant in the engine is approximately 2.5 litres (0.7 US gallons).
Revision No.: 1
Date of issue: 2011-07-08
10 - 38
CR-MM-1-0-00
CHAPTER 10 – POWERPLANT
PS-28 Cruiser
SportCruiser
Drainage of cooling liquid
Disconnect the hose supplying liquid from the radiator to the pump (at the lowest point of
the system) and drain cooling liquid into the prepared vessel.
Refilling cooling liquid
Refill cooling liquid into the expansion tank in the engine compartment. In addition to this
there is a overflow bottle which collects cooling liquid in case of engine overheating and is
attached to the fire wall.
10.5.3
Exchange / Check of oil filter
- refer to the Rotax Maintenance Manual, Chapter 12-00-00, Section 5 Oil System
NOTE:
Carry out at every oil exchange.
(a) Remove the oil filter.
(b) Remove the filter insert, cut of the upper and the lower lid of the insert. Remove the
middle part of the insert, disassemble and check for metal chips, foreign corpuscles
and contamination.
CAUTION:
IF YOU DETECT AN INCREASED QUANTITY OF METAL PARTICLES
(BRASS OR BRONZE CHIPS OR BEARING ABRASIVE), FIND OUT THE
REASON AND ELIMINATE IT.
(c) Install the new oil filter. Slightly lubricate the sealing ring of the new filter with engine
oil and tighten it up manually by a normal force.
10.5.4
Exchange / Check of air filter
(a) Remove the hose fastener and the bracket attaching the air filter to the left side lower
engine cowling and remove the air filter.
(b) Inspect the air filter and if contaminated, clean it according to instructions in the Rotax
Maintenance Manual, Chapter 12-00-00, Section 2.4.
(c) Attach the cleaned or the new filter to the hole on the left side of lower engine cowling
by means of the bracket and hose fastener.
Date of issue: 2011-07-08
Revision No.: 1
10 - 39
PS-28 Cruiser
SportCruiser
CR-MM-1-0-00
CHAPTER 10 – POWERPLANT
INTENTIONALLY LEFT BLANK
Revision No.: 1
Date of issue: 2011-07-08
10 - 40
CR-MM-1-0-00
CHAPTER 11 – ELECTRICAL SYSTEM
PS-28 Cruiser
SportCruiser
Contents
11.1 General ................................................................................................................ 11-2
11.2 Description and operation.................................................................................... 11-2
11.2.1
Switches .............................................................................................. 11-4
11.2.2
Circuit breakers ................................................................................... 11-5
11.2.3
Fuses................................................................................................... 11-6
11.2.4
Generator ............................................................................................ 11-6
11.2.5
Battery ................................................................................................. 11-6
11.2.6
Lighting ................................................................................................ 11-7
11.3 Removal / Installation .......................................................................................... 11-8
11.3.1
Electrical safety ................................................................................... 11-8
11.3.2
Battery removal ................................................................................... 11-8
11.3.3
Battery installation ............................................................................... 11-8
11.3.4
Position / strobe light removal ............................................................. 11-9
11.3.5
Position / strobe light installation ....................................................... 11-10
11.4 Exchanges / Service information ....................................................................... 11-11
11.4.1
Charging the battery.......................................................................... 11-11
Date of issue: 2011-03-08
Revision No.: 11 - 1
CR-MM-1-0-00
PS-28 Cruiser
SportCruiser
11.1
CHAPTER 11 – ELECTRICAL SYSTEM
General
Electrical system of PS-28 Cruiser / SportCruiser airplane serves for supplying electrical
current to the instruments.
11.2
Description and operation
The airplane is equipped with 14 VDC electrical installations with grounded negative pole
(see Fig. 11-1). Primary source of electrical energy is formed by the generator. The
secondary source of electrical energy is the battery 12 V, which is located on the firewall. It
is used for starting the engine and in the case of generator failure as a back-up source of
electric energy.
DC voltage is distributed to the individual systems by means of the main busbar. Systems
are protected by circuit breakers which are permanently ON and switches-circuit breakers
which are turning ON as needed. If some of the circuit is overloaded, then the circuit breaker
disconnects the circuit. Some circuits are protected by the fuses.
After switching the MASTER BAT switch ON and by turning the ignition key to the position
START the starter is activated. The starter is supplied from the battery before starting the
engine. After starting up the engine and reaching the idle rpm and switching the MASTER
GEN switch ON, the generator starts supplying current to the electrical network.
Information about voltage in the main busbar is indicated by EMS or by the analog voltmeter
on the instrument panel.
NOTE:
Valid wiring diagrams are mentioned in PS-28 Cruiser / SportCruiser Wiring
Manual.
Revision No.: 1
Date of issue: 2011-07-08
11 - 2
CR-MM-1-0-00
CHAPTER 11 – ELECTRICAL SYSTEM
11.2.2
PS-28 Cruiser
SportCruiser
Circuit breakers
Circuit breakers serve for protecting individual electrical circuits from overloading. Every
circuit breaker is marked by the placard with a circuit designation. Circuit breakers are
located on the right instrument panel.
Circuit breakers – instrument panel with the EFIS/EMS
Designation
COMM
IC
EMS
NAV
EFIS
HS34
GPS
XPDR
FUEL P
12V
AP
ROLL SERVO
PITCH SERVO
FLAPS
TRIM
NAV L
STROBE
LDG L
INT L
Description
Circuit breaker of VHF transceiver
Circuit breaker of intercom
Circuit breaker of engine monitoring system display
Circuit breaker of optional navigation device
Circuit breaker of flight instrument system display
Circuit breaker of HSI navigation interface
Circuit breaker of GPS
Circuit breaker of transponder
Circuit breaker of electric fuel pump
Circuit breaker of 12V socket
Circuit breaker of optional autopilot control unit
Circuit breakers of optional autopilot servos
Circuit breakers of optional autopilot servos
Circuit breaker of flaps
Circuit breaker of trims
Circuit breaker of position lights
Circuit breaker of strobe lights
Circuit breaker of landing light
Circuit breaker of instrument lighting and cockpit lamp
Circuit breakers – instrument panel with the analog instruments
PWR
ATT
DG
Circuit breaker of DC rectifier
Circuit breaker of attitude indicator
Circuit breaker of directional gyro
TB
Circuit breaker of turn & bank indicator
Circuit breaker of VHF transceiver
Circuit breaker of GPS
Circuit breaker of transponder
Circuit breaker of intercom
Circuit breaker of engine monitoring system display
Circuit breaker of electric fuel pump
Circuit breaker of flaps
Circuit breaker of trims
Circuit breaker of position lights
Circuit breaker of strobe lights
Circuit breaker of landing light
Circuit breaker of 12V socket
COMM
GPS
XPDR
IC
ENG INSTR
FUEL P
FLAPS
TRIM
NAV L
STROBE
LDG L
12V
Tab.11-2: Circuit breakers
Date of issue: 2011-03-08
Revision No.: 11 - 5
CR-MM-1-0-00
PS-28 Cruiser
SportCruiser
11.2.3
CHAPTER 11 – ELECTRICAL SYSTEM
Fuses
Fuses serve for protecting individual electrical circuits from overloading. The box with the fuses is
located on the firewall in the engine compartment.
Fuses – instrument panel with the EFIS/EMS
Designation
Description
1A SIGN. DOOR
Fuse of unlocked canopy signaling system
25A DC GEN
Fuse of generator
25 A BATTERY
Fuse of battery
Fuses – instrument panel with the analog instruments
11.2.4
Designation
Description
1A SIGN. DOOR
Fuse of unlocked canopy signaling system
1A VOLTMETER
Fuse of voltmeter
1A ENGIN. INSTR.
Fuse of engine instruments
25A DC GEN
Fuse of generator
25 A BATTERY
Fuse of battery
Generator
The generator is a part of the engine which supplies electric current through the rectifier.
Regulator supplies electric current of 14 V voltage to onboard network.
Technical parameters of generator:
Maximum output power:
12 V / 20 A at 5 000 rpm
Technical parameters of rectifier - regulator:
Type:
electronic
Output voltage:
14 ± 0.3 V (from 1 000 ± 250 rpm)
Range of operation temperatures:
min. - 25°C (- 13°F)
max. + 90°C (+ 194°F)
Weight:
11.2.5
0.3 kg (0.66 lbs)
Battery
Lead-acid maintenance-free battery is installed on firewall. Battery can be charged directly
in the airplane after its disconnecting from the onboard electrical system.
Technical parameters:
Voltage
12 V
Nominal capacity
20 Ah
Max. discharge current
300 A (5 s)
Short circuit current
1000 A
Range of operation temperatures
- 20 to + 60°C (-4 to + 140°F)
Service life is about
3 - 5 years
Revision No.: 1
Date of issue: 2011-07-08
11 - 6
CR-MM-1-0-00
CHAPTER 11 – ELECTRICAL SYSTEM
Weight:
PS-28 Cruiser
SportCruiser
6 kg (13 lbs)
If the airplane is not operated for more than one month, then remove the battery from the
airplane and store it.
Always store the battery fully charged at temperature of 20°C (68°F). Daily discharging is
less than 0.1 % of battery nominal capacity.
Regularly recharge it up to the full capacity of charging once a month.
11.2.6
Lighting
External lighting consists of the LED position / strobe lights which are located in the wing
tips and of the landing light which is located in the lower engine cowling. Position lights are
switched by the switch NAV L and strobe lights are switched by the switch STROBE. The
landing light is switched by the switch LDG L.
Internal lighting consists of the instrument lighting and of the cockpit lamp, which is located
on the instrument panel. The instrument lighting (illumination of the altimeter and the
airspeed indicator) is switched / controlled by the switch INSTR L. The cockpit lamp is
switched / controlled by the switch COCKPIT L.
Date of issue: 2011-07-08
Revision No.: 1
11 - 7
CR-MM-1-0-00
PS-28 Cruiser
SportCruiser
CHAPTER 11 – ELECTRICAL SYSTEM
11.3
Removal / Installation
11.3.1
Electrical Safety
The aircraft has a low-voltage DC electrical system. When correctly maintained it is safe to
work on. But the battery can supply heavy current through low-resistance circuits (for
example, if you ground the positive output with a wrench by accident).
Always follow the usual safety practices for working on electrical equipment. Allow only
qualified persons to maintain the electrical system.
11.3.2
CAUTION:
DISCONNECT THE BATTERY BEFORE DOING MAINTENANCE ON
THE ELECTRICAL SYSTEM. MAKE SURE TO DISCONNECT THE
NEGATIVE LEAD FIRST.
CAUTION:
USE ONLY AIRCRAFT
MANUFACTURER.
SPARE
PARTS
APPROVED
BY
THE
Battery removal
Type of maintenance: line
Authorization to perform:
- Sports pilot or higher
Tools needed:
- screwdriver
- wrench size No.8
(a) Set the MASTER BAT, MASTER GEN switches to OFF.
(b) Remove engine cowlings.
(c) Unscrew the bolts (5, Fig. 11-2) with washers (6) and disconnect the wires (2; 3; 4) from
the battery contacts; make sure to disconnect the negative lead first.
(d) Unscrew the bolts (8) with washers (9), disconnect the battery strap (7) and remove the
battery (1) from the airplane.
11.3.3
Battery installation
Type of maintenance: line
Authorization to perform:
- Sports pilot or higher
Tools needed:
- screwdriver
- wrench size No.8
(a) Install the battery (1, Fig. 11-2) into the bracket on the firewall (10).
(b) Fasten it with battery strap (7), bolts (8), and washers (9); tighten bolts so that the
battery cannot move in the bracket.
(c) Install the wires (2; 3; 4) by means of bolts (5) with washers (6); make sure you connect
the positive lead first.
(d) Grease the battery contacts with lubricating grease.
(e) Install the engine cowlings.
Revision No.: -
Date of issue: 2011-03-08
11 - 8
CR-MM-1-0-00
CHAPTER 11 – ELECTRICAL SYSTEM
PS-28 Cruiser
SportCruiser
11.4 Exchanges / Service information
11.4.1
Charging the battery
(a) Disconnect the battery from the onboard electrical network.
(b) Clean the battery contacts and connect the charging device on them. Mind the polarity!
(c) Charging voltage at temperature of 25°C (77°F) is:
- Cycle use 14.5-14.9 V
- Standby use 13.6 to 13.8 V. Maximum charging current is 8 A.
(d) After charging grease the battery contacts with lubricating grease and reconnect the
battery to the onboard electrical network.
Date of issue: 2011-07-08
Revision No.: 1
11 - 11
PS-28 Cruiser
SportCruiser
CR-MM-1-0-00
CHAPTER 11 – ELECTRICAL SYSTEM
Fig. 11-4: Battery characteristics
Revision No.: 1
Date of issue: 2011-07-08
11 - 12
CR-MM-1-0-00
CHAPTER 12 –INSTRUMENTS AND AVIONICS
PS-28 Cruiser
SportCruiser
Contents
12.1 General ................................................................................................................ 12-2
12.2 Description and operation.................................................................................... 12-4
12.2.1
Pitot-static system ............................................................................... 12-4
12.2.2
Flight instruments ................................................................................ 12-6
12.2.3
Engine instruments.............................................................................. 12-7
12.2.4
Avionics ............................................................................................... 12-7
12.3 Removal / Installation ........................................................................................ 12-11
12.3.1
Removal of the pitot-static tube......................................................... 12-11
12.3.2
Installation of the pitot-static tube...................................................... 12-12
12.3.3
Removal of the flight instruments ...................................................... 12-13
12.3.4
Installation of the flight instruments ................................................... 12-13
12.3.5
Removal of the EFIS D100................................................................ 12-14
12.3.6
Installation of the EFIS D100............................................................. 12-16
12.3.7
Removal of the EMS D120................................................................ 12-16
12.3.8
Installation of the EMS D120............................................................. 12-17
12.3.9
Removal of transponder .................................................................... 12-18
12.3.10
Installation of transponder ................................................................. 12-18
12.3.11
Removal of COMM, COMM/NAV ...................................................... 12-19
12.3.12
Installation of COMM, COMM/NAV ................................................... 12-20
12.3.13
Removal of intercom.......................................................................... 12-21
12.3.14
Installation of intercom ...................................................................... 12-21
12.3.15
Removal of COMM antenna.............................................................. 12-22
12.3.16
Installation of COMM antenna........................................................... 12-23
12.3.17
Removal of NAV antenna.................................................................. 12-24
12.3.18
Installation of NAV antenna............................................................... 12-25
12.3.19
Removal of transponder antenna ...................................................... 12-25
12.3.20
Installation of transponder antenna ................................................... 12-25
12.4 Check / Adjustment............................................................................................ 12-27
12.4.1
Check of pitot-static system tightness ............................................... 12-27
12.4.2
Magnetic compass compensation ..................................................... 12-27
Date of issue: 2011-07-08
Revision No.: 1
12 - 1
PS-28 Cruiser
SportCruiser
12.1
CR-MM-1-0-00
CHAPTER 12 – INSTRUMENTS AND AVIONICS
General
This chapter provides information about pitot-static system and instruments.
The aircraft is equipped with the instrument panel that contains all flight, navigation, and
engine instruments that are required for VFR operations. Figures 12-1 and 12-2 show the
typical instrument panels used for PS-28 Cruiser / SportCruiser aircraft.
1
2
3
4
5
6
7
8
9
10
11
12
13
14
15
16
17
18
19
20
EFIS D100
GTX 328 transponder
Airspeed indicator
Altimeter
GPSMAP® 695
AP74 Autopilot interface module
EMS D120
COCKPIT L dimmer
INSTR L dimmer
PARKING BRAKE handle
Air vent
MASTER BAT switch
MASTER GEN switch
EMS switch
AVIONICS switch
FUEL P switch
NAV L switch
STROBE switch
LDG L switch
Keyed ignition switch
21
22
23
24
25
26
27
28
29
30
31
32
33
34
35
36
37
38
39
AUTOPILOT DISCONNECT button
SL30 NAV/COMM
FLAPS UP/DOWN switch
WING FLAP UP/DOWN position indicator
FUEL selector valve
Socket 12 V
CARBURETOR HOT AIR knob
CABIN HEATER knob
BRS activation handle
PM3000 intercom
VOLUME Dynon alerts control
Circuit breakers
ELT remote switch
ELT remote audio buzzer
Cockpit light connector
Magnetic compass
HS34 HSI expansion module
CABIN OPENED red warning light
EMS ALARM yellow warning light
Fig. 12-1: Typical instrument panel with EFIS / EMS
Revision No.: 1
Date of issue: 2011-07-08
12 - 2
CR-MM-1-0-00
CHAPTER 12 –INSTRUMENTS AND AVIONICS
1 Airspeed indicator
2 Turn and bank indicator
3 Artificial horizon
4 Directional gyro
5 Altimeter
6 Vertical speed indicator
7 Aera 510 GPS
8 GTX 327 transponder
9 RPM indicator
10 Fuel pressure indicator
11 Oil pressure indicator
12 Fuel quantity indicator
13 Oil temperature indicator
14 CHT indicator
15 Voltmeter
16 SL40 VHF transceiver
17 PARKING BRAKE handle
18 Air vent
19 MASTER BAT switch
20 MASTER GEN switch
21 ENG INSTR switch
22 FLT INSTR switch
23 AVIONICS switch
24 FUEL P switch
PS-28 Cruiser
SportCruiser
25 NAV L switch
26 STROBE switch
27 LDG L switch
28 Keyed ignition switch
29 PM3000 intercom
30 FLAPS UP/DOWN switch
31 WING FLAP UP/DOWN position indicator
32 FUEL selector valve
33 Socket 12 V
34 CARBURETOR HOT AIR knob
35 CABIN HEATER knob
36 Elevator TRIM UP/DOWN
37 AILERON TRIM L/R
38 Circuit breakers
39 Instrument lighting
40 Hourmeter
41 ELT remote switch
42 Cockpit light connector
43 Magnetic compass
44 COCKPIT L switch
45 INSTR L dimmer
46 CABIN OPENED red warning light
47 FUEL PUMP green signalling light
48 GEN red warning light
Fig. 12-2: Typical instrument panel with analog instruments
NOTE:
Current instrument panel arrangement is stated in the Pilot′s Operation
Handbook, Supplement No. 1.
Date of issue: 2011-07-08
Revision No.: 1
12 - 3
CR-MM-1-0-00
PS-28 Cruiser
SportCruiser
CHAPTER 12 – INSTRUMENTS AND AVIONICS
12.2
Description and operation
12.2.1
Pitot-static system
The pitot-static tube for sensing static and total pressure is located under the left half of the
wing close to the rib No. 4. Total pressure is sensed through the hole in the pitot-tube face
and static pressure is sensed through the holes on the tube circumference. Pressure
distribution to individual instruments is performed by means of flexible plastic hoses (see
Fig. 12-3).
Airplanes equipped with analog instruments:
Static pressure is lead to the ALT, ASI, VSI and altitude encoder. Total pressure is
connected to the ASI only.
Airplanes equipped with EFIS:
Static pressure is lead to the ALT, ASI and EFIS. Total pressure is connected to the ASI and
EFIS.
Revision No.: 1
Date of issue: 2011-07-08
12 - 4
CR-MM-1-0-00
CHAPTER 12 –INSTRUMENTS AND AVIONICS
PS-28 Cruiser
SportCruiser
Fig. 12-3: Pitot-static system scheme
Date of issue: 2011-07-08
Revision No.: 1
12 - 5
CR-MM-1-0-00
PS-28 Cruiser
SportCruiser
12.2.2
CHAPTER 12 – INSTRUMENTS AND AVIONICS
Flight instruments
Airspeed indicator - ASI
The airspeed indicator located on the left side of instrument panel is classical analogue
round pressure gauge.
The airspeed indicator color range marking is shown in Tab.12-1.
IAS value or range
Marking
Significance
knot
km/h
mph
White
arc
32-75
59-139
37-86
Flap Operating Range.
Green
arc
39-108
72-200
45-124
Normal Operating Range.
Yellow
arc
108-138
200-255
124-158
Red line
138
255
158
Maneuvers must be conducted with
caution and only in smooth air.
Maximum speed for all operations.
Tab.12-1: ASI color range marking
Altimeter - ALT
The altimeter located on the left side of instrument panel is classical analogue round
pressure gauge. Range of measure is up to 20,000 ft.
Magnetic compass
The magnetic compass is designed to determine magnetic course of the airplane. The
magnetic compass is positioned on the upper edge of the instrument panel and consists of
the vessel filed with nonfreezing liquid with the little window in the front wall. The compass
rose is positioned on the rotary and swinging pivot inside the compass.
EFIS D100
The Dynon D100 is a panel-mounted Electronic Flight Instrument System (EFIS). The
instrument integrates multiple flight instruments, including airspeed, altitude, gyro-stabilized
magnetic compass, turn rate, slip/skid ball, bank angle, and vertical speed. Other useful
functions include a clock/timer, g-meter, voltmeter and density altitude/true airspeed
calculator.
Revision No.: 1
Date of issue: 2011-07-08
12 - 6
CR-MM-1-0-00
PS-28 Cruiser
SportCruiser
CHAPTER 12 –INSTRUMENTS AND AVIONICS
12.2.3
Engine instruments
Engine parameters (RPM, CHT, EGT, oil pressure and temperature, fuel pressure, manifold
pressure) are displayed either on the EMS D120 or on the classical analog instruments. A
typical example of the EMS display is shown in the Figure 10-3. The EMS D120 is located
on the right side of instrument panel. The engine parameters color marking is shown in
Tab.12-2.
Value
Minimum
Limit
(red line)
Caution
Range
(yellow arc)
Normal
Operating
Range
(green arc)
Caution
Range
(yellow arc)
Maximum
Range
(red line)
Engine speed
[RPM]
-
0-1 400
1 400-5 500
5 500-5 800
5 800
Oil
Pressure
0.8 bar
(12 psi)
0.8-2 bar
(12-29 psi)
2-5 bar
(29-73 psi)
5-7 bar
(73-102 psi)
7 bar
(102 psi)
Oil
Temperature
50°C
(122°F)
50-90°C
(122-194°F)
90-110°C
(194-230°F)
110-130°C
(230-266°F)
130°C
(266°F)
Cylinder head
Temperature
(CHT)
-
-
50-135°C
(122-275°F)
-
135°C
(275°F)
Exhaust
Gas Temp.
(EGT)
-
400-500°C
(752-932°F)
500-850°C
(932-1562°F)
850-880°C
(1562-1616°F)
880°C
(1616°F)
Fuel
Pressure
0.15 bar
(2.2 psi)
-
0.15-0.4 bar
(2.2-5.8 psi)
-
0.4 bar
(5.8 psi)
Tab.12-2: The engine instruments colour marking
12.2.4
Avionics
COMM, COMM/NAV system
The Apollo SL-30 includes a 760-channel VHF Comm transceiver and 200-channel
VOR/LOC/GS navigation receiver with DME display.
NOTE:
For detailed information refer to SL-30 Pilot′s Guide.
Fig. 12-4: SL-30 COMM/NAV
Date of issue: 2011-07-08
Revision No.: 1
12 - 7
CR-MM-1-0-00
PS-28 Cruiser
SportCruiser
CHAPTER 12 – INSTRUMENTS AND AVIONICS
The Apollo SL-40 is a 760-channel VHF Comm transceiver.
NOTE:
For detailed information refer to SL-40 Pilot′s Guide.
Fig. 12-5: SL-40 VHF transceiver
The PM3000 is a panel mounted, 4-place high-fidelity stereo intercom system that allows
the pilot and copilot/passenger to communicate and listen to music.
NOTE:
For detailed information refer to PM3000 Pilot′s Guide.
Fig. 12-6: PM3000 intercom
Navigation system
The panel-mounted GTX 327 is a TSO-certified Mode A/C digital transponder with the
addition of altitude reporting and timing functions such as flight time and count-up and
count-down timers, as well as current pressure altitude.
NOTE:
For detailed information refer to GTX 327 Pilot′s Guide.
Fig. 12-7: GTX 327 transponder
Revision No.: 1
Date of issue: 2011-07-08
12 - 8
CR-MM-1-0-00
CHAPTER 12 –INSTRUMENTS AND AVIONICS
PS-28 Cruiser
SportCruiser
The panel-mounted GTX 328 is a TSO-certified Mode S digital transponder. In addition to
displaying the code, reply symbol and mode of operation, the GTX 328 screen displays
pressure altitude, density altitude, temperature, and timer functions, depending on
equipment connections and configuration selection. The unit also features an altitude
monitor and flight timers. A voice or tone audio output announces altitude deviation and
count down timer expiration.
NOTE:
For detailed information refer to GTX 328 Pilot′s Guide.
Fig. 12-8: GTX 328 transponder
The panel-mounted GTX 330 is a TSO-certified Mode S digital transponder. In addition to
displaying the code, reply symbol and mode of operation, the GTX 330 screen displays
pressure altitude, density altitude, temperature, and timer functions, depending on
equipment connections and configuration selection. The unit also features an altitude
monitor, TIS traffic advisories and flight timers. A voice or tone audio output announces
altitude deviation, TIS traffic advisory and count down timer expiration.
NOTE:
For detailed information refer to GTX 330 Pilot′s Guide.
Fig. 12-9: GTX 330 transponder
The GPSMAP 695/696 is the ultimate portable MFD. This portable GPS navigator presents
GPS-derived analog flight instrumentation, position, navigation, and hazard avoidance
information to the pilot using a bright 7-inch diagonal high-definition sunlight readable color
display.
NOTE:
For detailed information refer to GPS 695/696 Owner′s Manual.
Date of issue: 2011-07-08
Revision No.: 1
12 - 9
PS-28 Cruiser
SportCruiser
CR-MM-1-0-00
CHAPTER 12 – INSTRUMENTS AND AVIONICS
Fig. 12-10: GPSMAP 695/696
The Aera 510 presents GPS-derived analog flight instrumentation, position, navigation, and
hazard avoidance information to the pilot using a bright 4.3-inch diagonal high-definition
sunlight readable color display with touch screen.
NOTE:
For detailed information refer to Aera Models 500, 510, 550, 560 Pilot′s
Guide.
Fig. 12-11: GPS Aera 510
Revision No.: 1
Date of issue: 2011-07-08
12 - 10
CR-MM-1-0-00
CHAPTER 12 –INSTRUMENTS AND AVIONICS
PS-28 Cruiser
SportCruiser
Antennas
Fig. 12-12 shows the antenna locations. The COMM antenna (1) is installed on the upper
part of the fuselage behind the canopy. The ELT antenna (3) is installed directly in the rear
of the COMM antenna. The NAV antenna (2) is installed on the top of the fin. The
transponder antenna (4) is installed on the bottom part of the fuselage. The GPS antenna is
attached to the upper side of the instrument panel cover.
1
2
3
4
COMM antenna
NAV antenna
ELT antenna
XPDR antenna
Fig. 12-12: Antenna locations
12.3
Removal / Installation
12.3.1
Removal of the pitot-static tube
Type of maintenance: line
Authorization to perform:
-
Repairman (LS-M) or Mechanic (A&P)
Tools needed:
-
Phillips PH1 screwdriver
-
pliers, cutting pliers
(a) Loose securing bolt (4, Fig. 12-13) in the pitot-static tube bracket (2) and pull out a bit
the pitot-static tube (1) with hoses from the bracket.
(b) Remove the cable ties from hoses (3). The hose and tube for static pressure line mark
by S letter and for total pressure mark by T letter.
(c) Disconnect the transparent hoses (3) of static and total pressure from the ports on the
pitot-static tube (1).
Date of issue: 2011-07-08
Revision No.: 1
12 - 11
CR-MM-1-0-00
PS-28 Cruiser
SportCruiser
12.3.2
CHAPTER 12 – INSTRUMENTS AND AVIONICS
Installation of the pitot-static tube
Type of maintenance: line
Authorization to perform:
-
Repairman (LS-M) or Mechanic (A&P)
Tools needed:
-
Phillips PH1 screwdriver
-
pliers, cutting pliers
(a) Connect the hoses (3, Fig. 12-13) to the ports on the pitot-static tube (1) and secure
them with cable ties.
WARNING:
WHEN CONNECTING THE PITOT-STATIC SYSTEM HOSES PAY
INCREASED ATTENTION. THERE MUST NOT BE ANY INCORRECT
CONNECTION! CONNECT THE HOSE MARKED S LETTER TO THE
PORT MARKED BY S LETTER AND THE HOSE MARKED T LETTER
TO THE PORT MARKED BY T LETTER.
(b) Insert the pitot-static tube (1) in the bracket (2).
(c) Secure pitot-static tube by means of securing bolt (4).
(d) Carry out check of pitot-static system tightness (see 12.4.1).
(e) Check, that pitot-tube is parallel to bottom wing skin.
1 Pitot-static tube
2 Bracket
3 Hose
4 Bolt
Fig. 12-13: Removal / installation of the pitot-static tube
Revision No.: 1
Date of issue: 2011-07-08
12 - 12
CR-MM-1-0-00
CHAPTER 12 –INSTRUMENTS AND AVIONICS
12.3.3
PS-28 Cruiser
SportCruiser
Removal of the flight instruments
Type of maintenance: line
Authorization to perform:
-
Repairman (LS-M) or Mechanic (A&P)
Tools needed:
-
Phillips PH1 screwdriver
-
pliers, cutting pliers
(a) Remove bolts securing the left instrument panel and carefully pull out and hold the
instrument panel.
(b) Remove the cable ties (9, Fig. 12-14) from the hoses (7; 8).
(c) Disconnect the hoses (7; 8) of static and total pressure from the rear ports on the
appropriate indicator (1; 2).
(d) Disconnect the wires (10) from the illuminator (3).
(e) Unscrew the nuts (5), remove the washers (6) and bolts (4).
(f) Remove the instrument (1; 2) and illuminator (3) from the panel.
(g) Install the protective cover on the rear ports of the instrument.
12.3.4
Installation of the flight instruments
Type of maintenance: line
Authorization to perform:
-
Repairman (LS-M) or Mechanic (A&P)
Tools needed:
-
Phillips PH1 screwdriver
(a) Remove the protective covers from the rear ports of the instrument.
(b) Connect the hoses (7; 8, Fig. 12-14) to the rear ports on the instrument (1; 2) and
secure them with the cable ties (9).
WARNING:
WHEN CONNECTING THE PITOT-STATIC SYSTEM HOSES PAY
INCREASED ATTENTION. THERE MUST NOT BE ANY INCORRECT
CONNECTION! CONNECT THE HOSE MARKED S LETTER TO THE
PORTS MARKED BY S LETTER AND THE HOSE MARKED T LETTER
TO THE PORT MARKED BY T LETTER.
NOTE:
The hose for static pressure line mark by S letter and for total pressure
mark by T letter.
(c) Connect the wires (10) to the illuminator (3).
(d) Put the instrument (1; 2) and illuminator (3) in position in the panel (11).
(e) Attach the instrument (1; 2) with the illuminator (3) by means of the bolts (4), nuts (5)
and washers (6).
(f) Install the left instrument panel (10).
(g) Carry out check of pitot-static system tightness (see 12.4.1).
Date of issue: 2011-07-08
Revision No.: 1
12 - 13
CR-MM-1-0-00
PS-28 Cruiser
SportCruiser
1
2
3
4
5
6
CHAPTER 12 – INSTRUMENTS AND AVIONICS
Altimeter
Airspeed indicator
Illuminator
Screw
Nut
Washer
7 Hose
8 Hose
9 Cable tie
10 Wires
For information:
11 Instrument panel
Fig. 12-14: Flight instruments removal / installation
12.3.5
Removal of the EFIS D100
Type of maintenance: line
Authorization to perform:
-
Repairman (LS-M) or Mechanic (A&P)
Tools needed:
-
7/64 Allen wrench
-
cutting pliers
(a) Set the MASTER BAT, AVIONICS switches to OFF.
(b) Put a 7/64 Allen wrench into the access hole (2, Fig. 12-15) for the locking screw;
engage the screw.
(c) Turn the screw counter-clockwise until the unit disengages from the mounting rack.
CAUTION:
DO NOT PRY THE FACE-PLATE. YOU CAN DAMAGE THE UNIT.
Revision No.: 1
Date of issue: 2011-07-08
12 - 14
CR-MM-1-0-00
CHAPTER 12 –INSTRUMENTS AND AVIONICS
PS-28 Cruiser
SportCruiser
(d) Pull gently on the sides of the unit (1) to remove it from the mounting rack (9).
(e) Remove the cable ties (7) from hoses (5; 6).
(f) Disconnect the hoses (5; 6) of static and total pressure from the rear ports (3; 4) on the
unit.
(g) Disconnect the connector (4) from the unit.
(h) Install the protective cover on the rear ports (3; 4) of the unit.
1
2
3
4
5
EFIS D100
Access hole of the locking screw
Static port
Pitot port
Hose
6 Hose
7 Cable tie
8 Connector
For information:
9 Mounting rack
Fig. 12-15: EFIS D100 removal / installation
Date of issue: 2011-07-08
Revision No.: 1
12 - 15
CR-MM-1-0-00
PS-28 Cruiser
SportCruiser
12.3.6
CHAPTER 12 – INSTRUMENTS AND AVIONICS
Installation of the EFIS D100
Type of maintenance: line
Authorization to perform:
-
Repairman (LS-M) or Mechanic (A&P)
Tools needed:
-
7/64 Allen wrench
(a) Remove the protective covers from the rear ports on the unit.
(b) Connect the hoses (5; 6, Fig. 12-15) to the rear ports (3; 4) on the unit (1) and secure
them with cable ties (7).
WARNING:
WHEN CONNECTING THE PITOT-STATIC SYSTEM HOSES PAY
INCREASED ATTENTION. THERE MUST NOT BE ANY INCORRECT
CONNECTION! CONNECT THE HOSE MARKED S LETTER TO THE
PORTS MARKED BY STATIC AND THE HOSE MARKED T LETTER TO
THE PORT MARKED BY PITOT.
NOTE:
The hose for static pressure line mark by S letter and for total pressure
mark by T letter.
(c) Connect the connector (4) to the unit.
(d) Slide the unit (1) into the rack (9). Engage the locking screw so that the latch front lobe
touches the rack.
(e) Turn the locking screw clockwise so that the rear lobe engages the mounting rack.
CAUTION:
DO NOT OVER-TIGHTEN THE LOCKING SCREW. YOU CAN DAMAGE
THE LOCKING MECHANISM.
(f) Continue to turn the screw until the unit is fully installed in the mounting rack.
(g) Carry out check of pitot-static system tightness (see 12.4.1).
(h) Set the MASTER BAT, AVIONICS switches to ON and do an operational test of the
system.
12.3.7
Removal of the EMS D120
Type of maintenance: line
Authorization to perform:
-
Repairman (LS-M) or Mechanic (A&P)
Tools needed:
-
7/64 Allen wrench
-
cutting pliers
(a) Set the MASTER BAT, EMS switches to OFF.
(b) Put a 7/64 Allen wrench into the access hole (2, Fig. 12-16) for the locking screw;
engage the screw.
(c) Turn the screw counter-clockwise until the unit disengages from the mounting rack.
CAUTION:
DO NOT PRY THE FACE-PLATE. YOU CAN DAMAGE THE UNIT.
Revision No.: 1
Date of issue: 2011-07-08
12 - 16
CR-MM-1-0-00
CHAPTER 12 –INSTRUMENTS AND AVIONICS
PS-28 Cruiser
SportCruiser
(d) Pull gently on the sides of the unit (1) to remove it from the mounting rack (5).
(e) Disconnect the connectors (3; 4) from the unit.
1 EMS D120
2 Access hole of the locking screw
3 Connector
4 Connector
For information:
5 Mounting rack
Fig. 12-16: EMS D120 removal / installation
12.3.8
Installation of the EMS D120
Type of maintenance: line
Authorization to perform:
-
Repairman (LS-M) or Mechanic (A&P)
Tools needed:
-
7/64 Allen wrench
(a) Connect the connectors (3; 4, Fig. 12-16) to the unit (1).
(b) Slide the unit (1) into the rack (5). Engage the locking screw so that the latch front lobe
touches the rack.
(c) Turn the locking screw clockwise so that the rear lobe engages the mounting rack.
Date of issue: 2011-07-08
Revision No.: 1
12 - 17
CR-MM-1-0-00
PS-28 Cruiser
SportCruiser
CAUTION:
CHAPTER 12 – INSTRUMENTS AND AVIONICS
DO NOT OVER-TIGHTEN THE LOCKING SCREW. YOU CAN DAMAGE
THE LOCKING MECHANISM.
(d) Continue to turn the screw until the unit is fully installed in the mounting rack.
(e) Set the MASTER BAT, EMS switches to ON and do an operational test of the system.
12.3.9
Removal of transponder
Type of maintenance: line
Authorization to perform:
-
Repairman (LS-M) or Mechanic (A&P)
Tools needed:
-
3/32 Allen wrench
(a) Set the MASTER BAT, AVIONICS switches to OFF.
(b) Put a 3/32 Allen wrench into the access hole (2, Fig. 12-17) for the locking screw;
engage the screw.
(c) Turn the screw counter-clockwise until the transponder (1) disengages from the
mounting rack.
CAUTION:
DO NOT TOUCH THE CONNECTOR CARD AT THE REAR OF THE
UNIT. THE ELECTROSTATIC CHARGE ON YOUR BODY CAN DAMAGE
THE UNIT.
(d) Pull gently on the sides of the transponder (1) to remove it from the mounting rack (3).
(e) Install the protective covers on the rear connectors of the transponder.
12.3.10 Installation of transponder
Type of maintenance: line
Authorization to perform:
-
Repairman (LS-M) or Mechanic (A&P)
Tools needed:
-
3/32 Allen wrench
(a) Remove the protective covers from the connectors on the transponder.
(b) Looking at the bottom of the unit, make sure the front lobe of the locking mechanism is
in a vertical positron.
(c) Slide the transponder (1, Fig. 12-17) into the rack (3). Engage the locking screw so that
the latch front lobe touches the rack.
(d) Turn the locking screw clockwise so that the rear lobe engages the mounting rack.
CAUTION:
DO NOT OVER-TIGHTEN THE LOCKING SCREW. YOU CAN DAMAGE
THE LOCKING MECHANISM.
(e) Continue to turn the screw until the transponder is fully installed in the mounting rack.
(f) Set the MASTER BAT, AVIONICS switches to ON and do an operational test.
Revision No.: 1
Date of issue: 2011-07-08
12 - 18
CR-MM-1-0-00
PS-28 Cruiser
SportCruiser
CHAPTER 12 –INSTRUMENTS AND AVIONICS
NOTE
The location of the transponder
may be different.
1 Transponder
2 Access hole of the locking screw
For information:
3 Mounting rack
Fig. 12-17: Transponder removal / installation
12.3.11 Removal of COMM, COMM/NAV
Type of maintenance: line
Authorization to perform:
-
Repairman (LS-M) or Mechanic (A&P)
Tools needed:
-
3/32 Allen wrench
(a) Set the MASTER BAT, AVIONICS switches to OFF.
(b) Put a 3/32 Allen wrench into the access hole (2, Fig. 12-18) for the locking screw;
engage the screw.
(c) Turn the screw counter-clockwise until the unit (1) disengages from the mounting rack.
CAUTION:
DO NOT PULL ON THE KNOBS. DO NOT PRY THE FACE-PLATE.
YOUCAN DAMAGE THE UNIT.
DO NOT TOUCH THE CONNECTOR CARD AT THE REAR OF THE
UNIT. THE ELECTROSTATIC CHARGE ON YOUR BODY CAN DAMAGE
THE UNIT.
(d) Pull gently on the sides of the unit (1) to remove it from the mounting rack (3).
(e) Install the protective covers on the rear connectors of the unit.
Date of issue: 2011-07-08
Revision No.: 1
12 - 19
CR-MM-1-0-00
PS-28 Cruiser
SportCruiser
CHAPTER 12 – INSTRUMENTS AND AVIONICS
12.3.12 Installation of COMM, COMM/NAV
Type of maintenance: line
Authorization to perform:
-
Repairman (LS-M) or Mechanic (A&P)
Tools needed:
-
3/32 Allen wrench
(a) Remove the protective covers from the connectors on the unit.
(b) Looking at the bottom of the unit, make sure the front lobe of the locking mechanism is
in a vertical positron.
(c) Slide the unit (1, Fig. 12-18) into the rack (3). Engage the locking screw so that the latch
front lobe touches the rack.
(d) Turn the locking screw clockwise so that the rear lobe engages the mounting rack.
CAUTION:
DO NOT PULL ON THE KNOBS. DO NOT PRY THE FACE-PLATE.
YOUCAN DAMAGE THE UNIT.
DO NOT TOUCH THE CONNECTOR CARD AT THE REAR OF THE
UNIT. THE ELECTROSTATIC CHARGE ON YOUR BODY CAN DAMAGE
THE UNIT.
(e) Continue to turn the screw until the unit is fully installed in the mounting rack.
(f) Set the MASTER BAT, AVIONICS switches to ON and do an operational test.
1 COMM/NAV unit
2 Access hole of the locking screw
For information:
3 Mounting rack
Fig. 12-18: COMM/NAV unit removal / installation
Revision No.: 1
Date of issue: 2011-07-08
12 - 20
CR-MM-1-0-00
CHAPTER 12 –INSTRUMENTS AND AVIONICS
PS-28 Cruiser
SportCruiser
12.3.13 Removal of intercom
Type of maintenance: line
Authorization to perform:
-
Repairman (LS-M) or Mechanic (A&P)
Tools needed:
-
Phillips PH1 screwdriver
(a) Set the MASTER BAT, AVIONICS switches to OFF.
(b) Disconnect the connector (5, Fig. 12-19) from the unit.
(c) Remove the knobs (2) from the volume and squelch control shafts.
(d) Unscrew the screws (4) and remove the faceplate (3).
(e) Carefully remove the unit (1).
CAUTION:
DO NOT TOUCH THE CONNECTOR CARD AT THE REAR OF THE
UNIT. THE ELECTROSTATIC CHARGE ON YOUR BODY CAN DAMAGE
THE UNIT.
(f) Install the protective cover on the rear connector of the unit.
12.3.14 Installation of intercom
Type of maintenance: line
Authorization to perform:
-
Repairman (LS-M) or Mechanic (A&P)
Tools needed:
-
Phillips PH1 screwdriver
(a) Remove the protective cover from the connector on the unit.
(b) Insert the unit (1, Fig. 12-19) from behind the instrument panel, aligning the holes for the
knobs, LED, and switch.
(c) Place the faceplate (3) over the knob shafts and secure it by means of the two screws
(4).
(d) Install the knobs (2) over the volume and squelch control shafts.
(e) Connect the connector (5) to the unit (1).
(f) Set the MASTER BAT, AVIONICS switches to ON and do an operational test.
Date of issue: 2011-07-08
Revision No.: 1
12 - 21
CR-MM-1-0-00
PS-28 Cruiser
SportCruiser
1
2
3
4
CHAPTER 12 – INSTRUMENTS AND AVIONICS
Intercom
Knob
Faceplate
Screw
5 Connector
For information:
6 Instrument panel
Fig. 12-19: Intercom removal / installation
12.3.15 Removal of COMM antenna
Type of maintenance: line
Authorization to perform:
-
Repairman (LS-M) or Mechanic (A&P)
Tools needed:
-
screwdriver
-
wrench No. 7
(a) Set the MASTER BAT, AVIONICS switches to OFF.
(b) Disconnect the connector (4, Fig. 12-20) from the antenna.
(c) Remove the nuts (4) with the washers (5)
(d) Remove the antenna (1) with the gasket (2), screws (3) and washers (6).
(e) Install the protective cover on the antenna connector.
Revision No.: 1
Date of issue: 2011-07-08
12 - 22
CR-MM-1-0-00
PS-28 Cruiser
SportCruiser
CHAPTER 12 –INSTRUMENTS AND AVIONICS
12.3.16 Installation of COMM antenna
Type of maintenance: line
Authorization to perform:
-
Repairman (LS-M) or Mechanic (A&P)
Tools needed:
-
screwdriver
-
wrench No. 7
(a) Remove the protective cover from the antenna connector.
(b) Place the antenna (1, Fig. 12-20) with the gasket (2) on the fuselage (8).
(c) Insert the screws (3) with washers (6) to the holes in the antenna body (1); install the
washers (5), screw and tighten the nuts (4).
(d) Connect the connector (7) to the antenna (1).
(e) Set the MASTER BAT, AVIONICS switches to ON and do an operational test.
1 COMM antenna
2 Gasket
3 Screw (4 pcs.)
4 Nut (4 pcs.)
5 Washer (4 pcs.)
6 Tooth washer (4 pcs.)
7 Cable connector
For information:
8 Fuselage upper part
Fig. 12-20: COMM antenna removal / installation
Date of issue: 2011-07-08
Revision No.: 1
12 - 23
CR-MM-1-0-00
PS-28 Cruiser
SportCruiser
CHAPTER 12 – INSTRUMENTS AND AVIONICS
12.3.17 Removal of NAV antenna
Type of maintenance: line
Authorization to perform:
-
Repairman (LS-M) or Mechanic (A&P)
Tools needed:
-
Phillips PH2 screwdriver
-
wrench No. 8
(a) Set the MASTER BAT, AVIONICS switches to OFF.
(b) Unscrew the screws (7, Fig. 12-21) and remove the fin tip (6).
(c) Remove the nuts (4) and disconnect the cables (5) from antenna studs.
(d) Unscrew the screws (2) with the washers (3) and remove the antenna (1).
1 NAV antenna
2 Screw (2 pcs.)
3 Washer (2 pcs.)
4 Nut (2 pcs.)
5 Cable (2 pcs.)
6 Fin tip
7 Screw (8 pcs.)
For information:
8 Fin
Fig. 12-21: NAV antenna removal / installation
Revision No.: 1
Date of issue: 2011-07-08
12 - 24
CR-MM-1-0-00
CHAPTER 12 –INSTRUMENTS AND AVIONICS
PS-28 Cruiser
SportCruiser
12.3.18 Installation of NAV antenna
Type of maintenance: line
Authorization to perform:
-
Repairman (LS-M) or Mechanic (A&P)
Tools needed:
-
Phillips PH2 screwdriver
-
wrench No. 8
(a) Place the antenna (1, Fig. 12-21) on the bracket and fasten it by means of the screws
(2) with the washers (3).
(b) Connect the cables (5) to the antenna studs; screw and fasten the nuts (4).
(c) Place the fin tip (6) on the fin (8) and fasten it by means of the screws (7).
(d) Set the MASTER BAT, AVIONICS switches to ON and do an operational test.
12.3.19 Removal of transponder antenna
Type of maintenance: line
Authorization to perform:
-
Repairman (LS-M) or Mechanic (A&P)
Tools needed:
-
wrench No. 3/4 in
(a) Tilt forward the right seat back.
(b) Set the MASTER BAT, AVIONICS switches to OFF.
(c) Disconnect the connector (4, Fig. 12-22) from the antenna.
(d) Unscrew the nut (2), remove the washer (3) and the antenna (1).
(e) Install the protective cover on the antenna connector.
12.3.20 Installation of transponder antenna
Type of maintenance: line
Authorization to perform:
-
Repairman (LS-M) or Mechanic (A&P)
Tools needed:
-
wrench No. 3/4 in
(a) Remove the protective cover from the antenna connector.
(b) Insert the antenna (1, Fig. 12-22) to the hole in the fuselage bottom part (5).
(c) Insert the washer (3), screw and tighten the nut (2).
(d) Connect the connector (4) to the antenna (1).
(e) Place the fin tip (6) on the fin (8) and fasten it by means of the screws (7).
(f) Tilt backward the right seat back.
(g) Set the MASTER BAT, AVIONICS switches to ON and do an operational test.
Date of issue: 2011-07-08
Revision No.: 1
12 - 25
CR-MM-1-0-00
PS-28 Cruiser
SportCruiser
CHAPTER 12 – INSTRUMENTS AND AVIONICS
1 XPDR antenna
2 Nut
3 Lockwasher
4 Cable connector
For information:
5 Fuselage bottom part
Fig. 12-22: Transponder antenna removal / installation
Revision No.: 1
Date of issue: 2011-07-08
12 - 26
CR-MM-1-0-00
CHAPTER 12 –INSTRUMENTS AND AVIONICS
12.4
Check / Adjustment
12.4.1
Check of pitot-static system tightness
PS-28 Cruiser
SportCruiser
(a) In the static pressure system create the under pressure by means of an appropriate
instrument corresponding to altitude of 1 000 ft. Drop in the indicated altitude per one
minute must not exceed 100 ft.
(b) In the system of total pressure create the overpressure corresponding to speed of
140 knots (260 km/h, 161 mph) by means of a suitable instrument. Drop in speed during
3 minutes must not exceed 2.3 knots (4.4 km/h, 2.7 mph).
12.4.2
Magnetic / EFIS compass compensation
Rules for doing compensation of the compasses:
(a) Compass compensation must be performed on the approved compass bases, which are
at least 100 m (300 ft) from steel structures, electric leading or other over ground or
underground steel equipment or objects.
(b) If the compass north is westward from magnetic north, the deviation is westward, i.e.
negative. If the compass north is eastward from magnetic north, the deviation is
eastward, i.e. positive.
Compensation procedure:
(a) Turn the airplane to "N" heading; eliminate the deviation by "C" screw.
(b) Turn the airplane to "S" heading; reduce the found out deviation to the half-value by "C"
screw and write down the rest of the deviation.
(c) Turn the airplane to "E" heading; eliminate the deviation by "B" screw.
(d) Turn the airplane to "W" heading; reduce the found out deviation to the half-value by "B"
screw and write down the rest of the deviation.
(e) Turn the airplane by grades indicated in the compensation report (see Tab. 12-3; 12-4)
and write down individual deviations in the table.
(f) After finishing compensation of the magnetic compass fill out the deviation card (see
Fig. 12-12) and position it in the airplane near the magnetic compass.
Fig. 12-23: Example of the deviation card
Date of issue: 2011-07-08
Revision No.: 1
12 - 27
CR-MM-1-0-00
PS-28 Cruiser
SportCruiser
CHAPTER 12 – INSTRUMENTS AND AVIONICS
REPORT OF MAGNETIC COMPASS SWING
Aircraft
Aircraft S/N
Compass type
Check 1.
CM 24 (L)
Compass S/N
All electrical equipment ON and operating
The engine running, idle
Fuselage placed in flying attitude
XPDR ON, XCVR receiving
Check 2.
Switched ON just those instruments, which are necessary for VFR flight. COM, NAV,
XPDR, lights - switched OFF
The engine running, idle
Fuselage placed in flying attitude
Measured
Heading
1.
N
Deviation
2.
1.
2.
000
030
060
E
090
120
150
S
180
210
240
W
270
300
330
Maximal allowed deviation ± 10°
If the compass deviations are not identical for both checks, two separate compass correction cards
should be done.
Note:
General evaluation
Performed by:
Complied
Elaborated by:
Failed
Date:
Tab. 12-3: Report of magnetic compass compensation
Revision No.: 1
Date of issue: 2011-07-08
12 - 28
CR-MM-1-0-00
PS-28 Cruiser
SportCruiser
CHAPTER 12 –INSTRUMENTS AND AVIONICS
REPORT OF EFIS COMPASS SWING
Aircraft
Aircraft S/N
Compass type
EFIS type
Check 1.
EDC-D10A
Compass S/N
DYNON D100
EFIS S/N
All electrical equipment ON and operating
The engine running, idle
Fuselage placed in flying attitude
XPDR ON, XCVR receiving
Check 2.
Switched ON just those instruments, which are necessary for VFR flight. COM, NAV,
XPDR, lights - switched OFF
The engine running, idle
Fuselage placed in flying attitude
Measured
Heading
1.
N
Deviation
2.
1.
2.
000
030
060
E
090
120
150
S
180
210
240
W
270
300
330
Maximal allowed deviation ± 10°
If the compass deviations are not identical for both checks, two separate compass correction cards
should be done.
Note:
General evaluation
Performed by:
Complied
Elaborated by:
Failed
Date:
Tab. 12-4: Report of magnetic compass compensation
Date of issue: 2011-07-08
Revision No.: 1
12 - 29
PS-28 Cruiser
SportCruiser
CR-MM-1-0-00
CHAPTER 12 – INSTRUMENTS AND AVIONICS
INTENTIONALLY LEFT BLANK
Revision No.: 1
Date of issue: 2011-07-08
12 - 30