1
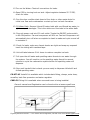
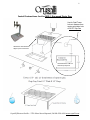
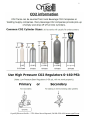
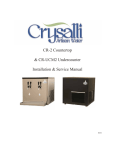
1
CR-UC1 & CR-UC2 Undercounter Chilled Sparkling Water Dispenser
Quick Installation Guide Instructions
1. Select a counter location for your draft tower and an undercounter or remote
location for your CR-UC# unit (unit requires a minimum of 6” on all side and
top). Place the CR-UC# unit as close as possible to water filter connection &
120-volt electrical outlet.
2. Place the condenser coil facing out for best air in to unit. Allow for air flow
out of cabinet as well (louver paneling if enclosed). Without adequate air flow
the unit will not operate properly.
3. Mount the draft tower and drain pan. Plumb drain line from pan to the floor
sink. Use silicone on bottom and edges of drain pan for best seal.
4. Measure and Route the insulated trunk line that is pre-plumbed from the CRUC# unit to the location of the draft tower.
5. Using the supplied John Guest Union fitting and Tube-to-barb fitting, connect
the braided lines, labeled “soda” and “water” to the stainless steel lines on
the draft tower, marked “1” and “2”. Line “1” goes to sparkling water
(“soda”), line “2” goes to still water (“water”).
6. Splice together the ends of the two clear (or red) re-circ tubes in the trunk at
the connection point of the tower. Use the 3/8” “U” barb fitting (in CR-KitUC) to create the continual loop from the unit through the lines and back.
7. Connect water inlet line from the CR-UC# unit to your water filter system.
When using the Everpure Filter system, you’ll need to reduce down from the
¾” fpt inlet and outlet to accommodate your line size. Water line from the
CR-UC# is a 3/8” braided hose with a 3/8” barb fitting. Labeled “water”.
8. If using a Back Flow Preventer and or Water Pressure Regulator plumb in
after the water filter system. Use Water Pressure Regulator when incoming
water pressure is above 70 PSI.
9. Connect a High Pressure CO2 regulator (CR-3741) to CO2 cylinder, then
connect CO2 line from unit to regulator. CO2 braided line has a stainless
steel nut on it and is labeled “co2”.
Crysalli/Western Pacific – 1739 Sabre Street Hayward, CA 800-229-4410 www.crysalli.com
2
10.Turn on the Water. Check all connections for leaks.
11.Open CO2 by turning knob on tank. Adjust regulator between 55-75 PSI,
check for leaks.
12. Run the clear overflow drain hose to floor drain or other waste drain for
initial over flow and condensation on start-up from ice bank formation.
13. Fill Water Bath: Remove lid and fill water bath with non-filtered tap water, to
¼” from top of standpipe. This is the white over flow tube in the water bath.
14. Plug unit power cord into 120-volt outlet. Toggle the ON/OFF rocker switch
to the ON position. Fan and compressor will turn on. Fan and Compressor will
automatically turn off when a complete ice bank is made and cycle on and off
to maintain it.
15. Check for leaks, make sure faucet shanks are tight and wrap any exposed
trunk line tubing with insulated tape.
16. Unit will take between 3 & 4 hours to make a complete ice bank.
17. Pull open the still water and sparkling water faucets to run water through
the system. You will need to run the sparkling water faucet for several
minutes to cycle the carbonation system before full sparkling water will
dispense.
18. Once unit has built the ice bank you are ready to dispense chilled still and
chilled sparkling water.
CR-KIT-UC Install Kit is available which includes barb fitting, clamps, extra hose,
armaflex, back flow preventer and water regulator.
CBR2-FS Fitting Kit is available when a second tower is being installed.
Owner’s manual and Registration can be found online at www.crysalli.com
Crysalli/Western Pacific – 1739 Sabre Street Hayward, CA 800-229-4410 www.crysalli.com
3
Crysalli/Western Pacific – 1739 Sabre Street Hayward, CA 800-229-4410 www.crysalli.com
4
Crysalli/Western Pacific – 1739 Sabre Street Hayward, CA 800-229-4410 www.crysalli.com
5
Install Instructions for the RDP-1 Recessed Drain Pan
Use for Draft Tower
hole cut distance from
center point/drain hole
of DP-CT Drip Pan
Add silicone around bottom
edges of pan for best seal
And Dimensions of DP-CT
Counter top Drip Pan.
Crysalli/Western Pacific – 1739 Sabre Street Hayward, CA 800-229-4410 www.crysalli.com
6
Optional X0101-HEX faucet instructions. For use in Self-Serve applications.
Crysalli/Western Pacific – 1739 Sabre Street Hayward, CA 800-229-4410 www.crysalli.com
7
Crysalli/Western Pacific – 1739 Sabre Street Hayward, CA 800-229-4410 www.crysalli.com