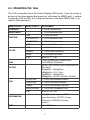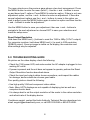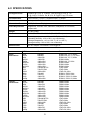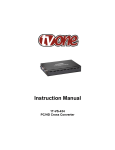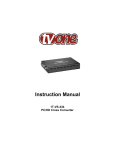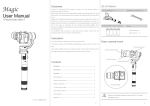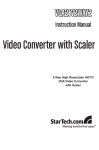
1
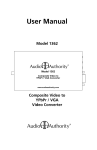
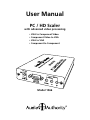
User Manual
PC / HD Scaler
with advanced video processing
• VGA to Component Video
• Component Video to VGA
• VGA to VGA
• Component to Component
Model 1366
WARNINGS
•
•
•
•
•
•
•
Read these instructions before installing or using this product.
To reduce the risk of fire or electric shock, do not expose this unit to rain or moisture.
This product must be installed by qualified personnel.
Do not open the cover—there are no user-serviceable parts inside.
Do not expose this unit to excessive heat.
Install only in dry, indoor locations.
Clean the unit only with a dry or slightly dampened soft cloth.
LIABILITY STATEMENT
Every effort has been made to ensure that this product is free of defects. Audio
Authority cannot be held liable for the use of this hardware or any direct or indirect
consequential damages arising from its use. It is the responsibility of the user of the
hardware to check that it is suitable for his/her requirements and that it is installed
correctly. All rights are reserved. No parts of this manual may be reproduced or
transmitted by any form or means electronic or mechanical, including photocopying,
recording or by any information storage or retrieval system without the written
consent of the publisher.
Audio Authority reserves the right to revise any of its hardware and software following
its policy to modify and/or improve its products where necessary or desirable.
Audio Authority and the Double-A Symbol are registered trademarks of Audio
Authority Corp. Copyright June, 2007. All third party trademarks and copyrights are
recognized.
2
Model 1366
PC / HD Scaler
with advanced video processing
Table Of Contents
1.0
Introduction . . . . . . . . . . . . . . . . . . . . . . . 4
2.0
Checking Package Contents . . . . . . . . . . . . . . . 4
3.0
Installation . . . . . . . . . . . . . . . . . . . . . . . . 5
4.0
Operating the 1366. . . . . . . . . . . . . . . . . . . . 7
5.0
Troubleshooting . . . . . . . . . . . . . . . . . . . . . 8
6.0
Specifications
7.0
Limited Warranty . . . . . . . . . . . . . . . . . . .
10
8.0
Regulatory Compliance . . . . . . . . . . . . . . . .
11
9.0
Contact Information . . . . . . . . . . . . . . . . . .
11
. . . . . . . . . . . . . . . . . . . . . . 9
3
1.0 INTRODUCTION
Thank you for purchasing a Model 1366 from Audio Authority. This multi-function
scaler is the most practical VGA to component video scaler available, offering
vital video processing features such as overscan control and scaling, eliminating
the need for complex third party video software on the source computer. It is ideal
for board room or classroom applications where different laptops may be used
with an HDTV display. It allows the user to quickly adapt any analog PC video
output to the exact requirements of any component video display. Other 1366
applications are PC to PC, HD to PC, and HD to HD.
Audio Authority offers an extensive line of audio and video switchers,
converters, distribution amps and extenders available for purchase online at
www.audioauthority.com or through authorized dealers.
1.1 INPUT AND OUTPUT CAPABILITIES
• PC input resolutions: RGBHV signals from VGA through WUXGA
• HDTV input resolutions: 480i through 1080p @ 60Hz
• PC output resolutions: RGBHV signals from VGA through WUXGA
• HDTV output resolutions: 480i through 1080p @ 60Hz
1.2 FEATURES
• Overscan, aspect ratio, and other scaling adjustments
• OSD user interface (On Screen Display)
• Contrast, brightness, hue, saturation, sharpness, RGB levels, and aspect ratio
adjustments for output signals
• Passthrough output preserves the original source video format
• Locking power connector ensures system stability
2.0 CHECKING PACKAGE CONTENTS
Before connecting the 1366, please make certain the following items are in the
shipping carton:
• 1366 scaler
• 5V DC power adapter
• VGA-15 to 3-RCA cable
• User manual
Note: Please retain the original packing material
in case you need to return the unit. If you find
any items are missing, contact Audio Authority
immediately. Have the model number and
invoice available for reference when you call.
4
3.0 INSTALLATION
The installation procedure described in this manual is for converting a PC output
signal to component video for an HDTV input. Other applications are possible
with the 1366, and require similar steps but different connection cables and menu
settings. See page 9 for a listing of supported resolutions.
VGA (PASSTHROUGH)
PC
MONITOR
PC
HDTV
1366
YPbPr
VGA
3.1 GETTING THE BEST RESULTS
• Output display device. The quality of the output signal will depend largely
upon the type and quality of display device used. For instance, HDTV displays
may not be capable of displaying text as well as a computer monitor does.
• Using Native Resolution. It is always best to set the output resolution of the
scaler to the native resolution and refresh rate of the display device. This allows
the 1366 to do most of the scaling, which usually results in a superior picture.
• Distance between the 1366 and the display device. Long distances are
possible, but use high quality (coax-type) cables to avoid signal losses from
impedance and interference.
• Output connection cables. Low quality cables are susceptible to interference.
They degrade signal quality due to poor matching and cause elevated noise
levels. Therefore, cables should be of the best quality and identical lengths.
Coax-type computer cables are recommended because of their superior
internal shielding characteristics.
• Interference. Nearby electrical devices can have an adverse effect on signal
quality. For example, older computer monitors often emit electromagnetic fields
that can interfere with the performance of nearby video equipment.
5
VIDEO BYPASS OUTPUT
(FEMALE DB-15)
VIDEO INPUT
(FEMALE DB-15)
PC / HD
BYPASS
POWER
INDICATOR
LIGHT
DC 5V
AC ADAPTER
CONNECTION
PC / HD
BYPASS
PC / HD
IN
VIDEO OUTPUT
(FEMALE DB-15)
PC / HD
OUTPUT
DC 5V
XGA
480p
MENU
ENTER
AND EXIT
PC / HD
IN
MENU
480p
PC / HD
OUTPUT
UP AND DOWN
CONTROLS
XGA
MENU
3.2 CONNECTING THE HARDWARE
• Turn off the computer or other video source and the HDTV display.
• Connect the appropriate PC video and component video cables: first between
the source PC and the input of the 1366 and then between the 1366 output
and the component video inputs on the display. The included VGA-15 to 3-RCA
adapter is used to connect the 1366 output to component video input jacks.
• Optional: connect the bypass output of the 1366 to a computer monitor capable
of accepting the computer’s output video format.
• Plug in the provided AC adapter: first to the 1366 and then to an active AC
power outlet.
• Turn on the computer (the video source) and the HDTV. The 1366 has no power
switch and begins to function as soon as the AC adapter has been connected to
a live outlet. Observe that the power light is on.
• If no picture is displayed on power up, perform the HD reset procedure as
described in section 4.0 Operating the 1366.
6
4.0 OPERATING THE 1366
The 1366 is operated via an On Screen Display (OSD) menu. If you do not see a
picture on the video display after power-up, hold down the MENU and (–) buttons
to reset the 1366 to 480p. (For computer monitors, hold down MENU and (+) to
reset to XGA resolution.)
MENU LEVEL 1
MENU LEVEL 2
ADJUSTMENT
CONTRAST
0 - 100 of Contrast Level
BRIGHTNESS
0 - 100 of Brightness Level
FINETUNE
COLOR
• HUE
0 - 100 of Hue Level
• SATURATION
0 - 100 of Saturation Level
• SHARPNESS
• EXIT
0 - 100 of Sharpness Level
Back to 1st Tier
• RED
0 - 100 of Red Color Level
• GREEN
0 - 100 of Green Color Level
• BLUE
0 - 100 of Blue Color Level
Back to 1st Tier
• EXIT
FULL / OVERSCAN / UNDERSCAN /
LETTERBOX / PANSCAN
SIZE
NATIVE / VGA / SVGA / XGA / SXGA /UXGA /
480i / 480p /
720p@60Hz / 1080i@60Hz /
1080p@60Hz / 576i / 576p /
720p@50Hz / 1080i@50Hz /
1080p@50Hz / WXGA / WSXGA / WUXGA
OUTPUT
OSD
• HPOSITION
0 - 100 of OSD Horizontal Position
• VPOSITION
0 - 100 of OSD Vertical Position
• TIMER
0 - 100 of OSD Existing Time (sec.)
• BACKGROUND
0 - 100 of OSD Transparent Level
Back to 1st Tier
• EXIT
INFORMATION
SOURCE (Input Interface) INPUT
(Input Resolution) OUTPUT (Output
Resolution) VERSION (Firmware
Version)
EXIT
Close OSD Menu
7
The menu structure on the previous page shows a two-level arrangement. Press
the MENU button to enter the menu (level 1). Use the + and – buttons to move
up and down level 1 options. Press MENU to select an option. If there is only one
adjustment option, use the + and – buttons to make an adjustment. If there are
several adjustment options use the + and – buttons to move to the option you
wish to adjust, press the MENU button again to select an option and then use the
+ and – buttons to make the adjustment.
Use the MENU button to save your adjustment, then use + and – buttons to
navigate to the next adjustment or choose EXIT to save your selections and
leave the setup menu.
Reset Output Resolution
Hold down the MENU and (–) buttons to reset the 1366 to 480p (Y Pb Pr output).
For computer monitors, hold down MENU and (+) to reset to XGA resolution
(RGBHV output). Once an image is visible on the display, the resolution and
other settings may be adjusted.
5.0 TROUBLESHOOTING GUIDE
No picture on the video display–check the following:
• Check the 1366 power LED, and make certain the AC adapter is plugged in to a
working AC outlet.
• If power is present and the unit does not appear to operate, perform the Reset
Output Resolution function described above.
• Check the input and output cables loose connections, and inspect the cables
for damage, and/or substitute a known good cable.
Poor quality picture–check the following:
• Use high quality VGA and component video cables.
• Note: Many HDTV displays are not capable of displaying text as well as a
computer monitor does.
• It is always best to set the output resolution of the scaler to the native resolution
and refresh rate of the display device.
If problems persist, contact the Audio Authority Technical Service department via
email: support@audioauthority.com, or call 800-322-8346 or 859-233-4599.
8
6.0 SPECIFICATIONS
I/O Signal Levels
RGBHV @ 0.7V p-p, 75 ohms, H&V Sync @ 3-5V p-p, TTL
Y @ 1V p-p, 75 ohms. Pb, B-Y, Pr, R-Y @ 0.7V p-p, 75 ohms
I/O Connectors
HD15 female, (1) input, (1) bypass output, (1) output
Controls
Side panel buttons
Information Menu
OSD (On Screen Display)
Video Adjustments
Brightness, contrast, color, saturation, sharpness, R-G-B levels,
aspect ratio
Weight
0.73lbs (332g)
Dimensions
HxWxD, inches: .98x4.16x6.18 (25x102x157mm)
Environmental
Operating temperature: +32° to +122° F (0° to +50° C)
Operating humidity: 10% to 90%, non-condensing
Storage temperature: +14° to +140° F (-10° to +60° C)
Storage humidity: 10% to 90%, non-condensing
Power Source
AC-DC adapter 100~240VAC to 5VDC@2.6A
VESA
Resolution
Format and Refresh Rate
Input
Resolutions
VGA
SVGA
XGA
WXGA
SXGA
WSXGA
UXGA
WUXGA
480i
576i
1080i
480p
576p
720p
1080p
640x480
800x600
1024x768
1280x768
1280x1024
1680x1050
1600x1200
1920x1200
720x480 NTSC
720x576 PAL
1920x1080
720x480
720x576
1280x720
1920x1080
RGBHV 60, 72, 75, 85Hz
RGBHV 56, 60, 72, 75, 85Hz
RGBHV 60, 70, 75, 85Hz
RGBHV 60Hz
RGBHV 60, 75, 85Hz
RGBHV 60Hz
RGBHV 60Hz
RGBHV 60Hz
YPbPr 60Hz
YPbPr 50Hz
YPbPr 50, 60Hz
RGBHV, YPbPr 60Hz
RGBHV, YPbPr 50Hz
RGBHV, YPbPr 50, 60Hz
RGBHV, YPbPr 50, 60Hz
Output
Resolutions
VGA
SVGA
XGA
WXGA
WXGA+
SXGA
SXGA+
WSXGA
UXGA
WUXGA
480i
576i
1080i
480p
576p
720p
1080p
640x480
800x600
1024x768
1280x768
1440x900
1280x1024
1400x1050
1680x1050
1600x1200
1920x1200
720x480 NTSC
720x576 PAL
1920x1080
720x480
720x576
1280x720
1920x1080
RGBHV 60Hz
RGBHV 60Hz
RGBHV 60Hz
RGBHV 60Hz
RGBHV 60Hz
RGBHV 60Hz
RGBHV 60Hz
RGBHV 60Hz
RGBHV 60Hz
RGBHV 60Hz
YPbPr 60Hz
YPbPr 50Hz
YPbPr 50, 60Hz
YPbPr 60Hz
YPbPr 50Hz
YPbPr 50, 60Hz
YPbPr 50, 60Hz
9
7.0 LIMITED WARRANTY
If any consumer product from Audio Authority fails due to defects in materials
or workmanship within one year from the date of the original sale to the enduser, Audio Authority guarantees that we will replace the defective product at no
cost. Freight charges for the replacement unit will be paid by Audio Authority
(ground service only). A copy of the invoice showing the item number and date
of purchase (proof-of-purchase) must be submitted with the defective unit to
constitute a valid in-warranty claim.
Units that fail after the warranty period has expired may be returned to the factory
for repair at a nominal charge, if not damaged beyond the point of repair. All
freight charges for out-of-warranty returns for repair are the responsibility of the
customer. Units returned for repair must have a Return Authorization Number
assigned by the factory.
This is a limited warranty and is not applicable for products which, in our opinion,
have been damaged, altered, abused, misused, or improperly installed. Audio
Authority makes no other warranties either expressed or implied, including
limitation warranties as to merchantability or fitness for a particular purpose.
Additionally, there are no allowances or credits available for service work or
installation performed in the field by the end user.
7.1 WARRANTY SERVICE PROCEDURES
If you suspect a product defect, contact Audio Authority’s Technical Service
Department at 800-322-8346 or 859-233-4599 for assistance in verifying the
problem. If a defect or potential defect is suspected, a replacement unit will be
shipped immediately on a defect-exchange basis and a Return Authorization
Number will be issued for the return of the defective product. Replacement units
are sent out at the Manufacturer’s Suggested Retail Price which is debited to the
Customer’s Credit Card at the time of shipment. Once we receive the defective
unit back at the factory, it will be evaluated under the conditions of this warranty
and if found to be in-warranty, a full credit will be issued to the Customer’s
Credit Card. Return freight charges for the defective unit are the customer’s
responsibility. Please contact our Technical Support Department for complete
details concerning all in and out of warranty service matters.
We appreciate your confidence in our products and services and will always
strive to meet or exceed your needs.
10
8.0 REGULATORY COMPLIANCE
The 1366 has been tested for compliance with CE and FCC rules and
regulations. The power supply included has been tested for compliance with UL,
CUL, CE, PSE, and GS regulations and guidelines. This product and its power
supply are RoHS compliant.
9.0 CONTACT INFORMATION
If you have questions or require assistance with this product in areas not covered
by this manual, please contact Audio Authority using the information below.
Audio Authority Technical Support
800-322-8346 M-F 8:30 AM to 5:00 PM, EST
International: 859-233-4599 Fax: 859-233-4510
Send email to: support@audioauthority.com
Audio Authority Corporation
2048 Mercer Road
Lexington, Kentucky 40511-1071
USA
11
2048 Mercer Road, Lexington, Kentucky 40511-1071
Phone: 859-233-4599 • Fax: 859-233-4510
Customer Toll-Free USA & Canada: 800-322-8346
www.audioauthority.com
E-086
8/09