Download Delstar DV 5400 User manual

Transcript
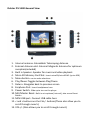
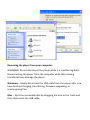
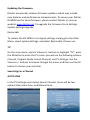
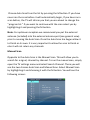
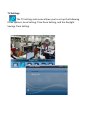
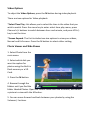
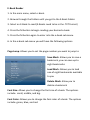
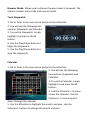
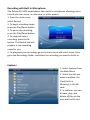
DV 5000 Series User Manual
Delstar DV 5400 Manual
Congratulations on your purchase of a Delstar DS 5400 Series TV/ MEDIA
PLAYER!
The Delstar DV 5400 is a high performance Portable Digital Television with a
fully functional Media Player. The DV 5400 has a dazzling 3.5” color screen
that performs the following capabilities: T.V player, e-book reader, calendar
viewer, picture viewer, Mp3 player, Video Player, Game Player and Built in
Microphone for Voice Recording. Its ATSC digital tuner will allow you to
receive and watch Digital Channels. Additionally, you can use the Micro SD
card slot to expand your storage memory.
Features:
Portable Digital T.V
Video Player
MP3 Music Player
Video Game Player
E-book Reader
Picture Viewer
3.5” LCD Screen
Supports 17 different languages
Voice Recorder via Built in Microphone
Micro SD memory slot (2GB capacity)
USB connection function
Built-in 4GB of internal memory
Built-in Lithium-ion Battery allows up to 4-5 hours of viewing time
Built in extendable digital Antenna
Package Contents:
Delstar DV 5400 TV/Media Player, USB 2.0 Transfer Cable, AC Adaptor,
Earphones, External Magnetic Antenna, and Manual
Delstar DV 5400 General View
1. Internal antenna- Extendable Telescoping Antenna
2. External Antenna slot- External Magnetic Antenna for optimum
reception(included)
3. Built in Speaker- Speaker for music and video playback
4. Micro SD Memory Card Slot- Insert microSD/microSDHC (up to 4GB)
5. Menu button- use to make selections
6. Play/Pause-Toggles between Play/Pause
7. Return- Navigates back to previous screen
8. Earphone Port- Insert headphones here
9. Power Switch- Slide up to turn on the player
10. MIC/Master Reset- Built-in microphone (internal), also use as Reset
Button
11. MINI USB port- Connect USB cable here
12. < and > buttons are the CH+/- buttons(These also allow you to
scroll through menu’s)
13. VOL+/- (Also allows you to scroll through menu’s)
Easy Usage
The DV 5400 is easy to use with three main buttons. You can always
use the Volume +/- button to browse up and down through menus,
and to highlight selections. Use the M button to choose or to make
your selections. Use the Return button to get back to the previous
screen.
Battery
The Delstar DV 5400 TV/Media Player comes with an internal
rechargeable battery. The battery is not user replaceable. Fully charge
the battery before you use the player for the very first time. We
recommend that your initial charge is 10 hours. After your initial chare,
it will only take up to 5 hours to fully charge the DV 5400. You can
charge your player using the USB port on your computer, but we
recommend that you use the ac wall charger (included).
NOTE: ATTEMPTING TO CHANGE THE BATTERY WILL VOID THE WARRANTY
NOTE: Some low-power USB ports may not provide enough power to charge
the DV 5400. If the device does not charge, use a USB port located at the
back of your computer.
Battery Level Indicator
The battery level indicator is located at the top-right corner of the
screen.
Battery Full:
Battery Low:
Charging by AC adaptor
1. Take the supplied USB cable and connect the larger end to the
supplied AC wall adaptor.
2. Take the smaller end of the wire and connect it to your DV 5400 via
the USB port.
3. It will normally take 4-5 hours to achieve a full charge; this will
allow 3-5 hours of constant viewing time.
Charging by Computer
1. Connect the smaller end of the USB cable into the DV 5400.
2. Connect the larger end of the USB cable into an available USB port
on your computer.
3. The computer must be on for the USB port to charge the battery.
Your DV 5400 will show its connection screen The DV 5400 will be
charging while in this mode.
4. To stop recharging, simply disconnect the USB cable.
Main Menu Options
TV- allows you to scan for Digital Signals first, and subsequently watch the
digital stations you have located second.
Music – allows you to browse and listen to music, audio books, and
recordings The Music Menu includes: All Music, Artist, Album, Genre, My
Favorite, Record, Directory, and Update Media Library.
Video – allows you to browse and watch videos.
Photo – allows you to browse and view photos.
Record – allows you to do voice recording using the built-in microphone.
E-Book- allows you to read your electronic books (must be in TXT format)
Tools- allow you to utilize the stopwatch, and the calendar tools.
Game- allows you to play two of the built in games: Slide and Tetris
Explorer- allows you to manage all files stored on either the internal memory
(4GB), or the micro SD card (up to 4GB)
Settings- allows you to manipulate the system settings to your personal
preferences. The Settings menu includes: Display Setting, System Settings,
Desktop wallpaper, Date and Time, Language, System Information, and
Automatic Shut Off Time.
Basic Usage
Power Switch
The power switch, located on the right side of the unit, is used to turn
the player on or off (see general view).
Power On
Slide the Power switch up to turn on the player. The Delstar logo will
be the first thing to appear on the screen. The Main Menu will appear
after it has been booted up, and you will see the TV icon blinking.
Power Off
Slide the Power switch up and hold it for about 2 seconds to turn off
the player.
Reset
To reset your player, use a bent paper clip to push the reset button in;
you should feel it click over. You will see the screen shutoff and reboot.
Connecting the DV 5400 to your Computer to Manage files
1. Connect the larger end of the USB cable into an available USB port on your
computer.
2. Connect the smaller end of the USB cable into the USB port of your player.
3. Your player will show a picture of a computer on the display screen; this
indicates that it is connected to your computer.
4. Your computer will recognize the DV 5400 and display the “removable
disk“popup menu (shown below) asking you what you would like to do with
the drive.
4. You will be able to access the DV 5400 in My Computer as a “Removable
Disk” (shown below). If you have a SD card installed in the DV 5400 then you
will see two “Removable Disk” icons in “My Computer”, one will manage all
the files on the internal memory of the player (4GB), and the other will allow
you to manage all files stored on the external memory of the SD card.
Removing the player from your computer:
WARNING: Do not disconnect the player while it is transferring data!
Disconnecting the player from the computer while data is being
transferred may damage the player.
Windows – Simply disconnect the USB cable from the player after you
have finished charging, transferring, firmware upgrading, or
synchronizing files.
Mac – Eject the removable disk by dragging the icon to the Trash and
then disconnect the USB cable.
Updating the Firmware:
Delstar occasionally releases firmware updates, which may include
new features and performance enhancements. To ensure your Delstar
DV5400 has the latest firmware, please contact Delstar or visit our
website www.delstar.net. To upgrade the Firmware Go to Setting>
System Setting>Upgrade.
Restorable
To restore the DV 5400 to its original settings, simply go to the Main
Menu, select System Settings, and select Restorable. Choose yes.
TV
On the main menu, use the Volume+/- buttons to highlight “TV”, press
the M button to enter the TV menu; you will see the following options:
Channel, Program Guide, Search Channel, and TV Settings. Use the
Volume +/- buttons to browse through the menu, and then use the M
button to choose your selection.
Searching For a Channel
AUTO SCAN
In the TV Settings menu select Search Channel, there will be two
options there Auto Scan, and Manual Scan.
Choose Auto Scan from the list by pressing the M button. If you have
never ran the scan before it will automatically begin, If you have ran a
scan before, the TV will inform you that you are about to change the
“program list.” if you want to continue with the scan select yes by
highlighting it and pressing the M button.
Note: For optimum reception we recommend you put the external
antenna (included) into the external antenna port (see general view)
prior to running the Auto Scan. Once the Auto Scan has begun allow it
to finish on its own. It is very important to allow the scan to finish or
else it will not return any channels.
Manual Scan
Opposite to the Auto Scan is the Manual Scan. This will allow you to
search for a signal, channel by channel. To run the manual scan, simply
open the TV settings menu and select Search Channel. There you will
see the two choices Auto Scan and Manual Scan. Select Manual Scan
by highlighting it and choosing it with the M button. You will see the
following screen:
Once you are at this screen, you can begin scanning manually, channel
by channel. To begin scanning a channel, simply highlight the desired
channel you want to scan and press the M button. The DV 5400 will
begin searching for a signal on that channel; the process will take up to
a minute to complete. If the DV 5400 does locate a signal it will bring
you to the channel list. There you will be able to select the channel to
start viewing. If the DV 5400 does not locate a signal then it will display
a “NO CHANNEL” message. Simply retry if it does fail.
The other TV menu options include:
Channel List
The channel list will allow you to see a list of channels and their
station names. You can use the volume+/- button to browse through
the channel list. To select a channel, simply highlight it and press the M
button.
Electronic Program Guide (EPG)
The EPG displays a detailed Chanel guide that lists all of its Show
Information.
Subtitles
The subtitle option allows you to enable or disable on screen
subtitles. Simply Enable or Disable this feature.
Audio
This feature allows you to see audio information on a certain
channel.
TV Settings
The TV settings sub menu allows you to set up the following
three options: Area Setting, Time Zone Setting, and the Daylight
Savings Time Setting
This chapter shows you how to transfer music files, photos, and
videos from your computer to your Delstar DV 5400.
Loading ContentLoading Music
You can transfer music, videos, and photos from your computer to the
player using the drag-and-drop method.
Drag and Drop (Windows)
1. Connect your Delstar player to your PC.
2. Open Windows Explorer.
3. Double-click on your Delstar DV 5400 player.
4. Double-click on the Internal Memory icon which would be the first
“Removable Disk” icon you see. You will see the following folders:
Music, EBook, Video, Picture, and Record.
Note: Do not delete these folders!
5. Drag and drop music files from your computer to the Delstar 5400
MUSIC folder.
You can also drag and drop files to a microSD™ card inside your player
by going to My Computer > “Removable Disk” (this one usually follows
right after the internal memory “Removable Disk”).
Drag and Drop (Mac)
1. Connect your Delstar DV 5400 player to your MAC computer.
2. Double-click on the “removable disk” icon that appears on your
desktop.
3. Double-click on your Music folder.
4. Drag and drop music files from your computer to the player’s Music
folder.
NOTE: Remember to eject the removable disk before disconnecting
your player.
Playing Content
Playing Music
The Delstar 5400 Media Player supports MP3, WMA, MP2, audio books
and podcasts in WMA and MP3 file formats.
1. Press the Return button to return to the Main Menu.
2. Select Music from the Main Menu.
3. The music options will be: Currently Playing, All Music, Artists,
Albums, Genres, My Favorite, Record (voice), Directory, and Update
Media Library.
4. Highlight and select the desired track to play.
5. Press the channel +, >, button to skip to next song or press-and-hold
it to fast forward.
6. Press the channel-, <, once to return to the beginning of the current
song. Press the channel- button, <, twice to go back to previous song;
or press-and-hold it to rewind.
7. Use the Volume+/- buttons to adjust the volume level during music
playback.
8. Press the M button to view current song’s Lyrics, Equalizer, or
Frequency Chart,
9. The following options are available during music playback by
pressing the M button
Music Options
Repeat Mode
1. Select Repeat from the submenu.
2. Use the Volume+/- buttons to highlight a choice to choose for
repeat mode.
Once: Repeat the track one time.
Repeat: Repeat the current track
All: Repeat all selected tracks
All Repeat: Repeat all tracks
Intro: Plays the first ten seconds of a song.
3. Press the M button to change the Repeat Mode.
Shuffle Mode
1. Select Play Mode from the Music sub menu.
2. Use the volume+ button to choose Shuffle, the other option is “in
order”, which will return the player to its normal track playing mode.
3. Press the M button to select the Shuffle mode.
Music EQ (MSEQ)
1. Select Music EQ (MSEQ) from the music submenu.
2. Use the volume+ button to choose an equalizer mode.
3. Press the M button to make the change.
Equalizer Setup
1. Select EQ Setup from the music submenu.
2. Use the Volume+ button to select one of the following EQ options:
Normal, MSEQ, Rock, Pop, Classic, Bass, Jazz, and User EQ.
3. Press the M button to make your selection.
User EQ setup
1. Select User EQ setup from the Music submenu
2. Use the channel <, and channel> buttons to move between bars,
and use the Volume+/- buttons to set each bar to the setting you
desire.
3. Highlight the “YES” option at the bottom of the screen to set up your
personal EQ.
Display
1. The Display option allows you to control what is being displayed
during music playback.
2. The options are Lyrics, Frequency Chart, and Closed.
3. To make a selection simply highlight it and press the M button to
finish.
Playing music from a microSD™ Card
microSD™ card with content
1. Insert a microSD card with content into the microSD card slot.
2. Select Music.
3. The player will display the message: “Updating Media Library.”
4. Select Artists, Albums, Songs, Genres or Directory to navigate to the
music you wish to listen to.
5. Alternately, from the Music menu, select Directory > SD Card, and
select the filename of the song you want.
Delete Song
1. Select a song to delete by highlighting it.
2. Press the M button, your options will be Delete File or Exit.
3. Press the M button on “Delete File” to delete the file.
Watching Videos
1. From the main menu, select Video.
2. Use the Volume +/- button to highlight folders, and the M button
to open a folder.
3. Highlight the desired video and press the M button to play.
- Press the Play/Pause (see general view) button to pause or resume
video playback.
- Press the channel> or channel< button to skip forward or backward
within the video.
- Press and hold the channel> or channel< to fast forward or rewind
within the video.
- Use the Volume+/- button to adjust volume level.
Video Options
To adjust the Video Options, press the M button during video playback.
There are two options for Video playback:
*Select Time Play: this allows you to select the time in the video that you
wish to watch. Press the menu key to enter select time play menu, press
Channel </> buttons to switch between hour and minute, and press VOL+/key to set the time.
*Screen Expand: The Unit includes two size options to view your videos,
Normal and Full screen. Press the M button to select either setting.
Photo Viewer and Slide Shows
1. Select Photo from the
main menu.
2. Select which disk you
want to explore for
photos using the Built in
flash memory or a SD
Card.
3. Press the M button.
4. Browse through the
folders until you find the
folder labeled Photos. Open the Photos folder with the M button, and select
a picture to view with the M button.
5. You can move forward and back between your photos by using the
Volume+/- buttons.
Slideshow
1. Open the pictures submenu by pressing the M button while you are
viewing a photo.
2. Select Slide show from the submenu by pressing the M button.
3. The slide show feature has the following time options to flip
between photos: 3 sec, 5 sec, 10 sec, 20 sec, and Turn Off.
Other Photo Options:
The other photo options include:
Rotate Right- Allows you to rotate your photo to the right 90 degrees.
Rotate LeftAllows you
to rotate
your photo
to the left
90 degrees.
Zoom inAllows you
to zoom into
a photo.
Zoom outAllows you
to zoom out
of a photo.
E-Book Reader
1. In the main menu, select e-book.
2. Browse through the folders until you get to the E-Book Folder.
3. Select an E-Book to read (E-Books need to be in the .TXT format)
4. Press the M button to begin reading your desired e-book.
5. Press the M button again to enter into the e-book sub menu.
6. In the e-book sub menu you will have the following options:
Page Jump: Allows you to set the page number you want to jump to
Save Mark: Allows you to save a
bookmark, you can save up to
eight bookmarks
Load Mark: Allows you to load
one of eight bookmarks available
to you
Delete Mark: Allow you to
delete a bookmark
Font Size: Allows you to change the font size of a book. The options
include: small, middle, and big.
Font Color: Allows you to change the font color of a book. The options
include: green, blue, and red
Browser Mode: Allows you to choose the way a book is browsed. The
options include: auto mode and manual mode
Tools Stopwatch
1. Go to Tools in the main menu and press the M button.
2. You will see the following two
options: Stopwatch and Calendar.
3. To use the Stopwatch, simply
highlight it and press the M
button.
4. Use the Play/Pause button to
begin the stopwatch.
5. Use the Play/Pause button to
stop the stopwatch.
Calendar
1. Go to Tools in the main menu and press the M button.
2. You will see the following
two options: Stopwatch and
Calendar.
3. To use the Calendar, simply
highlight it and press the M
button.
4. Use the Channel<,> to move
across the calendar. Use the
Volume+/- to move up and
down through the calendar.
5. Use the M button to highlight the month and year. Use the
Volume+/- buttons to change the month and year.
Recording with Built in Microphone
The Delstar DV 5400 media player has a built-in microphone allowing you to
record your own voice, an interview, or other speech.
1. From the main menu,
select Record.
2. To begin recording simply
press the Play/Pause button.
3. To pause the recording,
press the Play/Pause button.
4. To stop and save a
recording, press the M
button. The Record tool will
prepare a new recording
name for you.
5. To play back your recordings go to the main menu and select music, then
go to the Recordings Folder, and select the recording you want to listen to.
Explorer
1. Select Explorer from
the Main Menu.
2. Select the disk you
want to explore: the
Flash (built in
Memory) or the SD
card.
3. In explorer, you can
browse, play, and
delete all files on the
unit and the SD card.
Settings
1. Choose Settings from the Main Menu
2. The settings menu will have the following options for you to set:
Display Setting
Display settings include:
Light Time: Allows you to set how long the backlight is on for
Brightness: Allows you to set the brightness on the unit
Light Mode: Allows you to select the light display mode, it includes two
options: Lighter and Darker
System Setting
System Settings includes:
Upgrade: Allows you to upgrade the current software
Restorable: Allows you to restore the unit to its default settings
Desktop Wallpaper
Desktop Wallpaper includes:
Allows you to choose from 8 different wallpapers
Date and Time
Date and Time includes:
Set Time: Allows you to set your local time
Set Date: Allows you to set your current date
System Information
Allows you to view all system information
Automatic Shutdown Time
Automatic Shutdown Time includes;
Allows you to choose how long the unit is on before it powers off
automatically. The options include: 3min, 5min, 10min, 15min, 20min,
and No Automatic Shutoff
Language
Allows you to set the units primary language, options include: English,
Deutsch, Italian, Japanese, French, Spanish, and Chinese.
Please note, do not attempt firmware update without contacting
Delstar Service & support.
Any firmware update without first contacting Delstar will void the
warranty.
Contact Delstar at 1 800 998 7771
Our address is:
Delstar
1060 N.W. First court
Hallandale, Florida 33009
U.S.A.
Our e-mail is: Delstarswc@aol.com