1
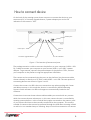
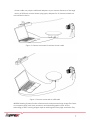
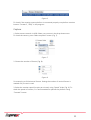
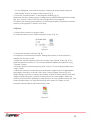
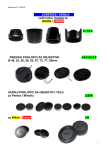
ROTATING SYSTEM T-12, T-20, T-50, T-150 USER MANUAL v. 1.08 released 06.05.2015 Table of contents Introduction to the Rotating System device Device components Technical characteristics Compatibility How to connect device Getting started Installing software Studio lights Use of camera connected via USB Use of camera connected via shutter cable Editing images Rendering 360 photo Exporting 360 photo Calibrating the platform Updating the software Safety instructions 3 4 4 5 6 9 9 9 9 12 14 14 15 16 16 16 2 Introduction to the Rotating System device A 360 degree rotating image is a modern way of merchandising in online stores and catalogs. This technology allows us to show product fully and accurately, giving your customer the opportunity to examine it from all sides. 360° image is obtained by combining a sequence of images into a single movie. INPROX Rotating system is designed to automate the creation of rotating images on the website. The principle of the platform is to create sequenced images of object placed on a rotating platform and edit these images with INPROX Rotating Systems Studio software (the latest version of software and driver can be found on http://www.inprox.eu in “Download“section). Rotating system is designed to be easily used even by non-professional users who do not have any specific photography skills. In order to start working with the system you only need to connect it to a computer and camera, install the software, configure settings and start taking photos. The process of making photos is the same as in a usual product photo-shoot: you have to place the product on the platform, expose lights and configure the camera. The only difference is that instead of making a single image, system takes a specified number of images while rotating the object which is mounted on the platform. The equipment allows the following settings to be configured: 1. The number of shots per turn. 2. The speed of platform rotation. 3. Pause before and after taking a single photo. 4. Calibration of full platform circle. 5. Shutter release options: via remote shutter cable or via USB (for Canon and Nikon cameras). INPROX Rotating Systems Studio software also allows you to upload photos to your PC, edit and export images or video (in JavaScript + HTML5 format) ready to be placed online. 3 Device components 1. Rotating system platform 2. Cable USB A - USB B 3. Cable USB A - mini USB 4. Power adapter 5. Removable platform 1 pc. 1 pc. 1 pc. 1 pc. 1 pc. Technical characteristics Rotating System T-12 T-20 T-50 T-150 Maximum weight of object Platform diameter Rotating system voltage Current 12Kg 280mm 12V 0.4A 20Kg 50Kg 500mm 12-24V 0.8A 150Kg 900mm 24V 2A 400 or 500mm 12V 0.4A 4 Compatibility Camera Remote switch cable control USB cable control CANON EOS 1D / 1D Mark II / 1D Mark II N EOS 1D Mark III / 1D Mark IV EOS 1Ds / 1 Ds Mark II EOS 1Ds Mark III EOS 1D X / 1D C EOS 10D / 20D / 30D EOS 100D / Rebel SL1 EOS 1000D / 1100D / 1200D / Rebel XS / T3 / T5 EOS 300D / Rebel EOS 350D / Rebel XT EOS 40D / 50D / 60D / 70D EOS 400D / Rebel XTi EOS 450D / Rebel XSi EOS 5D EOS 5D Mark II / 5D Mark III EOS 500D / 550D / Rebel T1i / T2i EOS 6D EOS 600D / 650 D / Rebel T3i / T4i EOS 700D/ Rebel T5i EOS 7D, 7D Mark II EOS D30 / D60 EOS M YES YES YES YES YES YES YES YES YES YES YES YES YES YES YES YES YES YES YES YES YES YES NO YES NO YES YES NO YES YES NO NO YES YES YES NO YES YES YES YES YES YES NO YES YES YES YES YES YES YES YES YES YES YES NO YES YES YES YES YES YES YES YES YES* YES* YES** YES YES** YES YES** YES** YES YES YES** YES YES YES YES* YES** YES** YES YES YES* YES NO NO NIKON Nikon D2x Nikon D200 Nikon D3s Nikon D3x Nikon D300 Nikon D300s Nikon D3000 Nikon D3100 Nikon D3200 Nikon D4 Nikon D40 Nikon D50 / D60 Nikon D5000 / D5100 / D5200 Nikon D600 Nikon D70 / D70s / D80 Nikon D700 Nikon D7000 Nikon D800 / D800e Nikon D90 Other Sony Alpha Pentax DSLR * Compatibility with some restrictions (automatic upload directly to RS Studio software may not work properly or other restrictions). ** Testing for restrictions is needed. 5 How to connect device On the back of the rotating system there are ports to connect the device to your camera and PC, a firmware upgrade button, a power adapter port and a LED indicating if the system is “ON”. PC port Power port Camera port Firmware upgrade button LED indicator Figure 1. The location of buttons and ports The package contains a cable to connect the platform to your computer (USB A - USB B), a cable to connect your computer to your camera (USB A - mini USB), a power adapter. To get started, connect the power adapter to the platform. Then, connect your computer to the platform using the appropriate USB cables. The camera can be connected using the port on the platform (via the remote cable shutter release) or directly to a PC with a cable USB A - mini USB. The two options of connecting devices are shown in Figure 2 and 3. Connect the camera via USB is the most convenient way when working with Canon and Nikon cameras. In this mode the shutter is controlled by INPROX Rotating Systems Studio software via USB and images are automatically loaded on the software. Connection via remote shutter release cable enables you to work with any camera which has remote shutter release port. In this case, camera shutter is controlled by rotating system platform. In this mode all the images are stored on the memory card of your camera and have to be manually transferred to the computer. This mode is suitable for cameras that cannot be operated through the USB when shooting in RAW as well as in non-standard ways of shooting. Keep in mind that connection via remote 6 shutter cable may require additional adapters to your camera. Because of the large variety of different remote shutter plug types, adapters for all camera models are not included in the kit. Figure 2. Camera connected via release shutter cable Figure 3. Camera connected via USB cable INPROX Rotating Systems Studio software works and processes large image files faster on computers with multi-core processors and advanced graphic cards. As the technology of 360° rotating images requires working with many high-resolution files, 7 for a comfortable work it is highly recommended to use modern computers with sufficient RAM (read always memory). Attention! We do not guarantee that the equipment will work properly on nonlicensed operating systems. Attention! Direct download of images from your camera to software via USB cable requires using the computer with Microsoft Windows 7 (or higher) operating system. Working with other Windows versions can be unstable or impossible (depending on the camera driver’s support, etc.). Please note that the platform only rotates in one direction. This allows you to avoid any positioning error that can occur if opposite direction of the platform rotation is used. 8 Getting started To start working: 1. Plug the unit into an electrical outlet; connect the device to your PC using the included USB cable. 2. Connect the camera via the remote shutter cable (Fig. 2) or via USB (Fig. 3). Installing software 1. Download the latest version of drivers and software from http://www.inprox.eu found in “Download“ section. 2. Install Driver “INPROX_Rotating_Systems_Driver.exe”. 3. Install INPROX Rotating Systems Studio by double clicking on the file “setup.exe” found in “INPROX_RotatingSystemsStudio_XX_Setup” folder. Studio lights When choosing lighting for any model of INPROX Rotating System, please consider: the dimension of the object (the light should uniformly cover the whole object); the material of the object (some materials have a limited time of being exposed in high temperatures which should be taken into account if halogen lamps or similar light sources are used); the maximum speed of the platform rotation (built-in, external compact or studio flashlights have various recharge times); construction of camera (some models have limitations on shutter synchronization with studio flashlights). Use of camera connected via USB Getting ready 1. Turn the camera on and get ready to start taking photos: Set up studio lighting; Turn off the auto focus (“AF”) on the lens or the camera; Select the manual mode (“M”) and adjust the exposure according to your working conditions; Disable the auto power down mode of the camera (optional); Select JPG or RAW image format NOTE: RAW is currently compatible with limited camera models, but new 9 models are being added with new versions of software. Please check manually if our software is already compatible with RAW image format of your camera; Make sure that mass storage mode of the camera is turned off. 2. Turn on the rotating system platform; wait until the device is recognized by the computer. 3. Run the program (Start-> All Programs-> Inprox-> Inprox RS Studio). 4. In the dialog box, name the new project, choose the project folder and press “New Project” button to create a new project (Fig. 4). Figure 4. 5. Press the “Connect devices” in the program window (Fig. 5). Figure 5. Make sure that the rotating system and the camera are recognized by INPROX Rotating Systems Studio (Fig. 6). If a crane is used, it also has to be recognized by the program. 10 Figure 6. To check if the rotating system platform is connected properly use platform rotation buttons “Forward”, “Stop” in the program. Capture 1. Select camera control via USB. Select your camera in the drop-down menu. To check the camera, press “Make snapshot” button (Fig. 7). Figure 7. 2. Choose the number of frames (Fig. 8). Figure 8. For example, set 24 horizontal frames. Setting the number of vertical frames is needed only if crane is used. 3. Select the rotation speed (in spins per minute) using “Speed” slider (Fig. 9). To check the speed of rotation, it is recommended to operate the platform using “Forward” button 11 Figure 9. 4. Start the process of shooting using “Start” button. To stop making images, press “Stop” button. 5. When camera is connected via USB, software automatically loads photos for editing (Fig. 10). Figure 10. Use of camera connected via shutter cable Getting ready 1. Turn the camera on and get ready to start taking photos: Set up studio lighting; Turn off the auto focus (“AF”) on the lens or the camera; Select the manual mode (“M”) and adjust the exposure according to your working conditions; Disable the auto power down mode of the camera (optional); Select image format: JPG or RAW; 2. Turn on the rotating system platform; wait until the device is recognized by the computer. 3. Run the program (Start-> All Programs-> Inprox-> Inprox RS Studio). 12 4. In the dialog box, name the new project, choose the project folder and press “New Project” button to create a new project (Fig. 4). 5. Press the “Connect devices” in the program window (Fig. 5). Make sure that the rotating system is recognized by INPROX Rotating Systems Studio (Fig. 6). If a crane is used, it also has to be recognized by the program. To check if the rotating system platform is connected properly use platform rotation buttons in the program “Forward” and “Stop”. Capture 1. Select camera control via shutter cable. To check the camera, press “Make snapshot” button (Fig. 11). Figure 11. 2. Choose the number of frames (Fig. 8). For example, set 36 horizontal frames. Setting the number of vertical frames is needed only if crane is used. 3. Select the rotation speed (in spins per minute) using “Speed” slider (Fig. 9). To check the speed of rotation, it’s it is recommended to operate the platform using “Forward” button. 4. Start the process of shooting using “Start” button. To stop making images, press “Stop” button. 5. When the camera is connected via shutter cable, images have to be uploaded to the program manually: in the tab “Edit” press “Import images” button (Fig. 12). Before doing it you have to connect the camera via USB (or insert memory card with images into the computer’s internal or external memory card reader). When the camera is connected via USB keep in mind that you can only add files one by one. The most convenient way is to copy the files from the camera to a folder on your computer and afterwards upload them all at once. Figure 12. 13 Editing images After uploading pictures to the program you have to edit images (if it has not been already done with “Photoshop” or other editor.) 1. Click to select a photo for editing. 2. For example, edit the framing of the image: Click the “Crop” button (Fig. 13). Figure 13. Select the crop ratio and other adjustments (Fig. 14) Figure 14. Select the area of the image. Apply or cancel the action. 3. After editing the selected image, click “Apply to all” to apply changes to all images of the project. 4. If you are not satisfied with the results, click the “Restore all” (Fig. 15). Figure 15. 5. Adjust levels, brightness, contrast, add watermark and choose it’s transparency, if needed. Rendering 360 photo 1. Make sure that at least one image is selected (this is required for the correct proportions determination of the exported photo). 14 2. Set the desired resolution of 360 photo in “Base resolution” (Fig. 16). 3. Set the resolution of the function “Zoom resolution”. Please note that large resolution of the 360 photo will increase the file size (it will increase size of website used memory on server, server traffic and loading time for user). When a user chooses to zoom in, website only loads the image from which perspective the item is being seen at that moment. Figure 16. 4. Select a file type for storing still images (JPG or PNG are recommended) (Fig. 17). 5. Set the image quality (set it to a minimum level only if you are sure that the image quality is good enough). Recommended quality is not higher than 90%. Figure 17. 6. After setting all required settings, click “Render Images” to make images of required format and resolution. Exporting 360 photo 1. Go to the “Script” section (Fig. 18) 2. Choose the right number of frames used in the capture program. 3. Set the project’s rotation and braking speeds, direction of rotation, output script type. 4. Choose between additional features as inverting control, automatic start when webpage is loaded or loading the project only after picture is clicked, etc. 5. Check the result by clicking “Open in Browser” button Figure 18. 15 6. All files of working 360 photo, including JavaScript files, stylesheets, image files and button files are stored in the “Output” folder found in your current project folder. Calibrating the platform In the “Options” section (Fig. 19) the user can calibrate the full circle of the platform. For example: if platforms of different sizes are used or big weight products are photographed the circle of the platform can become shorter or longer). Figure 19. 1. Press “Calibration wizard” button and follow the instructions of the setup. 2. If you are not satisfied with the calibration result, you can restore the platform to factory condition by pressing “Restore default calibration” button. Updating the software The updates are automatically offered when the software is opened, but there is also an “Update application” button in the options menu to check if update is available. Safety Instructions For a safe and reliable operation of the rotating system, follow these rules: 1. Do not use device with other power adapters. 2. Do not attempt to open or repair the device. 3. Never rotate or stop the platform manually as this may cause damage to the rotary engine. 4. Do not use the rotating platform to make photos of objects whose weight exceeds the maximum load specifications. 5. It is not recommended to use the device to capture objects with much larger dimensions than the size of the platform. To capture such items, use larger model of Rotating System. 6. It is recommended to reduce the rotating speed if you are photographing heavy objects which might be affected by inertia. 16