1
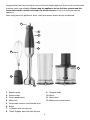
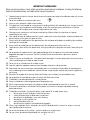
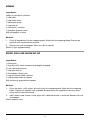
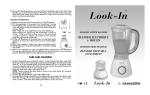
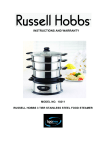
RHHB50_IB_RB_FA_020715
ASTON HAND BLENDER
2 YEAR WARRANTY
RHHB50
INSTRUCTIONS & WARRANTY
Spectrum Brands Australia Pty Ltd
Locked Bag 3004 Braeside
Victoria 3195 Australia
Spectrum Brands New Zealand Ltd
PO Box 9817 Newmarket
Auckland 1149 New Zealand
Customer Service in Australia
TollFree: 1800 623 118
Email: info@spectrumbrands.com.au
Website: www.spectrumbrands.com.au
Customer Service in New Zealand
TollFree: 0800 736 776
Email: service@spectrumbrands.co.nz
Website: www.spectrumbrands.co.nz
Spectrum Brands Australia Pty Ltd and Spectrum Brands New Zealand Ltd
Warranty Against Defects
W
0911
In this warranty:
Australian Consumer Law means the Australian consumer law set out in Schedule 2 to the
Competition and Consumer Act 2010;
CGA means the New Zealand Consumer Guarantees Act 1993;
Goods means the product or equipment which was accompanied by this warranty and
purchased in Australia or New Zealand, as the case may be;
Manufacturer, We or us means:
1. for Goods purchased in Australia, Spectrum Brands Australia Pty Ltd ABN, 78 007 070 573;
or
2. for Goods purchased in New Zealand, Spectrum Brands New Zealand Ltd, as the case
may be, contact details as set out at the end of this warranty;
Supplier means the authorised distributor or retailer of the Goods that sold you the Goods in
Australia or in New Zealand; and
You means you, the original end-user purchaser of the Goods.
1. Our goods come with guarantees that cannot be excluded under the Australian Consumer
Law, or the CGA. You are entitled to a replacement or refund for a major failure and
compensation for any other reasonably foreseeable loss or damage. You are also entitled
to have the goods repaired or replaced if the goods fail to be of acceptable quality and the
failure does not amount to a major failure.
2. The benefits provided by this Warranty are in addition to all other rights and remedies in
respect of the Goods which the consumer has under either the Australian Consumer Law
or the CGA. The original purchaser of the Goods is provided with the following Warranty
subject to the Warranty Conditions:
3. We warrant the Goods for all parts defective in workmanship or materials from the date
of purchase (Warranty Period), for the period of 2 years from the date of purchase
(Warranty Period).
If the Goods prove defective within the Warranty Period by reason of improper workmanship
or material, we may, at our own discretion, repair or replace the Goods without charge.
2
Warranty Conditions
4. The Goods must be used in accordance with the manufacturer’s instructions. This
Warranty does not apply should the defect in or failure of the Goods be attributable
to misuse, abuse, accident or non-observance of manufacturer’s instructions on the
part of the user. As far as the law permits, the manufacturer does not accept liability
for any direct or consequential loss, damage or other expense caused by or arising
out of any failure to use the Goods in accordance with the manufacturer’s instructions.
5. Exhaustible components (such as batteries, filters and brushes) of the Goods are
included under this Warranty only where there is a defect in workmanship or materials
used.
6. The warranty granted under clause 3 is limited to repair or replacement only.
7. Any parts of the Goods replaced during repairs or any product replaced remain the
property of the manufacturer. In the event of the Goods being replaced during the
Warranty Period, the warranty on the replacement Goods will expire on the same
date as for the Warranty Period on the original Goods which are replaced.
8. In order to claim under the warranty granted under clause 3 you must:
(a) Retain this warranty with your receipt/proof of purchase; and
(b) Return the Goods to us at the relevant address or to the Supplier by prepaid
freight within the Warranty Period accompanied with (i) the legible and unmodified
original proof of purchase, which clearly indicates the name and address of the
Supplier, the date and place of purchase, the product name or other product serial
number and (ii) this warranty.
9. This warranty is immediately void if:
(a) Any serial number or appliance plate is removed or defaced;
(b) The Goods have been serviced or otherwise repaired by a person not authorised
to do so by us or where non approved replaced parts are used.
10. The Goods are designed for domestic use only. A limited 90-day Warranty applies to
any industrial or commercial use of the Goods. The Goods must be connected to the
electrical voltage requirements as specified in the ratings label located on the Goods.
11. This warranty does not cover the cost of claiming under the warranty or transport
of the Goods to and from the Supplier or us.
12. This warranty is only valid and enforceable in Australia against Spectrum Brands
Australia Pty Ltd and in New Zealand against Spectrum Brands New Zealand Ltd.
Contact us or the Supplier for further details.
Register your product online
If you live in Australia please visit: www.spectrumbrands.com.au/warranty
If you live in New Zealand Please visit: www.spectrumbrands.co.nz/warranty
Registration of your warranty is not compulsory, it gives us a record of your purchase
AND entitles you to receive these benefits: Product information; Hints and tips; Recipes
and news; Information on special price offers and promotions.
Any questions? Please contact Customer Service for advice.
3
Congratulations on the purchase of your new Russell Hobbs appliance. Each unit is manufactured
to ensure safety and reliability. Before using the appliance for the first time, please read this
instruction booklet carefully and keep it for future reference. Pass it on if you pass on the
appliance.
When using electrical appliances, basic safety precautions should always be followed.
1
2
3
4
5
10
8
11
6
12
7
9
1. Speed control
9. Chopper blade
2. Power button
10.Whisk
3. Turbo speed button
11.Whisk drive
4. Motor unit
12.Blade cover (not pictured)
5. Detachable stainless steel blender shaft
6. Blade
7. 1L Beaker with non-slip mat
8. 750ml Chopper bowl with non-slip mat
4
BEFORE FIRST USE
CAUTION: Always turn off and unplug from the wall power outlet before fitting or removing
attachments.
• Carefully remove all contents from the box.
• Take extreme care when unpacking and handling the sharp blades.
• As some parts may be packed separately, check to ensure all items have been unpacked
before disposing of the packaging.
• Dismantle and clean all parts as instructed in the CARE AND CLEANING section of this
manual.
• Insert the metal whisk into the hole on the bottom of the whisk drive which is attached to the
motor unit. Rotate in a an anti-clockwise direction to unlock the whisk attachment from the
motor unit.
CAUTION: Handle blades carefully.
FEATURES
• Variable speed control. Allows the optimum speed to be used for various food processing
tasks.
• Power button. Pressing the ( • ) button will operate the hand blender at the speed selected
on the variable speed control dial.
• Turbo speed button ( •• ) provides an extra boost of power.
• High powered 900 Watt motor for the most demanding blending tasks.
• Unique blade design with vertical teeth for optimal blending. Crushes ice in seconds.
• 1L beaker with non-slip mat.
• 750ml Chopper with non-slip mat. Bowl conveniently attaches to the hand blender motor
unit to chop a variety of food including meats, vegetables, nuts and herbs.
• Whisk attachment. Ideal for beating egg whites and mixing light batters.
USING THE HAND BLENDER OR WHISK
CAUTION: Always turn off and unplug from the wall power outlet before fitting or removing
attachments.
CAUTION: DO NOT handle by the blade. The blade attachments are very sharp. Use
caution when handling and storing. Always remove the blade cover before blending.
IMPORTANT: Ensure that the hand blender is unplugged from the power outlet before
assembling or removing attachments.
• Fit the motor unit to the blender shaft or whisk attachment by aligning the motor unit arrow
(d)above the unlock symbol (U) on the attachment. Then rotate in a clockwise direction
towards the lock symbol (L) until the motor unit locks into place.
• Insert the plug into a wall power outlet and switch the outlet on.
NOTE: To avoid splashing, place the blender shaft into your ingredients before operating the
blender.
• With a firm grip on the blender, select the optimal speed for the processing task, by turning
the speed control dial. The small dot on the speed control dial is the slowest and big dot is
the fastest. Refer to the "SPEED SELECTION" section on page 7 of this manual.
• Then lower the hand blender into the food and depress the power button ( • ).
5
NOTE: All hand blenders are designed to operate only when the power buttons remain depressed.
• For an extra boost of power during operation, the turbo speed button ( •• ) may be
depressed.
NOTE: The power button ( • ) should be released when selecting turbo speed.
• To stop the hand blender, take your finger off the power button or the turbo speed button.
• To detach the shaft, rotate it counterclockwise , so the arrow symbol on the motor unit (d)
is moved towards the unlock (U) position on the attachment and the two pieces separate.
IMPORTANT: Do not run the motor longer than 2 minutes. Switch off if you feel the hand
blender motor surface becoming hot.
CAUTION: For your safety, do not blend liquids/foods that are hotter than 40°C.
USING THE CHOPPER BOWL
The chopper bowl is ideal for chopping parsley, onions, nuts, bread crumbs, biscuits, baby
food, etc.
CAUTION: Always turn off and unplug from the wall power outlet before fitting or removing
attachments.
CAUTION: DO NOT handle by the blade. The blade attachments are very sharp. Use
caution when handling and storing.
• Place the chopper bowl on a clean, level surface, ensuring the non-slip mat is attached to
the base.
• Fit the stainless steel chopping blade into the chopper bowl.
• Place food into the chopper bowl. Do not blend hard substances and cut large pieces of
food into manageable sized pieces no larger than 4cm-5cm.
• Insert the motor unit into the chopper bowl lid, aligning the motor unit arrow (d) above the
unlock symbol (U) on the chopper bowl lid. Then rotate in a clockwise direction towards the
lock symbol (L) until the motor unit locks into place.
• Attach the lid onto the chopping bowl.
• Insert the plug into a wall power outlet and switch the outlet on.
• Select the optimal speed for the processing task by turning the speed control dial and then
depressing the power button ( • ). The small dot on the speed control dial is the slowest and
big dot is the fastest. Refer to the "SPEED SELECTION" section of this manual. Hold the
bowl with one hand while operating the power button with the other.
• For an extra boost of power during operation, the turbo speed button ( •• ) may be
depressed.
NOTE: The power button ( • ) should be released when selecting the turbo speed button ( •• ).
• To stop the hand blender, take your finger off the power button or turbo speed button.
• After use, switch off the wall power outlet and remove the plug from the socket.
• To detach the motor unit from the chopping bowl attachment, rotate it counterclockwise ,
so the arrow symbol on the motor unit (d) is moved towards the unlock (U) position on the
attachment and the two pieces separate.
• To remove the chopper lid lift it from the chopper bowl.
CAUTION: For your safety, do not blend liquids/foods that are hotter than 40°C.
IMPORTANT: Do not run the motor longer than 2 minutes. Switch off if you feel the hand
blender motor surface becoming hot.
6
SPEED SELECTION GUIDE
Suggested
setting
Suggested
processing
procedure
Attachment
Processing task
Food
Blender shaft with beaker
Aerating
Milkshakes,
smoothies,
cocktail, fruit
frappes
2-12
Use chilled milk,
blend until desired
consistency is
achieved.
Pureeing
Soups, sauces,
dips, baby food
2-12
Blend until smooth.
Ice crushing
Cocktails, cold
drinks
2-12
Use small size ice
cubes and add 1/4
cup of water.
Emulsifying
Salad dressing
1-7
Blend until well
combined.
Mincing
Red meat,
chicken fillets,
fish fillets,
prawns
2-12
Use the chopping
blade.
Chopping
Herbs, nuts,
olives, fruits,
vegetables
2-12
Process 1/2 cup at a
time to ensure evenly
sized pieces.
Crumbing
Breadcrumbs,
biscuit crumbs
1-10
Tear bread roughly,
process until desired
consistency. Break
biscuit into pieces
and process until
crumbed.
Whisking
Cream, egg
whites, light
batters
2-12
Lower whisk into food
and whisk to desired
consistency. Use a
large vessel to avoid
spillage.
Chopper bowl
Whisk
7
Cut meat into pieces
no larger than 4cm5cm.
CARE AND CLEANING
Care should be taken when handling and cleaning sharp cutting blades of the blender
shaft blade and chopper blade.
CAUTION: Always switch off and disconnect the appliance from the wall power outlet and
remove any attachments before cleaning.
NOTE: DO NOT immerse, that is, soak the motor unit of the hand blender in water because
overtime the lubrication on the bearings can wash away.
• Take great care to avoid personal injury when handling the blades as they are very sharp.
• Do not immerse the motor unit in water or place in the dishwasher. Wipe over with a soft
damp cloth only.
• Wash the detachable blender shaft under running water, without use of abrasive
detergents.
• When you have finished cleaning the detachable blender shaft, place it upright so that any
water which may have got in, can drain out.
• To clean attachments including the lid, the chopping bowl and blade, and the whisk
attachment wipe with warm soapy water.
• Do not immerse the whisk drive, chopper bowl lid in water or place in the dishwasher. Wipe
over with a damp cloth and warm soapy water. Try to keep them dry, as water may become
trapped in the gearboxes of the whisk drive and chopper lid.
• Clean the blade end of the blender shaft in hot soapy water, with a nylon brush.
• Rinse thoroughly and ensure all items are completely dry before storing.
• Do not use alkaline cleaning agents or harsh abrasives when cleaning this appliance.
IMPORTANT: Blades are extremely sharp, handle with care.
For a quick wash up between processing tasks, hold the hand blender in the beaker half
filled with water and depress the power button for a few seconds.
IMPORTANT: Ensure that the motor unit is not immersed in water or any other liquid.
8
IMPORTANT SAFEGUARDS
When using this appliance, basic safety precautions should always be followed, including the following:
Read all instructions before, and follow whilst using this appliance.
1. To protect against electrical hazards, do not immerse the power cord, plug or hand blender motor unit in water
or any other liquid.
2. Do not use outdoors or in damp or moist areas.
3. Always use the appliance handles when handling.
4. This appliance is not intended for use by persons (including children) with reduced physical, sensory or mental
capabilities, or lack of experience and knowledge, unless they have been given supervision or instruction
concerning use of the appliance by a person responsible for their safety.
5. Cleaning or user maintenance shall not be carried out by children without the supervision of a person
responsible for their safety.
6. Care should be taken to avoid personal injury when handling the sharp cutting blades, emptying the bowl and
during cleaning. Use a glove or a towel for safety.
7. Always switch off and disconnect the appliance from the wall power outlet before assembling, disassembling,
cleaning or left unattended.
8. Always switch off and disconnect the appliance from the wall power outlet when not in use.
9. To disconnect, switch off the wall power outlet, then grasp and pull the plug from wall outlet. Never pull by the
cord.
10. Do not operate this appliance with a damaged cord/plug or after the appliance has malfunctioned, been
dropped or damaged in any manner. Contact Customer Service for examination, adjustment, repair or
replacement.
11. There are no user serviceable parts. If the power cord is damaged, it must be replaced by the manufacturer or
similarly qualified person in order to avoid a hazard.
12. Do not use on an inclined plane or unstable surface.
13. Keep the appliance and power cord away from the edges of benches and countertops.
14. Keep hands and utensils away from moving blades when in use to prevent the possibility of severe personal
injury and damage to the hand blender. A plastic/silicone scraper may be used, but only when the appliance is
not running.
15. Be certain the chopper lid is securely fitted and all fittings such as blades are secure before using.
16. Do not operate the hand blender motor unit without the attachments fitted.
17. The blender is not to be operated with an empty beaker.
18. Always cut food items into manageable pieces before processing.
19. When using extremely heavy loads, the appliance should not be operated for more than 4 seconds.
20. Ensure the hand blender is switched off and the blades have come to a complete stop before removing
processed contents.
21. The blender shaft blade is sharp and it rotates at high speed. So, to avoid serious injury:
a. do not switch on until the blade is inside the container
b. switch off before lifting the blade from the container
c. do not touch the blade edge – even when cleaning
d. do not plug in until just before use
e. unplug immediately after use
f.
do not leave the appliance unattended while plugged in
22. When using the blender shaft in hot liquids, do not let the blade break the surface at an angle, in case you
spray liquid outside the container.
23. Do not use the blender shaft in hot oil – splashes could cause a serious burn.
24. For your safety, do not blend liquids/foods that are hotter than 40°C.
9
25. Ensure the hand blender is switched off and the blades have come to a complete stop before removing processed
contents.
26. Do not overfill the mixing/processing containers.
27. Do not place on or near any heat sources.
28. CAUTION: The blades are extremely sharp. Handle with care.
29. Store the blades in a safe location out of reach of children or persons with disabilities.
30. Follow the instructions when cleaning this appliance.
31. Do not use alkaline cleaning agents or harsh abrasives when cleaning this appliance.
32. Always thoroughly clean the appliance after each use.
33. Do not use the appliance for other than its intended purpose.
34. Misuse of the appliance may cause injury.
35. This appliance is not a toy. Children shall be supervised to ensure they do not play with this appliance.
36. This appliance is not intended to be operated by means of an external timer or separate remote control system.
37. For added safety, electrical appliances should be connected to a power outlet that is protected by a residual current
device (RCD), also often referred to as a ‘Safety Switch’. Your switchboard may already incorporate an RCD. If
unsure, call an electrician for verification and fitting if necessary.
38. This appliance is intended to be used in household and similar applications such as:
Staff kitchen areas in shops, offices and other working environments;
-
Farm houses;
-
By clients in hotels, motels, and other residential type environments;
-
Bed & breakfast type environments.
-
SAVE THESE INSTRUCTIONS.
RHHB50_RB_FA_020715
RECIPES
ASTON HAND BLENDER
2 YEAR WARRANTY
RHHB50
RECIPES
SPICY MEXICAN MARINADE
Preparation Time: 5 minutes
Ingredients:
½ cup extra virgin olive oil
1 brown onion
4 cloves garlic
2 tablespoons tomato paste
2 tablespoons coriander leaves
20ml soy sauce
2 chillies, de-seeded, chopped
½ cup orange juice
25ml white wine vinegar
1 teaspoon dried oregano
30g brown sugar
1 teaspoon Worcestershire sauce
1 lime, zest and juice
Method:
1. Place all marinade ingredients in the beaker. Pulse to combine. Blend on speed 3 for 20
seconds. Great for chicken, beef, pork or lamb. Simply marinate meat overnight before
barbecuing.
2
HUMMUS
Ingredients:
420g can chickpeas, drained
¼ cup tahini
¼ cup lemon juice
1 tablespoon water
¼ cup olive oil
1 clove garlic, crushed
½ teaspoon ground cumin
Salt and pepper, to taste
Method:
1. Place all ingredients into the chopping bowl fitted with the chopping blade. Process on
speed 9 until combined and smooth.
2. Season with salt and pepper. Serve as a dip or spread.
Makes 2 cups (approximately)
ROCKET, CHILLI AND CASHEW NUT DIP
Ingredients:
1 clove garlic
1 large red chilli, seeds removed and roughly chopped
3 cups wild rocket leaves
½ cup light olive oil
2-3 teaspoons lemon juice
⅔ cup unsalted toasted cashews
½ cup grated parmesan cheese
Salt and freshly ground black pepper
Method:
1. Place the garlic, chilli, rocket, oil and juice in the chopping bowl fitted with the chopping
blade. Process on speed 3 until chopped. Scrape down any ingredients that may have
come up the sides of the bowl.
2. Add cashews and cheese. Pulse again until a desired texture is achieved. Season with salt
and pepper.
Makes about 2 cups
3
CHOCOLATE CHERRY RIPE MOUSSE
Ingredients:
300ml thickened cream
3 eggs, separated
200g dark chocolate, chopped
30g butter, softened
80g cherry ripe, finely chopped
Method:
1. Using the whisk attachment, whip cream on speed 12 until soft peaks form. Wash and dry
whisk attachment.
2. Using the whisk attachment, whip egg whites on speed 12 until soft peaks form.
3. Place chocolate in a microwave-safe bowl. Microwave on medium power (50%) for 1
minute; stir. Repeat process in 30 second intervals until melted. Add butter and stir until
melted. Stir in egg yolks.
4. Fold through cream and egg whites in 2 batches. Fold through cherry ripe. Spoon into
serving glasses. Refrigerate until firm.
Serves 6
BUTTERMILK PIKELETS
Ingredients:
1 cup self raising flour
Pinch of salt
½ teaspoon bicarbonate soda
¼ cup caster sugar
1 egg, lightly beaten
½ cup buttermilk
40g butter, melted
Jam and whipped cream, to serve
Method:
1. Sift dry ingredients into a bowl. Add sugar, egg, buttermilk and butter; using the whisk
attachment, whisk until thoroughly combined.
2. Heat non-stick frying pan over a medium heat.
3. Add heaped spoonfuls of batter to a frying pan and cook on both sides until golden.
4. Serve warm with jam and whipped cream.
Serves 6
4
PIZZA DOUGH
Ingredients:
2 teaspoons (7g) dry yeast
1 teaspoon sugar
¾ cup warm water
2 tablespoons olive oil
2 cups plain flour
½ teaspoon salt
Method:
1. Combine yeast, sugar and warm water in a bowl. Stir to combine. Cover mixture and stand
in a warm place for 5 minutes until frothy; add oil.
2. Using the chopping bowl fitted with the chopping blade, process flour, salt and yeast
mixture on speed 1 until mixture forms a dough (about 10-15 seconds).
3. Remove blade. Turn dough onto a floured surface and knead for about 8-10 minutes or
until the dough is firm and elastic. Place dough in a lightly greased bowl. Cover with plastic
wrap and allow to rest in a warm place for 20-30 minutes or until dough has doubled in
size.
4. Meanwhile, preheat oven to 240°C (220°C fan-forced)
5. Using your fist, punch down dough, fold sides to centre and turn dough over. Place dough
onto a floured surface and lightly knead until smooth.
6. For a thin pizza crust: Halve dough. Roll dough out to about a 4-5mm thickness and place
onto 2 oiled pizza trays. For a thick pizza crust: Press dough onto an oiled pizza tray and
allow to rest in a warm place until dough has risen again.
7. Spread with pizza sauce and assorted toppings.
8. Bake for 10-15 minutes or until crisp.
Makes 2 thin pizzas or 1 thick pizza
5
CHOCOLATE CHIP COOKIES
Ingredients:
125g butter, softened
½ cup brown sugar, lightly packed
½ cup caster sugar
½ teaspoon vanilla essence
1 egg
1¾ cups self-raising flour
¼ teaspoon salt
1 cup chocolate chips
Method:
1. Preheat oven to 180°C (160°C fan-forced). Grease and line two baking trays.
2. Using the chopping bowl fitted with the chopping blade, process butter, sugars and vanilla
essence on speed 6 until well combined.
3. Remove the chopping bowl lid and scrape the sides of the bowl.
4. Add egg and continue to process on speed 6 for 5 seconds. Once again remove the
chopping bowl lid and scrape the sides of the bowl.
5. Add flour and salt and process until combined. Transfer mixture to a bowl. Fold through
chocolate chips. Roll mixture into small balls.
6. Place on baking trays, allowing room for spreading. Flatten balls slightly with a fork. Bake
for 12-15 minutes or until golden. Allow to cool on trays.
Makes 25
SHORTCRUST PASTRY
Ingredients:
1½ cups plain flour
125g butter, chilled, cubed
1 egg, whisked
2-3 tablespoons chilled water
Method:
1. Place flour and butter in the chopping bowl fitted with the chopping blade and process
until mixture resembles breadcrumbs. Add egg and 2 tablespoons water. Process until
pastry comes together in a ball.
2. Turn pastry onto a lightly floured surface and knead gently. Wrap in baking paper.
Refrigerate for 15 minutes or until firm.
6
FRESH TOMATO SOUP
Ingredients:
1 tablespoon butter
2 cloves garlic, crushed
2 onions, chopped
8 large tomatoes, peeled and quartered
⅓ cup tomatoes paste
4 cups chicken stock
2 tablespoons Worcestershire sauce
1 tablespoon sugar
2 teaspoons fresh chopped oregano
¼ cup cream
Salt and pepper, to taste
Method:
1. Melt butter in a large saucepan. Add garlic and onions; stir over low heat until tender.
2. Using the chopping bowl fitted with the chopping blade, process tomatoes in batches until
smooth. Add tomatoes to saucepan.
3. Add remaining ingredients except cream. Bring to boil. Reduce heat and simmer for 10
minutes. Remove from heat. Cool to 40°C.
4. Using the stainless steel shaft attachment, blend soup until smooth, using a gentle up and
down action.
5. Stir through cream and season with salt and pepper. Reheat over low heat.
Serves 6
7
PUMPKIN SOUP
Ingredients:
1kg butternut pumpkin, chopped
1 onion, chopped
1 litre chicken stock
⅓ cup cream or sour cream to serve (optional)
Salt and pepper, to taste
Method:
1. Place pumpkin, onion and stock in a large saucepan. Bring to boil; reduce heat and simmer
until pumpkin is soft. Cool slightly.
2. Using the stainless steel shaft attachment, blend soup until smooth, using a gentle up and
down action.
3. Stir through cream and season with salt and pepper. Reheat over low heat if necessary.
Serves 4
HERB AND LEMON LAMB PATTIES
Ingredients:
2 slices wholegrain bread
2 cloves garlic, halved
4 green onions, roughly chopped
½ cup flat-leaf parsley leaves
½ cup mint leaves
1 lemon, rind grated, juiced
550g lean lamb mince
1 egg
Salt and pepper, to taste
Method:
1. Using the chopping bowl fitted with the chopping blade, process bread until crumbs are
formed. Transfer to a bowl.
2. Add garlic, onions, parsley, mint and lemon rind to the chopping bowl. Process on speed 6
until finely chopped.
3. Add mince, 1 tablespoon lemon juice, egg and breadcrumbs. Season with salt and pepper.
Pulse until combined and mixture comes together.
4. Remove mixture from bowl; divide into 12 patties. Place on a plate.
5. Heat a frypan over medium heat. Grease with cooking oil spray. Cook patties for 3-4
minutes each side or until cooked through.
6. Serve patties on burgers or with a salad.
Makes 12
8
CORN FRITTERS
Ingredients:
4 fresh corn cobs
⅓ cup flat-leaf parsley leaves
1 cup self-raising flour
5 eggs
4 green onions, thinly sliced
Salt and pepper, to taste
Cream cheese, smoked salmon and rocket, to serve
Method:
1. Using a sharp knife, cut corn kernels from cobs. Place half the corn in a large mixing bowl.
2. Using the chopper bowl fitted with the chopping blade, process remaining corn, parsley,
flour and 3 whole eggs on speed 6 until combined.
3. Transfer mixture to corn bowl. Stir in green onions. Season with salt and pepper.
4. Separate remaining eggs. Discard yolks. Using the whisk attachment, whisk egg whites to
soft peaks. Fold egg whites into corn mixture.
5. Heat a frypan over medium heat. Spray with cooking oil spray. Add heaped tablespoons of
mixture. Cook for 2-3 minutes each side or until golden.
6. Serve fritters, topped with cream cheese, smoked salmon and rocket.
Makes 12
9
THAI FISH CAKES
Ingredients:
500g firm white fish fillets (i.e. Ling, Flathead)
1 teaspoon fish sauce
2 tablespoons mild red curry paste
50g green beans, chopped finely
Oil, for deep frying
Sweet chilli sauce and lime wedges, to serve
Coriander leaves, to garnish
Method:
1. Using the chopper bowl fitted with the chopping blade, process fish, fish sauce and curry
on MAX speed for 30- 40 seconds or until smooth.
NOTE: Be careful not to over process the seafood as this is will toughen the fish cakes.
2. Transfer mixture to a bowl and stir through beans.
3. Using wet hands, roll tablespoons of mixture into balls, flatten slightly and place on a plate.
4. Deep-fry fish cakes until golden and cooked through. Drain on absorbent paper towel.
5. Serve with sweet chilli dipping sauce and lime wedges; garnish with coriander.
Makes 25 (approx)
10
HERB CRUMBED SCHNITZEL
Ingredients:
4 slices mixed grain bread, torn
⅓ cup flat-leaf parsley
1 tablespoon chopped chives
1 tablespoon thyme leaves
2 garlic cloves, halved
¼ cup finely grated parmesan cheese
Salt and pepper, to taste
⅓ cup flour
2 eggs, lightly beaten
2 tablespoons milk
4 thin veal schnitzels
Vegetable oil, for frying
Method:
1. Using the chopper bowl fitted with the chopping blade, process bread until crumbs are
formed. Transfer to a large bowl.
2. Add herbs and garlic to the chopper bowl. Process on speed 6 until finely chopped. Add
breadcrumbs and cheese. Pulse until combined. Season with salt and pepper. Transfer to a
flat plate.
3. Using the whisk attachment, whisk egg and milk together in a bowl.
4. Place flour in a separate shallow bowl.
5. Coat veal lightly in flour, shaking off excess. Dip in egg mixture. Lightly press in
breadcrumb mixture.
6. Heat oil in a large frypan over medium-high heat. Cook veal in batches for 2-3 minutes
each side or until golden and cooked through. Drain on absorbent paper towel.
7. Serve veal with crispy potatoes and mixed salad.
Makes 4
11
BANANA SMOOTHIE
Ingredients:
1 large ripe banana, peeled, chopped
¼ cup natural yoghurt
1 scoop vanilla ice cream
1 cup milk
1 tablespoon honey
Method:
1. Place all ingredients into the beaker.
2. Using the blender shaft attachment, blend until smooth and frothy.
Serves 2
BREAKFAST SHAKE
Ingredients:
1 cup milk
⅓ cup vanilla yoghurt
125g soft fresh fruit (strawberries, passionfruit, banana), chopped
1 tablespoon wheat germ or bran
Method:
1. Place all ingredients into a large jug.
2. Using the blender shaft attachment, blend until smooth and frothy.
Serves 2
12
VANILLA MILK SHAKE
Ingredients:
1 cup milk
2 scoops vanilla ice cream
¼ teaspoon vanilla essence
Method:
1. Place all ingredients into a large jug.
2. Using the stainless steel shaft attachment, process until smooth and frothy.
TIP: For a chocolate milkshake variation, substitute vanilla ice cream for chocolate ice cream
and add some chocolate topping or syrup to taste.
Serves 2
www.russellhobbs.com.au
www.russellhobbs.co.nz
RUSSELL HOBBS and logo are Trade Marks of Spectrum Brands, Inc., or one of its subsidiaries.
©2015 Spectrum Brands, Inc.
All rights reserved. No part of this publication may be reproduced, stored in a retrieval system or transmitted in any form or by any means,
electronic, mechanical, photocopying, recording or otherwise, without prior permission of the copyright owner.
13
NOTES
14