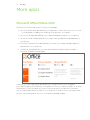
1
Your HTC 7 Pro User guide Icons used in this guide In this user guide, we use the following symbols to indicate useful and important information: This is a note. It might give extra information that’s only applicable in certain situations. Or explain a specific feature in a bit more detail. This is important info. Stuff you really need to know to accomplish a task or get a feature to work properly. This is a tip. It might provide an alternative way to do something or tell you about a special option you might find useful. This is a safety precaution. Read these carefully to avoid any potential problems when using your phone. Want more info? For other helpful resources, go to www.htc.com/support. Please also read the Safety and regulatory guide that’s included in the box. For additional information about your phone, go to windowsphone.com. Note: Certain Microsoft services/features may not be available in your country or region. Contents Contents Basics Inside the box 6 Your phone 6 Back cover 8 Battery 9 Switching your phone on or off 11 Finger gestures 11 Getting started Setting up your phone for the first time 12 Start screen 12 Accessing apps and settings 13 Hubs 13 Sleep mode 13 Unlocking the screen 14 Changing your lock screen wallpaper 14 Status icons 14 Adjusting the volume 15 Searching 15 Interacting with your phone by speaking 16 Setting up an account 16 Changing the ringtone 16 Changing the theme 16 Phone calls Making calls 17 Receiving calls 17 Using in-call options 18 Using call history 19 Call services20 Turning Flight mode (Airplane mode) on or off 20 People About the People hub21 Viewing your contacts list and feeds21 Adding a new contact22 Merging contact information23 Editing, searching, and deleting23 Your Me tile24 Keyboard The Hardware Keyboard25 Using the onscreen keyboard26 Entering words with predictive text27 Changing keyboard settings27 Contents Messaging About Messaging28 Sending a text message28 Sending a picture message29 Viewing and replying to a message29 Managing message conversations30 Email Adding a POP3/IMAP email account31 Adding a Microsoft Exchange Server account31 Checking your inbox32 Sending an email message33 Calendar About Calendar35 Creating a calendar appointment35 Changing calendar views36 Viewing, editing or deleting an appointment37 Viewing, dismissing, or snoozing appointment reminders37 Displaying and synchronizing calendars37 Getting connected Data connection39 Wi-Fi39 Using your phone’s web browser 40 Bluetooth 43 Camera Camera basics 45 Taking a photo 46 Capturing a video 46 After capturing 47 Camera settings 47 Pictures About the Pictures hub 48 Viewing photos and videos 49 Touching up your photos 49 Sending your photos 49 Sharing your photos on the Web 50 Zune Synchronizing your computer and phone 51 Music + Videos hub 52 Listening to music 52 Watching videos 53 Listening to or watching your podcasts 53 Listening to the radio 53 Contents Maps and location Turning on location services 54 Bing Maps 54 HTC Hub About the HTC Hub 58 More apps Microsoft Office Mobile 2010 63 Windows Marketplace 64 Games 64 Security Protecting your phone with a password 66 Protecting your phone through the Web 66 Settings Settings on your phone 67 Changing display settings 68 Changing sound settings 68 Checking information about your phone 69 Changing the phone language 69 Update and reset Updating the phone software 70 Restarting or factory resetting your phone 70 Trademarks and copyright 72 Index 73 Basics������ ������������ Basics Inside the box You’ll find the following inside the box: Phone Battery USB cable 3.5mm stereo headset Power adapter Start here guide Quick guide Safety and regulatory guide Your phone Front panel 1 9 1 Earpiece 2 Hardware keyboard 3 BACK 4 Microphone 2 8 5 CAMERA 6 SEARCH 7 START 7 6 5 3 4 8 Touch screen 9 Notification LED Basics������ ������������ Top panel 1 2 1 3.5mm audio jack 2 POWER Left panel 1 VOLUME UP/DOWN 2 USB 1 2 Back panel 1 1 LED flash 4 3 2 Back cover 3 5 megapixel camera 4 Speaker 2 Basics������ ������������ Back cover Removing the back cover Remove the back cover to access the battery compartment. 1. With the phone turned off, hold your phone securely with the front facing down. 2. Slide the back of the phone to the right. 3. With your thumb or finger, lift up the back cover from the small notch at the side of the phone. Replacing the back cover 1. Secure the right side of the back cover first by aligning the tabs on the back cover into the openings located inside the battery compartment. 2. Press the left side of the back cover down to lock the cover into place. You will hear a click when the back cover is locked in place. (You may find it easier if you slide the keyboard back into place first.) Basics������ ������������ Battery Your phone uses a rechargeable battery. Please use only original batteries and accessories that came with your phone or replacements that we recommend. How long the battery can last before it needs recharging depends on how you use your phone. Among these are the phone features and accessories you use (for example, leaving your Bluetooth connection always on uses more power). Long phone calls and frequent web browsing use up much battery power. Also, consider your location: poor signal strength from your mobile network and extreme temperature make the battery work harder. Inserting the battery 1. Remove the back cover. See “Removing the back cover.” 2. Insert the battery with its exposed copper contacts into the phone first. The exposed copper contacts should be on the right when you insert the battery. 3. Gently push the battery into place. Removing the battery 1. Make sure the phone is turned off. 2. Take the back cover off. See “Removing the back cover.” 3. Pull the battery up from the indentation in the battery compartment. 10 Basics������ ������������ Charging the battery The battery is partially charged when shipped. Before you turn on and start using your phone, it is recommended that you charge the battery. Some batteries perform best after several full charge/discharge cycles. To charge the battery, please use only the power adapter and USB cable that come with your phone. Don’t remove the battery from the phone while you’re charging it with the power or car adapter. 1. Connect the large end of the USB cable to the power adapter. 2. Connect the small end of the USB cable to the phone. 3. Plug in the power adapter to an electrical outlet to start charging the battery. Your phone may turn on when the battery is being charged. As the battery is being charged, the notification LED shows a solid red light when the battery is being charged. The light turns to solid green when the phone is fully charged. When you charge the battery while the phone is on, the charging battery icon is displayed in the status bar of the Start screen. After the battery has been fully charged, a full battery icon will be displayed in the status bar of the Start screen. As a safety precaution, the battery stops charging when it overheats. 11 Basics������ ������������ Switching your phone on or off Switching your phone on Press the POWER button. Easy. When you turn on the phone for the first time, you’ll need to set it up. Go to “Setting up your phone for the first time” and we’ll take you through it. Switching your phone off 1. If the display is off, press the POWER button to turn it back on. 2. Unlock your phone if the Lock screen is displayed. See “Unlocking the screen” in the Getting started chapter. 3. Press and hold the POWER button until you see the word “Goodbye” onscreen. Finger gestures Tap When you want to type using the keyboard, select items onscreen such as apps and settings, or press onscreen buttons, simply tap them with your finger. Press and hold To open the available options for an item (e.g. contact or link in a web page), simply press and hold the item. Swipe or slide To swipe or slide means to quickly drag your finger vertically or horizontally across the screen. Drag Press and hold your finger with some pressure before you start to drag. While dragging, do not release your finger until you have reached the target position. Flick Flicking the screen is similar to swiping, except that you need to swipe your finger in light, quicker strokes. This finger gesture is always in a vertical direction, such as when flicking the contacts or message list. Rotate For most screens, you can automatically change the screen orientation from portrait to landscape by turning the phone sideways. When entering text, you can turn the phone sideways to bring up a bigger keyboard. Pinch In some applications, like Pictures or the web browser, you can “pinch” the screen using 2 fingers (for example, thumb and index fingers) to zoom in or zoom out when viewing a picture or a web page. 12 Getting ��������������������� started������ Getting started Setting up your phone for the first time When you switch on your phone for the first time, you’ll be asked to set some options such as your time zone and your Window Live ID. Just follow the onscreen instructions and you’ll be up and running with your phone in no time. Start screen Up front on the Start screen, you get to see at a glance Windows® Phone live tiles that continuously update and show what’s most personal to you. You’ll see things like your photo album, XBOX LIVE, how many new messages and email you have, and more. Simply swipe your finger up or down to scroll through the tiles on the Start screen. Rearranging the tiles on the Start screen 1. Press and hold the tile you want to move until it floats. 2. Drag the tile to the position where you want to place it. Pause at the top or bottom edge of the screen to drag the tile to the extended Start screen. 3. When the tile is where you want it, tap the tile to dock it. Pinning items to the Start screen You can pin just about anything you want to the Start screen: apps, pictures, songs, shortcuts, and even contacts. For example, when you pin a contact to the Start screen, you’ll get all of that person’s updates—feeds, email, text messages, and call notifications—right from that tile. To pin something, let’s say a contact, to the Start screen, press and hold the contact until a menu appears, and then tap pin to start. 13 Getting ��������������������� started������ Unpinning a tile On the Start screen, press and hold the tile you want to remove, and then tap . Accessing apps and settings Easy. On the Start screen, just tap or slide your finger left. Hubs Simplify your everyday tasks with hubs. Instead of going in and out of various apps, hubs simplify things by tying together related experiences. For example, in the People Hub, not only can you see all your contacts but you can also check status updates from your Facebook friends. Check out the other cool hubs on your phone such as Office, Pictures, Music + Videos, and more. Sleep mode Sleep mode saves battery power by putting your phone into a low power state while the display is off. It also stops accidental button presses when the phone’s in your bag or pocket. You’ll still receive messages and calls though. Switching to Sleep mode Press the POWER button to turn off the display and switch your phone to Sleep mode. Your phone also automatically goes into Sleep mode when it’s idle for a while. Waking up from Sleep mode Your phone automatically wakes up when you have an incoming call. To wake it up manually, press the POWER button. You’ll need to unlock the screen. 14 Getting ��������������������� started������ Unlocking the screen When you see the lock screen, press the bottom of the screen and then slide your finger up to unlock the screen or answer an incoming call. If you’ve set up a phone password, you’ll need to enter the it to unlock the screen. To find out how to enable the phone password, see “Protecting your phone with a password” in the Security chapter. Changing your lock screen wallpaper Browse the collection of wallpapers available on your phone or choose from photos that you have taken with the camera. 1. On the Start screen, tap . 2. Tap Settings > lock & wallpaper > change wallpaper. 3. Choose whether to select from preset wallpapers, camera photos, or a photo album. 4. Select the photo you want to use as your lock screen wallpaper. 5. If the photo you selected is bigger than the allowable wallpaper size, crop the photo first. Drag the photo and position the part that you want to be your wallpaper inside the crop box, and then tap . Status icons You can tell a lot about your phone by checking the icons in its status bar. Simply tap the top of the screen to show the status icons. The status icons disappear after a few seconds. 15 Getting ��������������������� started������ Here’s some of the icons you might see and what they mean: Signal strength 3G (EVDO) connection Battery is charging 1xRTT connection Battery is full Wi-Fi enabled but not connected to a Wi-Fi network Battery state unknown Connected to a Wi-Fi network Airplane mode is turned on Connected to a Bluetooth headset Roaming Phone set to vibrate Calls are being forwarded based on the network settings. Phone set to silent only displays connection status, not signal strength. To find out how to view Wi-Fi network signal strength, see “Wi-Fi” in the Getting connected chapter. Adjusting the volume Press the VOLUME UP or VOLUME DOWN button to adjust the volume to your desired level. The volume bar appears on top of the screen and shows the volume level. On the volume bar, tap the icon on the right to quickly switch to ring or vibrate. If you want to have silent as an option, you need to turn off vibrate on your phone. See “Changing sound settings” in the Settings chapter to find out how to turn off vibrate. Searching Searching the Web 1. On the Start screen, press SEARCH . The Bing™ search screen opens. 2. Tap the search box, enter what you want to search for, and then tap keyboard. You’ll then see a list of matched items onscreen. on the 3. Tap the category below the search box (for example, local) or swipe left or right on the screen to check the other results for the other categories. Use your voice to do a search by tapping the microphone icon inside the search box. 16 Getting ��������������������� started������ Searching within an app In some apps like People, Maps, and Marketplace, you can do a search within those apps. Simply open the app, and then press SEARCH . Interacting with your phone by speaking From anywhere on your phone, press and hold START to bring up Tell Me, which lets you use your voice to call people, start apps, and search the web. To make a phone call, you’d say “Call Jennifer Singer, mobile.” To start an app, like Calendar, say “Open Calendar.” To search for something, just tell the phone what you want, like “Find pizza parlors,” and Bing will look for an answer. If you’re not sure, say “What can I say?” Setting up an account Set up your Windows Live, Microsoft Outlook, Facebook, and other accounts so you can sync information and receive updates from these accounts on your phone. 1. On the Start screen, tap . 2. Tap Settings > email & accounts. 3. Tap add an account, and then tap the type of account you want to set up. 4. Enter your email address and password, and then tap sign in. Changing the ringtone Choose from the available selections of ringtones on your phone. 1. On the Start screen, tap . 2. Tap Settings > ringtones & sounds. 3. Tap the Ringtone box. 4. Listen to a ringtone by tapping the play icon beside its name. 5. Tap the name of the ringtone that you want to use. Changing the theme Feeling a little blue? You can change the theme of your phone to match your mood for the day. 1. On the Start screen, tap . 2. Tap Settings > theme. 3. Select the Background and Accent color to fit your mood by tapping their respective boxes. 17 Phone ����������������� calls������ Phone calls Making calls 1. On the Start screen, tap the Phone tile. 2. Tap . 3. Dial the number you want to call, and then tap call. Making an emergency call On the phone dialer screen, dial the international emergency number for your locale (for example, 911), and then tap call. Receiving calls When you receive a phone call from a contact, the Incoming call screen appears and displays the caller ID icon, name, and phone number of the calling party. When you receive a phone call from someone who is not stored in People, only the default caller ID icon and phone number appear on the Incoming call screen. Answering or rejecting an incoming call 18 Phone ����������������� calls������ If To answer the call To reject the call Display is on Tap answer. Tap ignore. Display is off When the lock screen appears, slide up from the bottom of the lock screen, and then tap answer. When the lock screen appears, slide up from the bottom of the lock screen, and then tap ignore. Muting the ringing sound without rejecting the call Do one of the following: Press the VOLUME DOWN or VOLUME UP button. Press the POWER button. Place the phone face down on a leveled surface. If the phone is already facing down, the phone will still ring when there are subsequent incoming calls. Using in-call options When a call is in progress, use the buttons onscreen to mute or unmute the microphone or to turn the speakerphone on or off. You can also press MENU and choose whether to add a call, mute the microphone, and more. Switching between calls If you’re already on a call and accept another call, you can choose to switch between the two calls. 1. When you receive another call, tap answer to accept the second call, and to put the first call on hold. 2. To switch between the calls, tap the bar at the top of the screen. Setting up a conference call Three-way conference calling with your friends, family, or coworkers is easy. 1. Make a call to the first conference call participant. 2. Once the call has been answered by the first participant tap the (down arrow) and then tap FLASH. 3. Once the first participant is on hold tap ADD CALL and dial the number of the second participant. 4. Once the second participant has answered the call, tap FLASH again to join the calls together. 19 Phone ����������������� calls������ Turning the speakerphone on or off during a call 1. Tap . 2. Tap speaker. Tap speaker again to turn off the speakerphone. Make sure you don’t have the phone against your ear when you have the speakerphone on. It may damage your hearing. Muting the microphone during a call 1. Tap . 2. Tap mute. Tap mute again to turn on the microphone. Ending a call On the screen, tap end call. If the phone display is off, press POWER to turn on the screen so you can tap end call. Using call history Use the call history to check missed calls, your dialed numbers and received calls. Checking calls in the call history 1. On the Start screen, tap the Phone tile. 2. Tap a name or number in the list to go to a screen where you can select to call the number, view the contact information (if the number is stored in your contacts list), save the contact information (if the number is not stored in your contacts list), or send a text message. Adding a new phone number to your contacts from call history 1. On the Start screen, tap the Phone tile. 2. Tap the number you want to save to your contacts. 3. At the bottom of the screen, tap . 4. Tap new contact. 5. Edit the number if you need to, select the phone number type, and then tap . 6. Enter the contact name and other information. The phone number is automatically added for you. 7. Tap . To find out how to add new contacts or edit the contact information, see the People chapter. 20 Phone ����������������� calls������ Clearing the call history list On the call history screen, you can do the following: To remove a name or number from the list, press and hold it, and then tap delete item. To clear the entire list, tap ... , and then tap delete all. Call services Your phone can directly link to the mobile phone network, and enable you to access and change the settings of various phone services for your phone. Contact your mobile operator to find out about the availability of call services for your phone. To open call services, tap the Phone tile on the Start screen, tap ... , and then tap call settings. My phone number Displays your phone number. Voicemail number Shows the current voicemail service being used. Tap to change the voicemail number. International assist Turn on or off international assist. Long tones When Long tones is set to on, the tone is heard continuously for as long as the number on the keypad is pressed. Turn this off to only hear a brief tone when you press keys on the keypad. Turning Flight mode (Airplane mode) on or off In many countries, you are required by law to turn off the phone while on board an aircraft. A way to turn off the phone function is to switch your phone to Flight mode (Airplane mode). When you enable Flight mode, all wireless radios on your phone are turned off, including the call function, data services, Bluetooth, and Wi-Fi. 1. On the Start screen, tap . 2. Tap Settings > airplane mode. 3. Tap the Status switch to turn it on or off. When you disable airplane mode, the call function is turned back on and the previous state of Bluetooth and Wi-Fi is restored. 21 People������ ������������ People About the People hub When you set up your email and other accounts on your phone, your contacts are imported automatically into your People hub. You’ll be able to see contacts from your Windows Live, Facebook, as well as other email accounts like Google and Outlook (Microsoft Exchange ActiveSync). Your friends’ Windows Live and Facebook feeds also appear in your People hub. Their photos show up in your Pictures hub, and your own feeds pop up in your Me tile. If you haven’t set up your email or Facebook account yet, see “Setting up an account” in the Getting started chapter. Viewing your contacts list and feeds To open the People hub, tap the People tile on the Start screen. In all of the People hub, you’ll see all contacts that you’ve created on your phone as well as contacts that are synchronized with your email and Facebook accounts. If you’re signed in to your Windows Live and/or Facebook accounts, swipe to the left to see updates from your friends. If you signed in to your Windows Live account when you first set up the phone, your contacts from those accounts will appear in the contacts list when you first open People. 22 People������ ������������ Contact information When you tap a contact on the People hub, the profile screen opens, showing you the person’s contact details. You can call, send text, or send an email to the contact from the profile screen. Call, send a message, or send an email to that contact in the profile page. Slide your finger left to see what’s new with that contact. You’ll only see updates when you are signed in to your Windows Live and/or Facebook accounts and the person is also your friend in Windows Live and/or Facebook. Adding a new contact 1. On the Start screen, tap the People tile. 2. In all of the People hub, tap . 3. Select the Account, for example Windows Live. This determines which account the contact will sync with. 4. Enter information by tapping an item. 5. Tap when you’re done. 23 People������ ������������ Merging contact information If you have the same contacts stored in your phone and online accounts such as Windows Live and Facebook, your phone will try to link them as one automatically. If it doesn’t, you can manually link them so that you won’t have duplicated entries in your contacts list. 1. On the Start screen, tap the People tile. 2. In all of the People hub, tap the name of the contact you want to link. 3. At the bottom of the screen, tap . The link icon may look a little different depending if the contact is already linked to other contacts. 4. Do one of the following: Under suggested links (if available), tap the contact to link to that contact’s account. Tap choose a contact to select a contact from your People list to link to. Breaking the contact information link between contacts 1. On the Start screen, tap the People tile. 2. In all of the People hub, tap the name of the contact whose contact information link you want to break. 3. At the bottom of the screen, tap the link icon. The link icon will show how many contacts are linked. 4. Tap one of the linked profiles, and then tap unlink. Editing, searching, and deleting Editing a contact’s information 1. On the Start screen, tap the People tile. 2. In all of the People hub, press and hold the contact, and then tap edit. 3. Enter the new information for the contact. If the contact is linked to another account on your phone, you can choose to edit the contact information on the other account by tapping edit [name of account]. 4. Tap . Searching for a contact 1. On the Start screen, tap the People tile. 2. Press SEARCH . 3. In the search bar, enter the first few letters of the first or last name of the contact you are looking for. Matching contacts are displayed. 4. Tap the contact to open his or her contact details screen. See “Contact information” in this chapter for details. 24 People������ ������������ Looking for your contacts that start with the letter M? Tap the letter box, for example particular letter on your contacts list. , to go to a Deleting a contact You cannot delete Facebook contacts on your phone. 1. On the Start screen, tap the People tile. 2. In all of the People hub, press and hold the contact, and then tap delete. 3. When you’re asked to confirm, tap delete. Your Me tile When you sign in to your Windows Live and/or Facebook account, your Me tile is automatically created on the Start screen. Tap your Me tile on the Start screen (or in all of the People hub) and check status updates you have posted, comments you have received, and pics that you have uploaded to your Windows Live and/or Facebook accounts. While on the Me screen, you can tap: Your status message to the right of your photo to post a new status message. Your photo to change it. A photo to view it. An entry to add comments or reply to a comment. 25 Keyboard������ �������������� Keyboard The Hardware Keyboard Your device comes with a QWERTY keyboard, which is similar to a standard keyboard on a computer. To use the keyboard, slide the screen panel to the right to reveal the keyboard. The screen panel will pop up at an angle for comfortable viewing. The screen orientation automatically switches to landscape mode when the keyboard is opened. The screen is non-adjustable. Do not try to adjust the screen angle past its maximum angle to avoid damaging the phone. Using the hardware keyboard You can do the following with the hardware keyboard: To type lowercase letters and numbers, press the keys using your thumbs or fingers. To enter a single uppercase letter, press and then press the corresponding key. Press and hold to turn on caps lock. To change back to lowercase letters, press again. 26 Keyboard������ �������������� To enter the symbol or punctuation mark that is printed at the upper right corner of a key, press , and then press the corresponding key. To open the Symbol Pad, press Press . to insert a hard return while typing. Press the arrow keys / / / for directional movement. To delete the previous character, press Press . Press and hold to continue deleting. to insert a smiley. For special characters, press a letter and then press to select the character from the onscreen menu. For example, press “a” and then press to enter ǽ, à, à, etc. Using the onscreen keyboard When you start an app or select a box that requires text or numbers, the onscreen keyboard becomes available. After entering your text, press BACK to close the keyboard. To open and use it again, tap a text box. Entering text Depending on the app you’re in, you may see a slightly different keyboard layout. Use the following keys while entering text: Some keys have multiple characters or accents associated with them. Press and hold the key to see the available characters and accents. This is the Shift key. Tap to enter an uppercase letter. The next letter you type will be uppercase. Press and hold to turn on caps lock. Tap to switch to the numeric and symbol keyboard. While in the numeric and symbol keyboard, tap to show more symbols. Tap to switch back to the alphabet keyboard. Tap to switch to a different language keyboard. Available keyboard languages depends upon the phone version you have. This key may not be present in phones with only one keyboard language. See “Enabling other keyboard languages” for more details. This is the Enter key. Tap to create a new line. This is the Backspace key. Tap to delete the previous character. This is the Smiley key (Only available when writing an a text or picture message). Tap to enter smileys. 27 Keyboard������ �������������� Moving the cursor 1. While entering text, press and hold the text box. A floating cursor appears . 2. Drag the cursor to the position that you want, and then release your finger. Changing to the landscape keyboard When entering text, you can choose to use the landscape orientation of the keyboard. Turn your phone sideways to use a larger keyboard that lets you type easily using your thumbs. Enabling other keyboard languages You can choose to show other keyboard languages on the keyboard. The availability of this feature and the languages available to choose from may depend on the version of phone you have. 1. On the Start screen, tap . 2. Tap Settings > keyboard. 3. Tap the Keyboard languages box. 4. Select the keyboard languages you want to show, and then tap . Entering words with predictive text The keyboard has predictive text to help you type quickly and accurately. Predictive text input is enabled by default, and word suggestions are displayed as you type. To enter a word in predictive mode, do any of the following: If you see the word you want in bold, you can simply tap the space bar to insert the word into your text. If you see the word you want shown in the suggestions before you have finished typing the entire word, tap the word to insert it into your text. Slide left on the suggestion bar to see more words. Changing keyboard settings 1. On the Start screen, tap . 2. Tap Settings > keyboard. 3. Clear the check box of the options that you don’t want. 28 Messaging������ ��������������� Messaging About Messaging Keep in touch with important people in your life. Use the Messaging application to compose and send text and picture messages. On the Start screen, tap the Messaging tile. On the conversations screen, all your sent and received messages are neatly grouped into conversations, by contact name or phone number. You can: Scroll up or down the list of conversations by swiping your finger on the screen. Tap a contact name or number to view the exchange of messages. Sending a text message If you exceed the limit on the number of characters for a single text message, your text message will be delivered as one but will be billed as more than one message. 1. On the Start screen, tap the Messaging tile. 2. On the conversations screen, tap . 3. Fill in one or more recipients. You can: Enter complete phone numbers directly in the To field. Use the semicolon to separate recipients. Enter the first few letters of a contact name. As you enter, matching names with phone numbers from your stored contacts are displayed. Tap a contact that you want. Tap to the right of the recipient field, and then tap the contact that you want and choose which phone number to send to.. 4. Tap the box that says “type a message”, and then enter your message. 5. Tap to send the message. 29 Messaging������ ��������������� Sending a picture message To send a picture message, start by creating a new text message, and then attach a photo to include it. 1. On the Start screen, tap the Messaging tile. 2. On the conversations screen, tap . 3. Fill in one or more recipients. You can: Enter complete phone numbers or email addresses directly in the To field. Use the semicolon to separate recipients. Enter the first few letters of a contact name. As you enter, matching names with phone numbers and email addresses from your stored contacts are displayed. Tap a contact’s number or email address. Tap to the right of the recipient field, and then select the phone number of a contact to whom you want to send the message. 4. Tap Tap and then select a photo you want to send. to take a photo and insert it as the attachment. 5. Enter your message. 6. Tap to send the message. Viewing and replying to a message When you receive a new message, the phone plays an alert sound (if set) and displays the message briefly at the top of the screen. 1. To open and read the message, you can: Tap the message bar at the top of the screen. Open the Messaging app to access and read the message. 2. Enter your reply, and then tap . 30 Messaging������ ��������������� Managing message conversations Deleting a conversation 1. On the conversations screen, press and hold a contact (or phone number) whose messages you want to delete, and then tap delete. 2. When you’re asked to confirm, tap delete. Deleting a message 1. On the conversations screen, tap a contact (or phone number) to display the exchange of messages with that contact. 2. Press and hold the message that you want to delete. 3. Tap delete on the options menu. 4. When you’re asked to confirm, tap delete. Forwarding a message 1. On the conversations screen, tap a contact (or phone number) to display the exchange of messages with that contact. 2. Press and hold the message that you want to forward. 3. Tap forward on the options menu. 4. Fill in the recipient’s name. 5. Tap to send the message. 31 Email������ ����������� Email Adding a POP3/IMAP email account 1. Do one of the following: If you haven’t set up any accounts yet, tap Email setup on the Start screen. On the Start screen, tap account. , open Settings, and then tap email & accounts > add an 2. Tap the type of account you want to set up. If you don’t see the account type that you want, tap other account or advanced setup. The advanced setup requires you to enter the incoming and outgoing server settings so have them ready if you choose this option. 3. Enter the email address and password for the account. 4. Tap sign in. Adding a Microsoft Exchange Server account 1. Do one of the following: If you haven’t set up any accounts yet, tap Email setup on the Start screen. On the Start screen, tap account. , open Settings, and then tap email & accounts > add an 2. Tap Outlook. 3. Enter the Exchange ActiveSync account details, and then tap sign in. Your corporate Exchange Server must support auto-detect for the phone to automatically set up the Exchange ActiveSync account. If your corporate Exchange Server does not support auto-detect, you’ll need to enter your Exchange Server settings. Ask your Exchange Server administrator for details. 32 Email������ ����������� Checking your inbox After you set up an email account, a new tile is created on the Start screen for that account. To open an email account, tap its tile on the Start screen. If you don’t see the tile, tap the arrow on the Start screen, and then tap the account in the apps list. Slide your finger left or right to check only your unread, flagged, or urgent email. Refreshing an email account Whatever your automatic sync settings are, you can also synchronize your sent and received emails manually at any time. While in the account you want to sync, tap . Managing email messages Deleting an email message from the inbox 1. On the email account inbox, press and hold the message you want to delete. 2. On the options menu, tap delete. Moving an email message to another folder 1. On the email account inbox, press and hold the message you want to move. 2. On the options menu, tap move. 3. Tap the folder where to move the email message. 33 Email������ ����������� Selecting multiple email messages from the inbox to delete or move 1. On the email account inbox, do one of the following: Tap . Tap the area to the left of an email. 2. Tap the check boxes of email messages you want to delete or move to another folder. 3. Tap to delete them or tap to move them to a different folder. Sending an email message 1. Open the email account that you want to use to send your email. 2. On the email account inbox, tap . 3. Fill in one or more recipients. You can: Enter email addresses directly in the To field. If you’re sending the email to several recipients, separate the email addresses with a semicolon. As you enter email addresses, any matching addresses from your contacts list are displayed. Tap a match to enter that address directly. Tap to the right of the recipient field, and then select a contact to whom you want to send the message. Tap again to add more recipients. 4. Enter the subject, and then compose your message. Tap the space below the subject line to compose your message. 5. To add an attachment, tap 6. Tap . You can only attach photos. to send the message immediately, or tap > Save to send it later. Resuming a draft email message 1. In the email account inbox, tap , and then tap drafts. 2. Tap the message. 3. When you finish editing the message, tap . 34 Email������ ����������� Reading and replying to an email message 1. On the Start screen, tap the email account tile. 2. On the email account inbox, tap the email you want to read. 3. Tap , and then tap reply, reply all, or forward. Setting the priority for an email message 1. While composing the message, tap ... . 2. Tap priority. 3. Select the priority for the message. If you selected high or low priority, the priority appears below the subject line of the message. Flagging an email 1. On the Start screen, tap the email account tile. 2. On the email account inbox, press and hold the email you want to flag. 3. On the options menu, tap set flag. After flagging an email, you can choose to remove the flag or mark the flagged email as complete. Press and hold the flagged email, and then tap complete flag or clear flag. Changing email account settings 1. On the Start screen, tap the email account tile. 2. Tap ... , and then tap settings. 3. Tap sync settings. 4. Set the options you want, and then tap . 5. Choose if you want to add a signature to sent messages, and then tap Deleting an email account 1. On the Start screen, tap . 2. Tap Settings > email & accounts. 3. Press and hold the email account you want to delete, and then tap delete. . 35 Calendar������ �������������� Calendar About Calendar Use your phone’s Calendar to create and manage your appointments. You can also set up your phone to stay in sync with the following types of calendars: On your phone, sign in to your Windows Live account so you’ll be able to sync your phone’s Calendar with your Windows Live Calendar online. If you haven’t signed in to your Windows Live account yet, see the Getting started chapter to find out how to sign in. If you have a Microsoft Exchange ActiveSync account and you have added it on your phone, you can sync your phone’s Calendar with your Exchange Server calendar appointments. If you have a Google account and you have added it on your phone, you can sync your phone’s Calendar with your Google Calendar. Creating a calendar appointment You can create appointments that appear on your phone only, or appointments that sync with your online account calendars such as in Windows Live or Exchange Server. 1. On the Start screen, tap the Calendar tile. 2. In day or agenda view, tap . 3. If you have more than one calendar, select an Account in which to add the appointment: 4. Enter the appointment details. 5. Scroll down to the bottom of the screen, and tap more details to set a reminder, appointment occurrence, notes, and more. 6. Tap when you’re done. The Calendar tile on the Start screen will show your upcoming appointment. 36 Calendar������ �������������� Sending an invitation You can use Calendar to schedule a meeting or an appointment and invite people to attend it. An invitation email will be sent to them from the account that you choose. 1. Open Calendar and create a new appointment. For the steps, see “Creating a calendar appointment.” 2. Add details, such as date and time, location, and more. Remember to choose the Account to use for sending the invitation email 3. Tap more details, scroll down the screen, and then tap add someone. 4. Invite required and optional attendees. Tap add someone, then tap the name of the person to invite. You can only invite contacts that are stored or synchronized on your phone. 5. Tap when you’re done. Changing calendar views When you open Calendar, it displays the day view by default. You can also display the Calendar in agenda or month view. Day and Agenda views Day view displays a list of the appointments of one day. Agenda view lists all your appointments in chronological order. The color bars on the right side of the appointments in Agenda view indicate the type of calendar in which the appointments are part of. To find out what each color represents, tap ... , and then tap calendars. Change the color by tapping the color box. When in Day view, slide up or down the screen to view earlier or later days. Month view In Month view, you’ll see text on days that have appointments. To switch to Month view, tap . When in Month view: Tap a day to view the appointments of that day. Slide your finger up or down the screen to view earlier or later months. To change from month to day or agenda view, press BACK. 37 Calendar������ �������������� Viewing, editing or deleting an appointment You can view, edit, or delete appointments you’ve created. Viewing the details of an appointment 1. On the Start screen, tap the Calendar tile. 2. In day or agenda view, tap the appointment. Editing an appointment 1. On the Start screen, tap the Calendar tile. 2. In day or agenda view, press and hold the appointment, and then tap edit to open it. 3. Make your changes to the appointment. 4. When you’re done editing, tap . Deleting an appointment There are two ways to delete an appointment. In day or agenda view, press and hold an appointment and then tap delete. While viewing an appointment, tap . If the appointment repeats, you’ll be asked whether you want to delete just that occurrence or all occurrences in your Calendar. Viewing, dismissing, or snoozing appointment reminders If you have set a reminder for an appointment, your phone will play the alert sound and display a reminder message about the upcoming appointment. On the reminder message, tap snooze to snooze or tap dismiss to dismiss the appointment reminder. Displaying and synchronizing calendars You can choose which calendars to show or hide on your phone’s Calendar, and which ones to keep synchronized. Showing or hiding calendars 1. In day or agenda view, tap ... , and then tap calendars. 2. Tap the on switch for the calendar that you want to hide. The calendars are kept synchronized on your phone, whether or not you hide them. 38 Calendar������ �������������� Choosing which calendars are synchronized on your phone You can choose which calendars to keep synchronized on your phone or which ones to stop synchronizing. Stop synchronizing a calendar 1. On the Start screen, tap . 2. Tap Settings > email & accounts. 3. Tap the account whose calendar you want to stop synchronizing with your phone. 4. Clear the Calendar check box. 5. Tap . 39 Getting ����������������������� connected������ Getting connected Data connection Your phone will be automatically set up to use your mobile operator’s data connection when you turn on your phone for the first time. Turning the data connection on or off Turning your data connection off can help optimize your battery life. It can also save money on data charges. However, when your data connection is turned off, you may not always receive automatic updates to your email and other synchronized information. 1. On the Start screen, tap . 2. Tap Settings > cellular. 3. Tap the Data connection On/Off switch. Enabling data roaming Data roaming lets you connect to your mobile operator’s partner networks and access data services when you are out of your mobile operator’s coverage area. Using data services while roaming will be costly. Check with your mobile operator for data roaming rates before you use data roaming. 1. On the Start screen, tap . 2. Tap Settings > cellular. 3. Tap the Data roaming options box, and then tap Roam. Wi-Fi To use Wi-Fi on your phone, you need access to a wireless access point or “hotspot”. The availability and strength of the Wi-Fi signal will vary depending on objects, such as buildings or simply a wall between rooms, the Wi-Fi signal has to pass through. Turning Wi-Fi on and connecting to a wireless network 1. On the Start screen, tap . 2. Tap Settings > Wi-Fi. 3. Tap the On/Off switch to turn it on. The phone then scans for the network names and security settings of detected Wi-Fi networks are displayed in the Wi-Fi networks section. The signal strength for each Wi-Fi network is also displayed. 40 Getting ����������������������� connected������ 4. Tap the Wi-Fi network you want to connect to. If you selected an open network, your phone will automatically connect to the network. If you selected a network that is secured with WEP, enter the password and then tap done. Depending on the network type and its security settings, you may also need to enter more information. You cannot manually add a Wi-Fi profile. Many open networks common at restaurants and hotels require that you launch the web browser and follow additional steps to complete the Wi-Fi login process. When your phone is connected to a wireless network, the Wi-Fi icon ( brief moment on the status bar. ) appears for a The next time your phone connects to a previously accessed secured wireless network, you won’t be asked to enter the key or other security information again, unless you reset your phone to its factory default settings. Using your phone’s web browser You must have an active data connection or Wi-Fi connection to access the Internet. Opening the browser On the Start screen, tap the Internet Explorer tile to start surfing the Web. Going to a web page 1. On the browser screen, tap the URL box on top of the screen. 2. Enter the web page address using the keyboard. 3. Tap on the keyboard. Changing the screen orientation The phone automatically changes the screen orientation depending on how you’re holding your phone. Turn your phone sideways to display the web browser in landscape orientation and in full screen. When in landscape orientation, you won’t be able to enter a URL. Browsing full versions of all web sites Some web sites display a mobile version of their pages on phone web browsers. You can choose to view the full version of all pages, even for these sites. 41 Getting ����������������������� connected������ From the browser screen, while holding the phone in portrait orientation, tap ... , tap settings, and then select Desktop version. Navigating on a web page You can swipe your finger on the screen to navigate and view other areas of the web page. Zooming in or out on a web page Tap the screen twice quickly to zoom in, then tap the screen twice quickly again to zoom out. You can also use your fingers to spread or pinch the screen to zoom in or out. Selecting a link in a web page You can tap a link with your finger to open it, or press and hold a link for more options. Link What to do Web page address (URLs) Tap the link to open the web page. Press and hold the link to open a menu that allows you to open the page in a new tab or share the link via text message or email. Email address Tap to send an email message to the email address.. Opening a new browser tab Open multiple browser tabs to make it easier for you to switch from one web site to another. You can open up to 6 browser tabs. 1. While viewing a web page in portrait orientation, tap 2. Tap . . A new browser tab opens. Switching between browser windows 1. While viewing a web page in portrait orientation, tap . 2. Select the browser window you want to view by tapping the window you want to open. 42 Getting ����������������������� connected������ Finding text within a web page 1. While viewing a web page, tap ... , and then tap find on page. 2. Enter the search item, and then tap the Enter key on the keyboard. The search item is highlighted if found. 3. Tap or to go to the previous or next matching item. Bookmarking a web page 1. While viewing a web page in portrait orientation, tap . 2. Edit the bookmark name if needed, and then tap ok. Opening a bookmark Quickly view the pages that you access most often. 1. While viewing a web page in portrait orientation, tap . 2. In favorites, tap the bookmark you want to open. Editing a bookmark 1. While viewing a web page in portrait orientation, tap . 2. In favorites, press and hold the bookmark you want to edit, and then tap edit. 3. Enter your changes, and then tap ok. Viewing a previously visited page 1. While viewing a web page in portrait orientation, tap . 2. Slide your finger left to go to history. 3. Tap the page you want to open. Clearing the list of previously visited pages 1. While viewing a web page in portrait orientation, tap 2. Slide your finger left to go to history, and then tap . . 3. Tap delete. Setting browser options Customize the web browser to suit your browsing lifestyle. Set display, privacy, and security options when using the web browser. From the browser screen, tap ... , and then tap settings. 43 Getting ����������������������� connected������ Bluetooth Turning Bluetooth on Turning Bluetooth on also makes the phone discoverable. 1. On the Start screen, tap . 2. Tap Settings > Bluetooth. 3. Tap the On/Off switch. Your device is automatically made discoverable, and searches for Bluetooth devices within range. Turn off Bluetooth when not in use to conserve battery power, or in places where using a wireless device is prohibited, such as on board an aircraft and in hospitals. What Bluetooth profiles does my phone support? Your phone supports A2DP, PBAP, HFP, HSP, and AVRCP. Connecting a Bluetooth headset or car kit You can listen to music over a Bluetooth stereo headset, or have hands-free conversations using a compatible Bluetooth headset or car kit. It’s the same procedure to set up stereo audio and hands-free. For you to listen to music with your headset or car kit, the headset or car kit must support the A2DP Bluetooth profile. Before you connect your headset, you need to make it discoverable so your phone can find it. You can find out how to do this by referring to your headset manual. 1. Make sure that the headset is discoverable. 2. On the Start screen, tap . 3. Tap Settings > Bluetooth. 4. If the Bluetooth switch is off, tap it to turn on Bluetooth. Your phone will start to scan for Bluetooth devices within range. 5. When you see the name of your headset displayed, tap the name. Your phone then automatically tries to pair with the headset. 6. If automatic pairing fails, enter the passcode supplied with your headset. When the Bluetooth headset or car kit establishes a connection to your phone, the Bluetooth connected icon is displayed on the status bar for a brief moment. You can check the connection status below the hands-free headset or car kit name. Depending on the type of headset or car kit you have connected, you can then start using the headset or car kit to listen to music and/or make and receive phone calls. 44 Getting ����������������������� connected������ Reconnecting a headset or car kit Normally, you can easily reconnect your headset by switching on Bluetooth on your phone, and turning on the headset. However, you might have to connect manually if your headset has been used with another Bluetooth device. 1. Make sure that the headset is set to discoverable. 2. On the Start screen, tap . 3. Tap Settings > Bluetooth. 4. If the Bluetooth switch is off, tap it to turn on Bluetooth. 5. Tap the headset’s name in the Bluetooth devices section. 6. If you’re asked to enter a passcode, try 0000 or 1234, or consult the headset/car kit documentation to find the passcode. If you still cannot reconnect to the headset or car kit, follow the instructions in “Unpairing from a Bluetooth device”, and then follow the steps under “Connecting a Bluetooth headset or car kit” Disconnecting or unpairing from a Bluetooth device Disconnecting a Bluetooth device 1. On the Start screen, tap . 2. Tap Settings > Bluetooth. 3. On the list of Bluetooth devices, tap the device to disconnect from it. Tap the device again on the list to connect to it. Unpairing from a Bluetooth device You can make your phone forget its pairing connection with another Bluetooth device. To connect to the other device again, you may need to enter or reconfirm a passcode. 1. On the Start screen, tap . 2. Tap Settings > Bluetooth. 3. On the list of Bluetooth devices, press and hold the device to unpair. 4. Tap Delete. 45 Camera������ ������������ Camera Camera basics Whether traveling for business or fun, enjoy taking photos and videos of your trip and encounters with your phone’s camera. To open the camera, press CAMERA, or tap on the Start screen and then tap Camera. When you open the camera app for the first time, it will ask you if you want to share the location of your phone. This will add a location tag to your captured photos so you’ll know where they were taken. Viewfinder screen The camera displays in landscape view only. You’ll find the following controls on the Viewfinder screen: Tap to switch between Photo and Video modes. Tap to zoom in or out. Tap to open the camera settings. See “Camera settings” in this chapter for details. Zooming Before taking a photo or video, you can first use the onscreen zoom buttons to zoom in or out of your subject. Simply press the + or - buttons onscreen to zoom in or out. 46 Camera������ ������������ Taking a photo 1. On the Start screen, tap . 2. Tap Camera. 3. Before taking the photo, you can zoom in first on your subject. See “Zooming” to find out how. 4. Tap , and then select a camera flash mode depending on your lighting conditions. 5. Frame your subject on the Viewfinder screen. 6. Press CAMERA to take the photo. 7. Choose what you want to do with the photo you’ve just taken. See “After capturing“ for details. Camera flash doesn’t turn on? Using the flash eats up much battery power. To save battery power, the camera disables the flash (even when you have set the camera flash mode to Auto flash or Flash on) when one of the following occurs: You have an incoming call The flash will be disabled temporarily when you have an incoming call. After the call ends, you’ll be able to use the flash again. If you have set the flash to Flash on, it turns back on after you answer and end the call. Your phone’s battery level reaches 20% or lower Recharge the battery so that the camera can have enough battery power to use the flash. Cold weather may lower battery performance which affects the flash To make sure the camera has enough battery life to power up the flash, keep your phone warm. When not in use, put the phone inside your jacket to keep it warm, and try to avoid sudden temperature changes that may affect battery performance. Capturing a video 1. On the Start screen, tap . 2. Tap Camera. 3. On the Viewfinder screen, tap to switch to video mode. 4. Before you start capturing, you can zoom in first on your subject. See “Zooming” to learn how. 5. Tap and then choose whether to turn the flashlight on or off while capturing video. 6. Frame your subject on the screen. 7. Press CAMERA to start capturing video. Press it again to stop capturing. 8. Choose what you want to do with the video you’ve just captured. See “After capturing“ for details. 47 Camera������ ������������ After capturing After capturing a photo or video, slide your finger from left to right to see the photo or video you’ve just captured. Press and hold the photo or video so you can: add to favorites (Photo mode only) Add the photo to your favorites in the Pictures application. delete Delete the photo or video upload to SkyDrive: upload the photo to your SkyDrive online storage. You upload to SkyDrive / need to be signed in to your Windows Live account to upload to SkyDrive. upload to Facebook upload to Facebook: upload the photo to your Facebook page. You need (Photo mode only) to be signed in to your Facebook account to upload to Facebook. share (Photo mode only) Send the photo to your friends using Messaging or email. use as wallpaper (Photo mode only) Use the photo as your lock screen wallpaper. Camera settings To check and change your camera settings, tap an item. on the Viewfinder screen, and then tap Effects Apply a special effect to your captured photos or videos. Resolution Select a photo or video resolution to use for capturing. Scenes (photo mode only) Choose a scene that matches the subject or environment that you’re capturing. Flicker adjustment When taking indoor shots under fluorescent lighting, keep this setting on Auto or change it to the proper frequency (50Hz or 60Hz) of the power in your country to reduce flicker. Metering mode Set how the camera measures the amount of light to calculate the best exposure: Center area mode allows the camera to measure light in the center. Average mode allows the camera to measure light in the whole photo. Restore to default Change the camera back to default settings. 48 Pictures������ �������������� Pictures About the Pictures hub Using the Pictures hub, you can view photos and watch videos that you’ve taken with your phone’s camera, downloaded, or synchronized with your phone. You can also take a look at your photos on your Windows Live and Facebook accounts. To open the Pictures hub, tap the Pictures tile on the Start screen. After opening the Pictures hub, slide to the left to check out recent photos and photos on Facebook and Windows Live. Changing the Pictures hub wallpaper 1. On the Start screen, tap the Pictures tile. 2. Press and hold the text pictures on top of the screen. 3. Tap change background. 49 Pictures������ �������������� Viewing photos and videos 1. Choose how you want to browse through your photos and videos (all, date, favorites). 2. Select an album to view. 3. Tap a photo or video to view it in full screen. Viewing photos and videos in landscape orientation The photo orientation adjusts to how you hold your phone. Turn your phone sideways to view a photo in landscape mode. Video is always displayed in landscape mode when you play it. Use the onscreen controls to play, pause, or stop the video. Zooming in or out on a photo You can also use pinch zooming. Press your thumb and index finger on the screen and then spread your fingers apart to zoom in. Pinch your fingers together to zoom out. Zooming in Zooming out Touching up your photos Apply touch up work to your photos with the Photo Enhancer. See “Photo Enhancer” in the HTC apps chapter to learn how to touch up your photos. Sending your photos Using the Pictures hub, you can send photos via email or picture message. Sending a photo by email 1. On the Start screen, tap the Pictures tile. 2. Tap all. 3. Tap the album that has the photo you want to share. 4. Press and hold the photo you want to send, and then tap share. 5. Select the email account you want to use to send the photo. 6. Compose your message and then tap . 50 Pictures������ �������������� Sending a picture message 1. On the Start screen, tap the Pictures tile. 2. Tap all. 3. Tap the album that has the photo you want to share. 4. Press and hold the photo you want to send, and then tap share. 5. Tap Messaging. The photo is automatically added into the message. 6. Compose your message and then tap . Sharing your photos on the Web Using the Pictures hub, you can share your photos on Facebook and upload your photos to your Windows Live SkyDrive. You can also use the camera app to share a photo right after you’ve captured it. See the Camera chapter. Sharing photos on Facebook You need to be logged in to your Facebook account to be able to upload photos. 1. On the Start screen, tap the Pictures tile. 2. Tap all. 3. Tap the album that has the photo you want to share. 4. Press and hold the photo you want to send, and then tap share > upload to Facebook. 5. If you want to enter a caption, tap the add a caption box, and then enter your caption. 6. After entering the caption, tap . Uploading a photo to your SkyDrive You need to be logged in to your Windows Live account to be able to upload photos. 1. On the Start screen, tap the Pictures tile. 2. Tap all. 3. Tap the album that has the photo you want to share. 4. Press and hold the photo you want to send, and then tap share > upload to SkyDrive. 5. If you want to enter a caption, tap the add a caption box, and then enter your caption. 6. After entering the caption, tap . 51 Zune������ ���������� Zune Synchronizing your computer and phone You’ll need the Zune® software to get your music, videos, and podcasts from your computer to your phone. Use it to sync these stuff between your computer and phone. If you don’t have the Zune software on your computer yet, go to www.zune.net to download and install it. Setting up Zune to sync your computer and phone 1. Connect your phone to your computer using the supplied USB cable. Zune automatically opens on your computer, if you haven’t opened it. 2. Wait for Zune to recognize your phone, and then follow the onscreen instructions to set it up. Selecting items to sync with your phone After setting up Zune on your computer, choose what you want to sync with your phone. 1. Connect your phone to your computer using the supplied USB cable. Zune automatically opens on your computer, if you haven’t opened it. 2. Click collection on top of the Zune screen. 3. Choose the type of media (for example, Music) you want to sync to your phone. 4. Choose the items you want to sync with your phone, and then drag them to the phone icon at the bottom-left corner of the Zune screen. 52 Zune������ ���������� Music + Videos hub The Music + Videos hub is your gateway to your media collection. Listen to your music, watch your videos, check out your podcasts, listen to the radio, and go to the Marketplace to buy music — all in the Music + Videos hub. Listening to music 1. Get your music into your phone by following the steps in “Selecting items to sync with your phone” earlier in this chapter. 2. On the Start screen, tap the Music + Videos tile. 3. In zune of the Music + Videos hub, tap Music. 4. Slide your finger left or right to browse your music according to the category you want. 5. Tap the title of the song you want to listen to. While listening, you can press and hold forward. to rewind or press and hold to fast Buy additional music by visiting the Marketplace. For more information, go to “Windows Marketplace” in the More apps chapter. Turning on repeat or shuffle While playing a song, tap the album cover to loop or shuffle the songs in the album. You can also rate the album. Controlling music playback from the status bar When you exit the music player, you can still control music playback from the status bar. To show the playback controls on the status bar, press the VOLUME UP or VOLUME DOWN button. 53 Zune������ ���������� Watching videos 1. Get your videos into your phone by following the procedure in “Selecting items to sync with your phone” earlier in this chapter. 2. On the Start screen, tap the Music + Videos tile. 3. In zune of the Music + Videos hub, tap videos. 4. Slide your finger left or right to browse through your videos according to the category you want. 5. Tap the title of the video you want to watch. Listening to or watching your podcasts 1. Get your podcasts into your phone by following the steps in “Selecting items to sync with your phone” earlier in this chapter. 2. On the Start screen, tap the Music + Videos tile. 3. In zune of the Music + Videos hub, tap podcasts. 4. Slide your finger left or right to go to your audio or video podcasts. 5. Tap the title of the podcast you want to watch or listen to. Listening to the radio You need to connect a headset first to the audio jack of your phone to use the radio. The radio uses the stereo headset as the radio antenna, 1. On the Start screen, tap the Music + Videos tile. 2. In zune of the Music + Videos hub, tap radio. 3. Slide your finger left or right to go to the radio station you want to listen to. 4. Add the radio station to your favorites by tapping Access your favorite radio stations by tapping . . The radio plays in the background even if you exit the radio screen. If you do not want to continue listening to the radio, tap before exiting. 54 Maps ����������������������� and location������ Maps and location Turning on location services In order to find your location on your phone, you need to enable location sources. 1. On the Start screen, tap . 2. Tap Settings > location. 3. Tap the Location services On/Off switch to turn it on. Bing Maps Bing Maps lets you track your current location, view real-time traffic situations, and receive detailed directions to your destination. You need an active mobile data or Wi-Fi connection to use Bing Maps. Real-time traffic information is only available in some areas. Viewing locations in Bing Maps Finding your location To find your location with Bing Maps, you need to enable location sources. To find out how, see “Turning on location services” in this chapter. 1. On the Start screen, tap . 2. Tap Maps. 3. Tap . Moving on the map Swipe your finger on the screen to view other areas of the map. Zooming in or out of a map You can: Spread your thumb and index finger across the map to zoom in. Pinch your thumb and index finger on the map to zoom out. 55 Maps ����������������������� and location������ Getting an address and additional information for a location 1. Press and hold a location on the map. A balloon opens over the location with the address. 2. Tap the balloon to see more information. You can get directions to the location, pin the location to the Start screen, share the location via text message or email, and more. Clearing the map After you get directions or search on a map, you can clear away the various markers that such activities have drawn on the map. While viewing a map, tap ... , and then tap clear map. Switching to aerial view View satellite imagery by switching to aerial view. While viewing a map, tap ... , and then tap aerial view on. Searching for locations and places In Bing Maps, you can search for a location, such as an address, landmark, name of an establishment, or a city. 1. While viewing a map, tap . 2. Enter the address, landmark, or city you want to search in the search box. 3. Tap on the keyboard. 56 Maps ����������������������� and location������ Viewing search results The search results will be displayed as markers on the map. After tapping the balloon that shows the location that you want, you’ll see its address, rating, nearby places, and reviews, if available. To see the results as a list, tap ... while viewing a map, and then tap results list. Getting directions Get detailed directions to your destination. Bing Maps can provide directions for travel by foot or car. 1. While viewing a map, tap . 2. Use your current location as the starting point, or enter a location from where to start in the first text box. Then, enter your destination in the second text box. 3. Tap on the keyboard. 4. The next screen displays the directions to your destination in a list. Scroll up on the list to see the rest of the instructions. 57 Maps ����������������������� and location������ Checking traffic conditions Traffic information is available only in selected areas. You can choose to show real-time traffic conditions on a map. Traffic conditions are displayed over roads as color-coded lines. Each color represents how fast the traffic is moving. To show traffic conditions, tap ... while viewing a map, and then tap show traffic. 58 HTC ������������� Hub������ HTC Hub About the HTC Hub Get more out of your phone with apps from us. Check out the HTC Hub and see what we have in store for you. The built-in Weather app shows the weather in rich 3D animation for your location or in cities that you select, and provides a forecast for coming days. Apps ranging from fun games to management tools are just a tap away. Some apps you see in HTC Hub are not really on your phone yet. Tapping such an app takes you to Marketplace and lets you download it to HTC Hub. Opening HTC Hub Open HTC Hub from the Start screen by tapping and then tapping HTC Hub. The HTC Hub main page displays your current date, time, and location, as well as the weather for your location. Tap the weather image to open the Weather app and check for more weather forecasts. You’ll also see a list of featured apps from HTC. Tap to refresh the list. Downloading apps You need to be connected the Internet using a data connection or Wi-Fi to download apps. 1. On the Start screen, tap . 2. Tap HTC Hub. 3. Tap Get more. 4. Tap the app you want to open or download. If the app is preloaded in your phone, you’ll also see it in the apps list. 59 HTC ������������� Hub������ Weather Should I bring an umbrella today? Check what the weather’s like before you head out. Checking the weather 1. On the Start screen, tap . 2. Tap HTC Hub. The weather for your current location is displayed on the weather clock. 3. Tap the weather image to open the Weather screen. 4. Swipe your finger up or down the screen to check the weather in other cities. Not seeing your current location’s weather forecast? Check if you have Location services turned on in Settings. Adding a city 1. On the Weather screen, tap . 2. Enter the city you want to add. As you enter text, a list of possible locations are shown based on the letters you entered. 3. Tap the city to select it. Deleting a city from the list 1. On the Weather screen, tap ... > edit locations. 2. Tap the red circle beside the city you want to delete. 3. Tap done. Changing the order of cities on the Weather screen 1. On the Weather screen, tap ... > edit locations. 2. Press and hold at the end of the item you want to move. When the row is highlighted, drag it to its new position, then release. 3. Tap done. Changing the temperature scale 1. On the Weather screen, tap ... > settings. 2. Under Temperature scale, choose Fahrenheit or Celsius. Calculator Hold the phone upright and you get a basic calculator. Turn your phone to the side and you get a scientific calculator. Converter How many pounds are there in a kilo again? Use Converter to convert weight, length, volume, and even currency. Flashlight Use your phone’s camera flash as a flashlight. 60 HTC ������������� Hub������ List Forgot to buy the toothpaste again? Make sure you don’t forget next time by using List to jot down the things you need to get from the grocery. Love He loves me, he loves me not, he loves me!!! See whether that special someone is feeling the same way as you are. Notes Note to self – pick up flowers for wife before going to dinner. Use Notes to tack short reminders to yourself. Creating a note 1. On the Start screen, tap . 2. Tap HTC Hub. 3. Tap Get more. 4. Tap Notes. 5. Tap . You can also tap the stack of notes at the lower-left of the screen to create a new note. 6. Enter your note, and then tap . Editing a note 1. On the Note screen, tap . You can also slide your finger left while on the cork board to go to the List view. 2. Tap a note to open it, and tap the note again to edit it. Moving a note to another position on the cork board 1. On the cork board, press and hold a note until it floats. 2. Drag the note to the new position on the cork board, and then tap the note to dock it. Deleting a note Do one of the following: On the cork board, tap the note you want to delete, and then tap . Go to List view, press and hold the note you want to delete, and then tap delete. Deleting multiple notes 1. On the Note screen , tap 2. Tap to see your notes in List view. , 3. Select the notes you want to delete, and then tap done. 61 HTC ������������� Hub������ Photo Enhancer Photos need a bit of touch-up? Use one of the available photo enhancements to touch up your photos. The original photos are not touched. They’re saved as new files after you make your changes. 1. On the Start screen, tap . 2. Tap HTC Hub. 3. Tap Get more. 4. Tap Photo Enhancer. 5. Tap Choose Picture. 6. Open the album where the photo you want to edit is located, and then tap the photo. 7. Slide your finger left across the top of the screen to choose the effect you want to apply to the photo. 8. Tap . The enhanced photo is saved in another album called Saved Pictures. Sound Enhancer Get that surround sound feeling when you’re watching videos or listening to music on your phone. 1. On the Start screen, tap . 2. Tap HTC Hub. 3. Tap Get more. 4. Tap Sound Enhancer. 5. Tap Audio and Video to set the sound option you want to use. You can choose No effects or SRS enhancement. For Audio, If you’re using a wired headset, you can also choose from various preset equalizer settings. (SRS and equalizer are not available when you’re using a Bluetooth stereo headset.) Stocks Get updates for the stocks you are following. Checking your stocks 1. On the Start screen, tap . 2. Tap HTC Hub. 3. Tap Get more. 4. Tap Stocks. 5. Tap a stock to see its trading history. Swipe your finger up on the list of stocks to see more. Adding a stock quote or stock market index 1. On the Stocks screen, tap . 2. Enter the stock quote or stock market index on the text field, and then tap . 3. On the results list, tap the stock quote or stock market index you want to add. 62 HTC ������������� Hub������ Deleting a stock quote or index 1. On the Stocks screen, tap ... > edit. 2. Tap the red circle beside the item you want to delete. 3. Tap done. Changing the stock list order 1. On the Stocks screen, tap ... > edit. 2. Press and hold at the end of the item you want to move. When the row is highlighted, drag it to its new position, then release. 3. Tap done. 63 More ��������������� apps������ More apps Microsoft Office Mobile 2010 The Microsoft® Office hub consists of the following apps: Microsoft OneNote Mobile 2010 lets you keep track of stuff at home, school, or work — your big ideas, shopping lists, meeting notes, projects, you name it. Microsoft® Word Mobile 2010 lets you create and edit documents on your phone. Microsoft® Excel® Mobile 2010 lets you create, view, and edit Excel spreadsheets on your phone. Microsoft® PowerPoint® Mobile 2010 lets you view (not create) and edit slideshow presentations on your phone. SharePoint Workspace lets you view, edit, and download documents stored on Microsoft SharePoint Server 2010. Currently, you can’t copy Office documents into your phone from your computer. If you want to get your Word, Excel, or PowerPoint file into your phone, send it as an email attachment to one of the email accounts you have set up on your phone. From there, you can tap the attachment to open it on your phone. To find out how to set up an email account, see “Setting up an account” in the Getting started chapter. 64 More ��������������� apps������ Using Microsoft Office Mobile 1. On the Start screen, tap . 2. Tap Office. 3. Select the Office app you want to use. Scroll left to see the other Office apps. Windows Marketplace On Windows® Marketplace, it’s easy to download and purchase new apps, games, and music that fit your needs and make your phone truly personal. A wide range of free and premium programs is available, from games to powerful business apps. You can also preview and purchase songs on the Marketplace. To open Marketplace on your phone, tap on the Start screen, and then tap Marketplace. Games Join in and play Xbox LIVE® games right on your device. Download games from Windows Marketplace, then either play solo or use the Xbox LIVE service to play with your friends wherever they are. Signing into Xbox LIVE If you already signed in with a Windows Live ID that is associated with a gamertag (your Xbox LIVE player ID) when you first turned on and set up your device, then you’re also signed into Xbox LIVE and you can start accessing and playing games in the Game hub. If you haven’t signed in yet, follow the steps below to log into Xbox LIVE. 1. To open Games on your phone, tap the Games tile on the Start screen. 2. Swipe your finger horizontally across the screen to go to Xbox LIVE. Then tap Join Xbox LIVE to play with friends. 65 More ��������������� apps������ 3. When you see the “Windows Live ID required” message, tap sign in. 4. Follow the onscreen instructions to sign in using your Windows Live ID or create a new Windows Live ID if you don’t have one yet. Games Hub After successfully signing into Xbox LIVE, you’ll see the following in the Game hub: collection spotlight Xbox LIVE requests Lists games you can download and try out on your device. Tap one to download it from Windows Marketplace and install it on your device. To choose from more games, tap Get more games at the bottom of the list. Games that you’ve already purchased or downloaded are also listed. Tap a game to open it and start playing. Shows links to news, tips, and all kinds of information on Xbox LIVE. Displays your profile such as your gamertag and avatar. Displays new game invitations and also alerts to notify that it’s your turn to play. Tap one to accept an invitation or play your turn. You can also invite others to play with you. Downloading and Installing Xbox LIVE Extras If you’d like to change your gamertag or dress up your avatar from your device, you need to download and install Xbox LIVE Extras from Windows Marketplace. This application also allows you to track your achievements in your games and connect with your Xbox LIVE friends. In Xbox LIVE of the Game hub, just tap anywhere on the screen and follow the onscreen instructions to download and install Xbox LIVE Extras. 66 Security������ �������������� Security Protecting your phone with a password You can secure your phone by requiring a password every time your phone is turned on or every time it wakes up from sleep mode (screen is off). 1. On the Start screen, tap . 2. Tap Settings > lock & wallpaper. 3. Tap the Password On/Off switch. 4. Enter the password in both the New password and Confirm password boxes. 5. Tap done. Protecting your phone through the Web It’s a nightmare when you lose your phone especially if there’s sensitive information on it. Luckily, by going to www.windowsphone.live.com on your computer, you can find your phone’s location, lock it, make it ring, and even erase the contents on your phone through a web browser. Two things to keep in mind. One, before you go to the windowsphone.live.com website, make sure you are signed in to your Windows Live account on your phone. Two, make sure to sign in to Windows Live on your computer using the same Windows Live ID you used on the phone. For you to be able to find and control your phone from your computer web browser, make sure your phone is connected to the Internet through a Wi-Fi or data connection. 67 Settings������ �������������� Settings Settings on your phone Control and customize phone settings on the Settings screen. 1. On the Start screen, tap . 2. Tap Settings. 3. Slide your finger left or right to access the system or application settings System settings ringtones & sounds theme Turn on or off ringer and vibrate. Choose sounds to use for your phone ringtone and notifications. Choose which events to play a notification sound. Set the background and accent color to use. airplane mode Turn on or off airplane mode. Wi-Fi Bluetooth email & accounts brightness keyboard Set up your Wi-Fi connection. Manage your Bluetooth connections. Set up accounts such as Windows Live, Outlook (Exchange ActiveSync), Facebook, and more. Setting up accounts lets your phone sync information with those accounts. Change your lock screen wallpaper, set the screen time out, and set up a password for your phone. Choose whether to allow or prevent apps on your phone from accessing your current location. Turn on or off your data connection, choose whether to enable data roaming, and set the network type.. Choose to set the date and time automatically or manually and choose how you want the time displayed. Set the screen brightness. Choose the options you want for the onscreen keyboard. region & language Set the regional format to use for displaying and searching information. ease of access Set the TTY/TDD mode. speech Choose the options you want when using voice to interact with your phone. find my phone If you’re not signed in to a Windows Live account, set up your phone to communicate with a web browser. If you’re already signed in, change the settings on how your phone can be found. Choose if you want to be notified when there is an update available and how you want to check for updates. Check information about your phone. You can also do a factory reset of your phone. Choose if you want your phone to send feedback to Microsoft and whether to allow the use of data connection when sending. Note that if Use my cellular data connection to send feedback is selected, you may have to pay additional fees if feedback is enabled. lock & wallpaper location cellular date & time phone update about feedback 68 Settings������ �������������� Applications settings Check or change the settings for some apps on your phone. Tap the app name on the list to see what settings are available. Changing display settings Setting the screen brightness manually 1. On the Start screen, tap . 2. Tap Settings > brightness. 3. Tap the Automatically adjust On/Off switch to turn it off. 4. Select the Level to use. Adjusting the time before the screen turns off After a period of inactivity, the phone screen turns off to save battery power. You can set the idle time before the screen turns off. 1. On the Start screen, tap . 2. Tap Settings > lock & wallpaper. 3. Tap the Screen time-out box, and then select the time before the screen turns off. Changing sound settings Switching between silent and vibrate modes 1. On the Start screen, tap . 2. Tap Settings > ringtones & sounds. 3. Tap the Vibrate On/Off switch to turn off vibrate. With Vibrate on, your phone will go to vibrate mode when you lower the sound volume down to zero. When Vibrate is off, the phone will go to silent mode when you set the volume to zero. Switching between silent, vibrate, and normal modes Change from normal mode to vibrate or silent mode by pressing the VOLUME DOWN button until the volume level reaches zero. Change back to normal mode by pressing the VOLUME UP button. Choosing the notification sound You can choose a sound that you want for notifications. 1. On the Start screen, tap . 2. Tap Settings > ringtones & sounds. 3. Tap the box of the notification you want to change, and then choose the sound to use. 69 Settings������ �������������� Checking information about your phone 1. On the Start screen, tap . 2. Tap Settings > about. Changing the phone language When you turn your phone on for the first time, you are asked to select the language you would like to use. You can also change the language on the fly whenever you like. Changing the language adjusts the keyboard layout, date and time formatting, and more. The languages available to choose from may depend on the version of phone you have. 1. On the Start screen, tap . 2. Tap Settings > region & language. 3. Tap the Display language box, and then select the display language you want. 4. Tap Tap here to accept changes and restart your phone. 70 Update ���������������������� and reset������ Update and reset Updating the phone software From time to time, updates for your phone may be available. Your phone can check and then notify you if there’s a new update. Setting the phone to notify you when an update is available 1. On the Start screen, tap . 2. Tap Settings > phone update. 3. Select the Notify me when new updates are found check box. 4. Choose whether to allow the use of your phone’s data connection to check for updates. When you are notified of an available update, connect your phone to your computer using the supplied USB cable to download and install the update using the Zune software. Your computer needs to be connected to the Internet to download the update. Restarting or factory resetting your phone If your phone becomes unresponsive or sluggish, try restarting your phone and see if that helps. In case your phone has a persistent problem that cannot be solved, the last resort is to do a factory reset. Restarting your phone (soft reset) If your phone is running slower than normal, an app is not performing properly, or your phone becomes unresponsive, try restarting your phone and see if that helps solve the problem. To restart your phone, simply turn it off and back on. If pressing and holding the POWER button doesn’t work, then remove the battery, wait for a few seconds, reinsert the battery, and then turn the phone on. 71 Update ���������������������� and reset������ Performing a factory reset (hard reset) If you’re passing your phone on to someone else or your phone has a persistent problem that cannot be solved, you can do a factory reset (also called a hard reset). This returns your phone to the state it was in before the first time you turned it on. Factory reset is not a step to be taken lightly. It will permanently delete all your data and customized settings, and will also remove any apps you’ve downloaded and installed. Be sure to back up any data and files you want to keep before you do a factory reset. Performing a factory reset via settings The most convenient way to do a factory reset is via the phone settings. 1. On the Start screen, tap . 2. Tap Settings > about. 3. Tap reset your phone, and then tap yes. Performing a factory reset using phone buttons If you cannot turn on your phone or access the phone settings, you can still perform a factory reset by using the buttons on the phone. 1. With the phone turned off, press and hold the VOLUME UP and DOWN buttons, and then briefly press the POWER button. 2. Wait for the screen to show the instructions on how to do the factory reset, and then release the VOLUME UP and DOWN buttons. 3. Follow the instructions onscreen to factory reset your phone. 72 Trademarks ������������������������������ and copyright������ Trademarks and copyright ©2011 HTC Corporation. All Rights Reserved. HTC, the HTC logo, the HTC quietly brilliant logo, and HTC HD7 are trademarks of HTC Corporation. Microsoft, Windows, Windows Phone, ActiveSync, Bing, Excel, Hotmail, Internet Explorer, OneNote, Outlook, PowerPoint, Windows Live, Windows Phone Marketplace, Windows Media, Windows Vista, Word, Xbox LIVE, and Zune are the trademarks or service marks of the Microsoft group of companies.. Google is a trademark of Google, Inc. Bluetooth and the Bluetooth logo are trademarks owned by Bluetooth SIG, Inc. Wi-Fi is a registered trademark of the Wireless Fidelity Alliance, Inc. Facebook is a trademark of Facebook, Inc. All other company, product, and service names mentioned herein are trademarks or service marks of their respective owners. HTC shall not be liable for technical or editorial errors or omissions contained herein, nor for incidental or consequential damages resulting from furnishing this material. The information is provided “as is” without warranty of any kind and is subject to change without notice. HTC also reserves the right to revise the content of this document at any time without prior notice. No part of this document may be reproduced or transmitted in any form or by any means, electronic or mechanical, including photocopying, recording or storing in a retrieval system, or translated into any language in any form without prior written permission of HTC. 73 Index Index A Adding a new contact 22 Airplane mode 20 Answering an incoming call 17 B Back cover 8 Battery 9 Bing Maps 54 Bluetooth 43 - connecting headset or car kit 43 Browser 40 C - sending photos or videos 49 - settings 34 Ending a call 19 Entering Information - QWERTY keyboard 25 Exchange ActiveSync 31 F Facebook - sharing photos 50 Factory reset 70 Finger gestures 11 Flash (camera) 46 Flight mode 20 Calendar 35 - creating an appointment 35 - sending an invitation 36 Caller ID 17 Call history 19 Call services 20 Camera 45 Capturing video 46 Changing the phone language 69 Changing the ringtone 16 Charging the battery 10 Checking information about your phone 69 Conference call 18 Contacts 22 H D Linking contact information 23 Location services 54 Lock screen wallpaper 14 Data connection 39 Deleting contacts 24 E Editing a contact’s information 23 Email 31 - deleting 32 - Exchange ActiveSync 31 - POP3/IMAP account 31 - sending 33 HTC Hub 58 Hubs 13 I Inserting the battery 9 Interacting with your phone by speaking 16 K Keyboard 25 - moving the cursor 27 L M Maps 54 Marketplace 64 Merging contact information 23 Messaging 28 Me tile 24 Mobile network connection 39 Muting the microphone 19 74 Index N Office Mobile 63 Speakerphone 19 Start screen 12 Switching between calls 18 Switching your phone on or off 11 Synchronizing your computer and phone 51 P T People 21 Phone - front, top, left, and back panels 6 - making an emergency call 17 - making calls 17 - phone dialer 17 Photo capture 46 Pictures 48 POP3/IMAP 31 Powering on or off 11 Predictive text 27 Putting a call on hold 18 Taking a photo 46 Text message 28 Tiles 12 Turning your phone on or off 11 Notification sound 68 O Q QWERTY keyboard 25 R Rejecting an incoming call 17 Removing the back cover 8 Removing the battery 9 Removing the bottom cover 8 Replacing the bottom cover 8 S Searching 15 Searching for a contact 23 Sending - email 33 - picture message 29 - text message 28 Settings 67 - camera 47 Setting up an account 16 Setting up your phone for the first time 12 SkyDrive - uploading photos 50 Sleep mode 13 SMS 28 Sound volume 15 U Updating the phone software 70 V Video capture 46 Videos 49 Viewfinder screen (Camera) 45 Viewing photos and videos 49 Volume 15 W Web browser 40 Wi-Fi 39 Z Zooming - camera 45 - in and out of a photo 49 - web browser 41 Zune 51