1
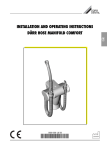
Comfort Hose Manifold EN 9000-606-18/30 1210V002 Installation and Operating Instructions Contents Important information Mounting 1 Documentation��������������������������������������� 2 1.1 Warnings and symbols ��������������������� 2 1.2 Notes on copyright ��������������������������� 2 6 Mounting����������������������������������������������� 13 6.1 Changing hose manifold elements����������������������������������������� 13 6.2 Wall mounting without swivel joint ��� 14 6.3 Wall mounting with swivel joint��������� 15 6.4 Fixing to Dürr Dental mounting plates ��������������������������������������������� 16 6.5 Connect the hoses and lay correctly����������������������������������������������� 16 6.6 Electrical connection����������������������� 17 6.7 Place panel in position��������������������� 18 6.8 Position and fit out suction hoses ��� 18 2 Safety ����������������������������������������������������� 3 2.1 Correct use��������������������������������������� 3 2.2 Incorrect use������������������������������������� 3 2.3 General safety notes������������������������� 3 2.4 Safe connection of appliance������������� 3 2.5 Qualified personnel ��������������������������� 3 2.6 Protection against electrical current ��������������������������������������������� 3 2.7 Only use original parts����������������������� 3 2.8 Transport������������������������������������������� 4 2.9 Disposal ������������������������������������������� 4 Usage Product description 3 Overview������������������������������������������������� 5 3.1 variants��������������������������������������������� 6 3.2 Delivery Contents ����������������������������� 7 3.3 Accessories��������������������������������������� 8 3.4 Special accessories��������������������������� 8 3.5 Disposable materials������������������������� 8 3.6 Working parts and spare parts����������� 8 4 Technical data ��������������������������������������� 9 4.1 Model identification plate������������������� 9 4.2 Note on Conformity��������������������������� 9 5 Function ����������������������������������������������� 10 5.1 Module set-up��������������������������������� 11 5.2 Triple hose manifold������������������������� 11 5.3 Four-fold hose manifold������������������� 11 5.4 Suction hose in position ����������������� 11 5.5 Suction hose removed��������������������� 11 5.6 Filter function����������������������������������� 11 5.7 Rinse function��������������������������������� 11 5.8 Suction handpiece��������������������������� 11 5.9 Suction handpiece for saliva extractor hose with slider ������������������� 11 5.10Swivel joint ������������������������������������� 11 9000-606-18/30 1210V002 7 Instructions for use ����������������������������� 19 7.1 Tips on ease of operation ��������������� 19 7.2 Tips on working with the four-fold hose manifold��������������������������������� 19 8 Disinfection and cleaning ����������������������������������������������� 20 8.1 Disinfect and clean the hose manifold together with the complete suction system ������������������������������� 20 9 Preparation������������������������������������������� 21 9.1 Mixing instructions��������������������������� 21 10 Maintenance����������������������������������������� 23 10.1Change disposable filter ����������������� 23 10.2Change the suction hose����������������� 23 10.3Lubricate the O-rings����������������������� 23 Trouble-shooting 11 Tips for Operators and Technicians ��� 24 1 EN Important information 1 Documentation These Installation and Operating Instructions form an integral part of the unit. They conform to the relevant version of the equipment and the status of technology valid at the time of first operation. Dürr Dental cannot guarantee smooth operation and safe function of the unit and will not accept any liability where the instructions and notes contained in these installation and operating instructions are not strictly observed. EN This translation has been carried out in all good faith. The original German version is decisive. Dürr Dental accepts no liability for incorrect translation. 1.1 Warnings and symbols Warnings The warnings in this document are there to point out possible injury to persons or damage to machinery. The following warning symbols are used: Notes, e.g. special instructions concerning economical use of the unit. Observe the accompanying documentation. CE-labeling Date of manufacture Dispose of product correctly and in accordance with EU directive (2002/96/ EG-WEEE). Unplug at the mains and remove all power. Wear protective gloves. Only use once. Part type B General warning symbol The warnings are structured as follows: SIGNAL WORD Description of type and sourceof danger Possible consequences of ignoringthe safety warning here •Measures to be taken to avoidany possible danger. 1.2 Notes on copyright All circuits, processes, names, software and appliances quoted are protected under industrial property rights. Any reprinting of the technical documentation, in whole or in part, is subject to prior approval of Dürr Dental being given in writing. The signal word differentiates between differentlevels of danger: DANGER High risk of danger of serious injury or death WARNING Possible risk of danger of serious injury or death CAUTION Risk of danger of minor injuries NOTICE Risk of serious damage Further symbols These symbols are used within the documentation and on the unit itself: 2 9000-606-18/30 1210V002 Important information 2 Safety Dürr Dental has designed and constructed this appliance so that when used correctly there is no danger to people or property. Nevertheless, there are residual risks. Please follow the instructions below carefully. 2.1 Correct use The Dürr Dental Comfort Hose Manifold is part of a dental suction system designed for intraoral aspiration during dental medical applications. Suction hoses can be hung in place in the Comfort hose manifold when not being used even with the cannula fitted in position. On hanging a suction hose into its holder an electrical signal switches off the suction unit. On removing a suction hose from its holder an electrical signal automatically switches on the suction unit. The Comfort hose manifold with its suction hoses and handpieces is suitable for both wet and dry suction systems. The Comfort hose manifold has been designed as a modular system. The number of modules can be expanded as required. 2.2 Incorrect use Any use of this appliance above and beyond that specifically described in these instructions will be deemed to be as not according to the intended use. The manufacturer cannot be held liable for any damage resulting from incorrect usage. The user bears all risks. WARNING Risk of explosion due to inflammation of combustible materials •Do not use the appliance in rooms in which combustible mixtures may be present, e.g. in operating theatres. 2.3 General safety notes •Before using the appliance observe any and all guidelines, laws, regulations and other restrictions which may apply to the appliance. •Before each use check the function and condition of the appliance. •Do not convert or change the appliance in any way. •Observe the Installation and Operating Instructions precisely. 9000-606-18/30 1210V002 •Keep the Installation and Operating Instructions in an accessible place so that the operator has instant access to them. 2.4 Safe connection of appliance During development and construction of the unit care has been taken to incorporate all requirements of medical products as far as was possible. As a result this appliance is suitable for installation within medical supply equipment. •Observe the requirements under directive 93/42 EWG as well as all relevant standards when fitting into medical facilities. A master copy of the system manufacturer‘s declaration according to Article 12 of Directive 93/42/EWG can be found in our download section under www.duerr.de (Document No. 9000461-264). 2.5 Qualified personnel Instructions for use Persons who operate the appliance must, on the basis of their training and knowledge, ensure safe and correct handling of the appliance. •Ensure personnel are trained in the correct usage of the appliance. Installation and repair •Installation, resetting, alterations, extensions and repairs must be carried out by Dürr Dental or by qualified personnel specifically approved and authorized by Dürr Dental. 2.6 Protection against electrical current •When working on and with the appliance always observe the local electrical safety procedures. •Never come into contact with patients and open plug-in connections on the appliance at the same time. •Damaged supply lines and connections must be replaced immediately. 2.7 Only use original parts •Only Dürr Dental parts or accessories and special accessories specifically approved by Dürr Dental may be used. •Only use original working parts and spare parts. 3 EN Important information Dürr Dental cannot accept any liability for damage caused by the use of accessories and special accessories not specifically approved by Dürr Dental or not using original working parts and spare parts. 2.8 Transport EN The original packaging offers the optimum protection for the appliance during transport. If required, the original packaging for the unit can be ordered at Dürr Dental. Dürr Dental cannot accept any liability for damage caused during transport by the use of unsuitable packaging, this is also valid during the warranty term. •Only transport the appliance in its original packaging whenever possible. •Keep the packing materials out of the reach of children. 2.9 Disposal The unit may be contaminated. Inform the waste management company so that they can take all necessary safety steps. •Prepare accessory parts before disposal, then dispose of according to local and national regulations. •If you have any questions concerning the correct disposal of parts please contact your dental trade supplier. 4 9000-606-18/30 1210V002 Product description 3 Overview F 1 K EN 2 G 3 4 5 6 11 10 8 9 7 Figure 1: Comfort hose manifold Type GFK 1 2 3 4 5 6 7 Cannula, e.g. Dürr Dental universal cannula III/Protect/Petito, prophylaxis cannula Suction handpiece for saliva extractor hose with slider Suction handpiece for larger suction hose Swivel joint Disposable filter Suction handpiece for smaller suction hose Small suction hose 8 9 10 11 G F K Large suction hose Clip for laying electric cable and rinsing hose Rinsing hose Electric cable Element for larger suction hose Filter element Element for smaller suction hose For further articles refer to the information leaflet (order number 9000-606-16/01) supplied and "3.4 Special accessories" 9000-606-18/30 1210V002 5 Product description 3.1 variants S G F K G = Element for larger suction hose K = Element for smaller suction hose S = Element for air and water spray F = Filter element F G 1 F G K G K G F 2 G EN 3 Figure 2: Double hose manifold Comfort, Type FG 1 Figure 4: Fourfold hose manifold Comfort Elements FG, 7602G01 G F K G F 1 1 2 3 G Type SGFK, 7604G01 Type GFGK, 7604G02 Type KGFG, 7604G03 2 Figure 3: Triple hose manifold Comfort 1 2 6 Type GFK, 7603G01 Type GFG, 7603G02 9000-606-18/30 1210V002 Product description 3.2 Delivery Contents Standard parts in scope of delivery of suction hoses and suction handpieces, etc. are grey. The following parts are included in the scope of delivery: Double hose manifold Comfort, Type FG��������������������������������������������� 7602G01 –– Large suction handpiece –– Large suction hose, 160 cm –– Central suction hose –– Rinsing hose, PVC, 3 x 1.5 x 6 mm –– Disposable filter, yellow (12 pieces) –– Universal cannula set (2 pieces) –– Drill template –– Swivel joint –– Rotating collar, 16 mm –– Hose manifold installation set –– Installation and Operating Instructions Triple hose manifold Comfort, Type GFK ����������������������������������������� 7603G01 –– Small suction handpiece –– Large suction handpiece –– Large suction hose, 160 cm –– Small suction hose, 160 cm –– Central suction hose –– Rinsing hose, PVC, 3 x 1.5 x 6 mm –– Disposable filter, yellow (12 pieces) –– Universal cannula set (2 pieces) –– Drill template –– Swivel joint –– Rotating collar, 16 mm –– Hose manifold installation set –– Installation and Operating Instructions Triple hose manifold Comfort, Type GFG ����������������������������������������� 7603G02 –– Larger suction handpiece, 2x –– Large suction hose, 160 cm, 2x –– Central suction hose –– Rinsing hose, PVC, 3 x 1.5 x 6 mm –– Disposable filter, yellow (12 pieces) –– Universal cannula set (2 pieces) –– Drill template –– Swivel joint –– Rotating collar, 16 mm, 2x –– Hose manifold installation set –– Installation and Operating Instructions 9000-606-18/30 1210V002 Four-fold hose manifold Comfort, Type SGFK ��������������������������������������� 7604G01 –– Small suction handpiece –– Large suction handpiece –– Large suction hose, 160 cm –– Small suction hose, 160 cm –– Central suction hose –– Rinsing hose, PVC, 3 x 1.5 x 6 mm –– Disposable filter, yellow (12 pieces) –– Universal cannula set (2 pieces) –– Drill template –– Swivel joint –– Rotating collar, 16 mm –– Hose manifold installation set –– Inserts for air and water spray –– Installation and Operating Instructions Four-fold hose manifold Comfort, Type GFGK��������������������������������������� 7604G02 –– Small suction handpiece –– Large suction handpiece –– Large suction hose, 160 cm –– Small suction hose, 160 cm –– Central suction hose –– Rinsing hose, PVC, 3 x 1.5 x 6 mm –– Disposable filter, yellow (12 pieces) –– Universal cannula set (2 pieces) –– Drill template –– Swivel joint –– Rotating collar, 16 mm –– Hose manifold installation set –– Saliva cannula –– Installation and Operating Instructions Four-fold hose manifold Comfort, Type KGFG��������������������������������������� 7604G03 –– Small suction handpiece –– Large suction handpiece –– Rinsing hose, PVC, 3 x 1.5 x 6 mm –– Large suction hose, 160 cm –– Small suction hose, 160 cm –– Central suction hose –– Disposable filter, yellow (12 pieces) –– Universal cannula set (2 pieces) –– Drill template –– Swivel joint –– Rotating cover, 16 mm –– Hose manifold installation set –– Saliva cannula –– Installation and Operating Instructions 7 EN Product description Five-fold hose manifold Comfort Type SGFKK������������������������������������� 7605G51 The five-fold hose manifold Comfort can be configured to meet any requirements. 3.3 Accessories An overview of Dürr Dental suction handpieces, swivel joints, rotating covers, adapters and cannula can be found in the information leaflet supplied: "Cleaning and Disinfection of Suction Handpieces". Order number (9000-606-16/01) or in our download area under www.duerr.de EN 3.4 Special accessories When ordering, the order number must be completed by substituting ? by either the letter A = grey or S = black. Example: 7600A010-50 for grey or 7600S010-50 for black The following are optional and can be used with the unit: large suction hose 160 cm���������������������������������������� 7600?010-50 large suction hose 145 cm���������������������������������������� 7600?010-51 small suction hose 160 cm���������������������������������������� 7600?020-50 small suction hose 145 cm���������������������������������������� 7600?020-51 central suction hose�������������������� 7600?350-00 saliva cannula (fits large suction handpiece)��������� 7068-003-05 swivel arm�����������������������������������7600G150-00 filter cover for disposable filter, yellow, 1 piece ����������������������������� 0725-041-03 adapter plate for triple-hose manifold, grey ��������������������������������������������� 7600-163-01 adapter plate for four-fold hose manifold, grey����������������������� 7600-164-01 adapter plate for five-fold hose manifold, grey����������������������� 7600-165-01 adapter plate suitable, for example, for Cattani connection bore holes� 7600-166-01 8 Further elements for hose manifolds element for air and water spray with 4 inserts��������������������������������������7600G980-50 VistaCam element for use with Dürr Dental intraoral cameras (VistaCam Model 2106)��7600G980-54 VistaCam iX element for use with Dürr Dental intraoral cameras (VistaCam Model 2108)��7600G980-56 3.5 Disposable materials The following materials are required when operating the unit and must be ordered separately: Disposable filter, yellow (12 pieces)0725-041-00 3.6 Working parts and spare parts The following parts are subject to wear and tear and must be replaced regularly (refer also to section on maintenance): large suction hose, grey, 160 cm���������������������������������������� 7600A010-50 large suction hose, grey, 160 cm���������������������������������������� 7600S010-50 small suction hose, grey, 160 cm���������������������������������������� 7600A020-50 small suction hose, black, 160 cm���������������������������������������� 7600S020-50 Information concerning spare parts can be found in the Spare Parts Catalogue under: www.duerr.de/etk. 9000-606-18/30 1210V002 Product description 4 Technical data Unit electrical data Protective low voltage AC / DC Surge current min max Operating pressure, max. Fusing V 5 - 24 mA A mbar / hPa 5 4 -200 IP23 Ambient conditions during storage and transport Temperature °C -10 to +60 Rel. humidity % < 95 4.1 Model identification plate The model identification plate to the Comfort hose manifold can be found under the filter element cover. EN Classification according to medical devices directive (93/42/EWG) Unit Class I Handpiece Class I Cannula Class IIa General technical data Dimensions (W x H x D) cm Weight kg Suction performance Universal cannula on large suction hose Surgical suction cannula on small suction hose Saliva cannula on small suction hose 15 x 18 x 11 ca. 1 l/min 250 - 350 l/min 50 - 80 l/min 30 - 60 Suction handpiece, cannula retainer Large suction handpiece mm ∅16 Small suction handpiece mm ∅ 6± 0.1 Suction handpiece for saliva extractor hose with slider mm ∅16 Hose cross-sections Large suction hose Small suction hose central suction hose mm mm mm LW 19 LW 10 LW 25 Order number/Model number SN Serial number 4.2 Note on Conformity This appliance has been tested according to the relevant directive of the European Union and the required conformity acceptance procedure. This appliance meets all the necessary requirements. Ambient conditions during operation Temperature °C +10 to +40 Rel. humidity % < 70 9000-606-18/30 1210V002 9 Product description 5 Function 1 2 EN 3 4 5 Figure 5: Suction hose in position 1 2 3 4 5 Suction handpiece Membrane Disposable filter Suction hose Suction hose, central Figure 6: Suction hose removed 10 9000-606-18/30 1210V002 Product description 5.1 Module set-up Due to its modular design the Comfort hose manifold can be individually set up to meet your needs, depending on types of treatment, or personal suction style and handling. Between 2 and 4 elements, in special cases even 5 elements, can be configured for one hose manifold. For other variations of Comfort hose manifold see "3.1 variants" Individual elements are adjustable and can be adapted to three different ergonomic angles of application (0°, 15°, 30°). 5.2 Triple hose manifold The triple hose manifold has a selective function, i.e. the suction hose actually being used at any moment is supplied with vacuum. 5.3 Four-fold hose manifold The selective function for the four-fold hose manifold is restricted to the single element next to the filter element. As soon as two further elements are used next to the filter element then both are supplied with vacuum. Both the large and small suction handpieces are fitted with a slider to control the rate of flow or to switch off the suction flow while working. 5.6 Filter function During suction of spray mist, saliva and other particles from the patient mouth, these are then passed through the suction hose and via the open membrane and filter and into the suction system. The integrated yellow filter serves to hold the larger particles back. 5.7 Rinse function EN Connection of a rinsing unit serves to supply water to the suction system while working. This serves to prevent drying out and thus prevent the build up of difficult to remove deposits in the suction system. 5.8 Suction handpiece The slider fitted in the large and small suction handpieces can be used to control the rate of flow or to switch off the suction flow while working. 5.9 Suction handpiece for saliva extractor hose with slider A rotating collar can be added to the large suction handpiece. This enables the cannula to be turned more easily. 5.10Swivel joint 5.4 Suction hose in position When the suction hose is placed into the hose manifold the switch is pressed and the valve is thus closed. Atmospheric pressure is present in the upper section of the selective membrane. Due to the arrangement of the selective membrane the path between suction hose and suction system is interrupted. A swivel joint can be attached to the large suction handpiece. The swivel joint is rotatable in 15° steps. This helps to achieve a smoother, better supply of the hose. 5.5 Suction hose removed By removing the suction hose a valve and two microswitches are activated. One microswitch activates the suction unit, the other can regulate the station selection valve or the separation, for example. The valve opens. Due to the vacuum created by the suction unit the membrane rises and opens the path between suction hose and suction system. 9000-606-18/30 1210V002 11 Product description EN 12 9000-606-18/30 1210V002 Mounting Only fully-qualified or from Dürr Dental trained personnel may set-up, install or operate this appliance. 6.1 Changing hose manifold elements This section is only required in the case of changing an element of the hose manifold or where a different element is required. 6 Mounting The hose manifold can be fixed with or without the swivel arm (1) as follows: –– to the wall –– on or under a work surface •Remove the side panel. EN 1 1 ~1 mm 2 press 3 •Undo 3 screws. •Remove the front cover, pressing the sides, and lifting to the front. 1 9000-606-18/30 1210V002 2 1 •Pressed the section marked from both sides in order to take the element apart. 13 Mounting •Slide both the red and the white hoses from the filter element. •Use the drill template (7600-100-31) supplied to mark 3 bore positions on the wall. 1. 30 mm Ø 5mm 1 3 4 EN 98 mm •Unclamp the cable to the filter element. 2. 3. Ø 5mm Ø 5mm 47 mm 7600-100-31 2005/02 1 3 4 •Bore 3 holes, 5 mm in diameter. Depending on the material, pre-bore and / or use dowels. •Screw the first screw half way into the upper bore hole. •Install the new element in reverse order. 6.2 Wall mounting without swivel joint •Hang the Comfort hose manifold in position. •Choose a suitable location on wall for mounting. •Check that there are no cables or supply lines under the plaster. 14 9000-606-18/30 1210V002 Mounting •Open the filter flap and remove the yellow filter. •Fix the mounting plate with the two screws. 2 EN 1 6.3 Wall mounting with swivel joint Instructions on installing the Comfort hose manifold in combination with the swivel arm are contained in the instruction leaflet (order no. 7600150-00). •Remove the cover. 1 •Insert the screwdriver horizontally through the opening and tighten the screw. 1 Swivel arm •Replace filter and cover. 9000-606-18/30 1210V002 15 Mounting 6.4 Fixing to Dürr Dental mounting plates Previous versions of the Dürr Dental hose manifold were fitted with the aid of a mounting plate to the wall, to a swivel arm or swivel joint. Where a Comfort hose manifold is replacing an older, previous version, then we recommend that an adapter plate is used between manifold and mounting plate. Adapter plates are available in various sizes, depending on the type of hose manifold, see Special accessories. EN •Mount the adapter plate using two M5 x 12 screws to the Comfort hose manifold. •Mount the adapter plate with hose manifold Comfort to the mounting plate using M4 x 12 hex screw and M4 hex nut. 1 2 2 1 1 Mounting plate 2 Adapter plate •Loosen parts 1a and 1b of the mounting plate. 6.5 Connect the hoses and lay correctly Connect the central suction hose and lay correctly: •Connect the central suction hose to the hose manifold. 2 1 1a 4 3 1b •Unscrew the older hose manifold from part 1a. •Attach plate part 1b again to part 1a. 16 •Measure the length of the central suction hose, between hose manifold and waste water drain, e.g. to the floor waste pipe. 9000-606-18/30 1210V002 Mounting •Shorten the central suction hose to the required length. •Connect the central suction hose on waste water side, using the connector pieces supplied where necessary. •Attach the hose with the clip to the central suction hose. 1 2 EN 3 4 6.6 Electrical connection Connect the rinse hose and lay correctly: •Slide off the blue covering cap and slide the rinse hose in place. NOTICE Fault due to cable being laid under mechanical tension •Avoid mechanical strain when laying cable. •Lay the cable parallel to the central suction hose and to rinse hose and connect to the floor socket. •Clip the hose to the central suction hose. •Lay the rinsing unit hose, ensuring as far as possible that it is parallel to the central suction hose. 9000-606-18/30 1210V002 17 Mounting 6.7 Place panel in position Example of connection A EN B •Place front panel in position again, noting sequence: 1. Slide the cover under the edge. 2. and 3. Snap clipse in place. 2 C 1 3 A B C Comfort Hose Manifold Station selector switch Control box, e.g. 0732-.. or 0700-.. Connection in filter element 6.8 Position and fit out suction hoses •Connect suction hose or suction hoses. Fit out suction hoses, depending on variant and according to needs, e.g.: •Large suction hose fitted with: swivel joint, large suction handpiece, rotating collar and universal cannula. •Small suction handpiece fitted with: small suction handpiece and e.g. saliva cannula. 1 3 4 18 9000-606-18/30 1210V002 Usage 7 Instructions for use 7.1 Tips on ease of operation Adjustable inserts in the elements, depending on function •Initial position 0°. Turn the inserts to the desired position 0° / 15° / 30°. 0° •A rotating collar (1) can be added to the large suction handpiece. This enables the cannula to be turned more easily. •The slider fitted in the large and small suction handpieces (2) can be used to control the rate of flow or to switch off the suction flow while working. •A rotating collar (3) can be added to the large suction handpiece. The swivel joint is rotatable in 15° steps. This helps to achieve a smoother, better supply of the hose. 7.2 Tips on working with the fourfold hose manifold 0°/15°/30° Using the rotating collar, suction handpiece and swivel joint 360° 1 Vacuum supply When using a four-fold hose manifold (e.g. GFGK, KGFG) and two further elements have been connected next to the filter element, then both elements will be supplied with vacuum. Optimising suction performance Using as an example a hose manifold with the layout GFGK: If the large suction hose G is being used, then close the slider on the small suction hose K. 2 3 15° steps 1 2 3 Suction handpiece for saliva extractor hose with slider Suction handpiece Swivel joint 9000-606-18/30 1210V002 19 EN Usage 8 Disinfection and cleaning 8.1 Disinfect and clean the hose manifold together with the complete suction system EN For reasons of hygiene and perfect function, after every patient treatment •Aspirate a glass of cold water through the large and the small suction hoses. Carry out this, even when for example only the small suction hose was actually used during treatment. Aspiration using the larger suction hose allows a greater amount of fresh air to be drawn up and this increases considerably the cleaning efficiency. After completing treatment Disinfect and clean the suction system after treatment is completed, and where greater patient loads are experienced 2 x day (midday and evening) For the disinfection and cleaning of the complete suction system (Comfort hose manifold, suction hoses, amalgam separator, suction unit) use a non-aggressive, non-foaming disinfection and cleaning agent approved and released by Dürr Dental, e.g. Orotol plus. To aspirate the disinfection and cleaning agent, a care system using a suction hose adapter should be used (e.g. OroCup). Suction from a beaker or another vessel without using a suitable adapter is not appropriate for disinfection and cleaning. •Make up 1 liter anew and distribute among max. four spittoons. •Allow to work for a minimum of one hour or leave overnight. •After the effective working time, or the next morning, suck 2 liters water through using the care set OroCup. Disinfect and clean surface parts •Disinfect and clean all surface areas of the Comfort hose manifold and all hoses regularly, e.g. using FD 350 disinfection wipes. 1 - 2 x Weekly Clean the suction system 1 - 2 x week, on heavier patient loads also during the midday break, using special cleaning agent For water with higher calcium levels, we recommend using a special cleaning agent for suction systems, such as MD 555 cleaner. This has a stronger cleaning action against deposits, scaling and sludge accumulation. •As pretreatment suck up 2 liters of water through the system using the system OroCup. •Preparing the solution. For a single treatment unit: 50 ml (2.5 cap fulls) MD 555 cleaner together with sufficient cold water to make up one liter and mix the solution. •Attach the suction hose to the care system and aspirate the solution. •Make up 1 liter anew and distribute among max. four spittoons. •Allow to take effect for 0.5 to 2 hours (midday break). •After the effective working time suck up 2 liters of water through the system using the system OroCup. •As pretreatment suck up 2 liters of water through the system using the system OroCup. •Preparing the solution. For a single treatment unit: 20 ml (1 cap full) Orotol plus together with sufficient cold water to make up one liter and mix the solution. •Attach the suction hose to the care system and aspirate the solution. 20 9000-606-18/30 1210V002 Usage 9 Preparation 9.1 Mixing instructions Clean, disinfect and steam sterilise accessories •Clean, disinfect and steam sterilise cannula, suction handpiece, and the swivel joint if necessary etc. after every patient. Observe preparation regulations under EN ISO 17664. Also refer to the information leaflet (order number 9000-606-16) supplied Risk assessment and classification Cannula and suction handpieces are medical instruments which come into contact with mucous membranes and skin or tissue which has been affected by illness. Observe all current local and national regulations concerning the cleaning, disinfection, sterilisation and storage of all parts! In Germany a risk assessment and classification of medical devices must be carried out according to „Empfehlungen der Kommission für Krankenhaushygiene und Infektionsprävention“ (Recommendations of the Commission into Hospital Hygiene and Prevention of Infection). These medical products are classified as Semicritical B, requiring greater care in their preparation. Transport / Storage •After use, place parts in a suitable closed container which is filled with an instrument disinfectant solution (e.g. ID 212, ID 212 forte, ID 213; observe the manufacturer‘s instructions) collect and transport in a securely sealed vessel to the site of cleaning. Preparation for cleaning No special requirements. •Disassemble. •Where necessary, remove larger dirt particles etc. using a disinfectant disposable wipe (e.g. FD 350). •After the cleaning and disinfection cycles have finished check the cannula carefully for signs of residual dirt and repeat the cycles if necessary. Cleaning and disinfection, manual Cleaning takes place in a wet chemical process using a VAH/DGHM listed instrument disinfection agent: •Do not use an ultrasonic cleaning device or chemical autoclaven. •Do not use glutaraldehyde of a phenol basis. •Place the parts fully submersed in an instrument-disinfectant and cleaning agent, e.g. Dürr Dental ID 212, ID 212 forte; ID 213. Observe manufacturer‘s instructions carefully. •After the cleaning and disinfection cycles have finished check the cannula carefully for signs of residual dirt and repeat the cycles if necessary. •Rinse parts thoroughly with water.. •Drying should be carried out using hygienically clean, disposable wipes, or under the application of compressed air. Check and test of function Frequent application and cleaning has little effect on parts. The end of the product's life cycle is determined by the amount of wear and tear or damage during usage. •Always check parts before use and replace damaged parts and dispose of faulty parts. •Before disposal the parts should be disinfected and steam sterilised. Packaging •Sterilise parts either unpacked or packed in a container or in sterile product packaging. Use a suitable sterile product packaging! Cleaning and disinfection, automatic Use cleaning and disinfection devices strictly according to manufacturer's instructions. •Place the parts into the unit in such a way that the interior surfaces will be rinsed thoroughly and the water can drain off. •Set up the cleaning and disinfection cycles according to the manufacturer’s instructions. 9000-606-18/30 1210V002 21 EN Usage Steam sterilisation WARNING The wrong sterilisation inhibits effectiveness and can damage the product •Only steam sterilisation is permitted •Do not exceed 134 °C. •Observe the process parameters. •Do not use any other procedures. •Place filter paper on the sterilisation tray. •Always sterilise the parts together with instruments, as this ensures an even temperature distribution throughout the tray contents. •Avoid any metal contact of the parts either with any other instruments or with the sides of the tray. •Lay parts for sterilisation avoiding any contact to the inner sides of the sterilisation chamber and on the middle tray. •The product must be steam sterilised in a disassembled state only. EN suitable apppliances, materials and trained personnel in order to produce the desired results. Validation and routine monitoring of the preparation procedures are necessary. Any deviation from the instructions described herein by the staff preparing the equipment could lead to lower effectiveness and possible negative consequences: these lie solely with the staff responsible. Process parameters Temperature: 134 °C Pressure above environment: 2.16 bar / 0.216 MPa Working time: 5 min •Parts for sterilisation must be placed in a small steam sterilisor before every usage according to EN 13060 and with sterilisation cycle Type B with subsequent drying. •Observe manufacturer‘s instructions carefully regarding the usage of the steam sterilisator and the correct placement of items to be sterilised. •Observe all national and local guidelines and standards regarding sterilisation of medical products. Storage •Store the parts protected against possible contamination. Important information The instructions described above have been validated by Dürr Dental as suitable and are recommended for the preparation of parts before and after use. The surgery manager is responsible for ensuring that the correct and safe preparation of the instruments is carried out using 22 9000-606-18/30 1210V002 Usage 10 Maintenance 10.2Change the suction hose Wear protective gloves. 10.1Change disposable filter The suction hose is subject to wear and tear. •Check the suction hose regularly at bends, change if required. •Slide the suction hose from the Comfort hose manifold. Change the disposable filter once a week NOTICE Faulty function when working without a disposable filter Working without a disposable filter runs the risk that deposits or particles will accumulate in unsuitable locations within the hose manifold and hinder efficient function. •The yellow disposable filter must be in position. •Open the cover to the filter element and change the yellow disposable filter. Disposable filter (12 pieces) order number 0725-041-00 EN •Connect new suction hose. 10.3Lubricate the O-rings old 3 2 The suction handpiece, suction hoses etc. are easier to handle when the O-rings have been treated with a little Vaseline. •Disassemble the suction handpiece regularly and lubricate the O-rings. 1 ne eli s Va 9000-606-18/30 1210V002 23 Trouble-shooting 11 Tips for Operators and Technicians Repairs above and beyond simple maintenance may only be carried out by a qualified technician or one of our service technicians. EN Problem Probable cause Reduced suction performance Disposable filter in the hose mani- •Change disposable filter. fold is full No suction Solution Blockage in suction hose •Remove and clean suction hose. Blockage in suction handpiece •Disassemble and clean suction handpiece. Suction hose bent or twisted •Change the suction hose. Selective membrane does not completely open •Remove filter cover. Remove dirt particles, e.g. using blunt tweezers or jet of water. Do not damage the selective membrane! Suction handpiece slider is closed •Open the handpiece slider. Suction unit does not fuction •Check the suction unit function. Selective membrane does not open •Remove filter cover. Remove dirt particles, e.g. using blunt tweezers or jet of water. Do not damage the selective membrane! Control hose of one element bent •Check the control hose, e.g. in or twisted element for large suction hose and filter element, for signs of twisting. Fluid escapes from the suction handpiece slider 24 Dirt or accumulated deposits in suction handpiece •Disinfect suction handpiece, clean and then prepare, see "9 Preparation" 9000-606-18/30 1210V002 Dürr Dental AG Höpfigheimer Strasse 17 74321 Bietigheim-Bissingen Germany Fon: +49 7142 705-0 www.duerr.de info@duerr.de


![PLAS A O ]-OR](http://vs1.manualzilla.com/store/data/005852706_1-5db0b7ed584537f0e62af161fb124638-150x150.png)