1
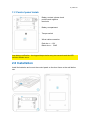
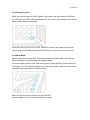
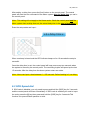
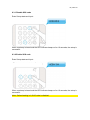
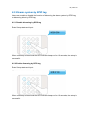
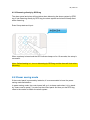
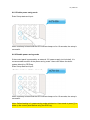
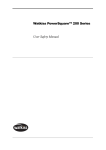
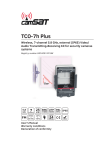
EM8622
Wireless Control Panel
2 | ENGLISH
EM8622 - Wireless Control Panel
Table of contents
1.0 Introduction ........................................................................................................... 3
1.1 Packing contents ............................................................................................... 3
1.2 Control panel front ............................................................................................. 3
1.3 Control panel inside ........................................................................................... 4
2.0 Installation ............................................................................................................. 4
3.0 Usage.................................................................................................................... 5
3.1 Arm the alarm system ........................................................................................ 5
3.2 Disarm the alarm system ................................................................................... 6
3.2.1 Using control panel to disarm ..................................................................... 6
3.2.2 Using RFID Tag to disarm .......................................................................... 7
3.2.3 Home Mode ................................................................................................ 7
3.2.4 Emergency Call .......................................................................................... 8
3.2.5 Mute Mode ................................................................................................. 8
4.0 Connect to the alarm system ................................................................................. 9
5.0 Connect RFID Tag to control panel ........................................................................ 9
6.0 Settings ............................................................................................................... 11
6.1 Enter Setup-state............................................................................................. 11
6.2 Delay Arm........................................................................................................ 11
6.3 SOS Speed dial ............................................................................................... 12
6.3.1 Disable SOS code .....................................................................................13
6.3.2 Enable SOS code ......................................................................................13
6.4 Keyboard tone ................................................................................................. 14
6.4.1 Disable keyboard tone ...............................................................................14
6.4.2 Enable keyboard tone ................................................................................14
6.5 Disarm system by RFID tag ............................................................................. 15
6.5.1 Disable disarming by RFID tag ..................................................................15
6.5.2 Enable disarming by RFID tag ...................................................................15
6.5.3 Disarming silently by RFID tag ...................................................................16
6.6 Power saving mode ......................................................................................... 16
6.6.1 Enable power savig mode..........................................................................17
6.6.2 Disable power saving mode .......................................................................17
6.7 Change user code ........................................................................................... 18
6.8 Change admin code ........................................................................................ 18
6.9 Reset the control panel .................................................................................... 19
7.0 Frequently Asked Questions and other related information .................................. 19
8.0 Service and support............................................................................................. 20
9.0 Warning and points of attention ........................................................................... 20
10.0 Warranty conditions ........................................................................................... 21
3 | ENGLISH
1.0 Introduction
Congratulations with the purchase of this high-quality Eminent product! This product
has undergone extensive testing by Eminent’s technical experts. Should you
experience any problems with this product, you are covered by a five-year Eminent
warranty. Please keep this manual and the receipt in a safe place.
Register your product now on www.eminent-online.com and receive product updates!
1.1 Packing contents
The following parts need to be present in the packing:
•
EM8622 Wireless Control Panel
•
Manual
•
3pcs AAA batteries
•
External connection cable
•
Screws and plugs
1.2 Control panel front
Led indicator
RFID tag reader
Arm button
Disarm button
Home mode button
SOS button
Wake-up button
4 | ENGLISH
1.3 Control panel inside
Battery contact, please check
positive and negative
terminals
Battery compartment
Tamper switch
Wired cable connection
Red wire = + 12V
Black wire = - GND
Low battery notification : the keypad beeps twice every two seconds and the LED
indicator flashes once.
2.0 Installation
Install the batteries and mount the control panel on the door frame or the wall before
use.
5 | ENGLISH
1) Remove the screw and open the case
2) Install the batteries according to the positive and negative signs (Remove the
insulating strip before the first use)
3) Mount the backcover on the door frame or wall
4) Close the case and replace the screw
Note : Opening the cover will trigger the tamper switch ! You can disarm it by entering
the admin code 123456 followed by [#].
Note : The default admin code is : 123456. See chapter “Change Admin Code” to
change it.
Note : The default user code is : 1234. See chapter “Change User Code” to change it.
3.0 Usage
The control panel can be used as a remote control. User code or admin code should
be input before the operation of Arm, Disarm, Home Mode and Mute Mode.
3.1 Arm the alarm system
Input user code or admin code, and press [Arm] key. The LED indicator
flashes once and the control panel beeps once and sends Arm command to
the alarm system.
When the alarm panel receives the signal, the siren will beep once and the
Arm indicator will light on. The alarm system enters armed state.
If there is an intrusion the alarm system will be triggered, the siren will hoot
and the alarm system will send an SMS and auto dial to pre-stored phone
numbers to notify users.
6 | ENGLISH
Note : When an entry delay is set, the external control panel will NOT warn you with
an audio signal when a sensor is triggered. Only the alarm system itself will give an
audio signal !
3.2 Disarm the alarm system
Users can disarm the alarm system by using the control panel or by using RFID tags.
3.2.1 Using control panel to disarm
Input user code or admin code, and press the [Disarm] key. The LED indicator
flashes once and the control panel beeps once, and sends Disarm command to the
alarm system.
When the alarm panel receives the signal, the siren will beep twice and the Disarm
indicator will light. The alarm system enters disarmed state. In this state the sensors
being triggered will not cause an alarm.
7 | ENGLISH
3.2.2 Using RFID Tag to disarm
If direct disarm by RFID tag is disabled (this is the default power saving mode when
using batteries), user needs to press [*] to wake up the control panel and then put
RFID tag close to the reader to disarm the alarm system..
When the power saving function is disabled, user can put the RFID tag directly close to
the control panel to disarm the alarm system.
3.2.3 Home Mode
Input user code or admin code and press [Home Mode] key, the LED indicator flashes
once and the control panel beeps once and sends Home Mode command to the alarm
system.
When the alarm panel receives the signal, the siren will beep once and the Home
Mode indicator will light, the alarm system enters Home Mode state.
All the sensors in other zones are armed to prevent the intruder except that the motion
detector in Home Mode Zone is disarmed, so that people can move freely at home.
Note : Check manual of the alarm system for installing sensors in home mode.
8 | ENGLISH
3.2.4 Emergency Call
When the control panel is in SOS Speed Dial mode, user just holds the [SOS] key
for 3 seconds, the LED indicator flashes once, the control panel beeps once, and the
alarm system alarms immediately.
When the control panel is not in SOS Speed Dial mode, user needs to input user
code or admin code before holding the [SOS] key for 3 seconds to send an alarm.
3.2.5 Mute Mode
Mute mode means that the LED indicators of the control panel flash, but the siren
does not beep to avoid disturbing the neighbourhood.
Input user code or admin code, and hold any key of [Arm] [Disarm] [Home Mode] for
2 seconds. The LED indicator flashes once, the control panel beeps once and sends
corresponding command to the alarm system.
When the alarm panel receives the signal, the LED
indicator lights on or off, but the siren does not beep.
9 | ENGLISH
4.0 Connect to the alarm system
Note : The default admin code is : 123456. See chapter “Change Admin Code” to
change it.
Note : The default user code is : 1234. See chapter “Change User Code” to change it.
Make sure the alarm system is in connection state (press code on alarm system and
press the memo button).
Input the admin code on the control panel and press the Arm, Disarm or Home mode
button.
When the control panel is connected successful the alarm system will give one beep.
5.0 Connect RFID Tag to control panel
Note : The default admin code is : 123456
1. Input the admin code followed by the [#] button. ( a long beep is heard)
2. Immediatly after step one, press the 9 button. One beep is heard an the LED
indicator will be on for about 2 seconds. The control panel is in learning state.
During the time the LED is on, you can connect the RFID tag to the control panel.
10 | ENGLISH
3. Put the RFID tag close to the RFID reader. If one beep is heard the connecting is
successful. When 2 beeps are heard, the RFID tag was already connected to the
control panel.
To remove all connected RFID tags, input the admin code followed by the # button.
Press and hold down the 9 button for six seconds. All RFID tags are cleared after one
beep is heard.
Note : you can connect up to 50 RFID tags to the EM8622.
11 | ENGLISH
6.0 Settings
Before changing the settings of the control panel, the control panel should be in
“setup-state”.
6.1 Enter Setup-state
Note : The default admin code is : 123456
Input the admin code followed by the [#] button to wake up the control panel.
Press [3] to enter the setup-state. The LED indicator will be on.
Note : When there is no key press within 10 seconds the control panel will exit the
setup-state automatically. You can also press [#] to exit the setup-state.
6.2 Delay Arm
When the alarm system is armed, detectors will start working immediately. At that
time, if you are still at home, it will trigger the alarm system.
12 | ENGLISH
After setting a delay time, press the [Arm] button on the control panel. The control
panel will send the Arm command to the alarm system after the delay time you set in
the control panel.
Note : This setting will not apply to the Home mode. If both the control panel and the
alarm system have a delay time set, the actual delay time is the total of both times !
Enter the setup-state and input :
When one beep is heard and the LED indicator keeps on for 10 seconds the setup is
succesful.
Once the delay time is set, the control panel will beep once every two seconds when
the system is armed by the control panel. The reminding rhythm will speed up the last
15 seconds. After the delay time the alarm system enters arm state.
Note : Users can input a time between 0 – 250 seconds. Default setting is 0, no delay.
6.3 SOS Speed dial
If SOS code is disabled, you only need to press and hold the [SOS] key for 3 seconds
and the control panel will alarm immediately. If SOS code is enabled,you need to input
the code, press the [#] key,then press and hold the [SOS] key for 3 seconds.This
function is to prevent false operation or trick.
13 | ENGLISH
6.3.1 Disable SOS code
Enter Setup-state and input :
When one beep is heard and the LED indicator keeps on for 10 seconds, the setup is
successful.
6.3.2 Enable SOS code
Enter Setup-state and input :
When one beep is heard and the LED indicator keeps on for 10 seconds, the setup is
successful.
Note : Default setting is 0, SOS code is disabled.
14 | ENGLISH
6.4 Keyboard tone
Keyboard tones can be switched on or off.
If they are switched off, the beep when a setup is successful will also be switched off !
6.4.1 Disable keyboard tone
Enter Setup-state and input :
When one beep is heard and the LED indicator keeps on for 10 seconds, the setup is
successful.
6.4.2 Enable keyboard tone
Enter Setup-state and input :
When one beep is heard and the LED indicator keeps on for 10 seconds, the setup is
successful.
Note : Default setting is 1, keyboard tones are enabled.
15 | ENGLISH
6.5 Disarm system by RFID tag
Users can enable or disable the function of disarming the alarm system by RFID tag,
or disarming silent by RFID tag.
6.5.1 Disable disarming by RFID tag
Enter Setup-state and input :
When one beep is heard and the LED indicator keeps on for 10 seconds, the setup is
successful.
6.5.2 Enable disarming by RFID tag
Enter Setup-state and input :
When one beep is heard and the LED indicator keeps on for 10 seconds, the setup is
successful.
16 | ENGLISH
6.5.3 Disarming silently by RFID tag
The alarm panel and siren will hoot twice when disarming the alarm system by RFID
tag. If set disarming silently by RFID tag, the alarm system and siren will keep silent
when disarming.
Enter Setup-state and input :
When one beep is heard and the LED indicator keeps on for 10 seconds, the setup is
successful.
Note : Default setting is 1, turn on disarming by RFID tag and the siren will hoot when
disarming.
6.6 Power saving mode
If the control panel is powered by batteries, it is recommended to have the power
saving mode switched on.
In power saving mode, the control panel will go in to sleep mode when it is in standby. Users need to press [*] to wake up the control panel and then put the RFID tag
close to the reader to disarm the alarm system.
17 | ENGLISH
6.6.1 Enable power savig mode
Enter Setup-state and input :
When one beep is heard and the LED indicator keeps on for 10 seconds, the setup is
successful.
6.6.2 Disable power saving mode
If the control panel is powered by an external 12V power supply (not included), it is
recommended to switch of the power saving mode. Users can disarm the alarm
system directly by RFID tag.
Enter Setup-state and input :
When one beep is heard and the LED indicator keeps on for 10 seconds, the setup is
successful.
Note : Default setting is 0, power saving mode switched on. User needs to press [*] to
wake up the control panel before using the RFID tag.
18 | ENGLISH
6.7 Change user code
A user can use its own code to wake up the control panel and send Arm, Disarm or
Home mode commands to the alarm system. The control panel can only have one
user code.
Note : The default user code is 1234. Please change this code at first use !
Enter Setup-state and input :
When one beep is heard and the LED indicator keeps on for 10 seconds, the setup is
successful.
6.8 Change admin code
The admin code is used to wake up the control panel and send Arm, Disarm or Home
mode commands to the alarm system. With the admin code you can also change the
settings of the control panel.
Note : The default admin code is 123456. Please change this code at first use !
Enter Setup-state and input :
When one beep is heard and the LED indicator keeps on for 10 seconds, the setup is
successful.
19 | ENGLISH
6.9 Reset the control panel
After a reset the user code, admin code and all other settings will be restored to
default. Only the connected RFID tags will remain working. To remove the connected
RFID tags, please refer to chapter “Connect RFID Tag to control panel”.
Enter Setup-state and input :
When one beep is heard and the LED indicator keeps on for 10 seconds, the setup is
successful.
7.0 Frequently Asked Questions and other
related information
The latest Frequently asked questions for your product can be found on the support
page of your product. Eminent will update these pages frequently to assure you have
the most recent information. Visit www.eminent-online.com for more information about
your product.
20 | ENGLISH
8.0 Service and support
This user’s manual has been carefully written by Eminent’s technical experts. If you
have problems installing or using the product, please fill out the support form at the
website www.eminent-online.com/support.
You can also contact us by phone. Please check www.eminent-online.com/support for
the helpdesk phone number and opening hours.
9.0 Warning and points of attention
Due to laws, directives and regulations set out by the European parliament, some
(wireless) devices could be subject to limitations concerning its use in certain
European member states. In certain European member states the use of such devices
could be prohibited. Contact your (local) government for more information about this
limitations.
Always follow up the instructions in the manual*, especially where it concerns devices
which need to be assembled.
Warning: In most cases this concerns an electronic device. Wrong/improper use may
lead to (severe) injuries!
Repairing of the device should be done by qualified Eminent staff. The warranty
immediately voids when products have undergone self-repair and/or by misuse. For
extended warranty conditions, please visit our website at www.eminentonline.com/warranty.
*Tip: Eminent manuals are written with great care. However, due to new technological
developments it can happen that a printed manual does not longer contain the most
recent information.
If you are experiencing any problems with the printed manual or you cannot find what
you are looking for, please always check our website www.eminent-online.com first for
the newest updated manual.
Also, you will find frequently asked questions in the FAQ section. It is highly
recommended to consult the FAQ section. Very often the answer to your questions will
be found here.
21 | ENGLISH
10.0 Warranty conditions
The five-year Eminent warranty applies to all Eminent products, unless mentioned
otherwise before or during the moment of purchase. After buying a second-hand
Eminent product the remaining period of warranty is measured from the moment of
purchase by the product’s initial owner. Eminent warranty applies to all Eminent
products and parts, indissolubly connected or mounted to the product it concerns.
Power supply adapters, batteries, antennas and all other products not directly
integrated in or connected to the main product or products of which, without
reasonable doubt, can be assumed that wear and tear during use will show a different
pattern than the main product, are not covered by the Eminent warranty. Products are
not covered by the Eminent warranty when exposed to incorrect/improper use,
external influences or when opening the service parts of the product by parties other
than Eminent. Eminent may use refurbished materials for repair or replacement of
your defective product. Eminent cannot be held responsible for changes in network
settings by internet providers. We cannot guarantee that the Eminent networking
product will keep working when settings are changed by the internet providers.
Eminent cannot guarantee the working of web services, apps and other third party
content that is available through Eminent products. Eminent products with an internal
hard disk have a limited warranty period of two years on the hard disk. Eminent could
not be held responsible for any data lost. Please make sure that if the product stores
data on a hard drive or other memory source, you will make a copy before you return
the product for repair.
When my product gets defective
Should you encounter a product rendered defective for reasons other than described
above: Please contact your point of purchase for taking care of your defective product.
EM8622 | 07-2014
NL
FR
PT
DE
PL
|EU-CONFORMITEITSVERKLARING
|DÉCLARATION UE DE CONFORMITÉ
|DECLARAÇÃO DE CONFORMIDADE UE
|EU-KONFORMITÄTSERKLÄRUNG
|DEKLARACJA ZGODNOŚCI UE
EN
ES
IT
HU
|EU DECLARATION OF CONFORMITY
|DECLARACIÓN UE DE CONFORMIDAD
|DICHIARAZIONE UE DI CONFORMITÀ
|EU-MEGFELELŐSÉGI NYILATKOZAT
Deze conformiteitsverklaring wordt verstrekt onder volledige verantwoordelijkheid van de fabrikant | This declaration of conformity is issued
under the sole responsibility of the manufacturer | La présente déclaration de conformité est établie sous la seule responsabilité du fabrikant | La
presente declaración de conformidad se expide bajo la exclusiva responsabilidad del fabricante | A presente declaração de conformidade é
emitida sob a exclusiva responsabilidade do fabricante | La presente dichiarazione di conformità è rilasciata sotto la responsabilità esclusiva del
fabbricante | Die alleinige Verantwortung für die Ausstellung dieser Konformitätserklärung trägt der Hersteller | E megfelelőségi nyilatkozat a
gyártó kizárólagos felelősségére kerül kibocsátásra | Niniejsza deklaracja zgodności wydana zostaje na wyłączną odpowiedzialność producenta
Productnummer | Product number | Numéro Produit | Número del
Producto | Número do Produto | Numero Prodotto | Produktnummer |
Termékszám | Numer Produktu:
EM8622
Naam fabrikant | Manufacturer’s Name | Nom du fabricant | Nombre del
fabricante | Nome do fabricante| Nome produttore| Name des Herstellers
Gyártó neve | Nazwa producenta:
Eminent
Productomschrijving | Product description | Description du produit |
Descripción del producto | Descrição do produto | Descrizione del
prodotto | Produktbeschreibung | Termékleírás | Opis produktu:
Control panel
Voldoet aan de volgende standaarden | Conforms to the following standards | Conforme aux normes suivantes | Cumple las siguientes
normativas | Em conformidade com as seguintes normas | Conforme ai seguenti standard | Stimmt mit folgenden Normen überein |Megfelel az
alábbi szabványoknak | Zgodnoś z następującymi standardami:
EN 301 489-1 V1.9.2:2011
EN 301 489-3 V1.4.1:2002
EN 300 220-1 V2.3.1:2010
EN 300 220-2 V2.3.1:2010
EN 62479:2010
EN 60950-1:2006 + A11:2009 + A1:2010 + A12: 2011
Ik, de ondergetekende, verklaar hierbij dat de apparatuur overeenkomt met de essentiële eisen en andere relevante eisen van de R&TTE Richtlijn
(1999/5/EG) en de bovengenoemde normen | I, the undersigned, hereby declare that the equipment Conforms with the essential requirements
and other relevant requirements of the R&TTE Directive (1999/5/EC) and to the above standards | Je, sous-signé, déclare par la présente que
l'équipement est conforme aux exigences essentielles et aux autres exigences pertinentes de la directive R&TTE (1999/5/EC) et aux normes cidessus | Yo, el abajo firmante, por la presente declaro que este equipo cumple los requisitos esenciales y otros requisitos relevantes de la
Directiva de Equipos Radioeléctricos y Equipos Terminales de Telecomunicaciones (1999/5/EC) y las normativas indicadas anteriormente | Eu,
abaixo assinado, declaro que o equipamento está em conformidade com os requisitos essenciais e outras disposições relevantes da Diretiva ETRT
(1999/5/CE) e com as normas acima referidas | Il sottoscritto dichiara che l'apparecchiatura è conforme ai requisiti essenziali ed alle altre
disposizioni pertinenti della Direttiva R&TTE (1999/5/CE) e agli standard di cui sopra | Ich, der Unterzeichner, erkläre hiermit, dass das Gerät mit
den wesentlichen Anforderungen und weiteren diesbezüglichen Anforderungen der R&TTE-Richtlinie (1999/5/EG) sowie den obig genannten
Normen übereinstimmt | Alulírott, ezúton tanúsítom, hogy a berendezés megfelel az R&TTE irányelv (1999/5/EK) lényeges követelményeinek és
egyéb vonatkozó rendelkezéseinek, illetve a fenti szabványoknak | Ja, niżej podpisany, niniejszym deklaruję, że to urządzenie spełnia ważne
wymagania oraz inne powiązane wymagania Dyrektywy R&TTE (1999/5/EC) i wspomnianych wyżej standardów.
Het hierboven beschreven voorwerp is conform Richtlijn 2011/65/EU (“RoHS”) van het Europees Parlement en de Raad van 8 juni 2011
betreffende beperking van het gebruik van bepaalde gevaarlijke stoffen in elektrische en elektronische apparatuur | The object of the declaration
described above is in conformity with Directive 2011/65/EU (“RoHS”) of the European Parliament and of the Council of 8 June 2011 on the
restriction of the use of certain hazardous substances in electrical and electronic equipment | L’objet de la déclaration décrit ci-dessus est
conforme à la directive 2011/65/UE (“RoHS”) du Parlement européen et du Conseil du 8 juin 2011 relative à la limitation de l’utilisation de
certaines substances dangereuses dans les équipements électriques et électroniques | El objeto de la declaración descrito anteriormente es
conforme a la Directiva 2011/65/UE (“RoHS”) del Parlamento Europeo y del Consejo, de 8 de junio de 2011, sobre restricciones a la utilización de
determinadas sustancias peligrosas en aparatos eléctricos y electrónicos | O objecto da declaração acima mencionada está em conformidade com
a Directiva 2011/65/UE (“RoHS”) do Parlamento Europeu e do Conselho, de 8 de Junho de 2011, relativa à restrição do uso de determinadas
substâncias perigosas em equipamentos eléctricos e electrónicos | L’oggetto della dichiarazione di cui sopra è conforme alla direttiva 2011/65/UE
(“RoHS”) del Parlamento europeo e del Consiglio dell’8 giugno 2011, sulla restrizione dell’uso di determinate sostanze pericolose nelle
apparecchiature elettriche ed elettroniche| Der oben beschriebene Gegenstand der Erklärung erfüllt die Vorschriften der Richtlinie 2011/65/EU
(“RoHS”) des Europäischen Parlaments und des Rates vom 8. Juni 2011 zur Beschränkung der Verwendung bestimmter gefährlicher Stoffe in
Elektro- und Elektronikgeräten | E nyilatkozat fent leírt tárgya összhangban van az egyes veszélyes anyagok elektromos és elektronikus berendezé
sekben való alkalmazásának korlátozásáról szóló, 2011. június 8-i 2011/65/EU (“RoHS”) európai parlamenti és tanácsi irányelvvel | Opisany
powyżej przedmiot deklaracji jest zgodny z dyrektywą Parlamentu Europejskiego i Rady 2011/65/UE (“RoHS”) z dnia 8 czerwca 2011 r. w sprawie
ograniczenia stosowania niektórych niebezpiecznych substancji w sprzęcie elektrycznym i elektronicznym
Plaats | Place| Lieu | Lugar | Local | Luogo | Ort | Hely | Miejsce:
Datum | Date | Date | Fecha | Data | Data | Datum | Dátum | Data:
Naam | Name | Nom | Nombre | Nome | Nome | Name | Név | Nazwa:
Barneveld, The Netherlands
2013, 11-05,
Marc Pannebakker, Marketing Director
Handtekening | Signature | Signature | Firma | Assinatura | Firma |
Unterschrift | Aláírás | Podpis:
Eminent is a brand of Intronics BV, Postbus 123, 3770 AC Barneveld, The Netherlands
www.eminent-online.com