1
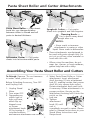
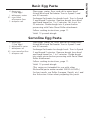
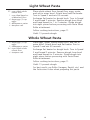
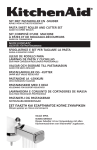
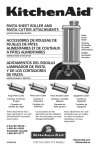
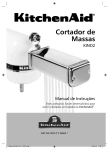
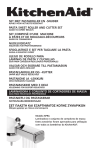
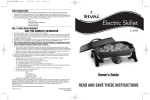
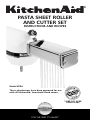
PASTA SHEET ROLLER
AND CUTTER SET
INSTRUCTIONS AND RECIPES
Model KPRA
These attachments have been approved for use
with all KitchenAid® household stand mixers.
1-800-541-6390
Details Inside
®
™
FOR THE WAY
A IT’S MADE.
Hassle-Free Replacement Warranty
We’re so confident
the quality of our
products meets the
exacting standards of
KitchenAid that, if your
Pasta Sheet Roller and
Cutter Set should fail within the first
year of ownership, KitchenAid will
arrange to deliver an identical or
comparable replacement to your
door free of charge and arrange to
have your “failed” Pasta Sheet Roller
and Cutter Set returned to us. Your
replacement unit will also be covered
by our one year full warranty. Please
follow these instructions to receive
this quality service.
If you reside in the 50 United
States or the District of Columbia
and your KitchenAid® Pasta Sheet
Roller and Cutter Set should fail
within the first year of ownership,
simply call our toll-free Customer
Satisfaction Center at 1-800-541-6390,
8 a.m. to 8 p.m., Monday through
Friday, 10 a.m. to 5 p.m., Saturday,
Eastern Time. Give the consultant your
complete shipping address. (No P.O.
Box Numbers, please.)
When you receive your replacement
Pasta Sheet Roller and Cutter Set, use
the carton and packing materials to
pack-up your “failed” Pasta Sheet
Roller and Cutter Set. In the carton,
include your name and address on a
sheet of paper along with a copy of
the proof of purchase (register receipt,
credit card charge slip, etc.).
For a detailed explanation of warranty
terms and conditions, including how
to arrange for service outside the
United States, see pages 3 and 4.
Proof of Purchase & Product Registration
Always keep a copy of the sales
receipt showing the date of purchase
of your Pasta Sheet Roller and Cutter
Set. Proof of purchase will assure you
of in-warranty service.
Before you use your Pasta Sheet
Roller and Cutter Set, please fill out
and mail your product registration
card packed with the unit.
This card will enable us to contact
you in the unlikely event of a product
safety notification and assist us in
complying with the provisions of the
Consumer Product Safety Act. This
card does not verify your warranty.
Please complete the following for
your personal records:
Model Number _______________________________________________________
Serial Number ________________________________________________________
Date Purchased _______________________________________________________
Store Name __________________________________________________________
Table of Contents
Hassle-Free Replacement Warranty...........................................Inside Front Cover
Product Registration Card ........................................................Inside Front Cover
Important Safeguards........................................................................................2
Warranty ...........................................................................................................3
For the 50 United States and District of Columbia.......................................3
For Puerto Rico ...........................................................................................4
Arranging for Service After the Warranty Expires.........................................4
Arranging for Service Outside the 50 United States and Puerto Rico ...........4
Ordering Accessories and Replacement Parts .....................................................4
Pasta Sheet Roller and Cutter Attachments ........................................................5
Assembling Your Pasta Sheet Roller and Cutters.................................................5
Tips for Perfect Pasta .........................................................................................6
Suggested Roller Settings ..................................................................................6
Using Your Pasta Sheet Roller and Cutters..........................................................7
Care and Cleaning .............................................................................................8
Maintenance .....................................................................................................8
Pasta Recipes .....................................................................................................9
Your safety and the safety of others are very important.
We have provided many important safety messages in this manual and on your
appliance. Always read and obey all safety messages.
This is the safety alert symbol.
This symbol alerts you to potential hazards that can kill or hurt you
and others.
All safety messages will follow the safety alert symbol and either
the word “DANGER” or “WARNING.” These words mean:
DANGER
You can be killed or seriously injured
if you don’t immediately follow
instructions.
WARNING
You can be killed or seriously injured
if you don’t follow instructions.
All safety messages will tell you what the potential hazard is, tell you how to
reduce the chance of injury, and tell you what can happen if the instructions are
not followed.
1
IMPORTANT SAFEGUARDS
When using electrical appliances, basic safety precautions should always be
followed including the following:
1. Read all instructions.
2. To protect against risk of electrical shock, do not put mixer in water or
other liquid.
3. Close supervision is necessary when this or any appliance is used near children.
4. Unplug mixer from outlet when not in use, before putting on or taking off
parts and before cleaning.
5. Avoid contacting moving parts. Keep fingers out of discharge opening.
6. Do not operate the mixer with a damaged cord or plug or after the mixer
malfunctions, or is dropped or damaged in any manner. Return the mixer
to the nearest Authorized Service Center for examination, repair or
electrical or mechanical adjustment.
7. The use of attachments not recommended or sold by KitchenAid may
cause fire, electric shock or injury.
8. Do not use the mixer outdoors.
9. Do not let the cord hang over the edge of table or counter.
10. Do not let cord contact hot surface, including the stove.
11. This product is designed for household use only.
SAVE THESE INSTRUCTIONS
2
KitchenAid® Pasta Sheet Roller and Cutter Set
Warranty for the 50 United States and
District of Columbia
This warranty extends to the purchaser and any succeeding owner for
Pasta Sheet Roller and Cutter Sets operated in the 50 United States and
District of Columbia.
Length of
Warranty:
KitchenAid Will Pay
For Your Choice of:
One Year Full Warranty
from date of purchase.
Hassle-Free Replacement
of your Pasta Sheet
Roller and Cutter Set.
See inside front cover
for details on how to
arrange for service, or
call the Customer
Satisfaction Center
toll-free at
1-800-541-6390.
OR
The replacement parts
and repair labor costs
to correct defects in
materials and
workmanship. Service
must be provided by an
Authorized KitchenAid
Service Center. See the
KitchenAid® Pasta Sheet
Roller and Cutter Set
Warranty for Puerto
Rico on page 4 for
details on how to
arrange for service.
KitchenAid Will Not
Pay For:
A. Repairs when
Pasta Sheet Roller
and Cutter Set is
used in other than
normal single family
home use.
B. Damage resulting
from accident,
alteration, misuse or
abuse.
C. Any shipping or
handling costs to
deliver your Pasta
Sheet Roller and
Cutter Set to an
Authorized Service
Center.
D. Replacement parts
or repair labor costs
for Pasta Sheet
Roller and Cutter Set
operated outside the
50 United States and
District of Columbia.
KITCHENAID DOES NOT ASSUME ANY RESPONSIBILITY FOR INCIDENTAL
OR CONSEQUENTIAL DAMAGES. Some states do not allow the exclusion or
limitation of incidental or consequential damages, so this exclusion may not
apply to you. This warranty gives you specific legal rights and you may also
have other rights which vary from state to state.
3
KitchenAid® Pasta Sheet Roller and Cutter Set
Warranty for Puerto Rico
A full one year warranty extends to
the purchaser and any succeeding
owner for Pasta Sheet Roller and Cutter
Sets operated in Puerto Rico. During
the warranty period, all service must
be handled by an Authorized
KitchenAid Service Center. Please bring
the Pasta Sheet Roller and Cutter Set,
or ship it prepaid and insured, to the
nearest Authorized Service Center.
Call toll-free 1-800-541-6390 to
learn the location of a Service Center
near you. Your repaired Pasta Sheet
Roller and Cutter Set will be returned
to you prepaid and insured.
Arranging for Service
After the Warranty Expires
For service information, call toll-free
1-800-541-6390 or write to:
Customer Satisfaction Center,
KitchenAid Portable Appliances, P.O.
Box 218, St. Joseph, MI 49085-0218.
Arranging for Service Outside
the United States and Puerto Rico
Consult your local KitchenAid dealer
or the store where you purchased the
Pasta Sheet Roller and Cutter Set for
information on how to obtain service.
Ordering Accessories and Replacement Parts
To order accessories or replacement
parts for your Pasta Sheet Roller
and Cutter Set, call toll-free
1-800-541-6390 or write to:
Customer Satisfaction Center,
KitchenAid Portable Appliances, P.O.
Box 218, St. Joseph, MI 49085-0218.
4
Pasta Sheet Roller and Cutter Attachments
St. JosKitche
eph nAid
, Mic
higa
n USA
Solid
Stat
Off e Sp
Stir eed
2 4 Con
6 8 trol
10
St. JosKitche
eph nAid
, Mic
higa
n USA
Pasta Sheet Roller — Adjustment
knob lets you change distance
between rollers to knead and roll
pasta to desired thickness.
St. JosKitche
eph nAid
, Mic
higa
n USA
Solid
Sta
Off te Spe
Stir
ed
2 4 Con
6 8 trol
10
Spaghetti Cutter — Cuts pasta
sheets into spaghetti and thin linguine.
Cleaning Brush —
Use to brush away dried
dough after use.
NOTES:
Solid
Stat
Off e Sp
Stir eed
2 4 Con
6 8 trol
10
• Never wash or immerse
attachments in water or other
liquid. Never wash in dishwasher.
• These attachments are designed to
be used with pasta dough only. Do
not cut or roll any other material or
food with this unit.
Fettuccine Cutter — Cuts pasta
sheets into fettuccine-width pasta.
• When using the machine, do not
wear ties, scarves or long necklaces;
gather long hair with a clasp.
Assembling Your Pasta Sheet Roller and Cutters
4. Select Pasta Sheet Roller or Cutter
attachment. Insert attachment
shaft housing (C) into attachment
hub (D), making certain that power
Before Attaching Accessory, Turn OFF
shaft fits into square hub socket.
and Unplug Unit.
Rotate attachment back and forth
if necessary. When attachment is in
1. Unplug Stand
A
proper position, the pin on the
Mixer
attachment housing will fit into the
2. Turn mixer OFF.
notch on the
3. Depending on
A
hub rim.
which type of
B
5. Tighten
hub you have,
attachment
either flip up
C D
knob (A) until
hinged cover
unit is
or loosen
completely secured to mixer. Please
attachment knob
refer to General Instructions in your
(A) by turning it
Stand Mixer Instructions and
counterclockwise
Recipe book.
and remove attachment hub cover (B).
To Attach: Remove “Do not immerse
in water” label, prior to use.
Lock
Lock
5
Tips for Perfect Pasta
• Good pasta dough is firm and
leathery to touch, but also pliable.
It should never stick to your fingers
or crumble and fall apart. Many
factors, such as humidity, brand of
flour used, and size of eggs, may
affect dough consistency. To test
for correct dough consistency,
pinch a small amount of dough
together after mixing with the flat
beater. If the dough stays together
without sticking to your fingers, it
should work well. It may be
necessary to add a small amount
of flour or water to reach correct
dough consistency.
• Divide sheets of rolled pasta into
halves or thirds before cutting into
fettuccine, spaghetti, or linguine
fini, as they can become quite long
and difficult to manage.
St. JosKitche
eph nAid
, Mic
higa
n USA
Solid
Stat
Off e Sp
Stir eed
2 4 Con
6 8 trol
10
• Some hand separation may be
necessary when cutting wheat or
spinach dough with the fettuccine
or spaghetti cutter. The small
pieces of wheat bran and spinach
are difficult to cut.
• Pastas can be either dried or frozen
for future use. To dry, lay strands of
pasta in a single layer on a towel
or drying rack, and completely air
dry. Store dried pasta in an airtight
container. To freeze, let pasta airdry for one hour before freezing in
an airtight container. It is not
necessary to separate strands of
pasta before freezing, just dust
with flour and form into “nests.”
Suggested Roller Settings
Roller Setting
1 or 2
3
4
4 or 5
6 or 7
7 or 8
Uses
Kneading and thinning dough
Thick “kluski”-type egg noodles
Egg noodles
Lasagna noodles, fettuccine, spaghetti, and ravioli
Tortellini, thin fettuccine, and linguine fini
Very thin “angel-hair”- type pasta/capellini or
very fine linguine
6
Using Your Pasta Sheet Roller and Cutters
4. Move
adjustment
knob to setting
2. Feed dough
through rollers
to further
flatten. Change to setting 3 and
feed dough through rollers again.
Continue to increase roller setting
until desired dough thickness is
reached. See “Suggested Roller
Settings” to determine the correct
thickness for each type of pasta.
5. To make
fettuccine or
spaghetti/thin
linguine,
exchange Pasta
Sheet Roller for
cutter attachment. Feed flattened
sheets of dough through cutter.
Cut pasta can be used immediately
or frozen or dried for later use.
See “Tips for Perfect Pasta” for
information on freezing and drying.
To Use:
1. Prepare pasta dough (see “Tips
for Perfect Pasta.”) Cut dough into
pieces about 3⁄8 inch (1 cm) thick.
Flatten each piece slightly.
10
2. Set adjustment knob on Pasta Sheet
Roller at 1 by
pulling the knob
straight out and
turning to setting
1. Release knob,
making certain
pin on roller housing engages
opening on the back of the knob,
allowing the knob to fit flush to
the roller housing.
3. Turn mixer to Speed 2 or 4. Feed
flattened piece
of dough into
rollers to knead.
Fold dough in
half and roll
again. Repeat
folding and
kneading
process several
times, or until
dough is
smooth and pliable. Lightly dust
pasta with flour while rolling and
cutting to aid in drying and
separation. Knead and fold each
piece of dough in the same manner.
4
6
NOTE: After you finish using your
Pasta Sheet Roller and Cutter
attachments, replace hub cover and
tighten attachment knob.
8 10
7
Care and Cleaning
NOTE: Never wash or immerse
attachments in water or other liquid.
Never wash in dishwasher.
To clean Pasta Sheet Roller and Cutter
attachments, let parts air dry for one
hour and then remove any dried
dough using the Cleaning Brush. If
dried dough cannot be removed, try
hand-tapping the attachment. A
toothpick can be used if necessary.
Never use a knife or other sharp
object to remove excess dough. Polish
with a soft, dry cloth and store
attachment pieces in a dry place at
room temperature.
NOTE: Do not run a dishtowel or any
other cloth through the rollers to
clean them. Do not insert objects such
as knives, screwdrivers, etc., to clean
the unit.
Maintenance
Clean properly after use as described
above. We recommend using a light
mineral oil to lubricate the gears
periodically. Add a drop of mineral oil
to each of the far corners of the
rollers and/or cutters to lubricate the
gears (4 locations). This can be done
annually or after 50 uses.
Lubrication Locations
8
4 large eggs
(7⁄8 cup eggs)
1 tablespoon water
31⁄2 cups sifted
all-purpose flour
1
⁄2 teaspoon salt
Place eggs, water, flour, and salt in mixer bowl.
Attach bowl and flat beater. Turn to Speed 2 and
mix 30 seconds.
Exchange flat beater for dough hook. Turn to Speed
2 and knead 2 minutes. Remove dough from bowl
and hand knead for 1 to 2 minutes. Let it rest for
20 minutes. Divide dough into 4 pieces before
processing with Pasta Sheet Roller attachment.
Follow cooking instructions, page 11.
Yield: 11⁄4 pounds dough.
Semolina Egg Pasta
4 large eggs
(7⁄8 cup eggs)
2 tablespoons water
1 tablespoon oil
31⁄3 cups semolina flour
1
⁄2 teaspoon salt
Place eggs, water, oil, flour, and salt in mixer bowl.
Attach bowl and flat beater. Turn to Speed 2 and
mix 30 seconds.
Exchange flat beater for dough hook. Turn to Speed
2 and knead 2 minutes. Remove dough from bowl
and hand-knead for 1 to 2 minutes. Divide dough
into eight pieces before processing with Pasta Sheet
Roller attachment.
Follow cooking instructions, page 11.
Yield: 11⁄4 pounds dough.
(This recipe not intended for use with other
KitchenAid pasta maker models SNFGA & SNPA.)
For best results use Roller (Lasagna, Ravioli, etc.) and
the Fettuccine Cutter when preparing this pasta.
9
PASTA RECIPES
Basic Egg Pasta
Light Wheat Pasta
21⁄2 cups sifted whole
wheat flour
1 cup sifted bread or
unbleached flour
4 large eggs (7⁄8 cup
eggs)
2 tablespoons water
1
⁄2 teaspoon salt
Place whole wheat flour, bread flour, eggs, water,
and salt in mixer bowl. Attach bowl and flat beater.
Turn to Speed 2 and mix 30 seconds.
Exchange flat beater for dough hook. Turn to Speed
2 and knead 2 minutes. Remove dough from bowl
and hand knead for 1 to 2 minutes. Divide dough
into eight pieces before processing with Pasta Sheet
Roller attachment.
Follow cooking instructions, page 11.
Yield: 11⁄4 pounds dough.
Whole Wheat Pasta
4 large eggs (7⁄8 cup
eggs)
2 tablespoons water
31⁄2 cups sifted whole
wheat flour
1
⁄2 teaspoon salt
Place eggs, water, whole wheat flour, and salt in
mixer bowl. Attach bowl and flat beater. Turn to
Speed 2 and mix 30 seconds.
Exchange flat beater for dough hook. Turn to Speed
2 and knead 2 minutes. Remove dough from bowl
and hand knead for 2 minutes. Divide dough into
eight pieces before processing with Pasta Sheet
Roller attachment.
Follow cooking instructions, page 11.
Yield: 11⁄4 pounds dough.
For best results use Roller (Lasagna, Ravioli, etc.) and
the Fettuccine Cutter when preparing this pasta.
10
Spinach Pasta
1 package (10 oz.)
frozen chopped
spinach, thawed
1 tablespoon water
4 large eggs (7⁄8 cup
eggs)
4 cups sifted allpurpose flour
Place spinach in a towel and wring out all water
until spinach feels very dry. Finely chop spinach
using a food grinder attachment, food processor
or blender.
Place chopped spinach, water, eggs, and flour in
mixer bowl. Attach bowl and flat beater. Turn to
Speed 2 and mix 30 seconds.
Exchange flat beater for dough hook. Turn to
Speed 2 and knead 2 minutes. Remove dough from
bowl and hand knead for 1 to 2 minutes. Divide
dough into eight pieces before processing with
Pasta Sheet Roller attachment.
Follow cooking instructions, See below.
Yield: 11⁄2 pounds dough.
To Cook Pasta
Add 2 teaspoons salt and 1 tablespoon oil
(optional) to 6 quarts boiling water. Gradually add
pasta and continue to cook at a boil until pasta is
“al dente” or slightly firm to the bite. Pasta floats
to the top of the water while cooking, so stir
occasionally to keep it cooking evenly. Drain in a
colander.
Dry pasta – 7 minutes
Fresh pasta – 6 minutes
11
12
13
®
FOR THE WAY IT’S MADE.™
® Registered trademark/™ Trademark/
the shape of the mixer is a registered trademark of KitchenAid, U.S.A.
9704828 Rev. C
© 2005. All rights reserved. (4705dZw405)