1
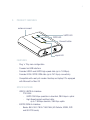
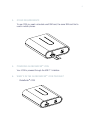
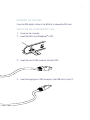
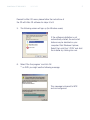
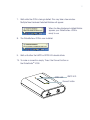
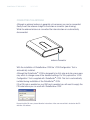
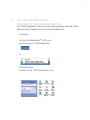
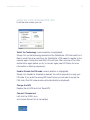
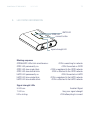
GlobeSurfer i CON
®
User Guide
2
TABLE OF CONTENTS
1. Welcome to GlobeSurfer ® i CON
3
2. Product Features
4
Features
4
Specifications
4
Hardware Specifications
5
3. System Requirements
5
4. Other Requirements
6
5. Powering GlobeSurfer ® i CON
6
6. What’s in the GlobeSurfer ® i CON package?
6
7. Installing and setting up GlobeSurfer ® i CON
7
Inserting the SIM card
7
Installing the GlobeSurfer ® i CON
8
Connecting the antenna
11
8. The ‘i CON Configuration’ Tool
12
9. LED Status Information
15
10. Troubleshooting
16
Appendix A: Limited Warranty
17
Appendix B: Safety and health tips
19
Appendix C: Qualcomm Licensing information
19
GlobeTrotter GT MAX HSUPA
USER GUIDE
IMPORTANT NOTICE
Please check with your network provider for advice on network coverage to
ensure satisfactory performance of this device. Other characteristics such
as network cell handover, dead coverage spots, geographic or structural
obstructions, etc. may also affect the performance of the data transmission.
Before you proceed, be sure to read the Health and Safety Tips in Appendix B.
1.
WELCOME TO GLOBESURFER ® i CON
GlobeSurfer i CON is a self-contained wireless access device, offering the
simplest Internet access method, ever. It attaches to any PC through the USB
connector and provides instant Internet access at DSL-speed using the latest
HSDPA wireless network technology.
GlobeSurfer i CON, combines the convenience of high speed wireless
connectivity (up to 1.8 Mbps downlink) with extreme ease of use.
Automatic drivers installation, built-in control applet, and one-button connect, all
contribute to maximum user-friendliness.
There is no need for installing SW from discs, connecting DSL wires and filters,
setting parameters… It therefore appeals to the broadest market of PC-owners
looking for simple access to Internet and associated services like e-mail, Instant
messaging, on-line gaming, or media download.
GlobeSurfer i CON connects to the Internet at data speeds of up to 1.8 Mbps
using HSDPA and up to 384 Kbps using UMTS.
And in areas beyond 3G coverage, GlobeSurfer i CON still enables reliable and
secure data connections over EDGE at up to 247 Kbps.
Connect anytime, anywhere!
3
4
2.
PRODUCT FEATURES
antenna connect
GPRS LED
UMTS LED
Connect button
signal LED
FEATURES
•
Plug ‘n’ Play zero configuration
•
Powered via USB interface
•
Provides HSDPA and UMTS High-speed data (up to 1.8 Mbps)
•
Provides EDGE / GPRS / GSM data (up to 247 Kbps) connectivity
•
Compatible with nearly all modern Desktop and laptop PC’s equipped
with Microsoft or Mac OS
SPECIFICATIONS
•
HSDPA / UMTS Air Interface:
2100 MHz
- UMTS: 384 Kbps operation in downlink, 384 Kbps in uplink
- High Speed packet-switched data:
•
up to 1.8 Mbps downlink, 384 Kbps uplink
EGPRS / GSM Air Interface:
•
Bands: 850 / 900 / 1800 / 1900 MHz (US-Cellular, EGSM, DCS
and US-PCS bands)
•
•
GlobeTrotter GT MAX HSUPA
USER GUIDE
HARDWARE SPECIFICATIONS
•
•
•
•
•
•
•
USB 1.1 interface*
Powered via the USB interface
Built in Antenna
Miniature External Antenna Connection for optional external antenna
Connect / Disconnect button
Connect Status LEDs and Signal Strength LEDs
SIM card interface compliant with 3GPP 31.101 and 31.102
supporting 1.8 and 3V UICCs
Environmental Operating temperature: 0 to +40ºC
* This product is not compatible with and may not be used on a USB 1.0 port !
3.
SYSTEM REQUIREMENTS
•
•
•
Windows® 2000, Windows® XP or Mac OS
USB 1.1 Type A port*
10 Mb free hard disk space
5
6
4.
OTHER REQUIREMENTS
To use i CON you need a standard small SIM card, the same SIM card that is
used in mobile phones.
5.
POWERING GLOBESURFER® i CON
Your i CON is powered through the USB 1.1 interface.
6.
WHAT’S IN THE GLOBESURFER ® i CON PACKAGE?
•
GlobeSurfer ® i CON
GlobeTrotter GT MAX HSUPA
•
•
•
USER GUIDE
USB Cable
Quick Install Guide
User Manual
In some cases the package may contain
• a SIM card supplied by your Mobile Operator
• an external antenna
• a CD-ROM with software for Mac OS
7.
INSTALLING AND SETTING UP GLOBESURFER ® i CON
INSERTING THE SIM CARD
1. Verify that you have a plug-in SIM card and locate the golden
connector area on this SIM.
2. Look for the SIM slot at the front of the GlobeSurfer ® i CON.
3. Insert the SIM card with the cut corner first and with the golden connector
area on it facing downwards.
4. Push the SIM carefully into the slot until it is firmly seated.
7
8
REMOVING THE SIM CARD
Press the SIM slightly further in the SIM slot to release the SIM card.
INSTALLING THE GLOBESURFER ® i CON
1. Power up the computer
2. Insert the SIM in the GlobeSurfer ® i CON
3. Insert the mini-B USB connector into the i CON.
4. Insert the large Type-A USB connector in the USB port of your PC.
GlobeTrotter GT MAX HSUPA
9
USER GUIDE
Remark for Mac OS users: please follow the instructions of
the CD with Mac OS software for steps 5 to 8.
5. The following screen will pop up (for Windows users)
If the software installation is not
automatically started, the auto-start
feature may be disabled on your
computer. Start Windows Explorer,
Select the Local Disk “i CON” and start
the installer by clicking icon.msi.
6. Select ‘Run the program’ and click OK.
** on W2K you might see the following message
This message is inherent to W2K
and can be ignored
10
7. Wait while the i CON is being installed. This may take a few minutes.
Multiple New Hardware Detected Bubbles will appear.
When the New Hardware Installed Bubble
appears your GlobeSurfer ® i CON is
ready to use.
8. The GlobeSurfer ® i CON is now installed
9. Wait until either the UMTS or GPRS LEDs double blinks
10. To make a connection simply ‘Press’ the Connect button on
the GlobeSurfer ® i CON.
GPRS LED
UMTS LED
Connect button
GlobeTrotter GT MAX HSUPA
11
USER GUIDE
CONNECTING THE ANTENNA
Although an external antenna is generally not necessary one can be connected.
Gently insert the antenna straight to the antenna connector (see drawing).
While the external antenna is connected the internal antenna is automatically
disconnected.
antenna connector
With the installation of GlobeSurfer ® i CON the ‘i CON Configuration’ Tool is
automatically installed.
Although the GlobeSurfer ® i CON is designed to be fully plug and play some users
may whish to change some of the standard settings. For this purpose the ‘i CON
Configuration’ Tool is supplied with GlobeSurfer ® i CON. This tool is automatically
installed during installation of the GlobeSurfer ® i CON.
If the PIN code is enabled on your SIM card is enabled you will need to supply the
PIN code before you can work with GlobeSurfer ® i CON.
Remark for Mac OS users: please follow the instructions of the user manual that is located on the CD
with Mac OS software.
12
8.
THE ‘i CON CONFIGURATION’ TOOL
LAUNCHING THE ‘i CON CONFIGURATION’ TOOL
The ‘ICON Configuration’ Tool is running in the background while the i CON is
attached to the computer and can be launched either from
•
the Systray
Left click the GlobeSurfer ® i CON’s icon
and choose Open i CON Configuration
or
•
the Control Panel
Double click the ‘i CON Configuration’ icon
GlobeTrotter GT MAX HSUPA
USER GUIDE
13
USING THE i CON CONFIGURATION TOOL
From the main screen you can:
Select the Technology (current selection is highlighted)
Simply click on the technology desired and the GlobeSurfer i CON will switch to it.
Bear in mind that when switching, the GlobeSurfer i CON needs to register to the
network again. During this time both LEDs will blink. Wait until one of the LEDs
double blinks again before you try to connect again (see LED Status for more
information on blinking sequences).
Enable / Disable the PIN code (current selection is highlighted)
Simply click Enabled or Disabled as desired. You will be required to supply your
PIN code. If you enter the wrong PIN Code 3 times you will need to supply the
PUK code (The PUK code window will automatically be displayed).
Change the APN
Replace the old APN and click ‘Save APN’
Connect / Disconnnect
Left click the i CON’s icon
and choose Connect (if not connected)
14
When you are already Connected you will have the option to Disconnect.
Getting an information summary
When the mouse pointer is hovered on the GlobeSurfer i CON’s icon in the
systray, the tooltip will display some basic information
• Selected Network
• Selected Technology
• Signal Strenght
• Connection Status
GlobeTrotter GT MAX HSUPA
9.
15
USER GUIDE
LED STATUS INFORMATION
UMTS LED
GPRS LED
connect button
signal strenght LED
Blinking sequence
GPRS&UMTS LEDs blink simultaneous:
i CON is searching for network
GPRS LED permanently on:
i CON Connected on GPRS
GPRS LED slow single blink:
i CON is registered to the GPRS network
GPRS LED slow double blink:
i CON is attached to the GPRS network
UMTS LED permanently on:
i CON Connected on UMTS
UMTS LED slow single blink:
i CON is registered to the UMTS network
UMTS LED slow double blink:
i CON is attached to the UMTS network
Signal strenght LEDs
5 LEDs on:
1 LED on:
LEDs circling:
Excellent Signal
Very poor signal strenght
i CON attempting to connect
16
10. TROUBLE SHOOTING
SYMPTOM
POSSIBLE CAUSE
POSSIBLE SOLUTION
No LEDS burning on
i CON
USB cable not connected
with i CON or computer
Connect Cable
Signal Strenght LEDs
keep circling but
i CON does not connect when clicking
the Connect button
APN Incorrect
Use the i CON configura-tion Tool
to update your APN
No SIM inserted
Disconnect the cable! Insert the
SIM and reconnect the cable
UMTS or GPRS LED
do not start double
blinking (i CON does
not attach to GPRS
or UMTS)
Insufficient signal
strength (Check signal
strength on the LED’s)
Move i CON to location with better
coverage (e.g. windows)
Use external antenna
SIM card was not present
when powering i CON and
reconnect cable while SIM
is present.
Disconnect the cable! Insert the
SIM and reconnect the cable
Drivers are not properly
loaded (i CON shows yellow exclamation marks in
Device Manager)
Close all ports before disconnecting
i CON (cable) from your computer.
(Close communication software that
might be accessing i CON)
GlobeTrotter GT MAX HSUPA
USER GUIDE
17
APPENDIX A: LIMITED WARRANTY
HARDWARE: Option warrants its products to be free from defects in workmanship
and materials, under normal use and service, for one year. If a product does not
operate as warranted during the applicable warranty period, Option shall, at its
option and expense, repair the defective product or part, deliver to Customer an
equivalent product or part to replace the defective item. All products replaced will
become property of Option. Replacement products may be new or reconditioned.
Option shall not be responsible for any software, firmware, information or memory
data of Customer contained in, stored on, or integrated with any products returned
to Option pursuant to any warranty.
SOFTWARE: Option warrants that the software programs licensed from it will perform
in substantial conformance to the program specifications therefore for a period of
ninety (90) days from the date of purchase from Option or its Authorized Reseller.
Option warrants the magnetic media containing software against failure during the
warranty period. No updates are provided. Option’s sole responsibility hereunder
shall be (at Option’s discretion) to replace any defective media with software, which
substantially conforms to Option’s applicable published specifications. Customer
assumes responsibility for the selection of the appropriate applications program
and associated reference materials. Option makes no warranty that its products will
work in combination with any hardware or applications software products provided
by third parties, that the operation of the software products will be uninterrupted or
error-free, or that all defects in the products will be corrected. For any third-party
products listed in the Option software product documentation or specifications
as being compatible, Option will make reasonable efforts to provide compatibility,
except where the non-compatibility is caused by a “bug” or defect in the third
party’s product.
STANDARD WARRANTY SERVICE: Standard warranty service for hardware
products may be obtained by delivering the defective product, accompanied by
a copy of the dated proof a purchase, to Option’s Corporate Service Center or
to an Authorized Option Reseller during the applicable warranty period. Standard
warranty service for software products may be obtained by calling Option’s
Corporate Service Center or an Authorized Reseller, within the warranty period.
Products returned to Option’ Corporate Service Center must be pre-authorized by
18
Option with a Return Material Authorization (RMA) number marked on the outside
of the package, and sent prepared, insured, and packaged appropriately for safe
shipment. The repaired or replaced item will be shipped to Customer, at his own
expense, not later that thirty (30) days after receipt by Option.
WARRANTIES EXCLUSIVE: if an Option product does not operate as warranted
above, customer’s sole remedy shall be repair or replacement, at Option’s option.
The foregoing warranties and remedies are exclusive and are in lieu of all other
warranties, express or implied, either in fact or by operation of law, statutory or
otherwise, including warranties of merchantability and fitness for a particular
purpose, Option neither assumes nor authorizes any person to assume for it
any other liability in connection with the sale, installation, maintenance or use
of its products. Option shall not be liable under this warranty if its testing and
examination disclose that the alleged defect in the product does not exist or was
caused by Customer’s or any third person’s misuse, neglect, improper installation
or testing, unauthorized attempts to repair, or any other cause beyond the range of
intended use, or by accident, fire or other hazard.
LIMITATION OF LIABILITY: in no event, whether based in contract or tort (including
negligence) shall Option be liable for incidental, consequential, indirect, special or
punitive damages of any kind, or for loss of revenue, loss of business, or other
financial loss arising out of or in connection with the sale, installation, maintenance,
use, performance, failure, or interruption of its products, even if Option or its
Authorized Reseller has been advised of the possibility of such damages.
GlobeTrotter GT MAX HSUPA
USER GUIDE
19
APPENDIX B: SAFETY AND HEALTH TIPS
•
•
•
•
•
•
•
•
Do not expose i CON to extreme temperatures such as found near a hot
radiator or stove or in a car parked in the sun.
Do not expose i CON to extreme cold temperature such as a car parked
outdoors in winter.
Do not expose i CON to water and moisture.
To prevent possible interference with aircraft systems, safety regulations
require you to have permission from a crewmember to use i CON while
the plane is on the ground. You must not use i CON while the plane is in
the air.
i CON may cause interference some implanted cardiac pacemakers,
equipment for people with hearing impairments and all other implanted
medical equipment.
Do not use your i CON in a potentially explosive atmosphere.
Do not attempt to disassemble i CON. Doing so will void warranty.
Service should only be performed by Authorized Service Centers.
APPENDIX C: QUALCOMM LICENSING INFORMATION
Licensed by QUALCOMM Incorporated under at least one or more of the following
United States Patents and/or their counterparts in other nations: 4,901,307;
5,490,165; 5,056,109; 5,504,773; 5,101,501; 5,506,865; 5,109,390;
5,511,073; 5,228,054; 5,535,239; 5,267,261; 5,544,196; 5,267,262;
5,568,483; 5,337,338; 5,600,754; 5,414,796; 5,657,420; 5,416,797;
5,659,569; 5,710,784; 5,778,338
Copyright Option nv © 2007 all rights reserved. No parts may be reproduced without written permission.
The Apple logo, Mac and Mac OS are trademarks of Apple Computer, Inc.
Option nv, Gaston Geenslaan 14, 3001 Leuven, Belgium.
www.option.com