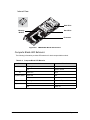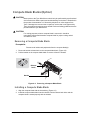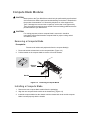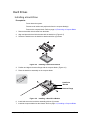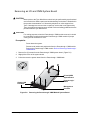
1
Tyan MicroServer Series FM65-B5511 / FM65-B8001 4U SERVER – 18 NODES User’s Manual Revision History Refer to the table below for the updates made to this user’s manual. Revision No. Draft Date Note Copyright This publication, including all photographs, illustrations, and software, is protected under international copyright laws, with all rights reserved. Neither this manual, nor any material contained herein, may be reproduced without written consent of manufacturer. Copyright 2012 MiTAC International Corporation. All rights reserved. TYAN® is a registered trademark of MiTAC International Corporation. Version 1.0a Disclaimer Information contained in this document is furnished by MiTAC International Corporation and has been reviewed for accuracy and reliability prior to printing. MiTAC assumes no liability whatsoever, and disclaims any express or implied warranty, relating to sale and/or use of TYAN® products including liability or warranties relating to fitness for a particular purpose or merchantability. MiTAC retains the right to make changes to produce descriptions and/or specifications at any time, without notice. In no event will MiTAC be held liable for any direct or indirect, incidental or consequential damage, loss of use, loss of data or other malady resulting from errors or inaccuracies of information contained in this document. Conventions The following conventions are used in this manual: ! WARNING: Indicates a potential for property damage, personal injury or death. ! CAUTION: Indicates a potential loss of data or damage to equipment. NOTE: NOTE: Indicates information that is important to know for the proper completion of a procedure, choice of an option, or completing a task. ii Overview. . . . . . . . . . . . . . . . . . . . . . . . . . . . . . . . . . . . . . . . . . . . 1-1 About the Tyan MicroServer System . . . . . . . . . . . . . . . . . . . . . . . . . . . . .1-1 Features. . . . . . . . . . . . . . . . . . . . . . . . . . . . . . . . . . . . . . . . . . . . . . . . . . .1-1 Product Models . . . . . . . . . . . . . . . . . . . . . . . . . . . . . . . . . . . . . . . . . . . . .1-6 Catalog Parts List. . . . . . . . . . . . . . . . . . . . . . . . . . . . . . . . . . . . . . . . . . . .1-6 Contents . . . . . . . . . . . . . . . . . . . . . . . . . . . . . . . . . . . . . . . . . . . . . . . . . . . . . . . . . . 1-6 Accessories. . . . . . . . . . . . . . . . . . . . . . . . . . . . . . . . . . . . . . . . . . . . . . . . . . . . . . . . 1-6 About Your System . . . . . . . . . . . . . . . . . . . . . . . . . . . . . . . . . . . 2-1 Necessary Information . . . . . . . . . . . . . . . . . . . . . . . . . . . . . . . . . . . . . . . .2-1 Safety Information and Precautions . . . . . . . . . . . . . . . . . . . . . . . . . . . . . . . . . . . . . Recycling Information . . . . . . . . . . . . . . . . . . . . . . . . . . . . . . . . . . . . . . . . . . . . . . . . General Information . . . . . . . . . . . . . . . . . . . . . . . . . . . . . . . . . . . . . . . . . . . . . . . . . Work Area . . . . . . . . . . . . . . . . . . . . . . . . . . . . . . . . . . . . . . . . . . . . . . . . . . . . . . . . . Recommended Equipment . . . . . . . . . . . . . . . . . . . . . . . . . . . . . . . . . . . . . . . . . . . . 2-1 2-2 2-2 2-2 2-2 System Overview . . . . . . . . . . . . . . . . . . . . . . . . . . . . . . . . . . . . . . . . . . . .2-3 System Front View . . . . . . . . . . . . . . . . . . . . . . . . . . . . . . . . . . . . . . . . . . . . . . . . . . 2-4 System Rear View. . . . . . . . . . . . . . . . . . . . . . . . . . . . . . . . . . . . . . . . . . . . . . . . . . . 2-4 System Internal View . . . . . . . . . . . . . . . . . . . . . . . . . . . . . . . . . . . . . . . . . . . . . . . . 2-5 Compute Blade Overview . . . . . . . . . . . . . . . . . . . . . . . . . . . . . . . . . . . . .2-6 Features . . . . . . . . . . . . . . . . . . . . . . . . . . . . . . . . . . . . . . . . . . . . . . . . . . . . . . . . . . FM65-B5511 Blade . . . . . . . . . . . . . . . . . . . . . . . . . . . . . . . . . . . . . . . . . . . . . . . . . . FM65-B8001 Blade . . . . . . . . . . . . . . . . . . . . . . . . . . . . . . . . . . . . . . . . . . . . . . . . . . Compute Blade LED Behavior . . . . . . . . . . . . . . . . . . . . . . . . . . . . . . . . . . . . . . . . . 2-6 2-6 2-7 2-8 Mid Plane . . . . . . . . . . . . . . . . . . . . . . . . . . . . . . . . . . . . . . . . . . . . . . . . . .2-9 Pass-through / CMM Module Overview . . . . . . . . . . . . . . . . . . . . . . . . . . .2-10 Pass-through / CMM LED Behavior . . . . . . . . . . . . . . . . . . . . . . . . . . . . . . . . . . . . . 2-11 I/O Connectivity . . . . . . . . . . . . . . . . . . . . . . . . . . . . . . . . . . . . . . . . . . . . .2-11 I/O Port Mapping . . . . . . . . . . . . . . . . . . . . . . . . . . . . . . . . . . . . . . . . . . . . . . . . . . . . 2-11 Mounting the System into a 4-Post Rack. . . . . . . . . . . . . . . . . . . . . . . . . .2-12 Preparing for the Installation . . . . . . . . . . . . . . . . . . . . . . . . . . . . . . . . . . . . . . . . . . . Installing the Inner Rail . . . . . . . . . . . . . . . . . . . . . . . . . . . . . . . . . . . . . . . . . . . . . . . Installing the Outer Rail. . . . . . . . . . . . . . . . . . . . . . . . . . . . . . . . . . . . . . . . . . . . . . . Installing the System using the 4-Post Rack Kit . . . . . . . . . . . . . . . . . . . . . . . . . . . . 2-12 2-12 2-13 2-13 Chassis Management Module . . . . . . . . . . . . . . . . . . . . . . . . . . 3-1 Acquiring an IP Address . . . . . . . . . . . . . . . . . . . . . . . . . . . . . . . . . . . . . .3-1 Chassis Management Console . . . . . . . . . . . . . . . . . . . . . . . . . . . . . . . . .3-3 Overview . . . . . . . . . . . . . . . . . . . . . . . . . . . . . . . . . . . . . . . . . . . . . . . . . . . . . . . . . . System Information . . . . . . . . . . . . . . . . . . . . . . . . . . . . . . . . . . . . . . . . . . . . . . . . . . Server Health . . . . . . . . . . . . . . . . . . . . . . . . . . . . . . . . . . . . . . . . . . . . . . . . . . . . . . Configuration. . . . . . . . . . . . . . . . . . . . . . . . . . . . . . . . . . . . . . . . . . . . . . . . . . . . . . . Remote Control . . . . . . . . . . . . . . . . . . . . . . . . . . . . . . . . . . . . . . . . . . . . . . . . . . . . . Maintenance . . . . . . . . . . . . . . . . . . . . . . . . . . . . . . . . . . . . . . . . . . . . . . . . . . . . . . . GroupBMC . . . . . . . . . . . . . . . . . . . . . . . . . . . . . . . . . . . . . . . . . . . . . . . . . . . . . . . . 3-3 3-4 3-4 3-5 3-6 3-7 3-7 iii Compute Blade Components . . . . . . . . . . . . . . . . . . . . . . . . . . . 4-1 Introduction . . . . . . . . . . . . . . . . . . . . . . . . . . . . . . . . . . . . . . . . . . . . . . . .4-1 Disassembly Flowchart . . . . . . . . . . . . . . . . . . . . . . . . . . . . . . . . . . . . . . .4-1 Compute Blade, Power Supply & Fan Module Order Identification . . . . . .4-2 Compute Blade Numbering. . . . . . . . . . . . . . . . . . . . . . . . . . . . . . . . . . . . . . . . . . . . 4-2 Compute Blade Blanks (Option) . . . . . . . . . . . . . . . . . . . . . . . . . . . . . . . .4-3 Removing a Compute Blade Blank . . . . . . . . . . . . . . . . . . . . . . . . . . . . . . . . . . . . . . 4-3 Installing a Compute Blade Blank . . . . . . . . . . . . . . . . . . . . . . . . . . . . . . . . . . . . . . . 4-3 Compute Blade Modules . . . . . . . . . . . . . . . . . . . . . . . . . . . . . . . . . . . . . .4-4 Removing a Compute Blade . . . . . . . . . . . . . . . . . . . . . . . . . . . . . . . . . . . . . . . . . . . 4-4 Installing a Compute Blade . . . . . . . . . . . . . . . . . . . . . . . . . . . . . . . . . . . . . . . . . . . . 4-4 System Memory . . . . . . . . . . . . . . . . . . . . . . . . . . . . . . . . . . . . . . . . . . . . .4-5 General Guidelines . . . . . . . . . . . . . . . . . . . . . . . . . . . . . . . . . . . . . . . . . . . . . . . . . . Population Rules . . . . . . . . . . . . . . . . . . . . . . . . . . . . . . . . . . . . . . . . . . . . . . . . . . . . Installing a Memory Module . . . . . . . . . . . . . . . . . . . . . . . . . . . . . . . . . . . . . . . . . . . Removing a Memory Module . . . . . . . . . . . . . . . . . . . . . . . . . . . . . . . . . . . . . . . . . . 4-5 4-5 4-5 4-5 Hard Drives . . . . . . . . . . . . . . . . . . . . . . . . . . . . . . . . . . . . . . . . . . . . . . . .4-7 Installing a Hard-Drive. . . . . . . . . . . . . . . . . . . . . . . . . . . . . . . . . . . . . . . . . . . . . . . . 4-7 Removing a Hard Drive. . . . . . . . . . . . . . . . . . . . . . . . . . . . . . . . . . . . . . . . . . . . . . . 4-8 Processors . . . . . . . . . . . . . . . . . . . . . . . . . . . . . . . . . . . . . . . . . . . . . . . . .4-9 General Guidelines . . . . . . . . . . . . . . . . . . . . . . . . . . . . . . . . . . . . . . . . . . . . . . . . . . 4-9 Removing a Processor . . . . . . . . . . . . . . . . . . . . . . . . . . . . . . . . . . . . . . . . . . . . . . . 4-9 Installing a Processor . . . . . . . . . . . . . . . . . . . . . . . . . . . . . . . . . . . . . . . . . . . . . . . . 4-11 Heat-Sinks . . . . . . . . . . . . . . . . . . . . . . . . . . . . . . . . . . . . . . . . . . . . . . . . .4-13 General Guidelines . . . . . . . . . . . . . . . . . . . . . . . . . . . . . . . . . . . . . . . . . . . . . . . . . . 4-13 Installing a Heat-Sink . . . . . . . . . . . . . . . . . . . . . . . . . . . . . . . . . . . . . . . . . . . . . . . . 4-13 Removing a Heat-Sink . . . . . . . . . . . . . . . . . . . . . . . . . . . . . . . . . . . . . . . . . . . . . . . 4-13 System Board . . . . . . . . . . . . . . . . . . . . . . . . . . . . . . . . . . . . . . . . . . . . . .4-15 Removing a Bridge Board . . . . . . . . . . . . . . . . . . . . . . . . . . . . . . . . . . . . . . . . . . . . . Installing a Bridge Board . . . . . . . . . . . . . . . . . . . . . . . . . . . . . . . . . . . . . . . . . . . . . . Removing a System Board . . . . . . . . . . . . . . . . . . . . . . . . . . . . . . . . . . . . . . . . . . . . Installing a System Board . . . . . . . . . . . . . . . . . . . . . . . . . . . . . . . . . . . . . . . . . . . . . 4-15 4-15 4-16 4-17 Chassis Components . . . . . . . . . . . . . . . . . . . . . . . . . . . . . . . . . 5-1 Introduction . . . . . . . . . . . . . . . . . . . . . . . . . . . . . . . . . . . . . . . . . . . . . . . .5-1 Disassembly Flowchart . . . . . . . . . . . . . . . . . . . . . . . . . . . . . . . . . . . . . . .5-1 System Power Guidelines . . . . . . . . . . . . . . . . . . . . . . . . . . . . . . . . . . . . . . . . . . . . . 5-2 Removing a Power Supply Module . . . . . . . . . . . . . . . . . . . . . . . . . . . . . . . . . . . . . . 5-3 Installing a Power Supply Module . . . . . . . . . . . . . . . . . . . . . . . . . . . . . . . . . . . . . . . 5-3 Fan Modules . . . . . . . . . . . . . . . . . . . . . . . . . . . . . . . . . . . . . . . . . . . . . . .5-4 Removing a Fan Module . . . . . . . . . . . . . . . . . . . . . . . . . . . . . . . . . . . . . . . . . . . . . . 5-4 Installing a Fan Module . . . . . . . . . . . . . . . . . . . . . . . . . . . . . . . . . . . . . . . . . . . . . . . 5-4 Opening and Closing the System . . . . . . . . . . . . . . . . . . . . . . . . . . . . . . .5-5 Opening the Top Cover. . . . . . . . . . . . . . . . . . . . . . . . . . . . . . . . . . . . . . . . . . . . . . . 5-5 Closing the Top Cover . . . . . . . . . . . . . . . . . . . . . . . . . . . . . . . . . . . . . . . . . . . . . . . 5-5 iv Pass-through / CMM Module . . . . . . . . . . . . . . . . . . . . . . . . . . . . . . . . . . .5-6 Removing Pass-through / CMM Module . . . . . . . . . . . . . . . . . . . . . . . . . . . . . . . . . . Installing Pass-through / CMM Module . . . . . . . . . . . . . . . . . . . . . . . . . . . . . . . . . . . Removing an I/O and CMM System Board . . . . . . . . . . . . . . . . . . . . . . . . . . . . . . . . Installing an Pass-through / CMM System Board . . . . . . . . . . . . . . . . . . . . . . . . . . . 5-6 5-6 5-7 5-8 Troubleshooting the MicroServer . . . . . . . . . . . . . . . . . . . . . . . 6-1 Safety First. . . . . . . . . . . . . . . . . . . . . . . . . . . . . . . . . . . . . . . . . . . . . . . . .6-1 Start-up Routine. . . . . . . . . . . . . . . . . . . . . . . . . . . . . . . . . . . . . . . . . . . . .6-1 Checking Equipment . . . . . . . . . . . . . . . . . . . . . . . . . . . . . . . . . . . . . . . . .6-1 Troubleshooting External Connections . . . . . . . . . . . . . . . . . . . . . . . . . . .6-1 System Alert Messages . . . . . . . . . . . . . . . . . . . . . . . . . . . . . . . . . . . . . . .6-1 Troubleshooting Chassis Components . . . . . . . . . . . . . . . . . . . . . . . . . . .6-1 PSM . . . . . . . . . . . . . . . . . . . . . . . . . . . . . . . . . . . . . . . . . . . . . . . . . . . . . . . . . . . . . Fans . . . . . . . . . . . . . . . . . . . . . . . . . . . . . . . . . . . . . . . . . . . . . . . . . . . . . . . . . . . . . CMC . . . . . . . . . . . . . . . . . . . . . . . . . . . . . . . . . . . . . . . . . . . . . . . . . . . . . . . . . . . . . Pass-through / CMM Module . . . . . . . . . . . . . . . . . . . . . . . . . . . . . . . . . . . . . . . . . . 6-1 6-1 6-1 6-1 Troubleshooting Compute Blade Components . . . . . . . . . . . . . . . . . . . . .6-2 Memory . . . . . . . . . . . . . . . . . . . . . . . . . . . . . . . . . . . . . . . . . . . . . . . . . . . . . . . . . . . Hard Drives . . . . . . . . . . . . . . . . . . . . . . . . . . . . . . . . . . . . . . . . . . . . . . . . . . . . . . . . Processors . . . . . . . . . . . . . . . . . . . . . . . . . . . . . . . . . . . . . . . . . . . . . . . . . . . . . . . . System Board . . . . . . . . . . . . . . . . . . . . . . . . . . . . . . . . . . . . . . . . . . . . . . . . . . . . . . 6-2 6-2 6-2 6-2 System Diagnostics . . . . . . . . . . . . . . . . . . . . . . . . . . . . . . . . . . . . . . . . . .6-2 Administrator Diagnostics . . . . . . . . . . . . . . . . . . . . . . . . . . . . . . . . . . . . . . . . . . . . . System Diagnostics. . . . . . . . . . . . . . . . . . . . . . . . . . . . . . . . . . . . . . . . . . . . . . . . . . Using System Diagnostics . . . . . . . . . . . . . . . . . . . . . . . . . . . . . . . . . . . . . . . . . . . . Running System Diagnostics . . . . . . . . . . . . . . . . . . . . . . . . . . . . . . . . . . . . . . . . . . Testing Options . . . . . . . . . . . . . . . . . . . . . . . . . . . . . . . . . . . . . . . . . . . . . . . . . . . . . Error Messages. . . . . . . . . . . . . . . . . . . . . . . . . . . . . . . . . . . . . . . . . . . . . . . . . . . . . 6-2 6-2 6-2 6-2 6-3 6-3 Parts Listing. . . . . . . . . . . . . . . . . . . . . . . . . . . . . . . . . . . . . . . . . 7-1 Getting Help and Support . . . . . . . . . . . . . . . . . . . . . . . . . . . . . . A-1 Technical Support . . . . . . . . . . . . . . . . . . . . . . . . . . . . . . . . . . . . . . . . . . .A-1 Safety Information . . . . . . . . . . . . . . . . . . . . . . . . . . . . . . . . . . . . B-1 General Safety . . . . . . . . . . . . . . . . . . . . . . . . . . . . . . . . . . . . . . . . . . . . . .B-1 Electrical Safety . . . . . . . . . . . . . . . . . . . . . . . . . . . . . . . . . . . . . . . . . . . . .B-1 Safety Notices . . . . . . . . . . . . . . . . . . . . . . . . . . . . . . . . . . . . . . . . . . . . . .B-2 Glossary . . . . . . . . . . . . . . . . . . . . . . . . . . . . . . . . . . . . . . . . . . . . C-1 Index . . . . . . . . . . . . . . . . . . . . . . . . . . . . . . . . . . . . . . . . . . . . . . . D-1 v vi Chapter 1: Overview About the Tyan MicroServer System 0 Congratulations on the purchase of the Tyan MicroServer, a highly optimized 4U rack mount system. The Tyan MicroServer is available in two models, the FM65-B5511 featuring the Intel® Sandy Bridge-DT processor and the FM65-B8001 featuring the AMD® Opteron AM3 processors, designed to support 18 compute blades. Up to 32 GB UDIMM DDR3-800/1066/1333 memory can be installed per node. Utilizing advanced technology the Tyan MicroServer system provides scalable 32/64-bit computing, high bandwidth memory design, and lightning-fast PCI-E bus capabilities. The Tyan MicroServer not only can be utilized to manage today’s IT environments as well as tomorrow’s. The Tyan MicroServer uses the latest chassis designs for solid mechanical enclosures and robust features. The Tyan MicroServer delivers the power and flexibility to meet the needs enterprise-level requirements. Features 0 The Tyan MicroServer contains the following features: Table 1-1. MicroServer Features Item Chassis Description Industry 4U rack-mountable chassis Dimension: Height: 175.7 mm (7.17 inch) Width: 440 mm (17.32 inch) Depth: 650 mm (25.6 inch) (18) Compute Blades(1) Pass Through/CMM module (8) 8038 System FANs Power supply (2+1) 800W high efficiency (80+ Gold) w/ PFC (AC SKU) DC 12V sourced from rack (DC SKU, option) System board Tyan B5511GM2N, B8001GM2N Processors FM65-B5511 Support (1) Intel® Sandy-Bridge-DT CPU (Socket H2) Quad-core Sandy Bridge-DT w/ TDP 45W Dual-core Sandy Bridge-DT w/ TDP 20W FM65-B8001 Support (1) AMD® Opteron AM3 socket Athlon II X2 Dual-Core CPU (45W) Athlon II X3 Tri-Core CPU (45W) Athlon II X4 Quad-Core CPU (45W) Overview 1-1 Table 1-1. MicroServer Features (Continued) Item Description Chipset FM65-B5511 Intel® Cougar Point PCH AST2150 iBMC FM65-B8001 AMD SR5650 + SP5100 AST2150 iBMC Memory FM65-B5511, FM65-B8001 (4) U-DDR-III w/ECC 1066/1333 VLP UDIMM Integrated LAN Controllers (2) Intel® 82574L Gigabit controllers BIOS Internal Connector Internal I/O Form Factor (Compute Blade) AMI BIOS® on 8Mbit Flash ROM Supports ACPI 2.0 Supports boot from USB device Power-on mode control for AC power loss recovery (1) One SATA connector for 2.5” SATA/SATAII hard drive on the motherboard (1) One SATA connector for 2.5” SATA/SATAII hard drive on the Bridge Board (2) USB ports (1) VGA port Switches Power LED Power LED Hard drive activity LED System health/ID LED W128.88 x H28 x D358.8 mm (5.07 x 1.10 x 14.13 inch) NOTE: Supports 9 mm high hard drive. 1-2 Overview Table 1-1. MicroServer Features (Continued) Item Pass-through-M1902F65CMMPT Description Gigabit PHY (2) BCM 54616s GPHY (2) Octal Giga PHY (BCM54980) CMM subsystem (1) ASPEED AST2150 (1) 8 MB FLASH Rear I/O (1) RJ45 to support remote management from CMM (18) RJ45 1000 Base-T port w/ activity LED (1) One Power Switch (1) Power LED (1) System Health LED Form factor: W108 mm x L358.4 mm (4.25 in x 14.11 inch) Mid-Plane (M1247F65-BP) PDB Board (M1608F65-PDB) Bridge Board (M1708F65-BDG) Overview System management (1) CMM connector for IPMB (4) I2C switch for I2C Bus extender (4) Power connector (PDB) Blade connection (18) PCI-E x 8 connector H/W Monitor (4) System temperature sensor with SMBUS Form Factor: W435 mm x L165 mm (17.13 in x 6.50 inch) Power Rating SPEC 1600W Power output rating (2+1 Redundant PSU) PSU Power Input (3) System PSU comply connectors 12DC power input from Chassis Power delivery system 12V and 12Vsb power input Blade System DC power input DC power Connector 12V DC power input from chassis delivery system Power output (4) Power connector for Blade power 12V DC power Form Factor: W176.5 mm x L150 mm (6.95 in x 5.91 inch) One(1) SATA connector for 2.5'' SATA/SATAII hard drive Form factor: W118.88 mm x L96.8 mm (4.68 in x 3.81 inch) 1-3 Table 1-1. MicroServer Features (Continued) Item CMM Description Dedicated LAN port for chassis management Remote management & monitoring System Blades Blade Present status Blade Power On/Power Off Blade Power Stagger Start-up Blade Reset Blade Graceful Shutdown Blade identify (LED on/off) Power Supplies Power Present status Power Status (on or off) Cooling fans FAN speed control & monitor FAN failed alert Networking switches (option) Reset Ethernet Switch Gigabit 1-4 Switch Management UI Links H/W Healthy Monitor (Blade/Chassis/PSU module/FAN module): System Healthy monitor (Temperature sensors, power status and FAN speed) System Event Log Advance Control Power Fail alert. Power consumption Monitor (AC-in/DC-in/DC-out) IPMI 2.0 MANAGEMENT Through LAN or I2C E-MAIL report Chassis Graceful Shutdown Overview Table 1-1. MicroServer Features (Continued) Item Blade BMC Description Remote management & monitoring System Blades Blade Power On/Power Off Blade Reset Blade Graceful Shutdown Blade Operating Environment Overview identify (LED on/off) H/W Healthy Monitor: System Healthy monitor (Temperature sensors, and voltages) System Event Log IPMI 2.0 MANAGEMENT Through LAN or I2C iKVM Serial Over LAN (SOL) Virtual Media Over LAN Email report Chassis Graceful Shutdown Operating Temperature 10°C to 35°C Non-Operating Temperature FM65-B5511 -40°C to 70°C FM65-B8001 -40°C to 70°C Operating Humidity FM65-B5511 10% to 80% FM65-B8001 15% to 80% (non-condensing) at 40°C Non-Operating Humidity FM65-B5511 5% to 95% FM65-B8001 8% to 80% (non-condensing) at 40°C 1-5 Product Models 0 The system board within the Tyan MicroServer blades contain different processors and chipsets, which are defined by the following models: FM65-B5511-Intel based platform FM65-B8001-AMD based platform Catalog Parts List 0 Contents 0 FM65 Chassis Kit (1) 4U Chassis (1) Pass-through / CMM module (8) Fan Modules (3) Power Supply Modules (1) Power Distribution Board (M1608F65-PDB) (1) Mid Plane Board (M1247F65-BP) Compute Blade Single Kit (6) Compute Blade Blanks (6) Tyan System Boards configured for the FM65-B5511 and FM65-B8001 models (6) Bridge Boards (M1708F65-BDG) (6) Heat-sinks (1) HDD Screw Kit Accessories Rail 0 Mounting Kit Accessory Kit 1-6 (3) US Power Cord (3) EU Power Cord (1) USB Cable (1) Rail Screw Overview Chapter 2: About Your System Necessary Information 0 Safety Information and Precautions 0 Before installing and using Tyan MicroServer, review the following precautions: Read all instructions carefully. Do not place the unit on an unstable surface, cart, or stand. Do not block the slots and opening on the unit, which are provided for ventilation. Only use the power source indicated on the marking label. The unit uses a three-wire ground cable, which is equipped with a third pin to ground the unit and prevent electric shock. Do not place anything on the power cord. Place the power cord where it will not cause an accident. Follow all warnings and cautions in this manual and on the unit case. Do not push objects in the ventilation slots as they may touch high voltage components and result in shock and damage to the components. When replacing parts, ensure that parts specified by the manufacturer are used. When service or repairs have been done, perform routine safety checks to verify that the system is operating correctly. Avoid using the system near water, in direct sunlight, or near a heating device. Cover the unit when not in use. Components and circuit boards can be damaged by static electricity discharge. Follow the guidelines below to avoid damage to the system or bodily injury. Proper grounding is required before removing the top cover of the system. Disconnect the power cable from the power supply and then touch a grounded object to release static charge. A grounded wrist strap is recommended during any maintenance or troubleshooting to the system. To ensure proper handling of the components, refer to the following guidelines: Avoid touching system board components, IC chips, connectors memory modules and leads. The system board is pre-installed in the system. When removing the system board, always place it on a grounded anti-static surface until it is ready to be reinstalled. Hold electronic circuit boards by the edges only. Do not touch the components on the board unless it is necessary to do so. Do not flex, bend or stress circuit boards. Leave all components inside the static-proof packaging that they ship with until they are ready for installation. After replacing components and devices, make sure all screws, springs, or other small parts are in place and are not left loose inside the case. Metallic parts or metal flakes can cause electrical shorts. About Your System 2-1 Recycling Information 0 A lithium battery is included with the Tyan MicroServer. Do not puncture or dispose of battery in fire. There is a danger of explosion if battery is incorrectly replaced. Replace only with the same or equivalent type recommended by manufacturer. Disposal and recycling of used batteries, parts and components should be done in accordance with local regulations. General Information 0 The illustrations are representative of the latest system revision available at the time of publishing. The system you receive may not look exactly like the illustrations described later. Work Area 0 All maintenance and/or troubleshooting of the Tyan MicroServer should be conducted in a stable, clean working environment. Use containers to store small components separated, which prevents them from becoming lost or mixing with other components. The use of proper tools and adequate lighting is recommended. Recommended Equipment 0 The following tools are suggested to perform maintenance on the Tyan MicroServer: Phillips screwdriver Wrist-grounding 2-2 strap or conductive mat/anti-static pad About Your System System Overview ! 0 CAUTION: Most repairs to the Tyan MicroServer should only be performed by a professional service technician. Basic repairs and troubleshooting can be done if authorized in the product documentation or if directed by telephone or online support from Tyan. If damage has occurred due to repairs or services that are not approved by Tyan, the product warranty becomes invalid. Review all safety guidelines that are provided with the Tyan MicroServer. The Tyan MicroServer contains components that can be removed and replaced. The following image indicates the location of the components that can be removed, which are further described in detail in Chapters 5 and 6 of this user’s manual. System Fan Modules Power Supply Modules Pass-through / CMM Module Compute Blades Figure 2-1. About Your System Tyan MicroServer Overview 2-3 System Front View 0 2 1 Figure 2-2. Table 2-1. Front View System Front View Modules ID Description 1 Compute Blade (x18) 2 Pass-through / CMM Module System Rear View 0 2 1 Figure 2-3. Table 2-2. System Rear View Modules ID 2-4 Rear View Description 1 Fan Modules (x8) 2 Power Supply Modules (2+1) About Your System System Internal View 0 2 1 Figure 2-4. Table 2-3. ID About Your System Internal View System Internal View Modules Description 1 Mid Plane (M1247F65-BP): 18x PCI-e x 8 connector) 2 Power Distribution Board (PDB): M1608F65-PDB 2-5 Compute Blade Overview 0 Features 0 FM65-B5511 Blade (1) Intel® Sandy Bridge DT, Socket H2, Intel E3 series CPU Intel® Cougar Point PCH FM65-B8001 Blade (1) AMD® Opteron AM3 socket AMD SR5650 + SP5100 Common Features Compact compute blade: 118.88 mm X 263.52 mm(4.68 in x 10.37 inch) AST2150 iBMC (4) DDR3 VLP UDIMM slots (up to 32 GB) (2) Internal 2.5” hard drive bays (with connected bridge board) (2) Intel® 82574L Gigabit controllers FM65-B5511 Blade 0 Front View 0 Blade Release Latch USB Ports Handle VGA Port Figure 2-5. 2-6 ID/Status LED Hard Drive Activity LED Power Button/ System Power LED FM65-B5511 Blade Front View About Your System Internal View 0 Hard Drive Memory Module Hard Drive Processor Figure 2-6. FM65-B5511 Blade Internal View FM65-B8001 Blade 0 Front View 0 Blade Release Latch USB Ports Handle VGA Port Figure 2-7. About Your System ID/Status LED Hard Drive Activity LED Power Button/ System Power LED FM65-B8001 Blade Front View 2-7 Internal View 0 Hard Drive Memory Module Hard Drive Processor Figure 2-8. FM65-B8001 Blade Internal View Compute Blade LED Behavior 0 The following information provides LED behavior for both compute blade models. Table 2-4. Compute Blade LED Behavior Field HDD Activity Color Blinking Green Access Off System normal ID Solid blue Active System Status Solid Red Alert Off Normal ID/System Status Blinking blue/red System Power 2-8 Behavior ID located/System Alert Solid Green Power on Off Power off About Your System Mid Plane 0 1 Figure 2-9. 2 Mid Plane Front View Table 2-5. Mid Plane Front View ID Description 1 PCI-E x8 connectors (x18) 2 PCI-E x16 connectors (x2) 1 3 2 Figure 2-10. Mid Plane Rear View Table 2-6. ID About Your System Mid Plane Rear View Description 1 2 x 6 PIN Power connector (x4) 2 2 x 5 PIN I2C connector 3 2 x 15 PIN FAN connector 2-9 Pass-through / CMM Module Overview Gigabit LAN Ports 1 to 18 Pass-through / CMM Release Latch Figure 2-11. Dedicated Remote Management Port Pass-through / CMM Module Front View management & monitoring Blades Blade Present status Blade Power On/Power Off Blade Power Stagger Start-up Blade Reset Blade Graceful Shutdown Blade Identify (LED on/off) Power Supplies Power Present status Power Status (on or off) Cooling fans FAN Speed Control & Monitor FAN failed alert Networking Reset switches Ethernet Switch Gigabit Switch Management UI Links Healthy Monitor (Blade/Chassis/PSU module/FAN module): System Healthy Monitor (Temperature sensors, power status and FAN speed) System Event Log Advance 2-10 CMM Status ID/Warning LED LED LAN port for chassis management System H/W 0 Control Power Fail alert. Power consumption Monitor (AC-in/DC-in/DC-out) About Your System PMI 2.0 MANAGEMENT Through LAN or I2C E-MAIL report Chassis Graceful Shutdown Pass-through / CMM LED Behavior 0 The following information provides LED behavior for both compute blade models. Table 2-7. Pass-through / CMM LED Behavior Field Status CMM Status LED CMM ready Green Solid on GPIOA4/P HYLINK CMM fail Red Solid on GPIOA5/P HYPD# ID located Blue Solid on GPIOB5/V BCK Warning LED System fan fail Red Solid on VPAVSYN C/VSYNC/ GPIOH5 Fan fail Abnormal fan speed Warning LED PSU fail Red VPAVSYN C/VSYNC/ GPIOH5 OVP, OCP, OTP, AC lose PSU fan fail PSU asserted, AC on, no Vsb Must VPAVSYN C/VSYNC/ GPIOH5 Single PSU failure triggers warning display Must ID LED Warning LED 2+1 PSU redundancy fail Color Red Indication Solid on Solid on Address Remark Event Log Either Red or Green LED is on, not both. Must Must I/O Connectivity 0 I/O Port Mapping 0 Compute Blade I/O Ports (2) USB ports (1) VGA port 0 Pass-through / CMM Module Ports (1) RJ45 to support remote management from CMM (1) 2x8 ports RJ45 1000 Base-T port w/ activity LED (1) 2x1 ports RJ45 1000 Base-T port w/ activity LED About Your System 0 2-11 Mounting the System into a 4-Post Rack 0 After installing the necessary components, the Tyan MicroServer can be mounted in a 4-post rack using the optional rail kit. The rail kit includes the following items: (2) Rail kit assemblies (1) Set of screws Preparing for the Installation 0 Review all the tasks required to install and configure the system. Review the electrical requirements and power supply input voltage information. Examine the system’s shipping kit contents and assemble the required tools for installation. Review ESD requirements and take safety precautions. Before installing the system into a rack, install any optional components into the system. Stabilize the rack before installing the system, if necessary. Installing the Inner Rail ! 0 WARNING: Use caution when removing the inner rail from the rail kit assembly. The rails can slide out and cause personal injury or damage to the TYAN MicroServer. 1. Remove the inner rail from the rail kit assembly. 2. Align and insert the holes on the inner rail into the pins on the side of the chassis. (Figure 2-12) 3. Slide the inner rail until the latch key on the rail locks and is secure to the chassis. 4. Repeat steps 1 through 3 for the remaining side. Latch Key Inner Rail Figure 2-12. 2-12 Installing the Inner Rail About Your System Installing the Outer Rail ! 0 WARNING: Use caution when installing the outer rail. The middle rail, which is attached to the outer rail, can slide out and cause personal injury or damage to the system. 1. Align and place the front mounting bracket of the outer rail on the front cabinet column of the rack. (Figure 2-13) 2. Extend the length of the outer rail until the rail reaches the rear cabinet column of the rack 3. Align and place the rear mounting bracket on the rear cabinet column of the rack. NOTE: NOTE: 4. Secure the outer rail to the rack with the screws and washers to the front and rear of the rack. NOTE: NOTE: The outer rails contain the words “FRONT” and “REAR”. The “FRONT” of the outer rail must be placed towards the front of the rack and “REAR” must be placed towards the rear. ! CAUTION: Both outer rails must be aligned evenly or the chassis cannot be installed to the rack. Use a ruler to ensure that both rails are evenly aligned in a 180 degree angle. 5. Repeat steps1 through4 for the opposite side. Front Cabinet Column Outer Rail Figure 2-13. Rear Cabinet Column Installing the Outer Rail Installing the System using the 4-Post Rack Kit ! 0 WARNING: Due to the weight of the system, two people are required to lift and mount the system into a rack enclosure when following the procedure. About Your System 2-13 Prerequisite: Remove all compute blades from the chassis. Refer to Removing a Compute Blade. Remove the Pass-through / CMM module. Refer to Removing Pass-through / CMM Module. Remove the power supply modules. Refer to Removing a Power Supply Module. 1. Lift the chassis until it is leveled with the outer rails on the rack. (Figure 2-14) 2. Align the left and right side of the inner rail on the chassis with the outer rails on the rack. 3. Insert the rear side of the chassis into the rack until the inner rails and outer rails lock into place. 4. Secure the chassis to the rack by installing (2) screws from the mounting flanges to the rail. 5. Install the compute blades into the chassis. Refer to Installing a Compute Blade. ! CAUTION: Compute blades should be installed in the order shown in Compute Blade, Power Supply & Fan Module Order Identification. 6. Install the Pass-through / CMM module into the chassis. Refer to Installing Pass-through / CMM Module. 7. Install the power supply modules. Refer to Installing a Power Supply Module. Outer Rail Inner Rail Figure 2-14. 2-14 Installing the System to a 4-Post Rack About Your System Chapter 3: Chassis Management Module This chapter provides information about the chassis management console. To login remotely into the chassis management module (CMM) and access the console, you must first acquire the CMM’s IP address. Acquiring an IP Address 0 This section provides information in order to acquire an IP address for use in setting up and configuring the Chassis Management Module (CMM). Before you start, make sure all compute blades and the CMM are connected to the network through a DHCP server (recommended). 1. Power up the MicroServer. All MicroServer blades are powered on by the system through the BMC. 2. Connect a monitor and keyboard to an active compute blade. See “FM65-B5511 Blade” on page 6 or “FM65-B8001 Blade” on page 7 for port locations. 3. In the POST screen, navigate to Server Management and look for the compute blade BMC IP address NOTE: NOTE: Note the BMC IP address is assigned by the DHCP server. 4. Connect a remote computer to the same network used by the MicroServer. 5. In the remote computer, open a browser and in the address bar type the BMC IP (See step 3). 6. In the login screen, type in the following username and password for both CMM and BMC. username: root password: superuser Figure 3-1. NOTE: Login Menu NOTE: Passwords are case sensitive. Chassis Management Module 3-1 7. Select Group BMC=> Node BMC. CMM IP displays in the Select GroupBmc drop down list. NOTE: NOTE: Note that CMM IP must be in the same subnet as the MicroServer Blade BMC. An IP address result such as 127.0.0.1 is not valid and typically indicates there is a configuration error between the CMM BMC and compute blade node. It may be necessary to wait for a short period to allow for network settings to take place before beginning troubleshooting steps. 3-2 Chassis Management Module Chassis Management Console 0 Overview 0 This section displays the initial screen information. Figure 3-2. Management Console Menu Table 3-1. Management Console Item Description Options Displays available submenus. Refresh Refresh the current menu. Logout Select to logout. Chassis Management Module 3-3 System Information 0 The System Information menu provides general system information about the MicroServer system. Figure 3-3. System Information Menu Table 3-2. System Information Item Description System Information Displays firmware and AuxFirmware revision as well as build time information List FRU Displays available field replacement units (FRU) in the MicroServer. Further information for each FRU item is available by clicking on the FRU item. Server Health 0 The Server Health menu provides information about the MicroServer system’s sensor readings and event logs. Figure 3-4. 3-4 Server Health Console Menu Chassis Management Module Table 3-3. Server Health Item Description Sensor Readings Event Log Select to display readings with or without thresholds from various MicroServer sensors. Select to view the written event logs by Sensor-Specific, BIOS Generated, or System Management Software events. Configuration 0 The Configuration menu provides information for alert, user and network settings to configure and setup the MicroServer system. Figure 3-5. Configurtation Console Menu Table 3-4. Configuration Item Alerts Mouse Mode Network Settings SMTP User List SDR Chassis Management Module Description Select to configure or test an existing alert. Select the type of mouse mode, absolute (Default) or relative. Select to view and configure the network settings (DHCP or static). Select to configure alerts, users and network SMTP settings Select to add, modify or delete the current configured users list. Select to modify, enable or disable sensor thresholds. 3-5 Table 3-4. Configuration (Continued) Item Description Date Time/NTP Settings Select to manually set the date and time settings or synchronize with a specified NTP server. SSL Certificate Select to upload an SSL certificate. Remote Control 0 The Remote Control menu provides information about the remote management and power status of the MicroServer system. Figure 3-6. Remote Control Console Menu Table 3-5. Remote Control Item CMM Controls NodeBMC Controls 3-6 Description Select to set the power status of the microserver. Select to manage nodes. Chassis Management Module Maintenance 0 The Maintenance menu provides information regarding the maintenance tasks available for the MicroServer system. Figure 3-7. Maintenance Console Menu Table 3-6. Maintenance Item Description Firmware Update Select to enter the system’s Update Mode. The Update Mode allows for the updating the firmware. A system reset will follow after the Update Mode. GroupBMC 0 The GroupBMC menu provides information about BMC groups, such as grouped BMC, Node or User lists. Figure 3-8. Chassis Management Module GroupBMC Console Menu 3-7 Table 3-7. GroupBMC Item GroupBMC List Add, delete or scan GroupBMC lists. NodeBMC List Select existing GroupBMC lists to manage respective nodes. Group Login User 3-8 Description Select to designate user groups for grouped control functionality. Chassis Management Module Chapter 4: Compute Blade Components Introduction 0 This chapter explains how to replace components relating to the compute blade module, including the blade blank, system memory, hard drive, heat-sink, processor, bridge board and system board. Disassembly Flowchart 0 The following flowchart outlines the disassembly procedures. - Figure 4-1. Compute Blade Components Disassembly Flowchart 4-1 Compute Blade, Power Supply & Fan Module Order Identification 0 Before installing front components into the chassis, review the compute blade enumeration for each component. Compute Blade Numbering 0 16 17 18 13 14 15 10 11 12 7 8 9 4 5 6 1 2 3 Power Supply Numbering PSU3 PSU2 PSU1 Fan Module Numbering 4-2 1 2 3 4 5 6 7 8 Compute Blade Components Compute Blade Blanks (Option) ! 0 CAUTION: Most repairs to the Tyan MicroServer should only be performed by a professional service technician. Basic repairs and troubleshooting can be done if authorized in the product documentation or if directed by telephone or online support from Tyan. If damage has occurred due to repairs or service that is not approved by Tyan, the product warranty becomes invalid. Review all safety guidelines that are provided with the Tyan MicroServer. ! CAUTION: For cooling purposes, when a compute blade is removed, it should be immediately replaced with another compute blade for proper cooling and air circulation to occur. Removing a Compute Blade Blank 0 Prerequisite: Disconnect all cables and peripherals from the compute blade(s). 1. Press and hold the release latch on the compute blade blank. (Figure 4-2) 2. Pull the handle on the compute blade blank to remove it from the chassis. Release Latch Handle Figure 4-2. Removing a Compute Blade Blank Installing a Compute Blade Blank 0 1. Align the compute blade with the chassis bay. (Figure 4-2) 2. Install the compute blade blank into the chassis until the release latch locks and the compute blade is seated properly with the chassis. Compute Blade Components 4-3 Compute Blade Modules ! 0 CAUTION: Most repairs to the Tyan MicroServer should only be performed by a professional service technician. Basic repairs and troubleshooting can be done if authorized in the product documentation or if directed by telephone or online support from Tyan. If damage has occurred due to repairs or service that is not approved by Tyan, the product warranty becomes invalid. Review all safety guidelines that are provided with the Tyan MicroServer. ! CAUTION: For cooling purposes, when a compute blade is removed, it should be immediately replaced with another compute blade for proper cooling and air circulation to occur. Removing a Compute Blade 0 Prerequisite: Disconnect all cables and peripherals from the compute blade(s). 1. Press and hold the release latch on the compute blade. (Figure 4-3) 2. Pull the handle on the compute blade to remove it from the chassis. Release Latch Handle Figure 4-3. Removing a Compute Blade Installing a Compute Blade 0 1. Remove the new compute blade module from the packaging. 2. Align the new compute blade module to the chassis bay. (Figure 4-3) 3. Install the compute blade into the chassis until the release latch locks and the compute blade is seated properly with the chassis. 4-4 Compute Blade Components System Memory 0 General Guidelines 0 The system board contains four (4) memory slots. Make sure the memory modules are properly installed and secured before use. Population Rules 0 MEMORY POPULATION TABLE REQUIRED HERE. Installing a Memory Module ! 0 WARNING: Use caution when removing a memory module. The memory module can remain hot even after the system is powered down. 1. Push the memory slot locking latches outwards. (Figure 4-4) 2. Align the notch on the memory module with the socket guide. 3. Install the memory module into the desired socket. 4. Press down the memory module until the locking latches secure the memory module. 5. Install the compute blade into the chassis. See Installing a Compute Blade. Memory Module Notch Locking Latch Socket Guide Socket Figure 4-4. Installing a Memory Module Removing a Memory Module ! 0 CAUTION: Most repairs to the Tyan MicroServer should only be performed by a professional service technician. Basic repairs and troubleshooting can be done if authorized in the product documentation or if directed by telephone or online support from Tyan. If damage has occurred due to repairs or service that is not approved by Tyan, the product warranty becomes invalid. Review all safety guidelines that are provided with the Tyan MicroServer. Compute Blade Components 4-5 ! WARNING: Use caution when removing a memory module. The memory module can remain hot even after the system is powered down. Prerequisite: Power down the system. Disconnect all cables and peripherals from the compute blade(s). Remove the compute blade. Refer to Removing a Compute Blade (Figure 4-4). 1. Push the memory slot locking latch outwards. 2. Remove the memory module from the socket. 4-6 Compute Blade Components Hard Drives 0 Installing a Hard-Drive 0 Prerequisite: Power down the system. Disconnect all cables and peripherals from the compute blade(s). Remove the compute blade. Refer to page 4-3, Removing a Compute Blade. 1. Remove hard-disk drive bracket from the blade. 2. Align and place the hard drive bracket with the hard drive. (Figure 4-5) 3. Secure the hard drive to the hard drive bracket with four (4) screws. Figure 4-5. Installing a Hard Drive Bracket 4. Position and align the bracket flange with the compute blade. (Figure 4-6) 5. Place the hard drive assembly on the compute blade. Hard Drive Bracket Bracket Flange Figure 4-6. Installing a Hard Drive Module 6. Install and secure the hard drive assembly with two (2) screws. 7. Install the compute blade into the chassis. Refer to page 4-3, Installing a Compute Blade. Compute Blade Components 4-7 Removing a Hard Drive ! 0 CAUTION: Most repairs to the Tyan MicroServer should only be performed by a professional service technician. Basic repairs and troubleshooting can be done if authorized in the product documentation or if directed by telephone or online support from Tyan. If damage has occurred due to repairs or service that is not approved by Tyan, the product warranty becomes invalid. Review all safety guidelines that are provided with the Tyan MicroServer. Prerequisite: Power down the system. Disconnect all cables and peripherals from the compute blade(s). Remove the compute blade. Refer to Removing a Compute Blade. 1. Remove two (2) screws from the hard drive bracket. (Figure 4-7) 2. Slide and disconnect the hard drive bracket until the hard drive is disconnected from the connector. 3. Lift and remove the hard drive bracket. Hard Drive Bracket Bracket Flange Figure 4-7. Removing a Hard Drive Module 4. Remove four (4) screws from the hard drive bracket. (Figure 4-8) 5. Remove the hard drive bracket from the hard drive module. Figure 4-8. 4-8 Removing a Hard Drive Bracket Compute Blade Components Processors 0 General Guidelines ! 0 CAUTION: To avoid damage to the system board: ! Do not touch the processor socket contacts. Do not lower the processor into the socket at an angle. CAUTION: To avoid damage to the processor: Handle Do ! the processor ONLY by the edges. not touch the contacts on the bottom of the processor. CAUTION: The heat-sink thermal media is not reusable. It must be replaced after removing a heat-sink or prior to installing a new processor. Removing a Processor 0 FM65-B5511 Processor ! 0 CAUTION: Most repairs to the Tyan MicroServer should only be performed by a professional service technician. Basic repairs and troubleshooting can be done if authorized in the product documentation or if directed by telephone or online support from Tyan. If damage has occurred due to repairs or service that is not approved by Tyan, the product warranty becomes invalid. Review all safety guidelines that are provided with the Tyan MicroServer. ! WARNING: There is strong pressure securing the processor locking latch to the socket. Use caution when releasing the locking lever to prevent damage or injury. Prerequisite: Power down the system. Disconnect all cables and peripherals from the compute blade(s). Remove the compute blade. Refer to Removing a Compute Blade. Remove the heat-sink. Refer to Removing a Heat-Sink. 1. Release the locking lever from the socket cover tab. (Figure 4-9) 2. Rotate the locking lever on the processor socket from the locked position until the socket cover is fully open. ! CAUTION: Make sure that the locking lever is in the fully open position before installing or removing a processor. Failure to do so may result in permanent damage to the system board or the processor. Compute Blade Components 4-9 3. Remove the processor from the socket. Processor Connector 1 Indicator Locking Lever Connector 1 Indicator Socket Corner Tab Processor Socket Top Plate Figure 4-9. Releasing the Processor Locking Lever FM65-B8001 Processor ! 0 CAUTION: Most repairs to the Tyan MicroServer should only be performed by a professional service technician. Basic repairs and troubleshooting can be done if authorized in the product documentation or if directed by telephone or online support from Tyan. If damage has occurred due to repairs or service that is not approved by Tyan, the product warranty becomes invalid. Review all safety guidelines that are provided with the Tyan MicroServer. ! WARNING: There is strong pressure securing the CPU locking latch to the socket. Use caution when releasing the locking lever because it can spring up. Prerequisite: Power down the system. Disconnect all cables and peripherals from the compute blade(s). Remove the compute blade. Refer to Removing a Compute Blade. Remove the heat-sink. Refer to Removing a Heat-Sink. 1. Release the locking lever from the socket tab. (Figure 4-10) 2. Pull the locking lever on the processor socket from the locked position until it is fully open. ! CAUTION: Make sure that the locking lever is in the fully open position before installing or removing a processor. Failure to do so may result in permanent damage to the system board or the processor. 4-10 Compute Blade Components 3. Remove the processor from the socket. Processor Locking Lever Connector 1 Indicator Socket Tab Connector 1 Indicator Figure 4-10. Processor Socket Releasing the Processor Locking Lever Installing a Processor 0 FM65-B5511 Processor ! 0 CAUTION: If the CPU is positioned in the socket incorrectly, the CPU or system board can become damaged. The use of force is not required to install the CPU into the socket. Prerequisite: Power down the system. Disconnect all cables and peripherals from the compute blade(s). Remove the compute blade. Refer to Removing a Compute Blade. Remove the heat-sink. Refer to Removing a Heat-Sink. 1. Rotate the locking lever on the processor socket from the locked position until it is fully open. ! CAUTION: Make sure that the locking lever is in the fully open position before installing or removing a processor. Failure to do so may result in permanent damage to the system board or the processor. 2. Remove the socket cover from the socket. 3. Unpack the new processor and remove any protective material. 4. Align the processor over the socket and make sure the connector 1 indicators on the processor and the socket are aligned (Figure 4-9). 5. Gently place the processor in the socket. 6. Latch the lever under the top plate’s corner tab, being cautious not to damage the system board with the tip of the lever. Compute Blade Components 4-11 7. Secure the locking lever to the socket corner tab. 8. Apply a small amount of thermal grease/thermal pad on the processor. NOTE: NOTE: Always replace the thermal grease/pad before installing a processor. See the manufacturer’s guidelines for your type of thermal grease/pad. 9. Install the heat-sink. See Installing a Heat-Sink. 10. Install the compute blade into the chassis. See Installing a Compute Blade. FM65-B8001 Processor ! 0 CAUTION: If the CPU is positioned in the socket incorrectly, the CPU or system board can become damaged. The use of force is not required to install the CPU into the socket. Prerequisite: Power down the system. Disconnect all cables and peripherals from the compute blade(s). Remove the compute blade. Refer to Removing a Compute Blade. Remove the heat-sink. Refer to Removing a Heat-Sink. 1. Pull the locking lever on the processor socket from the locked position until it is fully open. ! CAUTION: Make sure that the locking lever is in the fully open position before installing or removing a processor. Failure to do so may result in permanent damage to the system board or the processor. 2. Remove the socket cover from the socket. 3. Unpack the new processor and remove any protective material. 4. Align the processor over the socket and make sure the processor connector 1 indicator is aligned with the socket connector 1 indicator. (Figure 4-10) 5. Gently place the processor in the socket. 6. Latch the lever under the socket tab, being cautious not to damage the system board with the tip of the lever. 7. Secure the locking lever to the socket tab to lock the processor socket. 8. Apply a small amount of thermal grease/thermal pad on the processor. NOTE: NOTE: Always replace the thermal grease/pad before installing a processor. See the manufacturer’s guidelines for your type of thermal grease/pad. 9. Install the heat-sink. See Installing a Heat-Sink. 10. Install the compute blade into the chassis. See Installing a Compute Blade. 4-12 Compute Blade Components Heat-Sinks 0 General Guidelines ! 0 CAUTION: The heat-sink thermal grease/pad is not reusable. It must be replaced after removing a heat-sink or prior to installing a new processor. Installing a Heat-Sink 0 Prerequisite: Power down the system. Disconnect all cables and peripherals from the compute blade(s). Remove the compute blade. Refer to Removing a Compute Blade. ! WARNING: Use caution when removing the heat-sink. The heat-sink can remain hot even after the system has powered down. 1. Unpack the new heat-sink and remove any protective material. 2. Align the heat-sink over the system board and retaining screw holes. (Figure 4-11) 3. Tighten the captive screws on the heat-sink in a diagonally opposite pattern. Heat-Sink Figure 4-11. Installing the Heat-Sink 4. Install the compute blade into the chassis. See Installing a Compute Blade. Removing a Heat-Sink ! 0 CAUTION: Most repairs to the Tyan MicroServer should only be performed by a professional service technician. Basic repairs and troubleshooting can be done if authorized in the product documentation or if directed by telephone or online support from Tyan. If damage has occurred due to repairs or service that is not approved by Tyan, the product warranty becomes invalid. Review all safety guidelines that are provided with the Tyan MicroServer. Compute Blade Components 4-13 ! WARNING: Use caution when removing the heat-sink. The heat-sink can remain hot even after the system has powered down. Prerequisite: Power down the system. Disconnect all cables and peripherals from the compute blade(s). Remove the compute blade. Refer to Removing a Compute Blade. 1. Loosen four (4) captive screws on the heat-sink. (Figure 4-12) 2. Lift and remove the heat-sink from the system board. Heat-Sink Figure 4-12. 4-14 Removing the Heat-Sink Compute Blade Components System Board ! 0 CAUTION: Most repairs to the Tyan MicroServer should only be performed by a professional service technician. Basic repairs and troubleshooting can be done if authorized in the product documentation or if directed by telephone or online support from Tyan. If damage has occurred due to repairs or service that is not approved by Tyan, the product warranty becomes invalid. Review all safety guidelines that are provided with the Tyan MicroServer. Removing a Bridge Board 0 Prerequisite: Power down the system. Disconnect all cables and peripherals from the compute blade(s). Remove the compute blade. Refer to Removing a Compute Blade. Remove the hard drive. Refer to Removing a Hard Drive. 1. Remove four (4) screws from the bridge board. (Figure 4-13) 2. Slide and disconnect the bridge board from the system board. 3. Lift and remove the bridge board from the compute blade. Bridge Board Connector System Board Figure 4-13. Removing the Bridge Board Installing a Bridge Board 0 1. Lower the bridge board onto the compute blade. (Figure 4-13) 2. Slide and connect the bridge board connector to the system board. 3. Install and secure the bridge board with the four (4) screws. 4. Install the compute blade into the chassis. See Installing a Compute Blade. Compute Blade Components 4-15 Removing a System Board ! 0 CAUTION: Most repairs to the Tyan MicroServer should only be performed by a professional service technician. Basic repairs and troubleshooting can be done if authorized in the product documentation or if directed by telephone or online support from Tyan. If damage has occurred due to repairs or service that is not approved by Tyan, the product warranty becomes invalid. Review all safety guidelines that are provided with the Tyan MicroServer. Prerequisite: Power down the system. Disconnect all cables and peripherals from the compute blade(s). Remove the compute blade. Refer to Removing a Compute Blade. Remove the heat-sink. Refer to Removing a Heat-Sink. Remove the bridge board. Refer to Removing a Bridge Board. 1. Remove the screws from the system board. (Figure 4-14) B8001 System x 4 screws B5511 System x 5 screws 2. Lift the rear of the system board, pivoting it at the front. 3. Pull the system board at the pivot point away from the blade housing. System Board USB Slots Power Button/ System Power LED Slot Figure 4-14. 4-16 Removing the B8001 System Board Compute Blade Components System Board USB Slots Power Button/ System Power LED Slot Figure 4-15. Removing the B5511 System Board Installing a System Board 0 1. Align front of the system board, DIMM slots positioned in the front, with the front of the blade housing. 2. Slide the front of the system board into the housing. 3. Lower the system board into the housing making sure the screw holes on the system board align with the screw nuts on the board housing. 4. Secure the system board to the blade housing with the screws (Figure 4-14): B8001 System x 4 screws B5511 System x 5 screws 5. Install the compute blade into the chassis. See Installing a Compute Blade. Compute Blade Components 4-17 4-18 Compute Blade Components Chapter 5: Chassis Components Introduction 0 This chapter explains how to replace components relating to the chassis components, including the power supply module, fan module, top cover and Pass-through / CMM module. Disassembly Flowchart 0 The following flowchart outlines the disassembly procedures. Figure 5-1. Chassis Components Disassembly Flowchart 5-1 Power Supply Modules 0 System Power Guidelines 0 The following table provides specifications about the power supply module. Table 5-1. Power System Module Specifications Information Description Vendor Delta Model DPS-800NB B Type Redundant PSU Input Range AC 100~127Vac / 9.2A / 50-60Hz AC 200~240Vac / 4.4A / 50-60Hz Output +12V / 65A, +12VSB/2A, 800W Max. Dimensions (L) 196 mm x (W) 73.5 mm x (H) 40 mm (7.72 x 2.89 x 1.57 inch) The following table provides information about the LED lights on the power supply module. Table 5-2. LED Status Bicolor Power Supply Condition 5-2 Green LED Amber LED No AC power to all power supplies OFF OFF Power supply critical event causing a shutdown; failure, OCP, OVP, Fan Fail OFF AMBER Power supply warning events where the power supply continues to operate; high temp, high power, high current, slow fan OFF 1Hz Blink AMBER AC present / Only 12VSB on (PS off) or PS in Smart Redundant state 1Hz Blink GREEN OFF Output ON and OK ON OFF AC cord unplugged 0.5Hz Blink GREEN OFF Chassis Components Removing a Power Supply Module ! 0 CAUTION: Most repairs to the Tyan MicroServer should only be performed by a professional service technician. Basic repairs and troubleshooting can be done if authorized in the product documentation or if directed by telephone or online support from Tyan. If damage has occurred due to repairs or service that is not approved by Tyan, the product warranty becomes invalid. Review all safety guidelines that are provided with the Tyan MicroServer. ! CAUTION: Make sure that the power cable is disconnected from the power supply module (PSU) before attempting to remove the PSU. 1. Disconnect the power cable from the power supply module socket. (Figure 5-2) 2. Press and hold the release latch on the power supply module. 3. Pull the handle on the power supply module to remove it from the chassis. Power Supply Socket Module Handle handle Release Latch Figure 5-2. Removing a Power Supply Module Installing a Power Supply Module 0 1. Install the power supply module into the chassis until the release latch locks and the power supply module is seated properly with the chassis. (Figure 5-2) 2. Connect the power cable into the power supply module socket. Chassis Components 5-3 Fan Modules ! 0 CAUTION: Most repairs to the Tyan MicroServer should only be performed by a professional service technician. Basic repairs and troubleshooting can be done if authorized in the product documentation or if directed by telephone or online support from Tyan. If damage has occurred due to repairs or service that is not approved by Tyan, the product warranty becomes invalid. Review all safety guidelines that are provided with the Tyan MicroServer. Prerequisite: Power down the system. Removing a Fan Module 0 1. Press and hold the release latch on the fan module. (Figure 5-3) 2. Pull the handle on the fan module to remove it from the chassis. Handle Release Latch Figure 5-3. Removing a Fan Module Installing a Fan Module 0 1. Align the fan module with the chassis. (Figure 5-3) 2. Install the fan module and push until the release latch locks and the fan module is seated properly with the chassis. 5-4 Chassis Components Opening and Closing the System ! 0 CAUTION: Most repairs to the Tyan MicroServer should only be performed by a professional service technician. Basic repairs and troubleshooting can be done if authorized in the product documentation or if directed by telephone or online support from Tyan. If damage has occurred due to repairs or service that is not approved by Tyan, the product warranty becomes invalid. Review all safety guidelines that are provided with the Tyan MicroServer. ! CAUTION: The top cover must be installed to maintain proper system cooling. Prerequisite: Power down the system. Opening the Top Cover 0 1. Remove three (3) screws from the top cover. (Figure 5-4) 2. Slide the top cover until clear from the chassis. 3. Lift and remove the top cover. Top Cover Figure 5-4. Opening the Top Cover Closing the Top Cover 0 1. Place the top cover over the chassis. (Figure 5-4) 2. Slide the top cover until the bottom edge of the top cover is under the chassis and the top cover is secure to the chassis. 3. Install and secure the top cover with the three (3) screws. Chassis Components 5-5 Pass-through / CMM Module ! 0 CAUTION: Most repairs to the Tyan MicroServer should only be performed by a professional service technician. Basic repairs and troubleshooting can be done if authorized in the product documentation or if directed by telephone or online support from Tyan. If damage has occurred due to repairs or service that is not approved by Tyan, the product warranty becomes invalid. Review all safety guidelines that are provided with the Tyan MicroServer. ! CAUTION: For cooling purposes, when the Pass-through / CMM module removed, it should be immediately replaced with another Pass-through / CMM module for proper cooling and air circulation to occur. Prerequisite: Power down the system. Disconnect all cables and peripherals from the Pass-through / CMM module. Removing Pass-through / CMM Module 0 1. Press and hold the release latch on the Pass-through / CMM module. (Figure 5-5) 2. Pull the handle on the Pass-through / CMM module to remove it from the chassis. Release Latch Handle Figure 5-5. Removing a Pass-through / CMM Module Installing Pass-through / CMM Module 0 1. Install the Pass-through / CMM module into the chassis until the release latch locks and the module is seated properly with the chassis. (Figure 5-5) 5-6 Chassis Components Removing an I/O and CMM System Board ! 0 CAUTION: Most repairs to the Tyan MicroServer should only be performed by a professional service technician. Basic repairs and troubleshooting can be done if authorized in the product documentation or if directed by telephone or online support from Tyan. If damage has occurred due to repairs or service that is not approved by Tyan, the product warranty becomes invalid. Review all safety guidelines that are provided with the Tyan MicroServer. ! CAUTION: For cooling purposes, when the Pass-through / CMM module removed, it should be immediately replaced with another Pass-through / CMM module for proper cooling and air circulation to occur. Prerequisite: Power down the system. Disconnect all cables and peripherals from the Pass-through / CMM module. Remove the Pass-through / CMM module. Refer to Removing Pass-through / CMM Module. 1. Remove five (5) screws from the Pass-through / CMM system board. (Figure 5-6) 2. Slightly lift the rear of the system board. 3. Pull and remove the system board from the Pass-through / CMM blade. I/O and CMM System Board Gigabit LAN Port Slots Pass-through / Blade Management Port Slot Figure 5-6. Chassis Components Removing the Pass-through / CMM Module System Board 5-7 Installing an Pass-through / CMM System Board 1. Holding the Pass-through / CMM system board in a slight angle, align and insert the system board connectors with the Gigabit LAN port and management port slots on the front of the Pass-through / CMM blade. (Figure 5-6) 2. Lower the system board onto the Pass-through / CMM blade. 3. Install and secure the system board to the Pass-through / CMM blade with the five (5) screws. 4. Install the Pass-through / CMM module into the chassis. See Installing Pass-through / CMM Module. 5-8 Chassis Components 0 Chapter 6: Troubleshooting the MicroServer Safety First 0 Start-up Routine 0 Checking Equipment 0 Troubleshooting External Connections 0 System Alert Messages 0 Troubleshooting Chassis Components 0 PSM 0 Fans 0 CMC 0 Pass-through / CMM Module Troubleshooting the MicroServer 0 6-1 Troubleshooting Compute Blade Components Memory 0 Hard Drives 0 Processors 0 System Board 0 System Diagnostics 0 Administrator Diagnostics 0 System Diagnostics 0 Using System Diagnostics 0 Running System Diagnostics 6-2 0 0 Troubleshooting the MicroServer Testing Options 0 Error Messages Troubleshooting the MicroServer 0 6-3 6-4 Troubleshooting the MicroServer Chapter 7: Parts Listing This parts listing supports the FM65-B5511 and FM65-B8001 models. NOTE: NOTE: The illustrations in this document may differ from your model. Parts Listing 7-1 7-2 Parts Listing Appendix A: Getting Help and Support Technical Support 0 If a problem arises with the Tyan MicroServer, you should first turn to your dealer for direct support. The system has most likely been configured or designed by the dealer and they should have the best idea of what hardware and software your system contains. If this option is not available, then MiTAC International Corporation can help. Besides designing innovative and quality products for over a decade, MiTAC has continuously offered customers service beyond their expectations. Tyan’s website (http://www.tyan.com) provides easy-to-access resources such as in-depth Linux Online Support sections with downloadable Linux drivers and comprehensive compatibility reports for chassis, memory and much more. With all these convenient resources just a few keystrokes away, users can easily find their latest software and operating system components to keep their systems running as powerful and productive as possible. MiTAC also ranks high for its commitment to fast and friendly customer support through email. By offering plenty of options for users, MiTAC serves multiple market segments with the industry’s most competitive services to support them. Please feel free to contact us directly for this service at tech-support@tyan.com Help Resources: See the Tyan’s website for FAQ’s, bulletins, driver updates, and other information: http://www.tyan.com Contact Check your dealer for help before calling Tyan. the Tyan user group: alt.comp.periphs.mainboard.Tyan TYAN® FM65-B5511/FM65-B800 User's Manual V1.0a Document No.: D2165-100 Getting Help and Support A-1 A-2 Getting Help and Support Appendix B: Safety Information The following section contains important safety information. Read this section thoroughly before servicing the system. General Safety 0 The following are guidelines to ensure general safety: Maintain When a clean environment during and after maintenance. lifting heavy objects: 1. Ensure you are standing on a clean stable surface to prevent slipping. 2. Distribute the weight of the object equally between your feet. 3. Use a slow lifting force. Never move suddenly or twist when you attempt to lift. 4. Lift by standing or by pushing up with your leg muscles to prevent additional strain on the muscles in your back. Do not attempt to lift any objects that weigh more than 16 kg (35 lb) or objects that you think are too heavy for you. Do not perform any tasks that will create a hazard make the equipment unsafe. Before you starting the system, ensure that all personnel are not in a hazardous position. Place removed covers and other parts in a safe place, away from personnel, while servicing the system. Do not wear jewelry, chains, metal-frame eyeglasses, or metal fasteners for your clothing to prevent an electrical discharge. Wear safety glasses to prevent injury or a hazard to your eyes. After service, reinstall all safety shields, guards, labels, and ground wires. Replace any safety device that is worn or defective. Reinstall all covers correctly before returning the system. Electrical Safety ! 0 CAUTION: Electrical current from the system or peripherals can be hazardous. To avoid personal injury or damage to equipment, disconnect the attached power cord(s) and peripherals before you open the system, unless specifically instructed otherwise in a stated procedures. Observe the following guidelines when working on the system. Know the location of the room emergency power-off (EPO) switch, disconnecting switch, or electrical outlet. In the event of an electrical accident, you can operate the switch or unplug the power cord quickly. Do not work alone under hazardous conditions or near equipment that has hazardous voltages. Disconnect all power before: Performing Safety Information a mechanical inspection B-1 Working near power supplies Removing or installing the system Before you start to work on the system, unplug the power cord. If the power cord cannot be unplugged, power-off the wall box that supplies power to the system and to lock the wall box in the off position. Never assume that power is disconnected from a circuit. Check that the power cord is disconnected. Safety Notices 0 Use caution when lifting. Table 2-1. Safe Lifting Practices Weight B-2 Required ≥ 18 kg (39.7 lbs) two individuals ≥32 kb (70.5 lbs) three individuals ≥55 kg (121.2 lbs) four individuals Safety Information Appendix C: Glossary Glossary G-1 G-2 Glossary Appendix D: Index Numerics 4-Post Rack Installing Inner Rail, 2-12 Outer Rail, 2-13 System, 2-13 Mounting, 2-12 Preparing, 2-12 C Chassis Components, 5-1 Disassembly Flowchart, 5-1 Introduction, 5-1 Compute Blade Components, 4-1 Disassembly Flowchart, 4-1 Enumeration, 4-2 Features, 2-6 FM65-B5511, 2-6 FM65-B8001, 2-7 Introduction, 4-1 Compute Blade Blank, 4-3 Installing, 4-3 Removing, 4-3 Compute Blade Modules, 4-4 Installing, 4-4 Removing, 4-4 F Fan Modules, 5-4 Installing, 5-4 Removing, 5-4 H Hard Drives, 4-7 Installing, 4-7 Removing, 4-8 Heat Sinks, 4-13 General Guidelines, 4-13 Installing, 4-13 Removing, 4-13 I I/O and CMM Module Installing, 5-6 Overview, 2-10 Removing, 5-6 System Board Index Installing, 5-8 Removing, 5-7 I/O Connectivity, 2-11 I/O Port Mapping, 2-11 Compute Blade, 2-11 I/O and CMM Module, 2-11 Information General, 2-2 Necessary, 2-1 Precautions, 2-1 Recommended Equipment, 2-2 Recycling, 2-2 Safety, 2-1 Work Area, 2-2 M Microserver About, 1-1 features, 1-1 Models, 1-6 Overview, 1-1 Mid Plane Features, 2-8, , 2-11 P Parts Accessories, 1-6 Contens, 1-6 List. See Catalog, 1-6 Power Supply Modules, 5-2 Installing, 5-3 Removing, 5-3 System Power Guidelines, 5-2 Processors, 4-9 General Guidelines, 4-9 Installing, 4-11 Removing, 4-9 S System Front View, 2-4 Internal View, 2-5 Overview, 2-3 Rear View, 2-4 Top Cover Closing, 5-5 Opening, 5-5 D-1 System Board, 4-15 Bridge Board Installing, 4-15 Removing, 4-15 Installing, 4-17 Removing, 4-16 System Memory, 4-5 General Guidelines, 4-5 Installing Memory Module, 4-5 Population Rules, 4-5 Removing Memory Module, 4-5 D-2 Index