1
We_i%house
USER'S MANUAL
MANUEL DE L'UTfLISATEUR
MANUAL DEL USUARIO
SK-lgH210S
WidescreenHDTV
HDTV b Ecmn (_i_t
H/OTVP{£ntal!a6rando
CONTENTS
WELCOME
Package Contents
Contacting
Westinghouse
1=
PRODUCT
Digital
SAFETY
Important Notice Concerning
FCC Compliance
Statement
Product Safety Instructions
mOther Notices
Power Cord Selection
Antenna
Installation
Safety
--Outdoor Antenna Grounding
--Lightning
--Power Lines
2,
INTRODUCTION:
THE BASICS
Digital Television (DTV)
High Definition Television (HDTV)
About the Digital Television Picture
About Digital Channels
The Electronic Program Guide (EPG)
CONTROLS
Front View
Side-Mounted
AND
CONNECTIONS
Controls
Rear Right/Left Spine-Mounted
Connectors
--Quick Reference: HDTV Connections
Install Base
Inserting
Remote Control
--Precautions
Remote Control Features
3=
HDTV/ACCESSORY
Connecting
--Power
---
Batteries
SETUP
Your HDTV
Determining Available Channels
Choose Your TV Source
Connecting
_onnection
--Power
Your Personal
Types
Computer
_omputer
Settings
Connecting
Other Accessories
--DVD
or Game System
--Video Cassette Recorder (VCR)
_able
or Satellite Receiver
--Audio
Equipment
4=
HDTV
OPERATION
About the On Screen Display
OSD Menus & Features
(OSD)
--Settings
Video Menu
--Audio
Menu
_olor
Menu
--Setup
Menu
_uick
Setup Menu
--Advanced
Setup Menu
--Lock
Menu
--reset
_uide
--About
--Input
5=
of Setup Menu
Menu
Parental Controls
Menu
APPENDIX
19-inch High Definition LCD TV Specifications
Troubleshooting
Cleaning the High Definition LCD TV
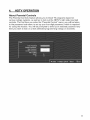
WELCOME
Congratulations on the purchase of your High Definition LCD TV--and thank you
for choosing Westinghouse. This User Manual was created to ensure simple,
safe setup and use of all the features offered by your new HDTV.
Package Contents
In addition to your new Westinghouse
find the following:
• Quick Setup Guide
• Remote control
• 2 AAA batteries
•
•
•
AC power cord
Warranty card
Stand (wall-mount
accessories
Contacting Westinghouse
HDTV and this User Manual, you'll also
available separately)
Digital
If you still have questions or require assistance after reading the Quick Setup
Guide and the instructions in this User Manual, please contact Westinghouse
Customer Service at 1-866-287-5555, or visit our Web site at
www.westing housedigital.com.
Don't forget to complete and return your Warranty card or use our online
Product Registration feature. Your Westinghouse HDTV is warranted for
defects in materials or workmanship for a period of one year from original
date of purchase.
Explanations
of required
symbols
SYMBOL
:
SYMBOL
DANGEROUS
The
lightning
DEFiNITiON
VOLTAGE
flash
with
:
arrowhead
symbol,
within
on equi-
lateral
triangle,
is intended
to alert the user to the presence
of unineuleted
"dangerous
voltage"
within the product's
enclosure
that may be of sufficient
magnitude
to constitute
a risk of electrical
shock to persons,
SA1965
The exclamation point with on equilateral triangle is intended
to alert the user to: the presence of important operating and
INSTRUCTIONS
maintenance ( servicing ) instructions in the literature
accompanying the appliance.
SA1966
PLEASE
1.
READ
FIRST:
PRODUCT SAFETY
WARNING: This device must be operated with the original power supply, part number DPS-210
EP2C.
CAUTION: The power supply outlet should be located near High Definition LCD TV and should
be easily accessible. Always use the appropriate AC cord that is certified for your specific country.
Some examples are listed below:
USA .................. UL
Switzerland ..... SEV
Canada ............. CSA
Britain ............. BASE/BS
Germany .......... VDE
Japan ............... Electric Appliance Control Act
IMPORTANT NOTICE CONCERNING
POWER CORD SELECTION
The specific power cord for this High Definition LCD TV is enclosed
according to the country of destination and must be used to prevent
following guidelines if it is necessary to replace the original cord set,
enclosed. The female receptacle of the cord set must meet IEC-60320
look like Figure A1 below:
Figure
A1 _
Figure
and has been selected
electric shock. Use the
or if the cord set is not
requirements and should
A2@_:.
For the United States and Canada
In the United States and Canada the male plug is a NEMA5-15 style (Figure A2), UL Listed, and
CSA Labeled. For High Definition LCD TVs that are placed on a desk or table, type SVT or SJT
cord sets may be used. For High Definition LCD TVs placed directly on the floor, only SJT type
cord sets may be used. The cord set must be selected according to the current rating for the High
Definition LCD TV. Please consult the table below for the selection criteria for power cords used
in the United States and Canada.
Cord
Type
Size of Conductors
SJT
18
16
14
18
17
SVT
FCC Compliance
AWG
AWG
AWG
AWG
AWG
in Cord
Maximum
Current
Unit
Rating
of
10 Arnps
12 Amps
12 Amps
10 Amps
12 Amps
Statement
This equipment has been tested and complies with the limits for a Class B digital device, pursuant
to part 15 of the FCC Rules. These limits are designed to provide reasonable protection against
harmful interference in a residential installation. This equipment generates, uses, and can radiate
radio frequency energy, and may cause harmful interference to radio communications if not
installed and used in accordance with the instructions. However, there is no guarantee that
interference will not occur in a particular installation. If this equipment does cause harmful
interference to radio or television reception, which can be determined by turning the equipment
off and on, the user is encouraged to try to correct the interference by one or more of the
following measures:
•
Reorient or relocate the receiving antenna.
•
Increase the separation between the High Definition LCD TV and receiver.
• Connect
theequipment
intoanoutlet
onacircuit
different
fromthattowhich
thereceiver
isconnected.
• Consult
theWestinghouse
Service
Center
oranexperienced
radio/TV
technician
for
assistance.
FCC Warninq
To assure continued FCC compliance, the user must use a grounded power supply cord
and the provided shielded video interface cable with bonded ferrite cores. If a BNC cable is
used, use only a shielded BNC (5) cable. Also, any unauthorized changes or modifications
not expressly approved by Westinghouse Digital will void the user's authority to operate
this device.
For tuner, according
with UL60950-1
"Make sure that your CATV system installer has connected the Co-axial cable shield to the
grounding system of the building, as close to the point of cable entry as practical.
The common or earthed side of the connected (SELV) circuits and any accessible metal parts
should be connected to the screen of coaxial cable."
The cable distribution system should be grounded (earthed) in accordance with ANSI/NFPA 70,
the National Electrical Code (NEC), in particular Section 820.93, Grounding of Outer Conductive
Shield of a Coaxial Cable.
1.
PRODUCT SAFETY
Follow and obey all warnings and instructions marked on the High Definition LCD TV. For your
safety, please read all of the following safety and operating instructions before you operate the
High Definition LCD TV--and keep this User's Manual for future reference.
Important
Safety Instructions
1.
2.
3.
Never use your HDTV near water.
Clean only with dry cloth.
Never block any ventilation openings; install in accordance with the manufacturer's
instructions.
4. Do not install near any heat sources such as radiators, heat registers, stoves or any other
equipment (including amplifiers) that produce heat.
5. Take care to maintain the safety purpose of the polarized or grounding type plug. A
polarized plug has two blades with one wider than the other. A grounding type plug has
two blades and a third grounding prong. The wide blade or the third prong are provided
for your safety; therefore, if the provided plug does not fit into your outlet, do not alter the
plug in any way to fir; consult an electrician for replacement of the obsolete outlet.
6. Ensure the power cord is protected from being walked on or pinched, particularly at plugs,
convenience receptacles and the point where they exit from the
apparatus.
7. Only use attachments/accessories specified by the manufacturer.
8. Use only with the cart, stand, tripod, bracket, or table specified by the
manufacturer, or sold with the apparatus. When a cart is used, use
caution when moving the cart/apparatus combination to avoid the potential for injuries
caused by tipping over.
9. Unplug this apparatus during lightning storms or when unused for long periods of
time.
10. Refer all servicing to qualified service personnel. Servicing is required when the
apparatus has been damaged in any way, such as: damage to the power supply cord or
plug; liquid has been spilled into--or objects have fallen onto the apparatus; the
apparatus has been exposed to rain or moisture and does not operate normally, or it has
been dropped.
Other
•
•
•
•
•
•
Notices
Avoid exposing the High Definition LCD TV to direct sunlight or high temperatures.
Avoid exposing the High Definition LCD TV to moisture or high humidity.
Do not attempt repairs yourself. Your warranty does not cover repairs or attempted
repairs by anyone not authorized by the manufacturer.
If your High Definition LCD TV will not be used for a long period of time, unplug your
HDTV and remove the batteries from the remote control.
Only use attachments/accessories specified by the manufacturer.
Avoid touching the screen. Skin oils are difficult to remove.
Never remove the rear cover. Your High Definition LCD TV contains high-voltage parts.
You may be seriously injured if you touch them.
Always handle your LCD display with care when moving it.
If the High Definition LCD TV emits smoke, abnormal noise, or a strange odor,
immediately turn it off and contact the Westinghouse Service Center.
1.
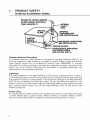
PRODUCT SAFETY
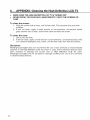
Antenna Installation Safety
EXAI.'R.E
OFANI_NI=AGROUNO
AS PER NATIONAL ELECTRICAL
_
-'LEAD IN
WRE
COOE.
J ANS_IFPA
70GROUNO, _,aN'I'ANTB_INA
ENI_
(NE-C SECTION g10-201
(NGC SECTION 910-2ol)
GROUNDING CONI_ cro_
]__
GROJNDO,A_PS
-,-----
POWER SERVICE GROUNDING
ELECTRODE SYSTEM
(NEC ART 2'30. PART H)
Outdoor
Antenna
Grounding
If an outside antenna or cable system is connected to the High Definition
LCD TV, be
sure the antenna or cable system is grounded to prevent voltage surges and built-up
static charges. Article 810 of the National Electrical
Code, ANS/NFPA
70, provides
information on proper grounding
of the mast and supporting structure, grounding of the
lead-in wire to an antenna
discharge
unit, connection
to grounding
electrodes,
and
requirements
for the grounding electrode.
Lightning
For added protection for the High Definition LCD TV during a lightning storm, or when it
is left unattended and unused for long periods of time, unplug it from the wall outlet and
disconnect the antenna or cable system. This will prevent damage to the High Definition
LCD TV due to lightning and power-line surges. Do not disconnect
the antenna or the
power cord during a heavy storm--lightning
may strike while you are holding the cable
cord, causing serious injury. Turn off your High Definition
LCD TV and wait for the
weather to improve.
Power
Lines
An outside antenna system should not be located in the vicinity of overhead power lines
or other electric light or power circuits. When installing an outside antenna
system,
extreme care should be taken to keep from touching such power lines or circuits.
2.
INTRODUCTION:
Digital Television
THE BASICS
(DTV)
Television broadcasting is changing. By February of 2009, traditional analog TV
transmissions (the standard since TV's inception) will cease to exist, in
compliance with a federal mandate requiring all U.S. television stations to convert
from analog to the new digital television (DTV) standards.
In contrast to the magnetic waves used for analog transmission (also known as
NTSC, short for National Television Standards Committee), DTV transmits
images and sound as data, using ones and zeroes, the same digital code
computers use. As a result of this increased efficiency, DTV offers an array of
benefits including dramatic improvements to picture and sound quality. In addition,
DTV allows the same number of stations to broadcast using fewer channels,
freeing parts of the broadcast spectrum for other uses, such as public safety and
wireless services
NUi%_) D YV should not be confused
with dif_ita/ c_,b/e or dif_it_/ sate/rite syr_tenls.
;%t d_,-;pMyon channel 3 or 4 of an ana/eg T_,(
High Definition Television
(HDTV)
The most common DTV formats are Standard Definition Television (SDTV) and
High Definition Television (HDTV). Of the two, HDTV delivers digital
broadcasting's highest resolution and picture quality. HDTV also uses a
"widescreen format," which refers to the aspect ratio (screen width vs. height) of
the image. To put this in perspective, analog television uses a 4 x 3 aspect ratio;
HDTV's aspect ratio is 16 x 9, creating a more cinematic-like viewing experience.
Plus HDTV increases the number of horizontal scan lines on the screen, enabling
it to render greater picture detail. And, while HDTV uses approximately the same
bandwidth, it transmits approximately six times more information, further
enhancing video and audio clarity.
2.
INTRODUCTION:
THE BASICS
About the Digital Television
Picture
Your new Westinghouse
High Definition LCD TV has a built-in HDTV/NTSC tuner,
meaning it can receive both analog and digital broadcasts from your antenna,
cable or satellite service. But because not all broadcasters have converted to the
new DTV standards,
television picture.
it's important to understand
some fundamentals
of the digital
The elements that make up onscreen images are pixels. The more pixels, the
more detail, because the number of pixels determines picture resolution--and
HDTV offers the highest pixel count and best resolution available. HDTV
resolution is available in both 720p and 1080i formats. The "p" and "i" refer to the
scanning method used to deliver the lines of resolution on the screen.
Progressive "p" scanning means that pixels on the screen are refreshed
simultaneously, with each scan showing every line for a complete picture at 1/60 th
of a second. Interlaced "i" scanning refreshes pixels by alternating first, by
showing every odd line, then following with the even lines--for a complete picture
at 1/30 th of a second.
True high definition image quality is possible only with a true high definition
display--and
a 720p or 1080i signal coming into your HDTV. Lower resolution
images from analog broadcasts or VHS recordings, for example, may result in
disappointing picture quality as they simply don't have enough detail to display
well in high-definition. If you have cable or satellite service, you'll want to check
with your provider to determine which packages include stations broadcasting in
high definition, and if you need a different box or tuner to receive HDTV signals.
And, as more and more broadcasters change to a digital signal, you will be able
to view all of your programming choices in stunning high definition--and
the
luxury of your personal home theater experience.
10
2.
INTRODUCTION:
THE BASICS
About Digital Channels
Currently, all broadcasters have an analog TV channel and a digital TV channel.
The digital bandwidth has the capability of accommodating
more than one
program stream because each broadcaster's assigned digital channel carries a
19.39-megabit-per-second
(Mbps) digital data stream. This allows the
broadcaster the option of broadcasting a single program or dividing the digital
data stream into multiple programming streams. These streams include the
"major" channel specific to a broadcasting station, as well as any additional
programming streams on the bandwidth, which are referred to as "minor
channels" or "sub-channels," each broadcasting a different program. As a result,
the numbering system for digital channels is different than that of traditional
analog TV.
Digital Virtual Channel
Number
Physical Channel
Number
Here's how it works:
•
•
The number in parentheses to the right is the actual physical channel
number of the transmitter used to broadcast the network programming in
your region
Each physical channel is mapped to one or more digital channel numbers,
known as "virtual channels," and represented by a number, followed by a
dot and then another number; for example, 7.1,7.2, etc. (the old analog
channel is always referenced to minor channel "0", as in 7.0, while 7.1
would represent the new digital television channel)
--The first number is the major channel used for all channels of a
particular broadcasting station
--The number following the dot is the minor channel number assigned to
each broadcaster's additional programming streams; digital television
stations may have only one virtual channel, or as many as six
11
2.
INTRODUCTION:
The Basics
The Electronic Program Guide (EPG)
Your Westinghouse High Definition LCD TV features an on-screen interactive
Electronic Program Guide (EPG) that allows you to review program information,
as well as navigate through any available minor programming.
To access the EPG, push the "Guide" button on the lower left side of your remote,
scroll to the "EPG" feature under "Guide" section of the On Screen Display's
(OSD) TV menu.
EPG includes:
•
current channel, program name and description, along with programming
titles, start and end times for all available minor channels from the same
broadcaster
EPG also provides:
• Content resolution,
• Program rating
Closed Caption information
To exit EPG, simply press the "Guide" button again.
12
2.
INTRODUCTION:
CONTROLS
AND CONNECTIONS
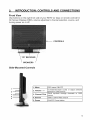
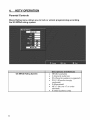
Front View
Use buttons on the right front side of your HDTV (or keys on remote control) for
On Screen Display (OSD), volume adjustment, channel selection, source, and
turning power on or off.
,_-iCONTROLS
"IR"RECEIVER
SPEAKERS
Side-Mounted
Controls
1. Menu
DSD menu ON/OFF
2. Volume + / -
4. Source
Increase/decrease sound or adjust selected
features in OSD menus
Scroll up/down through channels or OSD
"_enus
Select active Video source
5. Power
DN/OFF Power button
3. Channel VIA
13
2.
INTRODUCTION:
Rear Right/Left
CONTROLS
Spine-Mounted
AND CONNECTIONS
Connectors
LEFTSIDECONNECTORS
1,
2.
3,
4.
5.
6.
7.
8.
VGA
Connectpersonalcomputerusinga 15-pinVGA
cable
HBMI
ConnectexternalHDMIdevicelikea DVD,
cable/satellitereceiveror personalcomputer(using
a DVI-HDMIcable,notsupplied)
YPbPr/Audio
Connectan externalvideodevicelikea DVDor
gamingsystem
S-VideofAVVideo/Audio(Right/Left)
Connectan externalvideo devicelikea VCR (Audio
Right/LeftsupportsS-Videoor AV input)
SPIBF
DigitalAudioconnection
AudioIn (VGA)
Connectpersonalcomputerusinga 3.5rammini-jack
cablefromPC sAudioOut
AudioOut
Connecta headphone
ANT/Cable
Connectantennaor cableservice
BOTTOMAND BACKCONNECTOR
9.
VESA100mmWallMountHoles
Usefor attachingVESA100 mmwall mountbracket
10.
AC-IN(Power)
Connectto powersourcevia suppliedpowercord
.Seepages19-20formoreinformationaboutconnectingcable/satellitereceivers,gameconsoles,VCRand
DVDplayer/recorders,
audiodevicesandyourpersonalcomputer.
14
2.
INTRODUCTION:
CONTROLS
AND CONNECTIONS
Install Base
1.
Place the base on a fiat surface and
2.
3.
Align the holes and tabs between the TV neck and the base
Slide TV neck onto the base until it snaps into place
To remove the base stand, place your 19" HDTV face down on a flat and soft surface,
press the tabs on the bottom of the stand neck and then remove the base
15
2.
INTRODUCTION:
Inserting
1.
2.
3.
Remote
AND CONNECTIONS
Batteries
Remove the battery compartment
Insert the batteries corresponding
battery compartment
Reattach cover
iiii_N
16
Control
CONTROLS
cover
to the (+) and (-) marks inside the
2.
INTRODUCTION:
Remote
Control
CONTROLS
AND CONNECTIONS
Features
1. POWER
Switch the power On/Off
2. PIP
Display sub picture On/Off
Note: This feature is not available on this 19" HDTV.
3. MUTE
Turn the sound On/Off
4. SWAP
Switch between PIP and Main Picture
Note: This feature is not available on this 19" HDTV.
5. BACKLIGHT
Shortcut to adjust backlight adjustment
6. CO
Turn Closed Caption On/Off
7. SLEEP
Set sleep timer
8. FAVORITE CHANNEL A / B / C
Jump to favorite channels (Hold button for
3 seconds to program favorite channel).
9. CHANNEL NUMBER KEYS
Select specific channels
10. DOT
To input dot when selecting digital
channels
11.ENT
Complete channel selection
12.INPUT
Display MP input menu
13.VOL -/+
Volume Up/Down adjustment
14.SCALING
Set video display format to
"STANDARD", "FILL"
15.0H VIA
TV Channel Up/Down adjustment
16.MENU
Turn OSD Menu On/Off
17. LAST CHANNEL
Switch to previous channel
18. T I AI _III_
Navigate within OSD Menu
17
19.ENTER
Make a selection
20.EPG
Display Electronic Program Guide
21.1NFO
Display the source and channel information
22. YPbPrl
Switch to YPbPrl source
23. PC
Switch to VGA source
24.HDMI
Switch to HDMI source
25. TV
Switch and toggle between DTV and regular TV sources
26.YPbPr2
Switch to YPbPr2 source - Note: This feature is not available on this HDTV
27. AV
Switch to AV source
28. S-VIDEO
Switch to S-Video source
29. DVI
Switch to DVI source - Note: This feature is not available on this 19" HDTV
15
7
9
18
3.
HDTV/ACCESSORY
SETUP
Now that you're familiar with the basics of digital television and the various
controls and connections for your HDTV, you're ready to enjoy its superb picture
quality and sound, along with the ultimate convenience of connecting your game
consoles, VCR, DVD, audio devices or personal computer.
NOTE: ff yeu h<_veafr_':.'_vl>,
perMtmed _he steps k_ the Oufc'k Set.G_ Menu,
skill, to the instructions _y;>ecif/cto the ,_ecessot); ynu went to c >nnecL
Connecting
Your HDTV
Power
•
Connect the supplied AC power cord to your HDTV's "AC In" jack and to a
properly grounded AC outlet
--If you're using an antenna or your cable service, connect the antenna or
cable (not supplied) to the "Antenna'" connector first
--If you're using a satellite receiver, connect to either the "HDMI" or
"YPbPr" connector (see page 14 for connector descriptions and locations)
Press the Power button on either the remote control or the side-mounted
control panel to turn your HDTV on (it will take a few seconds to power up)
Determining
Available Channels
• When connected to an antenna or cable source for the first time, you'll need
to run "Autoscan"--it
shall be available first time when you power on your
TV
Or ChooseYourTV
Source
• Pressthe"lVbr_' bL_on on your remoteor the side panelto access the On Screen Display
(CSD)
the right/leftarrow bLltons to scroll across to the "Setup" menu
--Use the up/down arrow keys to select "TV" and "Quick Setup"
• Use the arrow keys to select your "Time Zone", which allows you to receive
proper HDTV programming information
• Continue with arrow keys to select your signal source "Air/Cable/IRC/HRC"
_f you Lr:,ea rooftop or indoorantenna, select ",_¢'
_f you Leea cable service, select "Cable," "IRC' or "HRC' (dependingon the frequercy
usedby ytxlr cable service)
--Press the left arrow key to start scanning for channels
NOTE:" Once the abov_, process is comple_od, pMaee _x]_ OSD, press_ TV
bu_ton _o e_/iMh _o _guM_ TV h_}uf and _l_eat the above TV Ou_ek
S_tup agMn [<>ythis #}put source
19
3.
HDTV/ACCESSORY
Connecting
SETUP
Your Personal Computer
Before making any connections,
make sure all equipment
is turned off.
Connection Types
• VGA Connection
--Connect a 15-pin analog VGA cable (not supplied) from your
computer's "VGA OUT" port to the HDTV's "VGA" port
--Connect a stereo mini cable from your computer's "AUDIO OUT" port
to the HDTV's "AUDIO IN" port
•
DVI-D Connection
--Connect a Digital DVI-HDMI cable (not supplied) from your computer's
"DVI-D OUT" port to the HDTV's "HDMI" port
--Connect a stereo mini cable from your computer's "AUDIO OUT" port
to the HDTV's "AUDIO IN" port
Power
•
•
Turn on your HDTV (wait a few seconds for it to power Lip)
Turn on your computer
--The HDTV will automatically adjust to the computer's resolution
Computer Settings
•
For optimal picture quality, set your computer's timing mode to VESA TM
(Video Electronics Standards Association) 1440x900 at 60Hz
•
Refer to your computer's graphic card User Guide for directions to set
this timing mode.
•
If using Microsoft Windows OS, please check its Display Properties.
2O
3.
HDTV/ACCESSORY
Connecting
SETUP
Other Accessories
Following are the recommended connections
your accessory equipment with your HDTV.
Before making any connections,
to ensure optimal enjoyment
make sure all equipment
of
is turned off.
DVD or Game System
•
Connect your DVD player or gaming system using the YPb/Pr and Audio
(Right/Left) connectors on the HDTV to (cable not supplied)
• You can also connect your DVD player using the HDTV's HDMI port
(HDMI cable not supplied
Video Cassette Recorder (VCR)
•
Use the S-Video connector on your HDTV to connect your VCR (S-Video
four-pin cable with round connector not supplied)
• You can also connect composite video to the HDTV's AV Jack
Cable or Satellite
•
•
Receiver
Connect your cable or satellite receiver using the HDTV's YPbPr and
corresponding Audio (Right/Left) connectors
You can also connect your cable or satellite receiver using HDTV's HDMI
port (HDMI cable not supplied)
Audio Equipment
•
Use your HDTV's "Audio Out" port to connect to an external audio device
such as a headphone (cable not supplied)
21
4.
HDTV OPERATION
About the On Screen Display (OSD)
Your HDTV's On Screen Display (OSD) conveniently integrates all functions
required for setup and operation. There are two ways you can access the
OSD--either
by pressing the remote control's "Menu" button (located just below
the volume controls on the left side of the remote), or by pressing the "Iv#rid'
button on the HDTVs ri_t-side control panel.You can select an_
any of the three menus by
using your rerT_te'sVIA
buttons. Similarly, each of the menus inclLicie_sub-_us,
wlichcan beselected by usJngthe remote's VIA and • buttons. Once an item is
selected, use "_/• to make proper adjustment.
OSD Menus and Features
Settings
Video Menu
The "Settings Video" menu allows you to adjust the properties of the picture you
see on the screen by selecting one of the preset modes or adjusting brightness,
contrast and sharpness individually. You can also adjust the backlight's intensity
and, if necessary, restore the factory default video settings.
22
4.
HDTV OPERATION
Settings Video Menu (while in PC input)
Modes
Choose one of the preset modes
Reset
Reset all video adjustments
back to default
Brightness
Adjust the black level of the picture
Contrast
Adjust the white level of the picture
Sharpness
Backlight
Adjust picture clarity
Set HDTV lamp illumination
Adjustments
PC Input
only available
intensity
while in PC(VGA)
input
•
•
•
Auto sync: auto adjust picture size and position
H.Size: adjust picture size horizontally
H.Position: move picture position horizontally
•
•
V.Position: move picture position vertically
Phase: adjust to reduce phase noise
23
4.
HDTV OPERATION
Audio Menu
The "Settings
Audio"
optimize
listening
your
menu
let you precisely
configure
Reset
Reset all audio adjustments
Treble
_,djust high pitch audio tone
Bass
_,djust low bass audio tone
Balance
Adjust left and right speaker
SRS *
Turn SRS feature
Shoose
DTV:
°
°
Multi-track Sound/MTS
to
back to factory default
level
from one of three available
sound tracks
under
English
French
°
Spanish
Or Choose from three available MTS (Multi-Channel
Television Sound) system under regular TV input :
°
Mono
°
Stereo
•
SAP
under
DTV and regular TV inputs
are Trademarks of SRS Labs, Inc.
SRS technology is incorporated
24
preferences
On or Off
This feature only available
and is content dependent.
* SRS, SRS and (_O)'
your audio
experience.
under license from SRS Labs, Inc.
4.
HDTV OPERATION
Color Menu
The "Settings Color" menu provides a broad array of functions you'll use during
any color adjustments on the screen.
i_ i:_;;_/_ !;; ;;;;;;;; ;;;;i̧¸it;;!¸;/!!!_;;;;;;;; _;i
Reset
Saturation
Tint
Color
Temp
_ i_
t;;;;;;; _;ii
Reset all color settings
back to factory
default
Adjust color intensity
Adjust color tone between
red and green
Select one of preset color temperature or adjust
Green and Blue color intensity individually.
each Red,
25
4.
HDTV OPERATION
Setup Menu
The "Setup" menu allows you setup some of the advanced features of this
HDTV. These features include ATSC/NTSC/ClearQAM
terrestrial or Cable
service, WDE patent pending AutoSource technology, Screen Format
conversion, Audio Output selection, Power on Plug and OSD languages.
26
4.
HDTV OPERATION
Quick Setup Menu in DTV and TV inputs
The "Quick Setup" menu lets yell easily setup your HDTV to watch the new
digital broadcasting as well as regular TV content.
Note: Make sure you run Quick Setup for both DTV and regular TV inputs
before watching any programs.
Quick Setu _ at DTV in 3ut:
Quick Setu
ular analo¢
3ut:
Language
Choose OSD language between English, French and SpanisP
Time
Select the proper local time zone, available in DTV input
Choose the proper tuner source between Air, Standard Cable.
HRC or IRC Cable
Source
Auto Scan
Find all of the available channel programs
27
4.
HDTV OPERATION
Advanced
Setup Menu in DTV and TV inputs
The "TV Advanced Setup" menu finds any available programs for you if you
know the actual physical frequency and need to set additional functions such as
Closed Caption or Caption Service for your HDTV
Advanced
Sett
Advanced
Sett
28
at DTV in)ut
lular analo{
)ut
Manual Scan
CCfTT
Type in an actual physical
programs available
frequency
Select one of Closed Caption
Caption
Service
Channel
List Edit
Select one of the caption
broadcasting
contents.
Enable
or disable channel
to see if there are any
or Text modes
services
available
from a channel
in some of the digital
list, available
in DTV
input.
Channel
Edit
Add and remove one analog channel
in TV input
Channel List Edit at DTV in3ut
29
4.
HDTV OPERATION
Lock Menu in DTV and TV inputs
The "LOCK" menu allows you to set proper lock or unlock certain programs
based on its ratings.
i!i!i!
i!i!i
!i!i!
i!i!i!
i!i!i
!i!i!
i!i!i!
i!i!i
!i!i!
i!i!i!
i!i!i
!i_!_i
i_:!:_
_i_ii_i_!_i
_i_i_
i_i_i_
_i_i_i
_i_i_
i_i_i_
_i_i_i
_i_i_
i_i_i_
_i_i_i
_i_ii;
!i_!_ii
_!_!_
!_!_!
_!_!_!
_!_!_
!_!_!
_!_!_!
_!_!_
!_!_!
_!_!_!
_!_!_
!_!_!
_!_!_!
_!_!_
!_!_!
_!_!_!
_!_!_
!_!_!
_!_!_!
_!_!_
!_!_!
_!_!_!
_!_!_
!_!_!
_!_!_!
_!_!_
!_!_!
_!_!_!
_!_!_
!_!_!
_!_!_!
_!_!_
!_!_!_i!_!!_!_!_
!:_i_
i_ i_!i
_!ii_i!:_!!_i_!_iil
¸_i
i¸_i
iiiiil
iill
¸_i
i¸_ii
iiiil
iill
¸_i
iiiill
¸_iiiil
¸_i
iiiill
¸_iiiil
ii¸_i
iiiill
¸_iiiil
ii¸_i
iii
ill
¸_i
iii¸_i
iii
iiil
ill
¸_i
i¸_ii
iiiiil
ill
¸_i
iiiiil
¸_iiill
¸_i
iiiiil
¸_iiill
¸_i
iiiiil
¸_i'i'i
iiii
Enter Password
Type in the password.
New Password
Type in new password
Confirm
Password
Movie
TV
Enter New Password
if you would
like to change
again if you are changing
the default
the password
Enter Movie Rating Menu
Enter TV Rating Menu
*For additional information on Parental
Parental Controls," page 33.
3O
Default is 0000
Control functions, please see "About
4.
HDTV OPERATION
The rest of Settings Menu
Select the desired
Screen
Audio
•
•
OSD
AutoSource
Reset
between
Select Speaker Output Option
or the audio output format between
available
Power
screen format
Standard
FILL
Dolby and PCM from
digital TV contents
Turn on and off Power On Plug
Set display
language
Turn on and off WDE's
and OSD time out in seconds
AutoSource
feature
Reset all of the HDTV OSD menu settings
to factory
default
31
4.
HDTV OPERATION
Guide Menu
i!i!i!i!i!i!i!i!i!i!i!i!i!i!i!i!i!i!i!_i_!iii_ii_ii_i,:_ii_ii_'i_i_i
_i_i_i
_i_i_i_i_i
_i_i_i
_i_i_i_ii_i!i!i!i!i!i!i!i!i!i!i!i!i!i!i!i!i!i!i!i!i!i!i!i!i!i!i!i!i!i!
_I_I_I
_I_I_I_I_I
_I_I_I
_I_I_I_I_I
_I_I_I
_I_I_I_I_I
_I_I_I
_I_I_I_I_I
_I_I_I
_I_I_I_I_I
_I_I_I
_I_I_I_I_I
_I_I_I
_I_I_I_I_I
_I_I_I
_I_I_I_I_I
_I_I_I
_I_I_I_I_I
_I_I_I
_I_I_I_I_
_I_I_I
_I_I_I_I
¸
Under DTV input
Under
32
other
inputs
Display
EPG information
as shown above
Display
Install Matrix Help Guide
4.
About
HDTV OPERATION
Parental
Controls
The Parental Controls feature allows you to block TV programs based on
various ratings systems, as well as to lock out the HDTV's right side-mounted
controls. The first time you enter the "Parental Control" menu, you will be taken
to the password sub-menu to set up your four-digit password, which is required
for using this feature. You will be prompted to enter your selected password any
time you wish to lock or unlock selected programming ratings or channels.
33
4.
HDTV OPERATION
Parental
Movie
Controls
Rating
menu
allows
the US MPAA
rating
system.
you to lock or unlock
US MPAA Rating System
according
•
•
•
NR (Not available)
G (General audience)
PG (Parental guidance
•
PG-13 (Parents strongly
cautioned)
R (Restricted0
NC 17 (No one 17 or under
admitted)
•
•
•
34
programming
X (Adult audience
only)
suggested)
4.
HDTV OPERATION
Parental
Controls
US TV Ratings & Content
This sub-menu allows you to block programming
well as
iiiili !i!!ii
¸i iii i iii i iii i iii i iii i iii i iii i iii i iii i ¸if!
!
!ili
iilii
according
to US TV Ratings as
iii i ¸! iiiii iii!iF! i!i!ii ¸ ; !iii!!F i!i! ¸¸!!i: ;i;;;i _¸iiiill i ¸¸!iiiiF ! _i!ii!_!ii!_!ii!_!ii!_!ii!_!ii!_!ii!_!ii!_!ii!_!ii!_!ii!_!ii!_!ii!_!ii!_!ii!_!ii!_!ii!_!ii!_!ii!_!ii!_!ii!_!ii!_!i
US TV Ratings& €ontent Sub-Menu
TV Y
All children
TV Y7
Directed
to elder children
TV G
General
audience
TV PG
Parental
guidance
TV 14
Parents
strongly
TV MA
Mature
audience
Content
suggested
cautioned
only
'
Definitions
i
All
All Content
FV
Fantasy Violence
D
Sexually Suggestive Dialog
L
Adult Language
S
Sexual Situations
V
Violence
35
4.
HDTV OPERATION
Input Menu
To change the Main Picture source, press the Input button on the remote to display the
Main Picture (MP) input menu. When the input menu is on, use the up/down arrows to
scroll through all inputs and the press enter to switch to the highlighted one.
38
5.
APPENDIX:
19-inch
ModelName
Color
19" TFT (Thin Film Transistor), Active Matrix WXGA LCD
1440 x900 vertical stripe; anti-glare coating
16.2 million colors
Aspect Ratio
16:10
Viewing Angles
Input Signal
LCD TV Specifications
BK19H210S
Type
Panel
Hiqh Definition
170° (H) / 160 ° (V)
Video/Audio
qGB Analog * 1 (75 ohms, 0.7 Vp-p)/Mini-Stereo
"1
- HN separated (TTL) for PC
- fh: 30-80 kHz, fv: 50-75 Hz NTSC
4DMI-HDCP*
1
]-V system NTSC / HDTV * 1
3omponent Video * 1 / RCA (L/R) Stereo * 1
3omposite * 1 / S-Video
3.5 mm Mini Stereo * 1
Output Signal
Dptical Audio Out * 1
HDTV Compatibility
PC Compatible
* 1 / RCA (L!R) stereo * 1
_80i, 480P, 720P, 1080i & 1080P
Recommended
1440 x 900 @ 60Hz
Supported
1024 x 768 @ 75Hz
800 x 600 @ 60, 75 Hz
1024 x 768 @ 60Hz
640 x 480 @ 60, 75 Hz
1280 x 720 @ 60, 75 Hz
Speaker Output
Power
3.5W (x2 Channels)
Voltage
100~240AC, 50~60Hz, 1.6A
Dperating
_-5C ~ +35C(Hum
Storage
-20 ~ +55C (Hum 20~ 85%)
Dperating
20~ 80% non-condensing.
Storage
20~ 85% non-condensing.
Dperating
3 to 3,000 m
Storage
3 to 12,000m
Temperature
20~80%)
Humidity (Relative)
Altitude
Dimensions
Physical
Weight
Net / Gross
Regulations
16.5" x 18.6" x 6.6" (with Base)
14.T' x 18.6" x 3.4" (w/out Base)
4.4kg / 5.0 kg
;).7 Ibs. (with Base)
_).0Ibs. (w/out Base)
JL/C-UL
FCC-B
Power saving
Dn
<80W Typical (Blue LED)
Modes
&ctive Off
<2W (Orange LED)
Warning: Do not set the graphics card in your computer to exceed these refresh rates
Note: Product Specifications are subject to change without notice.
37
5.
APPENDIX:
Troubleshootinq
No Power
•
•
•
Make sure power cord is securely connected to the "AC In" jack on the
back of the High Definition LCD TV.
Make sure AC power cord is securely connected to the AC socket.
Plug another electrical device (such as a radio) to the power outlet to
verify that the outlet is supplying the proper voltage.
Power is suddenly turned off
• Check if Sleep Timer is set. If so, turn it off.
Remote
•
•
•
•
Does Not Work
Press only one button at a time.
Point remote control closer and directly to the IR sensor.
Make sure batteries are inserted correctly.
Replace batteries with new ones if necessary.
Remote
•
•
Control
Control
Code Not Found
in a "Universal"
Remote
Purchase a separate "learning" remote control.
Go to www.westinqhousediqital.com
for a list of remote codes.
Image Quality Issues
• For the best TV image quality, "Standard Definition" TV content should
be viewed in Standard display format.
No Picture
•
Check the video connection.
•
Make sure the video cable connected to the High Definition LCD TV is
tightly secured to the video output port on the back of the computer or
any attached audio/video apparatus. If the other end of the video cable
is not attached permanently to the High Definition LCD TV, secure it
tightly.
Adjust brightness and backlight.
Make sure that the input source you are connected to corresponds to the
source on the High Definition LCD TV.
Verify that the antenna is properly connected.
•
•
•
No Picture when I connect VGA cable or "No Input Signal"
• Check VGA cable connection.
• Lower the video resolution on the computer and try plugging in the cable
again.
38
5.
APPENDIX:
Picture
•
•
•
•
•
images appear
or Abnormal
in TV mode.
Colors
If any colors (red, green or blue) are missing, check the video cable to
make sure it's securely connected. Loose or broken pins in the cable
connector could cause an improper connection.
Connect the High Definition LCD TV to another computer.
Snow Appears
•
•
on Screen
Check your antenna connection. If necessary, rotate the antenna.
Make sure the external device is HDCP compliant.
AUDIO
•
sidebar screen.
Check your antenna connection. If necessary, rotate the antenna and
wait up to 10 seconds for signal.
Reduce signal splitters and excessively long cables.
Replace poor antenna cables and/or connectors to improve signal quality.
Wrong
•
is cut off/with
Use "Auto Adjust" in PC mode
Make sure the aspect ratio is set correctly.
Blocky
•
Troubleshootinq
Interconnection
Issues
Remember--S-Video and Composite AV1 share the same audio source.
There's
No Sound
•
Check the audio connection.
•
If MUTE appears on the screen, press the "MUTE" button on the remote
control to turn the function off.
•
Check the audio settings to see if the HDTV audio is set to SAP or
minimum.
•
Press the Volume + (Up) key on the remote control.
Parental
•
Where
•
•
Control
Password
is "LOST"
While rare, if this should happen, select "PASSWORD
"0000" to reset the password.
EDIT" and enter
Can I Find More Help?
Log on to: www.westinghousedigital.com
Contact Westinghouse Customer Service at (866) 287-5555
service @westinghousedigital.com
or write us at
39
5.
•
•
APPENDIX:
Cleaninq the Hiqh Definition
LCD TV
MAKE SURE THE HIGH DEFINITION LCD TV IS TURNED OFF
NEVER SPRAY OR POUR ANY LIQUID DIRECTLY ONTO THE SCREEN OR
CASE
To clean
1.
2.
To clean
1.
2.
the screen:
Wipe the screen with a clean, soft lint-free cloth. This removes dust and other
particles.
If still not clean, apply a small amount of non-ammonia,
non-alcohol
based
glass cleaner onto a clean, soft lint-free cloth and wipe the screen.
the
case:
Use a soft, dry cloth.
If still not clean, apply a small amount of non-ammonia,
non-alcohol
based, mild
non- abrasive detergent onto a clean, soft lint-free cloth, then wipe the surface.
Disclaimer
Westinghouse
Digital does not recommend
the use of any ammonia or alcohol-based
cleaners on the High Definition LCD TV screen or case. Some chemical cleaners have
been reported
to damage
the screen
and or High
Definition
LCD TV case.
Westinghouse
Digital will not be liable for damage resulting from use of any ammonia
or alcohol-based
cleaners.
40
www,westinghousedigita|,com
Westinghouse Digital Electronics
Santa Fe Springs, CA
76-D014942