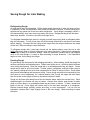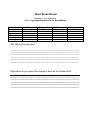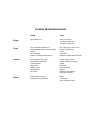
1
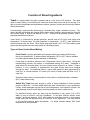
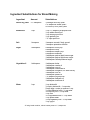
Dear Educator: We are in the midst of a growing national passion for bread with outstanding locally owned bakeries and franchised bread shops commonplace in both metropolitan and suburban areas. Our fondness for bread is apparent. Fine European breads unknown to most Americans a few years ago are now readily available. Non-traditional trendy American creations feature olives, onions, cherries, cranberries, blueberries, chocolate, macadamia nuts, flax seed, cracked wheat, rosemary, Asiago and cheddar cheese, jalapeno peppers, pesto, peppercorns, pumpkin and sun dried tomatoes. Ignited with a new appreciation of bread, the craft of baking is experiencing a rebirth with culinary schools, even vocational and technical schools are offering artisan bread making courses. Bread making competitions have expanded beyond county fairs to statewide, regional and national competitions. Creative Breads addresses this growing interest in bread and bread making. Written to assist educators with beginning, novice and even experienced bakers, it provides ingredient, nutrient and substitution information, baking and storage know-how and systematic directions for all types of traditional and bread machine baking. Using a foundational basic bread recipe, Creative Breads offers participants an opportunity to experiment replacing vital ingredients for others that serve identical functions. Information gained is transferable to real life situations: whether to add variety to bread making, to create new flavor combinations or for “kitchen emergencies” when knowing the correct alternate ingredient is essential. To assist you, the Consumer Service staff at Lesaffre Yeast Corporation offers special educator prices for thermometers and our fine yeast products: RED STAR® Active Dry Yeast, RED STAR® QUICK-RISE™ Yeast, SAF Perfect Rise Yeast and SAF Gourmet Perfect Rise Yeast. For information on ordering products or to discuss bread making, please contact our consumer service staff by phone, toll-free, at 1-800-445-4746 9AM – 5:30PM CT or e-mail us anytime at carol.stevens@redstaryeast.com. We welcome your comments and suggestions. CREATIVE BREADS An Educator’s Guide to Ingredient Substitution in Yeast Breads LEARNING OBJECTIVES Achieve ability to make informed decisions on appropriate substitutions Identify function of ingredients in a dough system Recognize interdependence of ingredients in a yeast dough Demonstrate bread making skill Integrate knowledge of bread dough ingredients with bread making skill Demonstrate ability to create a quality product PERFORMANCE TASK Apply knowledge of ingredients to create a bread recipe Demonstrate bread making skill PROGRAM GOALS Demonstrate knowledge of bread ingredient substitution Acquire knowledge of ingredients’ functions Apply knowledge of bread making Gain skill in bread making traditionally and with a bread machine EXPERIENTIAL LEARNING TEACHING STRATEGY Utilize ingredient substitutions in a basic recipe Integrate knowledge and bread making skill Process information: analyze and reflect on bread making experience Share results and observations Generalize to connect with everyday baking experiences ASSESSMENT DEVICE Improving Breads information APPLICATION Creating new breads Emergency substitutions Dietary restrictions Everyday cooking OTHER RESOURCES Breads for Youth Groups, Red Star Yeast Home Baking Association website: www.homebaking.org/foreducatores/educatornotes RED STAR Yeast website: www.redstaryeast.com The Science of Yeast, Red Star Yeast GROCERY LISTS Basic Bread Substitutions Optional Additions Active dry yeast Bread flour Sugar Salt Vegetable oil Water Instant yeast Cake yeast All-purpose flour Spelt flour Whole wheat flour Brown sugar Confectioners’ sugar Honey Molasses Salt substitute (KCl+NaCl) Sea salt Butter Olive oil Canola oil Shortening Potato water Yogurt Milk Non-fat dry milk Buttermilk Powdered buttermilk Evaporated milk Pumpkin puree Eggs Dried blueberries Dried cherries Dried cranberries Dried vegetable pieces Dried onions Raisins Sun-dried tomatoes Grated Swiss cheese Grated cheddar cheese Almonds Walnuts Pecans Spanish olives Ripe black olives Kalamata olives Jalapeno peppers Cracked wheat Flax seeds Sesame seed Caraway seeds Peppercorns Dill weed Dried herbs Fresh herbs Materials and Equipment List All methods Hand method Mixer methods Bread machine method Bread machine Optional Baking pans Large bowl Hand mixer Aprons Bread knife Large sturdy mixing spoon Stand mixer Freezer Cooling rack Medium bowl Food processor Plastic wrap Dry ingredient measuring cups Mixing bowl Refrigerator Liquid ingredient measuring cups Medium bowl Resealable plastic food storage bags Measuring spoons Rolling pin Microwave oven or stove Timer Oven Oven mitts or hot pads Rubber spatula Sturdy work surface Thermometer* *Thermometers especially designed for yeast bread baking are available for educators from RED STAR® Yeast, P.O. Box 737, Milwaukee WI 53201 Cost is 5 / $1.00 Function of Bread Ingredients Yeast is a single-celled living plant organism that is a rich source of B vitamins. The yeast used in bread making is saccharomyces cerevisiae (sack-rah-my-sees sar-ah-vis-see-ay). It is able to convert fermentable carbohydrates as maltose, glucose, fructose and sucrose into carbon dioxide and alcohol. In bread dough, yeast provides leavening as it ferments flour, sugar, molasses or honey. Tiny carbon dioxide gas bubbles are trapped within elastic dough forming a honeycomb-like structure that causes dough to stretch and expand--to “rise.” During this fermentation process, heat is generated and flavors produced. Yeast activity is influenced by storage practices, amount and pH of liquid, food supply and temperature. Of these points, the most important is temperature. At 86F, yeast doubles its numbers almost every two hours. When liquid, sugar and warmth (105-115F) are added, yeast germinates and reproduces even more rapidly in a budding process. Types of Yeast Used in Bread Making Fresh Yeast is a highly perishable yeast product with mere 8 weeks shelf life from the time of manufacture. It needs constant refrigeration (38F to 45F) and is available in limited markets where demand warrants its distribution. Fresh yeast is sometimes referred to as “Compressed Yeast or “Wet Yeast.” During the manufacturing process, the product is compressed leaving 65% water. Packaged in small blocks for the home baker, this form of yeast is also referred to as “cakes.” A cake, however, is not a standard of measurement and yeast blocks sizes have changed through the years. For traditional baking, 1-ounce fresh yeast will raise approximately 6 cups flour; in a bread machine, 2/3 ounce (0.6 ounce) of fresh yeast will raise 3 to 3 ½ cups flour. Other than when used in a bread machine, fresh yeast is usually dissolved in lukewarm (80F) water before using. Active Dry Yeast has gone through a series of drying chambers to lower moisture content to about 8%. It is more stable than fresh yeast, nevertheless, it too is perishable. Factory sealed packages may be kept at room temperature; once opened, however, the yeast package must be closed tightly and refrigerated or frozen to retain activity. For traditional baking, active dry yeast may be rehydrated in very warm (110-115F) water or may be mixed in with dry ingredients. In the latter method, termed “mixer method,” liquids are heated to 130F, then added to a yeast-flour mixture. In this method, fragile yeast cells are protected with an “overcoat” of dry ingredients. The extra warmth of this method produces faster fermentation. For bread machine baking, 80F liquid temperature is recommended. RED STAR® Active Dry Yeast and SAF Traditional Active Dry Perfect Rise Yeast are packaged in 4-ounce jars and in 3-packet strips. A packet contains ¼ ounce (7 g), approximately 2 ¼ teaspoons. This amount is sufficient to leaven up to 4 cups flour for traditional baking. For bread machine baking ¾ teaspoon active dry yeast is recommended for each cup of flour, or 2 1/4 teaspoons for 3 cups flour. Instant Yeast is a special strain of high activity, fast-acting yeast that has gone through a series of drying chambers to lower the moisture content to about 8%. It is more stable than fresh yeast; nevertheless, it too is perishable. Factory sealed packages may be kept at room temperature; once opened, however, the yeast package must be closed tightly and refrigerated or frozen to retain activity. Although this fast acting yeast does not eliminate a first rise time, it will shorten rising time as much as 50%. When used in traditional baking, 2¼ teaspoons instant yeast is recommended for up to 4 cups flour. When used in a bread machine, the recommended amount is ½ teaspoon for each cup flour or 1 1/2 teaspoons for 3 cups flour. For onehour bread machine cycles, however, yeast amounts must be increased to double or more. RED STAR® and SAF instant, fast-acting yeast is known as Bread Machine Yeast when packaged in 4-ounce jars and as Quick-Rise Yeast; and SAF Gourmet Perfect Rise Yeast when packaged in 3-packet strips Flour is the product obtained by grinding, then sifting a grain. Grinding grain for food has been traced to the Far East, Egypt and Rome. Grain was ground with rocks as early as 6700 B.C., The use of grain-grinding water mills began about 85 B.C. in Asia Minor. An upgrade, windmills, began to be used between 1180 and 1190 in Syria, France and England. The grain of choice for centuries has been wheat; in fact, the term ”flour” is used interchangeably with wheat flour today. Wheat differs from other grains as it contains a high percentage of glutenforming protein complex that is insoluble in water. Mixed with liquid, a rubbery mass forms creating an elastic network that provides structure to dough as it stretches. Wheat is a storehouse of nutrients considered essential in the human diet. It is an excellent source of complex carbohydrates, deriving at least 80 percent of its calories from carbohydrates. Depending on the flour type, the percentage of calories from protein ranges from 9 to 15 percent. Calories from fat are never more than 3 percent. Wheat flour contains 3 grams (cake flour) to 15 grams (whole wheat flour) dietary fiber for each 1-cup serving. Wheat contains B-vitamins, calcium, folic acid, iron, magnesium, phosphorus, potassium, zinc and other trace elements and minimal amounts of sodium. There are six different classes of wheat: Hard Red Winter, Hard Red Spring, Soft Red Winter, Hard White, Soft White and Durum. The end products are determined by the wheat's characteristics, especially protein and gluten content. Hard wheat has more gluten producing protein and is especially suited to bread making. Types of Wheat Flour Used in Bread Making All-purpose flour is a blend of hard and soft wheat white flours. It is milled from the endosperm, the white, protein-rich (7.5 to 11%) middle portion of a wheat kernel. Other nutrients are carbohydrates, iron and many B-complex vitamins as riboflavin, niacin and thiamine. All-purpose flour is enriched and may be bleached or unbleached. It has a low liquid absorption quality and a short mixing time tolerance. Different brands vary in performance. As its name states, all-purpose flour fills a wide range of home baking needs from breads and biscuits to pies and cookies. Breads made with all-purpose flour do not raise as high those made with bread flour. Bread flour is milled from the endosperm of hard wheat varieties. Hard wheat has a greater percentage of gluten, therefore bread flour has a greater gluten strength than allpurpose flour. Protein content of bread flour varies from 12 to 14 percent. In bread dough, a strong gluten network is of utmost importance for the retention of gases produced during fermentation. Bread flour has a high liquid absorption quality and a long mixing tolerance. Commercial bakers and home bakers using stand mixers, food processors or bread machines favor bread flour as it can withstand treatment from machinery. Whole wheat, stone-ground and graham flours are all milled from the entire wheat kernel containing the endosperm, germ and bran. Wheat germ is the embryo portion of the wheat kernel, rich with B-complex vitamins and nutrients and oil. The oil content of whole grain flour makes them more perishable than white flours, requiring refrigeration or freezing to preserve the natural oils and prevent rancidity. Bran is the kernel's outer insoluble fiber covering, providing fiber needed for our body’s digestive system. In a dough system, bran reduces gluten development resulting in heavier, denser loafs than those made with white flour. Whole grain wheat flours can be used interchangeably in bread making. They differ in coarseness, though minimally in nutrient value. Spelt is often tolerated by individuals who are wheat-sensitive. Available as white spelt and whole grain spelt, this ancient variety of wheat contains a high degree of protein-producing gluten needed to make good bread. Recipes using this flour need to be adjusted, however, as spelt does not absorb liquids as well as wheat. Other Grains traditionally used in bread making are barley, corn, millet, oats and rye. Breads made with these low gluten-producing grains are usually mixed with white or whole wheat flour. Liquids dissolve yeast, hydrate flour to form gluten to make an elastic, workable dough and provide a moist environment for yeast to grow and multiply. Liquids represent approximately 40% of total dough volume. Water and milk are the most common liquids used in bread making. Yeast thrives in a slightly acidic environment with an optimum pH range at 4.5 - 5.5. Milk products fit within that range, giving bread a softer crumb and crust than one made with water. Cultured milk products as buttermilk, yogurt, and sour cream produce moist breads with a flavor similar to sourdough bread. Acidic fruit and vegetable juices and purees can be used successfully in limited amounts in bread making. Berries, brussels spouts, grapefruit, kiwi, lemons, lentils, oranges, pineapple, strawberries and tomatoes are acidic. Alkaline liquids tend to neutralize the normal acidly developed during yeast fermentation. Therefore choosing purees and juices from alkaline fruit and vegetables must be chosen judiciously. Apples, apricots, asparagus, beans, beets, broccoli, cauliflower, cherries, grapes, onions, peaches and prunes are alkaline. Excessive hardness and softness of water also greatly affect bread dough. Water of medium hardness (120 - 180 ppm) the most suitable. Hard water is undesirable as it retards fermentation by tightening the gluten structure too much. Soft water lacks gluten-strengthening minerals and tends to produce dough that is soft and sticky. Fat tenderizes bread and crust, retards staling by providing moisture and acts as a lubricant on gluten strands enabling dough to stretch and expand freely making dough easier to handle and shape. Fat is a generic term for vegetable oil, butter, margarine, shortening, lard and combinations of these. Although not necessary in bread, up to 5 percent fat is recommended for breads with a minimum of 0.7 to 1 percent fat needed for good slicing. White pan bread has between 1.5 and 3 percent fat. Traditional French bread has no fat. Fat substitutes, as purees of applesauce and prune, produce heavy, moist bread. If substituting with one of these products, use half the usual amount of fat. Sugar provides food for the yeast. To maintain yeast activity, 3 to 3.5 percent fermentable sugar is required. In bread, sugar usage levels range from 0 to 15 percent. Sweet breads, an entirely different category of breads, have more than 15 percent sugar. Nevertheless, added sugar is not necessary for fermentation as this food supply can come from the conversion of starches (complex carbohydrates) to simple sugars in the fermentation process, or from a combination of both. The best known no-added-sugar bread is traditional French bread. Sugar that is not required to maintain yeast activity, that remains unfermented, is termed residual sugar. When residual sugar levels are higher, crust color is darker, taste is sweeter and moisture retention improved due to the water-holding properties of sugar. French bread’s light crust color is due to low residual sugar level. In home bread making, white sugar, brown sugar, honey, molasses, and maple syrup are used as fermentable sugar. Sugar substitutes are not recommended for yeast bread making as they are unable to ferment, do not provide food for yeast and will not contribute toward browning. Salt enhances flavor, masks off-flavors and strengthens the gluten protein in dough, but its prime function is to control the fermentation rate of yeast. Without salt, bread rises faster, air pockets enlarge and gluten strands forming the dough structure break down allowing holes to form and produce a coarse texture. Traditional French bread with its large holes is a salt-free bread. Eliminating salt in a bread made in a pre-programmed bread machine will cause dough to rise too much, to over-proof, then collapse during the bake cycle. Salt substitute mixtures, those containing part sodium chloride, have been used successfully in yeast bread making, however they may not perform as well in pre-programmed bread machines. Ingredient Substitutions for Bread Making Ingredient Amount Substitutions Active dry yeast 2 ¼ teaspoons 1 package active dry yeast 2 ¼ teaspoons instant yeast* 2/3 ounce (0.6 oz) cake yeast Bread flour 1 cup 1 cup + 1 teaspoon all-purpose flour 1 cup whole wheat flour 1 cup stone ground flour 1 cup graham flour 1 ¼ cups spelt flour Salt 1 teaspoon 1 teaspoon sea salt, finely ground 1 teaspoon potassium chloride Sugar 1 tablespoon 2 teaspoons corn syrup 2 teaspoons honey 2 teaspoons maple syrup 2 teaspoons molasses 1 tablespoon packed dark brown sugar 1 tablespoon packed light brown sugar 2 tablespoons sifted powdered sugar Vegetable oil 1 tablespoon 1 tablespoon butter 1 tablespoon canola oil 1 tablespoon corn oil 1 tablespoon cottonseed oil 1 tablespoon margarine, no water variety 1 tablespoon olive oil 1 tablespoon peanut oil 1 ½ teaspoon prune puree 1 tablespoon safflower oil 1 tablespoon sunflower oil Water 1 cup 1 cup buttermilk ¼ cup dry buttermilk + 1 cup water 2 large eggs + water to measure 1 cup ½ cup evaporated milk + ½ cup water 1/4 cup fruit juice + ¾ cup water 1 cup milk 1/3 cup powdered milk + 1 cup water 1 cup potato water ¼ cup vegetable juice + ¾ cup water 1 cup yogurt *If using bread machine, reduce instant yeast to 1 ½ teaspoons Bread Making Processes Mixing Dough In the first stage of bread making, all ingredients are thoroughly blended together. Dough is wet, sticky and lumpy. Gluten development begins as flour absorbs liquids. As mixing progresses, lumpiness disappears and dough becomes more firm but still sticky to the touch. Kneading Dough As dough continues to be worked, kneaded, it becomes less sticky and elastic. Gluten developed during kneading forms an elastic network in the dough that traps gases produced during fermentation. This elasticity enables kneaded dough to spring back to its original form when stretched. Dough kneaded by a stand mixer, will cling to the dough hook and clean the side of the bowl. When kneaded on a work surface, it becomes firm and elastic and does not stick to hands or work surfaces. Raising Dough During fermentation, yeast cells change simple and complex carbohydrates; this action produces carbon dioxide gas. When gas is trapped in an elastic kneaded dough, dough will stretch and rise (“proof”) as fermentation progresses. During this process, yeast conditions the dough, alcohol and heat are produced and flavor is developed. To raise kneaded dough, place in a lightly oiled, large mixing bowl. Turn dough over to oil the top so that it does not dry out. Cover bowl loosely with plastic wrap or foil or even plastic grocery bags, and let rise. Many factors, including the recipe, environmental temperature, altitude and humidity determine how long it will take dough to rise. Fermentation is best achieved in an environment of warmth and humidity. During rising, the temperature should not exceed 90F. A slightly warmed oven is an ideal place to raise dough. For an electric oven or a gas oven with electronic ignition, heat the oven at the lowest setting for one minute, then turn off. In other gas ovens, the pilot light will provide enough warmth. A pan of very warm water positioned toward the back of the oven will provide humidity. Place the bowl or pan of dough on the center rack and close the oven door. The best way to decide whether dough has risen sufficiently and is ready to be punched down and shaped is to perform a “ripe test.” Gently stick two fingers in the risen dough up to the second knuckle and take them out. If the indentations remain, the dough is “ripe” and ready for punch down. If not, cover and let rise longer. Punching Dough Down After dough has risen the first time, punch it down (deflate) to remove gas bubbles before shaping. To do so, use your fist and punch down in the center. Remove dough from bowl and place on a lightly floured work surface and squeeze out any remaining gas bubbles. Knead a few times then let it rest, covered, for approximately five minutes. This rest period allows the elastic gluten strands to relax and makes shaping easier. Shaping and Panning Dough After a short rest period, shape dough as desired and place in a greased bread pan or baking sheet. To prevent dough from drying out, cover loosely with oiled or non-stick coating sprayed grocery store plastic bag or plastic wrap or a damp towel. Final Rising of Dough Allow panned dough to rise again, expanding to almost double its volume. This final rising takes less time than the bowl rising. To check if panned dough has risen sufficiently, lightly touch dough. If an indentation remains, dough is ripe and ready for baking. Left too long, however, dough will expand more than double its volume. Panned, over-proofed dough placed in a hot oven will collapse on itself. To prevent a fallen loaf, return the panned, over-proofed dough back onto a work surface; knead briefly, reshape, pan again and allow the dough to rise yet another time. Baking Bread Bake bread on the center rack of a preheated 375F to 400F oven. During the first few minutes in a hot oven, a last burst of yeast activity occurs resulting in final expansion of the dough. This “oven spring” sets as the bread bakes. Yeast activity ceases at 140-145F, a firm crumb is produced at 140-180F and bread is thoroughly baked at 190F. The time-tested method of determining if bread has baked sufficiently is to look for a golden brown crust and to tap the crust lightly and listen for a hollow sound. An even more accurate method is to insert an instant read thermometer (available in most house wares departments) into the center of the bread. As bread bakes, moisture baked out improves bread’s structure and shelf life. Any residual sugar in dough caramelizes and browning occurs. If crust browns too quickly, covering with a loose tent of aluminum foil will prevent over-browning. Cooling Bread After baking, remove bread from the pan and place on a wire rack to cool. Cooling allows moisture to escape and the structure of the bread to firm up. Bakers recommend slicing bread at 90-110F since slicing bread while it is still hot breaks down the structure. Once cooled, slice with a serrated knife using a gentle sawing motion. Storing Bread Bread is best when fresh. Homemade bread contains no preservatives so it usually stays fresh for a short period of time. To preserve freshness and retain a crisp crust, store uncovered or in a paper bag, at room temperature. To retain a soft crust and prevent moisture loss, store in a tightly wrapped plastic bag at room temperature. Storing bread in a refrigerator prevents mold, but also hastens staling as the crumb dries out. For long storage, wrap closely in foil to prevent air pockets, place in plastic bag and freeze. Thaw at room temperature. If sliced before freezing, individual slices thaw quickly. Reheating thawed bread for 10-15 minutes in a 350F oven will refresh its taste and texture. Warming in a microwave takes but a few seconds and must be done with great care. Saving Dough for Later Baking Refrigerating Dough All yeast dough may be refrigerated. Chilling dough slows the activity of yeast, but does not stop it completely. In fact, the refrigeration time is often considered a rise time. It will be necessary to squeeze out any gases one to two hours after refrigeration. Once dough is completely chilled, it will need punching down only once every twenty-four hours. Refrigerated dough will last about three days; however, it is best to use within forty-eight hours. To refrigerate kneaded dough, place it in a tightly covered, large mixing bowl or recloseble plastic bag and refrigerate. To use, punch down the chilled dough and allow to rest about five minutes before shaping. Of course the final rising will be longer than the recipe indicates as the dough will be cool. Bake according to recipe directions. To refrigerate dough after it has been formed into the desired shape, cover the loaf or rolls tightly with plastic wrap or foil and refrigerate up to twenty-four hours. Remove from refrigerator and partially unwrap to let moisture escape. When an indentation remains after a light fingertip touch to the risen dough, it is ready to bake according to recipe directions. If the indentation begins to close, let the dough rise longer. Freezing Dough All yeast dough can be frozen for later shaping and baking. After kneading, divide the dough into sections required for the finished product. Flatten each section into a 1-inch thick disk that allows even chilling and thawing. Place the dough disk in a reclosable plastic bag and freeze. Frozen dough can be kept for up to four weeks. To thaw, place in refrigerator overnight. When ready to use, partially unwrap and let set at room temperature for fifteen to twenty minutes. Punch down and proceed with shaping and the second rising. Frozen dough may also be moved directly from the freezer to room temperature for a shorter thawing time, though the edges will thaw faster than the center so the dough will have to be worked some as it thaws. Dough can be frozen after being formed into the desired shape, before the second rising. Place shaped dough in the freezer one hour to harden. Remove from freezer, wrap closely in plastic wrap or foil then place in a recloseable plastic bag and return to freezer. To thaw, unwrap and lightly oil the top. Cover tightly with plastic wrap or foil and thaw overnight in a refrigerator. Remove thawed dough, partially unwrap and bring to room temperature. Let rise until an indentation remains after a light fingertip touch to the risen dough. Bake according to recipe directions. Basic Bread Recipe Substitute 1 to 3 ingredients Refer to Ingredient Substitutions for Bread Making Ingredients Water Vegetable oil Sugar Salt Bread flour Active Dry Yeast 1 loaf Amounts 1 cup 1 tablespoon 4 teaspoons 1 ½ teaspoons 3 cups 2 ¼ teaspoons My Ingredients 2 loaf Amounts My Ingredients 2 ¼ cups 2 tablespoons 3 tablespoons 1 tablespoon 6 ½ - 7 cups 4 ½ teaspoons Why did you choose them? ____________________________________________________________ ____________________________________________________________ ____________________________________________________________ ____________________________________________________________ ____________________________________________________________ ____________________________________________________________ What effect do you expect the change to have on the finished loaf? ____________________________________________________________ ____________________________________________________________ ____________________________________________________________ ____________________________________________________________ ____________________________________________________________ How to Make Bread Traditional Hand Method Use 2 loaf quantities. In a large bowl, combine yeast, 2 cups flour, sugar and salt. Combine liquids and heat to 120 to 130F. Add warmed liquids to flour mixture. Using a large, sturdy spoon, stir to combine ingredients. Beat until batter is smooth. Gradually stir in enough remaining flour to make a firm dough that becomes too stiff to mix by hand. Scrape dough out of bowl and onto a lightly floured work surface, turning it over several times to make it easier to handle. Knead dough. To knead, fold dough in half toward you. Using the heel of your hand, push dough down and away, firmly but lightly, in a rolling motion. Give dough a quarter turn. Repeat folding, pushing and turning. Add remaining flour as needed. Continue kneading until dough is smooth and elastic, about 5 to 7 minutes. During the kneading process, periodically stop and check the progress of the gluten development by performing a Gluten Window* test. Continue with Rising, Shaping and Baking instructions. Traditional Mixer Method Use 2 loaf quantities. In large bowl, combine yeast, 2 cups flour and other dry ingredients. Combine liquids and heat to 120 to 130F. Add to flour mixture. Blend at low speed until moistened; beat 3 minutes at medium speed. Using a large, sturdy spoon, gradually stir in enough remaining flour to make firm dough that becomes too stiff to mix by hand. Scrape dough out of bowl and onto a lightly floured work surface, turning it over several times to make it easier to handle. Knead dough. To knead, fold dough in half toward you. Using the heel of your hand, push dough down and away, firmly but lightly, in a rolling motion. Give dough a quarter turn. Repeat folding, pushing and turning. Add remaining flour as needed. Continue kneading until dough is smooth and elastic, about 5 to 7 minutes. During the kneading process, periodically stop and check the progress of the gluten development with a Gluten Window* test. Continue with Rising, Shaping and Baking instructions. Traditional Stand Mixer Method Use 2 loaf quantities. In mixer bowl, combine yeast, 2 cups flour, sugar and salt. Combine liquids, heat to 120 to 130F. Add warmed liquids to flour mixture. With paddle or beaters, mix for 4 minutes on medium speed. Gradually add remaining flour and knead with dough hook(s) for 4 to 6 minutes until dough is smooth and elastic and leaves side of bowl. During the kneading process, periodically stop and check the progress of the gluten development with a Gluten Window* test. Continue with Rising, Shaping and Baking instructions. Traditional Food Processor Method Use 1 loaf quantities. Divide water; warm ¼ cup; chill ¾ cup. In a 2-cup liquid measuring cup, dissolve yeast and 1 tablespoon sugar in ¼ cup warm (110-115 F) water. Let this mixture stand until foamy, about 5 minutes. Insert dough blade in the processor’s work bowl; add flour, remaining sugar and salt. Process these dry ingredients to combine. Add ¾ cup very cold water and any other remaining liquids (oil, eggs, etc.) to the yeast mixture. With the processor running, add the combined liquids through the feed tube in a steady stream only as fast as flour will absorb it. Once the dough forms into a ball, continue processing an additional 45 seconds to knead. Check gluten development with a Gluten Window* test. Continue with Rising, Shaping and Baking instructions. Rising, Shaping and Baking Place dough in a lightly oiled bowl; turn to grease top. Loosely cover with oiled plastic wrap; let rise until dough tests ripe**, about 45 minutes. Punch down dough to deflate. If making two loaves, divide into 2 parts. On lightly floured surface, roll or pat dough to a 14-x 7-inch rectangle. Starting with shorter side, roll up tightly, pressing dough into roll with each turn. Pinch edges and ends to seal dough. With seam side down, place shaped loaf in a lightly greased 9-x 5 or 8-x 4inch bread pan(s). Loosely cover with plastic wrap and let rise until an indentation remains after lightly touching dough. Bake in a pre-heated 375F oven for 30 to 40 minutes until golden brown. Immediately remove from pans and cool on a wire rack. Bread Machine Method Use 1-loaf quantities. Have all ingredients at room temperature. Place ingredients in pan in the order listed. Select Basic cycle and Medium crust. Check the dough’s consistency after 5 minutes of kneading, making adjustments in flour or liquid if necessary. When cycle is completed;, remove bread from pan and allow to cool on a wire rack. *Gluten Window Test: To check gluten development, break off a small, walnut-sized ball of dough. Stretch the dough ball, much like stretching a balloon or piece of bubble gum. A well kneaded dough will stretch and not tear easily and a translucent gluten mesh membrane will be visible when held up toward a light. **Ripe Test: To check if dough has risen enough, gently stick two fingers in the dough up to the second knuckle; remove. If the holes remain, the dough is “ripe” and ready for punch down. If not, cover again and let rise longer until dough tests ripe. Creative Bread Assessment Good Poor Shape Symmetrical form Small or low ends Too small for pan size Too large for pan size Crust Even, rich golden brown color Sides lighter than top but evenly baked Tender Even thickness Uniform smooth break and shred Pale, dark, gray, uneven color Burned or white spots Tough Thick crust Ragged or rough break and shred Texture Fine to medium size cells Even with thin cell walls Tender and soft Silky sheen Slightly moist Evenly baked Even color Coarse, large air holes Uneven with thick cell walls Tough Dull sheen Dry and crumbly Doughy Streaks or dark patches Heavy and compact Flavor Often wheaty or nut-like Pleasing, mild yeasty flavor Bland Too yeasty Sour, vinegar-like taste Improving Breads Traditional Methods Crust is too thick Decrease flour amount Lengthen rising time Use ripe test to check dough Raise oven temperature Loaf crumbles easily Increase mixing time Make sure rising place in not over 90F Use ripe test to prevent over-rising Raise oven temperature Bread has sour taste Make sure the rising place is not over 90F Use the ripe test to prevent over rising Dough does not rise Use thermometer for accurate liquid temperature Decrease flour amount Use unheated oven or microwave for rising place Check activity of yeast Bread has dark streaks Increase mixing and kneading times Use less oil to grease rising bowl Keep dough covered during rising time to prevent drying Bread has holes Completely press air out of dough before shaping Use the ripe test to prevent over-rising Bread is doughy on bottom Remove bread from pan immediately after baking and cool on rack Bread has excessive break on side Roll dough tightly and pinch edges securely to seal Use ripe test to be sure dough has risen enough Decrease oven temperature Top of loaf cracks Keep warm bread out of draft while cooling Decrease flour amount Increase kneading time Bread does not rise in oven Make sure rising place is not over 90 F Use ripe test to prevent over rising Bread is heavy and compact Decrease flour amount Use ripe test to assure dough has risen enough Add vital wheat gluten when using flours having low gluten content Bread is wet with a thick, coarse-grain Use a probe thermometer to be certain bread is completely baked Use ripe test to assure dough has risen enough Bread does not brown on sides Choose dull or dark pans; bright pans reflect heat away from sides Provide more space between loaves while baking Bread smells and tastes of yeast Decrease rising time Use ripe test to prevent over-rising Make sure rising place is not over 90F Bread is dry with coarse-grain Decrease flour amount Increase kneading time to develop gluten better Use ripe test to prevent over-rising Use hotter oven temperature Bread collapses in oven Decrease rising time Use ripe test to prevent over-rising Improving Breads Bread Machine Method Crust is too thick Remove bread from machine immediately after Bake cycle is completed Remove bread from machine 5 minutes before the end of Bake cycle Bread collapses during baking Use a thermometer to accurately measure liquid temperature Check dough consistency after 5 minutes into kneading cycle; if dough is wet, add flour, I tablespoon at a time Use less liquid Use cooler water Bread does not rise Check dough consistency after 5 minutes into kneading cycle; if dough is dry, add liquid, I tablespoon at a time Increase sugar amount Decrease flour amount Have liquids at 80F; all other ingredients at room temperature Yeast inactive or not added Loaf is short and dense Check dough consistency after 5 minutes into kneading cycle; if dough is dry, add liquid, I tablespoon at a time Use bread flour Certain flours, as whole wheat and rye, create heavier products than white flour Bread has coarse texture Decrease liquid amount Increase salt amount Bread has doughy center Decrease liquid amount Check yeast activity Refer to user’s manual; bread machine may be malfunctioning Bread has unbrowned top Select smaller recipe size Increase sugar amount Bread has mushroom top Check dough consistency after 5 minutes into kneading cycle; if dough is wet, add flour, I tablespoon at a time Decrease liquid amount Decrease yeast amount