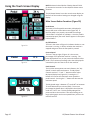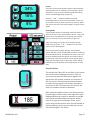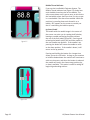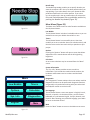
1
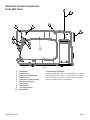
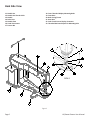
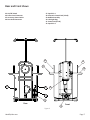
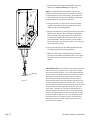
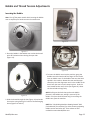
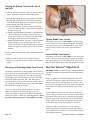
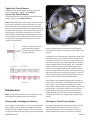
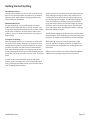
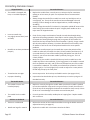
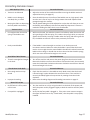
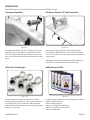
HANDI QUILTER 16-INCH SIT-DOWN LONGARM Designed by a Quilter, for Quilters.® USER MANUAL QM30277 • VERSION 3.0 Congratulations on your purchase of the HQ Sweet Sixteen from Handi Quilter! You haven’t just purchased a quilting machine, you’ve joined the Handi Quilter family and we welcome you. Handi Quilter is committed to innovation, reliability, customer service and education. Our machines are “Designed by a Quilter, for Quilters®” and we are committed to your quilting success. With that in mind, we invite you to bookmark our website: www.HandiQuilter. com and invite you to visit to learn more about the art of quilting. We’ve posted tips, tricks and tutorials on subjects as diverse as “Oiling Your Machine” to “Loading a Quilt” to “Making Perfect Feathers”. We’ve got videos to watch, pdf files to print out for reference and forums for asking questions. Remember, if you ever have questions, your local Rep can help you. If the Rep is not available, contact Handi Quilter directly at techsupport@HandiQuilter.com or by calling us at 1-877-697-8458, Monday-Friday, 8-5 MST. HandiQuilter.com Page 1 Page 2 HQ Sweet Sixteen User Manual Table of Contents 4 5 6 7 8 9 10 11 13 14 15 16 25 26 29 31 33 NOTE: A Handi Quilter “Getting Started” set of DVDs is included with your 35 HQ Sweet Sixteen machine. Review the DVDs and these instructions to better understand how to set up and use the HQ Sweet Sixteen. Safety Section Quick Facts Components (Front Side View) Components (Back Side View) Components (Rear and Front Views) Setting Up the Table Placing Machine in Table Installing Power Cord Installing Foot Pedal Installing Thread Mast Installing Color Touch-Screen Inserting Needle Needle/Thread Selection Guide Changing the Hopping Foot Threading the Machine Bobbin Case and Bobbin Thread Tension Adjustments Easy-Set Tension™ Adjustment Maintenance Using the Touch-Screen Display Geting Started Quilting Correcting Common Issues Optional Accessories Warranty Warranty Registration Form Training Checklist Safety Section This device complies with Part 15 of the FCC Rules. Operation is subject to the following two conditions: (1) This device may not cause harmful interference, and (2) this device must accept any interference received, including interference that may cause undesired operation. Please note: Do not operate your HQ Sweet Sixteen quilting machine until you have completely read the information contained in this manual. Please keep all packaging and order information for warranty purposes. 1. The HQ Sweet Sixteen is very heavy. Never attempt to lift it alone – always use two people when lifting. 2. Always unplug the HQ Sweet Sixteen from the electrical outlet when performing any maintenance, changing the needle, removing thread locks, or when left unattended. 3. Keep fingers away from all moving parts. Use caution around the needle or sharp external components. 4. Change the needle often. Do not use bent or dull needles. “Every quilt deserves a new needle”. 5. Switch the power off when making any adjustments in the needle or bobbin area, such as threading the needle, installing the bobbin case, or when oiling or cleaning. 6. Never drop or insert foreign objects into any opening. 7. The HQ Sweet Sixteen should only be used indoors away from moisture. 8. The HQ Sweet Sixteen should not be stored or used in extreme temperatures. Quick Facts The HQ Sweet Sixteen utilizes high-tech electronics and an innovative touch-pad user interface to offer greater functionality and ease of operation to home quilters than ever before conceived in the quilting industry. The HQ Sweet Sixteen quilting machine is a high quality machine that incorporates very robust design features and is very easy to service. Throat Dimensions: 8.25” X 16” (245 mm X 610 mm) Quilting Speed: Maximum: 1500 SPM Needle System: 134 (135 X 7) Needle Sizes: 12/80 - 20/125 Hook System: Rotary, Horizontal axis, M-class bobbin Bobbin Type: Aluminum, Class M Bobbin Case: Type MF Motor Type: Brushless DC Needle Positioning: Up and down, tieoff stitch Electrical Power: 90 – 264 VAC, 47-63Hz, 300W peak LED Power Consumption: 2.25W Hopping Foot Stroke/Lift: 5 mm Needle Bar Stroke: 35.3 mm Take-Up Stroke: 73 mm Lubrication, main components: Kluber Lube, permanent Lubrication of hook: Velocite 10, Texaco 22 9. Use the HQ Sweet Sixteen only for its intended use as described in this manual. 10. Use only attachments recommended by the manufacturer. 11. To disconnect from the wall outlet, push the switch to the off position, then remove the plug from outlet pulling from the plug, not the cord. Never operate the HQ Sweet Sixteen if the cord is damaged or not working correctly. If a mechanical or electrical problem is encountered, return the HQ Sweet Sixteen to the nearest authorized service center or the manufacturer for examination, repair, electrical or mechanical adjustment. Page 4 Disclaimer Handi Quilter and its Representatives are in no way legally responsible or liable for damage to the HQ Sweet Sixteen when used improperly or not in accordance with the guidelines stated in this manual or when used on machinequilting tables not recommended by Handi Quilter. HQ Sweet Sixteen User Manual HQ Sweet Sixteen Components Front Side View 7 1 2 3 10 6 8 4 5 9 Figure 1 1. 2. 3. 4. 5. 6. 7. 8. 9. 10. HandiQuilter.com Thread Mast Thread Guide A Three-Hole Thread Guide B Thread Guide C Top Thread Tension Assembly Stirrup Thread Guide E Take-Up Lever Thread Guide F Front Casing/Frame Hand Wheel Components Not Identified Because the HQ Sweet Sixteen is upgradeable to a stand-up frame quilting system, there are components found on the machine that are not used for sit-down machine quilting (such as threaded holes for handlebars). Page 5 Back Side View 18. Front Threaded Display Mounting Holes 19. Front Base 20. Back Casing/Frame 21. Rear Base 22. Color Touch-Screen Display Connector 23. Threaded Horizontal Spool Pin Mounting Hole 11. Needle Bar 12. Needle Bar Thread Guide 13. Needle 14. Ruler Foot 15. Needle Plate 16. Handi Feet mount 17. Presser Bar 17 11 22 12 23 16 13 18 14 15 DETAIL 'A' 21 20 19 Figure 2 Page 6 HQ Sweet Sixteen User Manual Rear and Front Views 27. Spool Pin 1 28. Electronic Control Pod (C-Pod) 29. Bobbin Assembly 30. LED Light Ring 31. Power Pod (P-Pod) 32. Spool Pin 2 23. On/Off Switch 24. Power Cord Connector 25. Accessory Power Outlet 26. Foot Pedal Connector 32 32 27 31 31 28 Detail 26 23 30 30 24 24 25 Rear 29 Front Figure 3 HandiQuilter.com Page 7 Setting Up the Table (and Taking it Down for Storage) Installing the Power Cord The HQ Sweet Sixteen table has been designed to accommodate the HQ Sweet Sixteen machine. It has folding legs that are height-adjustable and is heavy enough to provide stabilization for quilting at high speeds. 1. Open the box and gently remove the table, taking care not to drop the table on the floor. The table weighs nearly 50 pounds, so it is recommended that you ask someone to help. 2. Unfold the legs, pulling on the horizontal braces until the legs snap into place. Set the table upright. 3. Make the table taller by pinching the two heightadjustment tabs on each set of legs and lifting on table, while holding legs down with foot. Make the table shorter by pinching the same tabs and pushing down on the table. 4. To store the table, remove machine and return legs to their lowest position. 5. The legs are attached to the table top with brackets of two different sizes. One is longer than the other. Identify the long and the short leg brackets. 6. Fold in the short bracket leg first. Push on the horizontal braces to loosen the legs and push them back toward the table top. 7. Repeat with the long bracket leg. Placing the Machine in the Table Figure 4 Check that the On/Off switch (page 7, Figure 3, #23) is turned off (the 0 setting). Plug the power cord into the top power outlet on the back of the machine (Figure 4). Do not plug the power cord into a power source at this time. The lower power connector is available for powering future attachments as they are developed by Handi Quilter. (Not yet available.) Installing the Foot Pedal 1. Plug in the foot pedal cord end into the foot pedal connector (see page 7, Figure 3, #26). 2. Place the foot pedal under the table where operator can reach it from the front of the machine. 1. We recommend having someone help lift and place the machine. 2. Lift the machine by putting one arm through the throat space. 3. Guide the machine from the back of the table into the slot. Machine is positioned correctly when the back of the machine is flush with the back of the table. Page 8 HQ Sweet Sixteen User Manual Installing the Thread Mast Installing the Color Touchscreen Figure 6 The color touchscreen comes pre-installed on its mounting bracket and should have one end of the D cable attached to the back of the touchscreen (see Figure 6). NOTE: Confirm that the power is turned offer before installing the Color Touchscreen. 1. Remove the two long bolts from the bag in which they are packed. Figure 5 1. Locate the threaded hole on top of the machine near the rear by the hand wheel. 2. The thread mast comes with a washer and a nut. Remove the nut and washer, replace the nut onto the mast for two or three turns. 3. The washer protects the painted surface when the nut is tightened. Place the washer on the hole and insert the thread mast. 4. Turn the thread mast clockwise several revolutions, stopping when the mast eyelets are positioned directly over the spool pins. 5. Tighten the nut to secure the mast to the machine. Note: The eyelets of the thread mast MUST be centered over the spool pins. This ensures that the cone of thread will not pull, turn or tilt, which will cause thread tension problems (see Figure 5). HandiQuilter.com 2. There are three holes on top of the machine head (see page 6, Figure 2, #18). Only the two holes that are in line with each other are used. Ignore the third hole located to the side of these two holes. 3. Align the holes in the color touch-screen bracket with the two holes on top of the machine, with the touchscreen facing the needle end of the machine. 4. Use a 5 mm Allen wrench to insert the two long bolts through the holes of the bracket and into the machine (Figure 6). Tighten in place. 5. Plug the remaining cable end into the display connector located on the side of the machine (page 6, Figure 2, #22). 6. Remove the protective plastic from the touch-screen before using. Page 9 Inserting (or Changing) the Needle Needles are inexpensive and are important to the success of your project. Plan to change needles every 5-7 hours of quilting or more often if working with a lot of fusibles or heavy materials. Needle/Thread Selection Guide Needle Size 12 (80) SIGHT HOLE 14 (90) 16 (100) 18 (110) 20 (120) Figure 7 The needle that is in the machine when it arrives at your home has been used for 20 minutes of testing. It is possible that it could be damaged in shipping or as you remove the machine from the box. For these reasons, Handi Quilter recommends that you replace the needle before beginning to quilt with your new machine. 1. Move the needle bar to the highest position by turning the hand wheel. 2. Confirm that the power is off and that the machine is unplugged. 3. Loosen the needle-bar clamp thumb screw (see Figure 7) enough to assure that the needle can be inserted all the way up to the top of the sight hole. 4. With the scarf (small ground out section/dip on the back side of the needle just above the needle eye) facing the hand wheel end of the machine, and the long groove down the front of the needle facing the bobbin case side (see Figure 7), push the needle all the way up into the needle bar – until it can go no further. Look into the sight hole to verify that the butt of the needle reaches the top of the sight hole. 5. Carefully tighten the thumb screw. Over-tightening the thumb screw will result in damaged threads or stripping of the screw hole. Stripped holes are not covered under warranty. To avoid over-tightening the screw, fingertighten only. Note: Changing the needle is recommended for each new quilt loaded on the machine or any time the needle becomes bent, dull or burred. Page 10 Threads Monofilament, 100 wt. Silk, 60 wt. poly, mylar Silk (100 wt) 60 wt., monofilament, glitter, some metallics 60 wt., 50 wt., 40 wt., monofilament, glitter, metallics 50 wt., 40 wt., 30 wt., metallic 30 wt., 20 wt., 12 wt. Changing the Hopping Feet Your machine comes with two hopping feet: a ruler foot and an open-toe foot. Use the ruler foot for ruler work and everyday quilting, and the open-toe foot when you need greater stitch visibility (such as micro quilting). 1. Remove the foot that is on the mount by using the 2.5mm Allen wrench to loosen the mounting screw far enough that you can slide the foot off of the mount. Figure 8 2. Slide the desired foot onto the mount (figure 8). Note that the opening on the side of the foot is lined up with the screw hole. Push the foot up as far as it will go. 3. Ensure the middle of the foot opening is centered Figure 9 with the needle when the foot is fully tightened with the 2.5mm Allen wrench. If it isn’t properly centered, loosen the lock nut; center the foot with the needle; hold the foot in position; and firmly tighten the lock nut (Figure 9). HQ Sweet Sixteen User Manual B Threading the Machine Threading the Machine D C 2 A 1 B TAKE UP SPRING C C Take Up Spring EE A B D D BACK TENSION ASSEMBLY FRONT F BACK Tension Assembly F FRONT DETAIL 2 Figure 11 Figure 11 1. Place a cone or spool of thread on the spool pin. Pass the thread through the thread-mast eyelet from 1.back Placetoa front, cone orcontinuing spool of thread on theguide spool pin. to thread A. If using a spool, make sure that the slits on the spool are against (Figure 11) the base of the spool pin holder. Pass the thread through thread-mast eyelet from back to front, continuing to 2.the Continue to the three-hole thread guide B. Wrap thread guide A. (Figure 10) all three holes from back to front, hand wheel side to needle side (see Figure 12). 2. Continue to the three-hole thread guide B. Beginning at the top, wrap all three holes from back to front, hand Note: the(see three-hole thread guide B wheelThe side purpose to needleofside Figure 11). is to prevent loops of thread coming off the thread cone The from going of into top tension a knot Note: purpose thethe three-hole threadasguide B iscaustoing prevent loops of thread coming off the thread cone thread breakage and bad tension. For most from going into the top tension as a knot causing threads on a cone, it is important to threadthread all three breakage bad tension. For most threads a cone, it holes forand consistent results and to makeon adjustisments important to thread all three holes for consistent results at the top tension assembly. An exception to and to make adjustments at the top tension assembly. An this rule is when working with very delicate threads, exception to this rule is when working with very delicate such as holographic or threads that are prone to threads, such as holographic or threads that are prone to breakage, in which case you may try skipping one or breakage. You may try skipping one or two holes on thread two holes thread guide B. guide B whenonusing these threads. Page 12 HandiQuilter.com B DETAIL Figure 112 Figure 10 Note: See “HQ Quilting Machines Getting Started” DVD (included with your machine) videosDVD showNote: See “HQ Quilting Machines Gettingfor Started” ing threading and other tips. Theseshowing videos are also (included with your machine) for videos threading available on These www.HandiQuilter.com. and other tips. videos are also available on www. HandiQuilter.com. HQ18 Avanté User Manual Page 11 3. Thread continues through thread guide C, and then down to the tension assembly (see Figure 12). NOTE: It is important that the thread is “flossed” up between the two tension discs. If the thread is not firmly in place between the two tension discs, the thread rests on the outside of the tension discs (without tension) and looping on fabric or thread nests may occur. C D E 4. Once the thread is in place, be sure that the thread catches on the take-up spring and then pull it down under the stirrup (thread guide D). 5. Bring the thread back up through the take-up lever from back to front, and then down through thread guide E. Pull the thread at the take-up lever to ensure that it is properly flossed between the tension disks. If it is properly flossed in the tension disks you should feel some resistance as you pull the thread. If it is not, then the thread will pull freely. 6. Pull the thread down to the needle thread guide and thread through the hole (thread guide F). 7. Make sure the thread is following the groove down the front of the needle and threads from front to back. Be careful that the thread does not twist around the needle. F DETAIL 2 Figure 12 Page 12 IMPORTANT NOTE: The HQ Sweet Sixteen quilting machine does not have a presser foot lever or top tension release like a home sewing machine. On a home sewing machine the top tension is released when the presser foot is raised, allowing the thread to come freely out of the machine. When a home machine is threaded, the presser foot is raised and the tension discs are released and open for the thread to easily fall between the tension discs. This is not the case with the HQ Sweet Sixteen quilting machine where the top tension is always tight and the tension discs are never open. Therefore, the thread must be pulled up or “flossed” between the tension discs or it will stay outside the discs and float without tension, causing serious stitch problems and/or thread nests. It is also possible to bend the needle while it is threaded if care is not taken while moving the machine around the quilt because the top tension is never released. HQ Sweet Sixteen User Manual Bobbin and Thread Tension Adjustments Inserting the Bobbin Note: Turn off the power switch while inserting the bobbin case or anytime your hands are near the needle area. TENSION SPRING Figure 15 Figure 13 1. Place the bobbin in the bobbin case so that the thread pulls off clockwise when viewing the open side (Figure 13). Figure 16 3. To insert the bobbin case into the machine, grasp the bobbin case with thumb and first finger. Do not lift the lever on bobbin case. Fit the bobbin case onto the hook spindle in the machine. Rotate the case until the open throat keys into the alignment notch in the middle of the hook. Push the case in until it stops in place. Push the case inward further until it clicks (see Figure 16). Allow the thread end to hang freely. Figure 14 2. Slide the thread through the slot (Figure 14) and under the tension spring leaving 5-6 inches of thread hanging loose (Figures 14 and 15). HandiQuilter.com NOTE: Pulling out the latch lever pushes the bobbin forward in the bobbin case, aiding in removal of the bobbin. The lever should be used only for removing the bobbin case from the machine. NOTE See “HQ Quilting Machines Getting Started” DVD (included with your machine) for videos showing adjusting bobbin tension and other tips. These videos are also available on www.HandiQuilter.com. Page 13 Drawing the Bobbin Thread to the Top of the Quilt 1. After threading the machine, plug it in and turn on the power. Place quilt sandwich under hopping foot. 2. While firmly holding the tail of the needle thread with the left hand, choose one of the following methods to cycle the needle through one full rotation to bring the bobbin thread to the top of the quilt. A. Foot Pedal Method. LIGHTLY tap the foot pedal to make the needle go down. Then LIGHTLY tap again to bring the needle up. B. Needle Up/Down Button Half-Stitch. Find the Needle Up/Down Button in the center of the color touchscreen main display. Press once to cycle the needle down. Press again to cycle the needle back up. C. Needle Up/Down Button, Full-Stitch. Find the Needle Up/Down Button in the center of the color touchscreen main display. Press and hold briefly to cycle the needle through one complete stitch cycle (down and back up). 3. Pull the fabric 3-4 inches away while holding the needle thread. Figure 17 Tighten Bobbin Case Tension The bobbin case tension is TOO LOOSE if it will not lift up onto its side. Turn screw clockwise to tighten. The bobbin case screw requires very small adjustments. Think of the “tick of a clock”. Adjust, then check. Adjust and check again. Loosen Bobbin Case Tension 4. Bobbin thread will pull up and through to the top, allowing you to grasp the loop and pull it to the desired length. The bobbin case tension is TOO TIGHT if it lifts out of your hand. Turn screw counterclockwise to loosen. The bobbin case screw requires very small adjustments. Think of the ticks of a clock. Adjust, then check. Adjust and check again. Checking and Adjusting Bobbin Case Tension Easy-Set Tension™ Adjustment The bobbin case tension is the foundation tension for the entire machine. To test that bobbin tension is correct, hold the bobbin case in the palm of your hand with the open end facing up. Wrap the thread around your index finger and lift the bobbin case from your hand. While gently moving the finger front to back (not up and down, which is not consistent), the bobbin case should slide slowly down the thread, like a spider on its web. The small screw in the center of the tension spring is where the adjustment is made (see Figure 17). Turn clockwise to tighten and counter-clockwise to loosen the bobbin case tension. Make very small adjustments. Check the bobbin tension every time a new bobbin is inserted. Page 14 IMPORTANT NOTE: Top thread tension should be adjusted only after the bobbin case foundation tension adjustment is made. Puckering, gathers and thread breakage occur when the top tension is too tight. Loops and thread nests occur on the back when the top thread tension is too loose. (See Figure 18 on next page.) Tension may need to be adjusted, depending on the fabric, thread or batting used in each project. As you change the top tension, the value in the tension indicator box on the Main screen increases or decreases in increments of five. When you are happy with the tension, note the top tension value for that type of thread (brand, weight, and color) so you can quickly and easily set the tension when you use this thread again in the future. Unlike the bobbin case adjustment, which requires minute adjustments, the top tension knob may require turns anywhere from 1/4 of a turn to two to four turns to achieve balanced tension. HQ Sweet Sixteen User Manual Tighten Top Thread Tension To adjust the top tension tighter, turn the top thread tension knob (page 5, Figure 1, #5) clockwise. Loosen Top Thread Tension To loosen the tension, turn the top thread tension knob (page 5, Figure 1, #5) counter-clockwise. NOTE: Before adjusting the top tension, remember to floss or pull the top thread up into the tension discs or it will float outside the discs providing little or no top tension. This could cause significant tension or nesting problems on the bottom side of the quilt. If the top tension is too loose (causing loops of thread on the underside of the quilt) and no amount of tightening the top thread tension knob seems to affect it, there’s a good chance that the thread is riding on the outside of the tension discs and is not “flossed” between them. A stitch is balanced when the top thread and the bobbin thread meet in the middle of Havingthe set thequilt bobbinsandwich. thread tension properly, and the top thread looks like Diagram A: Problem: The top thread is too tight. Solution: Loosen the top thread tension discs. Having set the bobbin thread tension properly, and the top thread looks like DiagramB: Problem: The top thread is too loose. Solution: Loosen the top thread tension discs. Tight Top Thread Diagram A Loose Top Thread Diagram B 6 Figure 19 however, needs regular lubricating. Failure to keep the hook assembly lubricated can cause severe damage to the machine. To lubricate, turn off the machine. Remove the bobbin and case before oiling. Clean around the hook assembly with a soft brush to remove lint. Put a very small drop of oil on the hook in the region where the bobbin basket assembly and the rotating hook meet (see Figure 19)). The bobbin basket is the portion of the hook that the bobbin case snaps into. The bobbin basket remains stationary while the hook rotates around the basket. The oil lubricates the region where these two components interlock. A drop of oil in the region indicated will work its way back into the interlocking area of the hook and bobbin basket. NOTE: Turn off the machine and remove the power cord when performing maintenance on the machine. The frequency of lubrication depends upon the usage of the machine. Lubricating is recommended before running the machine if it has not been used regularly, or every other bobbin change if used frequently. After oiling, always stitch through a scrap piece of fabric, as oil may cling to thread. Over-oiling can cause excess dripping from the bobbin assembly. Lack of lubricant may be noticed by a change in the sound of the machine and will affect stitch quality. Cleaning and Lubricating the Machine Cleaning the Touch-Screen Display Only use light sewing machine oil in the HQ Sweet Sixteen. Internal oiling is not necessary on the HQ Sweet Sixteen except when the machine is taken to a service technician for routine maintenance and cleaning. The hook assembly, Use a soft rag dampened with isopropyl alcohol to gently wipe the display and remove any marks. Never use any other chemicals to clean your display as they may adversely affect the touch-screen response and clarity. Figure 18 Maintenance HandiQuilter.com Page 15 Using the Touch-Screen Display NOTE: Review the Handi Quilter “Getting Started” DVDs for interactive instruction on the HQ Sweet Sixteen menu functions. The HQ Sweet Sixteen has a color touch-screen display on the front of the machine. Settings are changed using this display. Main Screen Button Functions (Figure 20) Pedal Status The status of the foot pedal connection is displayed in the top left corner of the Main screen (Figure 20). If the foot pedal is not properly connected the message “Check Pedal” will appear in red letters. Once the pedal is connected properly the word “Pedal” appears in that space in black letters. On/Off Indicator The box in the center of Figure 21 indicates whether or not the motor is running. It will be red when the machine is stopped and green when the foot pedal is pressed. Figure 20 0% Pedal Figure 21 Limit 34 % 0% Needle Stop Up Down Limit 34 % 34% Figure 22 34% 16% 5% More Current Speed The box in the top right of Figure 21 is the current percentage of full speed the machine is running. The value displayed will vary as you press and release the foot pedal. The maximum percentage value that is displayed is controlled by the Limit that is set for the machine. Limit Controls The Limit box encompasses two main features, the “My Speed” controls and Preset buttons. The My Speed controls consist of “+” and “–” buttons and the white My Speed display box (Figure 22). Pressing the “+” button will increase the maximum motor speed the pedal controls. Pressing the “–” button will decrease the maximum speed. The My Speed range is between 5 % and 100 % or between 75 and 1500 stitches per minute (SPM). The current percentage My Speed value is displayed in the white box under the “Limit” text. This My Speed setting will be preserved when the machine is shut off, allowing you to begin quilting again at the same speed when you turn the machine back on. 16% Page 16 5% HQ Sweet Sixteen User Manual 34 % 34% 16% 5% Figure 23 More Presets Save up to three preset speeds to quickly switch between speed preferences. For example, you may prefer a slower speed when using rulers and a faster speed when doing all-over meandering quilting. (Figure 23) Use the “+” and “–” buttons to adjust the speed percentage and then press the record button next to one of the preset values to store that speed as a preset. When you want to use one of the preset speeds, simply press the speed. Basting Mode The HQ Sweet Sixteen has a basting mode that causes a stitch to be formed at a specified time interval – every half second, every three/quarters of a second, every second, every 1.5 second, or every two seconds. (Figure 24) Touch the basting icon (Figure 25) to activate basting mode. Then press the “+” or “–” button to set the time interval for the basting stitch. Pedal Figure 24 Press the foot pedal to begin quilting. The HQ Sweet Sixteen will take a stitch (needle down and then needle up) at the specified interval. Coordinate how quickly you move the quilt sandwich with how quickly the machine takes a basting stitch. Experiment with the various speed options along with moving the quilt to find which of the settings work best for you to position the basting stitches on your quilt. 1/2 Second Easy-Set Tension tension box (Figure 26) on the Main Screen shows DelayThe the current tension setting as a numeric value. As you turn the tension dial clockwise to tighten the top tension, the number increases in increments of five. As you turn the tension dial counterclockwise to loosen the top tension, the number decreases in increments of five. The faster you turn the dial, the faster the numbers increase or decrease. 31 % Figure 25 After setting the bobbin tension, test the top tension 25% by stitching on a fabric scrap on the edge of the quilt eedle Stop Up Down HandiQuilter.com 10% batting and backing. Increase or decrease as needed until you have achieved balanced tension. Make a note of the type of thread (weight, brand, color) you’re using and the tension value. You will be able to quickly and easily set the tension when you use this same thread again in the future. 35% Figure 26 More Page 17 Bobbin Thread Indicator If you use the Low-Bobbin Estimator feature, The Bobbin Thread Indicator box (Figure 27) shows how much bobbin thread remains on the bobbin. The value counts down until it gets to zero, at which time the low-bobbin alarm alerts you that it is time to put in a new bobbin if the alarm was enabled. While the machine is recording how much thread is on a bobbin, REC appears on the screen to remind you that it is estimating the bobbin capacity. Up/Down/TieOff edal Figure 27 The button with the needle image in the center of the screen can assist you in creating tieoff stitches, basting or needle-positioning functions without the use of the foot pedal (Figure 28). Pressing and releasing the button quickly will send the needle to the next needle stop position. If the needle is up, pressing the button will cause the needle to move to the down position. If the needle is down, it will return to the up position. 0% Limit Pressing and holding the button for a longer time allows you to do a full stitch. As long as you continue to hold the button down the machine will continue to stitch at a slow rate, and when the button is released the needle will stop in the closest stop position (up or down) available. This action is useful for tieing off beginning and ending stitches. 34 % 34% 16% le Stop Up 5% Down More Figure 28 Page 18 HQ Sweet Sixteen User Manual Limit Needle Stop The Needle Stop setting enables you to specify whether you want the needle to end in the up or down position when you stop quilting. If you select Down, when you release the foot pedal the needle ends in the down position. If you select Up, the needle ends in the up position when you release the foot pedal. Switch between the up and down position by 34 % 34% pressing the Needle Stop button (Figure 29). More Menu (Figure 31) The More menu allows access to other functions available on the HQ Sweet Sixteen. 16% Figure 29 Low Bobbin The HQ Sweet Sixteen includes a low bobbin alarm so you can estimate how soon your bobbin thread will run out. 5% Timers The HQ Sweet Sixteen has two useful timers. One timer enables you to set a reminder alarm (like a kitchen timer) and the other timer tracks how much time you spend on a quilt project. More Options Pressing the “Options” button will open a screen that allows adjustment of the sound volume and the LED Light Ring brightness. Figure 30 Calculator An on-screen calculator may be accessed from the “More” screen. System Information The “Sys. Info.” Button provides access to machine information. This includes the machine Serial Number, the hardware and firmware version numbers and the Stitch Counters. More Low Bobbin Timers Options Calculator Sys. Info Diagnostics English Main Diagnostics The “Diagnostics” button activates the screen where machine diagnostic functions can be performed. Diagnostic functions are generally only used when working with your authorized Handi Quilter retailer to resolve issues. Set Language The HQ Sweet Sixteen screens can appear in English, French, German, or Spanish. On the More Screen, press the lowerleft button to cycle between English, Français, Deutsch, and Español. After selecting your preferred language, press Main to return to the Main Screen. Main Press the “Main” button to return to the Main menu screen. Figure 31 HandiQuilter.com Page 19 Low Bobbin The HQ Sweet Sixteen includes a low bobbin alarm so you can estimate how soon your bobbin thread will run out. This Low Bobbin Capacity is based on an estimate of how much of a particular thread can fit on a bobbin, in combination with other quilting factors such as tension, stitches per inch, and how much bobbin thread you pull up when beginning and ending your quilting (Figure 32). To estimate how much thread is on a bobbin, place a full bobbin in the machine and under the heading Bobbin Thread Capacity, press the Record button and quilt as usual. Figure 32 Figure 33 When the bobbin runs out, press the square Stop Recording button and note the number that is indicated under the Bobbin Thread Capacity (Figure 33), perhaps 210 yards. Since you want a warning as to when the bobbin is getting low, use the “–” button to specify a lower number, such as 195. Save that as one of the Bobbin Thread Capacity Presets. You might want to make a note as to which type of thread the preset represents. Put a new bobbin with the same thread into the machine and press the New Bobbin button. Then press the Alarm button. As you quilt, the remaining bobbin thread value will estimate how much thread remains on the current bobbin, and when you reach the capacity value, an alarm will sound warning you that your bobbin is nearly out of thread (Figure 34). When recording the capacity of a bobbin, the HQ Sweet Sixteen assumes you will stitch at 10 stitches per inch if TruStitch stitch regulation (optional accessory) is not attached to your machine. Therefore, if you estimate bobbin capacity and stitch using different stitches per inch, increase the capacity setting (if stitching fewer than 10 stitches per inch) or decrease it (if stitching more than 10 stitches per inch). If TruStitch is attached and powered on, the low-bobbin capacity calculation uses the current last TruStitch stitches-per-inch setting to calculate bobbin capacity when you are stitching in regulated mode. In Manual mode the last stitches-per-inch setting used in regulated mode is used to calculate the bobbin usage. Figure 34 Page 20 You can store three Bobbin Thread Capacity preset values – one for each of three different types of thread. Simply go through the record process with a full bobbin of that type of thread and then store the capacity as a preset. When you switch to using that type of thread, press appropriate preset button. Insert a full bobbin with that type of thread, press New Bobbin, and all of the settings will be based on that type of thread. HQ Sweet Sixteen User Manual Timers Timers The HQ Sweet Sixteen has two useful timers. One timer enables you to set a reminder alarm (like a kitchen timer) and the other timer tracks how much time you spend on a quilt. 0 3:33:57 Back Reset Main Figure 35 Volume The Volume portion of this screen (Figure 36) has two buttons and a sliding control. Pressing on the “Mute” button turns off the sound of the buttons when they are pressed. Pressing the “Max” button turns the volume to its loudest level. Pressing the sliding control in any position sets the volume to the level indicated in that control. Pressing and moving back and forth across the sliding control will change the volume up as it is moved left to right and down as it is moved from right to left . Volume 100% Brightness 100% Back Main Figure 36 The second (bottom) timer enables you to track how much time you spend on a quilt project. When you begin a new project, press the Reset button. Then press the “play” button to begin recording your quilting time. The timer records when the machine is quilting. The time is saved even when the machine is turned off. When you begin another quilting session, quilting time is added to the timer. Only press Reset when you want to zero-out the timer and begin a new timing session. (Figure 35). Options Screen Options X The first (top) timer is a reminder timer. It enables you to set an alarm to go off after a specific period of time, similar to a kitchen timer. Use the “+” and “–” buttons to set the time duration. Then press the “play” button to activate the timer. When the time duration has elapsed, an alarm will sound and a message appears on the display. Brightness The “Brightness” portion of this screen has two buttons and a sliding control as well. The LED Light Ring can be turned on completely with the illuminated light bulb button or off completely with the darkened light bulb button. Pressing the sliding control in any position will set the brightness to the value indicated in the slider control. Pressing and moving back and forth across the sliding control will change the brightness up as it is moved left to right and down as it is moved right to left. Press the “Main” button to return to Main menu screen or the “Back” button to return to the “More” menu screen. HandiQuilter.com Page 21 Diagnostics Screen Four different diagnostics tests can be performed on the machine. These functions test the motor control operation, the foot pedal and the internal position sensors. (Figure 37) Press the “Main” button to return to the “Main” menu screen or the “Back” button to return to the “More” menu screen. Diagnostics Tests Figure 37 Diagnostics Motor Sensor Test Rotate the hand wheel SLOWLY. Passing Test: Regular pulsing beeps as you rotate the hand wheel. Failing Test: A solid tone or no beeping at all as you rotate the hand wheel. Back Main Figure 38 Diagnostics Needle Sensor Test Rotate the hand wheel. Passing Test: Solid beep for 1/3 of a stitch cycle, no beep for the rest of the cycle. Failing Test: No beep or solid beep as you rotate the hand wheel one full revolution. Back Motor Sensor Test The “Motor” Sensor test (Figure 38) can help you determine whether they may be a problem with the HQ Sweet Sixteen motor. Slowly rotating the hand wheel should result in an audible “beep.” If you get a constant solid “beep” or no “beep” at all, this indicates a failed test and the machine should be inspected by a qualified Handi Quilter repair technician. Press the “Main” button to return to the “Main” menu screen or the “Back” button to return to the “More” menu screen. Needle Sensor Test The Needle Sensor test will indicate whether the needle position sensor is functioning properly. Rotating the hand wheel should result in a “beep” for half of a stitch cycle followed by no “beep” for the other half. (Figure 39) If you hear a constant beep or no beep at all for a full 360° rotation of the hand wheel, this indicates a failed test and the machine should be inspected by a qualified Handi Quilter repair technician. Press the “Main” button to return to the “Main” menu screen or the “Back” button to return to the “More” menu screen. Main Figure 39 Page 22 HQ Sweet Sixteen User Manual Diagnostics Motor Speed Sensor Test Remove bobbin case and top thread. Clear all objects from the needle area. Depress foot pedal completely. Passing Test: The value stabilizes at 100. 173 Back Main Figure 40 Diagnostics Foot Pedal Test Remove bobbin case and top thread. Clear all Objects from the needle area. Depress foot pedal completely. Passing Test: Value below varies from 0 to 100% 45 % Back Main Figure 41 System Information HA010553310 Serial Number Firmware Board Type C-Pod Handles 4.04 4.02 2.00 3.00 Stitch Counters Lifetime 000005335 Trip Reset 000005335 Back Main Motor Speed Sensor Test The “Speed” Sensor test can help you determine whether or not there is a problem with the HQ Sweet Sixteen speed sensor. Before performing this test, remove the bobbin case and the top thread. Press the foot pedal so that the machine will begin slowly rotating. The white box will show a number that should stabilize at 100 if the sensor is functioning properly. Release the foot pedal to stop the machine. (Figure 40) Press the “Main” button to return to the “Main” menu screen or the “Back” button to return to the “More” menu screen. Pedal Test The “Pedal” test can help you determine if there is a problem with the HQ Sweet Sixteen foot pedal. As you slowly depress the foot pedal a percent of depression will appear in the white box. The foot pedal should be controllable from 0 to 100%. (Figure 41) Press the “Main” button to return to the “Main” menu screen or the “Back” button to return to the “More” menu screen. System Information Screen The serial number of the machine is displayed at the top of the System Information screen. This number matches the one found on the label at the back of the machine. Information contained in the white boxes below the serial number identifies the electronics board revision numbers as well as the firmware revision numbers of the HQ Sweet Sixteen. The Lifetime and Trip (or project) stitch counters count the number of stitches the machine is performed. The Lifetime count is the total number of stitches made since the machine was built. The Trip Counter can be reset to keep track of the number of stitches made during a given project. To reset this counter, press the blue “Reset” button found aligned with the Trip counter. The Lifetime counter cannot be reset and should be used as an indicator to determine when general machine maintenance should be performed by an authorized Handi Quilter Representative. (Figure 42) Press the “Main” button to return to the “Main” menu screen or the “Back” button to return to the “More” menu screen. Figure 42 HandiQuilter.com Page 23 MR 7 8 9 M+ 4 5 6 MC 1 2 3 +/- 0 . Back C X CE % + Main Figure 43 = Calculator Screen A basic six-function calculator is provided for your convenience. (Figure 43) The functions provided are addition, subtraction, multiplication, division, square root and percent. The arrow button on the top right may be used to delete a digit mistakenly entered. Press the “Main” button to return to the “Main” menu screen or the “Back” button to return to the “More” menu screen. Calibrate Tension The Tension button on the Diagnostics menu enables you to calibrate the tension device. You should only calibrate the tension device under the direction of Handi Quilter technical support. (Figure 44) While calibrating the tension, you will be asked to do the following: 1. Remove the tension knob. 2. Gently press the spring against the tension discs while not compressing the spring. 3. While holding the spring in place, press Reset. 4. When calibration is complete, replace the tension knob. Figure 44 Page 24 HQ Sweet Sixteen User Manual Getting Started Quilting Thread Requirements Threads have a tendency to dry rot over a period of time. Be sure to choose high quality threads for your valuable heirloom quilts. Most machine quilting threads on the market today are acceptable. Needle Requirements For general quilting, a size 16/100 needle will accom modate most threads and fabrics. Heavier threads, such as top stitch and some decorative threads, require a larger needle such as 18/110 or 20/120. Heavier fabrics such as denim, canvas or densely woven fabric may require a larger needle. To Prepare for Quilting With any quilting machine, it is important to understand the basics of free motion quilting. The HQ Sweet Sixteen Quilting Machine does not have feed dogs like domestic machines; therefore, the fabric does not automatically feed under the hopping foot. The operator controls the machine sewing speed with the My Speed setting and the foot pedal, and moves the fabric to get an even, consistent stitch. Set the machine at a medium My Speed setting (perhaps 25%) and begin moving the fabric until you become ac customed to the resistance. By moving the fabric faster, the stitches begin to elongate. The My Speed setting can either be increased or the fabric can be moved slower to get the stitches back to the desired length. By moving the fabric slower, the stitches get shorter and can build up on top of each other, breaking the thread or making it extremely difficult to unpick. The My Speed setting can be decreased or the foot pedal released slightly, while maintaining a constant motion with the fabric, to bring the stitches back to the desired length. When quilting, relax your hands and maintain a light touch on the fabric. Gripping the fabric too tightly may cause body tension resulting in poor quilting quality and discomfort. Different colors of fabric may require different brightness settings for the LED light ring to prevent eye strain. In order to become comfortable using the HQ Sweet Sixteen, quilters can begin with a few simple techniques using a sample quilt sandwich (two pieces of fabric with a layer of batting between them). HandiQuilter.com Page 25 Correcting Common Issues Skipped Stitches Corrective Measure • The needle is damaged, dull, bent, or installed improperly • Replace the needle often, normally once or twice per day for continuous quilting or at least once per quilt. Use HQ Sweet Sixteen recommended needles. • Always change the needle if the needle has struck any hard object such as a straight pin, etc. The tip of the needle can become damaged or burred, resulting in fabric damage as well as skipped stitches, thread breakage or shredding. • Always change the needle if it has been hit, bumped or pulled off center while maneuvering the machine about the quilt. A slightly bent needle can be a major cause of skipped stitches. • Incorrect needle size • Very tightly-woven fabric (such as batiks) • Check for the proper combination of needle size and thread weight being applied to the quilting operation. Some fabrics used in quilting may constrict or impede the thread passing through the front groove of the needle. This diminishes the loop lift required for stitch formation. Typically, a larger needle will solve the problem; however, it has been found that certain smaller sizes of needles as well as the use of ball-pointed needles solve some specific problems. • Needle has not been positioned • Position the needle properly to the needle bar. Inspect the position of the properly needle to make sure the needle is at the 6 o’clock position (see Photo 16)—If you stand directly in front of the needle (facing the bobbin case side of the machine), you will see the entire needle eye directly facing you. This is 6 o’clock position. • Make sure (1) the needle is installed all the way into the needle bar to the needle stop hole in the needle bar, (2) the long groove in the needle is toward the front (bobbin case side), and (3) the scarf/scooped out part of the needle is toward the handwheel. The needle can sometimes be rotated to 5 o’clock (slightly right) or 7 o’clock (slightly left) in order to adjust for a more positive thread loop pickup by the hook point. • Thread tension too tight • Loosen top tension. Re-check top and bobbin tension (see pages 13-14). • Improper threading • Inspect that the thread take-up lever, thread stirrup or tension spring are all threaded correctly. The Needle Breaks Corrective Measure • The needle is bent or not installed properly • Replace or correctly change the needle. Make sure that the needle is pushed up into the needle bar clamp until it can go no farther (visually check that it is up to the top of the stop/sight hole above the needle bar clamp screw). Failure to do so can cause damage in the bobbin area and throat plate. • The needle hits the needle plate • Correctly position the needle, needle plate or hopping foot. Replace needle with a new one. Stitches are Puckered Corrective Measure • Tension is not balanced • Balance the tension of the needle thread after ensuring the bobbin tension is adjusted correctly (see page 13). • Needle too large for material • Replace the needle with a size better suited to the fabric. Page 26 HQ Sweet Sixteen User Manual Correcting Common Issues Stitch Quality is Poor • Tension is not balanced Corrective Measure • Adjust the tension of the needle thread after ensuring the bobbin tension is adjusted correctly (see page 13). • Bobbin case is damaged, corroded, dirty, et cetera • Since thread slides over the surface of the bobbin case at a high speed, make sure the case is free of any lint or foreign matter that could impede thread passage through the machine. • Moving the fabric or depressing • The My Speed setting should be adjusted to a value that will allow you to sew the foot pedal inconsistently comfortably and confidently with the foot pedal fully depressed. Discover a method of holding the fabric that is most comfortable. Tension Is Poor Corrective Measure • Lint caught under the tension spring in the bobbin case • With some threads, lint and other material can build up under the tension leaf spring and begin to lift the spring. This reduces the spring’s ability to compress against the thread. By inserting a needle under the spring and clearing out the lint, the bobbin tension will return to the previously set tension. • Poorly wound bobbin • If the bobbin is wound too tight or too loose it can lead to poor and inconsistent tension. Make sure when the bobbin is wound that the thread tension is not so tight that the wound bobbin thread feels hard and causes the bobbin sides to bulge. It should also not be so loose that the thread is spongy, which can cause the thread to tangle as it is wound. Hand Wheel Won’t Rotate Corrective Measure • Thread is entangled and caught in the hook • Turn off the machine and remove the power plug from the electrical outlet. Remove the bobbin case from the machine. Lubricate the hook, then manually rotate the hand wheel clockwise and counter-clockwise several times. Remove the thread caught in the hook. Thread Nests Under Quilt Corrective Measure • Not enough tension on top thread • Check that the machine is threaded correctly. Make certain that the thread is flossed snugly in place between the two tension discs. If the machine is correctly threaded, tighten the top tension by rotating the tension knob clockwise. • Improper threading Motor Fails to Run • Refer to the threading diagram and threading instructions on page 12. Corrective Measure • On/Off switch is off or power cord is loose • Turn the machine on only by using the switch on the back of the power pod. Verify the power cord is plugged in tightly at both the machine and the power source. • Verify that the foot pedal is plugged in. If the main screen status message in the upper left hand corner says “Check Pedal”, then the pedal is not properly installed. • Foot pedal is unplugged HandiQuilter.com Page 27 Correcting Common Issues Needle Thread Breaks Corrective Measure • Top and bobbin tension not balanced • Check the tension of the top tensioner and bobbin for proper balance. • Thread cones/spools are poor quality or may have severe twisting or thread rot • Look for severe twisting of threads when approximately 12 to 15 inches has been pulled off, with ends pinched together. Cotton threads are particularly susceptible to dry rot which makes thread brittle. Do not use poor quality thread, or thread that is rotted or brittle. • The machine head has been threaded incorrectly or thread spools are not positioned correctly • Check that the machine is threaded correctly. • Inspect for accidental double wrapping of thread on thread guides. • Particles in tension discs • Inspect for particles and remove any lint or debris. • Bobbin rotation is not smooth • Change the bobbin. The slightest hesitation of the bobbin rotation can be the cause of dramatic tension change and thread breakage. Use ONLY HQ bobbins • Inspect the thread mast making sure the eyelets of the mast are directly over the spools. • Inspect the vertical positioning of the thread cones. Tipped cones can dramatically affect thread tension and can cause breakage. • Needle is burred, bent or dull, • Change the needle at least once per quilt. Make sure the needle is installed to or installed incorrectly the top of the sight hole in the needle bar. • Needle not suited for the • Replace the needle with one better suited for the thread. Use the proper size thread needle. • Hesitating too long at one point • Move more quickly so stitches don’t overlap or build up. When starting the in the pattern machine, begin moving immediately. Sewing in one place too long will cause the thread to break. • Improper needle/hook • Timing of the machine is improper. Consult a repair technician at your local, relationship authorized Handi Quilter representative. • Damage or burr at the needle • If the thread is shredding at the needle plate, check for burrs or jagged edges. hole in the needle plate or any Gently rub with metal cloth to remove the sharp edge. Consult a repair other place along the thread technician to polish any hard to reach or delicate areas, or if the burr is inside path the hole. • Wrong type of needle • Use needles recommended by Handi Quilter. Using the wrong needle with a smaller shank diameter causes many problems. For example a system 1738 or 287WH needle with a shank diameter of 1.64mm will fit loosely into the clamp at an angle. This may cause skipped stitches because the needle is positioned too far away from the hook point. It can also cause the needle to hit the hook, breaking the needle. • Other possible causes: • The needle is too close to the hook, which causes friction and a possible collision of the hook point and the needle. • Needle plate damage. • Hook damage. • Broken needle inside needle bar clamp, preventing the needle from insertion to the top of the clamp. No Visible Display • Cable unplugged Page 28 • Damaged needle bar clamp. Corrective Measure • Check the communication cable that connects the display to the machine and make sure the connection is secure. HQ Sweet Sixteen User Manual Accessories (available from your local HQ Rep or at www.HandiQuilter.com) Horizontal Spool Pin Figure 45 HQ Sweet Sixteen 18” Table Extension Figure 46 An optional horizontal spool pin is available for use with delicate threads such metallics or holographic threads or for specialty threads that are wound on a spool (not a cone). Some threads twist and break if fed from a veritcal spool. Expand your original HQ Sweet Sixteen table with HQ Sweet Sixteen Table Extensions. Each extension measures 18” x 30”. Purchase one or two to provide extra support for large projects. Handi Feet Couching Kit Debbie Brown DVD’s Adding two extensions will expand the original table to a full six feet in width (one extension shown above). Figure 47 Figure 48 The Handi Feet Couching Kit includes three sizes of interchangeable couching feet: 1.5mm, 2mm, and 3mm. You’ll have just the right size foot for adding couching embellishments using a variety of specialty threads, fibers, and yarns to your quilt. Sit-Down Longarm Quilting Featuring Debby Brown, Handi Quilter National Educator Video 1: Getting Started Video 2: Quilting Blocks and Borders Video 3: Using Rulers and templates Video 4: Thread Work HandiQuilter.com Page 29 This page was intentionally left blank. 501 N 400 W North Salt Lake, UT 84054 Phone: 801-292-7988; 877-697-8458 Fax: 801-294-3011 E-mail: sales@handiquilter.com www.HandiQuilter.com Warranty issues should, whenever possible, be first submitted to the Representative who completed your service/training certificate. These representatives have been selected for their dedication to customer satisfaction and superior service. They provide follow-up advice, training, service, accessories and other services. Representatives may offer their own warranties in addition to those offered by the manufacturer, but do not obligate the manufacturer. HQ QUILTING MACHINE LIMITED WARRANTY Handi Quilter, Inc. (hereinafter HQ) offers a limited warranty on the HQ QUILTING MACHINE (hereinafter “Machine”) to be free of defects in workmanship and materials under normal use upon the terms and conditions hereinafter set forth: (a) 90 day Limited Warranty - During the first 90 days from date of purchase, HQ will repair any manufacturing defect without charge for parts or labor. All subsequent warranties include parts costs only. (b) 10 year Limited Manufacturer’s Warranty. HQ warrants the sewing head is free of casting or machining imperfections causing product failure. This warranty does not extend to mechanical or electronic/electrical parts, which are covered under a separate warranty, or consequential damage to the head caused by mechanical or electronic/electrical part failures beyond their warranty period. (c) 5 year Mechanical Warranty For any mechanical failure within this period, manufacturer will provide free replacement parts, customer pays for labor and shipping. See warranty exclusions. (d) 5 year electronic/electrical warranty. The electric/electronic components are warranted to be free from manufacturing defects for one year from the date of purchase. If any defect is reported within this period, manufacturer will provide free replacement parts, customer pays for labor and shipping. The 5 year electronic/ electrical warranty will be invalid if the machine is left plugged into a power source when not in use. The limited warranty stated in sections (b), (c) and (d) above shall be limited solely to the replacement of parts which, in the opinion of HQ, are defective in workmanship or material and are returned to HQ, or an authorized repair facility, or such other point or place that may be designated by HQ. All other costs, including cost of freight and shipment for repair under this warranty, shall be the customer’s costs. This warranty shall be in force only for the original purchaser. The machine registration card must be completed and received by HQ before warranty is valid. Warranty Exclusions HQ shall have no obligation for any claim under this warranty if the machine has been misused, abused, neglected, damaged in transit or has been altered from the standard specifications established by HQ, or if proper maintenance and lubrication have not been timely performed. No warranties extend beyond the express warranty offered. HQ disclaims all other warranties, express or implied, regarding the Products, including any implied warranties of merchantability or fitness for a particular purpose. In the United States, some laws do not allow the exclusion of the implied warranties. Specific exclusions of warranty limitations include, but are not limited to, the following: • General, consequential, incidental or special damages including damage to fabric or material, the cost of rework or lost profits, the cost of installation or removal of any Products, and any inspection, testing, or redesign caused by any defect or by the repair or replacement of Products arising from a defect in any Product. • Products which are received by HQ improperly packaged, altered, or physically damaged. • Counterfeit or altered label(s) or stickers. • Broken pins on connectors. • Stripped screws or nuts. • Connector(s) damaged, cracked, missing or broken. • Missing, torn or punctured seal(s). HandiQuilter.com Page 31 • Any use besides machine quilting applications using customary fabrics, threads and accessories. • Operator error in the customary use of the Product. • Internal adjustments, tampering or parts replacement done by anyone except authorized Representatives or customers specifically authorized by Handi Quilter Customer Support or warranty repair personnel on a case by case basis. The warranty does not cover and the user assumes the risk of and there is hereby excluded any liability to HQ for failure, defects, loss, deterioration, personal injury or damage which are due to: (1) ordinary wear and tear or exposure, (2) abuse, misuse, negligence, or (3) use of parts not authorized by HQ. In no event shall HQ be liable to the purchaser of the Machine or to third parties for special or consequential damages, including, but not limited to, death or personal injuries. HQ does not assume, or authorize any person to assume on its behalf, any other obligation of liability other than that set forth herein. Some states do not allow exclusion of limitation of incidental or consequential damages, so above limitation or exclusion may not apply. This warranty gives the purchaser specific legal rights and the purchaser may also have other rights, which may vary for State to State. Exclusive Remedy Remedy is limited to the repair or replacement of the defective Product. HQ may elect which remedy or combination of remedies to provide at its sole discretion and shall have a reasonable time, after determining that a defective Product exists, to repair or replace the defective product. Replacement Product may be from new or serviceable used parts. HQ’s warranty applies to repaired or replaced Products for the balance of the applicable period of the original warranty or ninety days from the date of shipment of a repaired or replaced Product, whichever is longer. HQ's entire liability for any defective Product shall in no event exceed the purchase price for the defective Product. This limitation applies even if Handi Quilter cannot or does not repair or replace any defective Product. Warranty Claims Service under the above warranties may be obtained by returning the quilting machine, with proof of purchase, to the authorized Representative from whom the machine was purchased, a local Representative, or to Handi Quilter Customer Support. Any product to be returned to the factory, either by customers or Representatives, must be accompanied by a Return Material Authorization Number (RMA). RMAs may be obtained by email (sales@handiquilter.com) or by calling customer support toll free at 1-877-697-8458. If it is determined that the Product may be defective, an RMA number will be issued with instructions for Product return. An unauthorized return (a return without an RMA number) will be shipped back to customer at customer’s expense. Authorized returns are to be shipped prepaid and insured in an approved shipping container. The original box and packaging materials should be kept for storing or shipping. Shipping Costs Shipping is the responsibility of the customer. Product Service and Maintenance Replace needles every 2 to 4 hours (1 to 2 per large quilt) and lubricate bobbin hook every 3 to 4 hours of use. Periodically check the thread tensioner. Use a small brush to clean out all lint, loose thread or obstructions from the bobbin hook. Servicing is recommended annually from a qualified Representative. Servicing will cover belt tensioning, encoder positioning, bearing retainers, hook axial play and timing, presser and needle-bar adjustment and internal lubrication to take-up lever, hopping foot levers, bushings/bearings. Handi Quilter, Inc. Customer Service Department 501 N. 400 West North Salt Lake, Utah 84054 Page 32 11/01/14 HQ Sweet Sixteen User Manual Warranty Registration Return this registration card within 30 days of purchase or if you prefer, register online at http://www.handiquilter.com/warranty. MAIL TO: 11/01/14 Handi Quilter, Inc. Warranty Registration 501 N 400 W North Salt Lake, Utah 84054 WARRANTY REGISTRATION CARD Cut along dotted line and mail or fax this registration information within 30 days of purchase. The HQ Quilting Machine warranty is 10 years manufacturer’s warranty on casting and machining of the case, 5 years mechanical, and 5 years electronic/electrical. Check with your local HQ Representative for details on getting service or making warranty claims. Customer Name: _______________________________________________________________________________________ Company/Business Name (if any): ________________________________________________________________________ Address: _____________________________________________________________________________________________ City: __________________________________________________________ State: _____________ Zip: ________________ Day Phone: (____)_______________________ Evening Phone: (_____)___________________________ Fax: (_____)______________________________ Email: _________________________________________ HQ Quilting Machine Model (circle one): HQ Avanté HQ Fusion HQ Infinity HQ Sweet Sixteen HQ Serial Number: _________________________ Order Number (5 digits): ________________________________ Purchase Date: ___________________________________ Date Machine Received: _______________________________ Location of Purchase: __________________________ City: ________________________________ State: _____________ Type of use intended: Home/Personal Shared w/ Friends Some commercial Mostly commercial Other____________________________________________________________________________________________ Level of machine-quilting skills: Novice Intermediate Experienced Skill adjusting sewing machines: Novice Intermediate Experienced HandiQuilter.com Page 33 This page was intentionally left blank. Page 34 HQ Sweet Sixteen User Manual HQ Quilting Machine New Owner and Training Checklist and Certificate You are entitled to a one-time free introductory training class on the use of your HQ quilting machine as well as free adjustments for 60 days and any repairs covered by the warranty. Present this checklist to your authorized HQ quilting machine Rep to receive these free services. Cut along dotted line and mail or fax this registration information within 30 days of purchase. Table □ How to adjust length (Not applicable for HQ Sweet Sixteen) □ How to adjust height Machine Setup □ Identify the main parts of the machine and where they are located □ Ensure machine is properly mounted to the carriage or table □ Check all cable connections □ Ensure power outlet is available and does no cause a trip hazard □ Recommend and explain the importance of a power strip with surge protection □ Ensure the table is level □ Show how to wind a bobbin (including how to adjust the tensioner and the capacity lever) □ Show how to load a quilt Machine Operation (all machines) □ How to turn the machine on and off □ How to change the needle □ How to change the Handi Feet □ How to properly thread the machine □ How to set the bottom tension (bobbin case); teach the drop test □ How to set the upper tension □ How to bring up the bobbin thread □ How to tie off □ How to use the menus: explain each menu □ How to adjust light settings Machine Operation (HQ Avanté, HQ Fusion, IQ Infinity) □ How to switch between stitch regulation and manual mode □ How to set the speed in manual mode □ How to set the stitches-per-inch in stitch regulation □ How to use Cruise stitch regulation □ How to use Precision stitch regulation □ How to use the front and rear handlebars □ How to use the laser pointer stylus and the included pantograph □ Review features unique to the purchased machine HandiQuilter.com HQ Sweet Sixteen only □ How to use the foot control □ How to use the color touch screen □ How to use the functions of the touch screen □ How to set the presets and My Speed □ How to use needle up/down and tie-off buttons Machine Maintenance □ How to oil the bobbin hook: where, how, and when □ How to clean the bobbin hook area □ How to clean wheels and tracks (where applicable) IMPORTANT: Read before signing By signing this training checklist you are acknowledging you have been personally instructed in the operation of the Handi Quilter machine you purchased. Additional training by this HQ Retailer or any other HQ Retailer may result in being charged for additional instruction. Customer Name ______________________ Customer Signature ___________________ Training Date ____________________________ Trainer Name ___________________________ Rep Signature ____________________________ HQ Rep Business Name _____________________ Business City and State/ Province _____________ _________________________________________ HQ Quilting Machine Model (circle one) HQ Avanté HQ Fusion HQ Sweet Sixteen HQ Infinity Machine Serial Number ______________________ Representative: To register training services provided, return completed and signed certificate by FAX (1-801-294-3011) or MAIL: Handi Quilter 501 North 400 West North Salt Lake, UT 84054 Retain a copy for your records. Page 35 This page was intentionally left blank. Page 36 HQ Sweet Sixteen User Manual Handi Quilter, Inc. 501 N 400 W North Salt Lake, UT 84054 1-877-MY-QUILT (697-8458) • www.HandiQuilter.com HQ Sweet Sixteen® is part of the family of innovative quilting products from Handi Quilter® PRINTED 11 /01 /2014 © 2014 Handi Quilter, Inc. All rights reserved. Printed in the U.S.A.