1
ClearTrack
INSTALLATION AND RELEASE NOTES
4000-022-C
Unix Edition
Release 1.0.2
HP-UX 9
HP-UX 10
IRIX 5
IRIX 6
SunOS 4
SunOS 5
ClearCase Attache Manual
Document Number 4000-022-C
August 1996
Atria Software, Inc. 20 Maguire Road Lexington, Massachusetts 02173
© Copyright ATRIA SOFTWARE, INC. 1992, 1996
ALL RIGHTS RESERVED
© Copyright 1989, 1991, The Regents of the University of California
© Copyright 1984–1991 by Raima Corporation
Copyright 1992 Purdue Research Foundation, West Lafayette, Indiana 47907. All rights reserved.
This document contains proprietary and confidential information which is the property of Atria Software, Inc., Lexington,
Massachusetts 02173, and is furnished for the sole purpose of the operation and the maintenance of products of Atria. No part
of this publication is to be used for any other purpose, and is not to be reproduced, copied, disclosed, transmitted, stored in a
retrieval system or translated into any human or computer language, in any form, by any means, in whole or in part, without
the prior express written consent of Atria.
Except as may otherwise be explicitly agreed to in writing, Atria makes no representation that equipment, software programs
and practices described herein will not infringe on existing or future patent rights, copyrights, trademarks, trade secrets or other
proprietary rights of third parties. The descriptions contained herein do not imply the granting of licenses to make, use, sell,
license or otherwise transfer Atria products described herein. Atria disclaims responsibility for errors which may appear in this
document, and it reserves the right, in its sole discretion and without notice, to make substitutions and modifications in the
products and practices described in this document.
This software and documentation is based in part on BSD Networking Software Release 2, licensed from the Regents of the
University of California. We acknowledge the role of the Computer Systems Research Group and the Electrical Engineering and
Computer Sciences Department of the University of California at Berkeley and the Other Contributors in its development.
Written by Victor A. Abell. This software is not subject to any license of the American Telephone and Telegraph Company or the
Regents of the University of California. Permission is granted to anyone to use this software for any purpose on any computer
system, and to alter it and redistribute it freely, subject to the following restrictions:
1. Neither the authors nor Purdue University are responsible for any consequences of the use of this software.
2. The origin of this software must not be misrepresented, either by explicit claim or by omission. Credit to the authors and
Purdue University must appear in documentation and sources.
3. Altered versions must be plainly marked as such, and must not be misrepresented as being the original software.
4. This notice may not be removed or altered.
All software and documentation are provided with RESTRICTED AND LIMITED RIGHTS. Use, duplication or disclosure by the US
Government is subject to restrictions as set forth in FAR 52.227-14 (June 1987) Alternate III(g)(3) (June 1987), FAR 52.227-19 (June 1987), or DFARS
52.227-7013 (c)(1)(ii) (June 1988), as applicable. Contractor is Atria Software, Inc., 20 Maguire Road, Lexington, MA 02173.
• ClearTrackTM, ClearCase AttacheTM, and ClearCase MultisiteTM are trademarks, and ClearCase and Atria are registered trademarks of Atria
Software, Inc. • OPEN LOOKTM is a trademark of AT&T. • UNIXTM is a trademark of AT&T Bell Laboratories. • Novell and UnixWare are
registered trademarks of Novell, Inc. • Sun, SunOS, Solaris, SunSoft, SunPro, SPARCworks, NFS, PC-NFS, and ToolTalk are trademarks or
registered trademarks of Sun Microsystems, Inc. • SGITM and IRIXTM are trademarks of Silicon Graphics, Inc. • OSFTM and MotifTM are
trademarks of The Open Software Foundation, Inc. • SINIX is a registered trademark of Siemens Nixdorf Informationssysteme
AG • FrameMaker is a registered trademark of Frame Technology Corporation. • Hewlett-Packard, HP, Apollo, Domain/OS, DSEE, and HP-UX
are trademarks or registered trademarks of the Hewlett-Packard Company. • PostScriptTM is a trademark of Adobe Systems, Inc. • X Window
SystemTM is a trademark of X Consortium, Inc. • RISC System/6000TM and AIXTM are trademarks of International Business Machines
Corporation. • Windows NTTM, NMAKETM, and SourceSafeTM are trademarks of Microsoft Corporation. • Microsoft, Windows, and MS-DOS
are registered trademarks of Microsoft Corporation. • Opus MakeTM is a trademark of OPUS Software, Inc. • BmakeTM is a trademark of
Borland International. • PVCSTM, PolymakeTM, and Configuration BuilderTM are trademarks of Intersolv Corp.
All other products are trademarks or registered trademarks of their respective companies.
C:\Docs\FromPackardBell\Atria-All\FRAME\CTRACK\NTB_CLTK.TTL — October 3,
Author: Rod Owen
10/5/96
C:\Docs\FromPackardBell\Atria-All\FRAME\CTRACK\NTB_C102.TOC
Contents
1. Read Me First ........................................................................................................................ 1
1.1 Supported Architectures ................................................................................... 1
1.2 Notes to ClearCase Customers......................................................................... 2
1.3 Obtaining License Authorization .................................................................... 2
Determining the Number of Licenses ............................................................. 3
Determining the Number of License Server Hosts ....................................... 3
Filling out the License Registration Form ...................................................... 3
1.4 Obtaining Required Operating System Patches ............................................ 4
2. What’s New in this Release............................................................................................... 5
2.1 New Remote Trigger Execution....................................................................... 5
2.2 New Installation Procedures ............................................................................ 6
2.3 Bug Fixes.............................................................................................................. 6
2.4 New Policy and Environment Variables ........................................................ 6
2.5 Improvements in the Online Reference Pages ............................................... 7
3. Creating a Release Area..................................................................................................... 9
3.1 Setting Up a New Release Area ..................................................................... 10
3.2 Customizing the Loaded Release Area ......................................................... 12
site_prep options .............................................................................................. 13
Enabling non-Root Installations..................................................................... 14
Specifying License Host, Registry Host, and Registry Region .................. 14
Setting File Permissions .................................................................................. 14
3.3 Making the Release Area Accessible ............................................................. 15
Exporting the ClearTrack Release Area ........................................................ 15
Publicizing the Location of the Release Area............................................... 16
4. Installing ClearTrack from the Release Area.............................................................. 17
4.1 Choosing an Installation Method .................................................................. 18
4.2 Choosing an Install Model .............................................................................. 19
Contents
iii
C:\Docs\FromPackardBell\Atria-All\FRAME\CTRACK\NTB_C102.TOC — October 5,
Author: Rod Owen
10/5/96
C:\Docs\FromPackardBell\Atria-All\FRAME\CTRACK\NTB_C102.TOC
4.3 Providing Appropriate Client and Server Hosts .........................................20
Disk Space Requirements ................................................................................20
System Resources .............................................................................................21
Server Host Compatibility with ClearCase ..................................................22
Operating System Patches...............................................................................22
Host Visibility, Utilities, and Remote Access ...............................................22
Installation Order for Multiple Hosts............................................................23
4.4 Running install_release....................................................................................23
4.5 Installing Remotely-executable Software Triggers......................................28
4.6 Creating and Verifying the License Database File(s) ..................................29
4.7 Regenerating Existing Request Bases ............................................................30
4.8 Setting Up Additional Network Regions......................................................30
4.9 Preparing Users for ClearTrack......................................................................30
The XFILESEARCHPATH Environment Variable ......................................30
Reference Pages ................................................................................................31
Setting up ClearTrack/ClearCase Integration .............................................31
5. ClearTrack Release Notes................................................................................................33
5.1 Changes for ClearTrack Applications User’s Manual.................................33
Referencing Environment Variables in Queries...........................................33
Default Operators for Field Types .................................................................34
The ‘this week’ Built-in Date Expression ......................................................34
5.2 Changes for ClearTrack Administrator’s Manual............................................35
sample1.pdl .......................................................................................................35
Additional ClearTrack-Dependent Integration Scripts...............................35
Obsolete and Removed Files...........................................................................36
Additional Policy Variables ............................................................................36
5.3 Changes in the ReferencePages ......................................................................37
5.4 ClearTrack Installation and Release Notes ...................................................37
6. Status of Software Change Requests...........................................................................39
6.1 Known Problems ..............................................................................................39
#11883 Server allows clients to see each other’s partial transactions........39
#12219 Available Keys list in Sort window loses correct scroll bar scale.39
iv
ClearCase Installation and Release Notes
C:\Docs\FromPackardBell\Atria-All\FRAME\CTRACK\NTB_C102.TOC — October 5,
Author: Rod Owen
10/5/96
C:\Docs\FromPackardBell\Atria-All\FRAME\CTRACK\NTB_C102.TOC
#12743 You can lose edits by typing <CTRL-D> before leaving the field40
#13109 Install program does not notify users of all software being installed
40
#13156 Deletion of attachment does not enable Cancel button ................. 40
#13184 Setting the SCHEMESEARCHPATH changes GUI properties .... 40
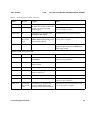
6.2 Problems Fixed in Release 1.0.2 ..................................................................... 41
A. Operating System Patches ................................................................................................. 43
A.1 Operating System Patches .............................................................................. 43
Layered Software Packages ............................................................................ 46
Contents
v
C:\Docs\FromPackardBell\Atria-All\FRAME\CTRACK\NTB_C102.TOC — October 5,
Author: Rod Owen
vi
10/5/96
C:\Docs\FromPackardBell\Atria-All\FRAME\CTRACK\NTB_C102.TOC
ClearCase Installation and Release Notes
C:\Docs\FromPackardBell\Atria-All\FRAME\CTRACK\NTB_C102.TOC — October 5,
Author: Rod Owen
10/5/96
C:\Docs\FromPackardBell\Atria-All\FRAME\CTRACK\NTB_C102.LOT
Tables
Table 1
Supported Hardware/Software Architectures ................................................. 1
Table 2
Network-Wide Resource Hosts ........................................................................... 9
Table 3
Mounting the CD-ROM ...................................................................................... 10
Table 4
Exporting the ClearTrack Release Area............................................................ 15
Table 5
Disk Space Requirements (in MB)..................................................................... 21
Table 6
Performance and Backup Needs for Installed Hosts...................................... 21
Table 7
New Policy File Variables................................................................................... 37
Table 8
Problems Fixed in ClearTrack Release 1.0.2 .................................................... 41
Table 9
Operating System Vendors’ Web Sites ............................................................. 43
Table 10
Operating System Patches .................................................................................. 44
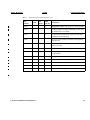
Table 11
Optional Software Packages Required by ClearTrack ................................... 47
Tables
vii
C:\Docs\FromPackardBell\Atria-All\FRAME\CTRACK\NTB_C102.LOT — October 5,
Author: Rod Owen
viii
10/5/96
C:\Docs\FromPackardBell\Atria-All\FRAME\CTRACK\NTB_C102.LOT
ClearTrack Installation and Release Notes
C:\Docs\FromPackardBell\Atria-All\FRAME\CTRACK\NTB_C102.LOT — October 5,
1
Read Me First
1
This document describes installation procedures, improvements, additions and corrections to
current manuals, and bug fixes for Release 1.0.2 of ClearTrackTM from Atria Software, Inc.
ClearTrack is a customizable, client/server, change-request management system that tracks
defects and enhancement requests throughout the life cycle of software products.
1.1
Supported Architectures
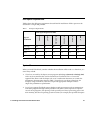
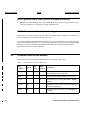
ClearTrack Release 1.0.2 runs on the platforms listed in Table 1.
Table 1
Supported Hardware/Software Architectures
Hardware Platform1
Operating System
SunTM SparcStationTM
SunOSTM 4.1.3 and 4.1.4; SolarisTM 2.3, 2.4,
and 2.5
HPTM 9000 Series 700
HP-UX 9.03, 9.05, 9.07, 10.01, 10.10
HP 9000 Series 800
HP-UX 9.04, 10.01, 10.10
SGITM IRIXTM
IRIX 5.2, 5.3, and 6.2 (32-bit systems only)
1. ClearTrack integration triggers may execute remotely on any architecture that supports ClearCase V3.0.
1 - Read Me First
1
Author: Rod Owen
1.2
10/5/96
C:\Docs\FromPackardBell\Atria-All\FRAME\CTRACK\NTB_RDME.DOC
Notes to ClearCase Customers
This section contains important information for ClearTrack customers who are also ClearCase
customers. If you are installing ClearTrack as a stand-alone product, you do not need to read this.
➤
ClearTrack installs in the same directories as ClearCase V3.0. We recommend that you
always install ClearTrack after ClearCase.
➤
You can’t use link or mount install models if you are installing both ClearTrack and
ClearCase—to install both products, you can only use standard or full-copy, and you don’t
need to use the same model.
➤
You no longer need to merge ClearTrack and ClearCase into a single release area. In fact,
you cannot, as there is no mechanism in the new installation procedures to merge release
areas.
➤
The same license and registry servers must be used for both ClearTrack and ClearCase.
➤
If a single registry or license host serves both ClearTrack and ClearCase, it must either be
running ClearCase V3.0 or later, or must have ClearTrack installed.
➤
You must exit all ClearCase views before installing ClearTrack, because the install_release
tool stops all Atria processes.
➤
ClearTrack reference pages are set up and used differently than ClearCase reference pages.
See Section 2.8 of ClearTrack Administrator’s Manual.
➤
See ClearCase Installation and Release Notes for ClearCase V3.0 for details about compatibility
issues affecting ClearCase/ClearTrack installation.
➤
If you have edited the integration policy_vars.sh file for a previous version of ClearTrack,
you may wish to edit the ClearTrack V1.0.2 version to bring it in line with your version.
(Refer to pages 218-219 of the ClearTrack Administrator’s Manual.)
CAUTION:
If ClearTrack and ClearCase are installed in the same environment, they must be
Release 1.0.2 and Release 3.0, respectively, otherwise the second one being installed will delete
the files belonging to the one already installed.
2
ClearTrack Installation and Release Notes
Author: Rod Owen
1.3
10/5/96
C:\Docs\FromPackardBell\Atria-All\FRAME\CTRACK\NTB_RDME.DOC
Obtaining License Authorization
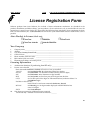
Your ClearTrack users need licenses to run ClearTrack, as explained in detail in the ClearTrack
Administrator’s Manual and in the clearlicense and license.db reference pages. The last pages of
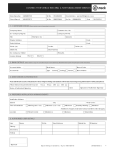
this installation guide contain blank license application forms that you can fill out and fax to
Atria, so that you can receive the appropriate number of licenses and license authorization codes
and have them available to finish making the ClearTrack software available to your users.
This section briefly introduces licensing concepts.
Determining the Number of Licenses
ClearTrack implements an active user, floating license scheme. You can specify a 60-minute or 7-day
time-out period so that inactive users temporarily relinquish their right to a license. And you can
specify a list of users and priorities so that higher-priority users can “bump” lower-priority ones.
(You can also specify a list of unauthorized users.)
Determining the Number of License Server Hosts
A set of licenses is defined in a license database file on a license server host. Your network can have
one or more of these hosts, and thus, you may need one or more license authorization codes. Each
such host runs a ClearTrack server process, and so must have ClearTrack installed.
➤
Using a single license server host — You might request a single license authorization code,
for as many user licenses as you need, but if your network’s single license server host goes
down, no one will be able to use ClearTrack. (You might consider making some important
ClearTrack data server also act as the license server; if that host goes down, important data
will be unavailable, so the incremental inconvenience of not being able to use ClearTrack
will be small.)
➤
Using multiple license server hosts — If you portion out your licenses to more than one
license server host, your ClearTrack users can still use ClearTrack if at least one of the server
hosts stays up. (The number of users in this situation depends on how many floating
licenses you have applied to this host.)
See the ClearTrack Applications User’s Manual for information on the different kinds of ClearTrack
licenses and interactions among Atria products using license server hosts. (For example, if you
1 - Read Me First
3
Author: Rod Owen
10/5/96
C:\Docs\FromPackardBell\Atria-All\FRAME\CTRACK\NTB_RDME.DOC
have ClearCase installed on your network, you can add ClearTrack licenses to the license
database file on the ClearCase license server host.)
Filling out the License Registration Form
When you’ve decided how to allocate ClearTrack licenses, fill in the appropriate number of
License Registration Forms, and fax them to Atria (or its designee) according to the instructions
on the form. You do not need to wait until you receive a response — you can proceed to load the
ClearTrack software from the distribution medium.
1.4
Obtaining Required Operating System Patches
You may need to install operating system patches from your hardware vendor in order for
ClearTrack to work properly. See Appendix A, Operating System Patches.
4
ClearTrack Installation and Release Notes
What’s New in this Release
2
2
This chapter summarizes new features for ClearTrack V1.0.2. These include the following:
2.1
➤
Remote script execution on ClearTrack hosts from ClearCase integration triggers
➤
New installation procedures
➤
Bug fixes
➤
Additional environment variables for ClearCase integration policy
➤
Improvements in the on-line reference pages
New Remote Trigger Execution
Integration can now run on platforms, including Windows NT, that support ClearCase but not ClearTrack.
This significant change allows ClearCase software triggers to communicate via remote shells to ClearTrack
systems.
These trigger scripts execute in remote shells on the ClearTrack host(s), using the hostname and user ID
specified in new policy environment variables. In addition, there is a new policy file, named local_policy.sh
which complements policy_vars.sh.
Several new scripts that help implement this new feature provide functions to set and check policy, validate
requests, update history files, and so on. (See Additional ClearTrack-Dependent Integration Scripts on
page 35.)
2 - What’s New in this Release
5
Author: Rod Owen
2.2
10/5/96
C:\Docs\FromPackard-
New Installation Procedures
With ClearTrack V1.0.2, there is a new install_release script for Unix hosts and a new installation script
for Windows NT, as follows:
➤
The install_release script for ClearTrack is the same as for ClearCase V3.0 on whose behalf it was
changed to install multiple products. Now you make two separate choices:
➣
The installation method—whether to install the software locally, or on one or more remote hosts.
To install a product using a different method requires you to re-invoke install_release.
➣
Which software to install.
CAUTION: Releases of ClearTrack and ClearCase other than Release 1.0.2 and Release 3.0,
respectively, cannot be installed together, as the install_release script will delete whichever one has
been previously installed. (It will also delete /usr/atria, but it warns you so that you can take
appropriate steps to preserve its contents.)
2.3
➤
A new, separate install script now sets up software integration triggers for ClearCase on Windows NT
to execute scripts on hosts that run ClearTrack.
➤
The install_script can also be used to install remote integration on Unix hosts that run ClearCase, but
not ClearTrack.
Bug Fixes
This release contains numerous bug fixes, as well as improvements in the overall robustness of the product.
See Chapter 6, Status of Software Change Requests, for details.
2.4
New Environment Variables
New environment variables related to integration policy include the following:
➤
ATRIAHOME
—Must be set on Unix systems and on Windows NT systems so that
is on the executable path for all integration users.
$ATRIAHOME/bugtrack
6
ClearTrack Installation and Release Notes
Author: Rod Owen
10/5/96
C:\Docs\FromPackard-
To install a specific policy (for example, ClearTrack or DDTS), you will need to link or copy
$ATRIAHOME/cleartrack/policy_vars.sh and $ATRIAHOME/cleartrack/local_policy.sh to
$ATRIAHOME/bugtrack.
—Specifies the host whose scripts are to execute.
➤
BUGTRACK_PROXY_HOST
➤
BUGTRACK_PROXY_USER—Sets
the user ID for the scripts.
You need to set the proxy variables (above) by editing the policy_var.sh file so that remote scripts
execute on the appropriate hosts and with the correct user IDs when the integration’s triggers the
remote script via the command rsh hostname -l username script.
➤
2.5
SUMMARIZE_BUGS—A
Cleartrack-specific command to obtain a bug’s summary information.
Improvements in the On-line Reference Pages
The language and readability of the ClearTrack reference pages have been improved.
2 - What’s New in this Release
7
Author: Rod Owen
8
10/5/96
C:\Docs\FromPackard-
ClearTrack Installation and Release Notes
Creating a Release Area
3
3
Before you can install ClearTrack on individual hosts, you need to establish one or more hosts
that will act as network-wide resources to provide the following services:
➤
Release area, on a single host known as a release host, to act as a storage area for the entire
ClearTrack distribution: executables, configuration files, reference pages, and so on. The
release host need not be one of the architectures that can run ClearTrack.
➤
License server, on one or more hosts, each with ClearTrack or ClearCase installed, to contain
the file /usr/adm/atria/license.db, which defines a set of ClearTrack licenses.
➤
Registry server, on a single host, to provide the databases in the directory /usr/adm/atria/rgy
to determine the locations of all the network’s ClearTrack request bases.
Table 2
Network-Wide Resource Hosts
Type of Host
Characteristics
Backup Requirements
Release Host
“Highly available” fast file-system
access, visible to all other
ClearTrack hosts, robust, and
infrequently rebooted
The ClearTrack release area is an
exact image of the distribution
medium and does not require
regular backup
License Server
If this host becomes unavailable, so
eventually do the licenses defined
in its license database file
Backup after changes to the license
database (also keep a printed copy
of each license database file)
Registry Server
If this host becomes unavailable,
users will eventually be unable to
access ClearTrack data
Readily-available backup copy of
the rgy directory on another host
and/or on a backup medium
3 - Creating a Release Area
9
Author: Rod Owen
3.1
10/5/96
C:\Docs\FromPackardBell\Atria-All\FRAME\CTRACK\NTB_AREA.DOC
Setting Up a New Release Area
To set up a new release area, perform the following steps:
1. Decide where to create the ClearTrack release area, into which you will load the contents of
the ClearTrack distribution medium. Select a location in a file system that is (or can be)
NFS-mounted by all current and prospective ClearTrack hosts. You need 25 MB for HP
systems and 35-37 MB for the others.
2. Log in, as root, to a host with a CD-ROM drive. Ideally, this is the network-wide release host
itself. But if that host does not have a CD-ROM drive, log into another host that is NFSaccessible to the network-wide release host.
CLEARTRACK FOR HP-UX INSTALLATION:
you must use a CD-ROM drive that is connected to
the network-wide release host.
3. If necessary, create a mount-point directory for the CD-ROM:
# mkdir /cdrom
4. Place the ClearTrack distribution CD-ROM in the drive.
5. Mount the CD-ROM using the appropriate command in Table 3, unless you are using a
Solaris host, in which case the volume manager mounts the CD-ROM automatically.
Table 3
Mounting the CD-ROM on ClearCase-Supported Hosts
Architecture
Mount Command 1
Solaris
not necessary
SunOS 4
mount –r –t hsfs /dev/sr0 /cdrom
HP-UX 9
mount –r –t cdfs /dev/dsk/c3d0s2 /cdrom
HP-UX 10
mount –F cdfs –r /dev/dsk/c3d0s2 /cdrom
IRIX 5,6
mount –r –t iso9660 /dev/sc0d6l0
Digital Unix
mount -r -t cdfs /dev/rz4c
AIX 4
mount -o ro -v cdrfs /dev/cd0
/cdrom
/cdrom
/cdrom
1. Different hosts may use slightly different CD-ROM device names, requiring different mount commands.
10
ClearTrack Installation and Release Notes
Author: Rod Owen
10/5/96
C:\Docs\FromPackardBell\Atria-All\FRAME\CTRACK\NTB_AREA.DOC
If the CD-ROM drive is not on the network-wide release host (and the host is not an
HP-UX 9 system), use NFS facilities to export the CD-ROM drive’s mount point from its host,
and mount it on the network-wide release host. For example:
# /etc/exportfs –i –o ro /cdrom
On the host with the CD-ROM drive
# mount drive-host:/cdrom cdrom
On the release host
6. If your release host is running HP-UX 9:
# cd /cdrom
# update -s /cdrom/atria/cleartra/hp9_type/102b1.upd
hp9_800 or hp9_pa
7. If your release host is not running HP-UX 9, run the standard installation script (be sure that
you are logged in as root to the release host). This script loads the ClearTrack software from
the CD-ROM to the release host.
# cd /cdrom
# sh copy_rel.sh
or
# sh COPY_REL.SH
Most architectures
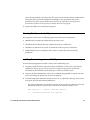
8. Look for the script to start up with the following output. (Note that the ellipses indicate that
some of the lines have been omitted—including the initial dozen or so.)
. . .
looking up items available to extract..,,....,,...
Please press enter/return to continue:
. . .
5 : ClearTrack
hp10_pa
1.0.2.BL1
6 : ClearTrack
sgi5
1.0.2.BL1
7 : ClearTrack
sun4
1.0.2.BL1
8 : ClearTrack
sun5
1.0.2.BL1
. . .
Please select item numbers you would like to extract [q] : 8
---------- Items chosen to extract ---------+ cleartra/sun5/102b1.tar
Please enter the name of a directory that has sufficient disk
space to hold the chosen releases
3 - Creating a Release Area
11
Author: Rod Owen
10/5/96
C:\Docs\FromPackardBell\Atria-All\FRAME\CTRACK\NTB_AREA.DOC
directory name [/usr/ccase_rls] : /user2/ctrack_rls
+ Extracting: /cdrom/atria/cleartra/sun5/102b1.tar ....
x cleartrack_v1.0.1a.bl1/sun5/Ctrack_examples, 0 bytes, 0 tape blocks
. . .
3.2
Customizing the Loaded Release Area
After you have loaded the software, run the site_prep script to:
➤
Define permissions for root or non-root users to use the release area
➤
Specify network-wide resources such as the network registry region and the hostnames of
the license and registry servers
To guarantee access, make sure you are logged in as root to the release area host. There is a
site_prep script for each supported host architecture. Go to the subdirectory for the architecture
of the host where you are logged in (and where you have loaded the software):
# cd /release_area/cleartrack_v1.0.2
# cd architecture/install
# ./site_prep
release_area is where you installed the software from CD-ROM
architecture is sun4, sun5, hp9_pa, hp10_pa, sgi5, or sgi6
If you specify no options, site_prep performs these tasks:
12
➤
Makes all ClearTrack files belong to root and disables writes to all files.
➤
Checks whether the NIS services database will accommodate the addition of the albd_server,
with no collision of port numbers.
➤
Marks a few files as setUID root.
➤
Prompts you to specify the hostnames of the license and registry server hosts (and the
optional backup registry host), as well as the name of the network region. (These names are
supplied later as suggested defaults when install_release is run to install individual hosts.)
ClearTrack Installation and Release Notes
Author: Rod Owen
10/5/96
C:\Docs\FromPackardBell\Atria-All\FRAME\CTRACK\NTB_AREA.DOC
site_prep options
Usage: site_prep [–enable_non_root | –disable_non_root]
[–license_host hostname | –lh hostname]
[–registry_host hostname | –rh hostname]
[–registry_backup hostname | –rbh hostname]
[–registry_region registry_region | –rr registry_region]
[–no_query | –nq] [–help | h]
Option:
Description:
–enable_non_root
–disable_non_root
–license_host hostname
–registry_host hostname
–registry_backup hostname
–registry_region registry_region_name
–no_query
Allow non-root users to install this release.
Revert to allowing installation only by root users.
Specify location of license host.
Specify location of registry host.
Specify location of optional backup registry host.
Specify registry region.
If any host (or registry region) is not set in the
command line, set it to Unknown, and suppress
queries for other values.)
Display this summary of site_prep options.
–help
NOTE: The –chmod and –setuid options that apply to mag tape installations are not described
here as ClearTrack is not released on mag tape.
Enabling non-Root Installations
Use the –enable_non_root option if you wish to allow installation of ClearTrack without
becoming root. This is always done as a separate invocation of site_prep. For example:
# site_prep –enable_non_root
If you have enabled non-root installation, eliminate the possibility of a security breach by
entering the following command after all ClearTrack hosts have been installed. Atria
Engineering has taken care to minimize the security risks of non-root ClearTrack installation, but
taking this step provides extra assurance. This is always done as a separate invocation of
site_prep. For example:
# site_prep –disable_non_root
3 - Creating a Release Area
13
Author: Rod Owen
10/5/96
C:\Docs\FromPackardBell\Atria-All\FRAME\CTRACK\NTB_AREA.DOC
Specifying License Host, Registry Host, and Registry Region
If you do not specify host names in the site_prep command line, the script prompts you for them
individually. The –no_query option suppresses this prompt (query), and sets the value to
Unknown unless you have specified one on the command line, for example:
# site_prep –license_host hostname –no_query
For license and registry hosts, any name you specify must match the hostname returned by the
/bin/uname –n command or by resolvable by the gethostbyname(3N) function.
When you (or others) install ClearTrack on individual hosts (see Chapter 4), these locations will
be offered as defaults. Accepting the defaults when prompted by the install script ensures that
all hosts are configured to use the same network-wide resources.
If your network has several license server hosts and/or several network regions, some or all
users will need to override the defaults — see Setting Up Additional Network Regions on page 30.
3.3
Making the Release Area Accessible
To make the release area accessible so that you or other users can use it to install ClearTrack on
individual hosts, you need to take the following steps, as described in this section:
➤
Export the release area
➤
Publicize its location
Exporting the ClearTrack Release Area
Make sure the release host exports ctrack_rls, the directory (or the file system where it resides) in
which you installed ClearTrack. Setting up the export is architecture-specific; consult Table 4.
Basically, you will edit /etc/exports or /etc/dfs/dfstab to include a line specifying the release area
and export options, and then you will issue a command to export the file. For details, see the
standard reference pages for these files and programs.
14
ClearTrack Installation and Release Notes
Author: Rod Owen
10/5/96
Table 4
C:\Docs\FromPackardBell\Atria-All\FRAME\CTRACK\NTB_AREA.DOC
Exporting the ClearTrack Release Area from ClearCase-Supported Hosts
Architecture
Steps to Export ClearTrack Release Area
SunOS 4,
IRIX 5,6,
HP-UX 9
1. revise /etc/exports:
ctrack_rls options
2. enter command:
# /usr/etc/exportfs –a other-options
HP-UX 10
1. revise /etc/exports:
ctrack_rls options
2. enter command:
# /usr/sbin/exportfs –a other-options
1. revise /etc/dfs/dfstab:
share –F nfs ctrack_rls options
2. enter command:
# /usr/sbin/shareall –F NFS
Digital Unix
1. revise /etc/exports:
ctrack_rls options
AIX 4
1. revise /etc/exports:
ctrack_rls options
2. enter command:
# /usr/sbin/exportfs –a other-options
Solaris 2
Publicizing the Location of the Release Area
If users will be installing individual hosts themselves, inform them of the pathname at which
they can access the ClearTrack release area on their individual hosts (for example,
/net/filsvr1/usr/ctrack_rls).
3 - Creating a Release Area
15
Author: Rod Owen
16
10/5/96
C:\Docs\FromPackardBell\Atria-All\FRAME\CTRACK\NTB_AREA.DOC
ClearTrack Installation and Release Notes
Installing ClearTrack from the
Release Area
4
4
Note that you have not “installed” ClearTrack in the previous chapter — you have simply loaded
the software into a release area, from which it can be accessed for installation on individual hosts.
ClearTrack 1.0.2 includes both the ClearTrack product and the ClearCase ClearTrack Integration.
While the ClearTrack product runs on UNIX platforms (as listed in Table 1), the integration runs
on both UNIX and Windows NT (as listed in Table 1). The integration allows communication
between ClearCase and ClearTrack, with some portions executing on the ClearCase side and
others executing on the ClearTrack side. For this reason, you install the integration onto a UNIX
system first and then move some of the files to the Windows NT system and continue the
installation there.
For all installations, you need to run install_release, a Bourne shell script found in the install
subdirectory of the release area. To perform an installation, you change to that directory and
invoke install_release, which prompts for information such as hostname, installation model,
and so on. Then, it performs the installation automatically, in verbose mode, noting any errors.
It creates a complete transcript file in /var/adm/atria/log, to help verify and troubleshoot the
installation.
If you are installing the ClearCase ClearTrack Integration onto Windows NT systems, you also
need to follow the additional steps explained in Installing Remote Integration on page 29.
Successful installation requires attention to the following issues, which are discussed more
thoroughly in this chapter:
➤
Choosing the installation method — local, remote, or multiple remote, where local is the local
host that you’ve logged onto and which has access to the release area; remote is another host,
which must have the same architecture as the local host; and multiple remote is a group of
4 - Installing ClearTrack from the Release Area
17
hosts all with the same architecture but excluding the local host. See Choosing an Installation
Method on page 18.
➤
Choosing the installation model (standard, full-copy, mounted, or link-only). See Choosing an
Installation Model on page 19.
➤
Providing appropriate client and server hosts. See Providing Appropriate Client and Server
Hosts on page 20.
➤
Obtaining and installing relevant operating system patches. See Operating System Patches on
page 22.
➤
Running the installation script. See Running install_release on page 23.
➤
Installing the integration and providing for remote execution of software trigger scripts for
both UNIX and Windows NT systems. See Installing Remote Integration on page 29.
➤
Creating and verifying the license database file(s). See Creating and Verifying the License
Database File(s) on page 36.
➤
Setting up user environments with appropriate environment variables. See Preparing Users
for ClearTrack on page 38.
NOTE: You
can only install ClearTrack V1.0.2 (or later) in the same installation directory as
ClearCase V3.0 (or later), because of the new installation mechanism. Please read the caution and
note on on page 24. However, the integration can run in a network that includes both ClearCase
V2.1 and V3.0 systems. Please see Using ClearCase ClearTrack Integration with ClearCase V2.1 on
page 36.
4.1
Choosing an Installation Method
Before you run install_release, consider which of the following methods of installation is
appropriate, and follow the indicated steps to log in and/or create a batch installation file. In all
cases, you should log in as root if you didn’t enable non-root installation when you ran the
site_prep script:
18
➤
Local installation — Install the software on the local system where you are logged in.
➤
Local Deinstallation — If you wish to remove the software from the host where you are
logged in.
ClearTrack Installation and Release Notes
4.2
➤
Remote installation — Install software on a single remote system.
➤
Multiple remote installation — Install software on a set of remote systems using the same
installation model and options. If you log in as root, you’ll get to choose another identity
during execution of install_release. Whatever user ID you log in with must have
permission to install the entire set of hosts. You also are asked to specify the name of a file
containing a list of hostnames, one per line.
Choosing an Installation Model
You have considerable flexibility in choosing how ClearTrack programs and data will be installed
on a host. Programs and data are installed into the following areas, which may be present locally
on a host, or which may be links to areas on the release area host:
➤
ClearTrack installation directory — Virtually all ClearTrack programs and host-wide
configuration files are installed in a single directory tree, whose default location is
/usr/atria. If you use a different location, /usr/atria is a link to it.
➤
System-level, administrative, and configuration areas — ClearTrack installation also
makes a small number of modifications elsewhere on a host. For example:
➣
It modifies a host’s /etc or /sbin directory, so that ClearTrack servers will begin running
at system start-up time.
➣
ClearTrack log files and error files are placed in a host-private directory, /usr/adm/atria
or /var/adm/atria.
There are four installation models:
➤
Standard — This default model copies many files into the installation directory. Symbolic
links are created to the release host for the ctrack_report, ctrack_path, graphs, dml,
ctrack_graph, xcleartrack, and xclearhelp commands, the documentation, and the
examples. The ctrack_admin, ctrack_dump, ctrack_load, ctrack.dbd, and ctrackSrt.dbd
files in /usr/atria/etc are also linked. This is the preferred and default model of installing
PureAtria products onto an individual host.
➤
Full-copy — All ClearTrack files are copied from the release host to the installation area.
➤
Mounted — This model validates that the pre-existing /usr/atria directory contains the
equivalent software as this release area. System-level and administrative files are created on
4 - Installing ClearTrack from the Release Area
19
the installation host, but your network must be set up so that hosts can access a common
/usr directory through NFS mounts. Using this method, you:
a. Run install_release on one host (using the full-copy installation model) to create the
ClearTrack installation directory, which is accessed by other hosts that mount the
common /usr directory.
b. Execute install_release, using the mounted model, on those hosts.
➤
Link-only — A symbolic link is created from /usr/atria on the installation host to the release
area on the release host. System-level and administrative files, however, are created on the
installation host. This limits future installations for this host to software contained in the
release area to which the link points.
In choosing the model, you need to consider the amount of available storage and the expected
patterns of use.
NOTE:
If you install both ClearCase and ClearTrack, you may use either the full or standard
installation model. You may also use the mounted installation model if both products are to be
installed into the same directory.
4.3
Providing Appropriate Client and Server Hosts
In order to provide appropriate client and server hosts, you need to consider the needs discussed
below in this section:
20
➤
Disk space requirements
➤
System resources
➤
ClearTrack server host compatibility with ClearCase
➤
Operating system patches
➤
Host visibility, utilities, and remote access
➤
Installation order for multiple hosts
ClearTrack Installation and Release Notes
Disk Space Requirements
Table 6 shows the disk space requirement for each kind of installation. All the space must be
contained in a single disk partition.
Table 6
Disk Space Requirements
Disk Space Required (in MB)
IRIX 51
HP-UX 10
HP-UX9-800
HP-UX 9-700
Solaris 2
SunOS 4
Type of
Installation
Full copy
43
52
44
44
43
64
Standard
9
9
7
7
9
12
Link
<1
<1
<1
<1
<1
<1
Mounted
<1
<1
<1
<1
<1
<1
1. ClearTrack support for IRIX 6.2 (32-bit systems only) is found in the sgi5 directory.
System Resources
When you install ClearTrack, consider whether the installation will be used as a client host, as a
server host, or both:
➤
Client hosts are used by developers to run programs including xcleartrack, xclearhelp, dml,
and so on, that constitute the user-level interface to ClearTrack. This is a successful
approach that allows each developer sole use of a workstation that meets or exceeds the
performance characteristics shown in Table 7. Several users can share a client host, for
example, using X terminals, if the host can provide appropriate multiples of these
single-user performance specifications.
➤
Server hosts support ClearTrack request databases and server processes that communicate
with client programs through remote procedure calls (RPCs). Each request base requires
several server programs, each placing a load especially on its host’s processing power and
main memory, but also on operating system resources (for example, the open-file descriptor
4 - Installing ClearTrack from the Release Area
21
table). A request base server host should meet or exceed the performance characteristics
shown in Table 7.
Table 7
Performance and Backup Needs for Installed Hosts
Selection
Criteria
Backup Needs
Client Hosts
Server Hosts
16–32 MB RAM; 400 MB disk
64–128 MB RAM; 2 GB disk;
96 UNIX processes, 600 file
descriptors
Back up request bases regularly
Users’ private queries and reports
Compatibility with ClearCase
ClearTrack V1.0.2 may be installed onto ClearCase hosts running ClearCase V3.0 or later.
NOTE:
If a single host serves as the registry or license server for both ClearTrack and ClearCase,
it must either be running ClearCase V3.0 or later, or have ClearTrack 1.0.2 installed.
You can safely install ClearTrack on hosts that already have ClearCase V3.0 releases installed if
you use the same install model for ClearTrack that you used when you installed ClearCase.
NOTE:
Before beginning to install ClearTrack on a client, ensure that no user on that machine
(including yourself) is inside a ClearCase view. In fact, you should ensure that no one is running
other Atria products.
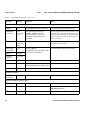
Operating System Patches
Operating system patches are available from your hardware or OS vendor, not from Atria. Before
installing ClearTrack on a host, be sure to consult Appendix A, Operating System Patches, to obtain
the appropriate operating system patches from the vendor, and to install them.
Host Visibility, Utilities, and Remote Access
ClearTrack installation relies on several UNIX-level mechanisms:
22
ClearTrack Installation and Release Notes
➤
The ClearTrack release area must be visible on every host to be installed — typically,
through NFS mounts and/or symbolic links.
➤
Each host where ClearTrack is to be installed must have the standard UNIX utilities in their
standard locations: grep, sed, echo, and so on.
➤
Trusted host remote-shell access must be enabled, so that no password will be required when
an install_release process is initiated on a remote host. Since the root user on one host is
often not a trusted user on other hosts, you can specify another user name under which
remote installations are to be performed. For information on this topic, see the
hosts.equiv(4) manual page, along with the remote-shell manual page: rsh(1M) or
remsh(1M).
NOTE:
If you are performing a remote ClearTrack installation from a machine on a different
subnet than that of the target machine, the installation will not be allowed to continue if the
mount point does not allow the execution of SUID programs.
Installation Order for Multiple Hosts
Install ClearTrack hosts in this order:
1. License server host and registry server host — We recommend that these be the same host.
If not, it doesn’t matter which one is installed first.
2. Request base hosts — Hosts where ClearTrack request bases physically reside.
3. Client hosts — Hosts where users run ClearTrack client programs.
4.4
Running install_release
The install_release program asks you to choose from the following options and to provide
hostnames for your license and registry server(s). You can use the following checklist to make
sure that you have the appropriate information before you begin:
➤
Installation method — local installation (or deinstallation), remote, or multiple remote
➤
Installation model — standard, full-copy, mounted, link-only, or uninstall
➤
The directory in which the software is to be installed
4 - Installing ClearTrack from the Release Area
23
➤
Components to install—integration, full function, or server only
➤
License server hostname — if you have not already installed software that specified a
license server
➤
Registry server hostname — if you have not already installed software that specified a
registry server
➤
Registry backup hostname (optional) — if you have not already installed software that
specified a backup registry server
➤
Registry region pathname — if you have not already installed software that specified a
registry region
➤
If you are installing on a host running ClearCase, you must use the same installation model
for ClearTrack that was used to install ClearCase.
CAUTION:
The first time the new install_release runs, it deletes all files and directories in the
installation directory. It warns you and gives you an opportunity to exit so that you can copy or
save what you want. If it encounters files in /usr/adm/atria or /var/adm/atria, it moves them to
/usr/adm/atria.preserve or /var/adm/atria.preserve unless you exit the installation.
NOTE: To install ClearCase ClearTrack Integration, see Installing Remote Integration on page 29.
You need first to install at least one UNIX system with ClearTrack and then proceed with the
steps to install the remote integration.
To install ClearTrack using the install_release program, follow these steps:
1. Go to the install subdirectory within the appropriate release area and the appropriate
architecture — architecture can be sun4, sun5, hp9_pa, hp9_800, hp10_pa, sgi5; ClearTrack
support for IRIX 6.2 (32-bit systems only) is installed from the directory specified by the sgi5
architecture:
# cd /net/release_host/ctrack_rls/cleartrack_v1.0.2/architecture/install
In the line above, release_host is the name of the network-wide release host, and ctrack_rls is
the release area that you have created within it.
2. Invoke the install_release program:
# ./install_release
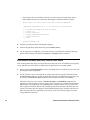
3. Look for the script to start with the following output. (Note that the ellipses indicate that
some of the lines have been omitted.)
24
ClearTrack Installation and Release Notes
Copyright Atria Software, Inc, All Rights Reserved.
. . .
This release area contains the following Atria product(s):
ClearTrack
ClearCase ClearTrack Integration
A transcript of this installation will be initially written
to /tmp/Atria.install.yymmdd.hh:mm.
After a successful installation, the transcript will be located
at /var/adm/atria/log/Atria_install.log.
The following installation methods are available:
1.
2.
3.
4.
Local Install:
Remote Install:
Multiple Remote Installs:
Local Deinstall:
Install occurs on the local host.
Install occurs on a single remote host.
Install occurs on a set of remote hosts.
Deinstall occurs on the local host.
Type "Help" or "h" for expanded descriptions
Type "Quit" or "q" to exit the installation
Please select the installation method by number.
4. Enter the number of the installation method, shown as 1 below, and look for the script to
continue.
Method of installation>> 1
User specified:Install method:local
The two remote methods operate exactly like the local method for all but the final steps. In
their case, install_release executes a command that carries out one or more remote
installations of the product (or products) and components you’ve selected, using the model
you specify. If you choose Multiple Remote Installs, you are also asked to specify the
pathname of the file containing the names of the hosts to be installed. (See Choosing an
Installation Method on page 18.)
We recommend starting with Local Install to gain familiarity with the new installation
options before trying the remote methods.
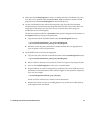
5. Next, look for the question about the installation model.
4 - Installing ClearTrack from the Release Area
25
The following installation operations or models are available:
1. Standard: Regular installation, allowing links to this release area.
2. Full-copy: Regular installation, with no links to this release area.
3. Mounted:
Host install via mounted or pre-populated /usr/atria or
ATRIAHOME.
4. Link-only: Host install via a symbolic link to this release area.
5. Deinstall: Deinstall software from the local installed host.
Type "Help" or "h" for expanded descriptions
Type "Quit" or "q" to exit the installation
Please select the installation type by number.
Model of installation>>
6. Enter the installation model. If you are unsure about the installation model, see Choosing an
Installation Model on page 19.
Model of installation>> 1
(for example)
User specified:Install model:standard
7. Enter the directory name for where ClearTrack is to be installed, or press the <RETURN> key
to accept the default shown in square brackets:
Specify directory to be installed with ClearTrack,
ClearCase ClearTrack Integration[/usr/atria]:<RETURN>
User specified:Install into /usr/atria
8. Enter the pathname of the network-wide release directory, which need not be your current
working directory, or accept the default (your current directory) shown in square brackets:
Pathname to the network-wide release directory
(used as target of symbolic links)
[release_area/cleartrack_v1.0.2/arch]:
/net/release_host/ctrack_rls/cleartrack_v1.0.2/architecture
User specified:Pathname to release area:
/net/release_host/ctrack_rls/cleartrack_v1.0.2/architecture
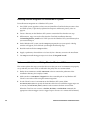
9. Answer the following dialog prompt with the number representing the component to install,
or a letter (a, x, r, or q) as appropriate. ClearTrack integration with ClearCase enables
association of ClearCase VOB element versions with ClearTrack requests, as explained more
fully in Appendix E of the ClearTrack Administrator’s Manual.
26
ClearTrack Installation and Release Notes
Please select for installation from the following components:
Components preceeded with a '*' are selected for installation.
1
2
3
a
f
x
r
q
:
:
:
:
:
:
:
:
ClearTrack Integration with ClearCase
ClearTrack Full Function Installation
ClearTrack Server-only Installation
Select all
Finish selection
Toggle expanded descriptions
Reset selections
Quit
Selection number>> 2
(for example)
10. Notice that install_release places an asterisk in front of the results of your selection(s), as in
the following output. This means that you might have selected one component, but if it
depends on other components in the list, they will be highlighted also.
Next selection, '*' denotes a selected component
* 1 : ClearTrack Integration with ClearCase
* 2 : ClearTrack Full Function Installation
* 3 : ClearTrack Server-only Installation
a : Select all
f : Finish selection
x : Toggle expanded descriptions
r : Reset selections
q : Quit
Selection number(s)>> f
11. When you choose to finish the selection in the above dialog, press f. The install_release
script may present you with a list of components that are termed “out of date relative
to the installed software.” This means simply that you will be installing components
to replace the ones in the list. Again, these items may be components on which your selection
in Step 10 depends. If particular components are already installed in the right version
because of a previous software installation, they will not be listed.
NOTE:
See Installing Remote Integration on page 29 for a discussion of installing ClearTrack
integration with ClearCase.
4 - Installing ClearTrack from the Release Area
27
The following list of selected components are out-of-date relative
to the installed software:
Atria Database Server Basics
. . .
**************************************************************************
>> Beginning component specific queries.
**************************************************************************
Reading component installation scripts.
12. Provide hostnames if you are prompted for license server, registry server, and registry server
backup; and provide a pathname for the registry region, unless you wish to accept the
defaults that were originally specified by site_prep and shown in brackets, for example:
Atria License Server Host[hostname]:
User specified:License host is hostname
. . .
Atria Registry Region[pathname/]:
User specified:Registry region: pathname
13. Answer yes or no to the question about whether to continue the installation:
The interactive portion of the installation is complete.
. . .
**** Enter 'quit' or 'no' to abort the installation ****
**** Enter 'yes' or press <RETURN> to continue ****
Continue installation?(yes, no, quit)[yes]: yes
14. At this point, you can simply watch as install_release copies the required files and
directories. The report first warns you that it stops all Atria software, as well:
**************************************************************************
>> Shutdown running Atria software
**************************************************************************
Shutting down running Atria software.
This will interfere with current users of the installed software.
. . .
**************************************************************************
>> Begin installing files into /usr/atria
**************************************************************************
*****************************************************************
>> Beginning installation of component files for atria_install
28
ClearTrack Installation and Release Notes
Updated:
/usr/atria/install/install_release
. . .
>> Beginning installation of component files for CT_FULL
*****************************************************************
. . .
15. When the installation program concludes, carefully read its messages to see if any errors
occurred. If there are errors, consult the installation log file (in /usr/adm/atria or
/var/adm/atria) for instructions on how to correct them.
A common cause of errors is lack of permission to create or modify standard system files
residing outside the ClearTrack installation area. Typically, you must become root on a
remote host to modify a configuration or administrative file manually.
Recovering from an Unsuccessful Installation
Some users may encounter problems running install_release on previously installed systems. At
a certain point, install_release attempts to shut down Atria software running on the system. This
is done by running a shutdown script. If the script encounters an error, it prevents install_release
from completing the installation.In this case, we recommend rebooting the system and rerunning
the install.
4.5
Installing Remote Integration
The ClearCase ClearTrack Integration lets you associate ClearCase VOB element versions with
ClearTrack requests. When ClearCase users execute standard checkout, checkin, and
uncheckout commands, ClearCase software triggers associated with them execute scripts on
ClearTrack host(s). These scripts have access to event history information and paths to VOB
elements that have been modified to address ClearTrack requests.
With ClearTrack Release 1.0.2, the ClearCase Release 3.0 users no longer need to be on the same
host with ClearTrack. This new remote integration feature also provides integration functionality
for systems that do not support ClearTrack themselves. Using this feature, ClearCase users on
Windows NT systems, for example, can now cause their ClearCase commands to trigger
appropriate scripts on the UNIX systems that run ClearTrack.
4 - Installing ClearTrack from the Release Area
29
Proper installation of the integration requires the following types of activities, which are
described in this section:
➤
For UNIX systems — installing the software into an installation directory from the release
area, using the install_release script; setting environment variables; and preparing VOBs
for integration. (See Installing Remote Integration on UNIX Systems on page 31.)
➤
For Windows NT systems — installing the software into a UNIX installation directory from
a UNIX release area, using the install_release script; copying a small set of files from the
installation directory; setting environment variables; copying policy file templates from a
source directory; and preparing VOBs for integration. (See Installing Remote Integration on a
Windows NT System on page 34.)
Overview of the Installation Process for Remote Integration
When you install the integration, you take the following steps, which are described more
completely in the rest of this chapter:
1. Check for available disk space. (See Checking Disk Space Availability on page 31.)
2. Set up a release area on a UNIX host by copying the software from the CD-ROM on which it
is distributed. (See Setting up a New Release Area Host on page 10.)
NOTE: If you are installing the integration for Windows
NT, you must first copy the software
into a release area on a UNIX host. There must be at least one such host in your network
because ClearTrack runs only on UNIX systems.
3. Prepare the release area so that it can be accessed by people who want to install software
from it. (See Customizing the Loaded Release Area on page 12.)
4. Install the software from the release area into a directory on the UNIX host. (See Running
install_release on page 23.)
NOTE: Even if you are installing the integration for Windows
NT users, you must first install
the software from the release area into a directory on a UNIX host.
5. If you are installing the integration on Windows NT, copy the installed software to each
Windows NT ClearCase host, and run a setup program. (See Installing Remote Integration on
a Windows NT System on page 34.)
6. Set environment variables on both the ClearCase and ClearTrack systems so that the trigger
scripts run on specified systems, using specified usernames. Some environment variables
30
ClearTrack Installation and Release Notes
also need to be defined so that the policy files can be found and their policies implemented.
These policy files govern the integration according to your site policies and system
parameters. See Environment Variables and Policy Files for UNIX Users on page 32 and
Environment Variables and Policy Files for Windows NT Users on page 34.
7. Prepare the VOBs to be used by the integration
Checking Disk Space Availability
The integration software has the following approximate disk space requirements:
➤
800 KB on the network-wide UNIX host for the release area
➤
745 KB for the installation directory, which will also be on a UNIX host
➤
745 KB on any Windows NT system to contain the software prior to installation
➤
25 KB additional space on Windows NT systems to contain the software after the
installation
Installing Remote Integration on UNIX Systems
To install remote integration on UNIX systems, take the following steps:
1. Copy the ClearTrack release software from the CD-ROM to a release area as previously
explained in Setting up a New Release Area Host on page 10. (You need to ensure that
ClearTrack itself is installed and functioning on at least one UNIX system.)
2. Log in to the host containing the release area, as root, if site_prep did not specify non-root
access (see Making the Release Area Accessible on page 15).
3. Install the integration software from the release area, as explained in Running install_release
on page 23, but with the following differences:
➣
If you do not choose the local installation method, make sure that you include at least the
integration selection in your choice, so that it has an asterisk to mark it, as in:
Next selection, '*' denotes a selected component
* 1 : ClearTrack Integration with ClearCase
4 - Installing ClearTrack from the Release Area
31
➣
If you choose the local installation method, you will see only the single choice shown
below. Make sure that you select it by specifying its selection number, as shown:
Please select for installation from the following components:
Components preceeded with a '*' are selected for installation.
1
a
f
x
r
q
:
:
:
:
:
:
ClearTrack Integration with ClearCase
Select all
Finish selection
Toggle expanded descriptions
Reset selections
Quit
Selection number>> 1
4. Proceed to specify f to finish selecting the option(s).
5. Answer the questions in the interactive part of install_release.
6. Let the script run to completion, so that the software is installed in the directory that you
specify. This directory will either be /usr/atria, or /usr/atria will be a link to it.
Environment Variables and Policy Files for UNIX Users
This section explains the steps you need to take to see that your users’ environments are properly
set up and that your site’s needs (as reflected in the policy files) are accommodated.
1. Make sure that /usr/atria/bugtrack is in the executable path of any ClearCase user who will
be using the remote integration.
2. In each ClearCase user’s environment on systems that do not support ClearTrack, define
BUGTRACK_PROXY_HOST to specify the hostname of the host on which the trigger scripts are
to execute, and BUGTRACK_PROXY_USER to set the username for them to run under.
When the ClearCase user executes a checkin, checkout, or uncheckout command, the
appropriate software trigger causes a trigger script to execute via a remote shell command,
rsh hostname –l username script. The bugtrack proxy variables must be set on systems that
don’t support ClearTrack, because the variables specify how the remote shell executes. On
ClearCase systems that also support ClearTrack,defining the proxy variables will cause an
rsh to be executed. This is generally not necessary unless you wish the scripts to execute
using a different username.
32
ClearTrack Installation and Release Notes
3. Make sure that /usr/atria/bugtrack is in the executable path of the ClearTrack host’s proxy
user. This user is specified in the BUGTRACK_PROXY_USER environment variable. The rsh
program needs to find /usr/atria/bugtrack on the ClearTrack hosts.
4. On each ClearTrack host that will run the integration, copy the policy files from their
installed locations to locations that the integration looks for. This step not only allows the
integration to find them, but it also allows you to customize them, and it keeps new
installations from overwriting them.
The files are initially installed in a cleartrack directory, but the integration looks for them in
the bugtrack directory. To prepare the policy files:
a. Copy them from their installed locations to the /usr/atria/bugtrack directory:
# cp /usr/atria/cleartrack/policy_vars.sh /usr/atria/bugtrack
# cp /usr/atria/cleartrack/local_policy.pl /usr/atria/bugtrack
b. Edit them so that the policy environment variables defined there are appropriate for
your site policies and system parameters.
5. On the UNIX ClearCase host for the integration:
a. Copy the local policy file from its installed location to the /usr/atria/bugtrack directory:
# cp /usr/atria/cleartrack/local_policy.pl /usr/atria/bugtrack
b. Edit it to define a directory to be used by the ClearCase scripts to keep temporary files.
c. See to it that /usr/atria/bugtrack is in the users’ executable paths.
d. Prepare VOBs for use with the integration by specifying one or more VOB tags for the
installation of connections between the software triggers and the particular scripts they
are to run, for example:
# /usr/atria/bugtrack/install/vob_prep /vobs/proj
See the ClearTrack Administrator’s Manual for more information.
e. Instruct other ClearCase users to run vob_prep over any of their own VOBs that they
want integrated with ClearTrack.
4 - Installing ClearTrack from the Release Area
33
Installing Remote Integration on a Windows NT System
To install remote integration on a Windows NT system:
1. On a UNIX system, populate a release area and install the ClearTrack software onto at least
one UNIX system, as previously explained in Chapter 3 and Running install_release on
page 23.
2. Create a directory on the Windows NT system to contain the files from the next step.
3. NFS mount to, copy, or move the files from the ClearTrack installation directory
/usr/atria/bugtrack/nt_install on the UNIX system to the Windows NT system directory that
you created in Step 2.
4. On the Windows NT system, run the setup.exe program that you just copied. A dialog
window will appear, and it will take you through the following steps.
5. Read the read-me file that setup.exe offers.
6. Supply a pathname, shown below as int-home-dir, for a directory to receive the installation.
7. Let setup.exe install the trigger scripts in int-home-dir\bugtrack\install.
Environment Variables and Policy Files for Windows NT Users
This section explains the steps you need to take to see that your users’ environments are properly
set up and that your site’s needs as reflected in the policy files are accommodated.
1. Define the environment variable ATRIAHOME so that it contains the pathname of the
installation directory, for example, c:\atria.
2. Make sure that %ATRIAHOME%\bugtrack is in the executable path of any Windows NT
ClearCase user who will be using the remote integration.
3. In each ClearCase user’s environment on the Windows NT system, define
BUGTRACK_PROXY_HOST to specify the hostname of the host on which the trigger scripts are
to execute, and BUGTRACK_PROXY_USER to set the username for them to run under.
When the ClearCase user executes a checkin, checkout, or uncheckout command, the
appropriate software trigger causes a trigger script to execute via a remote shell command,
34
ClearTrack Installation and Release Notes
rsh hostname –l username script. The bugtrack proxy variables must be set on systems that
don’t support ClearTrack, because the variables specify how the remote shell executes.
4. On the UNIX systems that run ClearTrack and on which the trigger scripts will execute, make
sure that /usr/atria/bugtrack is in the executable path of the proxy user as specified on the
Windows NT system in the BUGTRACK_PROXY_USER environment variable. The rsh program
needs to find the bugtrack directory on the ClearTrack host, so that the trigger scripts in that
directory can be executed.
5. On each UNIX system that runs ClearTrack, copy the policy files from their installed
cleartrack directory, to the bugtrack directory. This step not only allows the integration to
find them, but it allows you to customize them, and it keeps new installations from
overwriting them. To prepare the policy files for use by the integration:
a. Copy them from their installed locations to the /usr/atria/bugtrack directory:
# cp /usr/atria/cleartrack/policy_vars.sh /usr/atria/bugtrack
# cp /usr/atria/cleartrack/local_policy.pl /usr/atria/bugtrack
b. Edit them so that the policy environment variables defined there are appropriate for
your site policies and system parameters.
6. On the ClearCase Windows NT host for the integration, see to it that
%ATRIAHOME%\bugtrack is in the users’ executable paths.
7. Run vob_prep over any VOBs that you want to be integrated with ClearTrack. See Preparing
VOBs for Use by the Integration on page 35.
Preparing VOBs for Use by the Integration
Prepare VOBs for use with the integration by specifying one or more VOB tags, for example:
C:\> %ATRIAHOME%\bugtrack\install\vob_prep \proj
# /usr/atria/bugtrack/install/vob_prep /vobs/proj
(Windows NT)
(UNIX)
See the ClearTrack Administrator’s Manual for more information.
4 - Installing ClearTrack from the Release Area
35
4.6
Using ClearCase ClearTrack Integration with ClearCase V2.1
Although only ClearCase V3.0 or later may be installed on the same host as ClearTrack V1.0.2 or
later, your network may include ClearCase V2.1 installations on other ClearCase hosts on the
network. The integration can interoperate with these systems if you take the steps described in
this section.
Integration with UNIX ClearCase V2.1 Clients
For each ClearCase V2.1 UNIX client user, see that /usr/atria/cleartrack/triggers is in the
executable path.
Windows NT ClearCase V3.0 Clients and V2.1 VOB Servers
For each Windows NT ClearCase V3.0 client user who wants to use the integration with a
ClearCase 2.1 VOB server:
1. For each 2.1 VOB, run the V3.0 vob_prep script, for example:
C:\> %ATRIAHOME%\bugtrack\vob_prep \projs
2. See that each ClearCase V2.1 Windows NT client user’s executable path contains
%ATRIAHOME%\cleartrack\triggers.
4.7
Creating and Verifying the License Database File(s)
On each host that you’ve selected to be a license server host, create a license database file, using the
following procedure. This file must contain the license authorization code obtained from
Customer Support. (See Obtaining License Authorization on page 3.)
NOTE:
You need not stop or start ClearTrack to perform this procedure.
1. For a description of the ClearTrack licensing scheme, read the clearlicense reference page in
the ClearTrack Administrator’s Manual. For a description of the license.db file format, read the
license.db reference page in the same manual.
36
ClearTrack Installation and Release Notes
2. Using any text editor, open file /usr/adm/atria/license.db (some architectures use
/var/adm/atria).
3. Enter the license authorization code as a line of text beginning with –license, exactly as it
appears on the form provided by Atria. For example, the following file shows one license
authorization code for ClearCase and two for ClearTrack:
-license ClearTrack_C ATRIA *.5 19961205 31e469a3.874eba9f.02
-license ClearCase ATRIA *.2 19961231 315e9c08.130ef8e1.02
-license ClearTrack ATRIA *.4 19960601 304496b4.a430ed2f.02
4. You may enter one or more -user lines after the license authorization to specify users’ license
priorities. For example, the following lines give susan priority:
–user susan
–user george
5. Verify that ClearTrack has been properly licensed by issuing the following command. Use
ClearTrack if you have regular-user licensing, or ClearTrack_C for concurrent licensing.
(Note also that capitalization is important.)
# /usr/atria/bin/clearlicense –product ClearTrack_C
License server on host "argo".
Running since Friday 10/15/96 16:59:35.
. . .
4.8
Regenerating Existing Request Bases
To complete installation of an upgrade to an existing version of ClearTrack, regenerate all
existing request bases, or they will not reflect the new ClearTrack functionality, scripts, reference
pages, bug fixes, and so on.
To regenerate the existing request bases, see the reference page for genrbase and follow its
instructions.
4 - Installing ClearTrack from the Release Area
37
4.9
Setting Up Additional Network Regions
If your network needs to be partitioned into multiple network regions, and regions were not
specified when the individual hosts were installed, see the ClearTrack Administrator’s Manual.
4.10
Preparing Users for ClearTrack
Once you have installed ClearTrack on a UNIX host, add /usr/atria/bin to the users’ search path
if they do not already use ClearCase. You also need to set up a few other environment variables,
as described in this section:
➤
XFILESEARCHPATH
➤
MANPATH
➤
PATH
for Sun users
for users of the on-line reference pages
for users of the ClearCase ClearTrack integration
The XFILESEARCHPATH Environment Variable
Sun users must set the environment variable XFILESEARCHPATH to
/usr/atria/config/gui/%T/%N%S:/usr/openwin/lib/%T/%N%S.
Reference Pages
ClearTrack reference pages are installed by default in /usr/atria/ctrack_doc/man. For the man
command to find and display these pages, users must set the MANPATH environment variable to
include this path.
If ClearCase is also installed, set MANPATH so that /usr/atria/doc/man is listed after the path for
ClearTrack’s reference pages. This way, reference pages (such as license.db) that describe
network services and facilities used by all Atria products are displayed, rather than those that
describe the services in a ClearCase context.
NOTE:
You must use man to display a ClearTrack reference page. There is no ClearTrack
equivalent of the ClearCase cleartool man command.
38
ClearTrack Installation and Release Notes
To display reference pages for ctrack_admin subcommands as follows:
man ca+subcommand
For example:
man ca+genrbase
Setting up Users for ClearTrack ClearCase Integration
Because of the new remote execution of software triggers, you need to set up your users’ PATH
environment variable to find the trigger scripts, and to ensure that the policy files policy_vars.sh
and local_policy.pl are found and executed properly.
To do this, see to it that users of the integration include /usr/atria/bugtrack in their executable
path (if they are using UNIX) or %ATRIAHOME%\bugtrack (for Windows NT machines).
4 - Installing ClearTrack from the Release Area
39
40
ClearTrack Installation and Release Notes
ClearTrack Release Notes
5
5
This section contains notes on ClearTrack V1.0.2 features that are documented incorrectly or not
at all in ClearTrack documentation.
The current ClearTrack documentation consists of:
5.1
➤
ClearTrack Applications User’s Manual, for ClearTrack V1.0 and later
➤
ClearTrack Administrator’s Manual, for ClearTrack V1.0.1 and later
➤
ClearTrack Installation and Release Notes, for ClearTrack V1.0.2 and later (i.e., the release notes
that you are now reading)
➤
On-line reference pages
Changes for ClearTrack Applications User’s Manual
The changes in this section have been carried over from ClearTrack V1.0.1 and apply to the V1.0
version of the ClearTrack Applications User’s Manual, which is not being re-released.
Referencing Environment Variables in Queries
The ClearTrack Applications User’s Manual does not document the syntax used in queries to
reference Unix environment variables. That syntax is:
${env_var}
5 - ClearTrack Release Notes
33
Author: Rod Owen
10/5/96
C:\Docs\FromPackardBell\Atria-All\FRAME\CTRACK\NTB_RNOT.DOC
You can use this syntax in saved queries and in those you enter interactively. The following
examples specify requests owned by the current user:
➤
In the Owner field:
${USER}
➤
In the Queries
Define
Edit... window:
(owner=short-text ’${USER}’)
➤
In a saved query file:
owner:${USER}
(You may wish to note this in Section A.1, Expressions, and perhaps on pages 5 and 10.)
Default Operators for Field Types
When you are in Query mode, the fields in ClearTrack applications are associated with default
operators. The ClearTrack Applications User’s Manual does not document these defaults:
➤
For fields of type boolean, date, file (and the file type attachment), int, list-of, one-of, and
short-text, the default operator is = .
➤
For fields of type long-text (and the long-text type journal), the default operator is match.
(You may wish to note this in Table 6, DML Comparison Operators.)
The ‘this week’ Built-in Date Expression
The built-in date expression, this week, is documented in ClearTrack Administrator’s Manual but
not in the ClearTrack Applications User’s Manual nor in on-line documentation.
The expression this week means the current week, beginning Monday at midnight (which is the
second following Sunday at 11:59:59 p.m.).
Other date expressions that were not documented include this second (now), this day (today),
this hour, this minute, and their equivalents such as last week, next week, last hour, next hour,
last minute, next minute, and so on.
34
ClearTrack Installation and Release Notesl
Author: Rod Owen
10/5/96
C:\Docs\FromPackardBell\Atria-All\FRAME\CTRACK\NTB_RNOT.DOC
(You may wish to note this in Section A.6, Date Fields.)
5.2
Changes for ClearTrack Administrator’s Manual
Except for the first change reported below, which was reported in the ClearTrack Installation and
Release Notes for V1.0.1, the changes in this section primarily involve Appendix E and Appendix
F of ClearTrack Administrator’s Manual for ClearTrack V1.0.1. These changes are a result of the new
facility for remotely-executed trigger scripts. (This new facility is described more fully in Chapter
2 of these release notes.)
sample1.pdl
The description of sample1.pdl in Chapter 4 of ClearTrack Administrator’s Manuall does not
mention that there are related, on-line example queries and reports, or the applications file in the
directory /usr/atria/Ctrack_examples/sample1.
(You may wish to note this on page 45, which introduces the chapter.)
Additional ClearTrack-Dependent Integration Scripts
There are a few new scripts whose following descriptions you may want to add to the list of
trigger scripts on page 217 of ClearTrack Administrator’s Manual:
➤
clrcase.pl—Contains functions for the ClearCase side of the integration, to handle setting
ClearCase attributes, retrieving policy from the Unix side, and so on.
➤
clrtrack.pl—Contains functions specific to ClearTrack, for example, updating the
ClearTrack history files and retrieving summary information to enter into ClearCase when
requested by policy settings.
➤
validate_request—Validates ClearTrack request numbers entered by a user.
➤
getpolicy—Executes the policy_vars.sh file (on the ClearTrack side) and passes back the
policy items required by the remote system.
5 - ClearTrack Release Notes
35
Author: Rod Owen
10/5/96
C:\Docs\FromPackardBell\Atria-All\FRAME\CTRACK\NTB_RNOT.DOC
➤
get_summary—Retrieves the summary field information for entries referenced by
ClearCase (for inclusion in ClearCase comments when required by policy setting).
➤
bt_inform—Updates ClearTrack’s bug tracking mechanism, the bug tracker, with a history
record and sends mail when errors are encountered. Updates resolved_in field when
checking in files that reference this request.
Obsolete and Removed Files
Because of the new integration of remotely-executed trigger scripts, some related files have been
replaced, or are no longer useful. You may want to mark the following files as obsolete in the list
of trigger scripts on page 217 of ClearTrack Administrator’s Manual:
➤
cleartrack.pl—A perl package that implements some common subroutines for the
ClearCase integration trigger scripts.
➤
co_inform, ci_inform, unco_inform—Files that performed functions now performed by
bt_inform.
Additional Environment Variables
New environment variables related to integration are shown in Table 7, below. They should be
noted in the policy variable section of Table 23 on page 220 of ClearTrack Administrator’s Manual.
Table 7
36
New Environment Variables for the Policy File
Variable
Description
Values
BUGTRACK_PROXY_HOST
If set, ClearTrack scripts are
invoked via rsh hostname
script . . .
Set hostname to execute
ClearTrack scripts remotely.
BUGTRACK_PROXY_USER
Set both proxy vars to invoke
bugtrack scripts via rsh
hostname -l username script.
Set this to username to be
used to run the rsh script.
SAVE_SUMMARY_ON_CI
Save ClearTrack summaries
on checkin operation.
True or false
ClearTrack Installation and Release Notesl
Author: Rod Owen
10/5/96
Table 7
C:\Docs\FromPackardBell\Atria-All\FRAME\CTRACK\NTB_RNOT.DOC
New Environment Variables for the Policy File (Continued)
Variable
Description
Values
SAVE_SUMMARY_ON_CO
Save ClearTrack summaries
on checkout operation.
True or false
SUMMARIZE_BUGS
Appends ClearTrack
summary field to
checkin/out comments.
Name of script that
implements this function.
Also, you might add a note to page 217 of ClearTrack Administrator’s Manual that the
SUMMARIZE_BUGS variable points to a script that appends ClearTrack summary fields to
checkin/checkout comments, and that SAVE_SUMMARY_ON_CI and SAVE_SUMMARY_ON_CO
specify whether or not to actually do it.
Clarification of Setting Environment Variables
Appendix F of the ClearTrack Administrator’s Manual doesn’t make it clear that the environment
variables such as CTRACK_NOLOG should be set in the user’s .cshrc or .profile file.
5.3
Changes in the Reference Pages
The reference pages published in ClearTrack Administrator’s Manual have been superseded by
new on-line versions available with ClearTrack V.1.0.2.
5.4
ClearTrack Installation and Release Notes
The hard copy version of ClearTrack Installation and Release Notes supersedes the on-line version,
in the event of discrepancies between the two versions.
5 - ClearTrack Release Notes
37
Author: Rod Owen
38
10/5/96
C:\Docs\FromPackardBell\Atria-All\FRAME\CTRACK\NTB_RNOT.DOC
ClearTrack Installation and Release Notesl
6
6.1
Status of Software Change
Requests
6
Known Problems
This section describes some noteworthy problems in ClearTrack Release 1.0.2.
#10625 Cannot insert negative integer value into request base
#11883 Server allows clients to see each other’s partial transactions
It is possible for a client to see another client’s partially-completed write transaction. For the GUI, this
usually isn’t a problem; however, for customers who try to use ClearTrack as a general-purpose database,
this might be a security problem.
#12219 Available Keys list in Sort window loses correct scroll bar scale
The Available Keys list in the Sort window loses correct scroll bar scale and will not allow scrolling, once
you re-open the Sort window after having deleted sort keys in it.
Click on one of the list items to fix the scroll bar, but be sure to replace the item in the list.
6 - Status of Software Change Requests
39
Author: Rod Owen
10/9/96
C:\Docs\FromPackard-
#12743 You can lose edits by typing <CTRL-D> before leaving the field
If in the first field you touch (before the Cancel button is active), you type <CTRL-D>, you will lose your
edits. The reason is that ClearTrack does not know that anything has changed yet and <CTRL-D> is bound
via X-defaults to be an accelerator for entering Display mode.
#13156 Deletion of attachment does not enable Cancel button
If you delete an attachment, the Cancel button should be enabled immediately, preventing you from
backing out of the change. However, if you change modes after the deletion, ClearTrack detects the change,
an alert box pops up, and the Cancel button is then enabled, allowing you to back out of your change.
#13184 Setting the SCHEMESEARCHPATH changes GUI properties
By setting the SCHEMESEARCHPATH environment variable to
/usr/lib/X11/Schemes:/usr/atria/config/ui/Schemes:/usr/atria/config/gui/Schemes, the appearance of
the xcleartrack window (GUI) changes. This effectively prevents users from customizing the xclearcase
X Window System resources.
#13248 ccfunc.sh does not check for type of error from validate_bug
The user does not have enough ClearTrack licenses and the resultant message is confusing: "validate_bug
failed."
#13781 Short-circuit operators (&& and ||) do not work properly in actions
The evaluation order of expressions for the operators AND ("&&" ) or OR ("||") is incorrect in the action
section, but okay in the rules section. For instance, the right-hand side of the OR expression is evaluated
incorrectly.
40
ClearTrack Installation and Release Notes
Author: Rod Owen
10/9/96
C:\Docs\FromPackard-
#13865 Core from reading named query after resaving another query
#13873 Sometimes the y-axis label is missing from the graph
#13984 Summary type reports truncate the bug ID value to 4 digits
#14341 List-of one-of does not put values selected into the field
Selecting a "one-of parties" from the pop-up menu doesn’t enter it into the field. If you then enter an invalid
value, ClearTrack gets a segment fault.
#14576 Equivalent queries produce different results
#14817 Can't get fixed width fonts in Query Results Window on HP-UX
ClearTrack’s app-defaults file in the Scheme/Lascaux overrides any settings in app-defaults files in $HOME
or in the bugbase directory. To avoid this: edit the app-defaults file in the Scheme directory and comment
out the font resource setting for query results there.
6 - Status of Software Change Requests
41
Author: Rod Owen
10/9/96
C:\Docs\FromPackard-
#15231 genrbase fails if ctrack_sec file is in rbase db directory
3. genrbase fails if the ctrack_sec file is in the rbase db directory, contrary to expectations from the
ClearTrack Administrator’s Manual for creating a ctrack_sec file.
#15332 When I add a field with the following syntax
The message "Can’t create drop sites which are children of a simple drop site" appears if, for example, you
create a scrolled type of object as the first object in a view.
A temporary widget gets created the first time a field of any type is constructed to get some initial resource
values. If the first widget happens to be a scrolled widget, the temporary widget is not a valid child and the
warning is issued as a result. Other than producing the message, the behavior is harmless and the
application will continue to function properly.
6.2
Problems Fixed in this Release
This section lists previously reported problems that have been fixed in this release.
Table 8
Bug
Number
Problems Fixed in ClearTrack Release 1.0.2
Fixed
8869
9780
Will
not Fix
X
X
12042
42
Not
Fixed
Description
keyboard input on the OSF/1 X Window System server
was not handled well by ClearTrack
Lock command confusion reading reference page
X
you cannot specify a relative path with the –hpath
argument
12058
X
if an RDF file refers to a non-existing field, the report
goes into an infinite loop
12453
X
multiple invocations of graphs cause xcleartrack to
core dump
ClearTrack Installation and Release Notes
Author: Rod Owen
10/9/96
Table 8
Bug
Number
Problems Fixed in ClearTrack Release 1.0.2
Fixed
12698
12702
Not
Fixed
Will
not Fix
Description
X
Help Index window will not move to the foreground
X
12706
13005
C:\Docs\FromPackard-
electing a graph in an empty request base (or one with
no match) causes a core dump
X
X
13013
the attachments field does not "forget" previous data
and displays itself improperly
the server seems to hang occasionally when graphing
large data sets
X
remote installations from merged release area as
non-root user fail
13070
X
inst_utils.sh should add XKeysymDB if not found
13109
X
install program does not notify users of all software
being installed
13192
X
hp10_pa merged install fails with syntax error
13407
X
xcleartrack dumps core and seg faults
13433
X
xcleartrack can’t connect to database
13673
X
xcleartrack graph flashes on then disappears
14907
X
XKeysymDB not shipped with ClearTrack
6 - Status of Software Change Requests
43
Author: Rod Owen
44
10/9/96
C:\Docs\FromPackard-
ClearTrack Installation and Release Notes
Operating System Patches
A
A.1
A
Operating System Patches
Although ClearTrack runs at the application and not kernel level, Atria Customer Support runs
it in the same environment as ClearCase. Consequently, you may need to install operating system
patches from your hardware vendor in order to provide the same environment.
➤
To run ClearTrack on systems with ClearCase V3.0, see ClearCase Installation and Release
Notes for the relevant patch instructions. The operating system patches for ClearTrack
V1.0.2 are the same as those for ClearCase V3.0, so if you have already installed the OS
patches required for ClearCase V3.0, skip this section.
➤
If you install ClearTrack as a stand-alone product:
➣
Consult Table 9 for help in obtaining the patches. Please do not contact Atria Customer
Support regarding questions or problems concerning these web sites.
➣
Consult Table 10 and Table 11 to make sure that you have all the right patches.
8008
Table 9
Operating System Vendors’ Web Sites
Vendor
World Wide Web URL
Sun
http://sunsolve.sun.com
Hewlett-Packard
http://us.external.hp.com
SGI
http://www.sgi.com/Support/patch_intro.html
A - Operating System Patches
43
Author: Rod Owen
Table 10
10/5/96
C:\Docs\FromPackardBell\Atria-All\FRAME\CTRACK\NTB_APPA.DOC
Operating System Patches (Part 1 of 3)
Patch #
Release
Purpose
Notes
Patches for SunOS4
100075
4.1.3
fix rpc.lockd assertion failed panic
recommended for all ClearCase hosts
100444 (Rev
74 or later)
4.1.3,
4.1.3_U1B
4.1.4
fix OpenWindows 3.0 bugs
1103061, 1107070, 1116897.
Motif problems, vertical font
problems, X Input Extension
problems
required for all hosts on which ClearCase GUI
programs will be executed. Atria Engineering
strongly recommends that you check now with
Sun to see if there is a later rev and continue to
check in the future.
100492
4.1.3,
4.1.3_U1B,
4.1.4
fix to olwm
required for all hosts on which ClearCase GUI
programs will be executed
100173 (Rev
12 or later)
4.1.3
fix bug 1034328
recommended for all ClearCase hosts.
102177
4.1.3_U1
Jumbo NFS patch, especially useful
for dataless workstations
no patch
required
4.1.3_U1B
101784-03
4.1.3_U1
fix rpc.lockd assertion failed panic
recommended for all ClearCase hosts
102394
4.1.4
fix problems with locking, NFS
interruptible mounts, security hole
required for all ClearCase hosts
102264
4.1.4
fix rpc.lockd assertion failed panic
required for all ClearCase hosts
Jumbo kernel patch
required for all ClearCase hosts
Patches for Solaris
101945 (Rev
38 or later)
2.4
Patches for HP-UX 9 (Series 700)
PHCO_6225
9.x
fixes to tar
recommended for all ClearCase hosts
PHCO_7747
9.x
cumulative libc patch
required for all ClearCase clients. prevents
automount problems
PHCO_8008
10.20
fixes mount
required for all ClearCase clients
44
ClearTrack Installation and Release Notesl
Author: Rod Owen
Table 10
10/5/96
C:\Docs\FromPackardBell\Atria-All\FRAME\CTRACK\NTB_APPA.DOC
Operating System Patches (Part 2 of 3)
Patch #
Release
Purpose
Notes
PHNE_4003
9.x
NETSTAT programmatic access with
required if system has EISA interface for FDDI
PHNE_5959
9.x
PHNE_7072
RD_ONLY (check with vendor if you
are not sure of your network
interface type)
required if system has SLIDER built-in
network interface for FDDI
9.x
cumulative fix to problem with
automount –M hanging
recommended for all ClearCase hosts
PHSS_5723
C compiler
Rev 9.61 or
later
fix problems that prevent
install_release from creating a new
kernel with the MVFS
required for all ClearCase hosts with Rev 9.61
or later of the C compiler
PHSS_7691
9.x
cumulative libc patch
required for all ClearCase hosts. fixes dld
problems that could prevent albd.server
from being loaded
Patches for HP_UX 9 (Series 800)
PHCO_6214
9.x
fixes to tar
recommended for all ClearCase hosts
PHCO_7748
9.x
cumulative libc patch for seekdir()
and telldir()
recommended for all ClearCase hosts —
required if using SoftBench
PHKL_5350
9.04
fix fsync() indirect blocks not
written to disk
required for all ClearCase hosts
PHKL_6761
9.04
kernel megapatch
required for all ClearCase hosts
PHKL_7373
9.04
LVM and autochanger/
magneto-optic fixes
recommended for all ClearCase hosts
PHNE_7072
9.x
NFS/NIS megapatch
recommended for all ClearCase hosts
PHNE_7317
9.04
fixes ARPA transport defects
recommended for all ClearCase hosts —
required if using SoftBench
PHSS_5723
C compiler
Rev 9.61 or
later
fix problem in C compiler that
prevents install_release from
creating a new kernel with MVFS
required for all ClearCase client hosts with Rev
9.61 or later of the C compiler
A - Operating System Patches
45
Author: Rod Owen
Table 10
10/5/96
C:\Docs\FromPackardBell\Atria-All\FRAME\CTRACK\NTB_APPA.DOC
Operating System Patches (Part 3 of 3)
Patch #
Release
Purpose
Notes
PHSS_7691
9.x
cumulative libc patch
required for all ClearCase hosts. fixes dld
problems that could prevent albd.server
from being loaded
Patches for HP-UX 10 (Series 700 and 800)
PHKL_6902
10.10
Fix for data corruption with FDDI
Required if system has any network
interface for FDDI
PHNE_6317
10.10
cumulative mux and pty patch
Recommended for all ClearCase hosts
Patches for IRIX 5
patch870
5.3
MFS rollup patch
Required for all ClearCase hosts with view or
VOB storage located on an MFS file
patch1092
5.3
BSD rollup patch including fixes
for TLI. Fix automount hang due to
locking problem in NFS client.
Required for all ClearCase hosts
patch1102
5.3
NFS rollup patch. Fix automount
hang while using exported MVFS
Required for all ClearCase hosts
patch1255
5.3
Kernel rollup patch
Required for all ClearCase hosts
patch1264
5.3
XFS rollup patch
Required for all ClearCase hosts with view or
VOB storage located on an XFS file
patch1268
5.3
kernel rollup patch
Required for all ClearCase hosts.
Layered Software Packages
In some cases, correct ClearTrack processing requires installation of a layered (so-called optional)
software package. Before installing ClearTrack on a host, consult Table 11 to determine whether
you need to install any such packages.
46
ClearTrack Installation and Release Notesl
Author: Rod Owen
10/5/96
Table 11
C:\Docs\FromPackardBell\Atria-All\FRAME\CTRACK\NTB_APPA.DOC
Optional Software Packages Required by ClearTrack
Host Type
Package Name
Description
SunOS 4
/usr/5bin
/usr/5include
/usr/5lib
System V compatibility package
SunOS 4.1.x
options VDDRV
SunOS kernel configuration option
Solaris 2
SUNWsprot
SPARCompilers Bundled tools: Includes
default make.rules file
SUNWbcp
binary compatibility
SUNWscpr
source compatibility, root
SUNWscpu
source compatibility, user
Solaris 2.4.
2.5, 2.5.1
SUNWmfrun
Motif RunTime kit to run Atria GUIs
HP-UX 9
Motif: Version 1.2
Graphical user interface toolkit
X Window System: X11R5
Window system
(optional) SoftBench: V3.0
Tool messaging environment
HP-UX 10
Upgrade. UPG-TLINK
Compatibility links for file system
IRIX 5, 6
nfs
Network File System
dev.hdr.lib
Development Environment Headers
dwb
Documentor ’s Workbench
A - Operating System Patches
47
Author: Rod Owen
48
10/5/96
C:\Docs\FromPackardBell\Atria-All\FRAME\CTRACK\NTB_APPA.DOC
ClearTrack Installation and Release Notesl
Author: Rod Owen
10/3/96
C:\Docs\FromPackardBell\Atria-All\FRAME\CTRACK\NTB_LICN.DOC
Licensing Forms
for
Atria Software Products
4000-120-E
-
49
Author: Rod Owen
50
10/3/96
C:\Docs\FromPackardBell\Atria-All\FRAME\CTRACK\NTB_LICN.DOC
ClearTrack Installation and Release Notesl
Author: Rod Owen
10/3/96
C:\Docs\FromPackardBell\Atria-All\FRAME\CTRACK\NTB_LICN.DOC
License Registration Form
Software products from Atria Software, Inc. include a license enforcement mechanism. As described in the
product’s Installation and Release Notes, you must obtain a license authorization code, an encoded line of text to be
inserted into a special license database file. Please fill in the following form completely. Upon completing the form,
FAX it to Atria Software, Inc. at (617) 676-2510. You will receive your authorization code via return FAX as soon as
possible.
Atria Product to License (check one):
❒ ClearCase
❒ ClearCase Attache
❒ MultiSite
❒ ClearTrack
❒ Attache MultiSite
Your Company
1.
2.
3.
4.
5.
6.
7.
Company name__________________________________________________________________
Address ________________________________________________________________________
City/State/Country/Postal Code __________________________________________________
Contact Person __________________________________________________________________
Phone number (with area code): ___________________________________________________
FAX number (with area code): _____________________________________________________
Electronic mail address of contact person: ___________________________________________
Licensing Information
8.
9.
10.
-
Authorization Numbers (if purchasing from HP only): _____________________________
License server host ID:____________________________________________________________
Enter command clearlicense –hostid; if ClearCase is not yet installed:
SunOS 5:
run /usr/sbin/sysdef –h to determine 8-digit hex number
HP-UX:
run /bin/uname –i to determine number (usually, 10 or 12 digits)
AIX:
run /bin/uname –m to determine 12-digit number
IRIX:
run /etc/sysinfo; use first four pairs of hex digits from first line
OSF/1:
use last four pairs of hex digits of “Ethernet Interface, hardware address” in
/var/adm/messages
UnixWare or Windows NT:
install ClearCase and enter command clearlicense –hostid
MP-RAS
run ildconfig; use 12-digit number displayed in NODE field for first
csma/cd adapter.
SINIX
run /usr/ucb/hostid
New licenses requested or additional licenses required:
ClearTrack only: Number of concurrent-user licenses: _______
51
Author: Rod Owen
52
10/3/96
C:\Docs\FromPackardBell\Atria-All\FRAME\CTRACK\NTB_LICN.DOC
ClearTrack Installation and Release Notesl
Request to MOVE Product Licenses
Please complete and sign the following form. Upon completion, FAX to Atria Software at (617)
676-2510.
I certify that Atria’s ClearCase software, under the terms of the signed Software License
Agreement, will be deleted in its entirety from the old host referenced below, and will be installed
on one or more new hosts.
Authorized Signature:
__________________________________________________
Move Licenses (check one):
❒ ClearCase
❒ ClearCase Attache
❒ MultiSite
❒ ClearTrack
❒ Attache MultiSite
Your Company
1.
2.
3.
4.
5.
6.
7.
Company name _________________________________________________________________
Address ________________________________________________________________________
City/State/Country/ZIP _________________________________________________________
Contact Person __________________________________________________________________
Phone number (with area code): ___________________________________________________
FAX number (with area code): _____________________________________________________
Electronic mail address of contact person: ___________________________________________
Licensing Information
8.
Host ID of old license server: ______________________________________ # of licenses _____
Host ID of new license server #1: ___________________________________ # of licenses _____
Host ID of new license server #2: ___________________________________ # of licenses _____
Enter command clearlicense –hostid on license host; if ClearCase is not yet installed:
SunOS 4:
run /bin/hostid to determine 8-digit hex number
SunOS 5:
run /usr/sbin/sysdef –h to determine 8-digit hex number
HP-UX:
run /bin/uname –i to determine number (usually, 10 or 12 digits)
AIX:
run /bin/uname –m to determine 12-digit number
IRIX:
run /etc/sysinfo; use first four pairs of hex digits from first line
OSF/1:
use last four pairs of hex digits of “Ethernet Interface, hardware
address” in /var/adm/messages
UnixWare or Windows NT:
install ClearCase and enter command clearlicense –hostid
MP-RAS:
run ildconfig; use 12-digit number displayed in NODE field for first
csma/cd adapter.
SINIX
run /usr/ucb/hostid
Please FAX — do not phone and do not use electronic mail