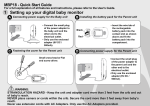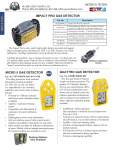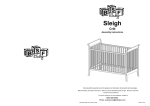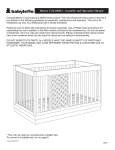
1
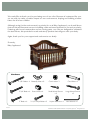
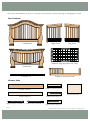
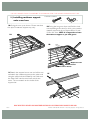
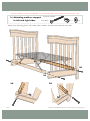
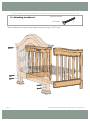
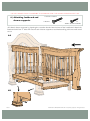
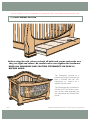
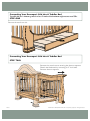
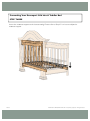
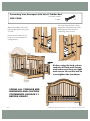
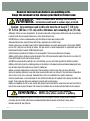
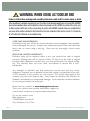
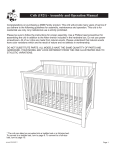
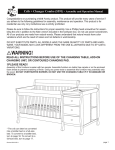
We would like to thank you for purchasing one of our cribs. Because of customers like you,
we are able to make a positive impact on our environment, shaping and building a better
future for all of our children.
Although caring for the environment is a priority for us at Baby Appleseed, you should know
that our first and foremost concern is building a safe and sound product for you and your baby.
Featuring solid wood construction and no moving parts, our cribs are designed to withstand
the test of time; this provides for a safe and sturdy product that will grow with your baby.
Again, thank you for your support and welcome to our family.
Sincerely,
Baby Appleseed
Hardware
3-1/8“ Bolts x 4
2-3/4“ Bolts x 6
2” Bolts x 6
PAGE A
Butterfly Nuts x 8
Barrel Nuts x 4
2-1/4” Philips Bolts x 8
Cam Locks x 3
Small Wood Screws
x2
Nylon Washers x 4
Cam Bolts x 3
Large Wood Screws
x3
Hex Wrench x 1
DAVENPORT CRIB ASSEMBLY MANUAL • ©2007 Baby Appleseed® All Rights Reserved.
Be sure to assemble the furniture in a dirt free environment to avoid scratching or damaging the wood.
Box Contents
Headboard
Right Panel
Left Panel
Mattress Support (Style may vary)
Footboard
Cross Bar x 2
Toddler Conversion Rail
Drawer Parts
Drawer Front x 1
Middle Drawer Panel x 1
Drawer Boards x 2
Drawer Back x 1
Right Drawer Support x 1 Left Drawer Support x 1
PAGE B
Left Drawer Panel x 1
Right Drawer Panel x 1
DAVENPORT CRIB ASSEMBLY MANUAL • ©2007 Baby Appleseed® All Rights Reserved.
USE OF A POWER TOOL TO ASSEMBLE THIS CRIB MAY STRIP THE WOOD. PLEASE DO NOT USE.
1.) Installing mattress support
onto cross bars
1A Swing the arm up as shown. Please note that
the style of mattress support may vary.
1A
Hardware needed:
x8
x8
1B Swing the long arm down and find the hole
corresponding to the level in which you want the
mattress support to be at. Repeat Steps 1A and
1B for all 4 arms. NOTE: It is important to lower
the mattress support as you child grows.
1B
Highest Level
Middle Level
Lowest Level
1C Attach the support bar to one end of the arm
and attach the mattress support to the other end
using the philips bolt and butterfly nut. Make sure
the other side is at the same level and do the
same. The arms attach on the inside of the
support bar.
1C
USING THE MATTRESS SUPPORT IN ANY NON-INTENDED POSITIONS MAY CAUSE SERIOUS INJURY OR HARM TO YOUR CHILD.
PAGE 1
MILLBURY CRIB ASSEMBLY MANUAL • ©2007 Baby Appleseed® All Rights Reserved.
USE OF A POWER TOOL TO ASSEMBLE THIS CRIB MAY STRIP THE WOOD. PLEASE DO NOT USE.
Hardware needed:
2.) Attaching mattress support
to left and right sides.
3-1/8” Bolts
x4
x4
x4
Attach each side using two 3-1/8” bolts, nylon washers, and two barrel nuts for each side.
2B
2A
2A
PAGE 2
2B
DAVENPORT CRIB ASSEMBLY MANUAL • ©2007 Baby Appleseed® All Rights Reserved.
USE OF A POWER TOOL TO ASSEMBLE THIS CRIB MAY STRIP THE WOOD. PLEASE DO NOT USE.
3.) Attaching headboard.
Hardware needed:
2-3/4” Bolts
x6
Attach headboard to mattress support/side assembly using six 2-3/4” bolts.
PAGE 3
DAVENPORT CRIB ASSEMBLY MANUAL • ©2007 Baby Appleseed® All Rights Reserved.
USE OF A POWER TOOL TO ASSEMBLE THIS CRIB MAY STRIP THE WOOD. PLEASE DO NOT USE.
4.) Attaching footboard and
drawer supports.
Hardware needed:
2” BOLTS
x6
x2
SMALL WOOD SCREWS
4A. Attach drawer supports by inserting the wooden dowels into the base of the headboard. Attach the
footboard with four 2” bolts. 4B. Secure each drawer support to eachheaboard leg with one small wood
screw.
4A
ppor
Drawer Su
t
port
4B
PAGE 4
Sup
Drawer
DAVENPORT CRIB ASSEMBLY MANUAL • ©2007 Baby Appleseed® All Rights Reserved.
USE OF A POWER TOOL TO ASSEMBLE THIS CRIB MAY STRIP THE WOOD. PLEASE DO NOT USE.
Hardware needed:
5.) Attach drawer back to left,
right and center drawer panels.
Insert drawer boards.
x3
LARGE WOOD SCREWS
5A. Attach the rear drawer panel to the drawer using 3 large wood screws. DO NOT USE POWER
TOOL. DO NOT OVER-TIGHTEN. 5B. Slide drawer boards along the grooves of the panels.
nel
wer Pa
Left Dra
ard
Drawer Bo
Middle
r Panel
Drawe
oard
Drawer B
el
er Pan
Draw
Right
6.) Attaching front panel to drawer
Hardware needed:
x3
x3
Attach three cam bolts onto drawer front. Insert cam locks into the holes of each panels. Attach drawer
front to each panel and tighten the cam locks by turning cam locks clockwise with philips screwdriver.
Fro
nt D
raw
er P
a
PAGE 5
nel
DAVENPORT CRIB ASSEMBLY MANUAL • ©2007 Baby Appleseed® All Rights Reserved.
USE OF A POWER TOOL TO ASSEMBLE THIS CRIB MAY STRIP THE WOOD. PLEASE DO NOT USE.
7.) Insert drawer into crib
Before using the crib, please recheck all bolts and screws and make sure
they are tight and secure. Be careful not to over-tighten the hardware.
READ ALL WARNINGS AND CAUTION STATEMENTS ON PAGE 10
BEFORE USING.
The Davenport converts to a
toddler bed using a conversion rail
that is included with the crib.
Instructions to convert to a
toddler bed are below.
The Davenport also converts to a
full size bed. The full size conversion rail kit is sold separately and
the instructions are included with
the kit.
PAGE 6
DAVENPORT CRIB ASSEMBLY MANUAL • ©2007 Baby Appleseed® All Rights Reserved.
Converting Your Davenport Crib Into A Toddler Bed
The toddler bed user’s minimum age must be at least 15 months old and maximum weight must not exceed 50lbs.
STEP ONE
Remove drawer from crib.
Converting Your Davenport Crib Into A Toddler Bed
STEP TWO
Remove the wood screws securing the drawer supports.
Detach the footboard by removing six 2” inch bolts.
Remove drawer supports.
PAGE 7
DAVENPORT CRIB ASSEMBLY MANUAL • ©2007 Baby Appleseed® All Rights Reserved.
Converting Your Davenport Crib Into A Toddler Bed
STEP THREE
Lower the mattress support to the lowest setting. Please refer to Step #1 on how to adjust the
mattress support.
PAGE 8
DAVENPORT CRIB ASSEMBLY MANUAL • ©2007 Baby Appleseed® All Rights Reserved.
Converting Your Davenport Crib Into A Toddler Bed
Hardware needed:
STEP FOUR
Attach the toddler rail to the
left and right panels using four
2” bolts.
2” Bolts
x4
You may want to place a cloth
against the side panel slats while
attaching the rail to prevent
scratching of the wood.
Recheck and make sure all
bolts are securely fastened
and tightened.
Before using the bed, please
recheck all bolts and screws
and make sure they are tight
and secure. Be careful not to
over-tighten the hardware.
!!READ ALL TODDLER BED
WARNINGS AND CAUTION
STATEMENTS ON PAGE 11
BEFORE USING!!
PAGE 9
DAVENPORT CRIB ASSEMBLY MANUAL • ©2007 Baby Appleseed® All Rights Reserved.
Read all instructions before assembling crib.
Keep the manual in the sleeve provided for future use.
to follow these warnings and assembly
WARNING: Failure
instructions could result in serious injury or death.
Caution: Any mattress used in this crib must be at least 27 1/4 in by
51 5/8 in (69 cm x 131 cm) with a thickness not exceeding 6 in (15 cm).
•Warning: Strings can cause strangulation! Do not place items with a string around a child’s neck, such as hood strings
or pacifier cords. Do not suspend strings over a crib or attach strings to toys.
•DO NOT place a crib near a window where cords from blinds or drapes may strangle a child.
•Keep wall decorations, especially those with strings, completely out of a child’s reach.
•Before each usage or assembly, inspect crib for damaged hardware, loose joints, missing parts or sharp edges. DO NOT
use the crib if any parts are missing or broken. Ask your dealer or contact manufacturer for replacement parts and
instructional literature if needed. DO NOT substitute parts.
•Check fasteners periodically for tightness. Do not overtighten. This may cause distortion or breakage.
•When a child is able to climb out, reaches the height of 35 in. (90 cm) or when the height of the side rail is less than 3/4
of the child’s height, the crib shall no longer be used.
•DO NOT use a water mattress with this crib. •If refinishing, use a non-toxic finish specified for children’s products.
•When a child is able to pull to a standing position, set the mattress to the lowest position and remove bumper pads, large
toys and other objects that could serve as steps for climbing out.
•Never use plastic shipping bags or other plastic films as mattress covers because they can cause suffocation.
•Do not tie pacifiers, necklaces, or any other items around a child’s neck or on crib parts. This could cause strangulation.
•Use a crib as a crib, not as a play pen. Remember that a crib is not a substitute for a parent’s supervision.
•Parents should ensure a safe environment for their child by checking the crib regularly before placing the child in the
product. Please make sure that every component is properly and securely in place.
•When re-assembling the crib for your second child, please keep in mind that the screw holes may need to be filled in
order for the screws to grip to the wood. Talk to your local hardware store or lumber yard about how to do this properly.
WARNING:
Infants can suffocate on soft bedding.
NEVER add a pillow, comforter or padding.
•To help prevent strangulation, tighten all fasteners. A child can trap parts of body or clothing on loose fasteners.
•To reduce the risk of SIDS, pediatricians recommend healthy infants be placed on their back to sleep, unless
otherwise advised by your physician.
PAGE 10
DAVENPORT CRIB ASSEMBLY MANUAL • ©2007 Baby Appleseed®
!
WARNING: WHEN USING AS TODDLER BED
Failure to follow these warnings and assembly instructions could result in serious injury or death.
•The intended user’s minimum age must be at least 15 months old and maximum weight must not exceed 50lbs •DO NOT
place bed near windows where cords from blinds or drapes may strangle a child •DO NOT place items with a string, cord,
or ribbon, around a child’s neck, such as a hood, strings, or pacifier cords •DO NOT suspend strings over a toddler bed for
any reason •The mattress intended for this bed shall be a full-size crib mattress that must be at least 27-1/4 inches by
51-5/8 inches with a thickness not exceeding 6 inches.
CARE AND MAINTENANCE:
Periodically check your crib for any loose bolts and screws and tighten where needed.
If crib is damaged, do not use - contact us for replacement parts. Clean with mild soap
that is safe on wood using a soft rag. Rinse and dry thoroughly. Avoid excess
moisture.
ONE YEAR LIMITED WARRANTY:
Defective parts will be replaced within a one year period from date of original
purchase. Missing parts will be replaced within 30 days from the date of original
purchase. Baby Appleseed warrants only new units purchased in it’s original packaging. The warranty does not cover used, secondhand or demos and is nontransferable.
Any damaged or defective part that result from normal wear and tear, abuse,
negligence, improper use or alteration to the finish, design, and hardware of the crib,
or the assembly of this product are not covered. The specific legal rights of this
warranty may vary from state to state. Some states do not allow any exclusion or
limitation of incidental or consequential damages. Some states do not allow limitation
on how long an implied warranty lasts.
Please visit our website at www.babyappleseed.com.
There you can find more product information, register for
your product, contact us or request replacement parts.
Or you can write to us at:
Baby Appleseed
13258 Nelson Ave Unit B
City of Industry, CA 91746
PAGE 11
DAVENPORT CRIB ASSEMBLY MANUAL • ©2007 Baby Appleseed®