1
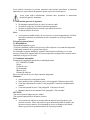
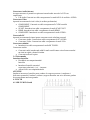
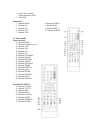
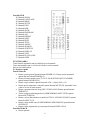
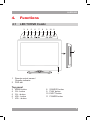
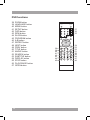
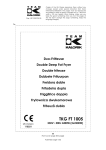
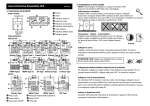
MANUAL DE UTILIZARE TELEVIZOR LED(FULL HD) 22” CU PLAYER DVD 1.SIGURANTA 1.1 Inainte de folosire Acest LCD TV/DVD COMBI reda filme si fotografii de pe DVD.Aparatul reda muzica de pe CD.Aparatul are toate caracteristicile unui TV pentru receptia canalelor analogice.Poate fi folosit de asemenea ca monitor pentru calculator. Cititi manualul cu atentie. 1.2 Etichetele manualului. ATENTIE! 1 Acest simbol avertizeaza in privinta existentei unor tensiuni periculoase in interiorul aparatului care sunt suficient de puternice pentru a provoca electrocutarea. Acest semn indica utilizatorului existenta unor operatiuni si instructioni deosebite legate de intretinere. 1.3 Instructiuni generale de siguranta Nu impingeti aparatul.Poate sa cada si sa cauzeze raniri. Nu lasati sa curga nici un lichid in interiorul aparatului. Nu lasati sa patrunda obiecte metalice prin fantele de aerisire. Nu blocati fantele de aerisire. Nota: Acest aparat are dubla izolatie :de aceea nu este necesara impamantarea.Verificati numai daca tensiunea de alimentare locala corespunde cu cea de pa eticheta aparatului. 2.Pregatirea pentru folosire 2.1 Dezambalarea *Dezambalati aparatul cu grija *Verificati continutul conform celor de mai jos.Daca lipseste ceva contactati magazinul. * Indepartati etichetele de pe panoul fata cu grija. Se recomanda sa pastrati ambalajul original si materialele de ambalaj in caz ca sunt necesare ulterior.Este singurul mod de a proteja aparatul la transport.Daca aruncati totusi ambalajul aveti grija sa-l reciclati. 2.2 Continutul ambalajului Urmatoarele componente sunt incluse in ambalajul primit: 1.TV LED/DVD COMBI 1.Picior 1.Cablu de retea 1.Telecomanda 2.Baterii (AA) 1.Manual de utilizare. Daca ceva din lista de sus este lipsa contactati magazinul. 3.Instalare Asezati aparatul in configuratia dorita Daca aparatul trebuie instalat pe picior ,cititi paragraful “Montarea piciorului”. Conectati echipamentele externe .Cititi paragraful “Conectarea echipamentelor externe” Conectati aparatul la retea .Cititi paragraful “Conectarea la retea” Instalati bateriile in telecomanda.Cititi paragraful “Telecomanda” ATENTIE! *Nu asezati aparatul langa surse de caldura, *Nu expuneti aparatul direct in lumina soarelui. Nota: Acest aparat este echipat cu picioare dintr-un material special pentru a evita miscarea acestuia. Totusi este posibil ca pe o anumita suprafata de mobila mai lucioasa acestea sa alunece.Se recomanada in acest caz montarea unei bande adezive pe picioarele aparatului inainte de al monta pe mobila. 2 3.1 Montarea piciorului Asezati aparatul pe o suprafata neteda orizontala cu ecranul in jos. Introduceti aparatul (A) in standul (B) . Rotiti standul (B) in directia sagetii pana se aude un click Asezati aparatul in picioare.Asezati-l pe o suprafata neteda orizontala. 3.2 Conectarea echipamentelor externe. Aparatul include diferite optiuni de conectare a echipamentelor.Cablurile corespunzatoare pot fi procurate din magazinele de specialitate. 3 Conectarea Audio (intrare) Aceasta conectare va permite receptia unui semnal audio stereo de la VCR sau amplificator. L/R Audio.Conectati un cablu corespunzator la canalele R/L ale mufelor AUDIO. Conectarea Video Aparatul are urmatoarele iesiri video (in ordinea preferintelor) COMPONENT: Conectati un cablu corespunzator Pr/Y/Pb la mufele COMPONENT. SCART: Introduceti un cablu corespunzator la mufa SCART OUT. HDMI: Introduceti un cablu corespunzator la mufa HDMI. COMPOSITE: Introduceti un cablu corespunzator la mufa VIDEO . Conectarile PC Aparatul are urmatoarele intrari pentru conectarea unui calculator personal Conectarea Audio: Conectati un cablu corespunzator la PC-AUDIO Conectarea Video: Conectati un cablu corespunzator la mufa VGA. Conectarea cablului. Introduceti un cablu corespunzator la mufa RF TUNER . Conectarea castilor Conectati castile introducand cablul la mufa casti.Pentrua evita afectarea auzului nu uitati sa reglati volumul al minim. Conectati steckerul la priza. 3.4 Telecomanda Instalarea bateriilor Deschideti usa compartimentului bateriilor Introduceti bateriile urmarind respectarea polaritati (+ )si ( – )marcate. Asezati la loc usa compartimentului. ATENTIE! Instalarea incorecta a bateriilor poate conduce la curgerea acestora si corodarea si defectarea aparatului.Corodarea ,oxidarea ,curgerea bateriilor sau orice defectare gradata de aceasta natura anuleaza garantia. 4. FUNCTII 4.1 LED TV/DVD Combi 4 1. Senzor Telecomanda Lampa indicatoare LED 2. Usita DVD Panoul Fata 3. Butonul MENU 4. Butonul CH – 5. Butonul CH + 6. Butonul VOL7. Butonul VOL+ 8. Butonul SOURCE 9. Butonul PLAY 10. Butonul EJECT 11. Butonul POWER 4.2 Telecomanda Functii generale 12. utonul POWER 13. Butoanele Digitale (0-10+) 14. Butonul VOL+ 15. Butonul VOL 16. Butonul CH + 17. Butonul CH 18. Butonul SYS MENU 19. Butonul SOUND 20. Butonul PICTURE 21. Butonul ASPECT 22. Butonul NICAM/A2 23. Butonul TIMER 24. Butonul DISPLAY 25. Butonul sageti 26. Butonul ENTER 27. Butonul RETURN 28. Butonul MUTE 29. Butonul SOURCE Functiile TELETEXT 30. Butonul CANCEL 31. Butonul TV/TXT 32. Butonul SIZE 33. Butonul HOLD 34. Butoanele colorate 35. Butonul INDEX 36. Butonul SUBPAGE 37. Butonul REVEAL 5 Functiile DVD 38. Butonul ZOOM 39. Butonul LANGUAGE 40. Butonul MENU 41. Butonul SETUP 42. Butonul FWD 43. Butonul REW 44. Butonul SLOW 45. Butonul PROGRAM 46. Butonul A-B 47. Butonul REPEAT 48. Butonul NEXT 49. Butonul PREV 50. Butonul TITLE 51. Butonul ANGLE 52. Butonul SEARCH 53. Butonul SUBTITLE 54. Butonul DISPLAY 55. Butonul STOP 56. Butonul PLAY/PAUSE 57. Butonul OPEN FUNCTIONAREA Toate functiile aparatului sunt accesibile de pe telecomanda Toate instructiunile sunt cu referire la folosirea cu telecomanda daca nu este altfel indicat. 5.1 Pornirea rapida Functii Generale Pentru a porni aparatul apasati butonul POWER (12) .Pentru oprirea aparatului apasati din nou butonul POWER(12) Pentru selectarea modul sursa (TV/AV/Y-Pb-Pr/DVD/SCART/VGA/HDMI) apasati butonul SOURCE(29) Pentru a regla volumul ,apasati butoanele VOL+ (14)sau VOL- (15) Pentru oprirea temporara a sunetului apasati butonul MUTE (28) .Apasandu-l inca o data se revine la sunet normal. Pentru a programa timerul sleep (OFF/15/30/45/60/90/120min) apasati butonul TIMER 923) Pentru a alege modul imagine dorit (USER/NORMAL/SOFT/VIVID) apasati butonul PICTURE(20) Pentru a selecta dimensiunea ecranului (AUTO/16: 9/ZOOM 1/ZOOM 2) apasati butonul ASPECT (21) Pentru a alege modul sunet (USER/NORMAL/NEWS/MOVIE) apasati butonul SOUND(19) Pentru a afisa programarile pe ecran apasati butonul DISPLAY(24) Functiile DVD/CD Porniti aparatul 6 Selectati modul DVD Introduceti un disc in locasul (2) ,cu eticheta in sus. Pentru a porni redarea apasati butonul PLAY/PAUSE(56) o data. 5.2 Folosirea menu Programare TV Urmatoarele actiuni pot fi activate prin telecomanda Apasati butonul SYS MENU(18) Apasati butoanele sageti sus/jos (25) pentru a alege un menu Apasati butoanele sageti dreapta (25) pentru a intra in menu selectat. Apasati butoanele sageti sus/jos(25) pentru a regla parametrul dorit Apasati butonul SYS MENU (18) pentru memorarea progamarilor si iesirea din menu. Menu Imagine PICTURE MODE: pentru a selecta modurile imagine USER/NORMAL/SOFT/VIVID BRIGHTNESS: regleaza stralucirea ecranului. CONTRAST: regleaza contractul ecranului SATURATION: regleaza culoarea ecranului. SHARPNESS:regleaza granulatia ecranului. HUE: regleaza nuanta culorii.Aceasta optiune este activa numai in cazul redarii NTSC. SCALE: pentru a selecta marimea ecranului (AUTO/16:9/4:3/ZOOM 1 / ZOOM 2) Menu Sunet MOD SUNET :pentru a programa modul sunet (USER/NORMAL/NEWS/MOVIE) VOLUME: pentru reglajul volumului BASS: pentru a regla frecventele JOASE TREBLE: pentru a regla frecventele INALTE BALANCE:pentru a regla BALANS Menu Canal (numai in modul TV) AUTO TUNE : pentru cautarea automata a canalelor MANUAL TUNE : pentru a cauta canalele manual SKIP: pentru a sari canalele cu imagine slaba. SOUND SYS: pentru a selecta sistemul de sunet PROGRAM EDIT : pentru a edita programul. Functia MENU LANGUAGE: pentru a alege limba pentru OSD (afisaj pe ecran) BLUE BACK: pentru a porni(ON) sau opri (OFF) culoarea protectie ecran. TTX LANGUAGE: pentru a selecta aria de limba a teletextului (WEST/EAST/RUSSIAN/ARABIC/FARS) COLOR TEMP: temperatura culorii imaginii (COOL/WARM/NORMAL) HOTEL LOOK: pentru a opri (OFF) sau porni(ON) accesul la programarile TV (parola :0000).Aveti grija de aceasta parola pentru a permite revenirea la programarile initiale. HOTEL MODE:pentru a porni/opri modul hotel. 7 VOLUME CONTROL:pentru a porni/opri controlul volumului. TUNNER CONTROL: pentru a porni/opri controlul tunerului. MAX VOLUME: pentru a fixa volumul la maxim. CHANGE PASSWORD: pentru a schimba parola la modul hotel. SOURCE LOCK :pentru a alege sursa dintre cele prohibitive sau oricare intrare externa KEYPAD LOCK: pentru a bloca/debloca butoanele TV PROG SET : pentru a programa sursa (OFF/TV/AV/Y-Pb-Pr/SCART/GA/HDMI) PROG NUM: pentru a selecta numarul programului. RESEST: pentru a reveni la programarile initiale. Menu PC(numai in modul PC) H-POSITION;pentru a regla pozitia orizontala pe ecran V-POSITION : pentru a regla pozitia verticala pe ecran CLOCK: pentru a regla frecventa pixelilor ceasului pana ce dimensiunea este maxima pentru ecran. PHASE: pentru a regla faza ceasului de sampling ADC fata de semnalul de sincronizare astfel incat sa se obtina o imagine stabila. AUTO ADJUST:pentru reglajul automat al parametrilor ecranului. 5.3 Functiile Teletext Apasati butonul TV/TXT (31) pentru a deschide modul teletext Pentru a alege o pagina apasati numarul folosind butoanele numerice . Pentru a selecta pagina urmatoare sau anterioara, apasati butonul CH + (16) sau butonul CH- (17) Pentru a reveni la pagina index ,apasati butonul INDEX(35). Pentru afisarea informatiilor ascunse ,apasati butonul REVEAL(37) .Optional pentru unele pagini teletext. Pentru a comuta subtitlurile ,apasati butonul MIX (30) .Apasati butonul inca o data pentru a iesi din aceasta functie. Pentru a selecta marimea paginii Teletext: - Apasati butonul SIZE(32) o data, pentru a mari jumatatea de sus a paginii. - Apasati acelasi buton inca o data pentru a mari partea de jos a paginii. - Apasati butonul din nou pentru a reveni la teletext normal. Pentru a tine o pagina Teletext ,apasati butonul HOLD(33) Apasati butoanele colorate pentru selectarea rapida a paginilor teletext (34) 5.4 FUNCTIILE DVS/CD Dupa introducerea unui disc menu continut apare pe afisajul TV. Apasati butoanele sageti (25) pentru a alege un parametru Apasati butonul ENTER (26) pentru a intra in parametrul menu selectat. In timpul redarii urmatoarele functii sunt active: Pentru a selecta un capitol(DVD) sau o melodie (CD) apasati butoanele digitale (13) Pentru a selecta capitolul sau melodia urmatoare sau anetrioara apasati butonul NEXT (48) sau PREV(49). Pentru cautare rapida inainte sau inapoi pe DVD apasati butonul FWD(42) sau REW (43) .Sunt posibile vitezele: 2x ,4x , 8x,20x.. Pentru pauza pe redare ,apasati butonul PLAY/PAUSE (56) o data. Pentru preluarea redarii apasati acelasi buton inca o data. 8 Pentru stop redare temporar apasati butonul STOP(55) o data.Pentru stop permanent apasati-l inca o data sau apasati butonul PLAY/PAUSE. Pentru redarea cu viteza mica ,inainte sau inapoi apasati butonul SLOW (44) repetat.Vitezele posibile sunt :1/2,1/3,1/4,1/5,1/6,1/7. Pentru a repeta un capitol (DVD) sau una sau toate melodiile CD : - Apasati butonul REPEAT (47) o data pentru a repeta capitolul sau melodia in redare. - Apasati butonul inca o data pentru repetarea titlului curent. - Apasati butonul inca o data pentru a repeta toate capitolele sau melodiile. - Apasati butonul inca o data oentru a anula functia. Pentru a vizualiza un titlu specific pe DVD ,apasati butonul TITLE(50) .Folositi butoanele sageti pentru a selecta titlul. Pentru a selecta limba audio a unui DVD ,apasati butonul LANGUAGE (39) repetat pana ajuneti la limba dorita. Pentru a comuta subtitlurile la un DVD apasati butonul SUBTITLE (53).Apasati butonul din nou pentru a opri subtilul. Pentru a selecta extra informatii despre DVD sau CD (timpul ramas/trecut/numarul melodiei/numarul capitolului) apasati butonul DISPLAY (54) Pentru a selecta unghiul camerei apasati butonul ANGLE (51) Pentru a reveni la menu principa apasati butonul MENU(40) Un DVD care nu are codul regional corect ,2 in cazul Romaiei, nu poate fi redat cu acest aparat. Folosirea functiei PROGRAM Apasati butonul ROGRAM (45) pentru a intra in functia PROGRAM Pentru a reda melodiile de pe un CD: - Apasati butoanele sageti (dreapta) (25) pentru a sublinia un tiltu - Apasati butoanele sageti (sus-jos) (25) pentru selectarea unui titlu Pentru a reda capitolele unui DVD: - Apasati butoanele sageti (dreapta) (25) pentru a sublinia un titlu. - Apasati butoanele sageti (sus-jos) (25) pentru a selecta un titlu. - Apasati butaonele sageti (dreapta) (25) pentru a sublinia un capitol. - Apasati butoanele sageti (dreapta) (25) pentru a selecta un capitol. Pentru a onfirma selectai apasati butonul ENTER(26) Repetati ultimii doi pasi pentru titluri su capitole suplimentare. Apasati butonul PLAY/PAUSE (56) pentru a porni programul. Folosirea functiei A-B REPEAT. Functia A-B REPEAT poate fi folosita pentru a repeta un fragment specificat a unui DVD. Apasati butonul A-B (46) o data pentru a marca punctul de pornire A Apasati butonul A-B (460 din nou pentru a marca punctul de sfarsit B. Aparatul va reda repetat sectiunea A-B. Apasati butonul A-B (46) pentru a anula functia.Aparatul va relua redarea normala. Folosirea functiei SEARCH Functia SEARCH poate fi folositapentru a alege un punct specific de pornire a DVD sau CD. Apasati butonul SEARCH (52) (25) 9 Apasati butoanele sageti pentru a selecta intrarile. Posibilele intrari pentru DVD sunt: - Timpul discului - Capitolul - Titlul - Timpul Capitolului - Timpul Titlului. Posibilele intrari pentru CD sunt: - Timpul Melodiei - Melodia Specifica Apasati butoanele numerice pentru a alege o selectie. Folosirea functiei redare MP3/MPEG4 Introduceti un disc MP3/MPEG4.Menu continut va fi afisat pe ecranul TV. Apasati butoanele sageti sus/jos (15/17) pentru a selecta un folder sau fisier. Apasati butonul ENTER(26) pentru a intra in folderul sau fisierul selectat. Apasati butonul MENU(40) pentru a comuta intre foldere si fisiere.Apasati butonul ENETR (26) pentru confirmare. 5.5 Folosirea Menu Programare DVD Acest menu este accesibil numai in modul DVD Pentru a schimba programarile initiale. Urmatoarele operatiui pot fi actionate din telecomanda. Apasati butonul SETUP (41) pentru a selecta menu programare. Apasati butoanele sageti pentru a seleta un parametru si a schimba programarile. Apasati butonul SETUP (41) pentru a memora programarile si a iesi din menu. Pagina Programare System Acest menu este activ numai daca nu este disc in aparat. TV SYSTEM Pentru a selecta sistemul de culoare NTSC/PAL/AUTO TIP TV Pentru a selecta sistemul de culoare 4:3PS/4:3LB/16:9 PASSWORD(parola) Pentrua selecta parola RATING Pentru a selecta parola pentru nivel acces copii. DEFAULT (initial) Pentru a reveni la programarile initiale. Pagina Programare Limba In sectiunea OSD LANGUAGE apasati butoanele sageti pentru a alege limba. In sectiunea AUDIO alegeti limba audio . In sectiunea SUBTITLE alegeti limba subtitlu. In sectiunea DVD MENU alegeti limba pentru menu DVD. Pagina Programare Audio IESIRI AUDIO Alegeti SPDIF OFF pentru a comuta iesirea audio pe semnal digital. Alegeti SPDIF RAW pentru a fixa iesirea audio digitala in format raw (DTS/Dolby Digital 5.1) Alegeti SPDIF PCM pentru a fixa iesirea audio digitala in format PCM. 10 Pagina Programare Digital DYNAMIC Alegeti valoarea pentru domeniul dinamic de compensare pentru a evita pierderea detaliilor sunetului la volum mic. DUAL MONO Stereo: ambele canale asa cum sunt .STEREO este programat initial din fabrica. L-Mono: numai canalul stanga R-Mono : numai canalul dreapta Mix-Mono: media intre canalul stanga si dreapta. Aceasta functie este activa numai la discurile codate cu doua canale Dolby AC-3. Intretinerea aparatului Curatarea carcasei Important : deconectati de la priza aparatul inainte de a-l curata. Folositi o carpa uscata. Daca carcasa este foarte murdara, imbibati carpa cu o solutie slaba de detergent neutru sau apa si curatati. Curatarea lentilelor O lentila murdara poate cauza distorsionarea sunetului si daca aceasta este foarte murdara, playerul CD nu va functiona. Deschideti usita CD si curatati cu grija lentila. Curatarea particulelor de praf Folositi o pensula pentru a curata lentila de praf si un betisor cu vata pentru a o curata de amprentele digitale. Curatarea discului Cand curatati discul nu atingeti partea colorata in curcubeu. Folositi o carpa uscata. Nu folositi benzina sau alta substanta care va deteriora discul. Acesta trebuie curatat in linie dreapta de la centru catre margini. Nu trebuie curatat intr-un mod circular. Nu amplasati discul pe alte echipamente sau in apropierea unei surse de caldura. Evitati sa expuneti discul la razele solare pentru 7. IN CAZ DE PROBLEME problema Sunet incomplet sau lipsa Lipsa Imagine actiunea Verificati echipamentul extern sa fie pornit si programat corect Verificati conectarea cablurilor Verificati daca a fost selectata correct sursa Verificati nivelul volumului si daca nu a fost actionat mutingul Verificati daca TV este pornitsi intrarile A/V sunt conectate corect 11 Nu se alimenteaza Functionare defectuoasa DVD/CD Nu reda Lipsa sunet au sunet incomplet Nu este posibil scan sau skip Imagine distorsionata sau cu zgomot Imaginea nu acopera tot ecranul Verificati conectarea cablurilor Verificati daac cablul de retea este conectata correct la priza Verificati intrerupatorul general de pe spatele aparatului Daca aparatul functioneaza defectuos ,decuplati-l de l aretea timp de 30 minute.Daca totusi problema persista apelati la service. Nu aveti disc in aparat.Incarcati un disc cu eticheta in sus Discul este incarcat gresit. Nivelul de acces al discului este mai mare decat cel programat,reprogramati aparatul. Codul regional este diferit Tip de disc incorrect Condens in aparat. Scoate-ti discul si lasati aparatul in priza un timp pentru eliminarea condensului Alegeti alta melodie In timpul SCAN,SLOW MOTION sau SINGLE STEP sunetul este oprit.Verificati daca discul este in cautare repede inainte sau inapoi.Apasati butonul PLAY/PAUSE(28) Unele discuri sunt programate sa refuse anumite comenzi ale utilizatorului la anumite sectiuni.Nu este defect.Discurile cu un singur capitol sau melodie nu permit functia skip Discul poate fi murder sau defect.Curatati-l sau incercati alt disc.Verificati sitemul TV (PAL/NTSC).Daca aveti un VCR conectat intermediary, elimiati-l si face direct conectarile Curatati discul Alegeti formatul ecranului din menu programari . Alegeti formatul ecranului din menu start disc. Telecomanda Telecomanda nu functioneaza 8.Date Tehnice Parametrii Tensiune Putere consumata Verificati daca aveti baterii Indreptati TL catre senzorul aparatului Apropiati-va la mai putin de 8 metri fata de aparat. Value 100 ~240 Vac/50 ~ 60Hz 60 W 12 Putere consumata in standby <1W Putere maxima de Iesire 2 x 3 W (RMS) Ecran LED Parametru valoare Diagonala 55 cm(22”) Raport imagine 16:9 Rezolutie 1920 x 1080 pixeli Starlucire 250 cd/m2 Raport Contrast 1000 : 1 Timp de raspuns 5 ms Unghi de vizualizare oriz/vert 170˚/160˚ Sistem Televiziune PAL/SECAM Generale Telecomanda baterii 2 x 1,5 V tip AA ________________________________________________________________________ 9. Reciclarea echipamentelor electrice si electronice uzate Acest simbol prezent pe produs sau pe ambalaj semnifica faptul ca produsul respectiv nu trebuie tratat ca un deseu menajer obisnuit .Nu aruncati aparatul la gunoiul menajer la sfarsitul duratei de functionare ,ci duceti-l la un centru de colectare autorizat pentru reciclare .In acest fel veti ajuta la protejarea mediului inconjurator si veti putea impidica eventualele consecinte negative pe care le-ar avea asupra mediului si sanatatii umane. Pentru a afla adresa celui mai apropiat centru de colectare : - Contactati autoritatile locale ; - Accesati pagina de internet :www.mmediu.ro - Solicitati informatii suplimentare de la magazinul de unde ati achizitionat produsul 13 LED TV with built-in DVD player ALED2202 User manual Gebruiksaanwijzing Manuel de l’utilisateur Manual de instrucciones Gebrauchsanleitung Οδηγίες χρήσεως Brugsanvisning GB 2 NL 25 FR 49 ES 73 DE 97 EL 122 DA146 Table of contents 1. 2. 3. 4. 5. 6. Safety............................................................................ 3 1.1 1.2 1.3 Intended use.....................................................................3 Labels in this manual........................................................3 General safety instructions...............................................3 2.1 2.2 Unpacking.........................................................................4 Package contents.............................................................5 3.1 3.2 3.3 3.4 Mounting the stand...........................................................6 Connecting random equipment.........................................7 Connecting to the mains...................................................8 Remote control.................................................................8 4.1 4.2 LED TV/DVD Combi.........................................................9 Remote control...............................................................10 5.1 5.2 5.3 5.4 5.5 Quick start.......................................................................13 TV setup menu operation...............................................14 TV functions....................................................................16 DVD/CD functions...........................................................16 DVD setup menu operation............................................19 6.1 Handle and care of a disc...............................................20 Preparations for use.................................................... 4 Installation.................................................................... 5 Functions...................................................................... 9 Operation.................................................................... 13 Cleaning and maintenance....................................... 20 7. Troubleshooting......................................................... 21 8. Technical data............................................................ 23 9.Disposal of used electrical and electronic equipment......................................... 24 Copyright notice Design and specifications are subject to change without notice. ALED2202 1. Safety 1.1 Intended use The LED TV/DVD Combi plays film and photos from DVD. The appliance also plays music from CD. The appliance can also be used as a TV and as a monitor for a personal computer. Read the manual carefully before first use. 2 DVDs and DVD appliances are manufactured under the worldwide agreed DVD regional code system that the appliance will operate only with corresponding disc of the same regional code. If the code number on the label of a DVD does not match that on the label alongside, the DVD will not play on this appliance. The appliance has built-in copyright protection technology that prevents copying from a disc to any media. If a video recorder is connected to the appliance, the video output image will be distorted during recording. i 1.2 WARNING A warning means that injury or death is possible if the instructions are not obeyed. CAUTION A caution means that damage to the equipment is possible. ! ! i Labels in this manual 1.3 ! A note gives additional information, e.g. for a procedure. General safety instructions WARNING Do not put force on the appliance. The appliance can fall and can cause serious injury. 3 CAUTION Do not spill any liquid on the appliance. WARNING Do not insert any objects in the ventilation holes. CAUTION Do not block the ventilation holes. This appliance is double insulated; therefore no earth wire is required. Always check that the mains voltage corresponds to the voltage on the rating plate. Never attempt to replace the adaptor plug with a regular mains plug. ! ! ! i L This appliance employs a laser system. To prevent direct exposure to the laser beam, do not open the appliance. Visible laser radiation when open and interlock defeated. 2. Preparations for use 2.1 Unpacking ● Unpack the appliance carefully. ● Check the package contents as described below. If any item is missing, please contact your reseller. ● Remove the labels from the front panel carefully if present. i 4 We recommend that you retain the original carton and packing materials in case it ever becomes necessary to return your product for service. This is the only way to safely protect the product against damage in transit. If you do dispose of the carton and the packing materials, please remember to recycle with due care to the environment. ALED2202 2.2 Package contents The following items are included in the received package: 1 LED TV/DVD Combi 1 Foot 1 Mains cable 1 Remote control 2 Batteries (AA) 1 Operator manual 3. Installation ● Place the appliance on the stand. Read the paragraph "Mounting the stand". ● Connect the random equipment to the appliance. Read the paragraph "Connecting random equipment". ● Connect the appliance to the mains. Read the paragraph "Connecting to the mains". ● Install the batteries in the remote control. Read the paragraph "Remote control". ! CAUTION ● Do not put the appliance near a heat source. ● Do not expose the appliance to direct sunlight. i This appliance is equipped with rubber feet to prevent it from moving. The feet are made from non-migrating material specially formulated to avoid leaving any marks or stains on furniture. However, certain types of furniture polishes, wood preservatives or cleaning sprays cause the rubber to soften and leave marks or a residue on the furniture, and potentially risk the surface to become damaged. To prevent damage to wooden surfaces, we recommend that you apply self-adhesive pads to the bottom of the rubber feet before installation. 5 3.1 Mounting the stand ● Put the appliance on a horizontal flat surface, with the screen upside down. ● Insert the appliance (A) into the stand (B). ● Turn the stand (B) into the direction of the arrow until the stand clicks into place. ● Put the appliance straight up. Put the appliance on a horizontal flat surface. A B A B A B 6 ALED2202 3.2 Connecting random equipment The appliance includes various options for permanent connection of random equipment. Suitable cables can be purchased at your reseller. Audio connections (input) ● L/R AUDIO: Connect a suitable cable to the L/R channels of the AUDIO connection. Video connections The appliance has the following video outputs (in order of preference): ● HDMI: Connect a suitable cable into the HDMI connection. ● COMPONENT: Connect a suitable cable to the Y/Pb/Pr channels of the COMPONENT connection. ● SCART: Insert a suitable cable into the SCART connection. ● COMPOSITE: Insert a suitable cable into the VIDEO connection. 7 PC connections The appliance has the following inputs to connect to your personal computer. ● Audio connection: Connect a suitable cable into the PC IN connection. ● Video connection: Connect a suitable cable into the VGA connection. Cable connection ● Insert a suitable cable into the RF OUT connection. Headphone jack ● To connect a headphone, insert the cable plug in the headphone jack. To prevent hearing damage, remember to adjust the volume to a comfortable level. 3.3 Connecting to the mains ● Connect the female connector on the mains cable to the POWER connection. ● Connect the mains plug to a wall socket. 3.4 Remote control Install batteries ● Remove the battery cover. ● Insert the batteries matching the (+) and (-) polarity markings. ● Re-install the battery cover. ! 8 CAUTION Incorrect installation can cause battery leakage and corrosion which will damage the appliance. Corrosion, oxidation, battery leakage and any other gradually acidic defect of this nature will invalidate the guarantee. ALED2202 4. Functions 4.1 LED TV/DVD Combi 3 4 5 6 7 8 9 10 11 POWER SOURCE 2 1 1 Remote control sensor / Standby indicator 2 DVD slot Top panel 3 4 5 6 7 MENU button CH - button CH + button VOL - button VOL + button 8 9 10 11 SOURCE button PLAY button EJECT button POWER button 9 4.2 Remote control General functions 12 13 14 15 16 17 18 19 20 21 22 23 24 25 26 27 28 29 10 POWER button Digit buttons (0-10+) VOL + button VOL - button CH + button CH - button SYS MENU button SOUND button PICTURE button ASPECT button NICAM/A2 button TIMER button DISPLAY button Arrow buttons ENTER button RETURN button MUTE button SOURCE button 12 SOURCE POWER 29 OPEN PLAY /PAUSE 13 STOP 28 27 26 14 15 16 17 18 19 20 21 25 DISPLAY NICAM/A2 ZOOM ASPECT 24 23 22 ALED2202 Teletext functions 30 31 32 33 34 35 36 37 CANCEL button TV/TXT button SIZE button HOLD button Coloured buttons INDEX button SUBPAGE button REVEAL button SOURCE POWER OPEN PLAY /PAUSE STOP DISPLAY NICAM/A2 30 31 32 33 ZOOM ASPECT 37 36 35 34 11 DVD functions 38 39 40 41 42 43 44 45 46 47 48 49 50 51 52 53 54 55 56 57 12 ZOOM button LANGUAGE button MENU button SETUP button FWD button REW button SLOW button PROGRAM button A-B button REPEAT button NEXT button PREV button TITLE button ANGLE button SEARCH button SUBTITLE button DISPLAY button STOP button PLAY/PAUSE button OPEN button SOURCE POWER OPEN PLAY /PAUSE STOP DISPLAY 38 39 40 41 42 43 44 45 NICAM/A2 ZOOM ASPECT 57 56 55 54 53 52 51 50 49 48 47 46 ALED2202 5. Operation All functions of the appliance are accessible using the remote control. All instructions refer to operation with the remote control, unless indicated otherwise. 5.1 Quick start General functions ● To switch on the appliance, press the POWER button (12). To switch back to the standby mode, press the POWER button (12) again. ● To select the source mode (TV/AV/Y-Pb-Pr/DVD/SCART/VGA/HDMI), press the SOURCE button (29). ● To adjust the volume, press the VOL + button (14) or the VOL - button (15). ● To mute or restore sound, press the MUTE button (28). ● To set the sleep timer (OFF/15/30/45/60/90/120 min), press the TIMER button (23). ● To select the desired picture mode (USER/NORMAL/SOFT/VIVID), press the PICTURE button (20). ● To select the screen size (16:9, 4:3, ZOOM1, ZOOM2, AUTO), press the ASPECT button (21). ● To select the sound mode (USER/NORMAL/NEWS/MOVIE), press the SOUND button (19). ● To display the setting on the screen, press the DISPLAY button (24). 13 DVD/CD functions ● Switch on the appliance. ● Select the DVD mode. ● Insert a disc in the slot (2) with the label backwards. ● To start playback, press the PLAY/PAUSE button (56) once. ● For extended instructions, read the paragraph "DVD/CD functions" further on in this manual. 5.2 TV setup menu operation To change the initial settings The following actions must be carried out with the remote control: ● Press the SYS MENU button (18). ● Press the arrow buttons (up and down) (25) to select a menu. ● Press the arrow buttons (right) (25) to enter the selected menu. ● Press the arrow buttons (up and down) (25) to adjust the setting. ● Press the SYS MENU button (18) to store the setting and exit. Picture menu ● PICTURE MODE: to set the picture mode (USER/NORMAL/SOFT/VIVID). ● BRIGHTNESS: to adjust the screen brightness. ● CONTRAST: to adjust the screen contrast. ● SATURATION: to adjust the screen saturation. ● SHARPNESS: to adjust the screen sharpness. ● HUE: to adjust the screen hue (TOWARD PURPLE/TOWARD GREEN). This option is available for NTSC playback only. ● SCALE: to set the aspect ratio (16:9, 4:3, ZOOM1, ZOOM2, AUTO). i The picture menu can also be entered by pressing the PICTURE button (20). Sound menu ● SOUND MODE: to set the picture mode (USER/NORMAL/NEWS/ MOVIE). ● VOLUME: to adjust the volume. 14 ALED2202 ● BASS: to adjust the bass. ● TREBLE: to adjust the treble. ● BALANCE: to adjust the balance. i The sound menu can also be entered by pressing the SOUND button (19). Channel menu (TV mode only) ● AUTO TUNE: to tune for channels automatically. ● MANUAL TUNE: to tune for channels manually. ● FINE TUNE: to fine-tune weak channels. ● SKIP: to switch automatic skipping of weak channels ON or OFF. ● SOUND SYS: to select the sound system. ● PROGRAM EDIT: to edit the program. Function menu ● LANGUAGE: to select the language for the On Screen Display (OSD). ● BLUE BACK: to switch the blue background ON or OFF. ● TTX LANGUAGE: to select the area of the teletext language (WEST/EAST/RUSSIAN/ARABIC/FARSI). ● COLOR TEMP: to set the screen colour temperature (COOL/WARM/NORMAL). ● HOTEL LOCK: to switch the hotel setting menu ON or OFF (password: 0000): i Carefully keep the password to be able to restore the default settings at all times. - - - - - - - - HOTEL MODE: to switch the hotel mode ON or OFF. VOLUME CONTROL: to switch the volume control ON or OFF. TUNER CONTROL: to switch the tuner control ON or OFF. MAX VOLUME: to set the maximum volume. CHANGE PASSWORD: to change the password for the hotel mode. SOURCE LOCK: to select the source for prohibiting any external input. KEYPAD LOCK: to lock or unlock the TV buttons. PROG SET: to set the preset source (OFF/TV/AV/Y-Pb-Pr/SCART/VGA/ HDMI). - PROG NUM: to select the program number. - RESET: to restore the default settings. 15 PC menu (PC mode only) ● H-POSITION: to adjust the horizontal position of the screen. ● V-POSITION: to adjust the vertical position of the screen. ● CLOCK: to adjust the pixel clock frequency until the image size is maximised for the screen. ● PHASE: to adjust the phase of the ADC sampling clock relative to the sync signal until a stable image is obtained. ● AUTO ADJUST: to adjust the parameters of the screen automatically. 5.3 TV functions Teletext functions ● Press the TV/TXT button (31) to open the Teletext mode. ● To select a page, press in the number using the digit buttons. ● To select the next or previous page, press the CH + button (16) or the CH - button (17). ● To select the index page, press the INDEX button (35). ● To show hidden information, press the REVEAL button (37) (optional for some Teletext pages). ● To select the size of Teletext page: -Press the SIZE button (32) once to enlarge the upper half of the page. -Press the button once again to enlarge the lower half of the page. -Press the button once again to cancel the function. ● To hold a Teletext page, press the HOLD button (33). ● Press a coloured button (34) to select a quick link to a teletext page. 5.4 DVD/CD functions After the disc has been loaded, a content menu will display on the TV screen. ● Press the arrow buttons (25) to select a menu item. ● Press the ENTER button (26) to enter the selected menu item. During playback, the following functions are available: ● To select a chapter (DVD) or track (CD), press the digit buttons (13). ● To select the next or previous chapter (DVD) or track (CD), press the NEXT button (48) or the PREV button (49). ● To forward or rewind the DVD, press the FWD button (42) or the REW button (43). The available speeds are: 2x, 4x, 8x, 20x. 16 ALED2202 ● To pause playback, press the PLAY/PAUSE button (56) once. To resume playback, press the PLAY/PAUSE button (56) again. ● To stop playback temporarily, press the STOP button (55) once. To stop playback permanently, press the STOP button (55) again or press the PLAY/PAUSE button (56). ● To playback in slow-motion, either forward or backward, press the SLOW button (44) repeatedly. The available speeds are: 1/2, 1/3, 1/4, 1/5, 1/6, 1/7. ● To repeat a chapter (DVD) or one or all tracks (CD): -Press the REPEAT button (47) once to repeat the current chapter or track. -Press the button once again to repeat the current title. -Press the button once again to repeat all chapters or tracks. -Press the button once again to cancel the function. ● To view a specific title of a DVD, press the TITLE button (50). Use the arrow buttons to select the title. ● To select the audio language of a DVD, press the LANGUAGE button (39) repeatedly until the desired language is set. ● To switch on the subtitles of a DVD, press the SUBTITLE button (53). Press the button again to switch off the subtitles. ● To select extra information of a DVD or CD (remaining time/passed playtime/track number/chapter number), press the DISPLAY button (54). ● To select the camera angle, press the ANGLE button (51). ● To return to the main menu, press the MENU button (40). i ● A DVD that does not match the region code cannot be read by this appliance. Using the PROGRAM function ● Press the PROGRAM button (45) to enter the PROGRAM function. ● To play tracks from a CD: -Press the arrow button (right) (25) to highlight the title. -Press the arrow buttons (up and down) (25) to select the title. ● To play chapters from a DVD: -Press the arrow button (right) (25) to highlight the title. -Press the arrow buttons (up and down) (25) to select the title. -Press the arrow button (right) (25) to highlight the chapter. -Press the arrow buttons (up and down) (25) to select the chapter. 17 ● To confirm the selection, press the ENTER button (26). ● Repeat the last 2 steps to add additional titles or chapters. ● Press the PLAY/PAUSE button (56) to start the program. Using the A-B REPEAT function The A-B REPEAT function can be used to repeat a specific section of a DVD. ● Press the A-B button (46) once to select the starting point (A). ● Press the A-B button (46) again to select the ending point (B). The appliance plays the section repeatedly. ● Press the A-B button (46) again to cancel the function. The appliance will resume the normal playback. Using the SEARCH function The SEARCH function can be used to select a specific starting point on a DVD or CD. ● Press the SEARCH button (52)(25). ● Press the arrow buttons to select an entry. The possible entries for DVD are: - Disc time - Chapter - Title - Chapter time - Title time The possible entries for CD are: - Track time - Specific track ● Press the digit buttons to set a selection. Using the MP3/MPEG4 playback function ● Insert an MP3/MPEG4 disc. A content menu will display on the TV screen. ● Press the up/down arrow buttons (16/17) to select a folder or a file. ● Press the ENTER button (26) to enter the selected folder or file. ● Press the MENU button (40) to switch between folders and files. Press the ENTER button (26) to confirm. 18 ALED2202 5.5 i DVD setup menu operation This menu only works in DVD mode. To change the initial settings The following actions must be carried out with the remote control: ● Press the SETUP button (41) to select the setup menu. ● Press the arrow buttons to select an item and change the settings. ● Press the SETUP button (41) to store the settings and exit. System setup page i This menu only works with an empty DVD player. TV SYSTEM ● To select the colour system (NTSC/PAL/AUTO). TV TYPE ● To select the aspect ratio (4:3PS/4:3LB/16:9). PASSWORD ● To set the password. RATING ● To set the parental rating password. DEFAULT ● To restore the default settings of the appliance. Language setup page ● In the OSD LANGUAGE section, press the arrow buttons to choose the language. ● In the AUDIO section, choose the audio language. ● In the SUBTITLE section, choose the subtitle language. ● In the DVD MENU section, choose the language for the DVD menu. 19 Audio setup page AUDIO OUT ● Select SPDIF OFF to switch off the digital audio signal output. ● Select SPDIF RAW to set the digital audio signal output to its raw format (DTS/Dolby Digital 5.1). ● Select SPDIF PCM to set the digital audio signal output to PCM format. Digital setup page DYNAMIC ● Select the value for the dynamic range compression to avoid losing sound details resulting from a low volume. DUAL MONO ● Stereo: both channels as is. STEREO is the default setting. ● L-Mono: left channel only. ● R-Mono: right channel only. ● Mix-Mono: the average of both the left and right channel. i 6. ! This function is only available for Dolby AC-3 encoded 2-channel discs. Cleaning and maintenance WARNING Before performing any cleaning or maintenance, switch off and unplug the appliance. ● Clean the outside of the appliance with a soft cloth. When the appliance is very dirty, dampen the cloth slightly with water and a neutral solution. 6.1 Handle and care of a disc ● Hold the disc with fingers. Hold the disc outer edge and/or the centre spindle hole. Do not touch the disc surface. ● Do not bend or press the disc. Do not expose the disc to direct sunlight or heating sources. ● Clean the disc surface with a soft, dry cleaning cloth. Wipe the disc surface gently, radially, from centre towards the outer edge. 20 ALED2202 ● Do not apply thinner, alcohol, chemical solvent, or sprays when cleaning. Such cleaning fluids will permanently damage the disc surface. 7. Troubleshooting Trouble Action No sound or incomplete audioCheck if the random equipment are switched on and set correctly. Check cables for connection problems. Check if the correct source is selected. Check volume or mute setting. No pictureCheck if the TV is switched on and set to the correct A/V input. Check cables for connection problems. No powerCheck if the power cord has been properly connected to the power outlet. MalfunctionShould the appliance develop a serious malfunction, unplug the appliance for 30 minutes. After this, power on the appliance and restore to factory default. DVD/CD Trouble Action No playbackThere is no disc inserted. Load a disc in the appliance. Disc is loaded label facing backward. Place the disc with the label facing forward. Rating level of the disc is higher than the rating level setting of the appliance. Invalid region code. Incorrect type of disc. Disc may be damaged or dirty, clean the disc or try another disc. Moisture may have condensed inside the appliance. Remove the disc and leave the appliance powered on for one or two hours. 21 No sound or incomplete audio Select another audio track. During SCAN, SLOW MOTION or SINGLE STEP the sound is muted. Check if the disc is in fast forward or fast rewind mode. Press the PLAY/PAUSE button (56). No scan or skip possibleSome discs are programmed to refuse user action at certain sections. This is no malfunction. Single chapter or track discs do not allow skip function. Picture distorted or noisyDisc may be damaged or dirty, clean the disc or try another disc. Check TV system setting (PAL/NTSC). A VCR is connected between the appliance and the random equipment. Connect the appliance to a A/V directly. Clean the disc. Picture not full screenSelect the screen format from the appliances setup menu. Select screen format in disc start menu. Remote control (RC) Trouble RC does not function 22 Action Check the battery installation. Point the RC at the remote control sensor. Stay within 8 metres of the appliance. ALED2202 8. Technical data Parameter Voltage Power consumption Standby power consumption Max power output Headphones output impedance Dimensions (W x H x D) without foot with foot Weight LED screen Parameter Diagonal size Ratio Resolution Brightness Contrast ratio Response time Viewing angle horizontally / vertically Television system Set-up Parameter Wall mountable Remote control Parameter Power consumption Battery size Value 100 ~ 240 VAC / 50 ~ 60 Hz 60 W <1 W 2x3W 32 Ω 548 X 365 X 50 mm 548 X 395 X 160 mm 5 kg Value 55 cm (22") 16:9 1920 x 1080 pixels 250 cd/m2 1000:1 5 ms 170°/160° PAL/SECAM Value VESA standard (100 x 100 mm) Value 2 x 1.5 V AA 23 9. isposal of used electrical D and electronic equipment Z The meaning of the symbol on the material, its accessory or packaging indicates that this product shall not be treated as household waste. Please, dispose of this equipment at your applicable collection point for the recycling of electrical and electronic equipments waste. In the European Union and Other European countries which there are separate collection systems for used electrical and electronic product. By ensuring the correct disposal of this product, you will help prevent potentially hazardous to the environment and to human health, which could otherwise be caused by unsuitable waste handling of this product. The recycling of materials will help conserve natural resources. Please do not therefore dispose of your old electrical and electronic equipment with your household waste. For more detailed information about recycling of this product, please contact your local city office, your household waste disposal service or the shop where you purchased the product. For more information and warranty conditions, please visit: www.akai.eu 24 Heeft u na het lezen van deze handleiding nog vragen? Neemt u dan contact op met AKAI Benelux via: 0900-3555333 Avez-vous des questions après avoir lu ce manual? Contactez AKAI Benelux par téléphone au : 070-355505 www.akai.eu