1
TDT4290 Customer Driven Project
Project report
Internet on TV
Group 2 - Digiboards AS
Authors:
Alessandro Boron
Ane Min Hofplass Garnaas
Lars Martin Riiser Haraldsen
Morten Weel Johnsen
Tiril Anette Langfeldt Rødland
Jarle Erdal Steinsland
Supervisors:
IDI:
Reidar Conradi, main
Snorre Gylterud, ass’t
Digiboards AS:
Harald Amundsen
Robin Skoglund
18th November 2009
ii
Given Project Assignment
This is the given task assignment, taken - word for word - from appendix D2
in (Gulla, Conradi, Ingvaldsen, Hagen and Solskinnsbakk 21 Aug 2009), and
is written by Digiboards AS. Group 2 disclaims responsibility for the content.
Title: Internet on TV
Digiboards is developing a unique Widget concept for easy creation of
Digital Signage content.
Digiboards’ intention with this student project is to explore the possibilities to use our Adobe Flash/AIR based technology to present live Internet
content on Internet enabled TVs.
The project shall by research identify a user friendly solution for interaction with the TV viewer.
If technology and time allows for it, a prototype based on AIR/Flash shall
be developed. The prototype shall run on a ST Micro STi 7109 Single-Chip
Set-Top Box IC.
Additional information:
Technology verification on ST Micro Single-Chip Set-Top Box IC:
− Verify that Adobe AIR can be used on the IC (preferred over Flash)
− If Adobe AIR is not possible: Verify that Adobe Flash can be used on
the IC (H.264 video and animated SWF file)
− Performance tests video/animations
− Performance tests TV channel in combination with Adobe Flash/AIR
video and animations (side-by-side & overlaid)
− Design and implement a Flash/AIR API for user interaction through
a remote control
iii
iv
Preface
This report is the result of a project work performed by group 2 in the course
TDT4290 Customer Driven Project, at the Department of Computer and
Information Science at the Norwegian University of Science and Technology,
during the fall 2009. The course is worth 15 credits, half of the total semester
work load.
The goal of this course is to give the students a taste of a real project,
with real customers demanding a real solution to real problems. The goal is
thus to teach the students fundamental software engineering skills through
realistic training in software development and project management.
We would like to thank Robin Skoglund and Harald Amundsen, the persons representing Digiboards AS, for good cooperation and feedback throughout the project. We would also like to thank our supervisors, Reidar Conradi
and Snorre Gylterud.
Trondheim, 18th November 2009
Alessandro Boron
Ane Min Hofplass Garnaas
Lars Martin Riiser Haraldsen
Morten Weel Johnsen
Tiril Anette Langfeldt Rødland
Jarle Erdal Steinsland
v
vi
Summary
Nowadays more and more TVs have the possibility of connecting to the
Internet. Digiboards AS plans to use this to create widgets on the TV screen.
Widgets can for example be news feeds, weather forecasts and sports results
overlaid on the TV.
Our original task was to make the widget system possible to run on
a set-top box or television. Unfortunately we did not manage to get the
microcontrollers we needed. This resulted in a big change of our project.
Our final assignment was thus to design the widget system, create a user
friendly interface and an overall architecture. A prototype of the system
should also be implemented and be used as a proof of concept.
The main focus during the project was thus on design and usability. We
had a substantial preliminary study where we mainly researched the different
microcontrollers, the technologies concerning the project and existing widget
systems.
Using the Scrum development method we had five sprints where we implemented the prototype and designed the system. We designed the architecture, created use cases, designed a user interface with the remote control
and performed usability tests.
We ended up with a solution where it was possible to have multiple user
profiles and the possibility of making widgets sticky. The sticky function is
unique and is our main difference from the competitors. Having a widget
sticky means that it is glued to the screen, letting the user view it while
watching TV. Widgets from different profiles can be sticky at the same time.
It is also possible to let the widgets be visible only when their content change.
Our work helped Digiboards to get a patent pending and will be used
in the future as a help for the implementation of the actual system. This
system will be implemented using Adobe AIR, which means our prototype in
Java is only shows the proof of concept. Despite this, we believe our design
will be helpful when making the final system as user friendly as possible.
vii
viii
Short Table of Contents
Chapter 1 : Introduction
1
Chapter 2 : Project Directive
3
Chapter 3 : Preliminary Study
17
Chapter 4 : Requirement Specification and Backlog
49
Chapter 5 : Sprint 1 - High Level System Design
55
Chapter 6 : Sprint 2 - Detailed System Design
77
Chapter 7 : Sprint 3 - Implementation, Part I
89
Chapter 8 : Sprint 4 - Implementation, Part II
99
Chapter 9 : Sprint 5 - Usability Testing
123
Chapter 10: Conclusion
133
Chapter 11: Evaluation
137
Glossary
152
References
156
Bibliography
157
Appendix A: Stakeholders
A-1
Appendix B: Concrete Plan
B-1
Appendix C: Risk Analysis
C-1
ix
Appendix D: Effort Budget
D-1
Appendix E : Block Diagrams
E-1
Appendix F : Usability Testing
F-1
Appendix G: Templates
G-1
Appendix H: Functionality Description
H-1
Appendix I : Email Conversations
I-1
x
Contents
Chapter 1 : Introduction
1
Chapter 2 : Project Directive
2.1 Project Mandate . . . . . . . . . . . .
2.1.1 Overview . . . . . . . . . . . .
2.1.2 Project Name . . . . . . . . . .
2.1.3 Project Sponsor . . . . . . . . .
2.1.4 Stakeholders . . . . . . . . . . .
2.1.5 Measurement of Project Effects
2.2 Project Plan . . . . . . . . . . . . . . .
2.2.1 Phases . . . . . . . . . . . . . .
2.2.2 Main Tasks . . . . . . . . . . .
2.2.3 Milestones . . . . . . . . . . . .
2.2.4 Effort Budget . . . . . . . . . .
2.3 Project Organization . . . . . . . . . .
2.3.1 Roles . . . . . . . . . . . . . . .
2.3.2 Group Members . . . . . . . . .
2.3.3 Weekly Schedule . . . . . . . .
2.4 Templates and Standards . . . . . . . .
2.4.1 Templates . . . . . . . . . . . .
2.4.2 Standards . . . . . . . . . . . .
2.4.3 Version Control Procedures . .
2.4.4 Literature References . . . . . .
2.5 Documentation of Project Work . . . .
2.5.1 Internal Project Meetings . . .
2.5.2 Supervisor Meetings . . . . . .
2.5.3 Customer Meetings . . . . . . .
2.5.4 Reports . . . . . . . . . . . . .
2.6 Quality Assurance (QA) . . . . . . . .
xi
.
.
.
.
.
.
.
.
.
.
.
.
.
.
.
.
.
.
.
.
.
.
.
.
.
.
.
.
.
.
.
.
.
.
.
.
.
.
.
.
.
.
.
.
.
.
.
.
.
.
.
.
.
.
.
.
.
.
.
.
.
.
.
.
.
.
.
.
.
.
.
.
.
.
.
.
.
.
.
.
.
.
.
.
.
.
.
.
.
.
.
.
.
.
.
.
.
.
.
.
.
.
.
.
.
.
.
.
.
.
.
.
.
.
.
.
.
.
.
.
.
.
.
.
.
.
.
.
.
.
.
.
.
.
.
.
.
.
.
.
.
.
.
.
.
.
.
.
.
.
.
.
.
.
.
.
.
.
.
.
.
.
.
.
.
.
.
.
.
.
.
.
.
.
.
.
.
.
.
.
.
.
.
.
.
.
.
.
.
.
.
.
.
.
.
.
.
.
.
.
.
.
.
.
.
.
.
.
.
.
.
.
.
.
.
.
.
.
.
.
.
.
.
.
.
.
.
.
.
.
.
.
.
.
.
.
.
.
.
.
.
.
.
.
.
.
.
.
.
.
.
.
.
.
.
.
.
.
.
.
.
.
.
.
.
.
.
.
.
.
.
.
.
.
.
.
.
.
.
.
.
.
.
.
.
.
.
.
.
.
.
.
.
.
.
.
.
.
.
.
.
.
.
.
.
.
.
.
.
.
.
.
.
.
.
.
.
.
.
.
.
.
.
.
.
.
.
.
.
.
.
.
.
.
.
.
.
.
3
3
3
3
3
4
4
4
5
5
7
7
7
7
8
9
9
9
10
12
12
12
12
12
13
13
13
2.6.1
2.6.2
2.6.3
2.6.4
Defining Quality . . . . . . . . . .
Time of Response . . . . . . . . . .
Routines for Producing Quality . .
Routines for Minutes and Meetings
.
.
.
.
.
.
.
.
.
.
.
.
.
.
.
.
.
.
.
.
.
.
.
.
.
.
.
.
.
.
.
.
Chapter 3 : Preliminary Study
3.1 Background Information . . . . . . . . . . . . . . . . . .
3.1.1 An Overview of the Television Industry . . . . . .
3.1.2 Technologies Concerning our Original Assignment
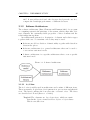
3.1.3 Software Architecture . . . . . . . . . . . . . . . .
3.2 The Situation and Solutions of Today . . . . . . . . . . .
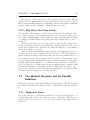
3.2.1 Internet on TV as of Today . . . . . . . . . . . .
3.2.2 Why Did It Not Come Earlier? . . . . . . . . . .
3.3 The Wanted Situation and Its Possible Solutions . . . . .
3.3.1 Digiboards’ Vision . . . . . . . . . . . . . . . . .
3.3.2 Yahoo!’s Solution . . . . . . . . . . . . . . . . . .
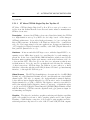
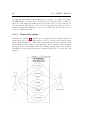
3.4 SWOT Analysis . . . . . . . . . . . . . . . . . . . . . . .
3.5 Business Requirements . . . . . . . . . . . . . . . . . . .
3.5.1 System Requirements . . . . . . . . . . . . . . . .
3.5.2 End Deliveries . . . . . . . . . . . . . . . . . . . .
3.6 Acquiring the Hardware . . . . . . . . . . . . . . . . . .
3.6.1 STMicroelectronics . . . . . . . . . . . . . . . . .
3.6.2 Intel Media Processor CE 3100 . . . . . . . . . .
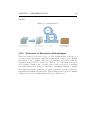
3.7 Alternative Microcontrollers . . . . . . . . . . . . . . . .
3.7.1 Description of Alternative Microcontrollers . . . .
3.7.2 Evaluation of Alternative Microcontrollers . . . .
3.7.3 Evaluation Criteria . . . . . . . . . . . . . . . . .
3.7.4 Choice of Microcontroller . . . . . . . . . . . . . .
3.8 Alternative Life-Cycle Models . . . . . . . . . . . . . . .
3.8.1 Description of alternative methodologies . . . . .
3.8.2 Evaluation of Alternative Methodologies . . . . .
Chapter 4 : Requirement Specification and Backlog
4.1 Requirements . . . . . . . . . . . . . . . . . . . . .
4.1.1 Functional Requirements . . . . . . . . . . .
4.1.2 Final System Requirements . . . . . . . . .
4.2 Product Backlog . . . . . . . . . . . . . . . . . . .
.
.
.
.
.
.
.
.
.
.
.
.
.
.
.
.
.
.
.
.
.
.
.
.
.
.
.
.
.
.
.
.
.
.
.
.
.
.
.
.
.
.
.
.
.
.
.
.
.
.
.
.
.
.
.
.
.
.
.
.
.
.
.
.
.
.
.
.
.
.
.
.
.
.
.
.
.
.
.
.
.
.
13
14
14
15
.
.
.
.
.
.
.
.
.
.
.
.
.
.
.
.
.
.
.
.
.
.
.
.
.
17
17
17
20
30
31
31
32
32
32
33
35
36
36
36
37
37
38
38
38
41
43
45
45
45
48
.
.
.
.
49
49
49
51
51
Chapter 5 : Sprint 1 - High Level System Design
55
5.1 Sprint 1 Planning . . . . . . . . . . . . . . . . . . . . . . . . . 55
5.1.1 Sprint Backlog . . . . . . . . . . . . . . . . . . . . . . 56
xii
5.2
5.3
Sprint
5.2.1
5.2.2
5.2.3
Sprint
5.3.1
1 Results . . . . . . . . .
User Interface . . . . . .
TV Use Cases . . . . . .
High-Level Architecture
1 Evaluation . . . . . . .
Conclusion . . . . . . . .
.
.
.
.
.
.
.
.
.
.
.
.
.
.
.
.
.
.
.
.
.
.
.
.
.
.
.
.
.
.
.
.
.
.
.
.
.
.
.
.
.
.
.
.
.
.
.
.
.
.
.
.
.
.
.
.
.
.
.
.
.
.
.
.
.
.
.
.
.
.
.
.
.
.
.
.
.
.
.
.
.
.
.
.
.
.
.
.
.
.
.
.
.
.
.
.
.
.
.
.
.
.
57
57
66
70
73
74
Chapter 6 : Sprint 2 - Detailed System Design
6.1 Sprint 2 Planning . . . . . . . . . . . . . . . .
6.1.1 Sprint Backlog . . . . . . . . . . . . .
6.2 Sprint 2 Results . . . . . . . . . . . . . . . . .
6.2.1 Scenarios . . . . . . . . . . . . . . . .
6.2.2 Web Use Cases . . . . . . . . . . . . .
6.2.3 Sketches . . . . . . . . . . . . . . . . .
6.2.4 Architecture . . . . . . . . . . . . . . .
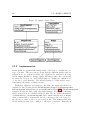
6.2.5 Implementation . . . . . . . . . . . . .
6.3 Sprint 2 Evaluation . . . . . . . . . . . . . . .
6.3.1 Conclusion . . . . . . . . . . . . . . . .
.
.
.
.
.
.
.
.
.
.
.
.
.
.
.
.
.
.
.
.
.
.
.
.
.
.
.
.
.
.
.
.
.
.
.
.
.
.
.
.
.
.
.
.
.
.
.
.
.
.
.
.
.
.
.
.
.
.
.
.
.
.
.
.
.
.
.
.
.
.
.
.
.
.
.
.
.
.
.
.
.
.
.
.
.
.
.
.
.
.
77
77
77
79
79
81
83
84
86
86
87
Chapter 7 : Sprint 3 - Implementation, Part
7.1 Sprint 3 Planning . . . . . . . . . . . . . .
7.1.1 Sprint Backlog . . . . . . . . . . .
7.2 Sprint 3 Results . . . . . . . . . . . . . . .
7.2.1 Sketches . . . . . . . . . . . . . . .
7.2.2 User Interface . . . . . . . . . . . .
7.2.3 Usability Testing . . . . . . . . . .
7.2.4 Implementation . . . . . . . . . . .
7.3 Sprint 3 Evaluation . . . . . . . . . . . . .
7.3.1 Conclusion . . . . . . . . . . . . . .
I
.
.
.
.
.
.
.
.
.
.
.
.
.
.
.
.
.
.
.
.
.
.
.
.
.
.
.
.
.
.
.
.
.
.
.
.
.
.
.
.
.
.
.
.
.
.
.
.
.
.
.
.
.
.
.
.
.
.
.
.
.
.
.
.
.
.
.
.
.
.
.
.
.
.
.
.
.
.
.
.
.
.
.
.
.
.
.
.
.
.
89
89
90
90
90
92
94
95
96
97
Chapter 8 : Sprint 4 - Implementation, Part
8.1 Sprint 4 Planning . . . . . . . . . . . . . .
8.1.1 Sprint Backlog . . . . . . . . . . .
8.2 Sprint 4 Results . . . . . . . . . . . . . . .
8.2.1 Patent application . . . . . . . . .
8.2.2 User Interface . . . . . . . . . . . .
8.2.3 New Use Cases . . . . . . . . . . .
8.2.4 Architecture . . . . . . . . . . . . .
8.2.5 Usability . . . . . . . . . . . . . . .
8.2.6 Usability Testing . . . . . . . . . .
8.2.7 Implementation . . . . . . . . . . .
II
. .
. .
. .
. .
. .
. .
. .
. .
. .
. .
.
.
.
.
.
.
.
.
.
.
99
99
99
101
101
101
104
110
114
117
118
xiii
.
.
.
.
.
.
.
.
.
.
.
.
.
.
.
.
.
.
.
.
.
.
.
.
.
.
.
.
.
.
.
.
.
.
.
.
.
.
.
.
.
.
.
.
.
.
.
.
.
.
.
.
.
.
.
.
.
.
.
.
.
.
.
.
.
.
.
.
.
.
.
.
.
.
.
.
.
.
.
.
.
.
.
.
.
.
.
.
.
8.3
Sprint 4 Evaluation . . . . . . . . . . . . . . . . . . . . . . . . 119
8.3.1 Conclusion . . . . . . . . . . . . . . . . . . . . . . . . . 120
Chapter 9 : Sprint 5 - Usability
9.1 Sprint 5 Planning . . . . . .
9.1.1 Sprint Backlog . . .
9.2 Sprint 5 Results . . . . . . .
9.2.1 Usability Testing . .
9.2.2 Implementation . . .
9.3 Sprint 5 Evaluation . . . . .
9.3.1 Conclusion . . . . . .
Testing
. . . . .
. . . . .
. . . . .
. . . . .
. . . . .
. . . . .
. . . . .
.
.
.
.
.
.
.
.
.
.
.
.
.
.
.
.
.
.
.
.
.
.
.
.
.
.
.
.
.
.
.
.
.
.
.
.
.
.
.
.
.
.
.
.
.
.
.
.
.
.
.
.
.
.
.
.
.
.
.
.
.
.
.
.
.
.
.
.
.
.
.
.
.
.
.
.
.
.
.
.
.
.
.
.
.
.
.
.
.
.
.
.
.
.
.
.
.
.
123
123
123
123
125
130
130
131
Chapter 10: Conclusion
133
Chapter 11: Evaluation
11.1 The Internal Process and Results . .
11.1.1 The Teamwork . . . . . . . .
11.1.2 Project Work Effort . . . . .
11.1.3 The Project . . . . . . . . . .
11.2 The Customer and the Project Task .
11.3 The Supervisors . . . . . . . . . . . .
11.4 Improvements of the Course . . . . .
137
137
137
138
139
141
142
142
.
.
.
.
.
.
.
.
.
.
.
.
.
.
.
.
.
.
.
.
.
.
.
.
.
.
.
.
.
.
.
.
.
.
.
.
.
.
.
.
.
.
.
.
.
.
.
.
.
.
.
.
.
.
.
.
.
.
.
.
.
.
.
.
.
.
.
.
.
.
.
.
.
.
.
.
.
.
.
.
.
.
.
.
.
.
.
.
.
.
.
.
.
.
.
.
.
.
Glossary
152
References
156
Bibliography
157
Appendix A: Stakeholders
A-1
Appendix B: Concrete Plan
B-1
Appendix C: Risk Analysis
C-1
Appendix D: Effort Budget
D-1
Appendix E : Block Diagrams
E-1
Appendix F : Usability Testing
F.1 The Tests . . . . . . . . . .
F.1.1 Basic Use . . . . . .
F.1.2 Profiles . . . . . . . .
F.1.3 Sticky Widgets . . .
F-1
F-1
F-1
F-2
F-2
.
.
.
.
xiv
.
.
.
.
.
.
.
.
.
.
.
.
.
.
.
.
.
.
.
.
.
.
.
.
.
.
.
.
.
.
.
.
.
.
.
.
.
.
.
.
.
.
.
.
.
.
.
.
.
.
.
.
.
.
.
.
.
.
.
.
.
.
.
.
.
.
.
.
.
.
.
.
F.2 The Rights of the Participants . . . . . . . . . . . . . . . . . . F-3
F.3 User Evaluation . . . . . . . . . . . . . . . . . . . . . . . . . . F-4
F.4 Summary Questions . . . . . . . . . . . . . . . . . . . . . . . F-7
Appendix G: Templates
G-1
Appendix H: Functionality Description
H-1
Appendix I : Email Conversations
I-1
xv
xvi
List of Figures
3.1
3.2
3.3
3.4
3.5
3.6
3.7
3.8
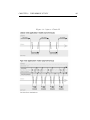
Ajax vs. Classic I . . . . . . .
Ajax vs. Classic II . . . . . .
Software Architecture . . . . .
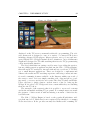
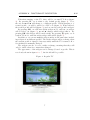
Flickr on TV . . . . . . . . .
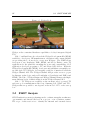
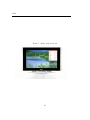
Widget Dock . . . . . . . . .
SWOT Analysis of the Widget
Waterfall Method . . . . . . .
Scrum Method . . . . . . . .
.
.
.
.
.
.
.
.
.
.
.
.
.
.
.
.
.
.
.
.
.
.
.
.
.
.
.
.
.
.
.
.
.
.
.
.
.
.
.
.
.
.
.
.
.
.
.
.
.
.
.
.
.
.
.
.
.
.
.
.
.
.
.
.
.
.
.
.
.
.
.
.
.
.
.
.
.
.
.
.
.
.
.
.
.
.
.
.
.
.
.
.
.
.
.
.
.
.
.
.
.
.
.
.
25
26
30
34
35
37
47
48
5.1
5.2
5.3
5.4
5.5
5.6
5.7
5.8
5.9
5.10
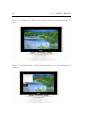
Regular TV . . . . . . . . . . . .
Default Profile . . . . . . . . . . .
Enter PIN Code . . . . . . . . . .
The Chosen Profile . . . . . . . .
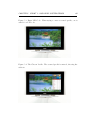
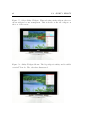
Select Sticky Widgets . . . . . . .
Sticky Widgets Shown . . . . . .
State Diagram of User Input . . .
TV Overview . . . . . . . . . . .
High-Level Architecture Overview
Sprint 1 Burn Down Chart . . . .
.
.
.
.
.
.
.
.
.
.
.
.
.
.
.
.
.
.
.
.
.
.
.
.
.
.
.
.
.
.
.
.
.
.
.
.
.
.
.
.
.
.
.
.
.
.
.
.
.
.
.
.
.
.
.
.
.
.
.
.
.
.
.
.
.
.
.
.
.
.
.
.
.
.
.
.
.
.
.
.
.
.
.
.
.
.
.
.
.
.
.
.
.
.
.
.
.
.
.
.
.
.
.
.
.
.
.
.
.
.
.
.
.
.
.
.
.
.
.
.
.
.
.
.
.
.
.
.
.
.
59
59
60
60
61
61
62
67
71
75
6.1
6.2
6.3
6.4
6.5
6.6
6.7
6.8
Web Overview . . . . . . . . . . . . . . . .
Edit Profile . . . . . . . . . . . . . . . . .
Sketch of a Very Minimal Remote Control
Sketch of a Television with Widgets . . . .
Sequence Diagram for Set-Top Box . . . .
Sequence Diagram for Web Portal . . . . .
Sprint 2 Demo Class . . . . . . . . . . . .
Sprint 2 Burn Down Chart . . . . . . . . .
.
.
.
.
.
.
.
.
.
.
.
.
.
.
.
.
.
.
.
.
.
.
.
.
.
.
.
.
.
.
.
.
.
.
.
.
.
.
.
.
.
.
.
.
.
.
.
.
.
.
.
.
.
.
.
.
.
.
.
.
.
.
.
.
.
.
.
.
.
.
.
.
.
.
.
.
.
.
.
.
.
.
.
.
.
.
.
.
82
83
84
84
85
85
86
88
xvii
. . . . .
. . . . .
. . . . .
. . . . .
. . . . .
Channel
. . . . .
. . . . .
.
.
.
.
.
.
.
.
.
.
.
.
.
.
.
.
.
.
.
.
.
.
.
.
.
.
.
.
.
.
7.1
7.2
7.3
7.4
7.5
Sketch of the Remote Control
Sketch of the Widgets . . . .
State Diagram of User Input .
Sprint 3 Demo Class . . . . .
Sprint 3 Burn Down Chart . .
.
.
.
.
.
.
.
.
.
.
.
.
.
.
.
.
.
.
.
.
.
.
.
.
.
.
.
.
.
.
.
.
.
.
.
.
.
.
.
.
.
.
.
.
.
.
.
.
.
.
.
.
.
.
.
.
.
.
.
.
.
.
.
.
.
.
.
.
.
.
.
.
.
.
.
.
.
.
.
.
.
.
.
.
.
.
.
.
.
.
91
92
93
95
98
8.1
8.2
8.3
8.4
8.5
8.6
8.7
8.8
8.9
State Diagram of User Input
TV Overview . . . . . . . .
Sticky Widgets . . . . . . .
Usability Scenario 1 . . . . .
Usability Scenario 2 . . . . .
Usability Scenario 3 . . . . .
Logical View of the System
Sprint 4 Demo Class . . . .
Sprint 4 Burn Down Chart .
.
.
.
.
.
.
.
.
.
.
.
.
.
.
.
.
.
.
.
.
.
.
.
.
.
.
.
.
.
.
.
.
.
.
.
.
.
.
.
.
.
.
.
.
.
.
.
.
.
.
.
.
.
.
.
.
.
.
.
.
.
.
.
.
.
.
.
.
.
.
.
.
.
.
.
.
.
.
.
.
.
.
.
.
.
.
.
.
.
.
.
.
.
.
.
.
.
.
.
.
.
.
.
.
.
.
.
.
.
.
.
.
.
.
.
.
.
.
.
.
.
.
.
.
.
.
.
.
.
.
.
.
.
.
.
.
.
.
.
.
.
.
.
.
.
.
.
.
.
.
.
.
.
.
.
.
.
.
.
.
.
.
103
104
109
112
112
113
114
118
121
9.1
Sprint 5 Burn Down Chart . . . . . . . . . . . . . . . . . . . . 132
.
.
.
.
.
.
.
.
.
11.1 Work Effort - Actual vs. Estimated . . . . . . . . . . . . . . . 138
11.2 Actual vs Planned Effort for the Different Phases . . . . . . . 139
B.1 Gantt Table . . . . . . . . . . . . . . . . . . . . . . . . . . . . B-2
D.1 Effort Budget . . . . . . . . . . . . . . . . . . . . . . . . . . . D-2
E.1 ST Micro STi7109 Single-Chip Set-Top Box Decoder . . . . . E-1
E.2 Intel®Media Processor CE 3100 . . . . . . . . . . . . . . . . E-2
F.1 Description of the O button . . . . . . . . . . . . . . . . . . . F-5
xviii
List of Tables
2.1
2.2
2.3
2.4
Milestones . . . .
Group Members .
Weekly Schedule
Time of Response
.
.
.
.
.
.
.
.
.
.
.
.
.
.
.
.
.
.
.
.
.
.
.
.
.
.
.
.
.
.
.
.
. 7
. 9
. 9
. 14
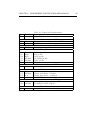
3.1
3.2
3.3
3.5
3.4
3.6
3.7
3.8
Rich Internet Application: Browser vs. Desktop .
Operating Systems with AIR Support . . . . . . .
Comparison between STi7109 and Intel®CE 3100
Evaluation Criteria Grades . . . . . . . . . . . . .
Evaluation Criteria Priorities . . . . . . . . . . .
Evaluation of STi7109 . . . . . . . . . . . . . . .
Evaluation of CE 3100 . . . . . . . . . . . . . . .
Evaluation . . . . . . . . . . . . . . . . . . . . . .
.
.
.
.
.
.
.
.
.
.
.
.
.
.
.
.
.
.
.
.
.
.
.
.
.
.
.
.
.
.
.
.
.
.
.
.
.
.
.
.
.
.
.
.
.
.
.
.
.
.
.
.
.
.
.
.
4.1
4.2
4.3
Functional Requirements . . . . . . . . . . . . . . . . . . . . . 50
Final System Requirement . . . . . . . . . . . . . . . . . . . . 51
Product Backlog . . . . . . . . . . . . . . . . . . . . . . . . . 53
5.1
5.2
5.3
5.4
Sprint 1 Backlog
UCTV-1 . . . . .
UCTV-2 . . . . .
UCTV-3 . . . . .
6.1
Sprint 2 Backlog . . . . . . . . . . . . . . . . . . . . . . . . . 78
7.1
Sprint 3 Backlog . . . . . . . . . . . . . . . . . . . . . . . . . 90
8.1
8.2
8.3
Sprint 4 Backlog . . . . . . . . . . . . . . . . . . . . . . . . . 100
UCTV-1 . . . . . . . . . . . . . . . . . . . . . . . . . . . . . . 105
UCTV-2 . . . . . . . . . . . . . . . . . . . . . . . . . . . . . . 107
.
.
.
.
.
.
.
.
.
.
.
.
.
.
.
.
.
.
.
.
.
.
.
.
.
.
.
.
.
.
.
.
.
.
.
.
.
.
.
.
.
.
.
.
.
.
.
.
.
.
.
.
xix
.
.
.
.
.
.
.
.
.
.
.
.
.
.
.
.
.
.
.
.
.
.
.
.
.
.
.
.
.
.
.
.
.
.
.
.
.
.
.
.
.
.
.
.
.
.
.
.
.
.
.
.
.
.
.
.
.
.
.
.
.
.
.
.
.
.
.
.
.
.
.
.
.
.
.
.
.
.
.
.
.
.
.
.
.
.
.
.
.
.
.
.
.
.
.
.
.
.
.
.
.
.
.
.
.
.
.
.
.
.
.
.
20
22
41
43
43
44
44
44
56
68
69
70
8.4
UCTV-3 . . . . . . . . . . . . . . . . . . . . . . . . . . . . . . 108
9.1
9.2
9.3
Sprint 5 Backlog . . . . . . . . . . . . . . . . . . . . . . . . . 124
First Usability Test . . . . . . . . . . . . . . . . . . . . . . . . 127
Second Usability Test . . . . . . . . . . . . . . . . . . . . . . . 129
C.1 Risk Analysis, Part I . . . . . . . . . . . . . . . . . . . . . . . C-3
C.2 Risk Analysis, Part II . . . . . . . . . . . . . . . . . . . . . . . C-4
F.1
F.2
F.3
F.4
Basic Use . . . . . . . . . . . . . . .
Profiles . . . . . . . . . . . . . . . . .
Sticky Widgets . . . . . . . . . . . .
Answers for the Summary Questions
xx
.
.
.
.
.
.
.
.
.
.
.
.
.
.
.
.
.
.
.
.
.
.
.
.
.
.
.
.
.
.
.
.
.
.
.
.
.
.
.
.
.
.
.
.
.
.
.
.
.
.
.
.
.
.
.
.
F-1
F-2
F-2
F-7
Acronyms
2D Two-Dimensional
3D Three-Dimensional
API Application Programming Interface
ATA Advanced Technology Attachment
CE Consumer Electronics
CISC Complex Instruction Set Computer
CPU Central Processing Unit
CSS Cascading Style Sheets
DAC Digital-to-Analog Converter
DDR Double Data Rate
DOM Document Object Model
DRAM Dynamic Random-Access Memory
DSL Digital Subscriber Line
DSP Digital Signal Processor
DVI Digital Visual Interface
DWD Digiboards Widget Dashboard
EPG Electronic Program Guide
HCI Human-Computer Interaction
xxi
HDMI High Definition Multimedia Interface
HD High Definition
HTML Hyper Text Markup Language
IA Intel Architecture
IC Integrated Circuit
IPTV Internet Protocol Television
IP Internet Protocol
IT Information Technology
KDE K Desktop Environment
KJS KDE JavaScript
LGPL Lesser General Public License
MII Media Independent Interface
MXML Magic eXtensible Markup Language
NRK Norsk Rikskringkasting
NTV Norges Televisjon AS
OEM Original Equipment Manufacturers
OS Operating System
QA Quality Assurance
Qn nth Quarter
RAM Random-Access Memory
RIA Rich Internet Applications
RISC Reduced Instruction Set Computer
RMII Reduced Media Independent Interface
SD Standard Definition
SDRAM Synchronous Dynamic Random Access Memory
xxii
SoC System on a Chip
STB Set-Top Box
SVG Scalable Vector Graphics
SWOT Strengths, Weaknesses, Opportunities, Threats
UCD User-Centered Design
UI User Interface
USB Universal Serial Bus
VCR Videocassette Recorder
VoD Video on Demand
W3C World Wide Web Consortium
WDK Widget Development Kit
XHR XMLHttpRequest
XHTML eXtensible Hyper Text Markup Language
XML eXtensible Markup Language
XSL eXtensible Stylesheet Language
XSLT XSL Transformation
xxiii
xxiv
CHAPTER 1
Introduction
The system designed is a widget overlay on the TV. The widgets are Internet
applications like news feeds and weather forecasts. Our main challenge of
this project was to find a solution of how Internet-widgets can be displayed,
overlaid the main TV-picture.
Another focus was to make the system as user friendly as possible. An
advanced user should have the possibility to edit the widgets and change
the layout without difficulty. The system was to run on a certain hardware
according to the customer’s criteria.
We designed and implemented a demo, having the basic operations, that
shows the proof of concept. All in all the project would, by research, identify
a user friendly solution for interaction with the TV viewer.
This report consists of 11 chapters. After the introduction follows the
project directive, the preliminary study, the requirement specification, followed by the conclusion and the project evaluation.
1
CHAPTER 1. INTRODUCTION
2
Chapter 1 - Introduction
Chapter 2 - Project Directive
Chapter 3 - Preliminary Study
Chapter 4 - Requirement Specification and Backlog
Chapter 5 - Sprint 1, High Level System Design: basic architecture and
functionality description.
Chapter 6 - Sprint 2, Detailed System Design: scenarios, some more
use cases, architectural details and the start of the implementation.
Chapter 7 - Sprint 3, Implementation, Part I: updated functionality description and more implementation details.
Chapter 8 - Sprint 4, Implementation, Part II: updated functionality
description, more architecture and usability.
Chapter 9 - Sprint 5, Usability Testing: the usability tests.
Chapter 10 - Conclusion
Chapter 11 - Evaluation
CHAPTER 2
Project Directive
This chapter documents the results of the planning phase. It specifies the
project mandate, project plan and describes the project boundary as well as
various administrative aspects of the project.
2.1
Project Mandate
Here follows the project mandate; an overview of the project.
2.1.1
Overview
Implement Internet on TV as widgets that people can use to read news and
check the weather forecast, among other things, with a simple push of a
button.
2.1.2
Project Name
The project name is ’Internet on TV’.
2.1.3
Project Sponsor
The customer for this project was Digiboards AS, which is the leading supplier of web-based information broadcasting in digital screens - also referred
to as Digital Signage or In-Screen TVs. Digiboards has developed the market’s first complete web-based enterprise solution for marketing on TV screens.
3
CHAPTER 2. PROJECT DIRECTIVE
4
Digiboards’ complete solution includes all of the necessary tools needed, including an animation toolkit for creation of digital posters and screen designs.
Their solution is so simple to use that representation and changes in the advertising can be done online by the customers themselves. This without going
through advertising agencies.
2.1.4
Stakeholders
We have the contact information of the stakeholders, both the group, supervisors and customers in Appendix A.
2.1.5
Measurement of Project Effects
There were no specific measurement of project effects. The effects were more
roughly measured by
The progress of the project backlog
Whether we and the customer had the same views on the product
Whether we agreed on the final product
Whether we got a working prototype
How well we described the system
2.1.5.1
General Terms
This solution was to be made for a microcontroller used for television or
set-top boxes. More specifically on either the STi7109 microcontroller or the
Intel CE 3100 microcontroller.
Our prototype were implemented on a x86 personal computer.
2.1.5.2
Planned Effort
TDT4290 yields half a semester work load. This meaning 312 working hours
per person, or 24 working hours per person each week. This was 312 × 6 =
1872 person hours in total and 24 × 6 = 144 person hours on a weekly basis.
2.2
Project Plan
This section covers the project plan which regulated the administrative part
of the project.
5
2.2. PROJECT PLAN
2.2.1
Phases
We had 5 sprints, each of one week. Thus we got the phases:
Project management
Lectures and self study
Planning
Prestudy
Product backlog
Sprint 1
Sprint 2
Sprint 3
Sprint 4
Sprint 5
Conclusion
Evaluation
Presentation and final demonstration
B.
For more information, see the Gantt-diagram in Figure B.1, in Appendix
2.2.2
Main Tasks
We have eight main tasks during this project. It is the project management,
the lectures and self study, the project planning, the prestudy, the product
backlog, the sprints, the evaluation and the presentation.
2.2.2.1
Project Management
Project management followed us throughout the project. It consisted of
meetings, minutes, coordination, planning and general management.
CHAPTER 2. PROJECT DIRECTIVE
2.2.2.2
6
Lectures and Self Study
This task included both the seminars and other lectures in this course, as
well as the time needed to learn the technologies used in this project. That
would be Git, LATEX, and the programming languages needed.
2.2.2.3
Planning
Planning was the creation of the project plan, the phases, milestones, project
organization, templates, standards and QA.
2.2.2.4
Prestudy
Prestudy includes the usual prestudy as well as the research. The research
was in this case both the market investigation and the more technical research
on Adobe AIR/Flash and STi7109/Intel CE 3100.
2.2.2.5
Product Backlog
The product backlog contains a broad description of all required features,
wish-list items and so on, prioritized by business value and development
effort.
2.2.2.6
Sprint X
All the sprints were built on the same structure.
Sprint Planning The planning of the sprints included the sprint backlog
and the overall description of what was to be done.
Sprint Documentation This is the documentation of what we did in the
sprint. It includes diagrams and description. In short, everything except the
code.
Sprint Evaluation After each sprint we evaluated what we did and looked
for improvements.
2.2.2.7
Project Evaluation
The final evaluation of the entire project.
7
2.3. PROJECT ORGANIZATION
Table 2.1: Milestones
Milestone
Date Planned
Planning
14.09.09
Prestudy
17.09.09
Product backlog
25.09.09
Pre-delivery of project report
28.09.09
Sprint 1
15.10.09
Sprint 2
04.11.09
Sprint 3
Sprint 4
Sprint 5
Presentation and demonstration 19.11.09
2.2.2.8
Re-planned Date Finished
14.09.09
25.09.09
25.09.09
05.10.09
05.10.09
28.09.09
07.10.09
07.10.09
14.10.09
14.10.09
21.10.09
21.10.09
28.10.09
28.10.09
04.11.09
05.11.09
19.11.09
Presentation and Demonstration
Preparations of the presentation and demonstration of our project.
2.2.3
Milestones
We made milestones (Table 2.1) to make sure every task was finished in
reasonable time.
2.2.4
Effort Budget
We made an effort budget (Appendix D, Figure D.1) to keep track of the
person work hours.
2.3
Project Organization
We organized the group into roles, all with different responsibilities.
2.3.1
Roles
We had six roles which covered the most important responsibilities.
2.3.1.1
Project Manager
The project manager was in charge of the whole project. He was responsible
for writing the meeting agendas for the customer and supervisor meetings,
CHAPTER 2. PROJECT DIRECTIVE
8
and being the chairman during these meetings. He was also responsible for
people keeping the deadlines and for planning and coordination of the work.
2.3.1.2
Technical Manager
The technical manager was responsible for having an overview of the technical
solutions, both in the project and out on the market. He was also responsible
for Git.
2.3.1.3
Quality Assurance Manager
The quality assurance manager was responsible for making sure we were
delivering the system in accordance to the customer’s needs. He was also
responsible for time of response.
2.3.1.4
Document Manager
The document manager was responsible for making templates of the standardized documents needed and the organization of the project documents.
She was also responsible for the final approval of phase documents and LATEX .
2.3.1.5
Customer Contact
The customer contact was responsible for keeping in touch with the customer.
All correspondence went through him. It was also his job to call in the
customer meetings and prepare for them.
2.3.1.6
Secretary
The secretary was responsible for taking notes during the meetings, writing
minutes and deliver them. She was also responsible for delivering all the
documents to the right people at the right time.
2.3.2
Group Members
An overview of the group members and their role in the project (Table 2.2).
9
2.4. TEMPLATES AND STANDARDS
Table 2.2: Group Members
Name
Email
Alessandro Boron
boron@stud.ntnu.no
Ane Min Hofplass Garnaas
garnaas@stud.ntnu.no
Lars Martin Riiser Haraldsen
larsmaha@stud.ntnu.no
Morten Weel Johnsen
mortjohn@stud.ntnu.no
Tiril Anette Langfeldt Rødland tirilane@stud.ntnu.no
Jarle Erdal Steinsland
jarleerd@stud.ntnu.no
2.3.3
Role
Quality assurance manager
Secretary
Customer contact
Project manager
Document manager
Technical manager
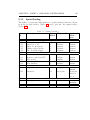
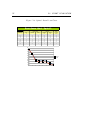
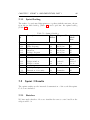
Weekly Schedule
We worked together three days each week (Table 2.3). The rest of the work
was done individually. At the start of these periods, we had group meetings.
Time
08:00
09:00
10:00
11:00
12:00
13:00
14:00
15:00
16:00
17:00
18:00
2.4
Table 2.3: Weekly Schedule
Monday
Tuesday Wednesday
Group meeting
Group working
Group working
Group working
Group meeting
Group working
Group working
Group working
Thursday
Supervisor meeting
Group meeting
Group working
Group working
Group working
Group working
Seminar
Seminar
Seminar
Seminar
Templates and Standards
This section contains the LATEX templates used in this report. Standards,
e.g. for files and code, are also presented here.
2.4.1
Templates
All templates are written in LATEX, either as standalone documents ready
to be copied and used, or as simple text ready to be inserted into another
document. The templates are included in Appendix G.
Friday
CHAPTER 2. PROJECT DIRECTIVE
2.4.1.1
10
Phase Documents
The phase documents and appendices are in the report directory and are all
named part <something> and app <something>. They are all included in
the report.tex file and compiled into report.pdf. The names are all short
for the actual phase document name.
2.4.1.2
Agenda for Meetings
We used two meeting agenda templates; one for the customer meetings and
one for the supervisor meetings.
2.4.1.3
Weekly Status Report for the Main Supervisor Meetings
There is a template for the status report in status-report.tex.
2.4.2
Standards
This is the standards used for files and for the code in the demo.
2.4.2.1
Organization of Files
The files are organized in these directories:
report contains everything needed for the final report. Here lies the report.tex
and all the phase files and appendices to be included. Figures and
images for the report are also here, having a flat structure for easier
compilation. The BibTEX-files1 can be found here as well.
meeting-agenda contains the subdirectories customer and supervisor, each
with the meeting agendas for their respective meetings.
minutes is also divided into the customer and supervisor subdirectories
and these contain their respective minutes.
status-report is divided into subdirectories named after the period of the
status report.
templates contains the document templates and are divided into meeting-agenda,
minutes, phase-documents, random and status-report. Each directory contains its respective template.
workhours contains the tables for person hours.
1
BibTEXis LATEX’s bibliography script language.
11
2.4. TEMPLATES AND STANDARDS
2.4.2.2
Naming of Files
The phase documents are named part <short-for-phase-name>2 and the
appendices are named app <short-for-appendix-name>.
2.4.2.3
Coding Style
In this section we describe the standards used for programming, in detail
how we labeled, structured and commented the source code.
Code Naming It was very important to use variable names that made
it easy to understand what this entity was used for. For naming classes,
variables and methods we used the following style:
Written in English.
A class name starts with a capital letter. If the class name consists
of more than one word, every sequent word starts with a capital letter
(Listing 2.1).
Variable and method names start with lower-case letter. If variable
and method names consist of more than one word, every sequent word
starts with a capital letter (Listing 2.2).
Method names are assigned after the method body is written.
Listing 2.1: Class Definition.
public abstract c l a s s Widget extends JFrame {
public s t a t i c int globalWidgetID = 0 ;
protected int i d ;
. . .
}
Listing 2.2: Method Definition.
public i n t e r f a c e O b s e r v e r I n t e r f a c e {
public void updateObserver ( ) ;
}
2
The part is because the phase documents separates the document into parts.
CHAPTER 2. PROJECT DIRECTIVE
12
Code Structure The programming language used is object oriented. A
class represents an abstract type of data, the state and the behavior of this
abstract data is specified respectively by variables and methods. This meaning the software consists of several classes divided by their functionality.
2.4.3
Version Control Procedures
We used Git as version control. This is Digiboards’ system as they use it
now. It has both commando line interface with Git and a web-based interface
on http://digiboards-apps.sourcerepo.com/redmine/
digiboards/projects/kpro2009.
2.4.4
Literature References
We used LATEX’s own BibTEX for references, using the Harvard style of referencing.
2.5
Documentation of Project Work
This section describes our meetings and the corresponding documents.
2.5.1
Internal Project Meetings
The group decided to have weekly meetings on Mondays from 08:00-09:00,
Wednesdays from 12:00-12:30 and Thursdays from 10:00-10:30. The Monday
meeting was be the main group meeting where we discussed the work done
the previous week, the status and the plan for next week. The two other
meetings was only short and informative so the project manager could be in
control of the resources and where they were used. In addition to the scheduled meetings the project manager decided when we needed any additional
meetings.
2.5.2
Supervisor Meetings
We had weekly meetings with the supervisors on Thursdays from 09:15-10:00.
The group delivered the meeting agenda and additional documents at least
24 hours before the meeting.
13
2.6. QUALITY ASSURANCE (QA)
2.5.3
Customer Meetings
We agreed with the customer to have meetings whenever we needed to clarify things. The frequency of the meetings was at least once every second
week. The customer could also ask for extra meetings if they thought it was
necessary.
2.5.4
Reports
The registration of personal work hours was delivered to the project manager
every Wednesday and he updated the groups total work amount for the
current week. The secretary wrote notes from the internal meetings, however,
most of the discussion was dealt with orally. We also communicated through
email and phone.
The supervisor and customer meetings had weekly minutes that was written by the secretary. The documents was delivered at least 24 hours after
the meeting.
2.6
Quality Assurance (QA)
This section was written to ensure high quality throughout the project. It
covers the response time, routines for producing first time quality results and
routines for minutes and meetings.
2.6.1
Defining Quality
Defining quality means developing expectations or standards of quality. For
our product, quality meant achieving the following goals:
The product must be easy to use.
The product must provide a better interaction between user and the
TV interface than a browser-based product.
The product must provide a friendly web interface for managing user’s
profiles and widgets.
The product must have an intuitive and simple way to access user’s
profiles, select and use widgets.
CHAPTER 2. PROJECT DIRECTIVE
2.6.2
14
Time of Response
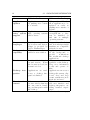
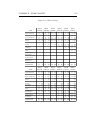
We discussed the response time with the customer and agreed on the appropriate time (Table 2.4). If, for some reason, the response time was too short,
a new response time would be discussed.
Table 2.4: Time of Response
Task
Time Limit
Arrange a meeting
24 hours before the meeting
Approval minutes of customer meeting
24 hours
Feedback on phase documents the customer 24 hours
would like for review
Approval of phase documents
24 hours
Answer to a question
24 hours
2.6.3
Routines for Producing Quality
This section explains the routines followed to ensure quality and approval of
all documents produced and all code written.
2.6.3.1
Routines for Producing High Quality Internally
Each group member approved the following routines.
We had three internal official weekly meetings according to the free time
of each group member:
On Monday the meeting starts at 08:00 and finish at 09:00
On Wednesday the meeting starts at 12:00 and finish at 12:30.
On Thursday the meeting starts at 10:00, immediately after the meeting
with our supervisors, and finishes at 10:30.
More meetings were arranged when needed. Rooms for these meetings
would vary depending on the availability.
Meetings were arranged by sending an email to the kpro2-mailing list
(kpro2@idi.ntnu.no) stating the room and the purpose of the meeting.
Minutes for the internal meetings were sent to the kpro2-mailing list.
Minutes were approved at the following meeting.
Each group member was responsible for keeping track of his/her own
effort hours during the week and update this on an online spreadsheet.
15
2.6. QUALITY ASSURANCE (QA)
2.6.3.2
Routines for Approval of Phase Documents
Each group member agreed with the following routine for approving the
documents.
The project manager set the deadlines and assigned different parts of the
phase documents to each member according to the project plan. If a member
of the group had any problem, for example meeting a deadline, he/she was
to contact the project manager as soon as possible.
Each group member worked with the task assigned according to the given
deadlines.
When a group member finished his/her work, he/she would commit it to
the Git repository.
The document was sent to the document manager that assembled the
parts and created the finished phase documents.
The assembled document had to be read by all group members before
the internal meetings and feedback were given. After evaluation of the feedback, it was sent by email to the supervisor, the assistant supervisor and the
customer for approval and comments.
2.6.4
Routines for Minutes and Meetings
This section explains the routines for minutes and meetings with both the
customer and the supervisors.
2.6.4.1
Calling for a Meeting with a Customer
Meetings with the customer were arranged when we needed to discuss the
status of the project or problems regarding it. An email (Appendix G) was
sent to the customer, and the kpro2-mailing list (kpro2@idi.ntnu.no), at
least 24 hours before the meeting with information about:
Date, time and location for the meeting.
Agenda for the meeting.
Any documents that the customer should have before the meeting
started.
The meetings were set up by the customer contact.
CHAPTER 2. PROJECT DIRECTIVE
2.6.4.2
16
Minutes of a Customer Meeting
The minutes (Appendix G) were to be delivered within 24 hours. The secretary sent an email with the minutes to the kpro2-mailing list. If the group
approved it, the document was sent to the customer for comments.
2.6.4.3
Calling for Weekly Advisory Meeting with the Supervisors
Each week, on Thursday morning at 09:00 in room 242 of the IT-building, we
had a meeting with the supervisors. Here we discussed the situation of the
project, all problems that came up and received feedback on the documents.
An email (Appendix G) was sent to the supervisors every Tuesday afternoon before the meeting with information about:
Date, time and location for the meeting.
Agenda for the meeting.
Any documents that the supervisors should have before the meeting
started.
The meeting was set up by the project manager.
2.6.4.4
Minutes of the Weekly Meeting with the Supervisors
The secretary sent an email with the minutes (Appendix G) from the customer meetings to the kpro2-mailing list. If the group approve it, the document was delivered to the supervisors so we could receive feedback.
CHAPTER 3
Preliminary Study
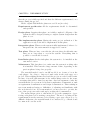
The preliminary study is to gain a deeper understanding of the various technical and theoretical aspects of the project task. In order to develop a good
solution it is vital that the task is investigated thoroughly. It is also necessary
to study and consider possible existing solutions for the problem.
The prestudy is intended to be used as a technical reference for the team.
3.1
Background Information
Here follows background information of the television industry and the technologies we were planning to use in our project, as well as an introduction
to usability and architecture.
3.1.1
An Overview of the Television Industry
Modern day television (Wikipedia 2009f) is a fairly complex business in which
several different actors are involved in the different stages. The process of getting from an idea to a broadcasted TV show can roughly be divided into three
parts or stages. These are planning, production and distribution/broadcasting.
3.1.1.1
TV Shows
There are three basic types of TV shows. Scripted TV shows (e.g. TV series,
TV movies), unscripted TV shows (e.g. talk show, reality show) and infor17
CHAPTER 3. PRELIMINARY STUDY
18
mational TV shows (e.g. documentary, news, weather forecasts). The most
important part of developing a TV show is the concept. For a scripted TV
show there will also be the need to describe the main characters and coming
up with their background story. For unscripted TV shows, the developers
must decide what types of people they want in their show. This are usually
strongly connected to the concept. For a talk show you might want the host
to have certain personal qualities that fits with the concept. When it comes
to the informational TV shows, doing research on the topic becomes a major
part of the development (research will probably be necessary in the other two
types of TV shows as well, but not to the same extent) and putting together
a research team becomes necessary.
The development of a TV show starts with someone having an idea and
then developing this idea into a concept. When the creator of a TV show
has decided on the theme and the main plot he must start to create the main
characters, the environment and the background history of the characters.
After he is done developing, he must find a TV stations that is willing to
present his work. At this stage he has typically only made one episode, called
the pilot, which is used to see whether or not people like it. If the pilot is
appreciated the production of the rest of the show can begin.
3.1.1.2
TV Stations
Most larger TV stations have their own TV studio with recording equipment
and produce some of their own content. The content which most commonly is
produced in-house by a TV station is news, weather forecasts, talk shows and
other local content. Larger TV shows, like TV series and documentaries, are
usually put out to a specialized production company. Smaller TV stations,
on the other hand, usually cannot afford to do any in-house production. They
let specialized production companies do the production of local content for
them, and buy the rest of their content from other providers. There are also
those TV stations that do not produce any content of their own, but rely
solely on buying from others.
Most TV stations on the Norwegian market do not have many shows that
are produces by themselves. One exception is the government-owned TV
station, NRK, that has a high share of Norwegian content that they produce
in-house. Another TV station that has above average ratio of Norwegian selfproduced content is TV2. The other TV stations buy most of their content
from major TV networks in the United States and the United Kingdom.
It is expensive to buy TV content, but having a production company
produce a TV show for you is even more expensive. Having your own TV
studio to produce your own TV shows, is the most expensive. There are
19
3.1. BACKGROUND INFORMATION
three ways TV stations can make money; having a tax or license, advertising
or a subscription fee. In Norway the government-owned TV station NRK, is
funded by a biannual TV license which all households with a TV must pay.
Most TV stations though, are funded by advertisement. In Norway there is
a law that limits the amount of commercial advertisement a TV station is
allowed to air. This results in fewer commercial breaks in Norwegian TV,
compared to American TV. There are two rules that limits the amount of
advertisement a TV station can have. Rule number one states that the
commercial breaks can maximum last a total of 15 % of the program time
a TV station has during one day. The second rule states that there can
be a maximum of 12 minutes of commercial breaks for each hour. Some
TV stations tend to avoid these laws by broadcasting from abroad. The
subscription fee model is also used by a few TV stations (e.g. TV1000,
Canal+). By paying this fee you get access to some TV series and movies
before they are shown on other TV stations.
3.1.1.3
Content Distribution
There are several different technologies for distributing TV content to the
end users. The most common in use to day are digital broadcast, cable,
satellite and IPTV1 . For distributing its content, a TV station has the choice
between owning its own infrastructure, selling its content to distributors or a
combination of both. The most common way for a TV station to distribute
its content in Norway, is to license its content to distributors like Get, Canal
Digital, Lyse (Altibox) etc. Exceptions to this are NRK and TV2, which
along with Telenor, owns Norges Televisjon AS (NTV), the owner of the digital terrestrial. Both of them distributes their content on this infrastructure
in addition to license their content to all the other distributors. Another
exception is Viasat, the company owning TV stations like TV3 and Viasat
4, that owns their own satellites in addition to license their content to the
other distributors.
When the content from a TV station has been transferred to the end
consumer, the signal must be converted into something that can be displayed
on a TV. Hence the top-set box. A top-set box is a box that is placed
between the signal source from your distributor and your TV. It converts
the signal that is received into moving images that can be displayed on the
TV. In addition, the top-set boxes usually also provide extra features, like
electronic program guides (EPG), Internet browsing, recording and video
on demand (VoD). Because of most distributors’ infrastructure are closed
i.e. digital television delivered over a packet-switched network using the Internet
protocol
1
CHAPTER 3. PRELIMINARY STUDY
20
networks they usually require that you use their set-top boxes for connecting
to their infrastructure. These boxes are usually from a major vendor, which
specializes in producing set-top boxes that have been re-branded and adapted
for use in the distributors network. When you sign up for a subscription, they
will either sell or rent you the set-top box you will need to connect to their
infrastructure.
3.1.2
Technologies Concerning our Original Assignment
The scope of this section is to analyze technologies that help the development
process. According to the customer requirements our attention is focused on
Adobe products such as Air and technologies that are possible to use with
it, such as Flash, Flex and Ajax. There is also a description of WebKit the
HTML renderer that Adobe Air use to display web content in applications.
As the focus of the project changed, we did not actually use any of these
technologies. It will, however, be used in the actual system, which will be
implemented by Digiboards.
3.1.2.1
Adobe AIR
Adobe®Integrated Runtime (AIR) (Adobe Systems Incorporated 2009a,
Paul 2008) is a cross-operating system runtime (nicknamed Apollo) that lets
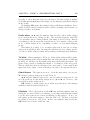
developers combine HTML, Ajax, Adobe Flash, and Adobe Flex technologies. This can be used to deploy Rich Internet Applications (RIAs) on the
desktop. AIR is a browser-less runtime environment that complements the
browser by providing the same application development and deployment benefits while adding desktop integration, local data access and so on. Browserdeployed applications, however, are more limited in where and how data can
be accessed and stored. More info in Table 3.1.
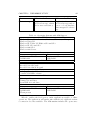
Table 3.1: Rich Internet Application: Browser vs. Desktop
Feature
Application
delivery
Installation
RIAs in the Browser
Applications can be easily discovered, explored,
and used.
No application installation is necessary.
RIAs on the Desktop
Installed
applications
have more persistence,
power, and functionality.
Applications
install
seamlessly from the
browser or download and
install like a traditional
desktop application.
Continued on next page
21
3.1. BACKGROUND INFORMATION
Feature
Application
updates
RIAs in the Browser
Applications are updated
by pushing new content
to a website.
Multiple operating system
support
Applications run on multiple operating systems
and browsers.
Programming
languages
JavaScript is provided
by browsers and ActionScript is provided by
Adobe Flash®Player.
RIAs can run only in a
visible browser window.
Background
capability
Persistence
Activity is limited to the
browser session. When
the browser is closed, information is lost.
Desktop integration
Applications are sandboxes, so desktop integration is limited.
User interface
control
RIAs run within a
browser window that has
its own controls, branding, and integration with
the desktop.
RIAs on the Desktop
AIR provides APIs that
allow applications to be
updated as easily as
pushing new content to a
website.
AIR applications are
cross-platform, so they
can be installed on
and run on multiple
operating systems.
Integrated
JavaScript
and ActionScript virtual
machines are compatible
with the browser.
Applications can run
in the background or
provide
notifications
like traditional desktop
applications.
RIAs are installed and
available on the desktop.
They store information
locally and operate offline.
Applications can access a
desktop file system, clipboard, drag and drop
events, system tray/notifications, and more.
RIAs have a customizable user interface and
desktop integration, enabling branded experiences.
Continued on next page
CHAPTER 3. PRELIMINARY STUDY
Feature
Data storage
RIAs in the Browser
Applications have limited local storage, which
the browser can destroy.
22
RIAs on the Desktop
Applications have unlimited local storage and access to a local database,
plus encrypted local storage.
Table 3.2: Operating Systems with AIR Support
Windows
Windows Vista®Home Premium, Business, Ultimate, or Enterprise
Windows Vista SP1
Windows XP Tablet PC Edition SP2 and SP3
Windows XP SP2 and SP3
Windows 2000 SP4
Windows 2003 Server
Requirements
Minimum
Recommended
Intel Pentium III 1GHz or faster Pentium 4 2GHz or faster
512MB RAM
1GB RAM
Mac OS X
Mac OS X 10.4 Tiger
Mac OS X 10.4 Leopard
Mac OS X 10.4 Snow Leopard
Requirements
Intel Core Duo 1.83GHz or faster
PowerPC G4 1GHz or faster
Linux
Fedora 8 and later
Ubuntu 7.10 and later
OpenSUSE 10.3 and later
Requirements
Minimum
Recommended
Intel Pentium III 1GHz or faster Pentium 4 2GHz or faster
512MB RAM
1GB RAM
XTerm present
AIR also enables the developers to make applications capable of offline
operations. The application will synchronize with the web application when
a connection becomes available. The AIR runtime includes the open-source
23
3.1. BACKGROUND INFORMATION
WebKit HTML renderer, which is used to display web content in applications.
This makes it possible to build entire AIR programs, using standards-based
web technologies and the same techniques that one would use to build a web
site. Developers can also use AIR to deploy Adobe Flex programs, which are
created with ActionScript and an XML-based user interface language. Use of
HTML obviously provides a high level of flexibility for user interface design.
Adobe AIR supports Adobe Flash 10 and it is available for the operating
systems in Table 3.2.
3.1.2.2
Adobe Flash
Adobe Flash (Adobe Systems Incorporated 2009b, Wikipedia 2009a) is a
multimedia platform created by Macromedia and currently developed and
distributed by Adobe Systems. Flash has become a popular method for
adding animation and interactivity to web pages. Flash is commonly used to
create animation, advertisements and various web page Flash components,
to integrate video into web pages. More recently, it is also used to develop
Rich Internet Applications. Flash can manipulate vectors, raster graphics
and supports bidirectional streaming of audio and video. In particular, the
last version, Flash 10, includes H.264 video support and does not require
the client to install any extra software. Initially focused on animation, early
versions of Flash content offered few interactivity features and thus had very
limited scripting capability. More recent versions include ActionScript, a
scripting language used to create almost all of the interactivity (buttons,
text entry fields, drop down menus) seen in many Flash applications. Flash
comes as a browser plug-in for all major browsers on Windows, GNU/Linux,
Mac OS and different UNIX/BSD flavors. Flash specializes in vector graphics
animation, but the latest versions have improved bitmap rendering drastically
as well. The fact that the vast majority of users already have Flash installed
makes it a perfect tool for the job of displaying multimedia as platform
independently as possible.
3.1.2.3
Adobe Flex
Flex (Adobe Systems Incorporated 2009c) is a free, open source framework
for building highly interactive, expressive web applications that deploy consistently on all major browsers, desktops, and operating systems. It provides
a modern, standards-based language and programming model that supports
common design patterns. MXML, a declarative XML-based language, is used
to describe UI layout and behaviors, and ActionScript 3, a powerful objectoriented programming language based on industry-standard ECMAScript, is
CHAPTER 3. PRELIMINARY STUDY
24
used to defines the client-side application logic. MXML and ActionScript are
compiled together into a single SWF file that makes up your Flex application. Flex also includes a rich component library with more than 100 proven,
extensible UI components for creating Rich Internet Applications, as well as
an interactive Flex application debugger. RIAs created with Flex can run in
the browser using Adobe Flash Player software or on the desktop on Adobe
AIR, the cross-operating system runtime. This enables Flex applications to
run consistently across all major browsers and on the desktop. By using
AIR, Flex applications can now access local data and system resources on
the desktop.
3.1.2.4
Ajax
Asynchronous JavaScript and XML (Garrett 2005, Wikipedia 2009b) is a
group of interrelated web development techniques on the client-side used to
create interactive web applications or RIAs. With Ajax, web applications
can retrieve data from the server asynchronously in the background without
interfering with the display and the behavior of the existing page. With
Ajax, the idea is that you get a richer and faster user experience. Properly
implemented, a web page can become a RIA. Most extremely popular web
sites use Ajax to some degree. As told before, Ajax is not a technology in
itself but use the following technologies:
XHTML and CSS for the presentation.
The Document Object Model (DOM) for dynamic display of and interaction with data.
XMLHttpRequest (XHR) for exchanging asynchronously data between
browser and server, thereby avoiding page reloads.
XML and XSLT for the interchange, and manipulation and display, of
data, respectively.
JavaScript for binding this technologies together.
JavaScript is not the only client-side scripting language that can be used
for implementing an Ajax application. Other languages such as VBScript
are also capable of the required functionality. However, JavaScript is the
most popular language for Ajax programming due to its inclusion in and
compatibility with the majority of modern web browsers. Even though Ajax
and XMLHttpRequest both reference XML, the data that is used does not
necessarily have to be formatted as XML. In fact, more and more other data
formats, such as JavaScript Object Notation (JSON), are being used.
25
3.1. BACKGROUND INFORMATION
Figure 3.1: Ajax vs. Classic I
CHAPTER 3. PRELIMINARY STUDY
Figure 3.2: Ajax vs. Classic II
26
27
3.1. BACKGROUND INFORMATION
Classic Model vs. Ajax Model Web Applications The classic web application model (Figures 3.1 and 3.2 (Garrett 2005)) works like this: most user
actions in the interface trigger an HTTP request back to the web server. The
server, after doing some process, returns an HTML page to the client. When
the server is working, user has to wait. An Ajax application eliminates the
start-stop nature of interaction on the Web by introducing an intermediary,
the Ajax engine, between the user and the server. Instead of loading a web
page at the start of a session, the browser loads the Ajax engine written in
JavaScript and usually tucked away in a hidden frame. It is responsible for
both rendering the interface that the user sees and communicating with the
server on the user’s behalf. The Ajax engine allows the user’s interaction
with the application to happen asynchronously. In this way the user never
waits while the server is working. Every user action that normally would
generate an HTTP request takes the form of a typical JavaScript call to the
Ajax engine instead. Any response to a user action that does not require a
trip back to the server, such as simple data validation, editing data in memory, and some navigation, the engine handles on its own. If the engine needs
something from the server in order to respond, such as submitting data for
processing, loading additional interface code or retrieving new data, the engine makes those requests asynchronously, usually using XML. This without
stalling a user’s interaction with the application.
Strengths of Ajax
In many cases, related pages on a website consist of much content that
is common between them. Using traditional methods, that content
would have to be reloaded on every request. However, using Ajax, a
web application can request only the content that needs to be updated,
thus drastically reducing bandwidth usage and load time.
The use of asynchronous requests allows the client’s Web browser UI to
be more interactive and to respond quickly to inputs. Sections of pages
can also be reloaded individually. Users may perceive the application
to be faster or more responsive, even if the application has not changed
on the server side.
The use of Ajax can reduce connections to the server because scripts
and style sheets only have to be requested once.
The state can be maintained throughout a Web site. JavaScript variables will persist because the main container page need not be reloaded.
CHAPTER 3. PRELIMINARY STUDY
28
Weaknesses of Ajax
Pages dynamically created using successive Ajax requests do not automatically register themselves with the browser’s history engine. This
meaning that clicking the browser’s ”back” button may not return the
user to an earlier state of the Ajax-enabled page, but may instead return them to the last full page visited before it.
Dynamic web page updates also make it difficult for a user to bookmark a particular state of the application. Solutions to this problem
exist, many of which use the URL fragment identifier (the portion of a
URL after the ’#’) to keep track of, and allow users to return to the
application in a given state.
Any user whose browser does not support Ajax or JavaScript, or simply has JavaScript disabled, will not be able to use its functionality.
Similarly, devices such as mobile phones, PDAs, and screen readers
may not have support for JavaScript or the XMLHttpRequest objects.
Also, screen readers that are able to use Ajax may still not be able
to properly read the dynamically generated content. The only way to
let the user carry out functionality is to fall back to non-JavaScript
methods. This can be achieved by making sure links and forms can
be resolved properly and rely not solely on Ajax. In JavaScript, form
submission could then be halted with ”return false”.
The same origin policy prevents some Ajax techniques from being used
across domains, although the W3C has a draft of the XMLHttpRequest
object that would enable this functionality.
Ajax opens up another attack vector for malicious code that web developers might not fully test for.
3.1.2.5
WebKit
WebKit (WebKit 2009, Wikipedia 2009j) is an open source web browser
engine. WebKit is also the name of the Mac OS X system framework version
of the engine that is used by Safari, Dashboard, Mail, and many other OS X
applications. Several browsers such as Safari and Google Chrome use WebKit
engine. The WebKit engine provides a set of classes to display web content
in windows, and implements browser features such as following links when
clicked by the user, managing a back-forward list, and managing a history
of pages recently visited. Its WebCore and JavaScriptCore components are
29
3.1. BACKGROUND INFORMATION
available under the GNU Lesser General Public License, and the rest of
WebKit is available under a BSD-style license.
WebKit Components
WebCore A layout, rendering, and Document Object Model (DOM) library for HTML and SVG, developed by the WebKit project. Its complete source code is licensed under the LGPL. The WebKit framework
wraps WebCore and JavaScriptCore, providing an Objective-C application programming interface to the C++-based WebCore rendering
engine and JavaScriptCore script engine. This allowing it to easily
be referenced by applications based on the Cocoa API; later versions
also include a cross-platform C++ platform abstraction, and various
ports provide additional APIs. WebKit passed the Acid2 test and as of
September 2008, nightly builds (including Safari 4) passed the Acid3
test as well.
JavaScriptCore A framework that provides a JavaScript engine for WebKit
implementations, and provides this type of scripting in other contexts
within Mac OS X. JavaScriptCore is originally derived from KDE’s
JavaScript engine (KJS) library (which is part of the KDE project)
and the PCRE regular expression library. Because of forking from KJS
and PCRE, JavaScriptCore has been improved with many new features and greatly improved performance. On June 2, 2008, the WebKit
project announced they rewrote JavaScriptCore as ”SquirrelFish”, a
byte code interpreter. The project evolved into SquirrelFish Extreme
(abbreviated SFX, marketed as Nitro), announced on September 18,
2008, which compiles JavaScript into native machine code, eliminating
the need for a byte code interpreter and thus speeding up JavaScript
execution.
Drosera A JavaScript debugger that was included with the nightly builds of
WebKit. It was named after Drosera, a genius of carnivorous plants (i.e.
bug-eaters). Drosera has been replaced by the inclusion of debugging
functionality in the Web Inspector.
SunSpider A benchmark suite that aims to measure JavaScript performance on tasks that are relevant to the current and near future use
of JavaScript in the real world, such as screen drawing, encryption and
text manipulation. The suite further attempts to be balanced and statistically sound. It was released by Apple’s WebKit team in December
CHAPTER 3. PRELIMINARY STUDY
30
2007. It was well-received and other browser developers also use it to
compare the JavaScript performance of different browsers.
3.1.3
Software Architecture
The software architecture (Bass, Clements and Kazman 2003) of a program
or computing system is the structure of the system, which compromise software elements, the externally visible properties of those elements and the
relationships among them.
An architectural pattern is a description of element and relation types
together with a set of constraints on how they may be used:
Reference model is a division of functionality together with data flow
between the pieces.
Reference architecture is a general architecture that can be used to
cover various customers’ needs.
Software architecture is a specific architecture that covers a specific
customer’s need.
Figure 3.3: Software Architecture
3.1.3.1
4+1 View
The 4+1 view is widely used in architecture and consists of different views.
These are namely; Logical view, development view, process view and physical
view. The latest combines the four views into a scenario view. The views
are described as followed (Bass et al. 2003):
”Logical The elements are key abstractions, which are manifested in the object-oriented world as objects or object classes.
This is a module view.
31
3.2. THE SITUATION AND SOLUTIONS OF TODAY
Process This view addresses concurrency and distribution of
functionality. It is a component-and-connector view.
Development This view shows the organization of software modules, libraries, subsystems and units of development. It is
an allocation view, mapping software to the development
environment.
Physical view This view maps other elements onto processing
and communication nodes and is also an allocation view
(which others call the deployment view).
Scenario view A combination of the other views to show their
relations.”
3.2
The Situation and Solutions of Today
This section describes how the market for ’Internet on TV’ is today.
3.2.1
Internet on TV as of Today
Broadcasting live television online is something that has been more and more
frequently used and known among people. The idea of using Internet on the
home television is not completely uncommon either. The way it has been
implemented earlier is, however, pretty advanced. You would often need a
keyboard and preferably a mouse to control the browser shown at your television screen. The browser being shown is usually a full scale browser, which
most is familiar with from computer use. Having all these components set
up correctly you are able to surf the Internet as if it was your own computer.
This, however, is proving to be quite a lot of stress just to get online. People
tend to prefer their laptop or other Internet enabled devices because it is easier and more user friendly. Most of the solutions that have been implemented
today are often quite slow too.
Sony, an Electronic and TV producing company, has recently published
a video and DVD player that also takes you online. They introduced it with
a remote control that enabled switching between Internet, watching DVDs
and watching regular television. If you wanted to surf the Internet properly
you had to connect a keyboard.
This is all very well, but is to most people stressful and too much work
just to get online. People tend to prefer their computer and no extra need
for a keyboard plug-in.
CHAPTER 3. PRELIMINARY STUDY
32
The purpose of this section is to give a bright overview about solutions
afforded by other Internet-TV providers. Our attention is focused not only on
the Norwegian market but also towards European and US market, analyzing
if there exists a solution similar to what the customer wants.
3.2.2
Why Did It Not Come Earlier?
The promise of the Internet on TV has been thwarted by a variety of factors. The slow pace of broadband penetration in some areas of the world,
the relative unavailability of Internet-based content and the limited ability
of existing Consumer Electronics (CE), may help explain the low rate of
adoption.
On the positive side, we are seeing steady progress in all of these areas.
Faster broadband services are becoming more widely available and TV networks and content service providers are using the Internet to disseminate
increasing volumes of content.
There is another fundamental reason that PC-based Internet usage models have not won wide acceptance in the TV space. TV viewers prefer a
simple navigation that provides them with easy access to familiar Web content, such as sports, news, weather and Web videos. They want to keep
in touch with friends and family through social networking sites and photo
sharing applications, but they do not want a browser interface on their TV.
Above all, they do not want menu screens and applications to interfere with
the fun and relaxation of watching television. This is why most part of people prefer to use their own PC. It is more user-friendly for accessing the Web
contents, instead of using the TV with a browser.
3.3
The Wanted Situation and Its Possible
Solutions
This section describes the wanted situation with widgets on TV. It describes
how Digiboards wants this, and how Yahoo! and Intel already have designed
it.
3.3.1
Digiboards’ Vision
For years, the idea of an Internet-enabled TV was viewed negatively. A
central pain point for the early solutions was the complexity of the interface;
in most cases, it was based on a browser and required user input from a
keyboard.
33
3.3. THE WANTED SITUATION AND ITS POSSIBLE SOLUTIONS
Digiboards’ solution is addressing the need for Internet content on consumers TVs in a user friendly manner, and make Internet on TV a pleasant
experience.
Digiboards’ widget platform takes advantage of industry standard-tools
making it easy to rapidly develop and use TV widgets based on popular Internet services. Ordinary users with no programming skills can easily connect to
dynamic Internet services and create their own widgets online, while skilled
developers may use the web-based widget creator to create TV web-widgets
that leverage a richer user interface.
Digiboards Widget Dashboard (DWD) enables TV owners to mix in their
favorite Internet content without intruding their TV watching. The users
personalizes the TV content through their web browser where they select
dashboard themes and widgets such as weather, stocks, sports scores, social
networking, photo sharing, casual games and music.
DWD for the digital home is poised to give consumers a new way to receive
and interact with rich content applications and services on their Internetenabled televisions. It will dramatically change the nature of TV viewing,
and it is beginning to open a new world of opportunity for the viewers,
Original Equipment Manufacturers (OEM’s) and content providers.
Digiboards products most important property, the key to their success,
is how easy it is to use for end users. With the click of a single button on a
remote control, users get their favorite Internet content directly on their TV.
Their revenues come from a mixed model of ads, plus premium usage for a
fee, and other services.
3.3.2
Yahoo!’s Solution
One year ago, Yahoo!Inc. and Intel Corporation 2 announced a new way to
provide this kind of services that revolutionized the user experience. They
collaborated together to provide a full-featured software framework, named
Widget Channel, that allows TV viewers to enjoy rich Internet applications,
called TV Widgets, while watching TV.
Consumer electronics (CE) platforms from Intel, such as the Intel®Media
Processor CE 3100, provide the robust processing performance and headroom
needed to create a new consumer experience. Widget Channel provides a
simple and user friendly way to personalize, enjoy and share Internet content and services on TV by enabling multiple Internet applications to be
One of the major American public corporation that provides Internet services worldwide the latter the world leader in silicon innovation, develops technologies, products and
initiatives to continually advance how people work and live.
2
CHAPTER 3. PRELIMINARY STUDY
34
Figure 3.4: Flickr on TV
displayed on the TV screen concurrently with video programming. The software framework is designed to run on a variety of connected CE devices
including advanced DVD players, Blu-ray players, set-top boxes and integrated Digital TVs. Widget Channel allows consumers to enjoy rich Internet
Application designed for TV while watching their favorite TV programs using
a new user-friendly interface.
The idea behind this is not using a web browser for providing the services,
but use a fifth-generation applications platform, the Yahoo! Widget Engine,
that will enable TV watchers to interact with and enjoy a rich set of TV Widget or small Internet applications. These are designed to complement and
enhance the traditional TV watching experience and bring content, information and community features available on the Internet within easy reach of
the remote control. It is very simple watching video clips and photos, reading email, or access your favorite web service like eBay, Twitter and Flickr.
Users only have to push a button on their remote control to bring up the
Widget Dock, select a TV Widget and view content while they are watching
their favorite TV show.
The strength of the system is that it is possible to access web contents
and in the meanwhile watching TV programs. For example users can watch
the pictures of their vacation without missing a moment of their favorite
baseball team.
The Yahoo! Widget Engine is based on the popular Konfabulator widget platform for PC, which has been re-engineered specifically for consumer
electronics devices. It also provides an entry-level framework for running TV
35
3.4. SWOT ANALYSIS
Figure 3.5: Widget Dock
Widget on the constrained hardware capabilities of today’s integrated digital
TVs.
Yahoo! and Intel have also released the Widget Development Kit (WDK)
available to developers, CE manufacturers, advertisers and content publishers providing the tools needed to create new Widgets. The WDK allows
developers to use JavaScript, XML, HTML, and Adobe Flash to write TV
applications for the platform, extending the power and compatibility of PC
application developer programs to TV and related CE devices. With the
Widget Development Kit (WDK), developers and publishers can quickly create and deploy TV Widgets, by leveraging a rich set of interfaces called the
Widget Channel API. The Widget Channel API provides access to popular Internet technologies such as Konfabulator (JavaScript and XML) and
HTML. The Yahoo! Widget Engine and Widget Channel frameworks implement different levels of functionality from the Widget Channel API.
Yahoo! TV Widgets are available at the moment only for several TV
and set-top box manufacturers like Sony, Samsung, LG, AT&T and TiVo.
Widgets that are possible to use depend on the model of TV or the set-top
box.
3.4
SWOT Analysis
SWOT analysis is a strategic planning used to evaluate strengths, weaknesses,
opportunities and threats involved in a project or in a business venture.
The scope of this section is to identify the internal and external factors
CHAPTER 3. PRELIMINARY STUDY
36
that are favorable and unfavorable to achieve the project objective. Internal
factors are usually classified as strengths (S) and weaknesses (W) while those
external are classified as opportunities (O) and threats (T).
There are SWOT analysis of the widget channel (Figure 3.6). This SWOT
analysis shows that there are competitors, so our system needs something
special to stand out. Sticky widgets can do the trick. It is also a possibility
to take the place as the market leader, and things in this area happens fast.
Widgets are not available for all countries, but this can be used as a strength,
as our system can be available for these countries, which have no competition.
It should be easy to personalize the widgets, and to create new ones. This
should be possible for our system to do.
3.5
Business Requirements
The business requirements were designed based on the discussion with the
customer and other information from the customer. Digiboards planned to
have a complete beta version with basic functionality within 2009.
In order to get this done we needed to have a prototype of the system
made for one of the microcontrollers, either the STi709 or Intel CE 3100.
Their intent was to release the product to the market in Q2 2010, have their
first commercially sale Q4 2009. Digiboards will have the control of the web
application system, thus the group’s focus is on the microcontrollers and
getting the widgets layered structure. These business requirements, which
were divided into functional and non-functional requirements, formed the
foundation of the product backlog and requirements for the project.
3.5.1
System Requirements
SR1 The chip must support Adobe AIR. If not Adobe AIR is supported, it
must at least support Adobe Flash.
SR2 The group needed to use Webkit and JavaScript in the development
process .
SR3 One of the microcontrollers, either the STi7109 Microcontroller or Intel
Media Processor CE 3100, must be used in the project.
3.5.2
End Deliveries
Having discussed with Digiboards, the end deliveries were to be as follow:
37
3.6. ACQUIRING THE HARDWARE
Figure 3.6: SWOT Analysis of the Widget Channel
A prototype of the complete system.
Basic research around the project.
Thoughts of future possibilities.
3.6
Acquiring the Hardware
As a part of our research and prestudy Digiboards wanted us to get the
information on the devices they chose for us. That being the ST Micro
STi7109 chip and the Intel Media Processor CE 3100. They wanted us to get
in contact and see if it was possible to get hand of an evaluation board for
the chip. This board is is a developer board to make it easier to develop for
the chip. Unfortunately this turned out to be a bit hard, as student groups
do not have much influence on these type of companies.
3.6.1
STMicroelectronics
In the research of the ST Micro controller (STi7109) we found the web page
http://www.st.com hard to browse for information. After spending hours
CHAPTER 3. PRELIMINARY STUDY
38
on searching the web with no results on the evaluation board, we sent an
email to the distributors of the chip in Norway (Appendix I). We sent out
emails to three to four companies and got pretty fast response. Unfortunately
the response was negative. This is an excerpt from ST’s response:
”Sorry but we are not in a position to support this request.
The board in itself is just a brick in the setup, then you need
the STAPI software license which cost itself 10k$, you need the
debuggers etc.. And of course all projects requires support from
ST at some point, and our support group is already overloaded
so we cannot enterprise to support a such project without clearly
identified potential.”
After bringing this up at the customer meeting, we decided to give up
ST and try to get the chip from Lyse Altibox instead. In the meanwhile we
could look at another solution; getting an Intel chip.
3.6.2
Intel Media Processor CE 3100
The starting place with the Intel chip was much the same as with the ST
chip. We browsed through the web pages, Googled around for information
and emailed the Norwegian and Swedish distributors in order to get a hold of
the chip. We got a more positive response from Intel Sweden, although they
needed more information to help the group. The information were brought
to them by Harald Amundsen, the CEO of Digiboards.
3.7
Alternative Microcontrollers
The solution Digiboards wanted, must run on a microcontroller. More specific, a microcontroller from a television set. We were looking at the ST
chip (ST Micro STi7109 Single-Chip Set-Top Box IC), which are in most
television sets today, and the Intel®x86-chip (Intel®Media Processor CE
3100), which is newer, fancier and not as common. However, what chip we
chose depended more on which one we could get a hold on than how suited
it was for the task. We also discussed a third solution; to get some poor
hardware from Digiboards that we could use to develop something for the
final presentation.
3.7.1
Description of Alternative Microcontrollers
The microcontrollers differ in many ways. Here we describe each microcontroller, focusing on hardware, video streams, graphics, and available operat-
39
3.7. ALTERNATIVE MICROCONTROLLERS
ing systems.
3.7.1.1
ST Micro STi7109 Single-Chip Set-Top Box IC
ST Micro STi7109 Single-Chip Set-Top Box IC is a set-top box microcontroller from the Italian-French electronics and semiconductor manufacturer
STMicroelectronics.
Description As stated in (STMicroelectronics, Data Brief 2006), the STi7109
is a high-definition set-top box/DVD decoder chip, based on the Omega2
(STBus) architecture. It provides high performance for low-cost high definition (HD) systems. It includes both Windows Media Video 9 and H.264
video decoders, supporting low bit rate applications. It supports distribution
of TV-signals via digital terrestrial, satellite, cable DSL (Digital Subscriber
Line) and IP (Internet Protocol).
Hardware It has an embedded ST40 processor, with the SuperH CPU core,
running at 266 MHz, that is used for controlling the box and running applications. It also has a dual DDR1 SDRAM interface which is used by the
hardware units requiring higher performance, such as the hardware video decoders and the CPU. The set-top box also has a second memory that it uses
as flash memory. It is also used for peripherals and allowing the exchange
of data between two STi7109 chips. In addition, it can connect to a harddisk drive, either through the serial ATA (Advanced Technology Attachment)
interface, or through the USB 2.0 port.
Video Streams The STi7109 demultiplexes, decrypts and decodes HD (High
Definition) or SD (Standard Definition) video streams with associated multichannel audio. The video is output to two independently formatted displays;
both a full resolution display intended for a TV monitor, and a downsampled
display intended for a VCR or DVD-R. The display connection can either be
analog through the DACs (Digital-to-Analog Converter), or digital through a
copy protected DVI (Digital Visual Interface)/HDMI (High-Definition Multimedia Interface). STi7109 can take digitized analog programs as input for
reformatting and display.
Graphics The chip also includes a graphics rendering and display capability
with a 2D graphics accelerator, three graphics planes and a cursor plane.
Thanks to a dual display compositor, it is possible to mix graphics and video
with independent composition for each of the TV and VCR/DVD-R outputs.
CHAPTER 3. PRELIMINARY STUDY
40
It is also possible for seven different transport streams, from different sources,
to be merged and processed concurrently.
Operating Systems STi7109 is both Linux, Windows®CE and OS21 compatible. All this makes STi7109 one of the most used set-top boxes of today.
3.7.1.2
®Media Processor CE 3100
Intel
Intel®Media Processor CE 3100 is a media microcontroller from Intel®Corporation,
one of the largest semiconductor chip makers in the world.
Description According to (Intel Corporation, Product Brief 2008), the CE
3100 is the first system-on-a-chip based on the Intel®architecture (IA). This
is developed for Blu-ray players with Internet connections, advanced cable
set-top boxes and modular digital televisions, as well as other Internet connected consumer electronics products.
To do that, the chip combines a high-performance IA processor core with
video decoding and processing hardware, dedicated multi-channel audio processing DSPs (Digital Signal Processor), a powerful 3D-graphics engine, a
security processor and support for multiple peripherals.
The CE 3100 chip is trying to combine the advantages of IA, such as
access to a great library of code, with those of a system-on-a-chip, such as
the cost-effectiveness, the integration, the low power consumption and so on.
The result is a chip that can run anything that a normal x86 machine can
run, except if it demands too much memory, disk space or processing power.
It is also small enough to fit in almost anything. Or, in this case, a TV that
can run Adobe AIR.
Hardware The chip has good memory support. Its memory controller supports three independent 32-bit DDR2 memory channels, with a peak bandwidth of 9.6 GB/s. Each video unit, including the video decoder, the display
processor, the graphics and the video display unit, has a dedicated connection to the memory controller, thus giving up to 3.2 GB/s of independent
bandwidth.
All traffic that is not video, such as disk and network traffic, compressedstreams and audio, shares a separate system bus, using a star topology. Each
peripheral has a bandwidth of 1 GB/s to the hub, and the hub has another
3.2 GB/s through to the memory controller.
41
3.7. ALTERNATIVE MICROCONTROLLERS
Video Streams Luckily for us, CE 3100 is designed to play with Internetbased video content. The Intel®Media Play Technology enables the CE 3100
to decode video content from broadcast and broadband sources. Whenever
a viewer watches a broadcast channel, the video is encoded in a standards
format (such as MPEG-2, H.264 or VC1), and the streaming media drivers
route the video to the on-chip hardware decoders.
As soon as the view switches to an Internet channel, the software automatically route the video to a software codec. Then the processor core
provides the computational capacity to perform the task. By doing the decoding in software, the CE 3100 has the flexibility to adapt to changing
standards.
And most importantly, the CE 3100 allows viewers to interact with a
spectrum of downloadable widgets and data services, such as localized news,
weather, sports, stock tickers, traffic updates and instant messaging applications.
Graphics The Intel®Graphics Media Accelerator 500 is an integrated programmable graphics core. It can accelerate both 2D and 3D, and supports
industry standard graphics APIs such as OpenGL ES 1.1, OpenGl ES 2.0
and OpenVG 1.0.
3.7.2
Evaluation of Alternative Microcontrollers
At that time we did not know which microcontroller we would end up with,
or if we would end up with a chip at all. We evaluated the different microcontrollers so we could be ready if we got one of them.
Table 3.3: Comparison between STi7109
STi7109
CPU
ST40
Architecture
SuperH
Strategy
RISC
Frequency
266 MHz
Graphics
2D
Video Streams Television
OS
Linux, Windows CE, OS21
and Intel®CE 3100
CE 3100
Intel®Pentium®M
IA
CISC
800 MHz
3D
Internet-Vased Video Content
Everything designed for x86
CHAPTER 3. PRELIMINARY STUDY
3.7.2.1
42
Comparison of Microcontrollers
Hardware The most important difference between the chips is the platform.
As the STi7109 is based on the SuperH CPU core, is CE 3100 based on the
Intel®Pentium®M CPU. This would be the difference between a normal
microcontroller CPU, and the x86 architecture normal for personal computers. This being the difference between the basic instructions designed for the
controller and everything written for IA. This do not including things that
are too hardware demanding.
In our case, this is the difference between very unlikely that Adobe AIR/Flash
will run and highly likely that Adobe AIR/Flash will run, which again makes
CE 3100 the ultimate choice. The goal of Intel is to ship the first CE 3100
chip with Adobe Flash Lite, as stated in (Intel Corporation 5 Jan 2009), so
that at least some Flash will work.
Video Streams The largest difference here is that STi7109 is designed to
be a television, while CE 3100 is designed for Internet-based video content.
Needless to say, the CE3100 were be the preferred chip.
Graphics STi7109 has 2D acceleration, while CE 3100 has both 2D and 3D
acceleration. The scope of the two are quite different, but at the same time
similar.
The STi7109 is designed for television and can thus do things such as
handling both the TV and VCR/DVD, merge streams from different sources
such as cable and satellite, and add extra disk space.
The CE 3100 is a television chip designed with widgets in mind. It has
good support of Internet TV and has the hardware to handle downloadable
widgets.
In short, the CE 3100 is absolutely the best choice, as for it is designed
for the widgets we need and not just for being a television.
Operating Systems The STi7109 can run Linux and Windows CE. The
CE 3100 can, because of its x86 architecture, run every operating system
designed for normal personal computers with x86.
However, it is still a microcontroller. Because of its shortcomings in
processing power and memory, many operating systems are still nothing but
a distant dream. An example is Windows Vista, which certain personal
computers have trouble running. Both Linux, *BSD, Solaris and Windows
XP should run fine.
43
3.7. ALTERNATIVE MICROCONTROLLERS
Grade
Good
Letter
G
Decent
D
Bad
B
3.7.3
Table 3.5: Evaluation Criteria Grades
Integer Description
5
The solution covers all aspects of this
criterion
2
The solution covers some aspects of this
criterion
0
The solution covers none of the aspects
of this criterion
Evaluation Criteria
We have run an evaluation of the most important criteria for choosing a
microcontroller, comparing how well the microcontrollers fulfill these criteria.
3.7.3.1
Priority
The priorities of the criteria (Table 3.4) describe how important that specific
criterion is. We have assigned each priority a number to easier calculate the
best solution.
Table 3.4: Evaluation Criteria Priorities
Priority Letter Integer Description
High
H
5
The criterion must be met to satisfy the
customer’s demand
Medium M
3
The criterion should be met to satisfy
the customer’s demand
Low
L
1
The criterion should be met, but not
have priority
3.7.3.2
Grades
We give each microcontroller a grade per criterion (Table 3.5), depending on
how well the controller fulfill the criterion. Each grade is given a number for
easier calculation.
3.7.3.3
Criteria
The most important criteria for the choice of microcontroller are:
EC1 Support for Adobe AIR
CHAPTER 3. PRELIMINARY STUDY
EC2 Support for Adobe Flash
EC3 3D acceleration
3.7.3.4
Evaluation of Possible Solutions
Criterion
EC1
EC2
EC3
Criterion
EC1
EC2
EC3
Criterion
EC1
EC2
EC3
Sum
Table 3.6: Evaluation of STi7109
Priority Grade Comment
H
B
Because of the architecture, Adobe
AIR is a distant dream with a small
hope for success.
M
B
There is a little better chance that
Adobe Flash will work, but the architecture is still wrong.
M
D
It seems the chip has only got 2D
acceleration, but that is better than
nothing.
Table 3.7: Evaluation of CE 3100
Priority Grade Comment
H
D
Adobe Flash Lite is supported, so it
is a very good chance it will work.
M
G
As Adobe Flash Lite is supported,
there is acceptable amounts of working Flash support.
M
G
3D acceleration is supported, as
well ass industry standard graphics
APIs.
Priority
H
M
M
Table 3.8: Evaluation
STi7109 CE 3100
0
10
0
15
6
15
6
40
44
45
3.8. ALTERNATIVE LIFE-CYCLE MODELS
We evaluated each microcontroller according to the specified criteria, their
priority and give the microcontroller a grade per criterion. This was to help
us find the best microcontroller for the task, given we would be able to choose.
As we were unable to get hold of any of the microcontrollers, this did not
help us much.
3.7.4
Choice of Microcontroller
As seen in Table 3.8, the Intel CE 3100 is clearly the optimal choice. It has
better graphics solution, 3D acceleration, is designed for Internet TV and
widgets and has a usable architecture 3 .
However, since these microcontrollers are far from easy to get a hold on,
the real choice depended on which chip we would end up getting.
Because it seemed to be impossible to get a hold on the STi7109 4 , the
CE 3100 would be our only choice. This, however, would be in the future.
Intel has no time to help with our project, nor give us a chip. They might,
however, help Digiboards in the future. At this stage we had to forget about
the chips and focus on making the prototype for a normal x86 computer.
3.8
Alternative Life-Cycle Models
As a part of the preparations and prestudy of the project we looked into
different ways of developing software. We specifically looked at two of the
most common ways:
the traditional waterfall method (Wikipedia 2009i)
and the Scrum method (Wikipedia 2009e).
3.8.1
Description of alternative methodologies
Here we describe the two different development methodologies.
3.8.1.1
The Waterfall Method
The waterfall method is a sequential software development, consisting of
seven different phases. The progress is seen as a stream steadily flowing
downwards, like a waterfall. By using the waterfall method one must assume
3
4
Which is indirectly in the evaluation criteria by supporting Adobe AIR and Flash.
It is only for selected customers and we are not one of them. (Appendix I)
CHAPTER 3. PRELIMINARY STUDY
46
that the project is fully specified and that the different requirements do not
change during the project.
In the original Waterfall the phases are as follows (in order):
Requirement specification All the requirements should be determined
and specified.
Design phase Requires that phase one is fully completed. All parts of the
system should be designed, having a complete system design when the
phase is over.
The implementation phase Having the entire project realization of the
application ready, it should be implemented in this phase.
Integration phase Whenever the system is fully implemented, it has to be
integrated into the environment it is supposed to run in.
Test phase When we have come this far, the test phase should make sure
there are no bugs what so ever in the system. Everything that is
possible to test should be tested.
Installation phase In the sixth phase the system is to be installed at the
customers location.
Maintenance This last phase is to make sure the system is working after
it is installed. This can take a huge amount of time, depending on the
previous phases being done properly.
The waterfall method can be an OK model if one focuses a lot at the
early phases. By doing so bugs are found easily in the early stage at a
project. This resulting in time saved and the project as a whole will benefit.
Because of its well built structure it also makes things easier for the team,
concerning what will be issued at any time. One last argument of why the
waterfall method is a great model is that it emphasizes documentation, such
as requirement documentation and design documentation. This resulting in
new team members having no difficulties of adjusting and familiarize with
the work already done. If a team member for some reason is to get sick, the
rest of the group can easily catch up by reading the documentation.
The main critique given to this methodology is the assumption of perfecting each phase before starting a new phase. The need of getting all the
requirements from the customer before having a prototype can prove to be
difficult. Otherwise, the waterfall method is considered a good method and
is common all over the world.
47
3.8. ALTERNATIVE LIFE-CYCLE MODELS
Figure 3.7: Waterfall Method
3.8.1.2
Scrum
The Scrum methodology is an agile development method that has become
more and more popular. It is an iterative method that contains different
roles. Typical primary roles are the project owner, the Scrum master, and
the team itself. Typical sub-roles can then be the chief in quality of assurance,
a secretary and a person being in charge of all technical issues. The work is
organized in units, also known as sprints, which usually are 2-4 weeks long.
During each sprint, every day should be started with a Scrum meeting.
At this meeting each team member should say something about what they
did last day, what obstacles they met while trying to accomplish the goal
and what they are to do this day. These meetings should not last more than
approximately 15-20 minutes and be at the same place and time every day.
After each sprint the results should be made available for the customer
to review. If any problems were encountered they should be discussed and
prevented from happening again. The project can also be monitored by the
customers during the sprints and be evaluated on the daily Scrum meetings.
Some projects also tend to use a burn down chart to visualize the progress.
There are plenty of advantages using Scrum. For instance if there’s a new
requirement coming up in the middle of the project, it can be implemented
at anytime. Also, having the availability of using the customer at anytime
increases the feedback given to the team. This will increase the final product, also resulting in a reduced need of maintenance after the product being
CHAPTER 3. PRELIMINARY STUDY
48
installed.
Figure 3.8: Scrum Method
3.8.2
Evaluation of Alternative Methodologies
These two methodologies are both good. The waterfall method needs a lot
of focus in the early phases, while the Scrum method can be more flexible
throughout a set of sprints. The need of flexibility and contact with the
customers was needed for our project. This is one of the main reasons we
chose Scrum. Scrum is also a better model of the real world, concerning
the requirements may change at any time. Discussing with the company
they suggested Scrum for this project and told us it has been more and more
frequently used during the past years. This leaving us an easy choice, making
Scrum our use of development methodology for this project.
CHAPTER 4
Requirement Specification and Backlog
In this chapter, we explain our requirements and the product backlog.
This chapter specifies the requirements of the final, real system. The
system Digiboards will implement. The requirements are thus not connected
to the product backlog in the usual way. As our product backlog contains
tasks like make architectural overview and not implement support for sticky
widgets, the tasks in the backlog is not directly linked with the requirement
specification.
The requirements does, however, decide how we are to do the tasks in
the backlog. Or rather, how we shall design the system, which is what the
backlog tells us to do.
4.1
Requirements
The requirements are divided into functional and non-functional requirements.
4.1.1
Functional Requirements
The functional requirements (Table 4.1) are the requirements the final system
must implement, not what our project must implement.
The requirements are divided in two ways. First, in category, like Profile
and Widget. Secondly, in Remote control and TV and Web portal. This
describes where it shall be possible to perform the task.
49
CHAPTER 4. REQUIREMENT SPECIFICATION AND BACKLOG
#
F1
Priority
F1.1 High
F2
F2.1 High
F2.2
F2.3
F2.4
F2.5
F2.6
F3
High
High
High
Medium
Medium
F3.1 High
F3.2 High
F3.3 Medium
F3.4 Low
F4
F4.1 High
F4.2 Medium
F4.3 Low
Table 4.1: Functional Requirements
Description
Widget Mode
Remote Control and TV
Change between widget mode and TV mode
Profiles
Remote Control and TV
Change current profile
Web Portal
Add new profile
Edit profile
Delete profile
Set default profile
Secure profile
Widgets
Remote Control and TV
Make widgets visible
Web Portal
Add new widgets to profiles
Change placement of widgets
Change appearance of widgets
Sticky Widgets
Remote Control and TV
Allow sticky widgets, visible in TV mode
Set multiple sticky widgets
Web Portal
Change placement of sticky widgets
50
51
4.1.2
4.2. PRODUCT BACKLOG
Final System Requirements
The final system requirements (Table 4.2) are the requirements the final
system must implement, not what our project must implement.
The requirements are divided into set-top box and web server.
#
Priority
FS1 High
FS2 High
FS3 High
FS4 Medium
FS5 Medium
FS6 High
FS7 High
4.2
Table 4.2: Final System Requirement
Description
Set-Top Box
The system shall use Adobe AIR, or at least Adobe
Flash
The system shall run on the CE 3100 microcontroller
The widgets shall be accessible from the remote
control
The remote control shall not need unnecessary
many extra buttons
Immediate response (of some kind)
Web Server
The widgets shall be retrieved from the server
Premium users shall have access to the web server
Product Backlog
The product backlog is the master list of all functionality desired in the
product. It contains a broad description of all required features, functional
and non-functional requirements, wish-list items, etc. According to the customer’s needs, the following priorities are assigned to each backlog item:
High The criterion must be met to satisfy the customers demand.
Medium The criterion should be met to satisfy the customers demand.
Low The criterion should be met, but not have priority.
Once the priorities are defined, the top priority backlog items are supposed to be completed during a sprint. These items become the sprint backlog.
Our product backlog (Table 4.3) contains all the tasks to be done.
The architecture, implementation, and testing are the most time-demanding
tasks. On the other hand, both much of the architecture and testing have
CHAPTER 4. REQUIREMENT SPECIFICATION AND BACKLOG
52
received a low priority. So even though there are many hours involved, they
will only be used if we have the time to do it.
Backlog Description Our backlogs have three levels. There are the main
parts (e.g. 1 - Use Cases), the subparts (e.g. 1.1 - Remote Control and TV )
and the actual tasks (e.g. 1.1.1 - Overview of the TV ).
The main parts are the overall classification of what the task is, while
the subparts are a further division. Properties like estimated effort, sprints
and people working with it, are all accumulated through the tasks in a subtask, and collected within that subtask. Similarly, the subtasks’ values are
accumulated within that main part.
The different levels are separated with different numbering (1, 2 and 3
level numbering) and different fonts.
53
Item #
1
1.1
1.1.1
1.1.2
1.1.3
1.1.4
1.2
1.2.1
2
2.1
2.1.1
2.1.2
2.2
2.2.1
2.2.2
2.3
2.3.1
2.4
2.4.1
2.4.2
3
3.1
3.1.1
3.1.2
3.1.3
3.2
3.2.1
3.2.2
3.3
3.4
4
4.1
4.1.1
4.1.2
4.2
4.2.1
4.2.2
4.2.3
5
5.1
5.1.1
5.1.2
5.1.3
5.1.4
SUM
4.2. PRODUCT BACKLOG
Table 4.3: Product Backlog
Description
Priority
Use Cases
Remote Control and TV
High
Overview of TV
High
Turn on/off widgets
High
Change widget-profile
High
Choose sticky widget
High
Web Portal
Medium
Overview of web portal
Medium
Functionality Description
Scenarios
Medium
Use widgets
Medium
Edit profiles
Medium
User Interface
High
Remote control and TV
High
Web portal
Medium
Alternative Solutions
Medium
User interface
Medium
Sketches
Medium
Remote control
Medium
TV with widgets
Medium
Architecture
Logical View
High
Overview
High
Class diagrams
Medium
Sequence diagrams
Medium
Development View
Low
Overview
High
Package diagram
Medium
Process View
Low
Physical View
Low
Implementation
Mock-Up
Medium
Widget window
Medium
Widget content
Low
Testing
Low
Test cases
Low
Testing
Low
Bug fixing
Low
Usability
Usability Testing
Medium
Discussion of necessity
High
Preparation
Low
Execution of test
Low
Evaluation
Low
Est. Effort Sprint
40
1,2
32
1
8
1
8
1
8
1
8
1
8
2
8
2
32
1,2,4
8
2
4
2
4
2
14
1,4
8
4
6
1
6
1
6
1
4
2
2
2
2
2
128 1,2,3,4
56
1,2,3
32
1
12
2,3
12
2
24
3,4
12
3,4
12
3,4
24
24
198 2,3,4,5
128 2,3,4,5
64 2,3,4,5
64 2,3,4,5
70
32
6
32
64
3,4,5
64
3,4,5
16
3
16
4
16
5
16
5
462
CHAPTER 4. REQUIREMENT SPECIFICATION AND BACKLOG
54
CHAPTER 5
Sprint 1 - High Level System Design
In this sprint we will be making an overview of the system design and explain
how our solution is simple and easy to use for the general user.
This first sprint took place between 1st and 7th October 2009.
5.1
Sprint 1 Planning
The focus for the first sprint was the high-level design, which included use
cases and high-level architecture. We tried to get most of the design completed. In addition the first sprint, we had focus on learning the Scrum
process, since none of the group members had any previous experience with
Scrum or any other agile development methodologies in projects.
For the first sprint we had a meeting with the customer where we decided
what would be most important. The product backlog was prioritized and in
collaboration with the customer we chose what the Sprint 1 backlog should
contain.
For Sprint 1 the group decided together with the customer that we needed
to get the high level design ready. The customer told us that we would not
get the chip from Intel and would like us to have our main focus on the design
part.
55
CHAPTER 5. SPRINT 1 - HIGH LEVEL SYSTEM DESIGN
5.1.1
56
Sprint Backlog
The tasks to be performed this sprint are, together with the customer, chosen
from the product backlog (Table 4.3) and copied into the sprint backlog
(Table 5.1).
Table 5.1: Sprint 1 Backlog
Est.
Responsible
Effort
Item
#
Description
1
1.1
1.1.1
1.1.2
1.1.3
1.1.4
2
2.2
2.2.1
2.2.2
2.3
2.3.1
3
3.1
Use Cases
Remote Control and TV
32
garnaas
Overview of TV
8
garnaas
Turn on/off widgets
8
garnaas
Change widget-profile
8
garnaas
Choose sticky widget
8
garnaas
Functionality Description
User Interface
14
tirilane
Remote control and TV
8
tirilane
Web portal
6
tirilane
Alternative Solutions
6
tirilane
User interface
6
tirilane
Architecture
Logical View
32
mortjohn
3.1.1
Overview
X
X.1
SUM
Backlog
32
mortjohn
Miscellaneous
boron
84
Assigned
Members
garnaas
garnaas
garnaas
garnaas
garnaas
tirilane
tirilane
tirilane
tirilane
tirilane
mortjohn,
jarleerd
mortjohn,
jarleerd,
boron
boron,
larsmaha
57
5.2
5.2. SPRINT 1 RESULTS
Sprint 1 Results
The sprint results are the internal documentation of the work this sprint,
code not included.
5.2.1
User Interface
The description of the user interface is divided in two parts; the TV with
remote control, and the web portal.
5.2.1.1
Remote Control and TV
The main interface of the widgets are done with the remote control, for
directly altering of the widgets on the TV.
TV - Buttons Our solution needs a remote control with one extra button
(W), but uses also some of the normal remote buttons. That would be the
arrows (J, I, N, H) and the OK or SELECT button in the middle. The
number buttons (0,1,2,3,4,5,6,7,8,9) are also used. The ON/OFF button is
used in our description, but not in the widget mode.
L J Left arrow
R I Right arrow
U N Up arrow
D H Down arrow
OK OK/SELECT button in the middle
W Our special widget button
ON/OFF The button for turning the TV on and off
0-9 Numeric buttons
TV - Modes Our solution has two modes, in which the buttons have separate meaning. When you turn on the TV, you are in the TV mode (Figure
5.1). Here, the television works as normal. The only special thing is the W
button, which is not normally there.
Pushing the W button, takes you to the widget mode. Here, most of the
buttons works as normal, except the numeric buttons and the navigation
CHAPTER 5. SPRINT 1 - HIGH LEVEL SYSTEM DESIGN
58
panel (the arrays and the OK button). The W button takes you back to
the TV mode.
TV - Profiles When first entering the widget mode, the widgets from the
default profile are loaded (Figure 5.2). We have yet to decide precisely what
the default profile is. Probably it will be shipped with a default profile, with
widgets with for example local news and weather. Then, premium users can
add new profiles, and change which is the default, on the web page.
By using the J and I buttons, the user can change the profile. It will
slide through the profiles, loading the widgets as we move along. When it
gets to a password protected profile, it asks for a PIN code (Figure 5.3). This
is entered through the numeric buttons, and the OK button is hit when the
code is finished. If correct, it loads the profile (Figure 5.4). If not, it asks for
a PIN again. If this is not the profile you are trying to open, just scroll to
next profile with J or I.
TV - Sticky Widgets When pushing the OK button in normal widget
mode, you get to choose a sticky widget (Figure 5.5). A sticky widget is a
widget that will stay put even when you go back to TV mode.
When entering this little sticky mode, the first widget is marked. You
scroll through the widgets by N and H. The current widget will be marked
in one way or another, for example with a border or color change. When
you have marked the widget you want to stick, press OK. Then, you are
back to the widget overview, with the sticky widgets marked in some way.
From here, you can choose another widget and press OK. When you are
done selecting sticky widgets, press the W button, and you will go back to
normal TV mode, but with the sticky widgets still present (Figure 5.6).
Next time you enter the widget mode, the sticky widgets will be gone.
A state diagram of the remote control input is in Figure 5.7.
59
5.2. SPRINT 1 RESULTS
Figure 5.1: Regular TV. This is the starting position, showing just the TV
signal.
Figure 5.2: Default Profile. When entering widget mode, the default profile
is shown.
CHAPTER 5. SPRINT 1 - HIGH LEVEL SYSTEM DESIGN
60
Figure 5.3: Enter PIN Code. When trying to enter a secured profile, one is
asked for a PIN code.
Figure 5.4: The Chosen Profile. The secured profile is entered, showing the
widgets.
61
5.2. SPRINT 1 RESULTS
Figure 5.5: Select Sticky Widgets. When selecting sticky widgets, the nonchosen widgets become transparent. This is shown on the two widgets on
the top of the screen.
Figure 5.6: Sticky Widgets Shown. The big widget is sticky, and is visible
even in TV mode. The other has disappeared.
CHAPTER 5. SPRINT 1 - HIGH LEVEL SYSTEM DESIGN
Figure 5.7: State Diagram of User Input
62
63
5.2.1.2
5.2. SPRINT 1 RESULTS
Web Portal
The magic behind the scenes are done at the web portal, http://www.embelir.com.
This is meant as a bonus for the advanced users. It will work fine without,
but then there will only be the one default profile.
This subsection is not meant as such a detailed design as was the case
with the remote control. The web portal is beyond the scope of this project,
and is only described as an overview of the possibilities.
This is only available for premium users, and is a part of an extra package
one can buy. The plan it to have this as a scription, with a monthly fee of
¿2 on average, according to the business plan in (Embelir Sep 2009).
Web - Widgets The point of the web portal is for the advanced users to
customize their widgets. In the Online Widget Store, you can choose between
a number of widgets, and even upload your own.
You can also change the style of the widgets, their appearance, background and color scheme. It is also possible to make your own, and sell them
in the Online Widget Store.
The placement of the widgets is an other important feature. Here, you
can place the widgets as you want across the television screen. This is, as
of now, not a planned feature for the remote control. This is thus the only
place to make sure they do not cover up some important part of the television
screen.
Web - Profiles The system ships with one default profile. This is common
for the local area, and ships with widgets for the local news and weather.
The point of this is to make it usable out of the box, and also for users
not comfortable or able to use the web portal. Another bonus is that the
customers of Digiboards, the so called content providers, will pay Digiboards
to have their dashboard theme pre-installed, showing their selected widgets
and ads.
On the web portal, one can add multiple profiles, for use within the boarders of the set-top box. There might be a roof of five or so, because scrolling
through limitless profiles to get to your own will be very time demanding
and annoying.
Sometimes it might be allowed to kill this roof, in dialog with Digiboards.
This is for bigger institutions and other places with more than five inhabitants. This is not up to us to decide, but if there are more profiles, something
should be done with the way one chooses one’s profile. One could, for example, use short codes by the number buttons instead.
CHAPTER 5. SPRINT 1 - HIGH LEVEL SYSTEM DESIGN
64
The main point, however, is to make profiles for family members who
want one. Each member can make their profile, add the widgets they want,
and choose to lock their profile with a PIN code. This is in case one adds
widgets like Facebook, Twitter, instant messaging clients, or other media one
tend to like to keep private and away from parents and siblings.
One can also kill the default profile, and set a new profile as default. Or
keep the default profile and still set a new profile as default. Or just alter
the default profile, with or without changing the default.
In short, profiles can be added, deleted, edited, locked and be set to
default.
5.2.1.3
Discussion of Alternative Solutions
We have not gone through an actual analysis of the potential best solutions.
We have, however, discussed them both internally in the group and with the
customer.
We only discuss the alternative solutions on the remote control and TV.
The web portal is beyond the scope of this project, and we have thus no right
to make decisions concerning it.
Buttons Concerning buttons, we wanted to have as few as possible, but
enough to do what we wanted. We found a way to do what we wanted
with only one extra button. In addition, we use some of the already
existing buttons on the remote.
Modes Since we needed to use the TV-owned buttons (like the arrows and
numbers), we thought different modes was a good idea. This way, the
owner of the buttons change depending on mode. Thus, the numeric
buttons will still be used for channel changing, but only in the TV
mode. And they can be used for widget-specific tasks, but only in
widget mode.
Profiles Digiboards wanted a default profile, which their customers could
provide contents for. The paying, premium users should have the possibility of creating own profiles.
How many profiles? Here, we had the issue of how many profiles it
should be possible to create. We thought about limitless, but that
did create new issues. We thought we should change the profile
by using the arrow buttons. But with limitless profiles, this would
take too long time.
65
5.2. SPRINT 1 RESULTS
Of course, not every household would make extremely many profiles. This would be for bigger institutions, like elder homes and
hospitals and such. But if or when so many profiles were created,
it would be chaotic.
Thus, we decided on a roof of 5 profiles. We also thought about
8, but 5 is a normal number for these things. It is about the size
of a normal family, and it is big enough to make quite different
profiles, but still small enough to handle.
This is of course just a proposition. To set the final number of
profiles is anyways not our job, since we will not implement the
final product. But we do recommend a relatively small number,
or change the way one switches profile.
How to switch between them? We do have a way to switch profiles
for large number of profiles. We thought about using the numeric
buttons as shortcuts. For example, 99 different profiles. And, in
a certain state in the widget mode, if one pushes, say, 4 and 2,
one jumps to profile 42.
Here, we do have the problem of not jumping to first profile 4 and
then profile 2, but this is already solved. This would work in the
same way as channel changing works, which waits a certain time
before jumping, in case new buttons are pushed.
Should one be able to password protect, and how? We decided
to make it possible to password protect the profiles, in case of
widgets with Facebook, Twitter, or other social media. These are
normally under password protection, and should continue to be
so. One might not want to share one’s social media with one’s
parents and siblings.
However, now one can give the password at the web portal, and
just have one password to access all of the password protected
media. This password is of course a PIN, since we only have
numeric buttons available. And in good PIN style, 4 digits.
Sticky widgets Digiboards wanted sticky widgets. That is, widgets that
still is shown even though the rest of the widgets are gone.
How many? We thought about having both one and multiple widgets, but we decided on multiple. That is because the users might
want more than just one widget to stick, and why not give them
the possibility if we can?
CHAPTER 5. SPRINT 1 - HIGH LEVEL SYSTEM DESIGN
66
Where shall they stick to the screen? Where to place these widgets are still not totally decided. For now, we are just placing them
wherever they are when they are not sticky. We also thought of
making a 3 × 3 grid on the screen, and use the numeric buttons to
choose grid square right after they have chosen the widget to be
sticky. As in first using the arrows to mark a widget, push OK to
make it sticky and then a numeric button to place it.
Another solution is to place the sticky position of each widget on
the web portal. Or just keep the usual position.
For now, we have ignored this decision. The default is the usual
position. Anything more is left for another sprint.
5.2.2
TV Use Cases
Here follows the use cases for the television. First is a graphical overview of
what is possible, then more detailed, textual use cases of these possibilities.
5.2.2.1
TV Overview
The overview of the TV interface (Figure 5.8) describes the possible actions
one can perform on the TV, using the remote control.
5.2.2.2
Turn On/Off the Widget Dock
This use case (Table 5.2) explains how the user can turn on and off the widget
based ”Internet on TV” solution (Embelir’s Widget Dock).
When a user is watching TV, he/she can easily press the W-button and
the widgets in the default profile1 will appear on the screen. That means
that the user can still watch TV while checking the weather, news and other
stuff. To turn off the Widget Dock, the user simply presses the W-button
one more time and all the widgets disappear from the screen.
5.2.2.3
Change Widget Profile
This use case (Table 5.3) explains how our solution solves the problem with
having more than one profile. The different profiles will be in a list the user
The default profile is the profile that is already installed on users ”Internet on TV”
solution. The user will have chosen what widgets he/she wants on the profile. (The
widgets can be local weather, news, sports updates, stocks and other things.) For a really
simple user it means he/she does not have to learn anything more than how to turn this
on and off.
1
67
5.2. SPRINT 1 RESULTS
can flip through with the J and I buttons, and choose profile by pressing
the OK-button. If the profile is PIN-protected the user will be asked to
enter the PIN, using the number-buttons. If the PIN is correct, widgets for
the new profile will appear on the screen. If not, the user will get an error
message and another attempt to enter correct PIN. The user can also choose
to go to a different profile.
5.2.2.4
Choose Sticky Widget
This use case (Table 5.4) explains how a user can make a widget sticky. A
sticky widget is a widget that sticks to the TV screen even when the user
turns off the Widget Doc. This widget will update itself on its content. That
means that if a user wants to stay updated on the weather while watching
the game he/she can simply make the weather widget sticky and continue
watching the game without having to turn the Widget Doc on and off for an
update.
Figure 5.8: TV Overview
CHAPTER 5. SPRINT 1 - HIGH LEVEL SYSTEM DESIGN
Use Case
Description
Requirements
68
Table 5.2: UCTV-1
UCTV-1
Turn on/off the Widget Dock
F1.1
F3.1
Actors
User
Assumptions
Embelirs ”Internet on TV” solution is installed.
User has a remote control that is compatible with
the system.
Steps
1 User presses the W-button on the remote control.
2 Widgets for the default profile appears above the
main TV-picture.
3 User presses the W-button again and the widgets
disappear from the screen.
69
Use Case
Description
Requirements
5.2. SPRINT 1 RESULTS
Table 5.3: UCTV-2
UCTV-2
Change widget profile
F2.1
Actors
User
Assumptions
Embelir’s ”Internet on TV” solution is installed.
The user has at least one widget profile in addition
to the default profile.
User has a remote control that is compatible with
the system.
The Widget Doc is already turned on.
Steps
1 User uses the J and I buttons to flip through the
different profiles.
2 User presses the OK-button to choose profile.
3 Widgets for the chosen profile appears on the
screen.
Variations
2.1 User uses the number-buttons to enter PIN.
2.1.1 User enters wrong PIN and ...
2.1.1a gets another attempt to enter the correct PIN
(step 2.1).
2.1.1b chooses to go to another profile (start from step 1
again).
2.1.2 User enters correct PIN and continues to step 3.
CHAPTER 5. SPRINT 1 - HIGH LEVEL SYSTEM DESIGN
Use Case
Description
Requirements
70
Table 5.4: UCTV-3
UCTV-3
Choose sticky widget
F4.1
F4.2
Actors
User
Assumptions
Embelir’s ”Internet on TV” solution is installed.
User has a remote control that is compatible with
the system.
The widget dock is already turned on.
Steps
1 User uses the up/down-buttons to select a widget.
2 User presses the OK-button.
3 The selected widget will be marked as sticky.
4 User presses W-button.
5 All the widgets disappear from the screen, except
for the sticky ones.
Variations
3.1 Choose more widgets to be sticky; repeat from step
1.
5.2.3
High-Level Architecture
The high-level architecture is an overview of how the system will work. After
looking at the desired functionality of the system we found that we need to
71
5.2. SPRINT 1 RESULTS
have a widget application, a web/content server and a configuration server.
These parts will be described in detail in the next sub chapters. The architecture will be described in detail for the entire system, but Digiboards will
make the web application for the system so our main focus of the architecture
will be on the widget application. We are going to make a demonstration
that will show how some of the widget applications features will look to the
end user, but it is also very important to know how the web application
should function as these are connected in the way they are going to operate.
Figure 5.9: High-Level Architecture Overview
The architectural overview diagram (Figure 5.9) shows us the three different components of the system, and how they are connected.
The overall idea is that the user can interact with the widget application
by the remote. Then the widget application handles the commands from the
user and make these to call functions on the content-server and the configuration server which will handle the different profiles or views the widget
application and TV should show. Content from widgets will be pushed or
pulled from the content server depending on which type of widget it is.
5.2.3.1
Widget Application
The system will need a widget application which will be implemented in our
demonstration for the final presentation. The widget application is responsible for all the interaction with the end user and the interaction with the
content server and configuration server, and will be on every set-top box
(STB) that the TV-distributors deliver.
The STB will respond to the remote control, which will make different
calls to functions in the widget application. Most of the logic will be in the
widget application, which is responsible for taking care of the interaction with
CHAPTER 5. SPRINT 1 - HIGH LEVEL SYSTEM DESIGN
72
the end use,r and communicate with the content and configuration server. To
get content from the content server, there will be need for pull functions so
that the application can ask for updated information from the content server.
The application also needs to be connected to the configuration server, and
thus get the different user profiles and widgets that the user requests.
The architecture with class diagrams, state diagrams and flow diagrams
will be described in more detail in later chapters.
5.2.3.2
Content Server
The content servers main functionality is to provide the content for the widgets from the Internet. The reason to have a content server is to have the
possibility of offering the widgets a standardized interface to fetch the information that the widgets need, so that if the source of data change, you
will not need to change the server or neither the widget itself. The content
server will have the widgets available so that when you have configured your
configuration server and added widgets, the widget application will download
the widgets that is needed to the widget application/STB.
The content server will be able to push through information when there
is need for it. For example a live score widget will be needed to push information from the content server whenever there is a goal. This is not always
necessary, so for other widget it is sufficient that the widget application asks
the content server if there are any changes and do a pull call to get information. The content server will typically be a Digiboards maintained server
and the different widgets are approved by Digiboards to ensure that they will
work on the system.
The content server part will not be implemented in our project but we
will show how the system will interact with the widget application and we
will also sketch the design part for the content server.
5.2.3.3
Configuration Server
The configuration server is responsible of the Internet interface for the system. The user is able to login to create different profiles and to edit the
profiles to reflect the users demands. After the user have confirmed his
choices on the web pages, the configuration server should be able to push the
information to the set-top box so that the user immediately gets the desired
widgets on the television. If the user decides to add widgets that is not currently stored on the widget application, the widget application will contact
the content server and download the widget. So there will be a coherence
with the widgets available on the configuration server and the content server.
73
5.3. SPRINT 1 EVALUATION
The configuration server will also be described but not implemented for
the final presentation.
5.2.3.4
How the Different Parts Will Work Together
The three different components of the system will need to communicate with
each other to work (Figure 5.9). The widget server will play the most important role, as it is the one the user will interact with and think of as the
system. The other components are the one who will have the content and
know what should be shown.
The content server will need to be connected with the Internet in some
way to get the updated information on the widgets. The configuration server
will need to have the web interface so that the user can log in and edit
his/hers profile and make changes on profiles.
The communication between the widget application and the two servers
will go through the cable provider, either through cable of fiber.
5.3
Sprint 1 Evaluation
After finishing Sprint 1 we had a meeting where we reflected over the results.
We found that the team is working well together and the major concern for
our next sprints is the possibility of sickness. This leads to more work for
some of the group members, and since we are having a effort budget with
the goal of 1879 time hours sickness also leads to more work later.
The first day, when we also had to learn Scrum, made the first sprint
sort of a test for the following sprints. Either way we worked this out fine
by following a reference guide: How to Implement Scrum in 10 Easy Steps
(Waters 2007).
The burn down chart (Figure 5.10) tells us how we have planned the
hours for the sprint, and also how it actual went. After each day we mark
how much time have been spent, and the goal is to end up at zero hours. For
the first sprint this went well. The reason for this is that we have regular
meetings where everyone at the group must attend. As a consequence of this
the planned work and the actual work would not differ that much.
This is what was mentioned as pros and cons at the sprint closing meeting.
Positive
Well prepared.
Finished all our goals.
CHAPTER 5. SPRINT 1 - HIGH LEVEL SYSTEM DESIGN
74
Good team-work.
Daily scrum meetings was effective.
Team members meet in time.
Negative
Sickness caused too few work hours and as a consequence the rest had
to work more to get the estimated effort.
We did not focus on updating the report during the sprint.
Everyone was not always updated on what the others were doing.
5.3.1
Conclusion
The conclusion from the sprint review meeting was that the group should try
to make the report a part of the sprint so that the report was updated with
the documentation made in the sprint. We will also in later sprints give the
team members more responsibility.
75
5.3. SPRINT 1 EVALUATION
Figure 5.10: Sprint 1 Burn Down Chart
Burn down chart - Sprint 1
Burned down
Weekday
Day
Balance
Planned
Actual
Planned
Actual
Daily
Completed
84
84
#N/A
Wed
0
1
24
22
60
62
22
Thur
2
30
40
30
22
40
Fri
3
4
4
26
18
4
Sat
4
0
0
26
18
0
Sun
5
0
0
26
18
0
Mon
6
12
12
14
6
12
Tue
7
12
4
2
2
4
90
80
70
60
50
Planned
40
Actual
30
20
10
0
1
2
3
4
5
6
7
8
CHAPTER 5. SPRINT 1 - HIGH LEVEL SYSTEM DESIGN
76
CHAPTER 6
Sprint 2 - Detailed System Design
This is the documentation of the progress, results and acquired knowledge
during Sprint 2 of the project.
This second sprint took place between 8th and 14th October 2009.
6.1
Sprint 2 Planning
We started Sprint 2 with a planning meeting, having all group members and
the customer present. We decided that the Sprint 2 we would continue to
focus on the system design. We had to create use cases for the web portal,
add scenarios and sketches to our functionality description. We also found
the need to continue with the architecture, making the class and sequence
diagrams. In this sprint, the customer wanted us to start making the demo,
hence we added this to the Sprint 2 backlog. Our goal for this sprint was to
get a window to appear and disappear in the demo.
6.1.1
Sprint Backlog
The tasks to be performed this sprint are, together with the customer, chosen
from the product backlog (Table 4.3) and copied into the sprint backlog
(Table 6.1).
77
CHAPTER 6. SPRINT 2 - DETAILED SYSTEM DESIGN
Table 6.1: Sprint 2 Backlog
Est.
Responsible
Effort
Item
#
Description
1
1.2
1.2.1
2
2.1
2.1.1
2.1.2
2.4
2.4.1
2.4.2
3
3.1
Use Cases
Web Portal
8
garnaas
Overview of web portal
8
garnaas
Functionality Description
Scenarios
8
tirilane
Use widgets
4
tirilane
Edit profiles
4
tirilane
Sketches
4
larsmaha
Remote control
2
larsmaha
TV with widgets
2
larsmaha
Architecture
Logical View
44
mortjohn
3.1.2
Class diagrams
32
mortjohn
3.1.3
Sequence diagrams
12
garnaas
4
4.1
4.1.1
X
X.1
X.2
X.3
SUM
Mock-Up
Widget window
Description of SWOT
Requirements
Backlog
Implementation
32
jarleerd
32
jarleerd
Miscellaneous
boron
tirilane
tirilane
96
78
Assigned
Members
garnaas
garnaas
tirilane
tirilane
tirilane
larsmaha
larsmaha
larsmaha
mortjohn,
jarleerd,
boron,
garnaas,
larsmaha
mortjohn,
jarleerd,
boron
garnaas,
larsmaha
jarleerd
jarleerd
boron
tirilane
tirilane
79
6.2
6.2. SPRINT 2 RESULTS
Sprint 2 Results
The sprint results are the internal documentation of the work this sprint.
Code is not included. In this sub chapter we will discuss the different tasks
a user can perform in the web interface as well as on the TV. We will also
describe the design of the interaction between the different parts of the system.
6.2.1
Scenarios
We have created scenarios of possible use. These help us imagine how the
system will be used, and thus creating the system in accordance, so that it
will be as simple to use as possible. They are also used to check that there
are no parts of the system that are ignored. The scenarios consist of the
steps necessary to use the widgets.So if our system can do everything that is
done in the scenarios, then nothing is forgotten.
And as our system can do what is described in the scenarios and the
scenarios do not seem to have any missing parts, it looks good for our system.
The following scenarios is about the two premium users Jane and John
Doe. They describe how they configure their profiles, and a normal day of
use.
6.2.1.1
Edit Profiles
John and Jane Doe are premium customers. Thus, they have a profile on
Embelir’s web portal. They want to use this to create their own profiles.
Log In They log in, using their username and password. They are shown
a list of the profiles they have, and the widgets they have. As of now, the
only widgets are the news feed and weather forecast that followed the default
profile. This is not very impressive, so they go to Buy new widgets to choose
some more.
Buy Widgets After browsing the widgets, they decide on a sports result
widget, an international news feed, the Facebook widget, the Twitter widget
and a clock widget.
Create Profile As of now, there is only the default profile. They click
Create new profile, to make their own. First out is John. He enters a profile
name, John’s profile, and adds the news feed and weather forecast. He
CHAPTER 6. SPRINT 2 - DETAILED SYSTEM DESIGN
80
also adds the sports widget and the Twitter widget, as well as the clock.
These are all placed after one another on a preview of the screen. This looks
messy, so he uses the mouse to drag the widgets where he wants them. As
he watches a lot of football, he makes sure that no widgets covers the normal
spot for the results.
When he is pleased with the result, he saves, and leaves the computer
for Jane. She also clicks Create new profile. As John did, she adds the
news feed and weather forecast. She also adds the Facebook and the Twitter
widgets, and finally the clock. She names it Jane’s profile, after dragging
the widgets where she wants them.
Secure Profile She does not want anybody to read her Facebook and Twitter feeds, so she marks the box for Secure profile, and is asked for a 4-digit
PIN code. She enters a PIN, reenters it and the profile is secure. She saves,
and is back to the list of profiles. Now, this contains all three profiles.
Edit Profile She clicks on the default profile, wanting to edit it a little. She
renames it to The Does’ profile, and adds an international news feed, in
addition to the other local news feed. She also adds another weather forecast,
and configures it to show the weather where her parents live, as they often
go there on the weekends. She then adds the clock. She drags the widgets
to different spots, so that they will not cover anything crucial.
Log Out They are pleased with the result, so they saves and log out, eager
to try out their new widgets.
6.2.1.2
Use of Widgets
Start Widgets John Doe makes himself ready for some hours in front of
the television, as his favorite football team is playing. He turns on the TV,
and chooses the right channel. As the game is not very interesting as first,
he soon clicks the widget button on his remote. He now enters the default
profile, showing news and weather. He reads through the news, and checks
the weather for tomorrow, while still following the game.
Change profile After a while, he scrolls to his private profile, using the
arrow buttons. This has, among other things, a widget with sports results,
which he is interested in.
81
6.2. SPRINT 2 RESULTS
Adding Sticky Widgets As there are multiple games played simultaneously, he would like to keep the result widget there permanently. He clicks
the OK button, and can now choose sticky widgets. He scrolls through the
widgets with the arrows, until the sports results widget is chosen. He clicks
OK, leaving it on permanently. After some consideration, he decides to keep
the news feed too. He scrolls up again to that widget, clicking OK to choose
it.
Use Sticky Widgets He now pushes the widget button again, going back
to watching the game. The sports results and news feed are however still
present, just where he wants them to. Now he can watch his game, while
following the other games played and read the news when the game is too
boring.
Using Secured Profile When the game is over, he leaves the TV as is,
still showing his widgets. After a while, his wife Jane enters the room.
Her favorite movie is soon to air. She has no interest in sports results,
so she pushes the widget button as soon as she has changed the channel.
Now she has John’s full profile. Pushing the right arrow, she arrives at her
profile. As this is password protected, she is queries about her PIN code. She
enters it with the numeric buttons, and her profile is shown. She spends the
advertisement break reading the news on her Facebook feed. As the movie
starts, she pushes the widget button again, to enjoy the film uninterrupted.
Next advertisement break, she again clicks the widget button. Her profile
is again displayed, no PIN necessary. She reads some news, before again going
back to TV mode.
Turning Off TV When the movie is finished, she turns off the television,
thus making sure her secured profile is out of reach of her husband.
6.2.2
Web Use Cases
Following are the use cases for the web interface. First, a graphical overview
of what is possible, secondly a graphical use case of how one edits the profile.
There is only graphical use cases on the web interface, as the web portal
is beyond the scope of this project, and thus we should not be too detailed.
6.2.2.1
Web Overview
The overview of the web portal (Figure 6.1) describes the possible actions
premium customers can perform on the web portal.
CHAPTER 6. SPRINT 2 - DETAILED SYSTEM DESIGN
82
The use case is included to show the main actions of the web portal.
A user can log in to the system, as well as view the current profiles, create
new profiles, edit the existing and change the password of the web portal.
All of this is done on the configuration server, with the web portal as an
interface.
Figure 6.1: Web Overview
6.2.2.2
Edit Profile
This use case (Figure 6.2) is a more detailed view on how one can edit one’s
profile.
One can change much on the profiles and widgets. One can list the
available widgets, seek out new widgets, choose one of them and add it to a
profile. One can change a widget’s location on the screen, both for normal
view and for when it is sticky. One can also change the PIN code for secure
profiles, as well as delete the profile.
83
6.2. SPRINT 2 RESULTS
Figure 6.2: Edit Profile
6.2.3
Sketches
We have made sketches of how we visualize the remote control and the widgets will look.
6.2.3.1
Remote Control
This remote control (Figure 6.3) is a very minimized version of a remote
control, but it does have the almost all the buttons we need. It does lack the
numeric buttons, it can be used for non-secured profiles.
All we want in the remote control is numeric buttons, arrow keys, an OK
button and our special widget button, W. This widget button is special for
our remote design. This can also be met by more ”normal” remote controls.
6.2.3.2
TV with Widgets
The TV (Figure 6.4) shows roughly how we visualize the widgets will look.
Here, a clock and weather widget and a sports results widget is present.
CHAPTER 6. SPRINT 2 - DETAILED SYSTEM DESIGN
84
Figure 6.3: Sketch of a Very Minimal Remote Control
Figure 6.4: Sketch of a Television with Widgets
6.2.4
Architecture
We have made some sequence diagrams showing the flow of information.
There is one for the cooperation between the set-top box and the content
85
6.2. SPRINT 2 RESULTS
server (Figure 6.5) and one for the web portal and the config server, and how
this server cooperates with the set-top box (Figure 6.6).
Figure 6.5: Sequence Diagram for Set-Top Box
Figure 6.6: Sequence Diagram for Web Portal
CHAPTER 6. SPRINT 2 - DETAILED SYSTEM DESIGN
6.2.5
86
Implementation
In this sprint we implemented the most basic functionality of the widget
application. We displayed two widgets on the screen, made them disappear
and appear again by the stroke of a key. We also implemented selection mode,
where the user can scroll through the different widgets and select them as
sticky. Sticky widgets remain visible when exiting widget mode.
The widget application now consisted of two classes: WidgetGUI and
MainWidgetGUI. The WidgetGUI class held the code for the widgets them
selves. It sets up a JFrame and places it on screen and holds methods to
set it as sticky, set it as selected and set the opacity of the frame. The
MainWidgetGUI class is the application entry point. It sets up a JFrame of
zero size to hold the KeyListener that listens for key input by the user and
executes the appropriate actions. It also creates the instances of WidgetGUI
that is to be displayed.
Figure 6.7: Sprint 2 Demo Class
When a user entered selection mode all the widgets that were not selected
had their opacity set to 70%. We thought this was an intuitive way of showing
which widget is the selected one and which widgets are not. Also, when the
application was in TV mode, the widgets that were not sticky and thereby not
to be visible had their opacity set to zero (i.e. fully transparent). However,
setting a JFrame to transparent or semi-transparent is not possible with the
official Java 6 API. After some research we found that this feature was added
in Java 6 update 10 in the private class com.sun.awt.AWTUtilities (Sun
Microsystems 2009).
6.3
Sprint 2 Evaluation
In this section we discuss how the sprint went and how the evaluation from
last sprint affected the development process for this sprint.
The customer were not able to be at the sprint review meeting due to
sickness. The consequence of this was that we were not able to show any
87
6.3. SPRINT 2 EVALUATION
of the progress during Sprint 2. We had some email contact so that the
customer were aware of what have been done, and that they were able to
give feedback. Below are what we found positive and negative about the
Sprint 2.
The burn down chart for the Sprint 2 (Figure 6.8) represents the planned
hours for the sprint, and the actual hours spent for the sprint. For Sprint
2 this fits very well with what we planned. A reason for this is that we as
a group have decided to have meetings four times during the sprints, were
we will be able to meet and work together. We did not have any sickness
or any other problems during this sprint. Everyone attended the meetings
according to what was planned. The burn down chart does not show what
the hours are spent on, but we can see that we have used the estimated hours
for Sprint 2.
Positive
We finished most of our goals.
We had daily scrum and no one were late for meetings.
We updated the report during the sprint.
We started implementing the demo.
Negative
We evaluated Sprint 1 a little late so it did not affect this sprint much.
We did not reach our goal for architecture, but we started implementing
the demo.
Customer was sick so we did not get to have a meeting with them at
the end of the sprint.
6.3.1
Conclusion
We finished the use cases and the functionality description, but we did not
finish the architecture. Consequently this will be a part of Sprint 3 instead.
We did, however, start implementing the demo, that was suppose to be a
part of Sprint 3. Otherwise the sprint went as planned.
CHAPTER 6. SPRINT 2 - DETAILED SYSTEM DESIGN
88
Figure 6.8: Sprint 2 Burn Down Chart
Burn down chart - Sprint 2
Burned down
Weekday
Day
Balance
Planned
Actual
Planned
Actual
Daily
Completed
96
96
#N/A
Wed
0
1
20
18
76
78
18
Thur
2
40
48
36
30
48
Fri
3
6
0
30
30
0
Sat
4
0
0
30
30
0
Sun
5
0
0
30
30
0
Mon
6
18
18
12
12
18
Tue
7
12
12
0
0
12
120
100
80
60
Planned
Actual
40
20
0
1
2
3
4
5
6
7
8
CHAPTER 7
Sprint 3 - Implementation, Part I
This is the documentation of the progress, results and acquired knowledge
during Sprint 3 of the project.
This third sprint took place between 15th and 21th October 2009.
7.1
Sprint 3 Planning
The Sprint 3 planning is a summary of the meeting we had on Wednesday
15th October. The customer was not able to attend this meet due to sickness.
We decided to make the Sprint 3 backlog and email it to the customer for
approval.
In this sprint we had to continue on the architecture because we did not
finish it in the last sprint.
We decided to continue implementing the demo. Having completed the
basic appear and disappear functionality in the last sprint, we now focused
on the more advanced features.
We also discussed whether or not to do a full usability test.
As feedback from the customer from Sprint 2, they wanted to add some
features. This was the possibility of sticky widgets to be displayed only when
the contents change. Also they wanted the possibility of selecting profiles by
shortcuts. Taking this into account, we had to change some of the earlier
work we had done.
89
CHAPTER 7. SPRINT 3 - IMPLEMENTATION, PART I
7.1.1
90
Sprint Backlog
The tasks to be performed this sprint are, together with the customer, chosen
from the product backlog (Table 4.3) and copied into the sprint backlog
(Table 7.1).
Item
#
3
3.1
3.1.2
3.2
3.2.1
3.2.2
4
4.1
4.1.1
4.1.2
5
5.1
5.1.1
SUM
7.2
Description
Table 7.1: Sprint 3 Backlog
Est.
Responsible
Effort
Logical View
Class diagrams
Development View
Overview
Package diagram
Mock-Up
Widget window
Widget content
Usability Testing
Discussion of necessity
Architecture
12
mortjohn
12
mortjohn
24
mortjohn
12
mortjohn
12
mortjohn
Implementation
48
jarleerd
24
24
Usability
16
16
100
Assigned
Members
all
all
all
all
all
jarleerd
boron
jarleerd,
boron
jarleerd
boron
larsmaha
larsmaha
all
all
Sprint 3 Results
The sprint results are the internal documentation of the work this sprint.
Code is not included.
7.2.1
Sketches
We have made sketches of how we visualize the remote control and how the
widgets will look.
91
7.2.1.1
7.2. SPRINT 3 RESULTS
Remote Control
This remote control (Figure 7.1) is a more normal version of a potential
remote control, where the numeric buttons are included.
We use the Arrow navigators (J, I, H, N), the Widget menu (W),
the Power button (ON/OFF), Select (OK), and Button numbers (numeric
buttons 0-9) to handle user input.
The only unique button here is the widget button (W). All other buttons
are commonly found on all other remote controls.
The original picture is taken from (DVRLife 2006).
Figure 7.1: Sketch of the Remote Control
CHAPTER 7. SPRINT 3 - IMPLEMENTATION, PART I
7.2.1.2
92
Widgets
The widgets in Figure 7.2 are an example of widgets spread out on a screen.
Figure 7.2: Sketch of the Widgets
7.2.2
User Interface
The description of the user interface is divided in two parts; the TV with
remote control and the web portal.
7.2.2.1
TV and Remote Control
Due to the customer adding extra features, we updated the state diagram
(Figure 7.3).
93
7.2. SPRINT 3 RESULTS
Figure 7.3: State Diagram of User Input
CHAPTER 7. SPRINT 3 - IMPLEMENTATION, PART I
94
TV - Profiles By using the J and I buttons, the user can change profiles.
It will scroll through the different profiles and load each profiles’ widgets.
When a pin protected profile is loaded, the user must enter the correct pin
to view this profile. The user types the pin with the numeric buttons and
then push OK.If the pin entered is not correct the user will be notified and
asked to enter it again.
The customer wanted to have an unlimited amount of profiles. To save
the user from scrolling through many profiles to get to the one he wants, we
implemented the alternative profile shortcut. When the user enters widget
mode, he has a limited amount of time where he can select a profile by typing
the profile number.
TV - Sticky Widgets The customer wanted a new feature. They wanted
the option of widgets being sticky-on-change. This meaning the widget will
be displayed for a few seconds whenever there is a change in that widget (e.g.
widget with football live feed results).
If pushing the OK button in normal widget mode, you get to choose a
sticky widget.
You can scroll through the widgets by N and H. All widgets not selected
will be semi transparent. When you have marked the widget you want to
make sticky, press OK. This widget is now sticky. Then, you are back to
the widget overview, with the sticky widgets marked with a colored border.
From here you can choose another widget and press OK or you can choose
this widget (or other sticky widgets) again. This time, by pressing OK, it
will be sticky-on-change. These widgets will be marked by a colored border
(with another color). When you are done selecting sticky widgets, press the
W button, and you will go back to normal TV mode, but with the sticky
widgets still present, and the sticky-on-change widgets popping up when they
need to.
7.2.3
Usability Testing
We will add a usability test to get feedback on the user interface. We want
a simple usability test with a few test subjects. We will demonstrate our
solution and show them videos of Intel and Yahoo!’s solution. The goal is to
find out which solution is best, and how we can use this to improve our end
product.
95
7.2. SPRINT 3 RESULTS
Figure 7.4: Sprint 3 Demo Class
7.2.4
Implementation
In this sprint we expanded the functionality of the demo to include the concept of profiles. The user can scroll through the different profiles and set
widgets from one of them as sticky. We expanded the widgets from being
merely empty JFrame’s to having background images and some content and
we started to develop a football widget that is to display the current score
of ongoing football matches. The intended purpose of this widget was to
demonstrate the sticky-on-change feature.
With these additions and changes to the demo, the application had been
expanded to the following classes: MainWidgetGUI, Widget, WeatherWidgetGUI,
OtherWidgetGUI, WidgetProfile and PassCodeBox (Figure 7.4). The MainWidgetGUI
remained mostly the same with only slight changes. In stead of containing
all the widgets it now contained all the profiles. We also added an instance
of PassCodeBox to the MainWidgetGUI class, which basically were a JFrame
with a JLabel and a JTextField, used for entering a pin code before being allowed to enter a pin code protected profile. The Widget class held
all the methods that were common to all types of widgets. Basically it
CHAPTER 7. SPRINT 3 - IMPLEMENTATION, PART I
96
were the same as the WidgetGUI class, but without the Graphical components. WeatherWidgetGUI and OtherWidgetGUI extended the Widget class
and held the content specific to their respective types of widget. Lastly we
implemented the sticky-on-change feature. When the application were in
TV mode and there was a change in a widget in sticky-on-change mode, the
widget displayed for a few seconds before disappearing again. Since none of
our current widgets ever changed we also added a change button to invoke
the change event of a sticky-on-change widget.
When a user entered widget mode he could scroll through the different
profiles, if the profile were pin protected he had to enter a pin before the
widgets were displayed. When at the wanted profile the user could enter
selection mode as before, scroll through the widgets and set them as sticky
or sticky-on-change. To make it even more clear which widgets were selected
and which ones were not we reduced the opacity of the widgets that were not
selected to 50% as it were sometimes difficult to see the difference when at
70%.
7.3
Sprint 3 Evaluation
In this section we discussed how the sprint went and how the evaluation from
last sprint affected the development process for this sprint.
For the third sprint we managed to follow the planned hours (Figure 7.5).
The reason for this is that we have four weekly meetings that everyone must
attend and work with the sprints. We can see that we worked more than
planned on Thursday, and that we were 4 hours behind schedule.
Positive
We had a meeting with Snorre Gylterud, who gave us feedback on the
report.
We managed to get the demo ready for the customer within time of
their meeting Thursday 22th.
Negative
We had no meeting with the customer beforehand, because of sickness.
We did not add many pages to our report, as most of the work was
programming.
97
7.3.1
7.3. SPRINT 3 EVALUATION
Conclusion
The demo is almost done and ready to be shown. Here, we have improved
a lot. The architecture is, however, still not documented, although much of
this has been done. The documentation of this must be done in Sprint 4.
CHAPTER 7. SPRINT 3 - IMPLEMENTATION, PART I
98
Figure 7.5: Sprint 3 Burn Down Chart
Burn down chart - Sprint 3
Burned down
Weekday
Day
Balance
Planned
Actual
Planned
Actual
Daily
Completed
100
100
#N/A
Wed
0
1
24
24
76
76
24
Thur
2
36
48
40
28
48
Fri
3
0
0
40
28
0
Sat
4
0
0
40
28
0
Sun
5
0
0
40
28
0
Mon
6
18
12
22
16
12
Tue
7
22
12
0
4
12
120
100
80
60
Planned
Actual
40
20
0
1
2
3
4
5
6
7
8
CHAPTER 8
Sprint 4 - Implementation, Part II
This is the documentation of the progress, results and acquired knowledge
during Sprint 4 of the project.
This fourth sprint took place between 22th and 28th October 2009.
8.1
Sprint 4 Planning
This sprint we will finish up as good as we can.
We will do the necessary changes in what we have already done, with
respect to the changes required by the customer. It should be possible to
change profiles when in sticky widget mode, and it should be possible to set
widgets from different profiles sticky at the same time. Therefore we must
change the design accordingly.
We must also finish the architecture and of course the implementation.
If we get the time we will also prepare for a later usability test.
8.1.1
Sprint Backlog
The tasks to be performed this sprint are, together with the customer, chosen
from the product backlog (Table 4.3) and copied into the sprint backlog
(Table 8.1).
99
CHAPTER 8. SPRINT 4 - IMPLEMENTATION, PART II
Table 8.1: Sprint 4 Backlog
Est.
Responsible
Effort
Item
#
Description
2
2.2
2.2.1
3
3.3
3.4
4
4.1
Functionality Description
User Interface
4
tirilane
Remote control and TV
4
tirilane
Architecture
Process View
24
mortjohn
Physical View
24
mortjohn
Implementation
Mock-Up
120
jarleerd
4.1.1
4.1.2
5
5.1
5.1.2
Widget window
Widget content
SUM
Usability Testing
Preparation
72
48
Usability
16
16
188
jarleerd
boron
larsmaha
larsmaha
100
Assigned
Members
tirilane
tirilane
all
all
jarleerd,
boron
jarleerd
boron
all
larsmaha,
tirilane
101
8.2
8.2. SPRINT 4 RESULTS
Sprint 4 Results
The sprint results are the internal documentation of the work this sprint.
Code is not included.
8.2.1
Patent application
Digiboards wanted to apply for a patent for the sticky widget functionality.
While there are other widget systems out there, this is the only one with the
sticky functionality.
They wanted help from us for the application. First and foremost, they
wanted use cases and an up-to-date functionality description. We gave them
the updated use cases and wrote a stand-alone functionality description, with
the newest design (Appendix H).
8.2.2
User Interface
The description of the user interface is divided in two parts; the TV with
remote control and the web portal.
Together with the customer we came up with some changes. Among
other things, the possibility to add sticky widgets from multiple profiles at
the same time.
8.2.2.1
TV and Remote Control
We decided that it should always be possible to change profiles. Thus we
have redesigned the state diagram (Figure 8.1) and added color codes for
easier reading. Red arrows are if/then cases, the green are button pushings
and the blue are automatic. These are state changes after an action has
taken place.
Similarly, the states are green, the activities are blue and the branches
are red. The modes are black.
Widget Mode Now widget mode consists of two other modes, sticky widget
mode and profile mode.
From TV mode, when W is pushed, one enters profile mode. Or rather,
all the widgets of the current profile is shown, naturally, without marking.
Sticky Mode By pushing OK, one enters sticky widget mode. This differs
from the normal by that each widget is marked, depending on whether it
is sticky, sticky-on-change or not sticky at all. One widget is also marked
CHAPTER 8. SPRINT 4 - IMPLEMENTATION, PART II
102
specially, to show that this is the chosen widget. The first widget is marked
as default. N and H changes this widget, by scrolling through all the widgets
in the profile.
By pushing OK again, this marked widget will change stickiness. If not
sticky it will be sticky, if sticky it will be sticky-on-change, and if sticky-onchange it will be non-sticky.
Profile Mode J, I and the numeric buttons will, both in sticky widget
mode and profile mode, change profile. The way this happens, with PIN
code and such, has not changed much. One thing, however, is new. Instead
of returning to the chosen profile in profile mode, one returns to either profile
mode or sticky widget mode, depending on where one was when changing
profile.
This makes it possible to be in sticky widget mode and choose sticky
widgets from all the profiles. By using the sideways arrows to change profile,
one can see all the widgets, sticky and non-sticky, and change their stickiness.
TV Mode When returning to TV mode, all the sticky widgets will be sticky.
Having multiple sticky widgets might have the same placement (on different
profiles), we will have an algorithm giving their final sticky placement. We
plan to have a setup of default placements, to be changed on the web portal.
That is, shall they start in the upper left corner and go down, start in the
upper left and go right, or start somewhere else and go in a specific direction.
Global Buttons The buttons are more or less the same where ever we are.
W changes between widget mode and TV mode.
J, I and the numeric buttons are only accessible in widget mode, but
in both profile mode and sticky widget mode. N and H are, however, only
accessible in sticky widget mode.
OK changes to sticky widget mode when in profile mode, and changes
stickiness when in sticky widget mode.
PIN Mode The loopholes here are the OK button and the numeric buttons,
which also are used for PIN code entering. So it’s important that when asked
for PIN, these buttons are locked specifically for this purpose. If not, one
will change profile when trying to enter the PIN code. We have solved this
by adding a new mode, PIN mode. In here, the numeric buttons and the
OK button are locked for PIN use only.
103
8.2. SPRINT 4 RESULTS
Figure 8.1: State Diagram of User Input
CHAPTER 8. SPRINT 4 - IMPLEMENTATION, PART II
8.2.3
104
New Use Cases
We had to change the requirements, and thus also the use cases. They must
now give the possibility to do any action at any time.
8.2.3.1
TV Overview
The overview of the TV interface (Figure 8.2) describes the possible actions
one can perform on the TV, using the remote control. This use cases does
not really have any changes, but the sticky widget function is put in a new
graphical use case (Figure 8.3).
Figure 8.2: TV Overview
8.2.3.2
Turn the Widgets On/Off
This use case (Table 8.2) is pretty much unchanged. It is only altered to fit
with the new modes in widget mode.
The use case explains how the user can turn on and off the widget based
”Internet on TV” solution.
105
Use Case
Description
Requirements
8.2. SPRINT 4 RESULTS
Table 8.2: UCTV-1
UCTV-1
Turn on/off the widget mode
F1.1
F3.1
Actors
User
Assumptions
Embelir’s ”Internet on TV” solution is installed.
User has a controller that is compatible with the
system.
Steps
1 User presses the W-button on the controller.
2 Widgets for the default profile appears above the
main TV-picture (this is now in profile mode).
3 User presses the W-button again and the widgets
disappear from the screen.
CHAPTER 8. SPRINT 4 - IMPLEMENTATION, PART II
106
When a user is watching TV, he/she can easily press the W-button and
the widgets in the default profile1 will appear on the screen. The user is now
in profile mode which is a part of widget mode (Figure 8.1).
To turn off the widget mode the user simply presses the W-button one
more time and all the widgets disappear from the screen.
Because the user have already chosen most of the widgets he/she wants
displayed in the default profile, the simple user does not really need to learn
anything more than this use case.
8.2.3.3
Change Profile
This use case (Table 8.3) has a bit more functionality from the last version.
It is now possible to enter the profile number for the profile you want to go
to, instead of having to flip through all the other profiles to get there. Also
you do not have to push the OK-button to load the profile to the screen,
it will automatically load itself after a pause of approximately a couple of
seconds.
The use case explains our solution to having more than one profile on
the system. The different profiles can be flipped through with the J and
I buttons. The profile will automatically appear after a couple of seconds
if there is no activity with the buttons, but the user can also press the OKbutton to make the profile appear right away.
If the user knows the number of his/her profile, he/she can choose to
simply enter the number using the number buttons and the profile with that
number will appear on the screen.
If the profile is PIN-protected the user will be asked to enter the PIN
using the number-buttons. If the PIN is correct, the widgets for the new
profile will appear on the screen. If not, the user will get an error message
and another attempt to enter correct PIN. If the user does not remember the
PIN2 he/she can choose to go to a different profile by doing all the steps one
more time.
8.2.3.4
Sticky Widgets
In this use case (Table 8.4) almost everything is changed. The sticky-onchange is a new feature the customer wanted and we had to alter pretty
The default profile is a profile already installed when the users gets the ”Internet
on TV” solution. Typically the user will have chosen what widgets he/she wants in the
profile. The widgets can be local weather, news, sports updates and stocks among other
things.
2
The user can also go to http://www.embelir.com to retrieve the PIN.
1
107
Use Case
Description
Requirements
8.2. SPRINT 4 RESULTS
Table 8.3: UCTV-2
UCTV–2
Change widget profile
F2.1
Actors
User
Assumptions
Embelir’s ”Internet on TV” solution is installed.
The user has at least one widget profile in addition
to the default profile.
User has a controller that is compatible with the
system.
The widgets is in profile mode.
Steps
1 User uses the J and I buttons to flip through the
different profiles.
2 User presses the OK-button or simply just do
nothing for a couple of seconds.
3 Widgets for the chosen profile appear on the
screen.
Variations
1a User takes a short-cut and enters his/hers profile
number by using the number buttons (continue to
step 2).
2.1 User uses the number-buttons to enter PIN.
2.1.1 User enters wrong PIN and:
2.1.1a gets another attempt to enter the correct PIN
(step 2.1).
2.1.1b chooses to go to another profile (start again from
step 1).
2.1.2 User enters correct PIN and continues to step 3.
CHAPTER 8. SPRINT 4 - IMPLEMENTATION, PART II
Use Case
Description
Requirements
108
Table 8.4: UCTV-3
UCTV–3
Sticky widgets
F4.1
F4.2
Actors
User
Assumptions
Embelir’s ”Internet on TV” solution is installed.
User has a controller that is compatible with the
system.
The widgets in on and in profile mode.
Steps
1 User presses the OK-button to get into sticky widget mode.
2 User uses the N/H-buttons to choose a widget.
3 User presses the OK-button to select the widget
to be sticky.
4 User presses the W-button and all the widgets
disappear from the screen, except for the sticky
one(s).
Variations
3.1 The user wants it to be sticky-on-change and
presses the OK-button a second time.
3.1.1 The user do not want the widget as sticky after all
and presses the OK-button a third time.
3.2 User wants more sticky widgets and repeats from
step 2.
3.3 User wants to select sticky widgets from another
profile and uses the J/I-buttons to get to the
preferred profile, then repeats from step 2.
109
8.2. SPRINT 4 RESULTS
Figure 8.3: Sticky Widgets
much the whole sticky functionality to implement this in our system and
still have an easy to use system.
The use case explains how a user can make one or more widgets sticky3 .
When a user turns on the Widgets he/she enters the profile mode, which
means he/she can only view the widgets and change the profile to be shown
on the screen (the N and H buttons have no functionality here).
To get into sticky widget mode he/she presses the OK-button. Now all
the widgets, except one that will be shown as selected, will be faded out and
the user can use the N and H buttons to select a widget. When the preferred
widget is selected he/she presses the OK-button to make the widget sticky.
3
A sticky widget will sticks to the screen even when the user turns off the other widgets.
CHAPTER 8. SPRINT 4 - IMPLEMENTATION, PART II
110
To make the widget sticky-on-change4 the user presses the OK-button one
more time, and the widget will be shown as sticky-on-change. To make the
widget not sticky again the user presses the OK-button a third time. The
widget will then be shown as not sticky and the user is back to where he/she
started before making the widget sticky.
After making a widget sticky/not sticky the user can just repeat the steps
to choose more widgets as sticky/not sticky.
If the user wants to choose a sticky widget from a different profile he/she
can use the J and I buttons to choose the preferred profile (Table 8.3), and
then repeat from step 2 to select more sticky widgets. When the user has
selected all the sticky widgets he/she wants, he/she presses the W-button
and the widgets that are not sticky will disappear while the sticky widgets
will appear on the screen (except for the sticky-on-change widgets which only
appears when their content changes).
This use case is also a graphical use case (Figure 8.3).
8.2.4
Architecture
In software development, the later a problem is solved, the more expensive
it is to fix it. Therefore it is important to have the architecture more or
less correct. One way of doing this is to have user scenarios on the different
aspects that are important for the system. For our project the factor that is
emphasized is the usability. The system needs to be easy to use, or else it
will have the consequence that no one will use it. The system is something
that are new to the customers in the sense that widgets appear on the TV
and not on the computer as some are used to.
Thus we need an easier solution, since the remote control is the only way
to interact with the system. We have a limited number of buttons to use and
it is important that they are used so that the system is as usable as possible.
We will have some general user test in this later, but for the architectural
part we will have usability scenarios which will describe the most important
functionality of the system, and then use this as a background for designing
the architecture. The overall architecture is already described in Sprint 1,
but we will here go deeper into it and see how the architecture for the system
will be like.
8.2.4.1
Usability of the Architecture
The goal is to achieve a system that is easy to learn and use. To achieve
high usability we will focus on visibility of system features, consistent and
4
Sticky-on-change means that the widget only appears when its content changes.
111
8.2. SPRINT 4 RESULTS
minimalistic design. By using the principle of affordance, all the selected
sticky widgets will be marked as selected and feedback is given through rendering a colored border around the widgets. We will also use the gestalt
principles through grouping of elements with similar attributes, continuity
of lines and use of similarity in shape and colors. By use of constraints the
user is forced to use the application in way which reduces the probability of
faults happening.
Usability is concerned with how easy it is for the user to accomplish a
desired task and the kind of user support the system provides. It can be
broken down to the following areas (Bass et al. 2003):
”Learning system features If the user is unfamiliar with the
particular system or a particular aspect of it, what can the
system do to make the task of learning easier?
Using a system efficiently What can the system do to make
the user more efficient in its operation?
Minimizing the impact of errors What can the system do,
so that a user error has minimal impact?
Adapting the system to the user needs How can the user
(or the system itself) adapt to make the user’s task easier?
Increasing confidence and satisfaction What does the system do to give the user confidence that the correct action is
being taken?”
8.2.4.2
Architectural Documentation
We will here try to give an architectural documentation of the system that
should be implemented later by Digiboards. This documentation will be
based on (Bass et al. 2003) and (IEEE 1471 2000), which is an IEEE standard
for describing the architecture of a software system. It will not follow entirely
the IEEE 1471 standard, but it will be used to extract some important point
that will be mentioned in our documentation.
8.2.4.3
Quality Attribute Scenarios
The quality attribute defines the non-functional requirements for the system,
and we need to consider this in our architecture design. We can express the
quality attributes by making scenarios for the quality attributes. A quality
attribute scenario is a quality-attribute-specific requirement. It consists of
six parts, which consists of the following, according to (Bass et al. 2003):
CHAPTER 8. SPRINT 4 - IMPLEMENTATION, PART II
112
”Source of stimulus This is some entity that generated the
system.
Stimulus The stimulus is a condition that needs to be considered
when it arrives at a system.
Environment The stimulus occurs within a certain conditions.
Artifact Some artifact is stimulated.
Response The response is the activity undertaken after the arrival of the stimulus.
Response measure When the response occurs, it should be
measurable in some fashion so that the requirement can be
tested.”
For our system, the main architectural driver, which is defined as the
attributes that have most impact on the architectural design, is usability.
In discussion with the customer it has become very clear that the usability
of the system is the most important attribute. Other attributes that are in
consideration for our system, is availability and performance, but these have
not as much impact as the usability. We have created three quality attribute
scenarios for the usability of the system.
Figure 8.4: Usability Scenario 1
Figure 8.5: Usability Scenario 2
113
8.2. SPRINT 4 RESULTS
Figure 8.6: Usability Scenario 3
8.2.4.4
Logical View
The logical architecture primarily supports the functional requirements, what
the system should provide in terms of services to its users. This is usually
done by decomposing the system into a set of key abstractions, taken mostly
from the problem domain, in form of objects or object classes (Kruchten
1995).
We will just focus on the widget application, i.e. the software that will
be on the set-top boxes, and not on the web application. We will thus not
go through the architecture of the web servers in detail. Of course these
must also be implemented, but this is something Digiboards are going to
implement and they are currently working on this solution. We will just
show the connection with the web application and have an interface for the
connection with the web servers. The rest is up to the developers that are
going to implement the final solution. We will go through the architecture for
the system in detail and figure out what is the best solution for the problem
given.
The application will be based on the Model-View-Controller (MVC) architectural pattern (Wikipedia 2009d), which isolates business logic from
input and presentation, permitting independent development, testing and
maintenance of each. The MVC pattern implements the tactic for usability
to separate the user interface from the rest of the application, and supports
the modification of the user interface. This is one of the main reasons for
choosing the MVC pattern. In addition we will need to combine it with the
client-server architectural pattern to have the relations with the application,
configuration server and content server. In addition there will be need to
have an architectural design for the web application. The MVC pattern is
often used in web applications.
In our system (Figure 8.7) we have the WidgetController which will be
the local controller according to the MVC pattern. The WidgetController
will define what the system should show on the TV screen. The WidgetController
CHAPTER 8. SPRINT 4 - IMPLEMENTATION, PART II
114
is connected with the Profile, which also works as a controller to see the
different Widgets. There can be from 1 to N different Profiles and from 1
to M different Widgets. Each separate Widget will work as a view to show
the widget on the screen.
Each of the different Widgets will have a WidgetModel which get the
content/data from the server to the local system that is on the set-top box.
The WidgetModel will in practice be a local copy of the WidgetModel that
is on the ContentServer. The ContentServer will therefore also serve as a
model for the application.
The ContentDownloader and the ContentReceiver is on the ContentServer,
and will be in control of the content. They will also work as a link with Internet and fetch data to the different widgets. There must be a link between
the WidgetModel and the ContentServer so that the information can be
pushed and pulled for the different widgets. In addition we will have the
ConfigurationServer, which is also a interface for the WidgetApplication
to work as a link between the web page (http://www.embelir.com) and the
WidgetApplication. When you edit the configuration server, this should be
pushed out to the Profile and then be visible on the TV screen.
Figure 8.7: Logical View of the System
8.2.5
Usability
Usability is a term for how easy a system works when people are to do
a specific task. The term is frequently used in human-computer type of
interactions (Shneiderman and Plaisant 2004, Wikipedia 2009c). Having
good logic behind the system, as well as clarity and elegance of the graphical
user interface, are key terms concerning good usability. The primary notion
of usability is the thought of an object being designed with the general users’
comprehensions. This specifically concerning five different points (Wikipedia
2009g):
Learnability How easy it is to accomplish basic tasks.
115
8.2. SPRINT 4 RESULTS
Efficiency After users have learned the different aspects of the system, how
fast are they able to solve different tasks.
Memorability To what extent do users remember the different functions of
the system.
Errors How many errors are made by users and to what extent does it
interfere with the actual task. How fast do they recover from them?
Satisfaction How the user feels when using the system.
To effectively handle these points, usability tests are needed. This is a
technique used to evaluate a product. Having nearly finished the product, it
is important to test everything around it. The idea of using persons that has
never seen the product before gives us useful feedback for improving the end
product. By giving these persons several tasks one can easily figure out if
the system is good or not. The tests mainly focus on learnability, efficiency,
errors and satisfaction. Examples of products that typically benefits from
usability testing are web sites, web applications and typically other humanmade computer interfaces.
8.2.5.1
Usability in This Project
For this project we created different tasks concerning the features we wanted
tested. Then we asked a few persons to sit down and do the tasks. We
observed and saw how well they performed, as well as asking questions on
their thoughts after the tasks were completed.
We wanted to make the system as easy as possible to use. Having this in
mind we therefore looked into Norman’s principles of Human Computer interactions and Schneiderman’s eight golden rules. Below the Schneiderman’s
golden rules (Shneiderman 2004) are stated, as well as how we are using them
in our project5 :
1. Strive for consistency Consistent sequent of actions should be required in similar situations. Typical prompts, menus and help screens
should be set up by the same individual terminology – making it easy
for the user to recognize and familiarize with the environment. For our
project this point is quite easily met as for having very few buttons the
user can interact with.
The rules are marked in bold. The rest is our description of how we used the rules,
and what they mean to our project.
5
CHAPTER 8. SPRINT 4 - IMPLEMENTATION, PART II
116
2. Enabling shortcuts for frequent and advanced users Abbreviations, function keys and hidden commands to decrease number of interactions and increase the pace of interaction. We have thought about
several shortcut possibilities. For instance having profile numbers from
1-9 where you can directly click the number of the profile you want to
enter. This requires that you know what number your profile is. We
also thought of an “un-stick all” function where you push and hold the
widget button for three seconds. By doing so all the widgets in sticky
mode should be reset to normal mode.
3. Give informative feedback For every operation the system should
give some sort of feedback, as for the user to know whether or not
the operation was successful. This being one of the core points from
Schneiderman, and one of our main priorities concerning usability. For
example while choosing what widgets are to be sticky, all other widgets
are faded out – making it obvious what widget the user is selecting.
Another example is if a pin code is needed to enter a profile, and a
wrong pin is unfortunately typed. This resulting in the user getting a
message about this and is asked to retype the correct pin.
4. Design dialog to yield closure In sequences with operations it
should be organized into groups with a beginning, middle and an end.
The informative feedback should be given at the end of each group. As
for our system, this point is to a certain extent not needed. The system
being as little complex as it is it does not have any sequence of actions.
We chose to give feedback at anytime instead of breaking the actions
into different groups.
5. Offer simple error handling Design the program such as the user
cannot make serious errors. If an error occurs the program should detect it and offer simple, comprehensible mechanisms for handling the
error. In such a small system as we got, there won’t be any error handling. However, the simplest way of handling any sort of problem would
be to shut off and turn the television on again – resetting everything
back to default.
6. Permit easy reversal of actions By having this feature it relieves
anxiety as for the user knows things can be undone. However, it also
encourages exploration of unfamiliar features. This point is barely used
in our system, as for the very few features available.
7. Support internal locus of control Design the system so that the
user is the initiator rather than the responder. In our system the user
117
8.2. SPRINT 4 RESULTS
controls everything. He/she is the initiator all the way, and will only
get response by the different feedback from his actions.
8. Reduce short-term memory load Keep things simple! Can our
system be more simplified? I doubt it!
The core of usability also focuses on a design philosophy called Usercentered design (UCD) (Wikipedia 2009h). This philosophy mainly focuses
on what the end user needs and what he wants. This is a view Donald A.
Norman has focused on. It seeks answers to questions such as:
Who are the users?
What are the users experience levels?
What information do the users need?
How do users think the final version should work?
UCD basically involves simplifying structure, making things clear and visible,
getting the mapping right, exploiting the powers of constraint and designing
for error prevention. Concerning our system being quite small already, we
did have and tried using these guidelines. This, resulting in an easy and well
structured system, which is also user friendly.
8.2.6
Usability Testing
In the next sprint, we will perform a usability test. Here we prepare for this
test (Appendix F).
There are three tests, one depending on the other. Basic use is necessary to complete all three tests, and Profiles is necessary to complete Sticky
widgets.
Basic use A normal user will only be able to turn the widgets on and off,
using only the default profile that shipped with the system. (Table F.1)
Profiles A premium user should be able to switch between different profiles,
including secured profiles. (Table F.2)
Sticky widgets A premium user should be able to set widgets sticky, stickyon-change and un-sticky. The sticky widgets shall be chosen from many
different profiles. (Table F.3)
CHAPTER 8. SPRINT 4 - IMPLEMENTATION, PART II
8.2.7
118
Implementation
After presenting the demo for our customer we found that we had put to
many limitations in place. What needed to change were to allow for a user
to set widgets from different profiles as sticky at the same time. To support
this we also had to change the demo to allow a user to change profiles after
entering selection mode as well. The customer also had reported problems
with the demo not working properly when they used it in their presentation,
mainly the setting of transparency did not always work and some times did
not work at all. To try and reduce the effect of this we changed the way we
made the widgets appear and disappear. We also finished the development
of the football widget and started to integrate that into the rest of the demo.
The widget application took it’s final form in this sprint. From an external
point of view not that much changed from the previous sprint. We added the
FootballWidget class and the RemoteControllerInputHandler class, but
most of the changes happened internally in the different classes. To account
for the change in behavior almost all of the methods needed some change.
This lead to many new bugs and unwanted behavior that took a lot of time
sorting out.
Figure 8.8: Sprint 4 Demo Class
119
8.3. SPRINT 4 EVALUATION
To minimize the use of the private class from AWTUtilities we stopped
setting widgets opacity to zero to make them disappear and in stead changed
their visibility. This, however, caused problems with the application stopping
to listen for key input from the user. We found that the reason for this was
that the dummy JFrame we set up with the KeyListener to handle the user
input got out of focus when the visibility of the widgets where changed. To
alleviate this problem we extracted the code that handled the key input into
its own class and passed an instance of this class around to all the JFrames
in the application so that key input would always be registered.
The football widget was also completed in this sprint and we started to
integrate this into the widget application. When the widget application was
running, a football team scored every 15 seconds and the football widget
was updated. If the widget application were in TV mode and the user had
set the football widget to sticky-on-change, it displayed for three seconds
when ever there was a goal. We also added a visual indicator to tell the user
which state the different widgets were in. A green border around the widget
now indicated that the widget was set to sticky, a blue border indicated that
it were set to sticky-on-change and no border indicated that it were in the
default state (i.e. not sticky or sticky-on-change).
8.3
Sprint 4 Evaluation
For Sprint 4 we estimated a total of 188 hours. We knew the estimate were
too high, but since this was the last sprint we wanted to finish the different
parts that were left. The estimate for this sprint was almost 100 hours more
than the other sprints which means everyone had to work approximately 15
hours more this week. We had set a new date that we could work together
in addition to the usual days. The rest we would hope was going to be work
at home. This seemed to be hard to manage and we decided midways in
the sprint that we would add a last sprint to meet the customer expectation
of having usability tests, and also to reduce the effort hours for this sprint.
Having planned to have a Sprint 5, the workload on Sprint 4 turned out
to be acceptable, although we were not able to reach the goals of Sprint 4
concerning the implementation.
After the Sprint 3 review meeting with the customer we got feedback from
the customer on the demo. The customer wanted to apply for a patent with
the sticky version so we had to spend some of the time that we estimated
for the sprint on this task. We extracted our project report into a short
summary that the customer could use for the patent application. We also
had to edit and make new use cases for the application.
CHAPTER 8. SPRINT 4 - IMPLEMENTATION, PART II
120
We wrote some user tests that we will be using in Sprint 5. We finished architectural parts that were not done in the previous sprints. On the
implementation part we continued working on our demo by extending some
functionality and adding extra widgets. This will be nice for the presentation.
Positive
The group worked well.
Divided the different tasks in a good way.
No sickness.
Negative
Sprint 4 planning should have been better.
Should have introduced Sprint 5 earlier, maybe before we started Sprint
4.
8.3.1
Conclusion
If we look at the burn down chart (Figure 8.9) we notice that we are 56
hours behind what we planned. The solution to complete all the tasks in
the product backlog will be to add a fifth sprint. Here we will also do the
usability tests and finish the implementation. The reason why we did not
reach the goal for Sprint 4 is simply that we had too much to do. After the
Sprint 3 review with the customer we got more tasks that needed to be done,
which lead to a higher estimate for the Sprint 4.
121
8.3. SPRINT 4 EVALUATION
Figure 8.9: Sprint 4 Burn Down Chart
Burndown chart - Sprint 4
Burned down
Weekday
Day
Balance
Planned
Actual
Planned
Actual
Daily
Completed
188
188
#N/A
Wed
0
1
36
24
152
164
24
Thur
2
44
50
108
114
50
Fri
3
36
12
72
102
12
Sat
4
0
0
72
102
0
Sun
5
0
0
72
102
0
Mon
6
36
32
36
70
32
Tue
7
36
30
0
40
30
200
180
160
140
120
100
Planned
Actual
80
60
40
20
0
1
2
3
4
5
6
7
8
'
CHAPTER 8. SPRINT 4 - IMPLEMENTATION, PART II
122
CHAPTER 9
Sprint 5 - Usability Testing
This is the documentation of the progress, results and acquired knowledge
during Sprint 5 of the project.
This fifth sprint took place between 29th October and 4th November
2009.
9.1
Sprint 5 Planning
We needed a fifth sprint to finalize the project. We will use this sprint to
finish the demo, the architecture and perform the usability tests.
9.1.1
Sprint Backlog
The tasks to be performed this sprint are, together with the customer, chosen
from the product backlog (Table 4.3) and copied into the sprint backlog
(Table 9.1).
9.2
Sprint 5 Results
The sprint results are the internal documentation of the work this sprint.
Code is not included.
123
CHAPTER 9. SPRINT 5 - USABILITY TESTING
Item
#
3
3.3
3.4
4
4.1
124
Table 9.1: Sprint 5 Backlog
Description
Est.
Responsible
Effort
Process View
Physical View
Mock-Up
Architecture
12
mortjohn
12
mortjohn
Implementation
48
jarleerd
4.1.1
4.1.2
5
5.1
Widget window
Widget content
5.1.3
Execution of test
16
larsmaha
5.1.4
Evaluation
16
larsmaha
SUM
Usability Testing
24
jarleerd
24
boron
Usability
32
larsmaha
104
Assigned
Members
mortjohn
mortjohn
jarleerd,
boron
jarleerd
boron
larsmaha,
garnaas
larsmaha,
garnaas
larsmaha,
garnaas
125
9.2.1
9.2. SPRINT 5 RESULTS
Usability Testing
Having consulted with the supervisors and our customer, we decided to execute user testing to improve our final product.
9.2.1.1
Participants’ Rights
For the tests we wrote a few tasks we wanted the test subjects to complete.
They are of course given full immunity and will not be mentioned by name in
our report. We also gave all our test subjects a contract, in which they had
to sign, giving us an insurance that they were aware of their rights (Appendix
F, Section F.2).
9.2.1.2
The Test
Before each test subject could begin any tasks, he/she had to read through a
manual given at the start of the test (Section F.3). This explains the different
buttons that are used, and it also contains a task description of the separate
tasks. While the test was under progress, we encouraged the test person to
think out loud. This giving us reasonable information when he/she did not
know what to do, and what parts that were easy to understand.
After all tests of our product had been completed, we showed a video of
one of the competitor’s product. Now our test subject could explain what he
liked and disliked between ours and the competitors. To fully optimize the
results of each test, we handed out a form with some questions we wanted
answered (Section F.4).
9.2.1.3
The Evaluation of the Test
For the tests we wrote a few tasks we wanted the test subjects to complete.
These tests are primarily to improve the customer’s end product, and not
our demo. However, we did manage to change a few things with our demo
as well. It should also be mentioned that all test subjects are given full
immunity and will not be mentioned by name in our report. Each person
had to sign a paper that stated he/she was aware of his/her rights, also
stating they could quit at any time they felt like (Appendix F, Section F.2).
When all the formalities were set, the user testing could finally begin.
Before each test subject could begin executing any tasks, he/she had to
read through a manual given at the start of the test (Section F.3). This
explaining the different buttons that are used and it also contains a task
description of the separate tasks. These tasks are written based on the use
case scenarios from the TV application. The first task, the easiest, is kind
CHAPTER 9. SPRINT 5 - USABILITY TESTING
126
of a ”warm-up” task that focuses on getting in and out of widget mode. We
believe there will be plenty of users, for example elder people, that only takes
this part of the program into use. Task two and three takes the user deeper
into our program and challenges him/her more. The test person will now
face all aspects of our program, making widgets sticky, sticky on a change
and place several widgets on the TV at the same time.
While the test was under progress, we encouraged the test person to think
out loud. This giving us reasonable information about the different parts of
the program. We observed and could easily see when he/she did not know
what to do, and also what parts that were easy to understand for the test
user. After all tests had been completed we showed a video of one of the
competitor’s product. Now our test subject was to explain what he liked
and disliked between ours and the competitors. In this part we mostly got
information about the different widgets they enjoyed (Table 9.2. Otherwise,
the systems looked more or less the same, although it was mentioned the
competitor’s system looked a bit overwhelming – as it was too much for a
user to handle.
To fully optimize the results of each test, we handed out a scheme with
some questions we wanted answered. Some of the important answers are
shown in Table 9.2. The rest can be seen in Appendix F.
After having tested on a few persons we soon figured the biggest weaknesses of our product. The use of the O button and the user feedback on
the different actions were clearly not good enough. Referring to a quote said
during the test by an early test subject (Male 20-25 years, good technological
skills):
”OK. . . I give up. You know I’ve click the O button so many
times I have no idea where I’m at... *pause* Can you help me?..
*pause* OK, I restart the task one more time before I give up.”
In this case, the user clearly did not get enough feedback as for not knowing
whether he had completed the task or not. He had simply done the right
things without knowing it.
Another issue was feedback concerning entering the different profiles.
Task two includes Log into Harald’s profile and should not be too hard.
After the user typed the correct pin and entered the profile, she was not
aware of actually having entered it. She believed she was at the same default
profile as she started at. Referring to a quote at this case (Female 20-25
years, good technological skills):
”Now I press O to enter the profile. . . *pause* Uhm. . . that
did not work. . . *thinking a short while*. . . I’ll go back to TVmode and restart the task.”
127
9.2. SPRINT 5 RESULTS
We did also get good feedback during the tests and understood the users
learned quickly how to get around in the application.
Table 9.2: First Usability Test
Person
What do what was If
you
you feel positive
could
about
about the change
what
applicaone
you have tion
thing,
seen?
what
would it
be?
Male 20- I never un- Nice
I
never
25, good derstood
overview
liked hand
technothe use of
manuals. . .
logical
O button
I
would
skills
comchange the
pletely.
system to
Where
give
indid it say
structions
I
should
directly at
click it to
the screen
enter
a
profile???
Female
I was un- Easy to get Maybe
20-25,
certain
around
“you have
good tech- how
the
now come
nological
sticky
to Harald’s
skills
function
profile”..?
worked
Male 50+, To be hon- I
could I
would
Lowest. . .
I see
the get a walkmediocre
did not un- weather in through
technoderstand
Trondheim function
logical
much
at today
skills
all. . .
I
felt completely lost
most
of
the times
Which
widgets
were important
to you?
Other
comments?
Football
results of
course. . .
maybe a
watch too?
The
Obutton was
confusing
as for it
was
involved in
so
many
types
of
actions
A calendar
where
I
can see all
my plans
News,
weather
CHAPTER 9. SPRINT 5 - USABILITY TESTING
128
By having this test, it resulted in slightly more implementation and writing more on the description part in the user manual. We implemented different profile names, and typically a Welcome to Harald’s profile message when
entered that profile. We also added one more widget (from two to three
widgets) making it easier to see what widget that is chosen and which ones
that are faded out. After running a few more tests with the improved demo,
the results were already better. This can bee seen in Table 9.3 below. The
rest can be seen in Appendix F.
As we can see from the second user test, the results have slightly improved.
The test persons seemed to be happier with the demo, having an easier time
to understand what was going on at the different modes. We did, however,
pick up a few important changes for the customer’s end product:
The different application modes TV-mode, Widget mode and Sticky mode
should be a lot more described and give feedback to the user whenever
he has changed from one mode to another
The different Widget modes Sticky mode, Sticky on a change and Not
sticky should also give better feedback whenever a user changes from
one to another. Only changing the boarder color did not seem to be
enough
The size of the different widgets This matters if the program is run on
a small screen
All in all, the tests were completed smoothly. We did run into one problem
though: Having to run the tests on a mac or computer, the user often believed
they could use the mouse pad or typical other buttons. This was a problem
during the test, and we continually had to repeat that the only buttons being
allowed to use, were the ones stated in the manual. This will of course not be
a problem with the real end product, as for it can be tested on a television
with the remote control. All over, our customer seemed satisfied with the
results, hence of course we are too.
We believe the usability testing have improved our end product, and
hopefully a good help for our customer. Even though our demo is an early
stage of the product, it will more or less look the same as the final TVapplication our customer makes. By completing the tests, we gained valuable
information that will help the customer in the process of making of the real
product. That being said, the test also strengthens our demo which in the
end gives more value to our customer as they tend to use it for presenting
the idea. All in all we are satisfied with the usability tests, the results and
believe it became a part of the core of our project.
129
9.2. SPRINT 5 RESULTS
Table
What do
you feel
about
what
you have
seen?
9.3: Second
What
was positive
about the
application
Male
15-20,
Mediocre Good technological
skills
Female
20-25,
Good technological
skills
Cool thing
for people
that watch
a lot of TV
I can see
the football results
while
I
watch
a
movie
I
liked
how things
float.
A
small system
and
easy
to
learn
to
use it!
Male
40-50,
mediocre
technological
skills
A
bit
too many
functions
for me to
handle. . .
I tried to
use
the
mouse
but
was
strictly
told
it
was
not
allowed. I
can see the
use of this
but I don’t
know if it
is anything
for me. . .
Person
OK
I
guess. A
bit confusing
with
the O button.. Got
it after a
while ;)
Usability Test
If
you Which
could
widgets
change
were imone
portant
thing,
to you?
what
would it
be?
I
don’t Football
know...
results and
football
results
I
don’t
know. . .
must
be
the
O
button but
I
think
it will be
better on
TV..
The stock I wouldn’t
market
have
so
widget.
many widEasy
to gets. But
turn
on I
underand off.
stand this
can
be
changed
individually?
Other
comments?
Easy
tasks;)
Calendar
and
bus
schedules
Stock
market
changes,
news
Thank
you
for
letting me
be a part
of
your
project!
CHAPTER 9. SPRINT 5 - USABILITY TESTING
9.2.2
130
Implementation
This sprint was mostly used to prepare the demo for the usability tests. We
discovered that the football widget did not always update properly when a
change happened and it also sometimes displayed strange behavior where it
would just disappear and not appear again unless the user exited widget mode
and entered widget mode again. We used the start of this sprint to fix this
and to remove a few other bugs before the usability tests were performed.
The bug were the opacity of the widgets are not set properly in selection
mode still sometimes occur. However, we discovered that this only happens
when the demo is run on a computer running Windows XP with only 1 GB
of RAM. We do not know why this is happening and have not been able
to resolve it, but we have notified our customer about this and they do not
consider this to be an issue.
In larger software development projects unit and integration testing are
usually used to find these kind of bugs. This being a demo which is never
to be used in any form of production environment, however, both we and
our customer felt that it would be unnecessary to do any formal unit tests
or integration testing. Although no formal testing was done we have during
the development performed manual tests whenever a new feature was added
or something was changed to ensure that it still was working as expected. It
was during one of these manual test of the functionality that we discovered
these last bugs that needed to be sorted out before the usability tests. The
reason for them not being discovered before this sprint, and thus forcing us
to postpone the usability test a little, is that the demo was not completed
until the very end of the last sprint.
After the first usability test we made two minor changes based on the
feedback we got from the test persons. The first change was that we added a
JFrame at the top center of the screen with the name of the profile currently
displayed. Secondly we added another widget to each profile so that the
two profiles now had three in stead of two widgets in them. This was in an
attempt to enhance the difference between the widgets that were selected
and those that were not, when in widget selection mode.
9.3
Sprint 5 Evaluation
The Sprint 5 was mainly about the usability testing and we managed to have
usability tests. One problem that occurred was that our implementation had
some bugs that needed to be fixed. This, resulting in a reschedule of the
usability tests. This was a minor problem, but it could have reduced some
131
9.3. SPRINT 5 EVALUATION
of the workload if we managed to run the tests earlier in the sprint. The
usability tests went very well and we felt like we got good feedback on our
demo regarding usability. We found some things we would probably never
have thought of if we did not have the possibility of usability testing. It also
showed that usability testing will play an important role in the future work
of the system concerning whether or not it will be a success.
For Sprint 5 we did not get the usability testing in the planned sprint,
so we are one day behind with the hours for this sprint. This is catched up
with having one day extra for the sprint with usability tests. Otherwise the
Sprint 5 went as planned.
Positive
The group worked well as a team.
Everyone met up at time.
Negative
The usability test was done too late.
Implementation should be finished earlier.
9.3.1
Conclusion
In Sprint 5 we had some problems with the demo not being finished after
Sprint 4, hence we had to use more time to finish the implementation. This
should have been avoided so that we could have the usability tests earlier in
the project. We needed to reschedule the usability tests and also extend the
sprint by one day to get the usability tests within this sprint.
CHAPTER 9. SPRINT 5 - USABILITY TESTING
132
Figure 9.1: Sprint 5 Burn Down Chart
Burn down chart - Sprint 5
Burned down
Weekday
Day
Balance
Planned
Actual
Planned
Actual
Daily
Completed
104
104
#N/A
Wed
0
1
36
24
68
80
24
Thur
2
36
36
32
44
36
Fri
3
0
0
32
44
0
Sat
4
0
0
32
44
0
Sun
5
0
0
32
44
0
Mon
6
12
6
20
38
6
Tue
7
20
12
0
26
12
120
100
80
60
Planned
Actual
40
20
0
1
2
3
4
5
6
7
8
'
CHAPTER 10
Conclusion
The original assignment given by Digiboards was based on the group getting
the ST microcontroller. This turned out to be impossible for us as a student
group to get hold of, as we did not meet the requirements from ST. The
microcontroller was only for ”selected partners”, but we hoped that Digiboards would get the deal with Lyse so we could get equipment from them.
An alternative for the ST microcontroller was the microcontroller from Intel.
We got in contact with a representative from Intel and forwarded the contact
to Digiboards. Unfortunately it did not help and we were unable to get a
hold of either of the microcontrollers. As a result of this we had a meeting
with Digiboards were we discussed what Digiboards expected from us and set
ourselves new goals. We agreed that we should focus more on the design of
the system and try to get a demo for our final presentation. They wanted us
to discuss internally the different possibilities for the system and figure out
a way of implementing it. In addition we brought up the need for usability
tests and also more comprehensive architecture design.
The change in project direction happened after we had gone through the
earliest phases, prestudy and requirements. A consequence of this was that
we needed to change much of the requirements and also do more on the
prestudy. Some parts of the prestudy that we had emphasized at first would
not be useful for our further work. This does not mean that it was futile, as
the prestudy would be important for the ones that will implement the final
system.
During the first sprints we did most of the design issues, describing the
functionality of the system and the high-level architecture. We started work133
CHAPTER 10. CONCLUSION
134
ing on the demo in Sprint 2 after desire from the customer to have a mock-up
of the system early in the sprint phases. We had customer meetings once
a week during the sprints to assure that we shared the same visions as the
customer. It was also a very nice opportunity for the group to show what we
had worked on and get feedback from the customer. This assured that we
were on the right track. During the sprints new requirements arose from the
customer and these were taken into consideration.
In Sprint 3 the customer told us that they wanted a running demo of
the system to show for their customer meeting with Lyse. This led to more
focus on the implementation in Sprint 3 and some of the other features in the
product backlog were postponed. In addition they wanted to use our demo
for a meeting in Finland. The demo has already shown to be a nice way for
the customer to show off their main vision for the widget system as a proof
of concept.
At the Sprint 4 meeting with the customer they stated that they would
like to apply for a patent regarding the sticky feature of the application, as
this differs from the other competitor’s solution. We helped Digiboards a
lot in this process by providing them a summary of the functionality of the
system, including use case diagrams and state diagram. The application for
patent that Digiboards delivered were based upon the documentation that
we gave to them.
During Sprint 4 we decided to add a fifth sprint to have time for usability
testing of our demo. The usability tests gave us good feedback and will be
useful for Digiboards to take into account when they implement the final
solution. We as a group also received good feedback on our demo and things
that needed to be improved for the ones who are going to implement the
system.
We have also gone in depth for the architecture showing the logical view
of the system and giving an idea of how the final system are going to be
implemented. We have taken into account that the most important requirement from the customer, the usability of the system, is emphasized. The
architecture, in addition to the system design, will be useful for the customer
when they are going to implement the system. They should be able to start
with the implementation after looking at our documentation.
What we did not do was the web portal for the customers, as this will be
Digiboards domain. Although this also need to be done in addition with our
widget application to get the final system up and running.
The web portal will be for the premium customers. Here, it should be
possible to configure the widgets, adding more widgets, creating profiles and
changing the appearance and placement. It will also be possible to secure
profiles by adding a PIN code for access. The default profile can also be
135
selected here.
These changes should be saved in a configuration server, while the widgets
and their contents are saved in a content server. Whenever the user tries to
load a widget the information about which widget should be presented is
fetched from the configuration server and the widgets themselves and their
content is fetched from the content server.
To use the widgets from the TV, one will need a remote control with –
in addition to normal remote control buttons like numeric buttons, arrows
and a select button – a special widget button. By pushing this button, the
widgets can be turned on and off. Without access to the web portal, this can
be used to show the default widgets that are shipped with the system.
By using the numeric buttons, the arrows and the select button, the user
can change between multiple profiles, and set widgets from one or more of
these profiles sticky. That is, when turning the widgets off, the sticky widgets
will still be shown.
Widgets can also be set as sticky-on-change. These widgets will normally
not be visible when the widgets are turned off, but will be shown when their
contents change. For example, when a new news feed has arrived or a football
team has scored a goal.
We are satisfied with our project outcome. Even though the project
changed drastic, we managed to set new goals. We feel that we did this in
a proper way and thus given Digiboards a complete system and architecture
design. Now they can easily start the implementation of the final system
based on our documentation.
Digiboards will not implement the final system in Java, but in Adobe AIR
with Flex. The fact that this will be implemented on a specific microcontroller might also affect the total effort. The future work to reach the original
goal is hard for us to give a prediction of, as we do not have enough insight in
how to implement it on the microcontrollers, nor Adobe AIR with Flex. For
those experienced with Adobe AIR and microcontrollers it should be possible
to start the implementation right away based on our documentation.
CHAPTER 10. CONCLUSION
136
CHAPTER 11
Evaluation
This is the evaluation of both our own work and collaboration, as well as the
task, the customer, the supervisors and the course in general.
11.1
The Internal Process and Results
The internal process was not flawless, but it worked. We worked well as a
group and we managed to finish the project.
11.1.1
The Teamwork
We collaborated well and worked well as a team.
What We Have Done Well There were no big issues during collaboration. Everybody were not always on time, but nothing later than acceptable.
There were no fights about how things should be done or who should do it.
Every little issue that arose was always solved democratically, without ever
becoming a problem.
We were good at delegating both tasks and roles, so we all knew our
responsibilities. We spent much of our work time together. This made it
easier to cooperate and discuss solutions.
What We Have Done Not So Well What we have not done well, is talk
English. Too much of the internal discussions took place in Norwegian, so
137
CHAPTER 11. EVALUATION
138
Alessandro had some trouble staying in the loop. We did, however, do the
more official communication in English. That is, the communication that
needed everyone’s input.
We should also have done more to get quality assurance of the documents
written. The documents written and added to the report should have been
proof read before they were added to the report. This would have saved us
time in the end of the project with correcting of the report.
11.1.2
Project Work Effort
The original estimate for the project was 1872 hours in total for the entire
team. The project lasted for 12 weeks, meaning we should have an estimate
of 156 work effort hours a week to reach the goal for the project. In Figure
11.1 we can see the estimated work effort versus our actual work effort. We
see that we had a slow start in the beginning, then we had a week where we
worked more than estimated. When we waited for the chip we had a little
lower effort than estimated and in the end we see that we had an increase in
the end. We ended up with 1814 effort hours in total, 58 hours behind the
actual estimate for the course. This was not a problem as we reached all our
goals.
Figure 11.1: Work Effort - Actual vs. Estimated
In Figure 11.2 we see the actual versus the planned work effort for the
different phases. The two parts that separates most is the prestudy and the
139
11.1. THE INTERNAL PROCESS AND RESULTS
programming. This was a consequence of not getting the microcontroller,
which lead to more prestudy for the design and architecture. We also used
more time on the design and less time on the programming and implementation since the project changed. Except for this it seems that we have followed
the plan and the estimated workload well.
Figure 11.2: Actual vs Planned Effort for the Different Phases
11.1.3
The Project
We did some mistakes during the project, but managed to salvage it before
it was too late.
What We Have Done Well We made most of the milestones in time (Table
2.1). We were late with the preliminary study, and thus we were also late with
the product backlog. This was because we was waiting on the microcontroller
to arrive and had to stall the time. We had to re-plan the sprints too, but this
was because we changed their number and length. Thus, we also re-planned
them to earlier than their original date.
Even though the whole project was changed, due to a non-arriving microcontroller, we managed to finish the new project. All this made it quite
difficult to plan from the start, but we still managed to turn around and
change our goals.
CHAPTER 11. EVALUATION
140
One thing that has always been up to date, is the report. We started
with it early, and kept writing in it. Thanks to this, we are in no hurry at
the end of the project.
The use of LATEX has also gone quite well. Those who did not know
it, mostly learned and manages to use it without too many mistakes. The
division of the content into multiple files have also minimized the problem of
editing the same file.
But this was mostly solved because of Git, the version control. We had
some starting problems, but after a while we got the hang of it and it worked
well since.
What We Have Done Not So Well Git caused some trouble in the start,
mostly thanks to the policy of committing everything. We should have made
a policy of not committing any auto created files. LATEXcreates many files
during compilation, e.g. .aux, .bbl, .blg, .toc, .lof, .lot, .out and .pdf.
When adding any of these files from another person’s compilation, we got
merge conflicts. If we made it clear that Git was only for .tex and other
self-written files, we would have avoided many problems.
Another mistake was being too democratic. Java was the only language
everybody knew, hence we chose that language to implement the demo. However, everybody did not contribute to the implementation and those who did
could easily, and with great advantage, have used another language. For
example C++ and Qt, instead of Java and Swing. The use of Java caused
much frustration and quite a few problems, as Mac OS X does not have Java
6, which we needed.
The implementers should also have started commenting their code while
coding and not after.
We should probably have worked more at the beginning of the project to
not get behind on the hours needed. We did not feel this as necessary, as
there was not much to do at the time being. We were stuck waiting for a
microcontroller that never arrived.
We probably should have given up on the microcontroller earlier and
started working on the project as it is now. Knowing when the first microcontroller was lost, the hope for a new microcontroller came. Unfortunately
this microcontroller never showed up either.
We should also have worked a bit harder later, so that the demo could
be finished by the end of Sprint 4. This resulting in the usability test being
postponed.
We should have planned the sprints better. We started out with two
sprints of two weeks, changed it to four sprints of one week and then added
141
11.2. THE CUSTOMER AND THE PROJECT TASK
an extra sprint at the end of Sprint 4. We should have had this planned out
before we started.
The Assignment Goals We did not reach the original assignment goals, as
the project was changed.
The original goal was to make either Adobe AIR or Adobe Flash run on
a ST Micro STi7109 Single-Chip Set-Top Box IC. This was later changed to
a Intel CE 3100 microcontroller, as the STi7109 was impossible to get hold
on. But so was the CE 3100, so the original goal was then completely out of
the picture.
Our new goal was to design the widget system instead of making it possible to run on a microcontroller. In addition to the design we would make
a demo to show the concepts of how everything works. This we managed to
do.
After our work Digiboards had enough information to apply for a patent.
What We Learned We learned how to use Scrum in a team.
In general we learned a lot about teamwork and how to cooperate and
work together. Especially the group dynamics lectures gave us information
about how to cooperate and how to better understand each other.
We learned how to write technical reports, this including report layouts,
bibliographies and how to structure it. We all learned more LATEX, both basic
and advanced use.
We also learned that things never go according to the plan. The missing
microcontroller is a good example of this.
11.2
The Customer and the Project Task
We are very satisfied with the customer and even though we had problems
with the assigned task, it turned out okay.
Communication with the Customer It was easy to get hold of the customer. We communicated mostly through the customer contact, but could
also contact them directly. We mostly used email, but also Google Talk and
of course meetings. They responded within the agreed time limit and came
to most of our proposed meetings.
In addition, we agreed on most of the issues and seemed to share the
same visions about the widget system.
CHAPTER 11. EVALUATION
142
The Project Task The original project task became impossible, as we did
not get the assigned microcontroller. Our first task was to get hold of this,
but it proved impossible. The customer could have done this themselves and
handed us the chip during the initial meeting. As this would have proved
difficult for them as well, they should have made the necessary changes to
the project before presenting it to us. That would have saved us a lot of time
and frustration and we could have dug even deeper into the new task.
11.3
The Supervisors
We are overall satisfied with our supervisors.
Communication with the Supervisors We had weekly meetings with both
our supervisors.
We invited the supervisors to some of the important customer meetings
and Snorre Gylterud, the assistant supervisor, joined us in two of these meetings. He gave positive feedback on how we held the meetings and input on
what we could do to improve our project, e.g. the usability test.
The Supervising The supervisors helped a great deal with the report. The
main supervisor gave us constructive criticism on the overall structure, while
the assistant supervisor read through it and gave us feedback on the content.
They both provided a lot of comments and was a great resource during
the project. They also were an inspiration when it came to budgeting effort
and keeping the budget.
11.4
Improvements of the Course
The course itself depends much on the task, the customer and the supervisor.
Thus difficult to give any general improvements, except on the lectures.
The Technical Writing Lecture The writing course, however, could have
been earlier. At least some of the information should have been provided
from the start, as it was important for how we structured the report. For
example, when to write in the past, present and future is something we need
to know when we write it, not afterward.
A lecture more directed towards computer-related writing might also be
an improvement. We had to disregard some parts, as they were not relevant
143
11.4. IMPROVEMENTS OF THE COURSE
for our report. The lecturer and supervisor disagreed on certain issues (e.g.
the use of references).
It should also be mentioned that most of the groups used LATEX, while
the lecture was very non-LATEX supportive. This complicated things a bit,
as the lecturer did not seem to understand why we did things the way we
did (standard LATEX) and wanted us to do it in a way that did not go well
with LATEX. A more How to write computer-related reports in LATEX -directed
lecture would have been great.
CHAPTER 11. EVALUATION
144
Glossary
Definitions from Wikipedia (http://wikipedia.org) and http://dictionary.
die.net, which has word searches from WordNet, Webster’s, FOLDOC and
a variety of specialized sources.
Acid3 Test A test page (http://acid3.acidtests.org) from the Web
Standards Project that checks how well a web browser follows certain selected elements from web standards, especially relating to the
Document Object Model and JavaScript. [Wikipedia]
ActionScript A scripting language based on ECMAScript. [Wikipedia]
Adobe AIR A cross-platform runtime environment for building rich Internet applications (using Adobe Flash, Adobe Flex, HTML, or Ajax)
that run outside of the web browser. [Wikipedia]
Adobe Flash A multimedia platform used for adding animation and interactivity to web pages. It is commonly used to create animation,
integrate videos into web pages and to develop rich Internet applications. [Wikipedia]
BibTEX A LATEXpackage for bibliographic citations. [die.net]
Blu-ray An optical disc storage medium, designed to supersede the standard
DVD. [Wikipedia]
C++ A statically typed, free-form, multi-paradigm, compiled, general-purpose
programming language. [Wikipedia]
CISC, Complex Instruction Set Computer A kind of computer architecture that has a large number of instructions hard coded into the
CPU chip. [die.net]
145
GLOSSARY
146
COCOA One of Apple Inc.’s native object-oriented application program
environments for the Mac OS X operating system. [Wikipedia]
Codec An integrated circuit or other electronic device combining the circuits needed to convert digital signals to and from analog (Pulse Code
Modulation) form. [die.net]
Digital signage Web-based information broadcasting on digital screens.
[Wikipedia]
DOM, Document Object Model A cross-platform and language-independent
convention for representing and interacting with objects in HTML,
XHTML and XML documents. Aspects of the DOM (such as its ”Elements”) may be addressed and manipulated within the syntax of the
programming language in use. The public interface of a DOM are
specified in its Application Programming Interface (API). [Wikipedia]
DRAM, Dynamic Random-Access Memory A type of semiconductor
memory in which the information is stored in capacitors on a MOS
integrated circuit. Typically each bit is stored as an amount of electrical
charge in a storage cell consisting of a capacitor and a transistor. Due
to leakage the capacitor discharges gradually and the memory cell loses
the information. Therefore, to preserve the information, the memory
has to be refreshed periodically. Despite this inconvenience, the DRAM
is a very popular memory technology because of its high density and
consequent low price. [die.net]
DVI, Digital Visual Interface A high-quality video interface for digital
displays. [Wikipedia]
ECMAScript A scripting language, standardized by Ecma International
in the ECMA-262 specification and ISO/IEC 16262. The language is
widely used on the web, especially in the form of its three best-known
dialects, JavaScript, ActionScript, and JScript. [Wikipedia]
Facebook A global social networking website that is operated and privately
owned by Facebook, Inc. Users can add friends and send them messages, and update their personal profiles to notify friends about themselves. Additionally, users can join networks organized by city, workplace, school, and region. [Wikipedia]
Framework In object-oriented systems, a set of classes that embodies an
abstract design for solutions to a number of related problems [die.net]
147
GLOSSARY
Git A distributed version control system, developed by Linus Torvalds for
handling the Linux kernel. [Wikipedia]
Google Talk (GTalk) A free Windows and web-based application for instant messaging and voice over Internet protocol (VoIP), offered by
Google Inc.
H.264/MPEG-4 AVC A standard for video compression. H.264 is most
popular for its use on Blu-ray Disc and HD DVD. [Wikipedia]
HDMI, High-Definition Multimedia Interface A compact audio/video
interface for transmitting uncompressed digital data. [Wikipedia]
IA, Intel Architecture The instruction set architecture of Intel’s most
successful microprocessors, also called x86. This is the instruction set
for the family of microprocessors installed in the vast majority of the
personal computers in the world. [Wikipedia]
IM, Instant Messaging A form of real-time communication between two
or more people based on typed text. The text is conveyed via devices
connected over a network such as the Internet. [Wikipedia]
®onMedia
Processor CE 3100 The first system-on-a-chip (SoC) based
Intel Architecture (IA) for Internet-connected Blu-ray players, ad-
Intel
vanced cable set top boxes, modular DTVs, and other connected Consumer Electronics products. This highly integrated device combines
a high-performance IA processor core with leading-edge video decoding and processing hardware, a 3-channel/800MT/s DDR2 memory
controller, dedicated multi-channel audio processing DSPs, a powerful 3D-graphics engine, a security processor and support for multiple
peripherals.
JavaScript An object-oriented scripting language used to enable programmatic access to objects within both the client application and other
applications. [Wikipedia]
KDE, K Desktop Environment A free software project based around its
flagship product, a desktop environment mainly for Unix-like systems.
The goal of the project is to provide basic desktop functions and applications for daily needs as well as tools and documentation for developers
to write stand-alone applications for the system. [Wikipedia]
GLOSSARY
148
KJS, KDE JavaScript KDE’s ECMAScript/JavaScript engine that was
originally developed for the KDE project’s Konqueror web browser by
Harri Porten in 2000. [Wikipedia]
LATEX Leslie Lamport’s document preparation system built on top of TEX.
LATEXwas developed at SRI International’s Computer Science Laboratory and was built to resemble Scribe. LATEXadds commands to simplify
typesetting and lets the user concentrate on the structure of the text
rather than on formatting commands. [die.net]
LGPL, GNU Lesser General Public License A free software license published by the Free Software Foundation (FSF). [Wikipedia]
MAC OS X A line of computer operating systems developed, marketed,
and sold by Apple Inc., and since 2002 has been included with all new
Macintosh computer systems. It is the successor to Mac OS 9, the
final release of the ”classic” Mac OS, which had been Apple’s primary
operating system since 1984. [Wikipedia]
MXML, Magic eXtensible Markup Language A XML-based user interface markup language first introduced by Macromedia in March
2004. Adobe Systems (which acquired Macromedia in December 2005)
gives no official meaning for the acronym, but some developers suggest
it should stand for ”Magic eXtensible Markup Language”. [Wikipedia]
Objective-C A reflective, object-oriented programming language, which
adds Smalltalk-style messaging to the C programming language. [Wikipedia]
PCRE, Perl Compatible Regular Expressions A regular expression C
library inspired by Perl’s external interface, written by Philip Hazel.
[Wikipedia]
Product Backlog A high-level document for a scrum project. It contains backlog items: broad description of all required features, wishlist items, etc., prioritized by business value. It is open and editable
by anyone, and contains rough estimates of both business value and
development effort. [Wikipedia]
RAM, Random-Access Memory The most common computer memory
which can be used by programs to perform necessary tasks while the
computer is on; an integrated circuit memory chip allows information to
be stored or accessed in any order and all storage locations are equally
accessible. [die.net]
149
GLOSSARY
RIA, Rich Internet Applications Web applications that have most of
the characteristics of desktop applications, typically delivered by way of
standards based web browser plug-ins or independently via sandboxes
or virtual machines. Examples of RIA frameworks include Curl, GWT,
Adobe Flash/Adobe Flex/AIR, Java/JavaFX, uniPaaS, Mozilla’s XUL
and Microsoft Silverlight.
RISC, Reduced Instruction Set Computer A kind of computer architecture that has a relatively small set of computer instructions that it
can perform. [die.net]
SDRAM, Synchronous DRAM A form of DRAM which adds a separate clock signal to the control signals. SDRAM chips can contain
more complex state machines, allowing them to support ”burst” access
modes that clock out a series of successive bits (similar to the nibble
mode DRAM). [die.net]
STB, Set-Top Box Any electronic device designed to produce output on
a conventional television set (on top of which it nominally sits) and
connected to some other communications channels such as telephone,
ISDN, optical fiber or cable. The STB usually runs software to allow
the user to interact with the programs shown on the television in some
way. [die.net]
STi7109 A high definition set-top box / DVD decoder chip.
Scrum An iterative planning and execution method for software development, based on agile development. [Wikipedia]
SoC, System-on-a-Chip An electronic system with all the components
integrated into a single chip. [Wikipedia]
Star Topology Network topology where all peripherals are connected to
each other through a hub in the middle, as the central node. [Wikipedia]
SuperH A RISC instruction set architecture for embedded systems. [Wikipedia]
SVG, Scalable Vector Graphics A family of specifications of an XMLbased file format for describing two-dimensional vector graphics, both
static and dynamic (i.e. interactive or animated). The SVG specification is an open standard that has been under development by the
World Wide Web Consortium (W3C) since 1999. [Wikipedia]
GLOSSARY
150
Twitter A free social networking and micro-blogging service that enables its
users to send and read messages known as tweets. Tweets are text-based
posts of up to 140 characters displayed on the author’s profile page
and delivered to the author’s subscribers who are known as followers.
Senders can restrict delivery to those in their circle of friends or, by
default, allow open access. Users can send and receive tweets via the
Twitter website, Short Message Service (SMS) or external application.
[Wikipedia]
W3C, World Wide Web Consortium The main standards body for the
World-Wide Web. W3C works with the global community to establish
international standards for client and server protocols that enable online commerce and communications on the Internet. It also produces
reference software. [die.net]
WBS, Work Breakdown Structure A tool used to define and group a
project’s discrete work tasks in a way that helps organize and define
the total scope of work for the project. [Wikipedia]
WDK, Widget Development Kit A set of API for developing widgets.
Widget In graphical user interfaces, a combination of a graphic symbol and
some program code to perform a specific function. E.g. a scroll-bar or
button. Windowing systems usually provide widget libraries containing
commonly used widgets drawn in a certain style and with consistent
behavior. [die.net]
Widget Dock A dock that shows the available widgets.
XHR, XMLHttpRequest A DOM API that can be used inside a web
browser scripting language, such as JavaScript, to send an HTTP or
an HTTPS request directly to a web server and load the server response
data directly back into the scripting language. Once the data is within
the scripting language, it is available as both an XML document, if the
response was valid XML markup, and as plain text. [Wikipedia]
XHTML, eXtensible Hyper Text Markup Language A family of XML
markup languages that mirror or extend versions of the widely used Hyper Text Markup Language (HTML), the language in which web pages
are written. [Wikipedia]
XML, eXtensible Markup Language An initiative from the W3C defining an ”extremely simple” dialect of SGML suitable for use on the
World-Wide Web. [die.net]
151
GLOSSARY
XSLT, XSL Transformations A declarative XML-based language used
for the transformation of XML documents into other XML documents.
The original document is not changed; rather, a new document is created based on the content of an existing one.The new document may
be serialized (output) by the processor in standard XML syntax or in
another format, such as HTML or plain text. XSLT is often used to
convert XML data into HTML or XHTML documents for display as a
web page. [Wikipedia]
Yahoo! Widget Engine (Konfabulator) A free application platform for
Mac OS X and Microsoft Windows. The software was previously called
Konfabulator, but after being acquired by computer services company
Yahoo! it was rebranded. The Yahoo! Widget Engine (Konfabulator)
has a very flexible application programming interface (API) based on
JavaScript with many features useful to developers. [Wikipedia]
GLOSSARY
152
References
Adobe Systems Incorporated. Browser vs. Desktop. 2009a. [Online; accessed
24th September 2009].
URL http://www.adobe.com/products/air/comparison/
Adobe Systems Incorporated. Create and deliver rich interactive content.
2009b. Product information, [Online; accessed 24th September 2009].
URL http://www.adobe.com/products/flash/
Adobe Systems Incorporated. Create engaging, cross-platform rich Internet applications. 2009c. Product information, [Online; accessed 24th
September 2009].
URL http://www.adobe.com/products/flex/
Len Bass, Paul Clements and Rick Kazman. Software Architecture in Practice. 2nd ed. Addison-Wesley, 2003.
DVRLife. 2006. [Online; accessed 15th October 2009].
URL http://www.dvrlife.com/images/tivo-remote-control.gif
Embelir. Widgets on TV. Sep 2009. Business plan.
Jesse James Garrett. Ajax: A New Approach to Web Applications. 2005.
[Online; accessed 24th September 2009].
URL
http://www.adaptivepath.com/ideas/essays/archives/
000385.php
Jon Atle Gulla, Reidar Conradi, Jon Espen Ingvaldsen, Steinar Hagen and
Geir Solskinnsbakk. Introduction to course TDT4290 Customer Driven
Project. 21 Aug 2009. [Online; accessed 25th August 2009].
URL
http://www.idi.ntnu.no/emner/tdt4290/docs/2009/
TDT4290InfoBook2009.pdf
153
REFERENCES
154
IEEE 1471.
Recommended Practice for Architectural Description of
Software-Intensive Systems -Description. 2000. [Online; accessed 27th
October 2009].
URL
http://standards.ieee.org/reading/ieee/std_public/
description/se/1471-2000_desc.html
Intel Corporation. Intel and Adobe to Extend Flash Platform to TVs. 5 Jan
2009. Press release, [Online; accessed 4th October 2009].
URL
http://www.intel.com/pressroom/archive/releases/
20090105corp.htm
®
Intel Corporation, Product Brief. Intel Media Processor CE 3100 Product
Brief. Intel Corporation, 2008. [Online; accessed 4th October 2009].
URL
http://www.intelconsumerelectronics.com/Download/
CE-3100.aspx
Philippe Kruchten. Architectural Blueprints — The “4+1” View Model of
Software Architecture. 1995. [Online; accessed 27th October 2009].
URL
http://www.cs.ubc.ca/~gregor/teaching/papers/4+
1view-architecture.pdf
Ryan Paul. First look: breathe in the Adobe AIR. 2008. [Online; accessed
24th September 2009].
URL
http://arstechnica.com/old/content/2008/03/
first-look-breathe-in-the-air.ars
Ben Shneiderman. Shneiderman’s ”Eight Golden Rules of Interface Design”.
2004. [Online; accessed 22nd October 2009].
URL
http://faculty.washington.edu/jtenenbg/courses/360/
f04/sessions/schneidermanGoldenRules.html
Ben Shneiderman and Catherine Plaisant. Designing the User Interface:
Strategies for Effective Human-Computer Interaction. 4th ed. AddisonWesley, 2004.
STMicroelectronics, Data Brief. Low-cost HDTV set-top box decoder for
H.264 and Microsoft WMA9. STMicroelectronics, 2006. [Online;
accessed 4th October 2009].
URL
http://www.st.com/stonline/products/literature/bd/
11660.pdf
Sun Microsystems. How to Create Translucent and Shaped Windows. 2009.
[Online; accessed 8th October 2009].
155
REFERENCES
URL http://java.sun.com/docs/books/tutorial/uiswing/misc/
trans_shaped_windows.html
Kelly Waters. How to Implement Scrum in 10 Easy Steps. 2007. [Online;
accessed 30th September 2009].
URL
http://www.agile-software-development.com/2007/09/
how-to-implement-scrum-in-10-easy-steps.html
WebKit. 2009. Project homepage, [Online; accessed 24th September 2009].
URL http://webkit.org
Wikipedia. Adobe Flash — Wikipedia, The Free Encyclopedia. 2009a.
[Online; accessed 24th September 2009].
URL
http://en.wikipedia.org/w/index.php?title=Adobe_
Flash&oldid=315691375
Wikipedia. Ajax (programming) — Wikipedia, The Free Encyclopedia.
2009b. [Online; accessed 24th September 2009].
URL
http://en.wikipedia.org/w/index.php?title=Ajax_
(programming)&oldid=315323113
Wikipedia. Human–computer interaction — Wikipedia, The Free Encyclopedia. 2009c. [Online; accessed 22nd October 2009].
URL http://en.wikipedia.org/w/index.php?title=Human%E2%80%
93computer_interaction&oldid=320586621
Wikipedia. Model–view–controller — Wikipedia, The Free Encyclopedia.
2009d. [Online; accessed 27th October 2009].
URL http://en.wikipedia.org/w/index.php?title=Model%E2%80%
93view%E2%80%93controller&oldid=322031337
Wikipedia. Scrum (development) — Wikipedia, The Free Encyclopedia.
2009e. [Online; accessed 8th October 2009].
URL
http://en.wikipedia.org/w/index.php?title=Scrum_
(development)&oldid=318267105
Wikipedia. Television — Wikipedia, The Free Encyclopedia. 2009f. [Online;
accessed 8th October 2009].
URL
http://en.wikipedia.org/w/index.php?title=
Television&oldid=318539506
Wikipedia. Usability — Wikipedia, The Free Encyclopedia. 2009g. [Online;
accessed 22nd October 2009].
REFERENCES
156
URL
http://en.wikipedia.org/w/index.php?title=
Usability&oldid=321151468
Wikipedia. User-centered design — Wikipedia, The Free Encyclopedia.
2009h. [Online; accessed 22nd October 2009].
URL
http://en.wikipedia.org/w/index.php?title=
User-centered_design&oldid=314259158
Wikipedia. Waterfall model — Wikipedia, The Free Encyclopedia. 2009i.
[Online; accessed 8th October 2009].
URL
http://en.wikipedia.org/w/index.php?title=Waterfall_
model&oldid=317339061
Wikipedia. WebKit — Wikipedia, The Free Encyclopedia. 2009j. [Online;
accessed 24th September 2009].
URL
http://en.wikipedia.org/w/index.php?title=
WebKit&oldid=315011864
Bibliography
die.net. die.net. 1996.
URL http://www.die.net
Jon Atle Gulla, Reidar Conradi, Jon Espen Ingvaldsen, Steinar Hagen and
Geir Solskinnsbakk. Introduction to course TDT4290 Customer Driven
Project. 21 Aug 2009. [Online; accessed 25th August 2009].
URL
http://www.idi.ntnu.no/emner/tdt4290/docs/2009/
TDT4290InfoBook2009.pdf
Thorsten Hansen. The bibunits Package, 12 May 2004. [Online; accessed
4th October 2009].
URL
ftp://ftp.tex.ac.uk/tex-archive/macros/latex/.../
bibunits/bibunits.pdf
Nicolas Markey. Tame the BeaST – The B to X of BibTEX, 16 Oct 2005.
[Online; accessed 4th October 2009].
URL www.tex.ac.uk/tex-archive/info/bibtex/tamethebeast/ttb%
_en.pdf
Wikipedia. Wikipedia. 2009.
URL http://wikipedia.org
157
APPENDIX A
Stakeholders
The partners for this project would be the customer representatives, the
supervisors and the project group.
Customer
Email list: kpro2009@digiboards.com
Robin Skoglund
Address: Mellomveien 9, 7042 Trondheim
Phone: +47 901 23 667
Email: robin.skoglund@digiboards.com
Harald Amundsen
Phone: +47 991 61 028
Email: harald.amundsen@digiboards.com
Supervisors
Reidar Conradi
Main supervisor
Address: Skule Bårdssøns gate 11, 7052 Trondheim
Phone: +47 918 97 028 / +47 73 59 34 44
Email: conradi@idi.ntnu.no
A-1
APPENDIX A. STAKEHOLDERS
Snorre Gylterud
Assistant supervisor
Address: Vallerveien 150E, 1346 Gjettum
Phone: +47 926 46 885
Email: gylterud@stud.ntnu.no
Project Group
Email list: kpro2@idi.ntnu.no, kpro2009@digiboards.com
Alessandro Boron
Address: Magnus Den Godes gate 2, 7030 Trondheim
Phone: +47 450 19 532
Email: boron@stud.ntnu.no
Ane Min Hofplass Garnaas
Address: Maristuveien 9, 7030 Trondheim
Phone: +47 980 74 235
Email: garnaas@stud.ntnu.no
Lars Martin Riiser Haraldsen
Address: Kjøiaveien 43, 1386 Asker
Phone: +47 454 05 764
Email: larsmaha@stud.ntnu.no
Morten Weel Johnsen
Address: Sandgata 14, 7012 Trondheim
Phone: +47 450 33 346
Email: mortjohn@stud.ntnu.no
Tiril Anette Langfeldt Rødland
Address: Båhus gt 14A, 7014 Trondheim
Phone: +47 996 45 285
Email: tirilane@stud.ntnu.no
Jarle Erdal Steinsland
Address: Steinsnesvegen 2, 5518 Haugesund
Phone: +47 938 13 563
Email: jarleerd@stud.ntnu.no
A-2
APPENDIX B
Concrete Plan
Here follows the Gantt table (Figure B.1) used for the project.
B-1
Start
Rolled Up Progress
Split
Milestone
Summary
Page 1
Rolled Up Milestone
Deadline
Group By Summary
Project Summary
External Tasks
Finish
September 2009
October 2009
November 2009
18 21 24 27 30 02 05 08 11 14 17 20 23 26 29 02 05 08 11 14 17 20 23 26 29 01 04 07 10 13 16 19 22 25
19.11
Thu 19.11.09 25.08
19.11
Thu 19.11.09 25.08
08.09
Tue 08.09.09 25.08
11.09
Fri 11.09.09 26.08
17.09
Thu 17.09.09
16.09
25.09
Fri 25.09.09
28.09
Mon 28.09.09
Wed 07.10.09
01.10
01.10
Thu 01.10.09
02.10
04.10
Sun 04.10.09
05.10
06.10
Tue 06.10.09
07.10
07.10
Wed 07.10.09
Wed 14.10.09
08.10
08.10
Thu 08.10.09
09.10
11.10
Sun 11.10.09
12.10
12.10
Mon 12.10.09
13.10
14.10
Wed 14.10.09
Wed 21.10.09
15.10
15.10
Thu 15.10.09
16.10
18.10
Sun 18.10.09
19.10
20.10
Tue 20.10.09
21.10
21.10
Wed 21.10.09
Wed 28.10.09
22.10
22.10
Thu 22.10.09
23.10
25.10
Sun 25.10.09
26.10
27.10
Tue 27.10.09
28.10
28.10
Wed 28.10.09
Wed 04.11.09
29.10
29.10
Thu 29.10.09
30.10
01.11
Sun 01.11.09
02.11
03.11
Tue 03.11.09
04.11
04.11
Wed 04.11.09
06.11
19.11
Thu 19.11.09
Rolled Up Task
Tue 25.08.09
Tue 25.08.09
Tue 25.08.09
Wed 26.08.09
Thu 17.09.09
Wed 16.09.09
Mon 28.09.09
Thu 01.10.09
Thu 01.10.09
Fri 02.10.09
Mon 05.10.09
Wed 07.10.09
Thu 08.10.09
Thu 08.10.09
Fri 09.10.09
Mon 12.10.09
Tue 13.10.09
Thu 15.10.09
Thu 15.10.09
Fri 16.10.09
Mon 19.10.09
Wed 21.10.09
Thu 22.10.09
Thu 22.10.09
Fri 23.10.09
Mon 26.10.09
Wed 28.10.09
Thu 29.10.09
Thu 29.10.09
Fri 30.10.09
Mon 02.11.09
Wed 04.11.09
Fri 06.11.09
Progress
87 days
87 days
15 days
17 days
0 days
10 days
0 days
7 days
1 day
3 days
2 days
1 day
7 days
1 day
3 days
1 day
2 days
7 days
1 day
3 days
2 days
1 day
7 days
1 day
3 days
2 days
1 day
7 days
1 day
3 days
2 days
1 day
14 days
Duration
Task
Project management
Lectures and self study
Planning
Pre-study
Pre-study finished
Product Backlog
Pre-delivery of project report
Sprint 1 - High level system design
Sprint planning
Design, implementation and testing
Final testing
Sprint review and demonstration
Sprint 2 - Detailed system design
Sprint planning
Design, implementation and testing
Final testing
Spring review and demonstration
Sprint 3 - Implementation part 1
Sprint planning
Design, implementation and testing
Final testing
Spring review and demonstration
Sprint 4 - Implementation part 2
Sprint planning
Design, implementation and testing
Final testing
Spring review and demonstration
Sprint 5 - Usability testing
Sprint planning
Design, implementation and testing
Final testing
Spring review and demonstration
Presentation and final demonstration
1
2
3
4
5
6
7
8
9
10
11
12
13
14
15
16
17
18
19
20
21
22
23
24
25
26
27
28
29
30
31
32
33
Project: Kundestyrt prosjekt gant
Date: Thu 12.11.09
Task Name
ID
APPENDIX B. CONCRETE PLAN
B-2
Figure B.1: Gantt Table
APPENDIX C
Risk Analysis
This is the risk analysis for the project. There risks are divided on the two
tables (Tables C.1 and C.2).
Activity describes which parts of the project that will be affected.
Risk Factor describes the actual problem, what we are afraid will happen.
Consequences explains why this is a problem. The letter at the start of
this column describes the severity of the consequences:
H High
M Medium
L Low
Prob. or Probability describes the probability for this risk to happen. The
letter grades are the same as for the consequences.
Strategy and Actions describes what we must do about it. We can either
accept it, reduce the risk, avoid it or approve the problem and try to
make the best out of it. How we will do all this is also described.
Deadline is the date this risk will stop being a risk, and either have happened or no longer be a problem. Most of the risks will be an issue
during the entire project.
C-1
APPENDIX C. RISK ANALYSIS
C-2
Responsible is the person that is responsible for this risk, either because
of one’s role in the group or of personal reasons.
Problem? describes whether or not this risk actually was a problem.
Actions is a descriptions of what we did for the risks that came true.
Testing, prototyping, everything except market analysis and Internet research
All
Work load
Everybody else
The practical work
Everything
Work load
All
All
2
3
4
5
6
7
8
9
Activity
1
No.
be
to
Team members do
not do their job
Alessandro might
return to Italy due
to a serious illness
or death in family
Lack of communication in group
Adobe
software
will not work with
microcontroller
Loss of data
Lars
might
transferred
MTIØT
Illness
Disagreement with
Digiboards AS
The chip does not
arrive
Risk Factor
H Delays to interrelated tasks and
difficult to meet
deadlines
H Difficult to meet
the project deadlines, poor quality
of the work done
and possible bad
mood among the
rest of the team
H All our work will
be gone
H More work for
the rest
H
M More work for
the rest
H More work for
the rest
H Quality will decrease
H The project will
lose every practical
part, it will be a
different project
Consequences
L
L
L
L
H
H
M
L
L/M
Prob.
Avoid Do frequently
meeting with the team
for example at University and work together
Avoid Solve the problem with the people as
soon as possible and
motivate each other
Reduce Be more than
one person on critical
tasks, share information
Accept Use Gnash instead of Adobe Flash,
or the ARM processor
Avoid Use version
control (Git)
Accept Meeting for
reassignment of work
Reduce Need to compromise, talk to supervisor
Accept Meeting for
reassignment of work
Strategy and Actions
Accept Must change
the project perspective
towards market analysis, future, theoretical
research
Whole
project
Whole
project
Whole
project
Whole
project
1st October
15th
September
Whole
project
Whole
project
1st October
Deadline
mortjohn
(project manager)
mortjohn
(project manager)
jarleerd (technical manager)
boron
jarleerd (technical manager)
Whole group
larsmaha
larsmaha (customer contact)
mortjohn
(project manager)
Responsible
No
No
No
No
Yes
Yes
No
No
Yes
Problem?
Used x86 instead
No problems
We shifted the
focus over to
design
and
usability, and
implemented a
demo on x86
Actions
C-3
Table C.1: Risk Analysis, Part I
Activity
All
All
All
Requirements
Specification,
Construction,
Implementation
Implementation
No.
10
11
12
13
14
of cusrequire-
Difficulty to implementing the design
and meet the requirements
Misunderstanding
of requirements
The customer has
not many opportunities to meet with
us
Change
tomer
ments
Team members are
busy with other activities, like a job
or assignments of
another subject
Risk Factor
H Difficult to meet
deadlines due to increased workload
M/H It’s very
difficult to make
sure that we are
on the same length
wave and come to
agreements when
we cannot meet
face to face
H Delivering the
wrong system
H Redistributing
of workload among
few people that
could decrease the
quality of the end
product
M New dialog with
the customer
Consequences
L/M
L
L/M
M
M/H
Prob.
Reduce Talk with the
customer for knowing
high priority requirements .
Leave out
some lower priority requirements
Avoid Do frequently
report to the customer
and receiving feedback
Approve Keep in
touch with the customer with frequently
email and/or by phone
Strategy and Actions
Reduce People let
team know their busiest periods. During
this periods,
team
members busiest will
have to do small tasks
Avoid
Approved
requirements specification
larsmaha (customer contact)
larsmaha (customer contact)
mortjohn
(project manager)
Responsible
End
of larsmaha (cusrequiretomer contact)
ments
specification
Implementation
jarleerd (technical manager)
Start of
implementation
Whole
project
Whole
project
Deadline
No
No
No
Yes
No
Problem?
Small changes
in design
Actions
APPENDIX C. RISK ANALYSIS
C-4
Table C.2: Risk Analysis, Part II
APPENDIX D
Effort Budget
The person hours are given in Figure D.1. The number at the top left is
the estimated number of hours that week, the top right is the estimated
accumulated from the start to that week. The bottom numbers are the
same, only the actual numbers, not the estimated.
D-1
APPENDIX D. EFFORT BUDGET
D-2
Figure D.1: Effort Budget
Activity
Project management
Lectures and self study
Planning
Pre-study
Week 36
Week 37
Week 38
Week 39
Week 40
Week 41
25.08-02.09
03.09-09.09
10.09-16.09
17.09-23.09
24.09-30.09
01.10-07.10
30
30
26
56
60
116
28
144
28
172
28
200
36
36
24
60
24
84
21
105
21
126
14
140
36
36
24
60
6
66
30
96
24
120
30
150
36
36
18
54
24
78
31
109
24
133
37
170
24
24
60
84
60
144
12
156
18
18
50
68
56
124
19
143
5
5
12
17
60
77
50
127
4
4
32
36
72
108
67
175
43
218
36
36
60
96
36
132
18
18
24
42
30
30
36
66
44
44
Requirements
specification
156
15
158
127
Design
Programming and
documentation
156
6
164
127
218
30
30
60
90
Project evaluation
Presentation and
demonstration
Total hours estimated
95
95
122
217
186
403
156
559
172
731
190
921
Total hours actual
94
94
124
218
176
394
138
532
121
653
125
778
Activity
Project management
Lectures and self study
Week 42
Week 43
Week 44
Week 45
Week 46
Week 47
08.10-14.10
15.10-21-.10
22.10-28.10
29.10-04.11
05.11-11.11
12.11-19.11
24
224
22
246
24
270
21
291
20
311
14
325
24
164
19
183
20
203
9
212
20
232
20
252
24
174
30
204
6
210
6
216
6
222
42
264
19
189
37
226
18
244
20
264
10
274
24
298
156
Planning
3
167
156
4
127
Pre-study
226
156
156
156
173
173
173
173
127
127
127
127
0
228
228
228
228
6
6
28
132
102
162
227
12
132
102
162
239
132
102
162
239
60
41
24
22
370
215
24
27
30
48
24
32
400
263
48
59
12
24
40
412
263
72
99
66
66
156
40
1714
66
120
158
222
160
1872
1608
204
1814
2
127
2
228
Design
31
30
33
132
73
96
77
11
30
62
132
84
126
139
12
30
60
132
96
156
199
Programming and
documentation
60
29
150
29
80
68
230
97
80
77
310
174
Project evaluation
2
2
2
3
5
Requirements
specification
8
171
156
Presentation and
demonstration
Total hours estimated
138
1059
162
1221
140
1361
183
1520
90
40
170
Total hours actual
149
925
203
1128
192
1320
126
1446
162
APPENDIX E
Block Diagrams
In this appendix are the block diagrams of the microcontrollers we have been
discussing; ST’s STi7109 (Figure E.1) and Intel’s CE 3100 (Figure E.2).
Figure E.1: ST Micro STi7109 Single-Chip Set-Top Box Decoder
E-1
APPENDIX E. BLOCK DIAGRAMS
Figure E.2: Intel®Media Processor CE 3100
E-2
APPENDIX F
Usability Testing
The following files were used during the usability testing.
F.1
The Tests
These are the usability tests. The tester filled out the blank slots during the
test.
F.1.1
Basic Use
The basic test of turning on and off the widgets (Table F.1).
Table F.1: Basic Use
ID TBU
Name Basic use
Description Basic functionality, turn on and off widgets
Tester
Test Subject
Date
Pre-requirements System available
# Description
Grade
1 Turn on the widgets.
2 Turn off the widgets.
F-1
APPENDIX F. USABILITY TESTING
F.1.2
F-2
Profiles
The task of this test (Table F.2) is to change between the different profiles.
Table F.2: Profiles
ID TP
Name Profiles
Description Using different profiles
Tester
Test Subject
Date
Pre-requirements In widget mode
# Description
1 Switch to the profile to the right (Harald’s profile).
2 Log in with PIN 1234.
3 Switch to profile no. 1.
4 Switch through all the profiles.
F.1.3
Grade
Sticky Widgets
The most advanced test (Table F.3) is testing the ease of using the sticky
widget functionality.
Table F.3: Sticky Widgets
ID TSW
Name Sticky widgets
Description Using sticky widgets
Tester
Test Subject
Date
Pre-requirements In widget mode
# Description
Grade
1 Go to sticky widget mode.
2 Set the weather widget sticky.
3 Set the football widget on Harald’s profile to sticky-onchange.
4 Set another widget sticky.
5 Go to TV mode.
6 Unstick the weather widget.
F-3
F.2. THE RIGHTS OF THE PARTICIPANTS
F.2
The Rights of the Participants
The following information was given to the participant, as a summary of
their rights as a participant.
Your Rights as a Participator
You are not a tool for the test itself, you are here to test the solution.
You are here of free will, and can cancel the tests whenever you feel
like.
If anything will be recorded, you are the first to know.
There will not be used any names or anything else that can connect
you to this test, in any reports or other public papers.
You are to be treated with respect.
Trondheim
Sign here
APPENDIX F. USABILITY TESTING
F.3
F-4
User Evaluation
The following information was given to the participant during the test. It
includes some information about the system, including a simple manual and
the tasks.
User Evaluation
Introduction
Welcome to an evaluation of ”Internet on TV”. You are here to help us
improve our end product. Throughout the evaluation we urge you to think
out loud, letting us know how you attack the different tasks. Imagine this
computer as your own television. When starting the different tasks you are
watching TV. The keyboards is your imaginary remote control and you can
only operate the buttons that are listed below.
About the System
The system an be in three different states. The initial state is TV mode,
where the user watches regular TV. You also have the Widget mode and the
Sticky widget mode.
Before you start, there are some buttons you need to be aware of:
W button Enters/exits widget mode.
J and I Flips through the different profiles.
N and H Scrolls through the different widgets in the selected profile. This
can only be done when in Sticky widget mode. Please notice there are
only two different profiles in this test.
O button Read below, then see Figure F.1. You might want to study it for
30 seconds to understand it completely.
Enters Sticky widget mode. All widgets that are not selected will
be shaded out.
Selects widget as sticky. Border will turn green when this is done.
Sets widget to Sticky-on-change. Border will turn blue when this
is done.
Back to Sticky widget mode.
F-5
F.3. USER EVALUATION
Figure F.1: Description of the O button
Task 1
1. Turn on the widget mode.
2. Turn off the widget mode.
Task 2
1. Turn on the widget mode.
2. Switch to the profile called ”Harald’s Profile”.
3. Use PIN ’1234’ to log in.
4. Switch back to the first profile.
5. Turn off widget mode.
Task 3
1. Turn on the widget mode.
2. Go to Sticky widget mode.
3. Select the weather widget and make it sticky.
4. Go to ”Harald’s Profile” and make the football-score widget as stickyon-change.
5. Select a random third widget and make it sticky.
APPENDIX F. USABILITY TESTING
F-6
6. Go back to TV mode.
7. Unstick the weather widget and go back to TV mode.
You have successfully finished this test. Thank you for your cooperation.
F-7
F.4. SUMMARY QUESTIONS
F.4
Summary Questions
What is written in Italic in the table below are answers from the different
test subjects. This first page is the question scheme each test person got
after finishing the tests.
Summary Questions
What do you feel about what you have seen?
What was positive about the application?
Imagine you had the opportunity to change one thing and one thing
only in the application. What would it be?
What widgets would be important for you?
Do you have any other comments?
Answers
Table F.4: Answers for the Summary Questions
Person
What do
you feel
about
what
you have
seen?
What
was positive
about
the situation?
Male 2025, good
technological
skills
I never un- Nice
derstood
overview.
the
use
of the O
button.
Where
did it say
I
should
click it to
enter
a
profile???
If
you
could
change
one
thing.
What
would it
be?
I never like
manuals...
I
would
change the
system to
give
instructions
directly on
the screen.
What
widgets
were important
to you?
Other
Comments?
Football
results of
course.
Maybe a
watch too?
The
O
button was
confusing
as is was
involved in
so
many
actions.
Continued on next page
APPENDIX F. USABILITY TESTING
Person
What do
you feel
about
what
you have
seen?
What
was positive
about
the situation?
I was uncertain
how
the
sticky
function
worked.
Male
To
be
50+, low- honest... I
mediocre
did not untechnoderstand
logical
much
at
skills
all... I felt
completely
lost most
of
the
time.
Male 20- It felt cool.
25, good Was a bit
technoconfusing
logical
at times.
skills
Easy to get
around.
Female
20-25,
good technological
skills
I
liked
how things
float.
A
small system
and
easy
to
learn how
to use!
Female
20-25,
good technological
skills
OK,
I
guess. A
bit confusing
with
the O button. Got
it after a
while ;)
I
could
see
the
weather in
Trondheim
today.
F-8
If
you
could
change
one
thing.
What
would it
be?
Maybe
”You have
now come
to Harald’s
profile”?
What
widgets
were important
to you?
Other
Comments?
A calendar
where
I
can see all
my plans.
I
would News,
get a walk- weather.
through
function.
Whenever
I log on
or
do
something
correct, it
should say:
”YOU
RULE
MAN!”.
I
don’t
know...
Must
be
the
O
button but
I
think
it will be
better on
TV.
Football
results.
Calendar
and
bus
schedules.
Continued on next page
F-9
Person
Male
15-20,
mediocregood
technological
skills
Male
40-50,
mediocre
technological
skills
F.4. SUMMARY QUESTIONS
What do
you feel
about
what
you have
seen?
What
was positive
about
the situation?
If
you
could
change
one
thing.
What
would it
be?
Cool thing I can see I
don’t
for people the foot- know...
that watch ball results
a lot of while
I
TV.
watch
a
movie.
What
widgets
were important
to you?
Other
Comments?
Football
results and
football
results.
Easy tasks
;)
A
bit
too many
functions
for me to
handle... I
tried to use
the mouse
but
was
strictly
told
it
was
not
allowed.
I can see
the use of
this, but
I do not
know if it
is anything
for me...
Stock
market
changes,
news.
Thanks for
letting me
be a part
of
your
project!
The stock
market
widget.
Easy
to
turn
on
and off.
I wouldn’t
have
so
many widgets. But
I
understand this
can
be
changed
individually?
Continued on next page
APPENDIX F. USABILITY TESTING
Person
Female
30-40,
mediocre
technological
skills
What do
you feel
about
what
you have
seen?
What
was positive
about
the situation?
If
you
could
change
one
thing.
What
would it
be?
I
didn’t Internet
Make
it
underon TV in more interstand
itself is a esting and
everynice idea. add more
thing. But Don’t
images.
it looked think
I
nice!
would
use
it,
though...
F-10
What
widgets
were important
to you?
Other
Comments?
News,
weather
were nice.
No, sorry...
APPENDIX G
Templates
Here are the templates used in correlation with the meetings. First are the
meeting agendas, both for the supervisor meetings and the customer meetings. Then follows a template for meeting minutes, which is used for both
supervisor and customer meetings. Finally is the status report, delivered to
the supervisor on our meetings.
G-1
APPENDIX G. TEMPLATES
G-2
Meeting Agenda
Group 2
October 15, 2009
Room R01
Date 01.01.2009
Time 00:00
Phone numbers
Alessandro Boron 45 01 95 32
Ane Min Hofplass Garnaas 98 07 42 35
Lars Martin Riiser Haraldsen 45 40 57 64
Morten Weel Johnsen 45 03 33 46
Tiril Anette Langfeldt Rødland 99 64 52 85
Jarle Erdal Steinsland 93 81 35 63
Reidar Conradi 91 89 70 28
Snorre Gylterud 92 64 68 85
Robin Skoglund 90 12 36 67
Harald Amundsen 99 16 10 28
Agenda
1. Approval of agenda
2. Approval of minutes of meeting from last advisory meeting
3. Comments to the minutes from last customer meeting of other meetings
4. Approval of the status report
(a) Summary
(b) Work done in this period
i. Status of the documents that are being created
ii. Meetings
iii. Other activities
1
G-3
(c) Problems - what is interfering with the progress or taking resources?
(d) Planning of work for the next period
i. Meetings
ii. Activities
(e) Other
5. Review/approval of attached phase documents
6. Other issues
2
APPENDIX G. TEMPLATES
G-4
Meeting Agenda
Group 2
October 15, 2009
Room R01
Date 00.00.2009
Time 00:00
Phone numbers
Alessandro Boron 45 01 95 32
Ane Min Hofplass Garnaas 98 07 42 35
Lars Martin Riiser Haraldsen 45 40 57 64
Morten Weel Johnsen 45 03 33 46
Tiril Anette Langfeldt Rødland 99 64 52 85
Jarle Erdal Steinsland 93 81 35 63
Robin Skoglund 90 12 36 67
Harald Amundsen 99 16 10 28
Intent
Agenda
1. Approval of agenda
2. Approval of minutes of meeting from last advisory meeting
3. Comments to the minutes from last customer meeting of other meetings
4. Approval of the status report
(a) Summary
(b) Work done in this period
i. Status of the documents that are being created
ii. Meetings
iii. Other activities
1
G-5
(c) Problems - what is interfering with the progress or taking resources?
(d) Planning of work for the next period
i. Meetings
ii. Activities
(e) Other
5. Review/approval of attached phase documents
6. Other issues
2
APPENDIX G. TEMPLATES
G-6
Minutes from ...
Group 2
Referent
November 18, 2009
Room ITV-242
Date Thu 27. August 2009
Time 09:00-10:00
Attendants
• Reidar Conradi, IDI
• Snorre Gylterud, IDI
• Alessandro Boron
• Ane Min Hofplass Garnaas
• Lars Martin Riiser Haraldsen
• Morten Weel Johnsen
• Tiril Anette Langfeldt Rødland
• Jarle Erdal Steinsland
Agenda
1. Approval of agenda
2. Approval of minutes of meeting from last advisory meeting
3. Comments to the minutes from last customer meeting of other meetings
4. Approval of the status report
(a) Summary
(b) Work done in this period
i. Status of the documents that are being created
ii. Meetings
iii. Other activities
(c) Problems - what is interfering with the progress or taking resources?
1
G-7
(d) Planning of work for the next period
i. Meetings
ii. Activities
(e) Other
5. Review/approval of attached phase documents
6. Other issues
2
APPENDIX G. TEMPLATES
G-8
Status Report
Group 2
August 26, 2009
Contents
1 Summary
2
2 Work done in this period
2.1 Status of the documents that are being created . . . . . . . . . .
2.2 Meetings . . . . . . . . . . . . . . . . . . . . . . . . . . . . . . . .
2.3 Other activities . . . . . . . . . . . . . . . . . . . . . . . . . . . .
2
2
2
2
3 Problems - what is interfering with the progress or taking resources?
2
4 Planning of work for the next period
4.1 Meetings . . . . . . . . . . . . . . . . . . . . . . . . . . . . . . . .
4.2 Activities . . . . . . . . . . . . . . . . . . . . . . . . . . . . . . .
2
2
2
5 Other
2
1
G-9
1
Summary
2
Work done in this period
2.1
Status of the documents that are being created
2.2
Meetings
2.3
Other activities
3
Problems - what is interfering with the progress
or taking resources?
4
Planning of work for the next period
4.1
Meetings
4.2
Activities
5
Other
2
APPENDIX G. TEMPLATES
G-10
APPENDIX H
Functionality Description
As Digiboards wanted to apply for a patent regarding the sticky widget
functionality, they needed an up-to-date description of the functionality for
the application. Following is the document we sent them for use in the
application. We also sent them the use cases regarding the television.
H-1
APPENDIX H. FUNCTIONALITY DESCRIPTION
Embelir
Internet on TV
Functionality description
TDT4290 Customer Driven Project
Group 2
12th November 2009
Abstract
This document is a description of the functionality of Digiboards
AS’ widget system as of 12th November 2009, according to the design
of group 2 in TDT4290 Customer Driven Project, IDI, NTNU.
The system is divided into two parts. First, there is the TV interface. This contains the use of the system, the collaboration between
the remote control and the system as shown on the television. Second,
there is the web portal, http://www.embelir.com. This is where the
user configures the system, by adding profiles and widgets. This is
only accessible for the premium users.
H-2
H-3
Contents
1 Users
1
2 Navigation
2.1 Buttons . . . . . . . . . .
2.2 Modes . . . . . . . . . . .
2.2.1 TV mode . . . . .
2.2.2 Widget mode . . .
2.2.3 Profile mode . . . .
2.2.4 Sticky widget mode
2.2.5 PIN mode . . . . .
.
.
.
.
.
.
.
3 Widgets
3.1 Sticky
3.1.1
3.1.2
3.1.3
3.1.4
. . . . .
. . . . .
. . . . .
multiple
. . . . .
widgets . . . . . . .
Levels of stickiness
Set widgets sticky .
Sticky widgets from
Placement . . . . .
4 Profiles
4.1 Secure profiles . .
4.2 Default profile . .
4.3 Creating profiles .
4.4 Customization . .
4.5 Changing profile .
.
.
.
.
.
.
.
.
.
.
.
.
.
.
.
.
.
.
.
.
.
.
.
.
.
.
.
.
.
.
.
.
.
.
.
.
.
.
.
.
.
.
.
.
.
.
.
.
.
.
.
.
.
.
.
.
.
.
.
.
.
.
.
.
.
.
.
.
.
.
.
.
.
.
.
.
.
.
.
.
.
.
.
.
.
.
.
.
.
.
.
.
.
.
.
.
.
.
.
.
.
.
.
.
.
.
.
.
.
.
.
.
.
.
.
.
.
.
.
.
.
.
.
.
.
.
.
.
.
.
.
.
.
.
.
.
.
.
.
.
.
.
.
.
.
.
.
.
.
.
.
.
.
.
.
1
1
3
3
3
3
3
3
. . . . .
. . . . .
. . . . .
profiles
. . . . .
.
.
.
.
.
.
.
.
.
.
.
.
.
.
.
.
.
.
.
.
.
.
.
.
.
.
.
.
.
.
.
.
.
.
.
.
.
.
.
.
.
.
.
.
.
.
.
.
.
.
4
4
4
4
5
5
.
.
.
.
.
5
5
5
6
6
6
.
.
.
.
.
.
.
.
.
.
.
.
.
.
.
.
.
.
.
.
.
.
.
.
.
.
.
.
.
.
.
.
.
.
.
.
5 Conclusion: A visual tour of the widgets
.
.
.
.
.
.
.
.
.
.
.
.
.
.
.
.
.
.
.
.
.
.
.
.
.
.
.
.
.
.
.
.
.
.
.
.
.
.
.
.
.
.
.
.
.
.
.
.
.
.
.
.
.
.
.
.
.
.
.
.
.
.
6
APPENDIX H. FUNCTIONALITY DESCRIPTION
1
Users
The system is meant to have two different kinds of users. The normal user
has access to the default profile, all that is shipped with the system. The
premium user pays for a subscription, and has thus access to the web portal,
with all the to, among other things, create multiple profiles and buy more
widgets.
2
Navigation
For navigating the system on the television, one uses a remote control. The
actions of the buttons of the control, varies depending on which mode one is
in at that specific time.
There is a state diagram covering the buttons’ actions, the states and the
modes (figure 1). Here, the states and the change of state due to button
pushes, are colored green. Actions and automatic state change and others
due to these actions, are colored blue. Branches are colored red.
2.1
Buttons
The solution needs a remote control with one extra button (W), but uses
also some of the normal remote buttons. That would be the arrows (J, I,
N, H) and the OK button in the middle. On some remotes, this is called
SELECT. The numeric buttons (0,1,2,3,4,5,6,7,8,9) are also used. The
ON/OFF button is used in our description, but not in the widget mode.
L J Left arrow
R I Right arrow
U N Up arrow
D H Down arrow
OK OK/SELECT button in the middle
W Widget button
ON/OFF Power-off button for the TV
0-9 Numeric buttons
1
H-4
Figure 1: State diagram of user input
H-5
2
APPENDIX H. FUNCTIONALITY DESCRIPTION
2.2
Modes
There are two main modes, and three sub-modes, in which the buttons have
separate meaning.
The main modes are TV mode and widget mode. Widget mode is again
separated into sticky widget mode and profile mode. PIN mode is yet another
sub-mode of profile mode.
2.2.1
TV mode
When you turn on the TV, you are in the TV mode. Here, the television
works as normal. The only special thing is the W button, which is not
normally there.
2.2.2
Widget mode
Pushing the W button, you are taken to the widget mode. Here, most of
the buttons works as normal, except the numeric buttons and the navigation
panel (the arrays and the OK button). The W button takes you back to
the TV mode.
In widget mode, J and I are used to switch profile, in addition to the
numeric buttons. Pushing the numeric buttons will take you directly to the
profile which number you entered. It is pretty much the same as changing
the TV channel, only for profiles.
2.2.3
Profile mode
Profile mode is the default mode when in widget mode. Here, the widgets of
the current profile are shown as normal.
The special button for profile mode, is the OK button. This will take
you to sticky widget mode.
2.2.4
Sticky widget mode
In sticky widget mode, the N and H buttons are used for scrolling through
the widgets. The OK button is used to choose the current widget, and thus
changing its stickiness.
2.2.5
PIN mode
There is also a fifth mode, PIN mode. This is a sub-mode of the profile mode.
Here, the numeric buttons and the OK buttons are locked. That is, they
will only be used to enter PIN, and not change profile or mode and such.
3
H-6
H-7
3
Widgets
Widgets are the small programs that will run on the TV screen. Premium
users can buy more widgets on the web portal. Once bought, they can be
used on any profile.
It might be possible to create your own widgets, and sell these in the
widget store.
3.1
Sticky widgets
It is possible to set the widgets sticky. Sticky widgets will we visible even
in TV mode. One can have several sticky widgets, and they can come from
several different profiles.
3.1.1
Levels of stickiness
There are several levels of stickiness. The default is not sticky. Then we have
normal sticky, which means that the widget always is visible. In addition,
we have the so-called sticky-on-change. This means that the widget usually
is not there, but pops up when there is a change on the widget’s info. For
example, the football widget pops up when there is a new goal, the Twitter
widget pops up when someone has twitred something, the weather widget
pops up when the forecast changes, and so on.
3.1.2
Set widgets sticky
The configuration of sticky widgets is done in sticky widget mode. By pressing OK in profile mode, the profile’s widgets are shown with stickinessmarking. That is, the non-sticky widgets are as normal, the sticky widgets
are marked in one way, and the sticky-on-change widgets are marked in another. This is the sticky widget mode.
When entering this mode, the first widget is marked specially. This is
done by fading out the other widgets. One can scroll through these widgets
by using the arrows N and H.
When pushing OK, the currently chosen widget changes stickiness. If it
was not sticky, then it becomes sticky. If it already was sticky, it becomes
sticky-on-change. Similarly, if it was sticky-on-change, it will no longer be
sticky.
4
APPENDIX H. FUNCTIONALITY DESCRIPTION
3.1.3
Sticky widgets from multiple profiles
To set sticky widgets from several profiles, one can simply scroll through the
profiles (using I and J) while in sticky widget mode, making the wanted
widgets sticky. Then, when pressing W and returning to TV mode, all of
the sticky widgets will be sticky, no matter which profile they are from.
The widgets will keep their stickiness until the TV is turned off. If you
want different sticky widget, you can either turn the TV off and on again, or
manually change stickiness on the widgets.
3.1.4
Placement
Because several of these widgets might have the same placement (only on
different profiles), they will be placed according to a pre-defined template.
This is defined on the web portal. It starts in one corner and continues in
one direction. Upper left corner and down might be a good default.
4
Profiles
A profile is meant as a collection of widgets. Premium users should be able
to create as many profiles as they wish. The profiles could either be personal
(such as John’s profile, with John’s favorite widgets) or categorical (such as
News or Sports, with many widgets of the same overall type). How the user
chooses to organize this, is totally up to him/her. A possible solution is
one profile for each of the family members, in addition to some categorical
profiles for the whole household to enjoy.
4.1
Secure profiles
Profiles can also be password protected, for privacy reasons. This is practical
when the user has a, say, Facebook widget. The password is a 4-digit PIN
code, which is entered using the numerical buttons.
4.2
Default profile
When first entering the widget mode, the widgets from the default profile
are loaded. Probably it will be shipped with a default profile, with widgets
with for example local news and weather. Then, premium users can add new
profiles, and change which is the default, on the web portal.
5
H-8
H-9
4.3
Creating profiles
Premium users can create more profiles on the web portal. Here, they can
choose the name of the profile, which widgets it shall contain, and where the
widgets shall be placed. When adding a new widget, it will be automatically
placed in the first free space. This might be a very unpractical place to have
a widget, so it is recommended to drag each widget to a more preferable spot.
Here, one can also edit the existing profiles, as well as deleting them. One
can also set a new profile as default.
4.4
Customization
It should be possible to change the appearance of the profile’s widgets. On
the web portal, one can choose between several themes, with different backgrounds and colors.
It should also be possible to create your own themes, and sell these in the
widget store.
4.5
Changing profile
By using the J and I buttons, the user can change the profile. It will
slide through the profiles, loading the widgets as we move along. When it
gets to a password protected profile, it asks for a PIN code. This is entered
through the numeric buttons, and the OK button when the code is finished.
If correct, it loads the profile. If not, it asks for a PIN again. If this is not
the profile you are trying to open, just scroll to next profile with J or I.
One can also change profile using the numeric buttons, almost as changing
the channel. Each profile will have its own number, and one can jump directly
to a given profile by entering the number on the numeric buttons. This is
very practical given many profiles. This will only work outside of PIN mode.
One can change profile both in profile mode and in sticky widget mode.
As the state diagram (figure 1) shows, the method is the same. The difference
is where one is taken afterwards. If one started in profile mode, one will stay
in profile mode, just showing the new profile’s widgets. If one was in sticky
widget mode, however, one will stay in this mode, showing the new profile’s
widgets with stickiness-marking.
5
Conclusion: A visual tour of the widgets
The following figures shows roughly how all this is done, and how it will look.
6
APPENDIX H. FUNCTIONALITY DESCRIPTION
H-10
When first turning on the TV, there will be a normal TV show (figure
2). By pressing W, one is taken to the default profile (figure 3). Now,
the arrows J and I will change to a different profile. When changing to a
secured profile, one will be asked for a PIN code (figure 4). When entered,
the secured profile will load (figure 5), and one can enjoy the profile’s widgets.
By pressing OK, one will enter sticky widget mode, and but one widget
will be faded out (figure 6). N and H changes which widget this is. By
pressing OK, this widget will be made sticky. By pressing W again, one is
back in TV mode, with the sticky widget still visible (figure 7).
In addition, one can set multiple widgets sticky at the same time, including widgets from different profiles. The sticky widgets will not change when
the current profile is changed, but stays sticky until the TV is turned off or
it’s stickiness is manually changed.
The widgets can also be set to sticky-on-change, meaning that they will
only be visible when its contents has changed.
The appearance of the widgets can be changed, based on profile. This is
not clearly shown in figures 2 to 7, but should still be possible.
Figure 2: Regular TV
7
H-11
Figure 3: Default profile
Figure 4: Enter PIN code
8
APPENDIX H. FUNCTIONALITY DESCRIPTION
Figure 5: The chosen profile
Figure 6: Select sticky widgets
9
H-12
H-13
Figure 7: Sticky widgets shown
10
APPENDIX H. FUNCTIONALITY DESCRIPTION
H-14
APPENDIX I
Email Conversations
Here follows a mail conversation we had, in the pursuit of the STi7109 microcontroller.
First mail, from us to Silica This is the first mail we sent, to Silica (a
customer of ST). We introduced ourselves as a student group from NTNU,
4th year computer science. Then we described the project and our need for
the evaluation board of STi7109. We asked which board we need and if Silica
sells this. If so, how much does it cost, and how long does it take to ship it.
From: Morten Weel Johnsen [mailto:mortjohn@stud.ntnu.no]
Sent: 3. september 2009 10:54
To: kpro2@idi.ntnu.no, silica.norway@avnet.com
Subject: STi7109 evaluation board
Hei,
Vi er en studentgruppe ved NTNU som går 4.året datateknikk.
Vi har i år et kundestyrt prosjekt hvor vi skal utvikle for
STi7109.
Vi har problemer med å finne evaluationboardet til denne chipen.
Hvilket evaluationboard er det vi trenger?
Selger dere dette evaluationboardet?
Hva koster denne chipen? Hva er forventet leveringstid?
I-1
APPENDIX I. EMAIL CONVERSATIONS
I-2
Mvh.
Morten Weel Johnsen
The answer from Silica Silica said we could risk problems with this microcontroller as they were uncertain if it was for sale to end users. They would
contact ST and ask, and then contact us again.
From: Neerbye, Kristoffer (Silica)
Sent: 3. september 2009 11:55
To: ’mortjohn@stud.ntnu.no’
Subject: RE: STi7109 evaluation board
Morten
Jeg er redd du kan få problemer med denne chip’en, jeg er
nemlig ikke sikker på om den selges og supporteres direkte
til vanlige sluttkunder. Jeg skal sjekke med ST og så sier
jeg ifra til deg igjen.
Med vennlig hilsen
Kristoffer Neerbye
Field Application Engineer
Silica - An Avnet Company
SILICA.
The Engineers of Distribution.
The final answer from ST ST answered that we are not allowed to use
the microcontroller, as it is for selected customers. The microcontroller is
not the only problem, we also need the software licence, the debuggers etc.
Eventually we will also need support, which ST not has the capacity to give
us. So they suggest that we should turn to one of their partners.
Dato: Thu, 10 Sep 2009 09:11:12 +0200
Fra: "Neerbye, Kristoffer (Silica)" <Kristoffer.Neerbye@silica.com>
Emne: RE: STi7109 evaluation board
Til: mortjohn@stud.ntnu.no
I-3
Hei Morten
Beklager at det tok tid å få svar på dette, men som jeg antydet
sist får du ikke lov av ST til å bruke denne chip’en. Den er for
spesielt utvalgte kunder, og dere er ikke en av dem...
Nedenfor følger svaret fra ST i sin helhet så du kan se hva de
skriver:
"Sorry but we are not in a position to support this request.
The board in itself is just a brick in the setup, then you need
the STAPI software license which cost itself 10k$, you need the
debuggers etc..
And of course all projects requires support from ST at some point,
and our support group is already overloaded so we cannot entreprise
to support a such project without clearly identified potential.
Maybe they could turn to one of our partners like Zenterio in Sweden,
but they are an independant design-house so it is up to them to
decide if they want to support or not."
Kristoffer