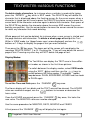
1
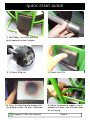
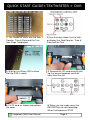
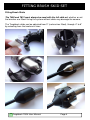
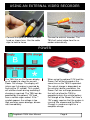
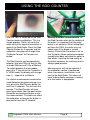
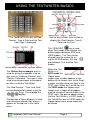
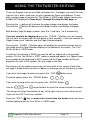
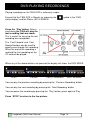
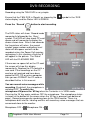
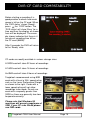
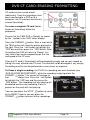
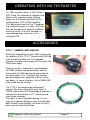
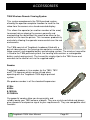
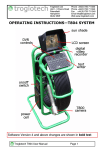
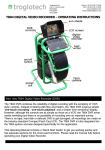
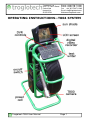
Troglotech Ltd
Unit 1, 3 Penns Road
Petersfield
Hampshire
GU32 2EW
Phone +44(0)1730 711240
Phone +44(0)1730 711240
Fax +44 (0)1730 711240
Email info@troglotech.com
Web www.troglotech.com
OPERATING INSTRUCTIONS—T804 SYSTEM
Troglotech T804 User Manual
Page 1
QUICK START GUIDE
1) Slot Power Cell into frame and
push upwards to lock in place
2) Fit camera to Rod Termination
3) Fit Brush Skid set
4) Switch Unit ON
5) Press the Rod Counter button until
the display shows ‘Counter Calibrated’
6) Adjust the brake to supply a small
amount of friction. You are now ready
for surveying
Troglotech T804 User Manual
Page 2
QUICK START GUIDE+TEXTWRITER + DVR
1) The Textwriter starts with the Rod
Counter, Time & Date and the Text
from Page 1 displayed
2) Use the keys shown here to hide
or display the Rod Counter, Time &
Date and the Text
3) Wait for the Status LED to show
that the DVR is ready
4) Remove the CD card cover by pulling the lanyard upwards and then
away from the unit
5) Fit CF card as shown and replace
the cover
6) When you are ready, press the
RECORD key to start recording.
When finished press STOP
Troglotech T804 User Manual
Page 3
FITTING BRUSH SKID SET
Fitting Brush Skids
The T800 and T812 must always be used with the full skid set, whether or not
the brushes are fitted. Using the system without skids may damage the camera.
The Troglotech skids can be adjusted from 3” (no brushes fitted), through 4” to 6”
by selecting from the two brush sizes.
Troglotech T804 User Manual
Page 4
END OF DAY PROCEDURE
1) Switch unit OFF
3) Fully apply the brake. The T804 is
ready for transportation
5) Connect the Mains Charger.
Charging will take 4—6 Hours.
Troglotech T804 User Manual
2) Fold the sunshade flat, swivel Control Unit flat against keyboard
4) Remove Power Cell by pressing
both buttons and lowering the Power
Cell
6) The Power Cell can be charged
whilst fitted to the frame if preferred
DO NOT OPERATE DURING CHARGE
Page 5
USING AN EXTERNAL VIDEO RECORDER
Connect the optional External Video
Lead as shown here. Use the cable
clips to hold to frame
Connect to external recorder. The
T804 will select video from the recorder automatically
POWER
The T804 has an On-Screen display
on all models to show the current
Power Cell charge. The display will
inform you if charging is required by
flashing the ‘B’ symbol. This symbol
will also be shown during recording if
charging is required. The T804 can be
powered by the optional 12V lead
from a vehicle cigar socket. If the ‘*’
symbol appears the voltage is too
high and may cause damage, disconnect immediately
Troglotech T804 User Manual
When using the optional 12V lead the
Power Cell will be charged at the
same time as the T804 is operated.
The rate of charge is dependant on
the vehicle’s battery condition, the
Power Cell has a charge processor
that will not allow the T804 to
completely drain the vehicle battery.
Full charge of the Power Cell from a
12V supply requires that the engine is
running. We recommend the Mains
Charger is used over-night for a
complete charge.
Page 6
CONTROL UNIT DISPLAY
The LCD on the Control Unit can be
adjusted using the ‘Menu’ and ‘Select’
buttons
Brightness, Contrast and Colour can
be adjusted to suit the conditions.
SIDE OPERATION
1) Disconnect both cables, remove
Control Unit from frame
2) Remove Keyboard from frame
3) Lay the T804 on its side, fit Keyboard and then Control unit above the
Hub
4) Connect Keyboard lead and Link
Cable, use the clips to position Link
Cable safely. Ready for operation.
Troglotech T804 User Manual
Page 7
USING THE ROD COUNTER
After the T804 is switched on the Rod
Counter requires calibration. This is a
simple process. Return all rod to the
coiler so that the camera termination is
against the Rod Guide. Press the Rod
Counter Button for 3 seconds and the
calibration message will change from
‘Calibrate Counter’ to ‘Counter calibrated’.
The Rod Counter can be operated in
Imperial (feet and 10ths of feet) or Metric mode (Metres and 10ths of Metres).
To switch between the two modes
press the ‘C’ key when the Textwriter is
in VIEW mode, the display will change
from (‘) - Imperial to (m) Metric.
If a relative measurement needs to be
made between two points during a survey, press the Rod Counter button for
less than 2 seconds. This will zero the
counter, The Rod Counter will now
count up or down from the point where
the button was pressed to give a relative measurement. This does not affect
the calibration as long as the button is
pressed for less than 2 seconds
Troglotech T804 User Manual
Making accurate measurements. As
the Rod Counter relies on the rotation of
the coiler it is important that the coiler
brake is set correctly. When letting Rod
out from the T804, the coiler may not
rotate freely if the brake is set too
fiercely. Ensure that the brake is set so
that the coiler allows rod to be removed
smoothly but does not allow the coiler to
free wheel. Layering the rod neatly on
the coiler increases the accuracy and is
always good practice.
Measurements will not be accurate if
the calibration routine is performed
when the camera termination is not
next to the Rod Guide. This does not
have to be critically accurate; a leeway
of a few inches is acceptable.
Page 8
USING THE TEXTWRITER-BASICS
The Textwriter starts with the Rod
Counter, Time & Date and the Text
from Page 1 displayed
Use the keys shown here to hide or
display the Rod Counter, Time &
Date and the Text
The VIEW/EDIT
key is used
when Text needs to be altered, this
button toggles between EDIT and
VIEW modes. The Text can be
cleared from the screen by using the CLEAR button, this toggles between Text and No Text
modes.
The ‘Status line messages’ area is
used for giving the operator information such as ‘Calibrate Counter’ and
‘Counter Calibrated’. This area is also
used to send messages to the operator when using the Text Writer.
The ‘Rod Counter’, ‘Time’ and ‘Date’
can be displayed or hidden using the
keys. These toggle the
display.
The position of these displays is fixed
and cannot be altered, they always
appear on the top line in the same
order.
Troglotech T804 User Manual
When the Text
Writer is in
EDIT mode the
‘Upper case/
Lower case’ symbol appears at the
bottom of the screen next to the Page
number and the cursor will flash in the
TEXT area. When the Text Writer is in
the VIEW mode the ‘Upper case/
Lower case’ symbol will disappear
and the cursor will not be shown in the
TEXT area. The picture above shows
that the Text Writer is in EDIT mode. If
the Text Writer was in VIEW mode the
‘Upper/Lower case’ arrow would not
be shown.
Page 9
USING THE TEXTWRITER-EDITING
There are 9 pages that are available to display text. The pages are useful for storing text that is often used such as your Companies Name and Address. To display a certain page of text put the Text Writer in VIEW mode (Upper/Lower case
symbol NOT displayed). Press keys 1 through 9 to display that page, or:
Pressing the
Pressing the
button will increase the page number and display that page.
button will decrease the page number and display that page.
Both buttons loop the page number, from 9 to 1 and from 1 to 9 respectively.
If no text needs to be displayed press the ‘CLEAR’
button, this will remove
the text from the screen (but will not delete it from memory), it will also remove the
‘Upper/Lower case’ indicator and the Page Number display.
Pressing the ‘CLEAR’
button again will display the text contained on the current page and the Page Number display on the bottom of the screen. The Text
Writer will be in VIEW mode.
To edit text first choose a PAGE you want to edit as explained in the previous
section. Put the Text Writer in ‘EDIT’ mode as explained above, the ‘Upper/Lower
case symbol will be displayed in EDIT mode and the Page number will be displayed to the right of the symbol. You are ready to edit text.
Pressing any of the alphanumeric keys will now write to the screen. Each letter
you type is automatically saved so if power is removed you will not lose any work.
If you want to change to lower case press the ‘CAP’
button once.
To create spaces press the ‘SPACE’ button.
If you want to jump to the next line press the ‘ENTER’ button.
Use the
and
cursor buttons to move the cursor around the screen.
The cursor will jump from bottom to top, left to right and visa-versa when the extremes of the TEXT area are reached.
Press the ‘EDIT’
key to remove the cursor from the screen when you have
finished typing to put the Text Writer in VIEW mode.
Troglotech T804 User Manual
Page 10
TEXTWRITER-VARIOUS FUNCTIONS
To delete single characters, for instance when a mistake is made while typing,
press the ‘DELETE’
key while in EDIT mode. The DELETE key will delete the
character that is displayed above the flashing cursor. As the cursor moves when a
character is typed you will have to press the DELETE key twice, once to move the
cursor back to the character and once again to delete that character. Each press of
the DELETE key deletes the character above the cursor AND moves the cursor
back by one position. Use the cursor buttons to move the cursor around the screen
to select any character that needs deleting.
Whole pages of text can be deleted, for instance when a new survey is started and
the page contains old information. To delete a whole page of text put the Text
Writer in VIEW mode (no ‘Upper/Lower case’ arrow displayed) and use the
buttons or 1-9 keys to display the page of text you want to delete.
Then press the
key once. The lower part of the screen will now display the
message ‘DELETE PAGE? Y or N’. Pressing the ‘Y’ key will now delete the current
page of text. Pressing any other key will NOT delete the page of text.
Display Modes:
The Text Writer can display the TEXT area in three different modes as shown in the first three pictures.
To switch between the display modes, select VIEW mode
using the ‘EDIT’
key and then use the
keys to
switch between the three modes. The display modes
loop between PLAIN, BORDERED, BOXED and then back
to PLAIN again
To set the Time and Date press the ‘CHANGE’
key once.
The Hours display will turn black and the TEXT area will be cleared. The HOURS
value can now be changed, use the
buttons to increase or decrease the
hours value.
Once the HOURS are correct press the ‘CHANGE’
key once, this locks the
new value. The MINUTES value can now be changed.
Use the same procedure for MINUTES, DAYS, MONTHS and YEARS.
A final press of the ‘CHANGE’
key will display the text again.
Troglotech T804 User Manual
Page 11
DVR-BASIC FUNCTIONS
Allow the T804 to initialize so that the DVR
status indicator seen on the T804 display shows
the ‘READY’ symbol
and the Status LED is
GREEN:
GREEN = DVR READY. CF card can be
removed or replaced, ready for operation.
OFF = DVR BUSY. DVR is busy, do NOT
remove CF card.
FLASHING RED = RECORDING. The LED will
only flash if recording successfully, if the LED
does not flash the CF card is full, missing or
faulty.
Use the ‘Display Time Left’ button to check that
there is sufficient space left on the CF card for
your survey
Press ‘Record’
to start the recording.
When you have finished recording, press ‘Stop’
to stop recording. Ensure that the Status LED
is flashing RED while recording. If the LED does
not flash RED then the CF card is incompatible
OR the CF card is full.
Press ‘Play’ to playback the last recording.
Use the ‘Fast Forward’ and ‘Fast Rewind’
buttons if required.
Whilst playing you can use the ‘Previous
Recording’ and ‘Next Recording’ buttons to play
any other recordings that are already on the CF
card. Press ‘Stop’ to stop playing
Troglotech T804 User Manual
Page 12
DVR-PLAYING RECORDINGS
Playing recordings on the T804 DVR is extremely simple:
Ensure that the T804 DVR is ‘Ready’ as shown by the
status display’ and the Status LED is GREEN.
symbol in the ‘DVR
Press the ‘Play’ button. After a
short delay the T804 will play the
last recording that was made.
This is usefull for ensuring the last
recording was acceptable.
The ‘Fast Forward’ and ‘Fast
Rewind’ buttons can be used to
quickly scan through the recording.
When the end of the recording is
reached the first recording on the
CF card will be played.
When any of the above buttons are pressed the display will show the DVR MODE:
PLAY
PAUSE
FAST FORWARD
FAST REWIND
You can play the previous recording by pressing the ‘Previous Recording’ button
You can play the next recording by pressing the ‘Next Recording’ button
You can pause the recording by pressing the ‘Play’ button, press again to Play
Press ‘STOP’ to return to the live picture.
Troglotech T804 User Manual
Page 13
DVR-RECORDING
Recording using the T804 DVR is very simple.
Ensure that the T804 DVR is ‘Ready’ as shown by the
status display’ and the Status LED is GREEN.
Press the ‘Record’
symbol in the ‘DVR
button to start recording.
The DVR status will show ‘Record mode’
momentarily followed by the ‘Busy’
symbol. The DVR will now check CF card
space and will momentarily display the
screen shown here. After a few seconds
the live picture will return, the record
symbol, page number and battery-level
meter will dissapear and will not be
recorded unless the Power Cell requires
recharging. In this situation a flashing ‘B’
will appear in the picture. The Status
LED will start FLASHING RED
If there was no space left on the CF card
the screen will show this display
momentarily. Replace the CF card with a
new card. If the recordings on the CF
card are not required and have been
copied to DVD, CD or onto a computer
then you can FORMAT the CF card as
described further in this manual.
You can record voice messages while
recording. By defualt, the microphone is
switched OFF. To switch the
microphone ON press the ‘M’ key when the Textwriter is in VIEW mode.
Pressing the ‘M’ key again switches OFF the microphone. The microphone status
is shown at the bottom of the screen when the ‘M’ key is pressed (see bottom of
page) . Record messages by speaking close to the T804 monitor. There is a
microphone built into the housing and this will record any voice messages that are
announced close to the monitor.
Microphone OFF =
Microphone ON =
Troglotech T804 User Manual
Page 14
DVR-CF CARD COMPATABILITY
Before starting a recording it is
good practice to check how much
space is left on the CF card. When
the ‘DVR status’ shows ‘Ready’,
press
the ‘DISP’ button. The
‘DVR status’ will show ‘Busy’ for a
time and then the display as shown
here will be displayed. The example shown indicates that there is 4
minutes of recording time left on
the CF card (84MB).
After 3 seconds the DVR will return
to the ‘Ready’ state
CF cards are readily available in various storage sizes.
A 32GB card will store 32 hours of recordings
A 16GB card will store 16 hours of recordings
An 8MB card will store 8 hours of recordings
Troglotech reccommends using 8GB
cards with at least a ‘80x’ speed rating
such as the Lexar Professional Range
as shown to the right. Cards with a
lower speed rating will not allow
recordings to be made. Do not use
cards with a capacity greater than
32GB as these are generally too slow
to operate correctly.
Please note that Windows 98
machines will accept a maximum of
2GB. If your PC runs Win98 please
use 2GB cards.
Troglotech T804 User Manual
Page 15
DVR-CF CARD-ERASING-FORMATTING
CF cards can be reused almost
indefinately. Once the recordings have
been transferred to a DVD or to a
computer, the CF card can be entrirely
erased (formatted).
To erase a complete CF card (better
known as formatting) follow this
procedure:
Ensure that the T804 DVR is ‘Ready’ as shown
by the symbol in the ‘DVR status display’.
Press the FORMAT
button. After a short while
the T804 screen will show the picture pictured to
the right. Press the ‘Left’ button to highlight the
‘YES’ box and then press the ‘YES’ button. After
Formatting the DVR will return to ‘Ready’, this
may take a few minutes depending on the size
and speed of the CF card.
Once the CF card is Formatted it will be completely empty and you can record as
though this was a brand new CF card. The card will not be damaged in any way by
Formatting and this can be performed as many times as required.
To Erase a single recording, first PLAY the recording you want to delete (see
‘DVR-PLAYING RECORDINGS’), while the recording is playing press the
FORMAT
button. The screen will change to
that
shown here. Press the ‘Left’ button
to highlight the ‘YES’ box and then press the
‘YES’ button. The recording that was playing will
be deleted and the next recording (if one is
present on the card) will start playing.
You can now press the STOP
button to return
to the READY state or you can press the
FORMAT
button to erase further recordings.
Troglotech T804 User Manual
Page 16
DVR-SETTING TIME AND DATE
The Time and Date are automatically updated and in normal use should not need
changing, the clock-calendar system is aware of Leap Years and will adjust the
date accordingly. However, some Countries employ Daylight Saving, in which case
the Time will need to be changed and as the T804 is shipped worldwide, the date
may need changing as well. The DVR clock is used to ‘Time Stamp’ the recordings
so that it is a simple case of matching recordings with the time and date that the
survey was made.
Ensure that the T804 DVR is ‘Ready’ as shown by the
display’ and the Status LED is GREEN.
symbol in the ‘DVR status
To set the Time and Date press the ‘Set
Time’ button. The screen will show the display
as pictured here.
The MONTHS display will now be highlighted
in yellow, use the buttons to increase or decrease the month’s value.
Once the MONTHS are correct
press the RIGHT button, this
locks the new value. The DAYS
display will now be highlighted in
yellow. Use the same procedure
for DAYS and YEARS.
When you are happy that the
DATE is set correctly, press the
YES button, this will now highlight the HOURS figure in the
box below. Set the TIME using
the same routine as that used for
the DATE.
When you are happy that the TIME is set correctly, press the YES button. This will
return the DVR to the ‘Ready’ state
Troglotech T804 User Manual
Page 17
DVR-PLAYING VIDEO ON A COMPUTER
The video files created by the T804 are in the latest MPEG4 format. All modern
computers will play the video without any need to download anything. For
older computers: For both Windows and Mac users the best video-player to use is
‘Quick Time Player’ by Apple. This player supports the modern MPEG4 files without the need to download any extra Codec’s. The Quick Time Player for Windows
can be downloaded for free from:
http://www.apple.com/quicktime/win.html
All Mac computers are delivered with the Quick Time Player already installed. If
you need to update your Mac computer go to:
http://www.apple.com/quicktime
Windows Vista does not support the Apple Quick Time Player correctly, There are
many ways to play MPEG4 files on Windows Vista, initially, download our universal
MPEG4 player from here:
http://www.troglotech-products.com/software/MP4/MP4.zip
There are also other options for playing MPEG4 files in Windows Media Player, the
details can be found here:
http://www.afterdawn.com/guides/archive/how_to_play_mp4_files.cfm
Moving the video files to your computer
Many Laptop computers are supplied with a CF card-slot. In this situation the CF
card can be simply copied to a new folder on your machine. The card is usually
seen as a removable drive and will contain a number of folders. The Video Files
are contained in the folder: ‘Drive:\MP_ROOT\TV’ where ‘Drive:’ is the letter allocated to the CF card by your computer. The Video Files all have the extension
‘.MP4’, the other files in the folder with the extension ‘.THM’ do not need to be copied and are used by the T804 DVR only to track the Video Files.
If your PC or Laptop does not have a CF card slot then the use of a Card
Reader is recommended. This will be seen as an additional drive.
Please contact your Distributor for advice in your area
Troglotech T804 User Manual
Page 18
MAINTAINANCE
MAINTAINANCE—T804 SYSTEM
When the Rod is returned to the coiler ensure that most debris is removed, although
the T804 is fully sealed to IP 67 the use of Jet Washers is strictly prohibited as the
pressure can exceed acceptable limits. Keeping the Rod clean as it is returned to the
coiler is the preferable method of keeping the T804 in good condition.
After each week’s operation ensure that the Rod Guide is clear of debris, clean if necessary using warm water and a paintbrush to get into the inaccessible parts. Wipe
down the enclosures with warm water and a mild detergent using a cloth. Perform
cleaning operations with camera and accessories connected.
MAINTAINANCE—–T800 CAMERA
It is best practice to leave the camera and skids fitted to the T804 system. If you need
to remove the camera ensure that the Termination is clean before removal. When
replacing the camera ensure that the threads are clean and that the ‘O’ rings are well
lubricated with Silicone Grease. Never use solvents (such as Ambersil) to clean the
termination as this will damage the o-rings. Keep the windows clean with a damp
cloth and a small brush to remove debris from the front guard.
The Lens Window is the only user-replaceable part on the T800 camera, although the
surface is extremely hard it may become scratched over a period of time and this will
affect the picture quality. The replacement requires the purchase of a Lens Window
Kit which includes the Quartz window and the sealing ‘O’ ring. Before attempting the
replacement ensure that the camera is perfectly clean and there is no debris in the
window aperture. Please see the T800 User Manual for lens window replacement.
MAINTAINANCE—–T812 CAMERA
It is best practice to leave the camera and skids fitted to the T804 system. If you need
to remove the camera ensure that the Termination is clean before removal. When
replacing the camera ensure that the threads are clean and that the ‘O’ rings are well
lubricated with Silicone Grease. Never use solvents (such as Ambersil) to clean the
termination as this will damage the o-rings. Keep the windows clean with a damp
cloth (microfiber cloths are best for this practice).
REPAIRS/SERVICING
The T804 has no user serviceable parts. Please refer to your Distributor for repairs
and service.
Troglotech T804 User Manual
Page 19
OPERATING WITH NO TEXTWRITER
On T804 systems where a Text Writer is
NOT fitted, the selection of Imperial and
Metric units is performed by holding
down the ‘Cal’ button while the unit is
switched from OFF to ON. Keep the
‘Cal’ button pressed until the ‘Troglotech
Ltd’ welcome screen is shown, the Units
will now change from Imperial to Metric
and visa-versa. The Units selection is
remembered even when the unit is
switched OFF
ACCESSORIES
T710 1” CAMERA AND 20M ROD
Extent the capabilities of your T804 system with
the addition of the T710 1" camera and 20M (66
feet) of highly-flexible rod. This upgrade
includes a smaller coiler cage that fits within the
T804 coiler cage.
When a survey is required of small pipework,
the T800 camera can be detached, and the
free-end of the 20M rod can be connected to
the termination. The 1" camera can now be
passed through the rod-guide and the survey
can begin. In some situations, the full 80M (262
feet) of rod can be utilised.
The T710 is the worlds most advanced 1"
camera. We have utilised the very latest in
CMOS sensor and LED technology to provide a
camera that out-performs all 1" cameras and
most larger cameras.
The rod is a new Troglotech design. It has a
high resin-content fibreglass core that provides
both flexibility and strength, the outer is highly
wear-resistant and low-friction.
Troglotech T804 User Manual
Page 20
ACCESSORIES
T812 PAN AND TILT CAMERA
Troglotech are proud to announce the launch of the worlds most advanced Pan and
Tilt camera, the T812. Most Pan and Tilt cameras fail to keep the picture upright
when the head rotates, some larger cameras have auto-uprighting, but only the
Troglotech T812 has 'Human Perspective View' which emulates the way a human
would view a pipe.
The T812 continues our well-proven construction techniques and extraordinary picture clarity from our T800 cameras (over a thousand camera systems operating
around the world). It can be fitted to our T804 pushrod system using the same skid
sets as the body is the same 48mm diameter as the T800.
Lighting: We have custom LED's manufactured exclusively for Troglotech cameras. The output of the LED's on the T812 are equivalent to a Halogen light-source
of 50W
Ruggedness: As always, the camera is constructed of Stainless Steel. It is fully
waterproof to IP68
Picture quality: Patented 'Digital Clarity' high-definition sensor with electronic focus
control (no moving parts)
Intelligent viewing: Along with 'Human Perspective View', the camera auto-centres
and auto-focuses with a single key-press
Troglotech T804 User Manual
Page 21
ACCESSORIES
T806 Wireless Remote Viewing System
This system complements the T804 pushrod system,
allowing the operator complete freedom to view the live
video from the camera via a head-mounted display.
This allows the operator (or another member of the crew)
to concentrate on placing the camera correctly and
manipulating the rod without the need to be close to the
control unit to view the picture. This increases productivity
and safety allowing the operator more control over the rod
and camera.
The T806 consists of Troglotech headwear fitted with a
pair of video glasses, the housing also contains a wireless
video receiver, rechargeable battery and charging system. The wireless transmitter
is fitted to the T804 pushrod system, the housing also contains a rechargeable
battery and charging circuit. The transmitter simply clips to the T804 frame and
connects to the control unit via the supplied cable.
Sondes
Troglotech produce in-line sondes for the T800, T812
and T710 cameras which can be utilised when
operating with the Troglotech T804 digital pushrod
system.
We produce sondes in all the standard frequencies:
512Hz
640Hz
8.192KHz
32.768KHz
Our powerful sondes allow you to accurately and
reliably locate your T800 camera at depth. They are crystal-controlled and always
give a powerful and precise signal to your requirements. They are compatible most
Locators.
Troglotech T804 User Manual
Page 22
ACCESSORIES
DC Lead:
To extend the operation time of the T804
system, the DC Lead can be used to both
charge the power cell and operate the
Trogloprobe system at the same time. The DC
Lead is 3 metres in length and has a cigarlighter plug to connect to a vehicle with a 12V
battery system.
The DC lead is especially useful for recharging
the Power Cell while travelling between inspections. Each hours charge while
travelling can provide up to three hours operation time without the need for any
generator or external power supply.
Extra Power Cell:
If up to eight-hours operation duration is insufficient and
a 12V supply is not available, an additional power cell
can be supplied. The Trogloprobe power cell uses
advanced lithium ion cells to provide dependable energy
and the machined-from-solid enclosure provides IP67
full waterproofing.
The T804 power cell is clipped to the system frame and
can be released and replaced in seconds. There are no
leads to connect, the power cell has a captive
waterproof connector that automatically mates with the hub.
The power cell also contains battery-manager electronics to enable charging from
a 12V DC source via the DC lead if mains electricity is not available. The Power
Cell is exceptionally robust with an anodised finish.
Text-writer upgrade:
Most Trogloprobe systems are sold fully loaded with
DVR and Text-writer, however, the Trogloprobe can
be sold as a 'Base System'. The 'Base System' has
on-screen meterage but has no text-writer
capabilities. The text-writer capabilities can be
simply enabled by the addition of the T804
keyboard.
The keyboard is a machined-from-solid anodised
assembly, fully waterproof to IP67 and simply snaps onto the T804 frame and
connected to the Control Unit by a single waterproof connector. The keyboard
assembly contains a full 9-page text-writer with clock-calendar to automatically
display the time and date on-screen. The text-writer is fully Wincan-compatible.
Troglotech T804 User Manual
Page 23
SPECIFICATION AND REQUIREMENTS
SYSTEM INPUT VOLTAGE
10.8V – 14.6V
FRAME CONSTRUCTION
Powder coated Steel
ENCLOSURE CONSTRUCTION
Machined-from-solid Aluminium, Hard Anodised
DIMENSIONS
540mm x 643mm x 302mm
PUSHROD
5-Conductor Epoxy Glass core
TEMPERATURE
-20°C to +85°C (storage) 0°C to 50°C (operating)
SYSTEM WEIGHT
17KG
STANDARD ROD LENGTH
61M (200 feet)
BASE UNIT ENVIRONMENTAL
IP 67
LCD
5.6” High resolution, High brightness
POWER CELL CAPACITY
9600mAH
POWER CONSUMPTION
1.3A @ 12V (15.6W)
MISSION TIME
6 – 8 Hours from a single charge of the Power Cell
VIDEO OUTPUT / INPUT
Auto – Switching, Buffered, 1V p-p into 75 Ohms
ACCESSORIES
WARNING
The T804 is a battery-operated system,
never operate the T804 when connected
to a mains supply. The mains charger
must never be operated on-site and is for
indoor use only. Failure to comply to this
warning may endanger lives
DEALER INFORMATION
Troglotech T804 User Manual
Page 24