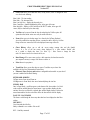
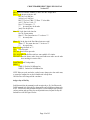
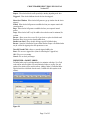
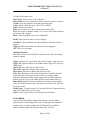
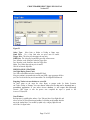
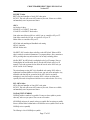
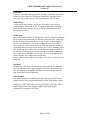
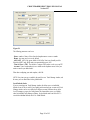
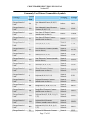
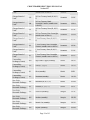
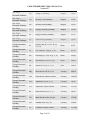
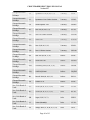
1
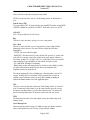
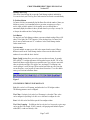
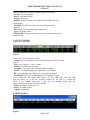
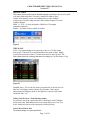
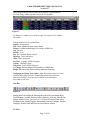
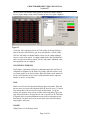
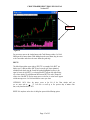
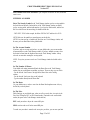
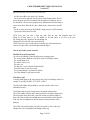
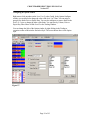
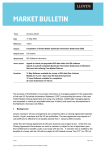
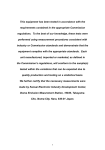
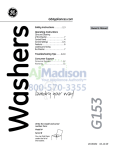
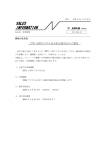
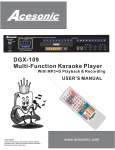
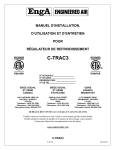
CHOICETRADER DIRECT PRO USER MANUAL
Version 1.37
TABLE OF CONTENTS:
LOGGING ON, OPENING & SAVING DESKTOP………………...
2
FOUR ESSENTIAL WINDOWS……………………………………...
3-10
OPENING OTHER WINDOWS………………………………………
10
CONFIGURING WINDOWS…………………………………………
14
MAIL……………………………………………………………………
14
CHART…………………………………………………………………
14-17
HOT KEYS…………………………………………………………….
17-19
ALERT AND TRIGGER ……………………………………………..
20-21
PREDEFINED OR BASKET ORDERS……………………………..
21-22
STOP ORDERS……………………………………………………….
22 & 28
MISCELLANEOUS FEATURES……………………………………
23-24
ECNS ORDER MATCHING ………………………………………..
25-38
PREPARING TO ENTER AN ORDER…………………………….
28-31
ENTERING AN ORDER……………………………………………..
32-34
OPTION TRADING..…………………………………………………
35-36
COMMONLY USED FUTURES / COMMODITIES SYMBOLS ...
37-41
E-SIGNAL INTEGRATION…………………………………………
42
Page 1 of 42
CHOICETRADER DIRECT PRO USER MANUAL
Version 1.37
LOGGING ON
Click on the start button and go to Programs. Select the program. Or, double click the
program icon on your desktop. Select File then Logon from the tool bar. In the TraderID
field, in place of YOURID, type in the User ID that was supplied to you by your broker.
Next, type your password in the password window. Check Remember ID/PWD and click
on Login.
Figure 1
OPENING A DESKTOP SCREEN
Your software installation should include a default desktop screen, which opens when
you log on. If a sample screen did not open when you logged on, go to FILE on the
toolbar. Left mouse click and select Open Desktop from the dropdown menu. Double
click on Default.dsk.
SAVING A DESKTOP SCREEN
You can create your own desktop by first closing all windows and recreate one. Go to
FILE and select Close All Window. Then begin opening the windows you need for trading
by going to Trade and select from the six main options. When you are satisfied with your
desktop go to FILE on the toolbar. Select save Desktop. Enter a file name and click save.
To open your screen, go to file. Select open screen and double click on your file name. To
have your screen open automatically every time you log on, save your screen with the
name "default". You can save as many different screens as you like. You can personalize
your own screen using any windows you choose. All these windows may be opened by
going to Trade on your tool bar. The drop down menu displays all available windows.
Page 2 of 42
CHOICETRADER DIRECT PRO USER MANUAL
Version 1.37
SET A DEFAULT ACCOUNT
Go to Setup on the toolbar. Select Order Template. In the Account fields for NASD,
NYSE and Option stock default, select your account from the drop down menu. This is
where you set your default number of shares, your preferred Route, AON/ANY and Time
in Force settings. Click OK when you are satisfied with the new changes.
SET TRADING DEFAULT
Go to Setup and select Trading Settings. You can then enable various settings to make
your trading experience smarter or with greater risk management. See section on
Preparing to Enter An Order of this manual for more information on Trade Settings.
FOUR ESSENTIAL WINDOWS
Windows essential for trading are the Trade Montage, Accounts, Position and Orders. A
description of these windows follows.
1. TRADE MONTAGE WINDOW
This is your order execution window and Level II quote window. Type the stock
symbol in the white box in the upper left corner of the Trade Montage window
and hit enter. The title bar of the Trade Montage window displays the stock
symbol and the current inside market (the best bid and ask). Previous close (PCL),
day's high-low (H/L), last trade (Last), Volume (Vol) are displayed below the title
bar. Net change compared to the previous day's close is displayed in red. A
maximum of ten Trade Montage windows may be opened. See image below:
Title bar
Link icon
Stock box
Message
Reserve
Share box
Lock box
Route box
Account
Preference
Price box
Figure 2
Page 3 of 42
CHOICETRADER DIRECT PRO USER MANUAL
Version 1.37
a) UPPER SECTION of the MONTAGE WINDOW
Following is an explanation of the functions of the boxes and buttons on the top portion
of the Montage window.
Title Bar
Displays the NASDAQ Inside Market. (Level one, the inside market, and the best Bid /
best Ask all mean the same thing).
Stock Box
Type a security symbol here and hit Enter.
Link or blue anchor button
Linking Trade Montage windows To Time & Sale and Charts by pointing your mouse
cursor on the anchor button on the Trade Montage window. Hold down the left mouse
button and drag the cursor to the Time/Sale window and release the mouse button (point,
click, drag and drop).
Market Designator
Located above the blue anchor or link button. Because not all NASDAQ securities are
the same. Securities can be distinguished by the letter code that appears here.
· Q NASDAQ National Market. Most major stocks are in this category.
· S NASDAQ SmallCap Market. Use our direct connection to ARCA.
· U Bulletin Board. Use our direct connection to ARCA.
· N - NYSE. New York Stock Exchange. Use ARCA, BRUT or OESO. On some securities
you may be able to use one of the free market markers and alleviate the cost for ECN per
share fees. Also some routes will not accept odd lot shares or less than 100 shares lot.
· A - AMEX. American Stock Exchange. Use ARCA , BRUT or OESO. On some securities
you may be able to use one of the free market markers and alleviate the cost for ECN per
share fees.
· V - Pink sheets Stock are currently routed to LAMP or FANC routes.
b) MIDDLE SECTION of the MONTAGE WINDOW
This is the Level II montage. It contains Market Maker (MM) ID symbols, Electronic
Communication Network (ECN) ID symbols (designated by #), and the Island Book
(ISB). To the right of each MM, ECN or ISB symbol is the Bid or Ask, and the size of the
Bid or Ask. Size is abbreviated multiply by 100 for the actual number of shares. Left
mouse click on any MM ID or ECN ID to load the Trade Montage window with an order
to that MM or ECN at the quoted price. The MM or ECN ID appears in the Preference
Box, and the quoted price appears in the Price Box. Click on the displayed share size to
load the shares box if desired. When directing an order to a MM or ECN, you must send
buy orders at the MM or ECN Ask, and send sell orders at the MM or ECN Bid.
c) LOWER SECTION of the MONTAGE WINDOW
The Green Message Line displays the status of your order in real time.
NOTE: Some actions will generate multiple messages. Only the last message will
remain in the message line. To see the rest of the messages, click on the toggle
down arrow when available. You can also review your trades by opening the
Trade Log window under Trade in the application menu bar.
Page 4 of 42
CHOICETRADER DIRECT PRO USER MANUAL
Version 1.37
Shares Box
The preset default is 1000. There are four ways to adjust the number of shares.
1. Use the up /down arrows to the right of the Shares Box. Left click on the appropriate
arrow, hold down the left mouse button or use the mouse wheel.
2. Use the forward / back arrow keys on the keyboard.
3. Type the number directly into the Shares Box.
4. Left click on the quote size on the Level II montage.
To delete the Shares, you right click on the down arrows to the right of the Shares Box to
delete a size. Move the mouse cursor over the Shares Box to make the field "live" and type
in the number of shares.
Preference Box
Located to the right of the Route box. For mo re information on preferencing to Market
Makers and ECNs s ee section on Order Matching. On the Level 2 montage, left click on
the MM or ECN you wish to preference. The MM or ECN ID will appear in this box.
Reserve Box
Located to the right of the Position button. The feature is useful if you are sending a large
amount of stock to the market but you do not want to display the amount that may result in
increasing the price of the stock. You put the amount you want to display in the reserve box
and the true amount in shares box.
Price Box
Located to the right of the Reserve box. There are four ways to set a price.
1. Left click on any Bid or Ask on the Level 2 montage.
2. Use the arrows to the right of the Price Box on the Trade Montage window. The left
arrows change the price in $.10 increments while the right arrows change the price in
$.01 increments. Left click on the appropriate arrow, hold down the left mouse button or
use the mouse wheel. When the Price Box is blank, the price always starts at the ASK
price.
3. Use the up / down arrow keys on the keyboard to change the price in $.001 increments.
Up adds $.001 to the best Level II Bid. Down cuts $.001 from the best Level II Ask.
4. Type the price directly in the Price Box.
To de lete a Price, you right click on the arrows to the right of the Price Box to delete a
price. Move the mouse cursor over the Price Box to make the field "live" and enter a
new price.
Route Box
Click on the arrow to open the dropdown menu. Select the appropriate order type. Or use
the End key on the keyboard. The default for all limit orders is no price in the price box,
Buy at the ASK, Sell at the BID.
Account Box
If you trade more than one account, click on the arrow to select the account to be traded.
Any account that begins “TR” denotes a training account.
Page 5 of 42
CHOICETRADER DIRECT PRO USER MANUAL
Version 1.37
Always select the account after entering the security symbol.
NOTE: Every time you enter a stock on a Trade Montage window, the default order is
reset.
Time In Force (TIF)
The preset default is DAY. All unexecuted Day orders on all ECN routes except ISLD
or INETL (Island) are cancelled at 6:30 PM ET. ISLD orders can be set to any TIF.
AON/ANY
ANY is the preset default. AON (All or None).
Buy
Click here to send a buy order to go long, or to cover a short position.
Sell / Short
Click here to send a sell order to cover a long position or to enter a Short Sell order.
Shorting rules must be observed. The system will reject illegal Short Sell orders.
Shorting Rules:
· UPTICK - May short at the bid or higher.
· DOWNTICK - Must short at least $.01 above the bid. If the spread is .01, you may short
at the ASK. You can enter a short sell on a listed security (stock symbols with three or
fewer letters, example: GE, LU, QQQ, COM, etc.) on a downtick; however, the specialist
on the trading floor won't actually place the order until the stock has an up tick.
· IPO - Initial Public Offerings are not shortable.
· Bulletin Board securities and Nasdaq Small Cap securities are only available by calling
your broker and are often not shortable because most are non marginable. Most
marginable securities are valued above $5.
The software automatically checks availability when a Short Sale order is entered. The
message "Send Rej Shrt Sec isn't shortable" will be generated if the security is not
available to short. Furthermore, traders can check Short availability by entering the
Symbol in the Shortlist window on the Trade application option.
CXL
Click here to cancel the last order sent from that Trade Montage window. Or, click the X
in the X column on the Order window. If you have more than one open order, you have
the option of canceling all orders, or just the order on that you click. You also have the
option of canceling all open orders for the same security as the order you selected.
TMP
This button otherwise known as the order template restores your default settings to the
Montage window.
Green Message Line
Please note that only the last message of a multiple message order appears in this line.
Always and frequently check your Trade log, Account and Trade windows.
Page 6 of 42
CHOICETRADER DIRECT PRO USER MANUAL
Version 1.37
Montage Active Log
Click on the Green Message Bar to open that Trade Montage window's individual log.
You can also check your Trade Log from Trade menu bar for all trades executed intraday.
P (Position) Button
Left mouse click here to automatically load the Shares Box with the number of shares you
hold in any security. Use it immediately after any execution, or anytime you call up a
stock in which you hold a position. It is also possible to set your default order to
automatically display the number of shares you hold whenever you call up a security. (Go
to Setup on the toolbar and select Trading Settings)
Lock Button
You may lock your Trade Montage windows to prevent accidental sending of Buy or Sell
orders. To the right of the "TMP" button is a Green checkmark icon. Left mouse click
here. It turns red and become and “X” to indicate a locked Trade Montage window.
Orders cannot be sent.
Lock Account
If you trade multiple accounts you can lock in the current selected account. Calling up
different securities on the Trade Montage window will not cause the default account
number to be reset while this box is checked.
Route Config function allows you to select your most often used routes, for example
ISLD, ARCAL. To configure right mouse click anywhere between the Sell, CXL or Buy
button. Scroll down to toggles between your specified routes. Type in the new route in the
order you wish them to toggle. Click Apply to save any changes. The following is the
correct spelling of a variety of routes. Please note that your broker may offer routes that
are not shown here, or may not offer all routes that are shown here. To see all available
routes, go to Trade and select Route Status.
Figure 3
CONFIGURING THE LEVEL II MONTAGE
Right click over the Level II montage, and select the Level II Configure window.
The following parameters can be configured.
Tier Color - Each price level on the Level II montage is color-coded. These colors
can be configured to your liking. Left click over a color band to configure the color.
Font - Left click on the Font field to open the Font configure window.
Tier Color Grouping - If a different color for each price level is too much, a price range
can be specified. For example, if .0625 is entered, color grouping would include all quotes
within $.0625, or what was formerly a 16th.
Page 7 of 42
CHOICETRADER DIRECT PRO USER MANUAL
Version 1.37
Show Grid Left click to check the box if you want to see a grid on the montage.
Show ECN # - Normally checked. ECNs are designated with # following the market
participant ID. Uncheck if you do not want to see the #.
Only Show ECN - Normally unchecked. The Island Book, which is received directly
from Island, is indicated by the symbols ISB. ISLD is the best bid/best ask quote supplied
by Nasdaq. If displayed along with ISB, there will be duplicate quotes representing the top
of the Island Book.
This is undesirable. Only Show ECN should only be selected if for some reason the
Island Book (ISB) is unavailable.
Optimized Paint (for slow computer) Check this button if you experience hanging due
to the data feed.
ISB Number Sets the depth, or number of Island Book (ISB) price levels that are
displayed on the montage.
Set As Default - You can set the current Level II configuration to be the default for all
your Trade Montage windows.
Load Default Left click to load your default Level II montage configuration on any
Trade Montage window.
Monitor Groups where Two Market Participant IDs may be monitored by entering the
MPID in the monitor field. Select text and background colors to make them stand out by
left clicking over the appropriate field.
NOTE: Be sure to save your screen to preserve your Level II settings, hide Column header
and market makers.
2. POSITION WINDOW
Displays all open positions. Right click on a symbol to load a Trade Montage window
with that security, the number of shares, and the account in which the position is held.
Figure 4
Columns on the Position window are as follows:
· Sym: The security symbol. Right click on the symbol to load a Trading
Page 8 of 42
CHOICETRADER DIRECT PRO USER MANUAL
Version 1.37
window with that security, the number of shares, and the account number.
· Account: Your account number.
· Shares: The number of shares.
· Avgcost: Average cost.
· Realized: If you have sold part of your position, the realized P&L on the sale
is displayed here.
· Unrealized: Your P&L if you were to close the position at the current
market price.
· Bid and Ask: The current inside market on that security.
· Type: Cash, Margin or Short.
· Withhold BP: The amount of buying power used if the position was opened on the
current trade date.
3. ACCOUNT WINDOW
Displays account information.
Figure 5
Columns on the Account window are as follows:
· Account: Your account number(s). Note: Any account that begins with “TR” is a training
account.
· Type: Your account type: 1 = cash 2 = margin
· Realized: Your P&L for the current day.
· Unrealized: Your change in value of all current positions combined.
· Init BP: Your Daytrading buying power, loaded daily for your account(s).
· BP: Your current buying power. Fluctuates as you open and close positions.
· OverNight BP: This is your Overnight buying power. It is displayed as a guide.
If any position that was opened today exceeds your Over Night buying power, this field
turns red, alerting you of that fact. Exceeding OverNight BP will result in a margin call.
NOTE: If your overnight buying power is less than your Daytrading buying power, the
software will not prevent you from exceeding your ONBP.
· Tickets: The number of trades for the day.
· Shares: The number of shares.
· +LiqShr: Liquidity share.
4. ORDER WINDOW
Figure 6
Page 9 of 42
CHOICETRADER DIRECT PRO USER MANUAL
Version 1.37
The columns are explained below:
Displays all open orders. Right click on the row containing the order, to open the
Cancel/Config window. Columns on the Order button are as follows:
· X: Left click to cancel an order.
· Status: Sending means the order has not yet reached the market; Accepted means the
order has reached the market and Canceling means Order is not yet canceled.
· Symb: The security symbol.
· Side: B = Buy S = Sell
· Qty: The number of shares on the original order.
· Open: The number of shares currently open.
· Price: The price on your order.
· Route: The routing selected for your order.
· Type: L = Limit M = Market S = Stop.
· Time: The time the order was entered.
· TIF: The time period that the order is active (i.e. DAY, 1, 2, 3, 5 or 10 min.)
· Broker: Preference Broker
· Account: Your trader ID
OPENING OTHER WINDOWS
As previously stated, the windows essential for trading are: Trade Montage, Account,
Position and Orders. Following is a description of the additional windows you may wish
to employ:
Trades Window
Displays all today’s trades. The columns on the Trades Window is basically the same as
those on the Orders window.
Figure 7
Trade Log
Displays all the messages generated in the Green message line on the Trade Montage
windows. The Log is only on your computer's hard drive. This log has every action you
performed on the trading platform for the day. Only the actions performed on one
computer will show up on the Log, if you switch computers during the day, then you will
have a separate log on the other computer.
Figure 8
Page 10 of 42
CHOICETRADER DIRECT PRO USER MANUAL
Version 1.37
Short List Window
This feature queries stocks that are shortable through your broker. Enter the stock symbol
in the Symb column and hit Enter. If the stock is shortable, the number of shares
available will be displayed. In some cases, additional shares as well as additional
securities may be located by calling your broker. Market: Market Designator. See section
on Market Designator.
HiRisk: Y = Yes N = No. Stocks designated as HiRisk have a 50% margin
maintenance requirement.
ShortSize: The number of shares available to sell short.
Figure 9
TIME & SALE
Can be a very important trading tool. It reports trades as they occur. The first column
shows the price of the trade. The second column indicates the number of shares. Multiply
by 100 for the actual number of shares. The third column shows the time of the trade. The
forth column shows the exchange that shares are trading on. The fifth column is a Flag.
Figure 10
Standalone feature - The Time & Sale window can function alone. It does not need to be
linked to a Trade Montage window to function. The full number of shares may be
displayed instead of dividing the number by 100. Right click to open the Config window
and uncheck Share / 100.
Linking Time & Sale to a Trade Montage window
Put your mouse cursor on the Anchor Button on the Trade Montage window. Hold down
the left mouse button. While holding down the mouse button, drag the cursor to the Time
& Sale window and release the mouse button (point, click, drag and drop).
Color Code on Time & Sale
The default settings are represented below:
Page 11 of 42
CHOICETRADER DIRECT PRO USER MANUAL
Version 1.37
Green represents a trade at the Ask price.
Red represents a trade at the Bid price.
White represents a trade between the Bid and Ask
Pink represents a trade below the Bid
Darker Green represents a trade above the Ask.
Configuring the Time & Sale Window
Right click on the Time & Sale window to open the Time & Sale Config window.
Default colors may be customized. Vertical and/or horizontal grid lines may be added.
Full number of shares may be displayed, and the font may be adjusted.
To save your Time & Sale settings as a default, click Save as Default. To load your
default settings in any Time & Sale window, click Load Default.
TopList
This is a live market statistics window. It lists NASDAQ (NASD) and New
York/American Exchange (LIST) securities in order by most active, and percentage
gainers and losers. Right click on a symbol to load a Trade Montage window.
Figure 11
ISLD BOOK
Displays the Island Book. Can be linked to a Trade Montage window, or can stand-alone.
Figure 12
MARKET VIEW
This window allows you to view data on stocks you wish to track. Enter the symbol in the
Page 12 of 42
CHOICETRADER DIRECT PRO USER MANUAL
Version 1.37
Symb column and hit enter or arrow up/down on the keyboard. To automatically load
your Trade Montage window, right mouse click on the security symbol.
Figure 13
Five Market View windows can be opened at on time. The capacity for each window is
forty symbols.
Columns on Market View are explained below:
Symbol: Security symbol
Tick: Show whether the stock is up or down.
Change: Net dollar amount change from yesterday's 4:00PM close.
Last: Last trade
Bid/Ask: Level I
Size: Size of the Inside Bid and Ask price.
High/Low: Today's high and low
Open: Today's opening trade
PrevClose: Yesterday's 4:00PM closing price.
Volume: Today's total volume
TodayClose: Today’s 4:00PM closing price
% Change: Percent change from yesterday’s 4:00PM close.
Range: How much the stock moved up and down for the day
Configuring the Market View window - Right click anywhere except on a security
symbol and select Config. Click on the Column heading and then click the Up/Down
button to move heading. You can open up to five Market Viewers and load up to
forty symbols in each viewer.
Icon Bar
Figure 14
Starting from Left to Right, the following the order of the icon buttons above:
Trade Montage, Account, Position, Orders Windows, Trade log, Time & Sale,
Option, Market Viewer, Top List, Level 1 Ticker, ECN boob, Chart, News,
Predefined order, Alert& Triggers, Internal Mail, Network Configure, Hot Key
Configure, Market Clock and Direct Access Software website.
L1 Ticker
Page 13 of 42
CHOICETRADER DIRECT PRO USER MANUAL
Version 1.37
This level I ticker is for securities whose symbols you enter into the window. Whenever
the Level I quote changes on your selected securities, the new Level 1 quote is displayed.
Figure 15
To load your Ticker, right mouse click on the Ticker window. In the upper field type a
name for the ticker. In the field below, type the security symbols in a vertical column.
Click Save and Commit. An unlimited number of tickers may be configured although
only one at a time can be opened. To configure multiple tickers, delete both fields and
enter a new ticker name and new symbols, click Save and Commit. Additionally, colors,
fonts and grid lines may be configured.
CONFIGURING WINDOWS
For all windows, a right mouse click opens a configuration option. Fonts and Colors are
configurable on all windows For the Market View window, right click anywhere except
on a security symbol. For the Top List window, Right click anywhere on the numbers on
the left or the column titles on top. For the Account and Position windows, right click
anywhere except on a security symbol.
MAIL
Mail is accessed via the Tools then Internal Message option on the toolbar. When mail
has been sent to you, an alert will be displayed on the title bar of the screen. To clear the
alert, click anywhere on the new message to open the Mail window. To reply to a
message, click anywhere on the message, and then click the Reply button. Type in your
reply, and click the Send key. Messages must be sent to a specific User ID. This feature
is frequently used by our system administrators and your broker to send updates on route
status intra-day. For specific issues on your account, please contact your broker directly
using a regular e-mail system.
CHARTS
Linking Charts to a Trade Montage window
Page 14 of 42
CHOICETRADER DIRECT PRO USER MANUAL
Version 1.37
RECTS
Figure 16
Put your mouse cursor on the Anchor button on the Trade Montage window. Left click.
Hold down the left mouse button. While holding down the mouse button, drag the cursor
to the Chart window and release the mouse button (drag and drop).
RECTS
The default chart window opens with two "RECTS" or rectangles. Each RECT can
display up to 15 different studies. RECTS may be moved up or down, minimized,
maximized and closed, using the Control Box (symbols highlighted in yellow, in the
upper left corner of each RECT), or selecting from RECT options when right clicking
over a chart window. The solid horizontal line between RECTS is used to change the
relative size of the RECTS. Put the mouse cursor over the line. A vertical arrow appears
with the message move. Left click and slide the cursor up or down.
HISTORICAL DATA Move the mouse cursor to the left of the Chart window until you
see an arrow such as
???. Left click to recall up to five previous days of minute chart
data, or day chart data back to 1970.
RIGHT click anywhere on the chart. A dialog box opens with the following options.
Page 15 of 42
CHOICETRADER DIRECT PRO USER MANUAL
Version 1.37
Figure 17
•
•
Configure is the dialog setting to add grid lines to the chart, change
background and label line color. Change Line Style, Color and width. Set
Screen Colors - Allows adjustment of Background, Grid, and Label colors.
Load Screen Setting - Load a previously saved .cst file (See below) Save
Screen Setting - Save a chart configuration as a .cst file. Clear Screen
Setting - Totally clears the chart window of all data.
Data Config is the Data Config Dialog that allows you to set Type - Choose Minutes
or Day Chart Point. Choose the desired Minute or Day Interval from the dropdown
menu, or directly type in the number of minutes or days. Show Pre/Post Market. If
desired, left click to put a check in the box. Configures From and To Select the
specific start and end date/time of the data you wish to view. Left click anywhere on
the chart to display data for that particular point in time. You can change or assign the
symbol for the Chart in this window as well.
NOTE: The amount of data that can be retrieved with one request is limited. Overlays
further limit the date or time range available with one request. However, once chart data is
retrieved, it is stored in your computer's memory. Subsequent requests will allow more
historical data to be retrieved. For example, two or three days of minute chart data can be
retrieved with one request. Four or five days will exceed the limit for one request. Start by
requesting two or three days first, then requesting four or five days of minute chart data.
The same applies for day chart data.
•
Study Config allows you to select various studies to be displayed on the chart. For
Example: Price, Volume, Moving Average, StoChastics, Momentum and to the
more advanced studies. Right click on a specific RECT to open the Chart Study
Config window. Click on a study on the left, in the Studies field. Click the right arrow
to move the study to the right, in the Studies in chart field. Or, double click on the
Studies to move it into the Studies in chart field. Studies UP/DOWN determines the
order of overlaid studies in the RECT. The study on the bottom of the list is drawn
first. Studies higher on the list will be overlaid on studies lower on the list. The scale
displayed will be that of the study on the top of the list.
Page 16 of 42
CHOICETRADER DIRECT PRO USER MANUAL
Version 1.37
•
Chart Area allows you to add new area, overlay, remove, move or configure the chart
area. Such as the following:
Show Label - The time reading.
Show Ruler - The horizontal scale.
Show Last Sale Price - Displays the last trade price.
Show Control Box - Symbols highlighted in yellow, in the upper left corner.
Show Study Info - Displays a color coded list of the RECT's studies, in the upper left
corner. (May be obstructed by the chart study).
•
Tool Bar can be removed from the chart by unchecking the Tool Bar option. All
options described in this section can easily accessible from here.
•
Zoom allows you resize the data range. In or Out, also the Up/Down Keyboard
Arrow Keys will do the same thing. Restore a zoomed in chart to full view. Set Data
Range so that once zoomed in, locks in the displayed zoom range or Best Fit.
• Chart History allows you to edit the screen setting, manage data and edit Symbol
history. Is a list of the last twenty charts displayed in a chart window. Double click
on a symbol to display that chart. Use Move Up / Move Down to change the chart
order. Use insert to insert a new chart in the list, etc.
•
Data Manage If for some reason, such as a bad connection, the chart data stored in
your computer's memory is corrupt, click Remove to delete it.
•
Print directed to your printer.
• Trend Line allows you to either draw or remove Trend line on your chart. Also
available is the Ray Line, Horizontal and Vertical Lines.
• Fibonacci Lines, Project and Arch are configurable and removable on your chart if
your user is enabled for Advanced Charting.
KEYBOARD ARROWS
Up/Down arrows Zoom in and Zoom out.
Left/Right once in Zoom Mode, these move horizontally along the time line.
SCROLL BAR
Once in Zoom Mode, a scroll bar appears on the bottom of the chart window. Left click
on the scroll bar and hold down the mouse button. A pop up window displays the date
and time. Move the scroll bar left or right the date and time display changes. Release the
mouse button and the first bar on the chart will be the date and time from the display.
PAGE UP / PAGE DOWN
This feature scrolls through the last twenty charts that have been displayed on that Chart
window.
HOT KEYS
Go to Setup and select Hot Key.
Hotkey command is case sensitive. Be careful.
BUY: Send Buy command
Page 17 of 42
CHOICETRADER DIRECT PRO USER MANUAL
Version 1.37
SELL: Send Sell command, Automatic go short if don’t have enough shares.
Price= ??? Set the price in the price box.
Bid: The Level1 Bid price;
Ask: the Level1 Ask price;
Bid+??? The Level 1 Bid +??? Where ??? is the dollar
Ask+??? The level 1 Ask +???
Price+??? Current price +???
??? the exactly price for this order.
[none] Clear the price box.
Share=??? Set the share in the share box
Pos: The Current position;
Share+??? The current share incr ??? or decress ???
??? the exactly share
SShare=??? Set the share in the Show Shares box(reserve order)
SShare+??? The current share incr ??? or decress ???
??? the exactly share
Route=??? Change the Route to ???
CXL: Cancel last trade.
CXL ALL: Cancel All the open order.
CXL ALLSYMB: Cancell all the order have same symbol In Lv2 window.
CXL LAST: cancel the last new order. (keeps cancel until no new order. once the order
been canceling, it is not new order.).
SwitchTWnd: Switch Trading window;
NoRR=?
NoRR=Y, Check the No ReReoute box.
NoRR=N, Uncheck the No ReRRoute Box.
NOTE: When you set the stack order, you don’t want to change price when switch route,
so you need to configure the way how to handle order in Setup menu.
Check the Price don’t change and the const shares.
Assign a key to Hot Key
Scroll down and select the command you wish to assign a key to. Eg., Scroll down to the
PANIC command. Left click in the Key column and on your keyboard press a button such
as ESC. Then click Save and Quit button when done. If you are trading several stocks and
you have positions, and you wish to close out all positions at once, the panic Hot Key will
send order to exit all. See Figure 18 below:
Page 18 of 42
CHOICETRADER DIRECT PRO USER MANUAL
Version 1.37
Figure 18
Page 19 of 42
CHOICETRADER DIRECT PRO USER MANUAL
Version 1.37
ALERT AND TRIGGER
Alerts allow you to define parameters, that when met, will trigger a visual and/or audible
alert. Additionally, the alert can be set to trigger a PreDefined order.
Figure 19
Select Alert &Trigger from "Tools" on the toolbar. The Alert config window will open.
To Add a new alert and trigger, right mouse click and select Add. Assign a name in the
Alert Name field. Set the symbol in SecSym field, unless the alert is based on time of
day. Then click the Add button to set button to set the parameters. Also allows you to add
multiple conditions on the same alert. You can then enable sound as well as visual action.
To Edit right click anywhere on predefined trigger to edit on any previously configured
alert, and then click Edit to change the parameters. (Or, double click on the row). Click
the Del button to delete that row or click Add to add another parameter. The Fit button
sizes the columns to fit the data.
To Delete click on any previously configured alert, the click Delete to remove it. Turn Off
Sound - Click to silence a triggered audible alert.
See more function description below:
Enable: When checked the alert is enabled.
Auto Delete: When checked the alert will automatically be deleted once it has been
triggered.
Page 20 of 42
CHOICETRADER DIRECT PRO USER MANUAL
Version 1.37
Repeat: When checked the alert will repeat daily or intraday, depending on the alert.
Triggered: When checked indicates that the alert has been triggered.
Show Alert Window: When checked will generate a pop up window when the alert is
triggered.
Sound: When checked will generate an audible alert form your computer sound card's
external speakers.
Beep: When checked will generate an audible alert from your computer's internal
speaker.
Loop: When checked will "Loop" the audible alert so that the sound is continuous, like
an alarm.
Browse: Allows you to select a wave file of your choice to replace the default sound.
Preview: Allows you to preview selected audible alerts.
Enable Auto Send: When checked will trigger specific PreDefined orders.
Browse: Opens the Select Basket Prepare window. Baskets Groups or PreDefined orders
may be selected for triggering when Alert parameters are met.
Turn Off Sound Click to silence a currently triggered audible alert.
Reset Click to reset a triggered alert. (Same as unchecking the Triggered box).
OK Click to save your settings.
Cancel Click to cancel your changes.
PREDEFINED or BASKET ORDER
PreDefined orders may be used independently or in conjunction with alerts. Go to Tools
on the tool bar and select Basket. Size and position the window as you like. Size and
position of the window will be stored in memory. Adding a Basket or PreDefined Order
right click and select Add Order from the menu. (Or double left click anywhere in the
window).
Figure 20
Page 21 of 42
CHOICETRADER DIRECT PRO USER MANUAL
Version 1.37
The Order Prepare window opens.
Order Name: If desired, enter a name for the order.
Baskets Name have been designated (See Below), orders are assigned to a Group here.
Account: Select the appropriate account from the drop down menu.
Action: Indicate whether the order is to BUY, SELL or SHORT.
Symb: Enter the security symbol.
Share: Enter the share size or select Position, to Sell the entire position.
Price: Enter the price in decimals. Example: 23.95, or select a price related to the Bid or
Ask when the order is triggered.
Route: Select the appropriate route for the PreDefined order.
Enable: When checked the order is ready to be triggered.
Auto Delete: When checked the order will automatically be deleted after it has been
triggered.
Triggered: When checked indicates the order has already been triggered.
OK: Click to save your settings.
Additional Functions
Select Basket from the tool bar and Right Click anywhere on the window. The following
options are displayed.
Trigger: Right click on a specific Basket order and select Trigger to trigger that order.
Trigger All: Right click anywhere on the window and select Trigger All to trigger ALL
displayed orders.
Add Order: Select Add to add a new Basket Order.
Edit Order: Right click on a Basket Order to edit that order.
Delete Order: Right click on a Basket Order to delete that order.
Filter: Right click anywhere on the window and select Filter. The Basket Order Filter
window opens. Enter the parameters you wish to filter by. For example, multiple
Predefined or Basket Order windows could be opened, with each window filtered by a
different Group TECH Group in one window; RETAIL Group in another window, etc.
Basket Define: Right click anywhere on the Basket Order window and select Basket
Define. In the Name field enter a name for the Group you wish to add. Click Add to add
that Group to the list.
Modify Name: To change the name of a Group, right click on the Group name and then
change. Click Modify Name to save the change.
Delete: To delete a group, left click on the Group name and click Delete.
STOP ORDERS
Select the route STOP from Route dropdown menu. Bring up a security in which a
position is held on a Trade Montage window. Select the appropriate route designated for
Stop orders. If you are Long the position, click the Sell button. If you are Short the
position, click the Buy button. The Stop Order window opens. See below:
Page 22 of 42
CHOICETRADER DIRECT PRO USER MANUAL
Version 1.37
Figure 21
Order Type: Select Limit or Market or Trailing or Range stops.
Limit Price: For a Stop Limit order two prices must be entered.
Trigger Price: This is the price that triggers the stop order.
Limit Price: This is the price beyond which your order will not execute.
For a Sell order, set the Limit Price below the Trigger Price.
For a Buy order, set the Limit Price above the Trigger Price.
Market For a Market Stop only one price is entered.
Click OK to Enter the Stop Order.
MISCELLANEOUS FEATURES
OverNight Buying Power Check
Go to Tools on the toolbar and select Overnight BP Check.
If any new position(s) you opened today exceeds your ONBP, a pop up message will alert
you. (There is also an alert on your Account window. The OverNight BP field turns red.
Exporting Trades to Access database or a text file
On Trade option on the menu bar select Report to generate trades for Orders, Execution
and Tickets. Select a Format. You can choose either text file that can be imported into a
spreadsheet application. If you select Access database, it will export into Microsoft
Access. Click Export to start the process once completed the report is opened in MS
Access or CVS (text) file.
News Windows
Real time news is available in the software. Go to Tools and select News. Right click and
select Get Next 20. This will load twenty headlines. Left clicking on the headline loads the
story in the window below. You can filter by symbol or by a category. Right click and
select Filter. See figure below:
Page 23 of 42
CHOICETRADER DIRECT PRO USER MANUAL
Version 1.37
Figure 22
Bullets Window
If your account is approved for Bullet trading your bullet positions will be displayed in
this window.
ECNs
(Electronic Communication Networks)
ARCA Archipelago ECN
ATTN Attain ECN
BRUT Brass Utility ECN
BTRD Bloomberg Trade Book ECN
INET or ISLD Island ECN
TRAC Track ECN
NTRD Nextrade ECN
ORDER MATCHING
ECNs are designated on the Trade Montage window with a pound sign following the
symbol. For example, BRUT#. We connect with the ECNs directly. To trade with an
ECN, left mouse click on the ECN symbol. An order to that ECN will be set up on the
Trade Montage window. Click the BUY button to buy at the ask. Click the SELL button
to sell at the bid. If the shares are available, your order will match with an immediate
execution.
Since our connection to the ECNs are Direct, if you do not get the shares for any reason,
your order, or the unexecuted portion of your order, will be posted to that ECN's Book.
Page 24 of 42
CHOICETRADER DIRECT PRO USER MANUAL
Version 1.37
POSTING ORDERS ON AN ECN BOOK
While our connection to an ECN is Direct, you have the option of posting your order on
any ECN's Book, in addition to matching orders that you see. Furthermore, ARCA will
actively attempt to execute market orders and marketable limit orders against other ECNs
and market makers, if there is not an immediate match for your order on the ARCA.
Direct Connection ECNs: ISLD/INET, BRUT, ARCA
(ISLD/INET) Any number of shares.
8:00 AM ET to 6:30 PM ET. Limit only. Island Book order matching.
All open ISLD orders are canceled at 8 PM ET
Island is one of the most dominant ECNs in today's market. Island matches buyers and
sellers. When an ISLD order is matched, execution is instantaneous. The program utilizes
a direct connection to Island, providing order entry and execution as fast as today's
technology allows.
The default order for ISLD, and all limit orders is no price in the price box, but at the ask,
sell at the bid.
ISLAND BOOK
Represents all the Bids and Asks in the Island system. The symbol ISB, in the MMID
column of the Trade Montage window Level 2 montage, represents the Island Book
quotes. NOTE: The Island Book (ISB) matches ISLD orders with other ISLD orders
only.
Figure 23
Matching Orders On Island
Like all ECNs, Island is an order matching system. If you enter an order that matches an
ISB quote you see, your order may be instantly filled, up to the number of available
shares displayed.
Match any ISB Ask with an ISLD Buy order, and up to the number of displayed shares
Page 25 of 42
CHOICETRADER DIRECT PRO USER MANUAL
Version 1.37
may be yours instantly. Match any ISB Bid with an ISLD Sell order, and up to the
number of displayed shares may be yours instantly.
However, other traders could beat you to it, if shares are in high demand. Shares on
Island are available on a first come, first served basis.
Posting Orders On Island
In addition to matching orders you see on the Island Book, you can Post your own BID or
ASK on the Island Book for all to see.
The same procedure is used for matching orders and posting orders, on Island. If shares
are available at your price or better, your order may receive an immediate match. If some
shares of your order are matched, but not all, the unmatched portion of your order will be
posted on the Island Book. Your posted order will stay on the Island Book for the duration
of the TIF set on the Trade Montage window. All open orders will be cancelled at 6:30
PM ET.
Invisible Island Orders
Invisible Island orders are available using ISLDN on the Route box dropdown menu.
These orders are not displayed on the Island Book or the Level 2 montage. Use ISLDN
when you do not want your order to be displayed. However, be aware that visible Island
orders receive priority over invisible orders. Visible orders, at any given price, will be
executed before invisible orders.
IOC Island Orders
Island offers two Immediate or Cancel (IOC) order options: AON and ANY.
IOC/ANY- This order will execute ANY amount of your order, if shares are available,
and immediately cancel any unexecuted shares.
IOC/AON This order will either immediately be executed in FULL, or be immediately
canceled if the total number of shares are not available.
BRUT
Round lots only.
8:00 AM ET to 6:30 PM ET. Limit only. Brut Book order matching.
BRUT only accepts round lot orders. A round lot is 100 shares or a multiple of 100.
Orders not for round lots will be rejected.
BRUT matches buyers and sellers. When a BRUT order is matched, execution is
instantaneous. The program utilizes a direct connection to BRUT, providing order entry
and execution as fast as today's technology allows.
Unlike the Island Book, the BRUT book is not displayed on the Level II montage.
However, Nasdaq displays the best bid and the best ask from the BRUT book on the
Level II montage. If your order represents the best bid or the best ask on the BRUT book,
you will see it on the Level II montage.
BRUT is most useful for matching orders you see displayed on Level II. If you wish to
post an order, Island (ISLD) may be your best bet.
Page 26 of 42
CHOICETRADER DIRECT PRO USER MANUAL
Version 1.37
IOC BRUT Order
BRUT offers one Immediate or Cancel (IOC) order option.
IOC/ANY- This order will execute ANY amount of your order, if shares are available,
and immediately cancel any unexecuted shares.
ARCA
Any Number of shares.
8:00 AM ET to 6:30 PM ET. Limit orders.
9:30 AM ET to 4:00 PM ET Market orders.
Limit orders entered between 8:00 a.m. and 4:01 p.m. are canceled at 4:02 p.m. ET.
Limit Orders entered after 4:02 p.m. are canceled at 6:30 p.m. ET.
Market Orders are canceled at 4:00 p.m. ET.
ARCA Book order matching and SmartBook order routing.
ARCAL Limit order
ARCAM Market order
Like BRUT, ARCA matches buyers and sellers on the ARCA book. When an ARCA
order is matched, execution is instantaneous. The program utilizes a direct connection to
ARCA, providing order entry and execution as fast as today's technology allows.
Also like BRUT, the ARCA book is not displayed on the Level II montage. However,
Nasdaq displays the best bid and the best ask from the ARCA book on the Level II
montage. If your order represents the best bid or the best ask on the ARCA book, you
will see it on the Level II montage.
The main advantage to using ARCA is its SmartBook order routing. ARCA utilizes a
sophisticated execution algorithm to effectively route your order to the marketplace. Any
marketable order that does not get matched on the ARCA book is sent into the
marketplace in search of best price execution. ARCA is often an excellent choice,
especially if the trader is inexperienced with direct access order selection. Give it a try.
IOC ARCA Order
ARCA offers one Immediate or Cancel (IOC) order option.
IOC/ANY- This order will execute ANY amount of your order, if shares are available,
and immediately cancel any unexecuted shares.
NASDAQ TEST SYMBOLS
NASDAQ provides a number of test symbols. You may use these symbols to practice
order entry, and to test your system. These are not real securities.
All NASDAQ orders may be entered on these test symbols. Real executions are possible.
However, Market Makers seldom bother to fill SelectNets on test symbols. Please use this
NASDAQ service responsibly.
The following is a list of NASDAQ test symbols:
Page 27 of 42
CHOICETRADER DIRECT PRO USER MANUAL
Version 1.37
TEST TESTB TESTE TESTX ATEST
NYSE and AMEX SECURITIES
ISLD 8:00 AM ET to 6:30 PM ET. Limit only.
ARCA 8:00 AM ET to 6:30 PM.
NOTE: Although regional quotes are shown, all orders are sent to NYSE and AMEX.
Odd lots (orders for a number of shares that is not a multiple of 100) must go as ANY
(not AON ).
ISLD / INET
- Limit order
Now the Island Book is available on all NYSE and AMEX Securities as well. Certain
popular securities (e.g. QQQ) have significant liquidity on Island, but as of this writing,
there is little liquidity on the Island Book on many Listed stocks. Use ISLD to trade the
Island Book in exactly the same way as described for NASDAQ securities.
ARCA
Limit or Market
ARCA is one of the best ways to execute orders on Listed securities. First, the order
checks the ARCA order book providing the possibility of an immediate match. If there is
no immediate match, the order goes to DOT. ARCA costs less than a regular DOT order
and increases your chances for an execution!
TICKET CHARGES
What is a Ticket? In most cases, a Ticket represents any and all executions that result from
one order being entered. Regardless of how many partial executions result from one order
being sent, only one ticket is generated.
One Ticket = one commission. If your order is partially executed, and is cancelled by
you, market conditions, or any reason, the partial execution(s) represent one ticket and
one commission. If additional orders are entered and executed in part or in whole,
additional tickets and commissions will be generated.
Most ECNs (not Island) charge a per share fee for routing through them. These fees are
added to the commission on that ticket. Please review your broker’s Fees and
Commission information for exact charges per ticket or execution.
PREPARING TO ENTER AN ORDER
As previously explained, there are four essential windows you must have open when
trading. They are the Trade Montage, Account, Positions and Orders windows.
Keep open the Position and Order windows. In this way you can always see your open
orders and open positions. Check your open orders and open positions frequently!
Page 28 of 42
CHOICETRADER DIRECT PRO USER MANUAL
Version 1.37
Limit Order
A limit price is specified on this type of order. If your order is executed, the price will not
be higher on a Buy, or lower on a Sell, than your specified price. Limit orders are the
safest way to enter an order, since they "limit" the possible price of the execution.
Market Order
A market order is entered without a specific price. It is an order to buy or sell at the
current market price whatever that may be. In a rapidly moving market, it is common to
get an execution significantly higher on a buy, or lower on a sell, than the price at the
time the order was entered.
Trailing Stop
Places a market order to sell once the trailing stop price has been reached. The trailing stop
will be activated at the increment that is set below the current market price. Trailing stops
will move up along with the current market price (Eg. You place a 1 point trailing stop
when the current market price is 100, this stop would be activated if the price falls to
99 or a percent value. If the stock price moves up to 103, your trailing stop will move up
with it and will now be activated if the price drops to 102). To place a trailing stop, choose
STOP and click the SELL or BUY button. Click the down arrow button in the StopType
box, and click on Trailing. Then place the increment that you would like the trailing stop
to be activated at in the TrailingPrice box (Eg. enter 1 for a one point trailing stop), then
click the OK button. The TrailingPrice box can take either
decimals, fractions and percentage (Eg. enter either 1 1/2 or 1.5 for a one and a half point
trailing stop).
Stop Range
This allows you to place a stop order and limit order at the same time. You would enter a
price below where the stock is currently trading at in the LowPrice field and enter a price
above the trading price in the HighPrice field. When it reaches one of the prices of the
range, the software will send a market order.
Order Template
Your software should have been installed with a default order for your Trade Montage
windows already set. Isld is the preset default order for all your Trade Montage windows.
To adjust your "Global" default order, go to Setup on the toolbar. Select Order Template
from the dropdown menu. Order Template Configure window opens. Separate
configurations for Nasdaq and NYSE/AMEX.
Page 29 of 42
CHOICETRADER DIRECT PRO USER MANUAL
Version 1.37
Figure 24
The following parameters can be set:
· Share number of shares. Select from the dropdown menu or enter a number.
· Route Any route may be set as the default.
· AON/ANY ANY is the preset default. AON (All or None) was formally used for
SelectNet (SNET) only. ISLD orders are automatically sent as ANY.
· Time In Force (TIF) The default is 3 minutes. ISLD orders can be set to any TIF.
· Account Your account number(s) are available on the dropdown menu. Select your
main account for your default order.
When done configuring your order template, click OK.
NOTE: Every time you type a symbol in the stock box on a Trade Montage window, and
hit enter, you reset that window to the global default.
Local Default Order
If you use more than one Trade Montage window, this allows you to set individual
defaults for each. This is useful if you regularly trade more than one account each Trade
Montage window can be set to default to a different account. Pull down the top of the
Level II montage to expose the Config button. This button allows you to set a default
order for individual Trade Montage windows. Set the default orders and click OK. To
override the individual default, check Use Global Default.
Page 30 of 42
CHOICETRADER DIRECT PRO USER MANUAL
Version 1.37
Trading Setting control
Figure 25
Go to Setup on the Toolbar. Select Trading Setting. This window allows you to set
controls and options for the Trade Montage window. Left click the little box to enable the
desired function.
Enable Send Order Confirm When you click Buy, Sell or Short, a pop up message will
appear, asking you if you want to send the order.
Price Check Set a percentage and/or dollar amount. Orders priced beyond those
parameters, compared to Level I (the inside market) will generate a pop up message
warning that the price is outside the market.
Add $.01 to Short Price on Down Arrow If an order is sent to Sell Short at the Bid, and
there is a down (Red) arrow, instead of rejecting the order, one cent will be added to the
price.
Clear Price After Execution After an order is executed, the Price Box goes blank.
Default To Position When Symbol Entered If you hold a position in a security, every
time you enter a symbol in the Trade Montage window, the number of shares you own
will automatically load in the Shares Box. Same as clicking the "P" button.
Reset Default Shares After Execution - The Shares Box on the Trade Montage window
will automatically reset to your default number of shares whenever your order is
completely filled. In other words, if, during execution of your order, the number of open
shares declines to zero, the Shares Box instantly resets.
Constant Shares The number of shares in the Shares Box remains constant. It does not
decline as the order is executed.
Default Buy Bid, Sell Ask... When you check this box the default for all Trade Montage
windows is reversed.
Page 31 of 42
CHOICETRADER DIRECT PRO USER MANUAL
Version 1.37
Reset Default Route After Execution Upon complete execution of an order, the default
route is reset.
ENTERING AN ORDER
Enter The Security Symbol on the Trade Montage window, type the security symbol in
the Stock Box and hit enter. On the title bar of the Trade Montage window you should
see the security symbol, and the inside market. (Level one, the inside market, and the best
Bid / best Ask all mean the same thing). It should look like this:
· CSCO 20.25 20.30. In this example, the bid on CSCOl is 20.25 and the ask is 20.30
NOTE: Make sure the symbol you entered appears on the title bar.
NOTE: Every time you type a symbol in the stock box on a Trade Montage window, and
hit enter, you reset that window to the global default.
Set The Account Number
If you have only one account, and you have set your default order, your account number
is automatically set on the Trade Montage window. If you have multiple accounts, select
the desired account from the dropdown menu on the Trade Montage window. Always
select the account after entering the security symbol.
NOTE : Every time you enter a stock on a Trade Montage window the default order is
reset
Set The Number Of Shares
Your default order setting automatically loads the Shares Box on the Trade Montage
window, but you can designate any number you choose. There are three ways to do this:
· Use the forward / back arrows to the right of the Shares Box on the Trading
window.
· Use the forward / back arrow keys on the keyboard.
· Type the number directly into the Shares Box.
Set The Route
Use your default route, or select a route from the Route Box dropdown menu. Also, try
the End key on the keyboard.
Set The Price
With a limit type as your default route, when you call up a stock, there is no price in the
Price Box. Clicking the BUY or SELL button sends a Limit order at the current inside
market (the quote on the Trade Montage window title bar).
BUY sends your order to buy at the current ASK price.
SELL sends an order to sell at the current BID price.
To make sure your order is entered at the exact price you desire, you can enter your limit
Page 32 of 42
CHOICETRADER DIRECT PRO USER MANUAL
Version 1.37
price in the Price Box. There are four ways to set a price.
· Left click on any Bid or Ask on the Level 2 montage.
· Use the arrows to the right of the Price Box on the Trade Montage window. The left
arrows change the price in $.10 increments while the right arrows change the price in
$.01 increments. Left click on the appropriate arrow, hold down the left mouse button or
use the mouse wheel. When the Price Box is blank, the price always starts at the ASK
price.
· Use the up / down arrow keys on the keyboard to change the price in $.001 increments
· Type the price directly in the Price Box.
NOTE: Every time you select a limit type order from the route box dropdown menu, the
default for all limit orders is set. The default for all limit orders is: no price in the price
box. Clicking buy sends a buy order at the current inside ask.
Clicking sell sends a sell order at the current inside bid.
NOTE: If you have a price set in the price box, and then select a limit order from the
route box, your price will be erased and replaced with the default.
You are now ready to enter an order.
Checklist Prior to Placing Order
You can use the following as a mini checklist prior to executing an order:
· The security symbol is displayed on the title bar of the Trade Montage window.
· The account number is set.
· The number of shares is set.
· The route is set.
· The limit price is set. (Or blank for the limit default).
· For market orders, the price box is empty.
· Your Account Manager is open and set to Position.
· Your Trade Manager is open and set to Order.
Click Buy or Sell
A message should appear on the Green message line on the Trade Montage window. For
example, "Accept Buy 100 DELL 25.25 ISLD - 10:30:01 ".
Check the Order window and you should see your open order there unless it was
immediately executed.
Check Position and your order is being executed, the position will appear here.
Check Trade window and if the order is being executed, the executions will appear here.
Check the number in the Shares Box. If your order is being executed, the number of
shares will decline to reflect any remaining open or unexecuted shares in the Share Box.
If the order was not completely executed, the number of unexecuted shares will be
displayed.
Check Trade Log for all the details of the order you entered. Or, click on the Green
Massage Line to see the Individual Trade Montage window log.
Page 33 of 42
CHOICETRADER DIRECT PRO USER MANUAL
Version 1.37
Partial Executions
Partial executions are part of trading NASDAQ securities. It occurs with listed securities
also, but is most common for NASDAQ. As your order is executed, the number of shares
on the Trade Montage window Shares Box will decline to reflect outstanding open shares
left on your order. Likewise, Order window will display current open shares in the open
column. Messages will continue to be displayed on the Blue message line.
REMEMBER: The Green message line only displays one message at a time.
Trade Log holds all messages very useful for reference. Also, the Trade window will
display all your executions as they occur. Additionally, your executions will be reflected
on the Position window. As you can see, there are many sources for confirmation of your
trade executions, orders, and messages.
Canceling Orders
It is possible to cancel any order that has not yet been executed. However, some orders
may be executed immediately after entry. If an order is partially executed it may be
possible to cancel the open remainder.
There are three ways to cancel an open order.
· Click the CXL button on the Trade Montage window on which you sent the order. The
CXL button will cancel the last order sent on that window.
· On Order window, left click on the "X" in the first column.
· To cancel any or all open orders: On the Order window, Right click on the row
containing the open order to be cancelled. The Cancel menu window opens. The cancel
options are:
CancelOne: Click to cancel only the order you selected.
CancelAll: Click to cancel all open orders.
Cancel Secsym: Click to cancel all open orders for the same symbol as the order,
which you selected.
Covering A Position
Once you have entered an order and it is executed in part or in whole, the number of
shares in the Shares Box on the Trade Montage window will decline to reflect any
remaining open or unexecuted shares. If the order was fully executed, 0 (the number
zero) will be displayed in the Shares Box. If the order was not completely executed, the
number of unexecuted shares will be displayed.
At this point, the balance of the order could be still open, or could be cancelled. Check
Order window to confirm the status of the order. The Qty (Quantity) column shows the
total number of shares on the order you entered. The Open column shows any shares still
open. If the order is not displayed on Order window, the unexecuted portion of the order
has been cancelled. (Confirm this on your Log).
In this case you would have to enter another order to attempt to complete the transaction.
Simply clicking the BUY or SELL button again will send the same order you originally
sent, but this time for the balance of the unexecuted shares. Make sure the order has been
cancelled before you do this. Of course it may be necessary to adjust the price on the order
Page 34 of 42
CHOICETRADER DIRECT PRO USER MANUAL
Version 1.37
to get an execution.
IMPORTANT : YOU CAN NOT ENTER TWO ORDERS TO SELL THE SAME
POSITION. If you see the message Check Open Orders on the Green Message Line when
you enter an order to sell a position, you already have a sell order in the system. That order
must be cancelled before another can be placed.
So now you are ready to cover your position. With the security in question called up on
the Trade Montage window, click the "P" button on the Trade Montage window.
(Located above the Sell button. This loads the Shares Box with the number of shares you
hold (long or short) in the security displayed on that Trade Montage window. Short
positions are designated with a minus sign following the number of shares.
NOTE : To cover a Short position, use the BUY button.
OPTION TRADING
Option chain is available in the software but only accounts approved by the broker is
allowed to trade options. Go to Quotes and select Option Chain. You enter the symbol in
the symbol box located in the top left corner of the window and hit enter. To trade a
contract select by clicking on the contract symbol in the SYMB column. In the trading
section of the window (similar to Montage Trading section) enter the number of contract,
the select ITSM (Market), ITSL (Limit) and ITSS (Stop) route, enter the price, select your
trading account and click on the execution side button.
Figure 26
Page 35 of 42
CHOICETRADER DIRECT PRO USER MANUAL
Version 1.37
Configuring the Option Window
Right mouse click anywhere on the Level 1 or 2, select Config. In the Option Configure
window you are allowed to change the color of the level 1 or 2 font. You can assign a
group by the Strike Price or Expire Date. You can also add more or remove Static in the
level 1 or 2 view or change the order of the Static. You can filter by Volume, Price or
Expire Day Filter. Show or Hide Level 2 or the Trading Window.
You can change the Style of the Option window by right clicking in the Trading or
execution section of the window and select Style. The screen shown above is the Option
style.
Figure 27
Page 36 of 42
CHOICETRADER DIRECT PRO USER MANUAL
Version 1.37
Commonly Used Future/Commodities Symbols
Exchange
Symbol
Root
Chicago Board of
Trade
/DI
Chicago Board of
Trade
Grouping
Example
Dow Industrial Future (H, M, U,
Z)
Indices
/DI5Z
/ZD
Dow Industrial Future Electronic
Contract (H, M, U, Z)
Indices
/ZD5Z
Chicago Board of
Trade
/YM
Dow Jones $5 Emini Contract
(months same as above)
Indices
/YM5H
Chicago Board of
Trade
/YJ
Dow Jones $2 Emini Contract
(months same as above)
Indices
/YJ5U
Chicago Board of
Trade
/C
Corn (H, K, N, U, Z)
Grain &
Oilseeds
/C 5K
Chicago Board of
Trade
/ZC
Corn Electronic Contract (months
same as above)
Grain &
Oilseeds
/ZC5H
Chicago Board of
Trade
/O
Oats (H, K, N, U, Z)
Grain &
Oilseeds
/O 5H
Chicago Board of
Trade
/ZO
Oats Electronic Contract (months
same as above)
Grain &
Oilseeds
/ZO5N
Chicago Board of
Trade
/W
Wheat (H, K, N, U, Z)
Grain &
Oilseeds
/W 5K
Chicago Board of
Trade
/ZW
Wheat Electronic Contract
(months same as above)
Grain &
Oilseeds
/ZW5N
Chicago Board of
Trade
/S
Soybean (H, K, N, U, Z)
Grain &
Oilseeds
/S 5K
Chicago Board of
Trade
/ZS
Soybean Electronic Contract
(months same as above)
Grain &
Oilseeds
/ZS5N
Chicago Board of
Trade
/RR
Rough Rice (F, H, K, N, U, X)
Grain &
Oilseeds
/RR5X
Chicago Board of
Trade
/ZR
Rough Rice Electronic Contract
(months same as above)
Grain &
Oilseeds
/ZR5N
Chicago Board of
Trade
/SM
Soybean Meal (F, H, K, N, Q, U,
V, Z)
Grain &
Oilseeds
/SM5Z
Chicago Board of
Trade
/ZM
Soybean Meal Electronic
Contract (months same as above)
Grain &
Oilseeds
/ZM5N
Chicago Board of
Trade
/BO
Soybean Oil (F, H, K, N, Q, U,
V, Z)
Grain &
Oilseeds
/BO5Z
Chicago Board of
/ZL
Soybean Oil Electronic Contract
Page 37 of 42
Grain &
/ZL5F
CHOICETRADER DIRECT PRO USER MANUAL
Version 1.37
Trade
(months same as above)
Oilseeds
/US
30 Year Treasury bond (H, M, U,
Z)
Financials
/US5Z
Chicago Board of
Trade
/ZB
30 Year Treasury Bond
Overnight Contract (months same
as above)
Financials
/ZB5H
Chicago Board of
Trade
/TY
10 Year Treasury Note (H, M, U,
Z)
Financials
/TY5Z
Chicago Board of
Trade
/ZN
10 Year Treasury Note Overnight
(months same as above)
Financials
/ZN5H
Chicago Board of
Trade
/FV
5 Year Treasury Note (H, M, U,
Z)
Financials
/FV5Z
Chicago Board of
Trade
/ZF
5 Year Treasury Note Overnight
Contract (months same as above)
Financials
/ZF5H
Chicago Board of
Trade
/TU
2 Year Treasury Note (H, M, U,
Z)
Financials
/TU5Z
Chicago Board of
Trade
/ZT
2 Year Treasury Note Overnight
Contract (months same as above)
Financials
/ZT5U
Commodities
Exchange (Comex)
/HG
High Grade Copper (monthly)
Metals
/HG5Z
Commodities
Exchange (Comex)
/GC
Gold (G, J, Q, V)
Metals
/GC5Z
Commodities
Exchange (Comex)
/SI
Silver (monthly)
Metals
/SI5H
Commodities
Exchange (Comex)
/AL
Aluminum (monthly)
Metals
/AL5H
New York
Mercantile Exchange
/PA
Palladium (H, M, U, Z)
Metals
/PA5H
New York
Mercantile Exchange
/PL
Platinum (F, J, N, V)
Metals
/PL5F
New York
Mercantile Exchange
/CL
Crude Oil (monthly)
Energies
/CL5Z
New York
Mercantile Exchange
/HU
Gasoline (monthly)
Energies
/HU5H
New York
Mercantile Exchange
/NG
Natural Gas (monthly)
Energies
/NG5Z
New York
Mercantile Exchange
/PN
Propane (monthly)
Energies
/PN5H
Chicago Board of
Trade
Page 38 of 42
CHOICETRADER DIRECT PRO USER MANUAL
Version 1.37
New York
Mercantile Exchange
/HO
Heating Oil (monthly)
Energies
/HO5Z
New York
Mercantile Exchange
/CO
Electricity COB (monthly)
Energies
/CO5F
New York
Mercantile Exchange
/VK
Electricity Palo (monthly)
Energies
/VK5Z
New York
Mercantile Exchange
/TN
CINergy Electricity (monthly)
Energies
/TN5H
New York
Mercantile Exchange
/NT
Entergy Electricity (monthly)
Energies
/NT5Z
New York
Mercantile Exchange
/QJ
PJM Electricity (monthly)
Energies
/QJ5H
Chicago Mercantile
Exchange
/FC
Feeder Cattle (F, G, H, J, K, Q,
U, V, X)
Meats
/FC5F
Chicago Mercantile
Exchange
/LC
Live Cattle (G, J, M, Q, V, Z)
Meats
/LC5G
Chicago Mercantile
Exchange
/LH
Lean Hogs (G, J, M, N, Q, V, Z)
Meats
/LH5Q
Chicago Mercantile
Exchange
/PB
Pork Bellies (G, H, K, N, Q)
Meats
/PB5H
Chicago Mercantile
Exchange
/LB
Lumber (F, H, K, N, U, X)
Softs
/LB5H
Chicago Mercantile
Exchange
/MQ
Mexican Peso (H, M, U, Z)
Currency
/MQ5Z
Chicago Mercantile
Exchange
/VM
Mexican Peso Globex Session
Currency
/VM5ZG
Chicago Mercantile
Exchange
/AD
Australian $ (H, M, U, Z)
Currency
/AD5Z
Chicago Mercantile
Exchange
/VA
Australian $ Globex Session
Currency
/VA5ZG
Chicago Mercantile
Exchange
/BP
British Pound (H, M, U, Z)
Currency
/BP5H
Chicago Mercantile
Exchange
/VB
British Pound Globex Session
Currency
/VB5HG
Chicago Mercantile
Exchange
/CD
Canadian $ (H, M, U, Z)
Currency
/CD5M
Chicago Mercantile
Exchange
/VC
Canadian $ Globex Session
Currency
/VC5MG
Page 39 of 42
CHOICETRADER DIRECT PRO USER MANUAL
Version 1.37
Chicago Mercantile
Exchange
/JY
Japananese Yen (H, M, U, Z)
Currency
/JY5Z
Chicago Mercantile
Exchange
/VJ
Japananese Yen Globex Session
Currency
/VJ5ZG
Chicago Mercantile
Exchange
/JA
Emini Japanese Yen
Currency
/JA5HG
Chicago Mercantile
Exchange
/EC
Euro FX (H, M, U, Z)
Currency
/EC5H
Chicago Mercantile
Exchange
/VE
Euro FX Globex Session
Currency
/VE5HG
Chicago Mercantile
Exchange
/EA
Emini Euro
Currency
/EA5HG
Chicago Mercantile
Exchange
/ED
Euro $ (H, M, U, Z)
Currency
/ED5H
Chicago Mercantile
Exchange
/GE
Euro $ Globex Session
Currency
/GE5HG
Chicago Mercantile
Exchange
/SP
S&P 500 (H, M, U, Z)
Indices
/SP5H
Chicago Mercantile
Exchange
/ES
Emini S&P 500
Indices
/ES5HG
Chicago Mercantile
Exchange
/ND
NASDAQ 100 (H, M, U, Z)
Indices
/ND5M
Chicago Mercantile
Exchange
/NQ
NASDAQ Emini
Indices
/NQ5HG
Chicago Mercantile
Exchange
/RL
Russell 2000 (H, M, U, Z)
Indices
/RL5H
Chicago Mercantile
Exchange
/FE
Fortune E-50
Indices
/FE5H
New York Board of
Trade
/CC
Cocoa (H, K, N, U, X, Z)
Softs
/CC5H
New York Board of
Trade
/KC
Coffee (H, K, N, U, X, Z)
Softs
/KC5K
New York Board of
Trade
/SB
Sugar (H, K, N, V)
Softs
/SB5H
New York Board of
Trade
/CT
Cotton (Monthly)
Softs
/CT5H
New York Board of
Trade
/OJ
Orange Juice (F, H, K, N, U, X)
Softs
/OJ5F
Page 40 of 42
CHOICETRADER DIRECT PRO USER MANUAL
Version 1.37
Futures Symbols Guide
The Dow Jones Industrial Average (and mini-sized Dow) trade on the Chicago Board Of Trade.
Futures symbols require CME feed at $65/month (includes e -mini feed).
Bond Futures require CBOT feed at $30/month.
ChoiceTrader Direct
Pro Symbol
E-mini Future
Quote Session
Exchange
#SPZ5
S&P 500
Market Se ssion
CME
#SPT5
S&P 500
Evening Session
CME
#NDZ5
NASDAQ 100
Market Session
CME
#NDT5
NASDAQ 100
Evening Session
CME
#ZDZ5
Dow Jones Industrial Average
European
Exchange Session
CME
#DJZ5
Dow Jones Industrial Average
Market Session
CBOT
To find a futures symbol take 1) commodity root 2) letter for month 3) last digit for year:
e.g. Nasdaq 100 March 2005 - #NDH5
e.g. S&P 500 March 2005 - #SPH5
1)
Commodity Roots
Name
#SP
S&P 500
#ND
Nasdaq 100
#DJ
Dow Jones
#NQ
E-Mini Nasdaq 100
#ES
E-Mini S&P 500
2)
Futures
(During market hours)
Globex Futures
(Before and after market hours)
Month
Letter
Month
Letter
March
H
March
C
June
M
June
I
Sept.
U
Sept.
P
Dec.
Z
Dec.
T
3)
Year
Number
2005
5
2006
6
2007
7
Note: Each contract expires on the Wednesday before the third Thursday of the indicated month.
Page 41 of 42
CHOICETRADER DIRECT PRO USER MANUAL
Version 1.37
ChoiceTrader Direct Pro PRO Integration with eSignal
1. In the ChoiceTrader Direct Pro Pro software, go to Setup and select Other
Configure.
• Check the box next to Integrate eSignal.
• Type in the Account field, your eSignal username.
• Click OK and close the application.
2. Restart the ChoiceTrader Direct Pro Pro software and login. You should notice that
eSignal will automatically start up when you login to ChoiceTrader Direct Pro Pro.
3. You will then need to re-link an application window in ChoiceTrader Direct Pro
such as the Level 2 Trade Montage window to the Time and Sales window.
• Left mouse click on the link button in ChoiceTrader Direct Pro Level 2
Montage window (looks like an anchor), drag and drop anywhere on the
Time and Sales Window.
In eSignal select link to all to complete integration.
Page 42 of 42