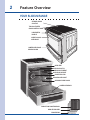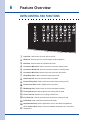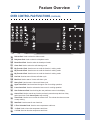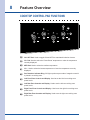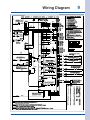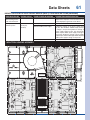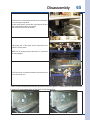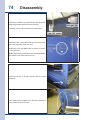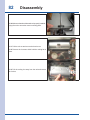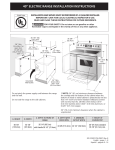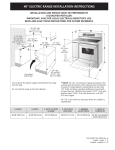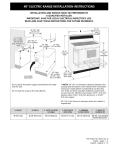
1
Service Manual
Induction Slide-in Range
318 202 124 (1004)
I Table of Contents
Safe Servicing practices........................................... 1
feature OVERVIEW.......................................................2-8
Wiring diagram...........................................................9-10
installation instructions................................... 11-21
clearance and dimensions................................................................................... 11-12
TO AVOID BREAKAGE: do not HANDLE OR MANIPULATE
THE UNIT BY THE COOKTOP.............................................................................................13
important notes to the installer..........................................................................14
important note to the consumer...........................................................................14
important safety instructions...............................................................................15
1. factory connected power supply cord (canada only)............................15
2. power supply cord kit (U.S.A.) .............................................................................15
3. ACCESS TO TERMINAL BLOCK & GROUNDING STRAP (usa)...................................15
4. electrical connection to range (U.S.A.).....................................................16-17
5. cabinet construction.............................................................................................18
6. range installation....................................................................................................19
7. leveling the range...................................................................................................20
8. check operation........................................................................................................20
9. anti-tip bracket installation INSTRUCTIONS....................................................21
NOTES..................................................................................................................................22
electronic oven control...................................23-46
setting the clock at power up................................................................................23
control panel display modes...................................................................................23
temperature visual display......................................................................................23
oven light.........................................................................................................................24
control lock..................................................................................................................24
setting the kitchen timer..........................................................................................24
baking.................................................................................................................................25
cook time..........................................................................................................................26
end time.............................................................................................................................26
broiling.............................................................................................................................27
convection baking........................................................................................................28
convection convert....................................................................................................29
rapid preheat..................................................................................................................29
convection roasting...................................................................................................30
convection broiling....................................................................................................31
keep warm.........................................................................................................................32
slow cook........................................................................................................................33
dehydrating.....................................................................................................................34
Table of Contents
defrosting.......................................................................................................................34
bread proofing..............................................................................................................35
perfect turkey..............................................................................................................36
temperature probe......................................................................................................37
multi stage..................................................................................................................38-39
user preferences....................................................................................................40-42
my favorites....................................................................................................................43
sabbath feature.......................................................................................................44-45
starting self-clean cycle........................................................................................46
induction cooktop controls............................47-52
about the ceramic glass cooktop.........................................................................47
use the correct cookware type............................................................................47
minimum pan size requirements...............................................................................47
cookware recommendations...................................................................................48
use quality cookware in good condition...........................................................49
setting the cooktop...............................................................................................50-51
setting power boost feature.................................................................................52
power sharing................................................................................................................52
operational noises.......................................................................................................52
service data .................................................................. 53
electronic oven control..........................................................................................53
electronic oven control relay board...............................................................53
electronic control display board.......................................................................54
power supply board for electronic control display board...................54
convection fan and oven lights control board.............................................54
electronic oven control (fault codes) descriptions..................................55
rtd SCALE..........................................................................................................................56
ELECTRICAL RATING for electric ovens.................................................................56
ELECTRIC SLIDE-IN OVEN CIRCUIT ANALYSIS MATRIX.................................................56
lower oven analysis matrix......................................................................................56
meat probe resistance................................................................................................56
oven light.........................................................................................................................57
electronic surface control (ESEC) user interface board (UIB)..............58
power supply board for ESEc uib..........................................................................58
induction cooktop electronic error (fault) code descriptions.......59-60
additional induction cooktop error (fault) conditions........................60-61
induction housing assembly.....................................................................................61
block diagram.................................................................................................................62
II
III Table of Contents
disassembly.................................................................... 63
1. how to ACCESS THE CONTROL PANEL AREA...........................................................63
2. Control panel’s components identification and replacement.............66
3. automated door light switch (plunger) & door lock assembly...........67
4. induction cooktop....................................................................................................68
5. cooling fan and safety thermostat.................................................................72
6. halogen light socket, hinge receptacle and oven rack sensor.........73
7. oven racks, ladder racks and halogen light cover and lens..............75
8. meat probe...................................................................................................................77
9. oven temperature sensor....................................................................................78
10. broil element............................................................................................................79
11. convection element. motor and cooling fan..............................................79
12. unit back view and components........................................................................83
13. hidden bake and mini oven element..................................................................83
14. mini oven light and glides....................................................................................87
15. mini oven drawer assembly.................................................................................88
16. main oven door assembly.....................................................................................90
exploded view drawings - to come
SAFE SERVICING PRACTICES
1
To avoid personal injury and/or property damage, it is important that Safe Servicing Practices be
observed. The following are some limited examples of safe practices:
1. DO NOT attempt a product repair if you doubt your ability to complete it in a safe and
satisfactory manner.
2. Before servicing or moving an appliance:
• Remove power cord from electrical outlet, trip circuit breaker to the OFF position, or remove
fuse.
• Turn off gas supply
• Turn off water supply
3. Never interfere with the proper operation of any safety device.
4. Use The Correct Replacement Parts Cataloged For This Appliance. Substitutions May
Defeat Compliance With Safety Standards Set For Home Appliances.
5. GROUNDING: The standard color code for safety ground wires is GREEN, or GREEN
with YELLOW STRIPES. DO NOT use ground leads as current carrying conductors. It is
EXTREMELY important that the service technician reestablish all safety grounds prior to
completion of service. Failure to do so will create a hazard.
6. Prior to returning the product to service, ensure that:
• All electrical connections are correct and secure.
• All electrical leads are properly dressed and secured away from sharp edges, hightemperature components, and moving parts
• All non-insulated electrical terminals, connectors, heaters, etc. are adequately spaced away
from all metal parts and panels
• All safety grounds (both internal and external) are correctly and securely connected
• All panels are properly and securely reassembled
©2010 Electrolux Home Products, Inc.
!
Warning
This service manual is intended for use by persons having electrical and mechanical training and a level of
knowledge of these subjects generally considered acceptable in the appliance repair trade. Electrolux Home
Products cannot be responsible, nor assume any liability, for injury or damage of any kind arising from the use
of this manual.
2
Feature Overview
Your Slide-in Range
ceramic glass
cooktop
touch activated
glass control panel
large metal
handle
curved glass
oven door
lower oven door
window glass
Oven vent
Oven Door Latch
Broiling Element
Oven Rack Support
Convection Fan
HALOGEN Oven Light
slideable Oven racks
lower oven rack
Convection Roasting rack
BROILER PAN Grid
BROILER PAN
Feature Overview
INDUCTION COOKTOP FEATURES
READ THESE INSTRUCTIONS CAREFULLY BEFORE USING THE COOKTOP
A COOLER COOKTOP - A unique feature of the Induction Cooktop is whether turned ON
or OFF, the cooktop surface remains cooler than standard ceramic cooktops.
!
Caution
The Cooking Zones may appear to be cool while turned ON and after they have been turned OFF. The glass
surface may be HOT from residual heat transferred from the cookware and burns may occur.
MAGNETIC DETECTOR - The coil sensor automatically detects whether the pan is
magnetic and eliminates accidental “turn-ONs.”
PAN SIZE DETECTION - The pan recognition sensor automatically detects and adapts the
Cooking Zones to the pan sizes in use.
EFFICIENT - Induction cooking heats faster while using less energy. Induction power levels
are quick to boil and delicate when simmering.
6” Induction
ELEMENT
7” Induction
ELEMENT
10” Induction
ELEMENT
8” Induction
ELEMENT
UPPER
OV E N
L OW E R
OV E N
3
4
Feature Overview
Oven rack supports & Oven Vents
Installing Oven Rack Supports
Always install oven rack support
before turning on the oven (when
the oven is cool).
To install oven rack support, insert the
supports by pushing them downward into
the two brackets on each side of the oven
interior, as shown below.
To remove the oven rack support for a selfclean cycle, pull up the support to disengage
them from the brackets. If the rack supports
are not removed, the self-clean cycle won’t
start.
Oven Vents Location
Oven Rack Positions
This oven is equipped with ladder rack supports with
7 positions to accommodate precisely every mode of
cooking.
Rack positions
7
5
3
1
6
4
2
(Non-SLIDING
rack only)
The oven is vented above each door. When
the oven is on, warm air is released through
the vents. This venting is necessary for proper
air circulation in the oven and good baking
results.
Oven Vent
Warm Air
Feature Overview
5
Removing and replacing oven racks
Removing Sliding Oven Racks
1. With the rack in its closed position; grasp the rack and the sliders at once.
2. Slightly lift the rack and sliders and pull it to clear the first bracket.
3. Pull the rack and sliders until the second bracket stops the rack.
4. Lift the rack and sliders and carefully remove them from the oven.
Refer to the care and cleaning section for directions on how to clean the racks.
Replacing Sliding Oven Racks
1st Bracket
2nd Bracket
Oven Rack
Oven Rack Slider
Oven Rack Support
TOWARD back OF OVEN
TOWARD FRONT OF OVEN
To replace the oven racks, follow the instructions above in reverse order.
Removing Non-Sliding Oven Rack
Simply pull the rack and slightly tilt it upward when the rack hits its stop position.
Replacing Non-Sliding Oven Rack
Insert the rack into the oven rack supports by inserting the rack openings into the rack
supports. Be sure the rack is at the same position on each oven rack support on both sides.
Insert the openings
into the rack support
Always arrange the oven racks when the oven is cool (prior to operating the oven). Always use
oven mitts when using the oven.
6
Feature Overview
Oven Control pad functions
1
2
3
4
5
6
7
8
10
11
12
13
14
15
16
17
1
2
3
4
Light Pad- Used to turn the oven light on and off.
5
6
7
8
9
Convection Roast Pad- Used to select the convection roasting mode.
9
Bake Pad- Used to enter the normal baking mode temperature.
Broil Pad- Used to select the variable broil mode.
Convection Bake Pad- Used to select the convection baking mode.
Convection Broil Pad- Used to select the convection broil mode.
Keep Warm Pad- Used to select the keep warm mode.
Slow Cook Pad- Used to select the slow cook mode.
Perfect Turkey Pad- Used to select the perfect turkey cooking mode.
10
Control Lock Pad- Used to disable all oven function.
11
12
13
14
Multi Stage Pad- Used to enter up to three subsequent modes.
15
16
Probe Pad- Used to activate the meat probe mode.
17
Conv. Convert Pad- Used to convert a standard temperature to a convection
temperature.
Cook Options Pad- Used to light up the cooking options pads.
Cook Time Pad- Used to set a cooking duration time.
End Time Pad- Used to select the time at which the cooking will end.
Rapid Preheat Pad- Used to preheat the oven to the desired temperature.
7
Feature Overview
Oven Control pad functions (Continued)
18
19
20
22
23
24
21
25
26
27
28
32
29
30
31
33
18
19
20
21
22
23
24
25
26
27
28
29
30
Defrost Pad- Used to select the defrost mode.
31
Cancel Pad- Used to cancel any function previously entered except the time of day
and minute timer. Push Cancel pad to stop cooking.
32
Timer Pads- Used to set or cancel the minute timer. The minute timer does not start
or stop cooking.
33
34
35
36
Start Pad- Used to start all oven functions.
Dehydrate Pad- Used to select the dehydrate mode.
Bread Proof Pad- Used to select the bread proof mode.
Clean Pad- Used to select the self-cleaning mode.
My Favorite 1 Pad- Used to save or recall the favorite 1 cooking mode.
My Favorite 2 Pad- Used to save or recall the favorite 2 cooking mode.
My Favorite 3 Pad- Used to save or recall the favorite 3 cooking mode.
Lite Pad- Used to start a 2 hours self-clean cycle.
Med Pad- Used to start a 3 hours self-clean cycle.
Heavy Pad- Used to start a 4 hours self-clean cycle.
Upper Oven Pad- Used to activate the upper oven for cooking operation.
Lower Oven Pad- Used to activate the lower oven for cooking operation.
User Preference Pad- Used to bring the user preference menu in the display.
0 Thru 9 Number Pads- Used to enter temperature and times.
- lo Pad- Used to lower the temperature and times.
+ hi Pad- Used to raise the temperature and times.
34
32
35
36
8
Feature Overview
Cooktop Control pad functions
38
39
40
42
44
43
46
45
41
38
ON / OFF Pad- Used to toggle ON and OFF the associated induction element.
39
HI + Pad- Used to select the “Power Boost” temperature or raise the temperature
currently displayed.
40
MED Pad- Used to select the medium temperature.
41
LO - - Used to select the lowest temperature or lower the temperature currently
displayed.
42
Pan Detection Indicator Ring- Will light up when a pan made of magnetic material
is placed in a cooking zone.
43
Left Front Zone Controls and Display- Used to set the left front cooking zone
power levels.
44
Left Rear Zone Controls and Display- Used to set the left rear cooking zone
power levels.
45
Right Front Zone Controls and Display- Used to set the right front cooking zone
power levels.
46
Right Rear Zone Controls and Display- Used to set the right rear cooking zone
power levels.
Wiring Diagram
9
10
Wiring Diagram
11
Installation Instructions
United States
INSTALLATION AND SERVICE MUST BE PERFORMED BY A QUALIFIED INSTALLER.
IMPORTANT: SAVE FOR LOCAL ELECTRICAL INSPECTOR'S USE.
READ AND SAVE THESE INSTRUCTIONS FOR FUTURE REFERENCE.
Canada
FOR YOUR SAFETY: Do not store or use gasoline or other
flammable vapors and liquids in the vicinity of this or any other appliance.
For existing 29" (73,7 cm) cutout wide opening, you must call the Service Center for
optional thinner side trims. Also you must prepare the countertop edge as shown in
the "Countertop Preparation" section (see page 8).
30" Min.
(76,2 cm) Min.
13"
(33 cm)
30" Min. (see Note 3)
(76,2 cm) Min. (See Note 3)
These surfaces should be flat &
leveled (hatched area).
½”min.
Shave Raised
Edge To Clear
Space for
31 1/2"
(80 cm)
Wide
Cooktop Rim.
18" Min.
(45,7 cm) Min.
3/8”min.
1 ½" Max.
(3,8 cm Max.)
E
½”min.
Approx. 1 7/8"
(4,8 cm)
G
F
24" Min.
(61 cm) Min.
Locate Cabinet Doors 1" (2,5 cm)
Min. From Cutout Opening
Grounded Junction Box or Wall Outlet Should Be
Located 8" to 17" (20,3 - 43,2 cm) From Right
Cabinet and 2" to 4" (5,1-10,2 cm) From Floor
Do not install the unit in the cabinet before reading next two pages.
A. HEIGHT
(Under Cooktop)
B. WIDTH
C. COOKTOP
WIDTH
D. TOTAL DEPTH TO
FRONT OF RANGE
E. CUTOUT WIDTH***
(Countertop
and cabinet)
F. CUTOUT
DEPTH
G. HEIGHT
OF COUNTERTOP
35 3/4" (90,8 cm)
30" (76,2 cm)
31 1/2"
(80 cm)
28 5/16" (71,9 cm)
30±1/16"
(76,2±0,15 cm)
21 3/4" (55,2 cm) Min.
22 1/8" (56,2 cm) Max
24" (61 cm) Min. with
backguard
35 3/4" (90,8 cm) Min.
36 5/8" (93 cm)
36 5/8" (93 cm) Max.
12
Installation Instructions
NOTE:
1.Do not pinch the power supply cord or the
flexible gas conduit between the range and
the wall.
2.Do not seal the range to the side cabinets.
3.24" (61 cm) minimum clearance between
the cooktop and the bottom of the cabinet
when the bottom of wood or metal cabinet Door Open
is protected by not less than ¼" (0,64 cm)
flame retardant millboard covered with
not less than No. 28 MSG sheet metal,
0,015"(0,4 mm) stainless steel, 0,024"(0,6
mm) aluminum, or 0,020" (0,5 mm) copper.
30" (76,2 cm) minimum clearance when
the cabinet is unprotected.
4.For cutouts below 22 7/8"(58,1 cm),
B
appliance will slightly show out of the
cabinet.
5.Allow at least 19 ¼" (48,9 cm) clearance
for door depth when it is open.
C
A
D
Side Panel
*** IMPORTANT: To avoid cooktop breakage for cutout width (E dimension) of more
than 30 1/16" (76,4 cm), make sure the appliance is centered in the counter opening while
pushing into it. Raise leveling legs and the rear adjustable wheels at a higher position than
the cabinet height (see page 3), insert the appliance in the counter and then level. Make
sure the unit is supported by the leveling legs at the front and the wheels at
the back and NOT by the cooktop itself.
22 7/8"(58,1 cm) min.
23 1/4"(59,05 cm) max.
(see Note 4)
IMPORTANT: Cabinet and countertop
width should match the cutout width.
E
1 1/8"
(2,86 cm)
FRONT OF
CABINET
E
FRef.
A. HEIGHT
(Under Cooktop)
B. WIDTH
C. COOKTOP
WIDTH
D. TOTAL DEPTH TO
FRONT OF RANGE
E. CUTOUT WIDTH***
(Countertop
and cabinet)
F. CUTOUT
DEPTH
G. HEIGHT
OF COUNTERTOP
35 3/4" (90,8 cm)
30" (76,2 cm)
31 1/2"
(80 cm)
28 5/16" (71,9 cm)
30±1/16"
(76,2±0,15 cm)
21 3/4" (55,2 cm) Min.
22 1/8" (56,2 cm) Max
24" (61 cm) Min. with
backguard
35 3/4" (90,8 cm) Min.
36 5/8" (93 cm)
36 5/8" (93 cm) Max.
Installation Instructions
13
To avoid breakage: DO NOT handle or
manipulate the unit by the cooktop.
1
2
3
4
The counter-top around the cut-out should be flat and
leveled (see hatched area on illustration 1).
Before installing the unit, measure the heights of the two (2)
cabinet sides (H1-4), front and back (see illustration 1) from the
floor to the top of the counter.
1 ½" Max.
Shave
Level the range using
(3.8
cm Max.)
the two (2) front leveling Raised
Edge
legs and the two (2)
H1
adjustable leveling wheel, to Clear
Space for a
so that the height from
31½" (81 cm)
the floor to the underside Wide Cooktop.
of the metal flange is
greater than the tallest cabinet measurement by
at least 1/16" (see illustration 2).
Illustration 1
Remove and discard the two rear leveling legs,
they are only in place to solidify the unit for the transport.
H2
Slide the unit into the cabinet. Make sure the center of the unit is
aligned with the center of the cabinet cut-out.
Remove the protective channels on each side of the cooktop
(if provided).
5
6
H4
H3
The metal flange under each side of the cooktop MUST be placed
7
over the cabinet countertop for proper unit support. The cooktop
should NOT rest directly on the countertop (see illustration 2) or
else it could cause damage to the cooktop voiding the warranty.
Level the unit if needed.
Metal
Flange
To successfully install
the range, the initial
level height from
floor to underside
of cooktop frame
should be at least
1/16" taller than
cabinet sides as
measured in step 2.
After the installation, MAKE SURE that the
is supported by the two front leveling
8 unit
legs and the two adjustable leveling wheels
and NOT by the cooktop.
Illustration 2
14
Installation Instructions
Important Notes to the Installer
1. Read all instructions contained in these installation
instructions before installing range.
2. Remove all packing material from the oven
compartments before connecting the electrical supply
to the range.
3. Observe all governing codes and ordinances.
4. Be sure to leave these instructions with the consumer.
Important Note to the Consumer
Keep these instructions with your Owner's Guide for the
local electrical inspector's use and future reference.
IMPORTANT SAFETY
INSTRUCTIONS
Cold temperatures can damage the
electronic control. When using the appliance for the first
time, or when the appliance has not been used for an
extended period of time, be certain the unit has been
in temperatures above 32°F (0°C) for at least 3 hours
before turning on the power to the appliance.
• Be sure your range is installed and grounded
properly by a qualified installer or service
technician.
• This range must be electrically grounded in
accordance with local codes or, in their absence,
with the National Electrical Code ANSI/NFPA No.
70—latest edition in United States or with CSA
Standard C22.1, Canadian Electrical Code, Part 1 in
Canada.
• The installation of appliances designed for
manufactured (mobile) home installation must conform
with Manufactured Home Construction and Safety
Standard, title 24CFR, part 3280 [Formerly the Federal
Standard for Mobile Home Construction and Safety,
title 24, HUD (part 280)] or when such standard
is not applicable, the Standard for Manufactured
Home Installation 1982 (Manufactured Home Sites,
Communities and Setups), ANSI Z225.1/NFPA 501Alatest edition, or with local codes in United States and
with CAN/CSA-Z240 MH in Canada.
• All ranges
can tip.
• Injury to persons could
result.
• Install antitip device
packed with
range.
To reduce the risk of tipping
of the range, the range
must be secured by properly
installed anti-tip bracket(s)
provided with the range.
To check if the bracket(s), is
installed properly, grasp the
top rear edge of the range
and carefully tilt it forward
to make sure the range is
anchored.
• Make sure the wall coverings around the range
can withstand the heat generated by the range.
• Before installing the range in an area covered
with linoleum or any other synthetic floor
covering, make sure the floor covering can
withstand heat at least 90°F (32.2°C) above room
temperature without shrinking, warping or
discoloring. Do not install the range over carpeting
unless you place an insulating pad or sheet of ¼"
(0.64 cm) thick plywood between the range and
carpeting.
Never leave children alone or
unattended in the area where an appliance is in
use. As children grow, teach them the proper, safe use
of all appliances. Never leave the oven door open when
the range is unattended.
Stepping, leaning or sitting on the
door or drawer of this range can result in serious
injuries and can also cause damage to the range.
• Do not store items of interest to children in
the cabinets above the range. Children could be
seriously burned climbing on the range to reach items.
• To eliminate the risk of burns or fire by reaching
over heated surface units, cabinet storage
space above the surface unit should be avoided.
If cabinet storage is to be provided the risk can
be reduce by installing a range hood that project
horizontally a minimum of 5 inches beyond the bottom
of the cabinet.
• Do not use the oven as a storage space. This
creates a potentially hazardous situation.
• Never use your range for warming or heating the
room. Prolonged use of the range without adequate
ventilation can be dangerous.
• Do not store or use gasoline or other flammable
vapors and liquids near this or any other
appliance. Explosions or fires could result.
• Reset all controls to the "off" position after using
a programmable timing operation.
FOR MODELS WITH SELF-CLEAN FEATURE:
• Remove oven racks, broiler pan, food and other
utensils before self-cleaning the oven. Wipe up
excess spillage. Follow the precleaning instructions in
the Owner's Guide.
Serial Plate Location
You will find the model and
serial number printed on the
serial plate. The serial plate is
located as shown.
Remember to record the
serial number for future
reference.
Installation Instructions
15
1. Factory Connected Power Supply
Cord (Canada only)
This range is equipped with a factory-connected
power cord (see Figure 1). Cord must be connected
to a grounded 120/240 volt or 120/208 volt range
outlet with a 50A recommended circuit. If no outlet is
available, have one installed by a qualified electrician.
Canada Style
Figure 1
2. Power Supply Cord Kit (U.S.A.)
The user is responsible for connecting the power supply
cord to the connection block located behind the back
panel access cover.
Electrical Shock Hazard
• Electrical ground is required on this appliance.
• Do not connect to the electrical supply until
appliance is permanently grounded.
• Disconnect power to the circuit breaker or fuse
box before making the electrical connection.
• This appliance must be connected to a
grounded, metallic, permanent wiring system,
or a grounding connector should be connected
to the grounding terminal or wire lead on the
appliance.
Failure to do any of the above could result in a
fire, personal injury or electrical shock.
3. Access to Terminal Block &
Grounding Strap (U.S.A.)
This appliance may be connected by means of permanent
"hard wiring"; flexible armored or nonmetallic shielded
copper cable (when local code allow it) or by means of a
power supply cord kit (only use 50A cord kits for use
with 13/8 inch connections). See chart (on next page)
for the minimum wire size (general UL listing, local code
may differ).
NOTE: Electric Slide-in Range is shipped from factory
with 1 1/8" (2.9 cm) dia. hole as shown on figure 4. If a
larger hole is required, punch out the knockout.
Risk of fire or electrical shock exists
if an incorrect size range cord kit is used, the
Installation Instructions are not followed, or the
strain relief bracket is discarded.
For mobile homes, new installations or recreational
vehicles, use only a power supply kit designed for a
range at 125V/250V 50A. Cord must have either 3
(when local code permits grounding through neutral) or
4 conductors. Terminal on end of wires must be either
closed loop or open spade lug with upturned ends. Cord
must have strain-relief clamp.
Do not loosen the nuts which secure
the factory-installed range wiring to terminal block
while connecting range. Electrical failure or loss of
electrical connection may occur.
BEND REAR WIRE COVER HERE
FOR ACCESS TO TERMINAL BLOCK
Figure 2
This appliance is manufactured with
the frame grounded by connection of a grounding
strap between the neutral power supply terminal
and the frame. If used in USA, in a new branch
circuit installation (1996 NEC), mobile home or
recreational vehicule, where local code do not
permit grounding through neutral (white) wire
or in Canada; remove the grounding strap from
the frame and cut the other end, near the neutral
terminal. Connect the appliance in usual manner.
16
Installation Instructions
4. Electrical Connection to the Range
(U.S.A.)
Three Conductor Wire Connection to Range
If local codes permit connection of the frame grounding
conductor to the neutral wire of the copper power
supply cord (see Figure 3):
1. Remove the 3 screws at the lower end of the rear
wire cover, then bend the lower end of the rear
wire cover (access cover) upward to expose range
terminal connection block (see Figure 2).
2. Using the nuts supplied in the literature package,
connect the neutral of the copper power supply cord
to the center silver-colored terminal of the terminal
block, and connect the other wires to the outer
terminals. Match wires and terminals by color (red
wires connected to the right terminal, black wires
connected to the left terminal) (see figure 3).
3. Lower the terminal cover and replace the 3 screws.
Silver Colored Terminal
Red Wire
Four Conductor Wire Connection to Range
Where local codes does NOT permit connection of the
frame grounding conductor to the neutral wire of the
copper power supply cord (see Figure 4):
1. Remove the 3 screws at the lower end of the rear
wire cover, then raise the lower end of the rear
wire cover (access cover) upward to expose range
terminal connection block (see figure 2).
2. Remove the grounding strap from the terminal block
and from the appliance frame.
3. Using the nuts supplied with the literature package,
connect the ground wire (green) of the copper
power supply cord to the frame of the appliance
with the ground screw, using the hole in the frame
where the ground strap was removed (see Figure 4).
4. Connect the neutral of the copper power supply
cord to the center silver-colored terminal of the
terminal block, and connect the other wires to the
outer terminals. Match wires and terminals by color
(red wires connected to the right terminal, black
wires connected to the left terminal).
5. Lower the terminal cover and replace the 3 screws.
Terminal Block
Silver Colored Terminal
Red
Wire
Terminal
Block
Cord
Mounting
Plate
Black Wire
Neutral
(White Wire)
Black
Wire
Grounding
Strap
A User Supplied
Strain-relief Must
Be Installed at This
Location.
To 240 V
Receptacle
Figure 3
1 1/8" (2.9 cm) Dia.
Direct Connection
Hole. Punch Out
Knockout for 1 3/8"
(3.5 cm) Dia. Cord
Kit Hole.
1 1/8" (2.9cm)
Dia. Direct
Connection
Hole. Punch
Out Knockout
for 1 3/8"
(3.5cm) Dia.
Cord Kit Hole.
A User Supplied
Strain-relief Must
Be Installed at This
Location
Neutral
(White Wire)
Ground (Bare
Copper Wire)
To 240 V Receptacle
NOTE: Be sure to remove the
supplied grounding strap.
Figure 4
Installation Instructions
Direct Electrical Connection to the Circuit
Breaker, Fuse Box or Junction Box
If the appliance is connected directly to the circuit
breaker, fuse box or junction box, use flexible, armored
or nonmetallic sheathed copper cable (with grounding
wire). Supply a U.L. listed strain-relief at each end of
the cable. At the appliance end, the cable goes through
the Direct Connection Hole (see Figure 5) on the Cord
Mounting Plate. Wire sizes (copper wire only) and
connections must conform to the rating of the appliance.
Where local codes permit connecting the appliancegrounding conductor to the neutral (white) wire
(see Figure 5):
1. Be sure that no power is supplied on the cable from
residence.
2. Remove the grounding strap from the terminal block
and from the appliance frame.
3. In the circuit breaker, fuse box or junction box:
a) Connect the green (or bare copper) wire, the white
appliance cable wire, and the neutral (white) wire
together.
b) Connect the 2 black wires together.
c) Connect the 2 red wires together.
Where local codes DO NOT permit connecting the
appliance-grounding conductor to the neutral
(white) wire, or if connecting to 4-wire electrical
system (see Figure 6):
1. Be sure that no power is supplied on the cable from
residence.
2. Remove the grounding strap from the terminal block
and from the appliance frame.
3. In the circuit breaker, fuse box or junction box:
a)Connect the white appliance cable wire to the
neutral (white) wire.
b)Connect the 2 black wires together.
c)Connect the 2 red wires together.
d)Connect the green (or bare copper) grounding wire to the grounding wire of the circuit breaker, fuse box or junction box.
Cable from Residence
Green (or Bare
Copper) Wire
White Wire
Red
Wires
Black
Wires
Cable from Residence
Neutral
(white) Wire
Black
Wires
Red
Wires
Green (or Bare
Copper) Wire
White Wire
Junction
Box
Cable from
Appliance
Junction
Box
White Wire
Green
(or Bare Copper)
Wire
Cable from
Appliance
17
U.L.-listed Conduit
Connector (or CSA
listed)
NOTE: Be sure to remove the
supplied grounding strap.
Figure 5
3-Wire (Grounded Neutral) Electrical System
(Example: Junction Box)
U.L.-listed Conduit
Connector (or CSA
listed)
NOTE: Be sure to remove the
supplied grounding strap.
Figure 6 – 4-Wire Electrical System
(Example: Junction Box)
18
Installation Instructions
5. Cabinet Construction
4.1
To eliminate the risk of burns or
fire by reaching over heated surface units, do not
have cabinet storage space above the range. If there
is cabinet storage space above range, reduce risk by
installing a range hood that projects horizontally a
minimum of 5" (12.7 cm) beyond the bottom of the
cabinet.
¾”
(1.9 cm)
Min.
Cutout
Width
31½”
(81 cm)
¾”
(1.9 cm)
4.2 Countertop Preparation
Formed or tile countertop
trimmed ¾" (1.9 cm) back at
front corners of countertop
opening.
Figure 7
• The cooktop sides of the range fit over the cutout
edge of your countertop.
• If you have a square finish (flat) countertop, no
countertop preparation is required. Cooktop sides lay
directly on edge of countertop.
• Formed front-edged countertops must have molded
edge shaved flat 3/4" (1.9 cm) from each front corner
of opening (Figure 7).
• Tile countertops may need trim cut back 3/4"(1.9
cm) from each front corner and/or rounded edge
flattened (Figure 7).
• If the existing cutout width is greater than
30 1/16" (76,4 cm), reduce the ¾" (1.9 cm)
dimension.
• Countertop must be level. Place a level on the
countertop, first side to side, then front to back. If
the countertop is not level, the range will not be level.
The oven must be level for satisfactory baking results.
Cooktop sides of range fit over edges of countertop
opening
4.3 IMPORTANT For existing cutout width of 29" (73.7 cm) :
2 3/16”
(5.56 cm)
2 3/16”
(5.56 cm)
29”
(73.7 cm)
1¼”
(3.2 cm)
4 3/8” Min.
(11.4 cm)
30”
(76.2 cm)
You must also clear
2 3/16" (5.56cm) of
material from front of
countertop.
31½”
(80 cm)
1¼”
(3.2 cm)
Figure 8
Formed or tile countertop
trimmed 1¼" (3.2 cm)
back at front corners of
countertop opening.
Installation Instructions
19
6. Range Installation
Important Note: Door removal is not a requirement for
installation of the range, but is an added convenience.
Refer to the Use and Care Guide for oven door removal
instructions.
10 Position range in front of the cabinet opening.
Make sure that the underside of the cooktop clears
11 the countertop. If necessary, raise the unit by lowering
the front leveling legs and the back leveling wheels.
Level the range (see section 6). The floor where
12 the range is to be installed must be level. Follow the
instructions under "Leveling the Range".
13 Slide the range into the cutout opening.
IMPORTANT If Accessories Needed :
Standard Installation
The range cooktop overlaps the countertop at the
1 sides and the range rests on the floor. The cooktop is
31½" (80 cm) wide.
2
Install base cabinets 30" (76.2 cm) apart. Make sure
they are plumb and level before attaching cooktop.
Shave raised countertop edge to clear 31½" (80 cm)
wide range top rim.
Install cabinet doors 32" (81.3 cm) min. apart so as
3 not to interfere with range door opening.
4 Cutout countertop exactly as shown on page 1.
Make sure the two front leveling legs and the rear
5 leveling wheels (see page 11) are setup higher than
the height of the cabinet (shown on page 3).
Remove and discard the two rear leveling legs, they are
6 only in place to solidify the unit for the transport.
7
Install the anti-tip bracket at
this point before placing the range at its final
position. Follow the installation instructions on page
11 or on the anti-tip bracket template supplied with
the range.
8
To provide an optimum installation, the top surface
of the countertop must be level and flat (lie on the
same plane) around the 3 sides that are adjacent to
range cooktop. Proper adjustments to make the top
flat should be made or gaps between the countertop
and the range cooktop may occur.
9
To reduce the risk of damaging your
appliance, do not handle or manipulate it by the
cooktop. Manipulate with care.
Installation For 29" Existing Cutout Wide Opening
1.You must replace the actual side trims by new and
smaller side trims. These new side trims can be
ordered through a Service Center.
2.Follow instructions supplied with your new side
trims to replace the actual side trims with the new
ones.
3.Check if the countertop and cabinet opening
are prepared for 29" cutout wide opening in
"Countertop Preparation" section (see page 8).
4.Install range as in the "Installation without side
panels" section.
Installation With Backguard
The cutout depth of (21 3/4" (55.2 cm)Min., 22 1/8"
(56.2cm) Max.) needs to be increased to 24" (61 cm)
when installing a backguard.
Installation With End Panel
A End Panel kit can be ordered through a Service
Center.
Installation With Side Panels
A Side Panels kit can be ordered through a Service
Center. Note: Install cabinet doors 32" (81.3 cm) min.
apart so as not to interfere with range door opening.
20
Installation Instructions
7. Leveling the Range
Models Equipped with Leveling Device
Level the range after installation in the cutout
opening.
1. Open the range drawer. The leveling screws control
the height of the rear leg.
2. Adjust the appliance legs and wheels as follows
until the underside of the cooktop surface is sitting
level on the countertop (Figure 9).
a.To adjust the front legs, use a wrench on
the leg base and turn clockwise to lower or
counterclockwise to raise.
b.Remove the rear legs using a wrench on the
leg base and turn counterclockwise until the
legs are removed from the unit. You can discard
those legs, they are only in place to solidify the
unit for the transport.
c.To adjust the rear wheels, use a ratchet or
a nutdriver and turn the leveling screws
counterclockwise to lower or clockwise to raise.
3. Check if the range is level by installing an oven rack
in the center of the oven and placing a level on the
rack (Figure 10).
4. Take 2 readings with the level placed diagonally in
one direction and then the other. Level the range, if
necessary, by adjusting the leveling legs and wheels.
5. If the range cannot be level, contact a carpenter to
correct sagging or sloping floor.
8. Check Operation
Refer to the Use and Care Manual packaged with
the range for operating instructions and for care and
cleaning of your range.
Do not touch the elements. They may be
hot enough to cause burns.
Remove all packaging from the oven before testing.
1. Operation of Surface Elements
Turn on each of the four surface elemens and check to
see that they heat. Check the surface element indicator
light(s), if equipped.
2. Operation of Oven Elements
The oven is equipped with an electronic oven control. Each
of the functions has been factory checked before shipping.
However, it is suggested that you verify the operation of
the electronic oven controls once more. Refer to the Use
and Care Manual for operation. Follow the instructions for
the Clock, Timer, Bake, Broil, Convection (some models)
and Clean functions.
Bake–After setting the oven to 350°F (177°C) for
baking, the lower element in the oven should become
red.
Broil–When the oven is set to BROIL, the upper element
in the oven should become red.
Clean–When the oven is set for a self-cleaning cycle, the
upper element should become red during the preheat
portion of the cycle.
Convection (some models)–When the oven is set to
CONV. BAKE/ROAST at 350°F (177°C), both elements
cycle on and off alternately and the convection fan will
turn. The convection fan will stop turning when the oven
door is opened during convection baking or roasting.
Warmer Drawer (some models)–Set the control knob
to HI and check to see the drawer is heating.
Rear Leveling
Device
When All Hookups are Complete
Make sure all controls are left in the OFF position.
Use this Screw
to Adjust Rear Leveling
Device Height
Before You Call for Service
LOWER
RAISE
RAISE
Leveling
Screw
LOWER
Figure 9
Font
Leveling
Leg
Read the Before you call list and operating instructions
in your Use and Care Manual . It may save you time and
expense. The list includes common occurrences that are
not the result of defective workmanship or materials in
this appliance.
Refer to the warranty and service information in your Use
and Care Manual for our phone number and address.
Please call or write if you have inquiries about your range
product and/or need to order parts.
LOWER
RAISE
Figure 10
21
Installation Instructions
9. Anti-Tip Brackets Installation
Instructions
To reduce the risk of tipping of the range,
the range must be secured to the floor by properly
installed anti-tip bracket and screws packed with the
range. These parts are located in the oven. Failure to
install the anti-tip bracket will allow the range to tip over
if excessive weight is placed on an open door or if a child
climbs upon it. Serious injury might result from spilled hot
liquids or from the range itself.
Follow the instructions below to install the anti-tip
brackets.
If range is ever moved to a different location, the antitip brackets must also be moved and installed with the
range.
Tools Required:
Adjustable Wrench
Ratchet
Drill & 1/8"(0,32 cm) bit
5/16" (0,8 cm) Nutdriver
Level
The anti-tip bracket attaches to the floor at the back of
the range to prevent range from tipping. When fastening
bracket to the floor, be sure that screws do not penetrate
electrical wiring or plumbing. The screws provided will
work in either wood or concrete.
OF
GE OR
D
E E
CK LIN
BANGE ALL
RA R W
A
RE
1. Draw a center line (CL) on the floor where the range
should be installed. Also draw a line on the floor at
the range back position if there is no wall.
2. Unfold paper template and place it flat on the floor
with the right rear corner positioned exactly on the
intersection of the center and back lines you just drew
before. (Use the diagram below to locate brackets if
template is not available. (Figure 11))
3. Mark on the floor the location of the 4 mounting
holes shown on the template. For easier installation,
3/16"(0,48 cm) diameter pilot holes 1/2"(1,27 cm)
deep can be drilled into the floor.
4. Remove template and place bracket on floor. Line up
holes in bracket with marks on floor and attach with
4 screws provided. Bracket must be secured to solid
floor (Figure 12). If attaching to concrete floor, first
drill 3/16"(0,48 cm) dia. pilot holes using masonry drill
bit.
5. Be sure the 4 levelling legs are at the highest position
they can be.
6. Slide range into place making sure structure of the
range is trapped by the anti-tip bracket (Figure 11).
Lower the range by adjusting the 4 levelling legs until
the underside of the cooktop is sitting level on the
countertop. Refer to “Levelling the Range” section.
7. After installation, verify that the anti-tip bracket is
engaged by grasping the top rear edge of the range
and carefully attempt to tilt it forward to make sure
range is properly anchored.
Kitchen
Cabinet
Door
Cabinet
CL
Anti-Tip Bracket
10½”
(26.7 cm)
Range
ANTI-TIP
BRACKET
(CL = Center line)
Floor
L
AL
RW
Floor Mount
Screws
A
RE
Rear of Range
Toe
Plate
Figure 12
SLIDE
BACK
Figure 11
Wall
22
Notes
Electronic Oven Controls
Setting clock at power up
When the unit is first plugged in, or when the power supply to the range has been interrupted,
the timer in the display will flash with “12:00”. The clock cannot be set when the oven is
on. If an invalid time of day is entered, the control will triple beep to prompt you to re-enter
a valid time of day.
To set the clock (example for 1:30):
1. Press 1 3 0 pads to set the time of day to 1:30. The pads
to raise or lower the actual time displayed.
2. Press START
to accept the changes or CANCEL
+
hi
or
-
lo
can also be pressed
to start with a time of 12:00.
Control panel display modes
Sleep Mode:
Your control will remain in a sleep mode when not in use. Only the clock will display during
this mode. You will need to wake the control to begin any function.
Wake Mode:
To wake the control, touch within the display panel. After 2 minutes without activity the control
will beep and go back into sleep mode.
To start a cooking feature you must select either the upper oven or the lower oven. User preferences will be available during this mode as well as timers, oven light and the control lock.
temperature visual display
Your oven is equipped with a temperature visual display for each oven. When a cooking mode
is set, the actual temperature will be shown in the display and will rise as the unit preheat.
When the unit has reached its target temperature, a chime will sound to remind you to place
the food in the oven. This feature will be active with some cooking modes; bake, convection
bake, convection roast and perfect turkey. The cooking modes which does not feature the
temperature visual display will be noted in their descriptions.
NOTE: The lowest temperature that can be displayed is 100°F.
23
24
Electronic Oven Controls
Oven light
Your appliance includes “theater” style oven lighting feature that gradually lights both the
upper and lower oven interiors to full brightness. The upper oven is equipped with 2 halogen
lights and the lower oven is equipped with 1 incandescent light. The oven lights will turn on
automatically when the oven door is opened. The oven light may be turned on when the door
is closed by using the oven light pad located on the control panel. The oven light key will
toggle the lights in both ovens at the same time at full intensity.
To toggle the Oven Lights ON and OFF:
1. Press OVEN LIGHT
.
Control Lock
The Control Lock feature automatically locks the upper oven door, control panel and the
cooktop. The Control Lock is only allowed when the oven and the cooktop are turned OFF
(not active). DOOR LOCK will flash in the display for 20 seconds or until the door has finished
locking. Once the door has been locked, Loc message will appear in the upper display and
“- -” will appear in the cooktop displays. Do not attempt to open the oven door while DOOR
LOCK is flashing.
To toggle the Control Lock ON and OFF:
1. Keep CONTROL LOCK
pressed for 3 seconds.
Setting the kitchen Timer
This unit is equipped with 2 Kitchen Timers which serves as extra timers in the kitchen that
will beep when the set time has run out. It does not start or stop cooking. The Timer feature
can be used during any of the other oven control functions and cooking modes.
To set the Timer (example for 5 minutes):
1. Press TIMER
. “00:00” will appear in the display.
2. Press 5 pad to set the timer to 5 minutes. The pads
raise or lower the actual time displayed.
+
hi
or
-
lo
can also be pressed to
3. Press again TIMER
to accept and start the countdown.
pad will flash.
4. When the set time has run out, “00:00” will be displayed and the TIMER
The clock will sound a chime that will be repeated at regular intervals until the TIMER
pad is pressed.
To cancel the Timer before the set time has run out:
Press TIMER
. The display will return to the time of day.
Electronic Oven Controls
Baking
This mode is best used for your standard recipes. The hidden bake element is used to heat
the air and maintain temperature. The temperature probe can be used in this cooking mode.
The upper oven can be programmed to bake at any temperature from 170°F to 550°F with a
default temperature of 350°F. The lower oven can be programmed to bake at any temperature
from 170°F to 450°F with a default temperature of 350°F.
Upper Oven Baking Tips:
• Always preheat your oven before using the bake mode.
• During preheat, the 3 elements and the convection fan are used in cycle to quickly heat the
oven.
• Use only one rack and center the pans as much as possible.
• If using two racks, place the oven racks in positions 2 and 6.
• Allow 2” to 4” (5,1 to 10,2cm) around the utensil(s) for proper air circulation.
• Be sure the pans do not touch each other, the door, sides or back of the oven.
If using multiple pans or racks, stagger as shown.
Lower Oven Baking Tips:
• Follow recommendations for lower oven cooking modes in the Lower Oven Operation
section of this manual.
To set a Bake Temperature of 350°F:
1. Arrange interior oven racks.
2. Select oven by pressing UPPER OVEN
.
3. Press BAKE
UPPER
OVEN
or LOWER OVEN
LOWER
OVEN
.
. The oven display shows PRE-HEATING.
4. Press START
5. Place food in the oven when the chime signals and temperature display shows that the oven
has reached the set target temperature and the PRE-HEATING message disappear.
6. Cook Time, Timer and End Time features can be set to control your cooking time in both
ovens (read their sections for directions). The Temperature Probe and Rapid Preheat
features can be used only with the upper oven.
7. Remove food. Always use oven mitts when removing hot pans from the oven.
to stop or cancel the Bake feature at any time.
8. Press CANCEL
To change to a Bake Temperature of 425°F:
1. Select oven by pressing UPPER OVEN
2. Press the HI
+
hi
or LO
3. Press START
Baking Problems
-
lo
UPPER
OVEN
or LOWER OVEN
LOWER
OVEN
.
pads to get to the desired temperature.
.
Refer to the Baking Problems Table in the Solutions to Common Problems section of this
manual.
25
26
Electronic Oven Controls
Cook time
Cook Time allows the oven to be set to cook for a set length of time and shut off
automatically.
The time remaining will always be shown in the timer section of the display. The oven will
shut off and will beep when the countdown is finished. This feature can be used with Bake,
Convection Bake, Convection Roast, Slow Cook, Keep Warm, Defrost, Bread Proof, Dehydrate
and Perfect Turkey cooking modes. It can also be part of a Multi-Stage sequence.
To set a timed cooking (example is a 450°F Bake for 30 minutes):
UPPER
Select oven by pressing UPPER OVEN OVEN .
Press BAKE
. The temperature numbers will blink in the display.
Enter temperature needed; 4 5 0 .
Press COOK OPTIONS
to bring up the cook options items.
Press COOK TIME
.
Enter time needed; 3 0 .
Press START
. The oven will start heating. The cook time will start counting down for
the set time.
8. Press CANCEL
to stop the audible alarm or to cancel cooking at anytime.
1.
2.
3.
4.
5.
6.
7.
End time
End Time allows the oven to be set to shut off automatically at a set time of day. The oven
control will calculate the remaining time by itself. The time remaining will always be shown in
the timer section of the display. The oven will shut off and will beep when the countdown is
finished. This feature can be used with Bake, Convection Bake, Convection Roast, Slow Cook,
Keep Warm, Defrost, Dehydrate, Clean and Bread Proof cooking modes. This oven can be
programmed with Cook Time and End Time to start and stop by itself at the right time.
To set a delayed timed cooking (example is a 450°F Bake for 30 minutes which will
end at 6:00PM):
1. Select oven by pressing UPPER OVEN
2. Press BAKE
4. Press COOK OPTIONS
5. Press COOK TIME
7. Press END TIME
5 0.
to bring up the cook options items.
.
6. Enter time needed; 3
.
0.
8. Enter time of day needed; 6
10. Press CANCEL
.
. The temperature numbers will blink in the display.
3. Enter temperature needed; 4
9. Press START
UPPER
OVEN
0 0.
. The time remaining will be shown in the display.
to stop the audible alarm or to cancel cooking at anytime.
Use caution with the COOK TIME or END TIME features. Use the automatic timer when
cooking cured or frozen meats and most fruits and vegetables. Foods that can easily spoil such as milk,
eggs, fish, meat or poultry, should be chilled in the refrigerator first. Even when chilled, they should not stand
in the oven for more than 1 hour before cooking begins, and should be removed promptly when cooking is
completed. Eating spoiled food can result in sickness from food poisoning.
Electronic Oven Controls
27
broiling
This mode is best for meats, fish and poultry up to 1” thick. Broiling is a method of cooking
tender cuts of meat by direct heat under the broil element of the oven. The high heat cooks
quickly and gives a rich, brown outer appearance. The temperature probe cannot be used
with this mode. The oven can be programmed to broil at any temperature from 300°F to
550°F with a default temperature of 550°F.
Broiling Tips:
•For optimum browning, preheat the broil element for 2 minutes.
•Broil one side until the food is browned; turn and cook on the second side. Season and
serve.
•Always pull the rack out to the “stop” position before turning or removing food.
•Always use the broiler pan and its grid when broiling. It allows the dripping grease to be
kept away from the high heat of the broil element (see Figure 1).
•For best broiling results, broil with the oven door slightly open.
•DO NOT use the broil pan without the insert. DO NOT cover the broil pan insert with
foil. The exposed grease could catch fire. DO NOT use the roasting rack when broiling.
1. Arrange interior oven racks.
2. Select oven by pressing UPPER OVEN
3. Press BROIL
.
UPPER
OVEN
Figure 1
Grid
To set a Broil Temperature of 550°F:
.
4. Press START
.
5. Place food in the oven after 2 minutes.
6. Turn food when the top side is browned and cook on
the second side.
7. Remove food. Always use oven mitts when removing
hot pans from the oven.
8. Press CANCEL
to stop or cancel the Broil feature at any time.
Broiler Pan
Broiling Times
Electric Wall Oven Broiling Table Recommendations
Food
Item
Steak 1” thick
Pork Chops 3/4” thick
Chicken - Bone In
Chicken - Boneless
Fish
Shrimp
Hamburger 1” thick
Rack
Position
Temp
Setting
7
7
7
5
7
7
5
7
5
550° F
550° F
550° F
450° F
450° F
500° F
550° F
550° F
550° F
Cook Time
1st side
2nd side
6:00
7:00
8:00
20:00
8:00
13:00
5:00
9:00
10:00
4:00
5:00
6:00
10:00
6:00
0:00
0:00
7:00
8:00
Doneness
Rare
Medium
Well
Well
Well
Well
Well
Medium
Well
Should an oven fire occur, close the oven door and turn off the oven. If the fire continues, throw
baking soda on the fire or use a fire extinguisher. DO NOT put water or flour on the fire. Flour may be explosive
and water can cause a grease fire to spread and cause personal injury.
28
Electronic Oven Controls
Convection baking
This mode of cooking enables you to obtain the best culinary results when baking with multiple
pans and racks. Multiple rack baking may slightly increase cook time for some foods but
the overall result is time saved. Most foods cooked in a standard oven will cook faster and
more evenly with Convection Bake. Convection baking uses the three elements and a fan
to circulate the oven’s heat evenly and continuously within the oven. The temperature probe
can be used in this cooking mode. The oven can be programmed for Convection baking at
any temperature between 170°F to 550°F with a default temperature of 350°F.
Convection Bake
Air Flow
Convection Baking Tips:
• Always preheat your oven before using the Convection Bake mode.
• If your recipe cooking temperature has already been converted for convection baking
there is no need to reduce your oven temperature. If your recipe has not had the temperature converted for convection baking you can easily reduce the temperature using
the Convection Convert feature. Please see Convection Convert section on next page for
further instruction on temperature conversion.
• Use tested recipes with times adjusted for convection baking when using this mode. With
single rack convection baking some foods may have as much as a 25% reduction in cook
time; check food at minimum time. Time reductions will vary depending on the amount and
type of food to be cooked.
• When using Convection Bake with a single rack, place oven rack in position 3 or 4. If
cooking on multiple racks, place the oven racks in positions 2 and 6 or 1, 4 and 7.
• Most bakeries (except cakes) should be baked on pans with no sides or very low sides to
allow heated air to circulate around the food.
• Food baked on pans with a dark finish will cook faster.
To set a Convection Bake Temperature of 350°F:
1. Arrange interior oven racks.
2. Select oven by pressing UPPER OVEN
3. Press CONVECTION BAKE
.
UPPER
OVEN
.
4. Press START
. The oven display shows PRE-HEATING.
5. Place food in the oven when the chime signals and temperature display shows that the oven
has reached the set target temperature and the PRE-HEATING message disappear.
6. The Temperature Probe, Cook Time, Timer, End Time and Rapid Preheat features can
be set to control your cooking time (read their sections for directions).
7. Remove food. Always use oven mitts when removing hot pans from the oven.
to stop or cancel the Convection Bake feature at any time.
8. Press CANCEL
Electronic Oven Controls
convection convert
The Convection Convert pad is used to automatically convert a standard baking recipe for
convection baking. When set properly, this feature is designed to display the actual converted
(reduced) temperature in the display. Convection Convert may ONLY be used with a Convection
Bake cooking mode. It can be used with the features End Time and Cook Time (see their
sections for directions). If convection conversion is used with the cook time and end time
features, “CF” (check food) will be displayed when 75% of the bake time is complete. At this
time the oven control will sound 3 long beeps at regular intervals until baking had finished.
When the bake time has completely finished the control will beep at regular interval until the
CANCEL
pad is pressed. NOTE: To use this feature with the COOK TIME
COOK TIME
pad must be pressed before the CONVECTION CONVERT
option, the
pad.
Changing from a normal bake temperature to a convection bake temperature:
UPPER
Select oven by pressing UPPER OVEN OVEN .
Press CONVECTION BAKE
.
Press COOK OPTIONS
. The cook options items will light up.
Press CONVECTION CONVERT
. The temperature displayed will be 25°F lower than
what it used to be.
5. Press START
to begin the convection baking (see Convection Baking section for
more informations).
1.
2.
3.
4.
rapid preheat
The Preheat feature will bring the oven up to temperature faster than a regular preheat and
then indicate when to place the food in the oven. Preheating is not necessary when roasting
or cooking casseroles. The oven can be programmed to preheat at any temperature between
170°F to 550°F with some of the cooking modes; Bake, Convection Bake and Convection
Roast.
IMPORTANT: The rapid preheat feature is for single rack ONLY. The heat distribution with
multiple rack will be uneven.
To set a rapid preheat (example is for a 350°F Bake):
1.
2.
3.
4.
5.
6.
Select oven by pressing UPPER OVEN OVEN .
Press BAKE
.
Press COOK OPTIONS
. The cook options items will light up.
Press RAPID PREHEAT
.
Press START
to begin the baking with the rapid preheat feature enabled.
Place food in the oven when the chime signals and temperature display shows that the
oven has reached the set target temperature.
UPPER
29
30
Electronic Oven Controls
Convection roasting
This mode is best for cooking tender cuts of beef, lamb, pork and poultry. Use this mode
when cooking speed is desired. The Convection Roasting gently browns the exterior and
seals in the juices. Convection roasting uses the hidden bake element, the hidden convection
element, the broil element and a fan to circulate the oven’s heat evenly and continuously
within the oven. The temperature probe can be used in this cooking mode. The oven can be
programmed for Convection Roasting at any temperature between 170°F to 550°F with a
default temperature of 350°F.
Convection Roasting Tips:
• Use the broiler pan and grid, and the roasting rack (Figure 1). The broiler pan will catch
grease spills and the grid will help prevent spatters. The roasting rack will hold the meat.
• Place an oven rack on rack position 2 (next-bottom).
• Make sure the roasting rack is securely seated on the grid in the broiler pan. The roasting
rack fits on the grid allowing the heated air to circulate under the food for even cooking and
helps to increase browning on the underside.
• There is no need to reduce the convection temperature or to use the Convection Convert
feature with this cooking mode.
• DO NOT use the broiler pan without the grid or cover the grid with aluminum foil.
• Always pull the rack out to the stop position before removing food.
• Position food (fat side up) on the roasting rack.
To set a Convection Roast Temperature of
350°F:
1.
2.
3.
4.
5.
Arrange interior oven racks.
UPPER
Select oven by pressing UPPER OVEN OVEN .
.
Press CONVECTION ROAST
.
Press START
The Temperature Probe, Cook Time, Timer, End
Time and Rapid Preheat features can be set to
control your cooking time (read their sections for
directions).
6. Remove food. Always use oven mitts when removing
hot pans from the oven.
7. Press CANCEL
Roasting
Rack
Grid
Broiler
Pan
Figure 1
to stop or cancel the Convection Roast feature at any time.
Convection Roasting Chart
Meat
Beef Standing rib roast
Rib eye roast
Tenderloin roast
Poultry Turkey, whole**
Turkey, whole**
Turkey, whole**
Chicken
Pork Ham roast, fresh
Shoulder blade roast
Loin
Pre-cooked ham
Weight
Oven Temp
Internal Temp
Min per lb.
4 to 6 lbs.
4 to 6 lbs.
2 to 3 lbs.
12 to 16 lbs.
16 to 20 lbs.
20 to 24 lbs.
3 to 4 lbs.
4 to 6 lbs.
4 to 6 lbs.
3 to 4 lbs.
5 to 7 lbs.
350° F
350° F
400° F
325° F
325° F
325° F
350-375° F
325° F
325° F
325° F
325° F
*
*
*
180° F
180° F
180° F
180° F
160° F
160° F
160° F
160° F
25-30
25-30
15-25
8-10
10-15
12-16
12-16
30-40
20-30
20-25
30-40
* For beef: med rare 145°F, med 160°F, well done 170°F
** Stuffed turkey requires additional roasting time. Shield legs and breast with foil to
prevent overbrowning and dying of the skin.
Electronic Oven Controls
Convection Broiling
Use this mode for thicker cuts of meat, fish and poultry. The Convection Broiling gently browns
the exterior and seals in the juices. Convection broiling uses the broil element and a fan to
circulate the oven’s heat evenly and continuously within the oven. The temperature probe
cannot be used in this cooking mode. The oven can be programmed for Convection Broiling
at any temperature between 300°F to 550°F with a default temperature of 550°F.
Convection Broiling Tips:
• For optimum browning, preheat the broil element for 2 minutes.
• Broil one side until the food is browned; turn and cook on the second side. Season and serve.
• Always pull the rack out to the “stop” position before turning or removing food.
• Always use the broiler pan and its grid when broiling. It allows the dripping grease to be
kept away from the high heat of the broil element (see Figure 1).
• DO NOT use the broil pan without the insert. DO NOT cover the broil pan insert with
foil. The exposed grease could catch fire. DO NOT use the roasting rack when broiling.
• Convection broiling is generally faster than conventional broiling. Check for doneness at
the minimum recommended time.
Figure 1
Grid
IMPORTANT: Always use this cooking mode with the
oven door closed or the fan will not turn on.
Broiler Pan
To set a Convection Broil Temperature of 550°F:
1. Arrange interior oven racks.
2. Select oven by pressing UPPER OVEN
3. Press CONVECTION BROIL
.
4.
5.
6.
7.
8.
UPPER
OVEN
.
Press START
.
Place food in the oven after 2 minutes.
Turn food when the top side is browned and cook on the second side.
Remove food. Always use oven mitts when removing hot pans from the oven.
Press CANCEL
to stop or cancel the Convection Broil feature at any time.
Should an oven fire occur, leave the oven door closed and turn off the
oven. If the fire continues, throw baking soda on the fire or use a fire extinguisher.
DO NOT put water or flour on the fire. Flour may be explosive and water can cause a
grease fire to spread and cause personal injury.
31
32
Electronic Oven Controls
keep warm
This mode is best for keeping oven baked foods warm for serving after cooking has finished.
The Keep Warm feature uses the hidden bake element to maintain the temperature within the
oven. The Keep Warm feature may be used with Multi-Stage (refer to its section for directions)
if you wish to have the Keep Warm feature turn ON automatically when cooking has finished.
The oven can be programmed for Keep Warm at any temperature between 150°F to 190°F
with a default temperature of 170°F.
Keep Warm Tips for Upper Oven:
• Always start with hot food.
• Do not use the Keep Warm feature to heat cold food.
• Food in heat-safe glass and glass ceramic containers may need higher temperature settings compared to food in regular containers.
• Avoid repeated openings of the oven, it will allow hot air to escape and the food to cool.
• Aluminum foil may be used to cover food to increase moisture content.
Keep Warm Tips for Lower Oven:
• Follow recommandations for lower oven cooking modes in the Setting Lower Oven section of this manual.
To set a Keep Warm Temperature of 170°F:
1. Arrange interior oven racks (for upper oven only).
2. Select oven by pressing UPPER OVEN
3. Press KEEP WARM
UPPER
OVEN
or LOWER OVEN
LOWER
OVEN
.
.
4. Press START
.
5. The Multi-Stage, Cook Time, Timer and End Time features can be set to control your
warming time (read their sections for directions).
6. Remove food. Always use oven mitts when removing hot pans from the oven.
7. Press CANCEL
to stop or cancel the Keep Warm feature at any time.
Electronic Oven Controls
slow cook
This mode may be used to cook foods more slowly, at lower oven temperatures and provide
cooking results much the same way as a Slow Cooker or Crock-Pot. The Slow Cook feature
is ideal for roasting beef, pork & poultry. Slow Cooking meats may result in the exterior of
meats becoming dark but not burnt. This is normal. The Slow Cook mode uses the hidden
bake element to maintain a low temperature in the oven. The temperature probe cannot be
used in this cooking mode. There are 2 settings available, high (HI) or low (LO). The maximum
cook time for the Slow Cook feature is 12 hours unless the oven control has been changed
to the Continuous Bake mode or the Sabbath mode has been activated.
Slow Cook Tips:
• Completely thaw all frozen foods before cooking with the Slow Cook feature.
• When using a single rack, position it in the center of the oven.
• Position multiple racks to accommodate size of cooking utensils when cooking multiple
food items.
• Do not open the oven door often or leave the door open when checking foods. If the oven
heat escapes often, the Slow Cook time may need to be extended.
• Cover the foods to keep them moist or use a loose or vented type cover to allow foods to
turn crisp or brown.
• Cook times will vary; depending on the weight, fat content, bone & the shape of the
meat.
• Use the recipe’s recommended food temperature and a food thermometer to determine
when the food is done.
• Preheating the oven will not be necessary when using the Slow Cook feature.
• Add any cream or cheese sauces during the last hour of cooking.
To set a Slow Cook:
1. Arrange interior oven racks and place food in the oven.
2. Select oven by pressing UPPER OVEN
3. Press SLOW COOK
4. Press
+
hi
UPPER
OVEN
or LOWER OVEN
LOWER
OVEN
.
.
for high (HI) setting or
-
lo
low (Lo) setting.
5. Press START
.
6. The Cook Time, Timer and End Time features can be set to control your Slow Cook time
(read their sections for directions).
7. Remove food. Always use oven mitts when removing hot pans from the oven.
8. Press CANCEL
to stop or cancel the Slow Cook feature at any time.
33
34
Electronic Oven Controls
dehydrating
This mode dries foods with heat from the bake and the convection element. The heat is
circulated throughout the oven by the convection fan. Dehydrating is used to dry and/or
preserve foods such as fruits, meats, vegetables and herbs. This mode holds an optimum
low temperature while circulating the heated air to slowly remove moisture. The oven can
be programmed for Dehydrating at any temperature between 100°F to 225°F with a default
temperature of 120°F.
Dehydrating Tips:
• Do not preheat the oven.
• Multiple racks can be used simultaneously.
• Drying times vary depending on the moisture and sugar content of the food, the size of
the pieces, the amount being dried and the humidity in the air.
• Check food at the minimum drying time.
• Treat fruits with antioxidants to avoid discoloration.
• Consult a food preservation book or a library for additional information.
To set a Dehydrate Temperature of 120°F:
1. Arrange interior oven racks and place food.
2. Select oven by pressing UPPER OVEN
3. Press DEHYDRATE
4. Press START
UPPER
OVEN
.
.
to begin dehydrating.
5. Remove food. Always use oven mitts when removing hot pans from the oven.
6. Press CANCEL
to stop or cancel the Dehydrate feature at any time.
defrosting
Use the defrost feature to thaw small portions of delicate items such as cream cakes,
frozen cream pies and cheesecake, at room temperature. While in the defrost mode,
the convection fan will operate to circulate room temperature air around the food slowly,
accelerating the natural defrosting of the food without heat.
To set a Defrost:
1. Arrange interior oven racks and place food in the oven.
2. Select oven by pressing UPPER OVEN
3. Press DEFROST
4. Press START
UPPER
OVEN
.
.
to start the defrosting. A “dEF” message is displayed when active.
5. The Cook Duration, End Time and Timer features can be set to control your Defrost time
(read their sections for directions).
6. Press CANCEL
to stop or cancel the Defrost feature at any time.
Note: This feature is not meant for thawing frozen meats, poultry, seafood or other foods
that need to be cooked before serving. Follow USDA recommendations for thawing foods.
Only frozen foods that can be defrosted and served without cooking should be used with
this feature.
Electronic Oven Controls
bread proofing
Proofing bread prepares the dough for baking by activating the yeast. This feature is ideal
for proofing, or rising bread dough. The oven can be programmed for Bread Proofing at any
temperature between 85°F to 100°F with a default temperature of 100°F. The temperature
visual display is not avalaible for this function.
Bread Proofing Tips:
• No need to preheat for this feature.
• Proof bread until dough has doubled in bulk.
• For best results, place a shallow pan with 1 to 3 cups of boiling hot water on the lowest
rack position to keep the air moist inside the oven cavity.
• Allow at least 1” between edge of pan and walls of the oven.
• Limit frequent door openings to prevent losing heat and lengthening proofing time.
To set a Bread Proof temperature of 100°F:
1. Arrange interior oven racks and place bread dough in the oven.
2. Select oven by pressing UPPER OVEN
3. Press BREAD PROOF
UPPER
OVEN
.
.
4. Press START
to begin the bread proofing.
5. The Cook Time, Timer and End Time features can be set to control your Bread Proof time
(read their sections for directions).
6. Remove food.
7. Press CANCEL
to stop or cancel the Bread Proof feature at any time.
To change a Bread Proof temperature while the function is active:
1. Select oven by pressing UPPER OVEN
2. Press the HI
+
hi
3. Press START
or LO
-
lo
UPPER
OVEN
.
pads to get to the desired temperature.
to continue the bread proofing with the new setting.
35
36
Electronic Oven Controls
perfect turkey
This mode uses the temperature probe to control precisely the cooking of a perfect turkey.
The convection system gently browns the turkey’s exterior and seals in the juices. The
temperature probe is required with this cooking mode (read its section on next page for
more details). The oven can be programmed for Perfect Turkey at any temperature between
170°F to 550°F with a default temperature of 325°F. The probe default temperature for the
perfect turkey feature is 180°F.
Perfect Turkey Tips:
• Thaw the turkey in the refrigerator at least 24 hours per 5 lbs before cooking the bird.
• Use the broiler pan and grid, and the roasting rack. The broiler pan will catch grease spills
and the grid will help prevent spatters. The roasting rack will hold the turkey.
• Place an oven rack on rack position 2 (next-bottom).
• Make sure the roasting rack is securely seated on the grid in the broiler pan. The roasting
rack fits on the grid allowing the heated air to circulate under the food for even cooking and
helps to increase browning on the underside.
To set a Perfect Turkey of 325°F:
1. Arrange interior oven racks and place food in the oven.
2. Insert the meat probe into the bird and connect it in the oven (read the probe section on
next page for more details).
3. Select oven by pressing UPPER OVEN
4. Press PERFECT TURKEY
UPPER
OVEN
.
. A temperature can be entered if another value than the
default is needed.
Optional : Press PROBE
if you wish to change the probe target temperature (see PROBE
section).
5. Press START
.
6. Remove food from the oven when the temperature probe chime signals that the oven
has reached the set target temperature.
7. Press CANCEL
to stop or cancel the Perfect Turkey feature at any time.
Perfect Turkey Chart
Poultry Turkey, whole*
Turkey, whole*
Turkey, whole*
Chicken
Weight
Oven Temp
Internal Temp
Min per lb.
12 to 16 lbs.
16 to 20 lbs.
20 to 24 lbs.
3 to 4 lbs.
325° F
325° F
325° F
350-375° F
180° F
180° F
180° F
180° F
8-10
10-15
12-16
12-16
* Stuffed turkey requires additional roasting time. Shield legs and breast with foil to prevent overbrowning and dying of the skin.
Electronic Oven Controls
temperature probe
For many foods, especially roasts and poultry, testing the internal temperature is the best
method to insure properly cooked food. The Temperature Probe gets the exact temperature
you desire without having to guess. This feature can be used with Bake, Convection Bake,
Convection Roast and Perfect Turkey cooking modes. The oven can be programmed for
Probe at any temperature between 130°F to 210°F with a default temperature of 170°F. This
unit is equipped with one temperature probe entry in the upper oven.
IMPORTANT:
1. Use only the probe supplied with your appliance; any other may result in damage to the
probe or the appliance.
2. Handle the Temperature Probe carefully when inserting and removing it from the food and outlet.
3. Do not use tongs to pull the cable when inserting or removing the Probe. It could damage the Probe.
4. Defrost your food completely before inserting the Probe to avoid breaking it.
5. Never leave or store the Temperature Probe inside the oven when not in use.
6. To prevent the possibility of burns, carefully unplug the Temperature Probe using hot
pads.
Proper Temperature Probe Placement:
1. Always insert the probe so that the tip rests in the center of
the thickest part of the meat. Do not allow probe to touch
bone, fat, gristle or pan.
2. For bone-in ham or lamb, insert the Probe into the center of
Figure 1
the lowest large muscle or joint. For dishes such as meat loaf or
casseroles, insert the Probe into the center of the food. When cooking fish,
insert the Probe from just above the gill into the meatiest area, parallel to the backbone.
3. For whole poultry (chicken, turkey, etc.), insert the probe into the thickest part of the inner
thigh from below and parallel to the leg (see figure 1).
Setting the Oven when using the Temperature Probe:
1. Insert the Temperature Probe into the food (see Proper Temperature Probe Placement above).
2. Plug the Temperature Probe into its outlet in the oven. (The outlet is located on the top
left hand side of the cavity wall, near front of the oven). Always insert the probe into
a cool oven. Make sure it is pushed all the way into the outlet. Close the oven door.
UPPER
3. Select oven by pressing either UPPER OVEN OVEN .
4. Select a cooking mode. A target temperature must be set to trigger the buzzer when the food
reaches the set temperature. Press COOK OPTIONS
to bring up the cook options items
and press PROBE
pad to enter the temperature. Adjust temperature to the desired setting
using the numeric+pads- or just press START
to use the default target temperature of
170°F. The pads hi or lo can also be pressed to raise or lower the temperature. The target
temperature setting will be accepted after the START
pad is pressed.
5. At any time during the cooking, the PROBE
pad can be pressed once to display the
actual meat temperature or pressed twice to display the target temperature. When on
the target temperature display, a new temperature can be entered. After 5-8 seconds,
the display will go back to showing the oven temperature.
6. When the food reach the target temperature, the oven will go into a KEEP WARM mode
until you press CANCEL
.
The probe can be damaged by very high temperature. To protect the probe against this
damage, the oven control will not allow you to start a self-clean, broil or convection broil
while the probe is connected.
37
38
Electronic Oven Controls
multi stage
This feature enables you to perform sequential cooking at the touch of a button. Its purpose is
to program a queue of up to three cooking modes with individual cooking time and temperatures
in a sequence. This feature can be used with most cooking modes; Baking, Broiling, Convection
Baking, Convection Roasting, Convection Broiling, Keep Warm and Bread Proof. A Cook
Time can be programmed with your cooking mode and then queued. An auto-suggested set
temperature outputs in the display as a default value during the set temperature programming.
Any stage programmed with Broil or Convection Broil cannot last longer than 10 minutes. A
proper cook time and a set temperature are required for every stage programming. At least
two stages must be programmed before a Multi-Stage cooking operation starts. During stage
1 cooking the electronic control provides temperature visual output in the display. During stage
2 and 3, the electronic control displays the set temperature only.
To set a Multi Stage sequence (Timed Convection Bake, Timed Broil, Keep Warm):
1. Arrange interior oven racks and place food.
2. Select oven by pressing UPPER OVEN
3. Press MULTI STAGE
UPPER
OVEN
.
.
4. Press CONVECTION BAKE
Stage 1
. “350” will flash in the display prompting to enter a temperature.
5. Enter a temperature using the numeric pads 0 to 9 .
6. Press START
. “00:00” will start flashing in the display prompting to enter a cook time.
7. Enter a cook time using the numeric pads 0 to 9 .
8. Press START
. The Multi-Stage indicator will now display the 2nd stage.
9. Press BROIL
Stage 2
. “550” will start flashing in the display prompting to enter a temperature.
10. Enter a temperature using the numeric pads 0 to 9 .
11. Press START
. “00:00” will start flashing in the display prompting to enter a cook time.
12. Enter a cook time using the numeric pads 0 to 9 .
13. Press START
. The Multi-Stage indicator will now display the 3rd stage. If a third stage
is not needed, press START
a second time. This will start the cooking sequence.
Read next page for stage 3 and canceling details
Electronic Oven Controls
multi stage (continued)
14. Press KEEP WARM
Stage 3
. “170” will start flashing in the display prompting to enter a
temperature.
15. Enter a temperature using the numeric pads 0 to 9 .
16. Press START
. “00:00” will start flashing in the display prompting to enter a cook time.
17. Enter a cook time using the numeric pads 0 to 9 .
18. Press START
. The cooking sequence will begin.
Canceling
19. At the end of the sequence, the display will show “End” and a chime will sound.
20. Remove food.
21. Press CANCEL
to stop or cancel the Multi-Stage sequence at any time (see below
for further details).
To cancel a Multi Stage sequence:
A multi stage cooking can be canceled any time while it is in progress (or during its programming)
by the Cancel
key.
If the key is pressed during a multi-stage programming, the electronic control returns to Idle
mode.
39
40
Electronic Oven Controls
user preferences
The User Preferences menu includes all user defined options. This feature enables you to
control the various options of the electronic controls. This menu features the Time of Day,
Celsius or Fahrenheit display mode, Continuous Bake or 12 Hour Energy Saving modes, Clock
display or No-Clock display, 12 Hours Time of Day or 24 Hours Time of Day, Audio Control,
and Adjusting the oven temperature. The User Preferences menu is only available when the
oven is not being used (not cooking).
To browse through the User Preferences menu:
1. Press USER PREF
to bring up the User Preferences menu.
2. Press USER PREF
again to browse through the menu pages.
3. Press
+
hi
or
-
lo
to toggle between the available options.
4. Press START
while the chosen option is on display to change.
5. Press CANCEL
when finished to get back to the standard oven display.
User Preferences menu items:
• CLO 12:00; Setting the clock.
• CLO on; Clock on/off.
• CLO 12hr; 12/24 hour time of day display.
• UPO; Adjusting oven temperature.
•
•
•
•
F-C F ; Fahrenheit / Celcius display.
AUd ; Audio on/off and volume.
E S on ; 12 hour Energy Saving on/off.
rSt ; Reset to default factory settings.
Setting the clock - time of day
The clock may be set for 12 or 24 hour time of day operation (see advanced settings section).
The clock has been preset at the factory for the 12 hour operation. When the range is first
plugged in, or when the power supply to the range has been interrupted, the display will show
“CLO 12:00”. The clock must be set before the oven can be used.
When power to the unit has been interrupted, “12:00” appears and flashes in the display. To
set the Clock in this case, skip step 1 in the example below and follow steps 2 and 3.
To set the clock (example for 1:30):
1. Press USER PREF
until you get to the CLO 12:00 menu page.
2. Press 1 3 0 pads to set the time of day to 1:30. The pads
to raise or lower the actual time displayed.
3. Press START
display.
+
hi
or
-
lo
can also be pressed
to accept the changes and go back to user preferences menu
Electronic Oven Controls
user preferences (continued)
Setting clock display — on or off
The oven control can be programmed to display the time of day or not. The oven has been
preset at the factory to display the time of day.
Changing clock display between ON and OFF:
1. Press USER PREF
2. Press
-
lo
or
+
hi
until you get to the CLO on menu page.
to toggle between displaying or hiding the clock.
3. Press START
display.
to accept the changes and go back to user preferences menu
Setting time of day display — 12 or 24 hours
The oven control can be programmed to display time of day in 12 hours or 24 hours mode.
The oven has been preset at the factory to display in 12 hours mode.
Changing between 12 or 24 hour time of day display:
1. Press USER PREF
2 Press
-
lo
or
+
hi
until you get to the CLO 12hr menu page.
to toggle the display of the clock in 12 or 24 hours.
3. Press START
display.
to accept the changes and go back to user preferences menu
4. Remember to set your clock after changing the time of day display mode.
adjusting oven temperature
The temperature in the oven has been pre-set at the factory. When first using the oven, be
sure to follow recipe times and temperatures. If you think the oven is too hot or too cool,
the temperature in the oven can be adjusted. Before adjusting, test a recipe by using a
temperature setting that is higher or lower than the recommended temperature. The baking
results should help you to decide how much of an adjustment is needed. Each oven can be
individually adjusted.
To adjust the oven temperature:
1. Press USER PREFERENCES
until you get to the UPO menu page.
2. To select the oven you want to adjust, press USER PREFERENCES
between the upper and the lower display.
3. Enter the temperature by pressing the
adjusted by ± 35°F.
4. Press START
display.
+
hi
or
-
lo
again to toggle
pads. The temperature can only be
to accept the changes and go back to user preferences menu
41
42
Electronic Oven Controls
user preferences (continued)
Setting Temperature Display — Fahrenheit or Celsius
The oven control can be programmed to display temperatures in Fahrenheit or Celsius. The
oven has been preset at the factory to display in Fahrenheit.
To change display from Fahrenheit to Celsius or Celsius to Fahrenheit:
1. Press USER PREF
2. Press
+
hi
or
-
lo
3. Press START
until you get to the F-C F menu page.
to toggle between the °C and °F display options.
to accept the changes and go back to user preferences menu display.
AUDIO CONTROL
The Audio Control feature allows the oven control to be operated without sounds or beeps
whenever necessary. If desired the control can be programmed for silent operation and later
returned to operating with all the default sounds and beeps. The volume of the beeps can
also be adjusted.
To change the audio mode or audio volume:
1. Press USER PREF
2. Press
+
hi
or
-
lo
until you get to the AUd menu page.
to toggle between the available volume settings. AUd 5 for the highest
volume setting to AUd 1 for the lowest volume. AUd OFF to disable the beeps.
3. Press START
to accept the changes and go back to user preferences menu display.
Setting Continuous Bake or 12 Hour Energy Saving
The oven control has a factory preset built-in 12 Hour Energy Saving feature that will shut
off the oven if the oven control is left on for more than 11 hours and 59 minutes. The oven
can be programmed to override this feature for Continuous Baking.
Changing between 12 hour energy saving and continuous bake:
1. Press USER PREF
2. Press
+
hi
or
-
lo
3. Press START
until you get to the E S menu page.
to toggle the energy saving setting on and off.
to accept the changes and go back to user preferences menu display.
RE-SETTING TO DEFAULT FACTORY SETTINGS
The oven control can be set to return to its original factory settings. This includes: Setting the
Clock ON/OFF to ON, Setting the clock display mode to 12h, Display mode to Fahrenheit,
Setting the oven temperature adjustment to zero, Setting audio level to 5 and Enabling the
12h energy saving mode. Reseting the control also erase the My Favorite recipes.
To reset the oven control to its original settings:
1. Press USER PREF
2. Press
+
hi
or
-
lo
3. Press START
until you get to the rSt no menu page.
to select YES.
to reset to default factory settings.
Electronic Oven Controls
MY favorites
The Favorites settings allows you to save your most frequently used or most complex cooking
sequences. This feature will save the cooking mode, the target temperature and the cooktime
(if any). The oven can recall up to six cooking sequences from its internal memory, three for
each oven, which are easily accessible from a one touch button. These functions can be used
with all cooking modes and features.
To save a Favorite (example is a 450°F Bake for 30 minutes):
- Saving a Favorite can only be done for an oven which is currently in operation.
1. Select oven by pressing either UPPER OVEN
2. Press BAKE
UPPER
OVEN
or LOWER OVEN
LOWER
OVEN
.
. The default temperature will appear in the display.
3. Enter temperature needed; 4 5 0 .
4. Press COOK OPTIONS
5. Press COOK TIME
to bring up the cook options items.
.
6. Enter time needed; 3 0 .
7. Press START
.
8. Press and hold for 3 seconds any MY FAVORITE
pad. Notice that the red indicator
above the key will light up.
To recall a Favorite:
- Recalling a Favorite can only be done for an oven which is not currently in operation.
1. Select oven by pressing either UPPER OVEN
2. Press any MY FAVORITE
3. Press START
UPPER
OVEN
or LOWER OVEN
LOWER
OVEN
.
pad which is currently lighted up.
.
To overwrite a Favorite:
1. To overwrite a My Favorite simply start a new cooking sequence and save it into the same
My Favorite location (1, 2 or 3) for the selected oven as shown in example above. The
new My Favorite settings will overwrite the old ones.
To delete a Favorite:
1. Select oven by pressing either UPPER OVEN
UPPER
OVEN
2. Press the currently lighted up MY FAVORITE
seconds.
or LOWER OVEN
LOWER
OVEN
.
pad you wish to delete for 3
43
44
Electronic Oven Controls
sabbath feature
(for use on the jewish sabbath & holidays)
The HI
+
hi
and LO
-
pads are used to set the Sabbath feature. The Sabbath feature may
lo
only be used with the BAKE
pad. The oven temperature may be set higher or lower after
setting the Sabbath feature (the oven temperature adjustment feature should be used only
during Jewish Holidays), however the display will not visibly show or provide any audible
tones indicating whether the change occurred correctly. Once the oven is properly set using
Bake with the Sabbath feature active, the oven will remain continuously ON until cancelled.
This will override the factory preset 12-Hour Energy Saving feature.
If the oven light will be needed during the Sabbath, press OVEN LIGHT
before activating
the Sabbath feature. Once the oven light is turned ON and the Sabbath feature is active, the
oven light will remain ON until the Sabbath feature is turned OFF. If the oven light needs to
be OFF, be sure to turn the oven light OFF before activating the Sabbath feature.
IMPORTANT NOTES: It is not advised to attempt to activate any other program feature other
than BAKE while the Sabbath feature is active. ONLY the following key pads will function
after setting the Sabbath feature; CANCEL
, HI
+
hi
and LO
-
lo
.
ALL OTHER KEYPADS will not function once the Sabbath feature is properly activated.
To Program the Upper Oven to Begin Baking Immediately & Activate the
Sabbath feature (example: baking at 350°F)
1. Place the food in the oven.
2. Select oven by pressing either UPPER OVEN
3. Press BAKE
UPPER
OVEN
or LOWER OVEN
LOWER
OVEN
.
.
4. If you desire to set the oven control for a COOK TIME
do so at this time. If not, skip
this step and continue to step 5. Refer to their section for complete instructions. Remember
the oven will shut down after using COOK TIME
and therefore may only be used
once during the Sabbath/Jewish Holidays.
5. Press START
.
6. The oven will turn ON and begin heating immediately.
7. Press and hold both the HI
+
hi
and LO
-
lo
pads for at least 3 seconds. SAb will appear in
the oven display and Sb in the cooktop displays. Once SAb appears in the display the
oven control will no longer beep or display any further changes and the oven is properly
set for the Sabbath feature.
45
Electronic Oven Controls
Sabbath feature (continued)
+
Note: You may change the oven temperature once baking has started. The HI hi key pad will
increase the temperature by 5°F (2°C) at each key press. The LO lo key pad will decrease the
temperature by 5°F (2°C) at each key press. Remember that the oven control will no longer
beep or display any further changes once the oven is set for the Sabbath feature.
8. The oven may be turned OFF at any time by pressing CANCEL
pad (this will turn the
+
oven OFF only). To turn OFF the Sabbath feature press and hold both the HI hi and LO lo
pads for at least 3 seconds. SAb will disappear from the display.
Should you experience a power failure or interruption, the oven will shut off. When power is
returned the oven will not turn back on automatically. SF (Sabbath Failure) will be displayed
in the oven control display and the surface element displays. The oven will remember that
it is set for the Sabbath and the food may be safely removed from the oven while still in the
Sabbath feature, however the oven cannot be turned back on until after the Sabbath. After the
+
Sabbath observance turn OFF the Sabbath feature. Press and hold both the HI hi and LO lo
pads for at least 3 seconds. SAb will disappear from the display and the oven may be used
with all normal functions. For further assistance, guidelines for proper usage, and a complete
list of models with the Sabbath feature, please visit the web at http:\\www.star-k.org.
Notes for the use of the cooktop in Sabbath mode:
• No Sabbath mode is available for induction cooktops. When Sabbath mode is enabled, the
cooktop will lock and it will not be possible to turn a cooking zone ON. If a cooking zone is
ON when Sabbath is set, it will turn off.
46
Electronic Oven Controls
Starting Self-clean cycle
A self-cleaning oven cleans itself with high temperatures (well above cooking temperatures)
which eliminate soil completely or reduce it to a fine powdered ash you can whisk away with
damp cloth. If you are planning to use the oven directly after a self-clean cycle remember to
allow time for the oven to cool down and the oven door to unlock. This normally takes about
one hour.
To set the controls for a Self-Cleaning cycle:
1. Remove the oven racks and the racks supports.
2. Be sure the clock is set with the correct time of day and the oven door is closed.
.
3. Press CLEAN
4. Press LITE for a 2 hour self-clean, or press MEDIUM
for 3 hours, or press
for 4 hours.
HEAVY
5. Press START
. The “DOOR
” icon will flash.
6. As soon as the control is set, the motor driven oven door lock will begin to close
automatically. Once the door has been locked the “DOOR
” indicator light will stop
flashing and remain on.
Note: Allow about 15 seconds for the oven door lock to close.
To set the controls for a delayed Self-Cleaning cycle:
1. Follow the instructions above.
2. Press COOK OPTIONS
3. Press END TIME
to bring up the cook options items.
.
4. Enter time of day needed for the end of the cycle (example for “6:00”; 6 0 0 ).
5. Press START
.
When the Self-Clean Cycle is Completed:
1. The time of day and “DOOR
” will remain ON.
2. The display will show an “Hot” message while the oven is still too hot to open door.
3. Once the oven has cooled down for 1 HOUR, and the “DOOR
displayed, the oven door can then be opened.
” icon is no longer
Stopping or Interrupting a Self-Cleaning Cycle:
If it becomes necessary to stop or interrupt a self-cleaning cycle due to excessive smoke:
1. Press CANCEL
.
2. Once the oven has cooled down for approximately 1 HOUR and the “DOOR
is no longer displayed, the oven door can then be opened.
” icon
During the self-cleaning cycle, the outside of the wall oven can become very hot to the touch.
DO NOT leave small children unattended near the appliance; they may be burned if they touch the hot oven
door surfaces.
DO NOT force the oven door open. This can damage the automatic door locking system. Use
care when opening the oven door after the self-cleaning cycle. Stand to the side of the oven when opening
the door to allow hot air or steam to escape. The oven may still be VERY HOT.
Induction Cooktop Controls
47
About the ceramic glass cooktop
The ceramic cooktop has inductor elements located below the surface of the glass. The
design of the ceramic cooktop outlines the area of the inductor element underneath. Make
sure the diameter of the pan matches the diameter of the element outline on the cooktop.
Only flat-bottom cookware should be used. Heat may be transferred from the cookware to
the ceramic glass and the areas surrounding the elements may become hot enough to
cause burns. The type and size of cookware, the number of inductor elements in use and
the settings, are all factors that will affect the amount of heat that will spread to areas beyond
the surface elements.
Use the correct cookware type
The magnetic Cooking Zone sensors located below the cooktop surface
require the use of cookware made with magnetic material in order to start the
heating process on any of the Cooking Zones.
When purchasing pans, look for cookware specifically identified by the
manufacturer for use with Induction cooktops. If you are not sure, use a magnet
to test whether the cookware type will work. If a magnet sticks to the bottom
of the cookware, the material type is correct for Induction cooking.
It is recommended to always use heavier high quality stainless steel cookware on your Induction Cooktop
surface. This will greatly reduce the possibility of developing scratches on the ceramic surface.
Even quality cookware can scratch the cooktop surface, especially if cookware is slid over the ceramic cooktop
surface without being lifted up. Over time sliding ANY type of cookware over the ceramic cooktop will likely
alter the overall appearance of the cooktop. Eventually the buildup of scratches will make cleaning the surface
difficult and degrade the overall appearance of the cooktop.
Minimum pan size requirements
USE THE CORRECT SIZE COOKWARE - The Cooking
Zones available on the Induction Cooktop require a
MINIMUM pan size to be used at each location. The inner
ring of each Cooking Zone is your guide to the correct
MINIMUM pan size. The pan bottom must FULLY cover
the inner ring for proper cooking to occur.
The thicker outer ring at each Cooking Zone is helpful to
determine the pan MAXIMUM size. After centering the
cookware on the cooktop, make sure the cookware does
not extend more than 1/2” beyond the thicker line on the
Cooking Zone. The pan must make FULL contact on the
glass surface without the bottom of the pan touching the
metal cooktop trims.
NOTE: If a pan made of the correct material is centered
properly on any of the active Cooking Zones but is TOO
SMALL, the circle around the digital part of the display will
stay off and the pan will not heat.
1/2"
13mm
NOTE: Pan
bottom should
not exceed 1/2”
(13mm) from outer
Cooking Zone
(Induction) rings.
5 3/4"
145mm
5"
125mm
7 1/4"
180mm
7 1/4"
180mm
UPPER
OV E N
L OW E R
OV E N
48
Induction Cooktop Controls
Cookware recommendations
INCORRECT
CORRECT
•Cookware not centered on Cooking
Zone surface.
•Cookware centered correctly on
Cooking Zone surface.
•Curved or warped pan bottoms or
sides.
•Flat pan bottom & straight sides.
• Pan does not meet the minimum
size required for the Cooking Zone
used.
• Pan size meets or exceeds the
recommended minimum size for the
Cooking Zone.
• Pan bottom rests on cooktop trim
or does not rest completely on the
cooktop surface.
•Pan rests completely on the Cooktop
surface.
• Heavy handle tilts pan.
• Pan is properly balanced.
Fig. 1
PLEASE NOTE - ANY one of the incorrect conditions listed above in Fig. 1 may be
detected by the sensors located below the ceramic cooktop surface. If the cookware
does not meet any of these conditions, one or more of the Cooking Zones will not heat
indicated by the turned off circle surrounding the digital display for that affected zone.
Correct the problems before attempting to reactivate the cooktop.
Induction Cooktop Controls
Use quality cookware in good condition
The cookware used with the Induction Cooktop should have flat bottoms that make good
contact with the entire surface of the Cooking Zone. Check for flatness by rotating a ruler
across the bottom of the cookware (See Fig. 1). Be sure to follow all the recommendations
for using cookware.
Also remember to:
• Use cookware made with the correct material type for
Induction Cooking.
• Use quality cookware with heavier bottoms for better heat
distribution allowing for more even cooking results.
• The pan size should match the amount of food being
prepared.
• Do not let pans boil dry. This may cause permanent damage in the form of breakage, fusion, or marring that
can affect the ceramic cooktop. (This type of damage is
not covered by your warranty).
• Do not use dirty pans with grease buildup. Always use
pans that are easy to clean after cooking.
Fig. 1
Caution
!
The Cooking Zones may appear to be cool while turned ON and after they have been turned OFF. The glass
surface may be HOT from residual heat transferred from the cookware and burns may occur.
Caution
!
DO NOT TOUCH HOT COOKWARE or PANS directly with hands. Always use oven mitts or pot holders to
protect hands from burns.
!
Caution
DO NOT SLIDE Cookware across the cooktop surface. Doing so may permanently damage the appearance
of the ceramic cooktop.
Prior to using your cooktop for the first time, apply the recommended cooktop cleaning creme
to the ceramic surface. Buff with a non-abrasive cloth or pad. This will make cleaning easier
when soiled from cooking. The special cooktop cleaning cream leaves a protective finish on
the glass to help prevent scratches and abrasions.
49
50
Induction Cooktop Controls
Setting the cooktop
The cooktop control provides 4 digital display windows to help set power levels for the heating
zones located on the cooktop. These settings work the same way as normal knob settings
except the settings are displayed in LCD style displays.
Available cooktop settings
Your control provides 23 different settings for each cooking zone. Some of these power levels
include Lo (1%) Fig. 1, 5.0 (medium 50%) Fig. 2, Hi (100%) Fig. 3, Pb (Power Boost) Fig. 4.
Fig. 1
Fig. 2
Fig. 3
Fig. 4
• The ON OFF key pad is used to power-up or power-off the cooking zone.
• The hi+ key pad is used to set the cooking zone at Power Boost (Fig. 4) if used after the ON OFF key pad. It can also be used at any moment to raise the power setting of the
cooking zone.
• The med key pad is used to set the cooking zone at 5.0 (Fig. 2).
• The lo- key pad is used to set the cooking zone at Lo (Fig. 1) if used after the ON OFF key
pad. It can also be used at any moment to lower the power setting of the cooking zone.
The hi+ and lo- keys provide incremental adjustments for more precise control when changing
settings between the lower heat levels (Lo to 3.0 power levels). Higher heat level setting
changes (between 3.0 to HI) will change much faster.
Display Settings Changes
Setting / Power
Incremental change
Lo to 3.0 (1-30%)
0.2
3.0 to HI (30-100%)
0.5
Induction Cooktop Controls
51
Setting the cooktop (continued)
Setting cooktop elements
• If needed, wake the control panel.
• Touch the ON OFF key for the desired heating zone.
• Press the desired power level key (hi+, med or lo-) or for more precise level settings use
the hi+ or lo- keys to make specific level changes.
Hot Element (HE) Message
After using any of the induction heating zones, the ceramic cooktop will become very hot
from heat transferred by the cookware. Even after turning the control off, the cooktop will
remain hot for some time.
The cooktop control monitors the temperature of the cooktop surface and displays a
message “HE” (hot element) and flashes the burner ring when the cooktop is still too
hot to touch -Fig. 1-. If the HE message remains displayed in the LCD, the heating zone
may be set again and used for cooking.
Suggested cooktop power settings
Use the chart below to determine the suggested setting for the type of food you are
preparing when using the cooktop.
Recommended Surface Settings Chart
Setting Type of Cooking
POWER BOOST (Pb) Start most foods; bring water to a boil and pan broiling.
HIGH (8-HI)
Continue a rapid boil; frying, deep fat frying.
MEDIUM (6)
Maintain a slow boil; thicken sauces and gravies; steaming
vegetables.
MEDIUM LOW (4- 5)
Keep foods cooking; poaching and stewing.
LOW (Lo-3)
Keep warm, melting and simmering.
!
Caution
Heat may be transferred from the cookware to the ceramic glass and the areas surrounding the elements may
become hot enough to cause burns. The Hot Element Message Light will turn on and will continue to
glow until the glass cooktop has cooled down to a moderate level. The glass surface may still be hot
and burns may occur if the glass surface is touched before the indicator light has turned OFF.
Do not place plastic items such as salt and pepper shakers, spoon holders or plastic wrappings on top
of the range when it is in use. These items could melt or ignite. Potholders, towels or wooden spoons could
catch fire if placed too close to the surface elements.
Fig. 1
52
Induction Cooktop Controls
Setting POWER BOOST FEATURE
Your induction cooktop is equipped with
a Power Boost feature on each cooking
zone. The Power Boost feature is used to
bring large quantities of water or food to
cooking temperature at the fastest speed
possible. The Power Boost feature will
give you up to 139% power output for a
maximum of 10 minutes.
To Turn ON the Power Boost Feature:
- Press the ON OFF pad to turn on the cooking
zone you want to set to Power Boost.
- Press the "hi +" key pad and the PB will be
shown in the display (figure 1).
Power sharing
Figure 1
To set the Power Boost, press hi +
when the zone is first turned on.
Your cooktop is equipped with four cooking zones within two
heating sections: right and left. Each section is powered by one
induction inverter. The two cooking zones in the right and left
section share the power of one inverter.
If you are cooking in both zones of a heating section, the last zone
that began to heat will cook at the power setting you selected.
The other zone will experience a slight decrease from its power
setting.
POWER SHARING TIPS: Remember to select the power setting
last for the cooking zone you want to maintain at full setting heat.
To maintain full setting heat for two items, place one item on a
zone in one section (left side), and the other item on a zone in
another section (right side).
UPPER
OV E N
L OW E R
OV E N
Fig. 2
Operational noises
The electronic processes involved with Induction Cooking create some unusual background
noises. These noises are normal and part of the Induction Cooking process.
Please note that these noises are more noticeable while cooking at the Power BOOST level.
Very loud noises are not part of normal Induction Cooking.
Data Sheets
53
ELECTRONIC OVEN CONTROL
1. This self-cleaning controller offers Bake, Broil, Convection Bake, Convection Roasting and Convection Broil modes,
Dehydrating, Defrosting, Temperature Probe, Perfect Turkey, Bread Proof, Keep Warm and Cleaning functions.
2. Convection operates with an element and a fan dedicated to convection.
3. This controller includes a display board, a relay board, and a convection fan and oven light control board.
NOTE: The controllers are not field repairable. Only temperature settings can be changed. See oven calibration.
ELECTRONIC OVEN CONTROL RELAY BOARD
P10
P2
P18 P4
J4
P6
K6
J7
K2
J6
J5
P5
K3 K5 K7
P7
P9
P11
J2
K1
P3 P17
K16
K11
P1
K18
Relay Board Legend:
K1.Double Line Break - Upper Oven
K2.Double Line Break - Lower Oven
K3.Broil Relay - Upper Oven
K5.Bake Relay - Upper Oven
K6.Bake Relay - Lower Oven
K7.Convection Element Relay - Upper
Oven
K11.Motor Door Latch - Upper Oven
K16.Cooling Fan Relay Low Speed Upper Oven
K18.Cooling Fan Relay High Speed Upper Oven
J3
This relay board serves to energize the upper and lower oven heating
elements, door lock motor and cooling fan.
P1 - L2 Out, Upper Oven
P2 - L2 Out, Lower Oven
P3 - L2 In, Upper Oven
P4 - Not Used
P5 - L1, Upper Oven
P6 - L1, Lower Oven
P7 - Broil, Upper Oven
P9 - Bake, Upper Oven
P10 - Bake, Lower Oven
P11 - Convection Element, Upper Oven
P17 - Not Used
P18 - L2 In, Lower Oven
J2 - DC Power Output To Display Board
J3 - AC Power Output (motor door latch, cooling fan) For Upper Oven
J4 - Power Input (L1, Neutral)
J5 - Relay Control Inputs (bake, broil and convection
elements, motor door latch, DLB) For Upper Oven
J6 - Relay Control Inputs (cooling fan) For Upper Oven
J7 - Relay Control Inputs (bake element and DLB) For
Lower Oven
54
Data Sheets
ELECTRONIC CONTROL DISPLAY BOARD
Electronic oven
display board
for electric
ranges
Connector Legend:
P1 - Upper Oven Probe Input
P2 - Communication with Convection Fan and Oven Light Control Board, Communication with ESEC UIB
P3 - Keyboard (touch panel)
P6 - Microprocessor Programming (not used)
P7 - Touch Panel LEDs
P8 - Power Supply Input for Display LEDs
P9 - Relay Control Output (heating elements, DLB, motor door latch) for Upper Oven
P10 - Switches Input (motor door latch switch, door switch, rack switch) for Upper Oven
P11 - Relay Control Output (heating element, DLB) for Lower Oven
P13 - Relay Control Output (cooling fan)
P16 - DC Power Supply Input (from Electronic Oven Control Relay Board)
P18 - Meat Probe Input
P20 - Lower Oven Probe Input
POWER SUPPLY BOARD FOR ELECTRONIC CONTROL DISPLAY BOARD
This board provides power to the electronic control display board.
P1 - AC Power Input (L2 and Neutral)
P1
P2 - DC Power Output
P2
CONVECTION FAN AND OVEN LIGHTS CONTROL BOARD
P2
This board control the power output of the convection fan and oven lights.
P1 - Communication with display board and power supply input
P2 - AC power output for convection fan and oven lights, power inputs (L1,
neutral)
P6 - Microprocessor programming (not used)
Q4
Q3
U2
U1
U4
P1
P6
Data Sheets
55
ELECTRONIC OVEN CONTROL (FAULT CODES) DESCRIPTIONS
Note: Generally speaking “F1X” implies a control failure, “F3X” an oven probe problem, and “F9X” a latch motor problem.
F10 Control has sensed a potential runaway oven condition. Control may have shorted relay, RTD sensor probe may have a gone
bad. 1) Check RTD sensor probe and replace if necessary. If oven is overheating, disconnect power. If oven continues to overheat when power
is reapplied, replace relay board and/or display board.
F11 Shorted Key: a key has been detected as pressed for a long period and will be considered a shorted key alarm and will
terminate all oven activity. 1) Press any key to clear the error. 2) If fault returns, replace the keyboard (touch panel). 3) If the problem
persists, replace the display board.
F13 Control's internal checksum may have become corrupted. 1) Press any key to clear the error. 2) Disconnect power, wait 30 seconds
and reapply power. If fault returns upon power-up, replace display board.
F14 Misconnected keyboard cable. 1) Verify connection between display board and touch panel (2 ribbon cables). Make sure the cables are well
connected at both ends. 2) If the cables are good, replace the touch panel. 3) If the problem persists, replace the display board.
F15 Controller self check failed or terminal cutoff open. 1) if the oven controller displays an F15 error code and the ESEC controller displays
an E15 error code at the same time, this is a strong indication that the safety thermostat (thermal cutoff) inside the front console opened. The
primary reason for a safety thermostat to open is a deficiency of the cooling fan. With a ohmmeter, verify if the thermostat tripped. Reset the
thermostat is needed and verify operation of the cooling fan. Note: the safety thermostat, when open, cuts AC power to the oven relay board
(connector J4, pin 1 and 3) and the ESEC relay board (connector J1, pin and 3). 2) An F15 error code on the oven controller may indicate the
oven controller is not receiving a synchronization signal from the relay board. One easy way to determine this is to power off the unit, power
it on and start a Timer for 1 minute before the F15 error code appears. If the timer counts-down normally then the synchronization signal is
okay. If the timer stays at 1:00 and does not countdown, then the synchronization signal is missing. If the synchronization signal is missing,
check first if the oven relay board is receiving 120VAC correctly (J4 pin 1 and 3). Then check the wiring between connector J2 on the relay
board and connector P16 on the oven controller. If AC power and wiring looks good and the problem is still there, replace the relay board. If
problem persists, replace the oven controller. 3) The F15 error code may be caused by an oven controller failure. If the safety thermostat and
synchronization signal have been verified and tested good, replace the oven controller.
F20 The oven controller has detected a problem with the communication link to the surface element controller (ESEC). 1) Is the
ESEC User Interface Board powered on (are the surface element displays showing something)? If not, that is the reason why the oven control
cannot communicate with it (ESEC has no power). Check the 120VAC voltage going in to the ESEC power supply board located in the front
console (connector P1) and the low voltage supply going from the power supply board (connector P2) to the ESEC UIB (connector P8). 2)
Check connections between connector P2 on the oven controller and P9 on the ESEC User Interface Board. This is the communication link.
Verify for continuity. Refer to the wiring diagram. 3) If the above steps failed to solve the problem, replace the ESEC UIB board. 4) If problem
persists replace the oven controller.
F23 The controller failed to communicate with the convection fan and oven lights control board. 1) Verify wiring between P2 on
the display board and P2 on the convection fan and oven lights control board. 2) If wiring is good, replace convection fan and oven lights
board. 3) If the problem persists, replace the display board.
F25 No zero cross signal detected on the convection fan and oven lights control board. 1) Make sure L1 and Neutral are connected to
the convection fan and oven lights control board on connector P2 (P2 pin 3 = neutral / P2 pin 5 = L1). 2) If problem persists, replace the oven
convection fan and oven lights control board.
F30 Open RTD sensor probe/ wiring problem. Note: EOC may initially display an "F10", thinking a runaway condition exists. F31
Shorted RTD sensor probe / wiring problem. Note: F30 or F31 is displayed when oven is in active mode or an attempt to enter an
active mode is made. 1) Check wiring in probe circuit for possible open condition. 2) Check RTD resistance at room temperature (compare
to probe resistance chart). If resistance does not match the chart, replace the RTD sensor probe. 3) Let the oven cool down and restart the
function. 4) If the problem persists, replace the display board.
F90 Door motor mechanism failure. 1) Press any key to clear the error. 2) If it does not eliminate the problem, turn off power for 30
seconds, then turn on power. 3) Check wiring of Lock Motor, Lock Switch and Door Switch circuits. 4) Unplug the lock motor from the board
and apply power (L1) directly to the Lock Motor. If the motor does not rotate, replace Lock Motor Assembly. 5) Check Lock Switch for proper
operation (do they open and close, check with ohmmeter). The Lock Motor may be powered as in above step to open and close Lock Switch.
If the Lock Switch is defective, replace Motor Lock Assembly. 6) If all above steps fail to correct situation, replace the display board and/or
the relay board in the event of a motor that does not rotate. 7) If all the above steps fail to correct the situation, replace the display board in
the event of a motor that rotates endlessly.
56
Data Sheets
RTD SCALE
Temp. °F
32 ± 1.9
75 ± 2.5
250 ± 4.4
350 ± 5.4
450 ± 6.9
550 ± 8.2
650 ± 9.6
900 ± 13.6
Temp. °C Resistance (ohms)
0.0 ± 1.1
1000 ± 4.0
23.9 ± 1.4
1091 ± 5.3
121.1 ± 2.4
1453 ± 8.9
176.7 ± 3.0
1654 ± 10.8
232.2 ± 3.8
1852 ± 13.5
287.8 ± 4.6
2047 ± 15.8
343.3 ± 5.3
2237 ± 18.5
482.2 ± 7.6
2697 ± 24.4
ELECTRICAL RATING FOR ELECTRIC OVENS
Kw Rating
See
Bake Element 2500W / 1879W
240/208 V
Nameplate
Wattage
Broil Element 4000W / 3004W Convection 2500W / 1879W
Wattage
Element Wattage
OVEN
TEMPERATURE
SENSOR
ELECTRIC SLIDE-IN OVEN CIRCUIT ANALYSIS MATRIX
Bake
Keep Warm
Broil
Conv. Bake
Conv. Roast
Conv. Broil
Clean
Locking
Locked
Unlocking
Unlocked
Light
Door Open
Door Closed
Bread Proof
On Relay Board
On Display
On Convection Fan and
Board
ELEMENTS
Door Oven Lights Control Board
Door Switch
Bake Broil Conv. Motor Light
Convection Fan
P8-3 / P8-5
P7
P9
P2-7
P13 J3-5 P2-1
X
X
X
X
X
X
X
X
X
X
X
X*
X*
X
X
X
X
X
On Relay Board
DLB
L2 out
P1
X
X
X
X
X
X
X
Cooling Cooling Fan
Fan Low High speed
speed J3-7
J3-8
X
X
X
X
X
X
X
X
X
X
X
X
X
X
X
X
*
Convection
element
and
fan
are
used
for
the
first
Relay will operate in this condition only
rise of temperature.
lower OVEN ANALYSIS MATRIX
Bake
Keep Warm
On Relay Board
ELEMENTS
Bake
P10
On Relay Board
DLB
L2 out
P2
X
X
X
X
MEAT PROBE RESISTANCE
Meat Probe Temperature VS Resistance Table
Temp. Celsius
Temp. Fahrenheit
Probe Resistance
25°C
50°C
80°C
100°C
77°F
122°F
176°F
212°F
49.478 Kohm +/- 7%
17.737 Kohm +/- 4.9%
6.107 Kohm +/- 3.3%
3.264 Kohm +/- 4.6%
Probe MTG Nut
Probe Receptacle
Meat Probe
Data Sheets
57
OVEN LIGHT
This appliance is equipped with electronics that control the intensity of the oven lights. This is done with the Convection
Fan and Oven Lights Control Board that modulates the AC voltage going to the 120V halogen lamps. When the
light key is pressed or when the oven door is opened the display board communicates with the Convection Fan
and Oven Lights Control Board to specify the required light intensity. The Convection Fan and Oven Lights Control
Board also add a “theater-like” effect on the light: the light intensity is gradually ramp-up or ramp-down as the
light is turned on or off.
The lights of the upper and lower oven (warmer oven) are connected together and will turn on or off at the same
time, they cannot be controlled individually.
If the oven lights do not operate, check the following:
- If you are getting an F23 error code it means the display board is not able to communicate with the Convection Fan
and Oven Lights Control Board, thus the oven light will not operate. Check connections between the display board
and the Convection Fan and Oven Lights Control Board. Refer to the fault code section for corrective actions.
- If the lights are always ON (even with the door closed), it could be because the control mistakenly thinks the door
is opened. Verify door switch and its wiring.
- Check connections on the Convection Fan and Oven Lights Control Board. On connector P2: pin 3 should be
Neutral, pin 5 should be L1 (120VAC) and pin 1 should go to the oven lights. The other terminal of the light should
be connected to Neutral.
- Verify is light bulbs need to be replaced.
- If there is no error code, the wiring is good and still the oven lights are not working then replace the Convection
Fan and Oven Lights Control Board.
58
Data Sheets
NOTICE - This service data sheet is intended for use by
persons having electrical and mechanical training and a level of
knowledge of these subjects generally considered acceptable
in the appliance repair trade. The manufacturer cannot be
responsible, nor assume any liability for injury or damage of
any kind arising from the use of this data sheet.
BASIC COOKING ZONE WIRING
SAFE SERVICING PRACTICES
To avoid the possibility of personal injury and/or property damage, it
is important that safe servicing practices be observed. The following
are examples, but without limitation, of such practices.
1.
Before servicing or moving an appliance remove power cord
from electrical outlet, trip circuit breaker to OFF, or remove fuse.
Never interfere with the proper installation of any safety device.
GROUNDING: The standard color coding for safety ground
wires is GREEN or GREEN WITH YELLOW STRIPES. Ground
leads are not to be used as current carrying conductors. It is
extremely important that the service technician reestablish
all safety grounds prior to completion of service. Failure
to do so will create a potential safety hazard.
Prior to returning the product to service, ensure that:
• All electric connections are correct and secure.
• All electrical leads are properly dressed and secured away from
sharp edges, high-temperature components, and moving parts.
• All uninsulated electrical terminals, connectors, heaters, etc.
are adequately spaced away from all metal parts and panels.
• All safety grounds (both internal and external) are correctly
and securely reassembled.
2.
3.
4.
NOTE: Connect inductor wire identified by a red sleeve (shortest) to X8 or X9 connectors.
POWER LEVEL EXPLANATION TABLE
Displayed Power Level
LH
Lo
1.2
1.4
1.6
1.8
2.0
2.2
2.4
2.6
2.8
3.0
3.5
Power Level %
3.0
3.0
3.5
4.0
4.5
5.0
5.5
6.0
7.0
8.0
9.0
10.5
13.0
Displayed Power Level
4.0
4.5
5.0
5.5
6.0
6.5
7.0
8.0
9.0
Hi
PB
Power Level %
15.5
18.0
21.0
25.0
31.0
38.0
45.0
54.0
64.0
100
130-153
ELECTRONIC SURFACE ELEMENT CONTROL (ESEC) USER INTERFACE BOARD (UIB)
User Interface Board (UIB) Legend:
P6
P3
J4
J2
P8
P9
J3
J2. Connector for Touch Panel LEDs and Display Indicators
J3. Connector for Touch Panel LEDs and Display Indicators
J4. Connector for Keyboard (Touch Panel)
P3.Micro Programming Header (Not Used)
P6.Power Supply Input (from Power Supply Board for ESEC)
P8.Communication with the Induction
P9.Communication with Oven Control
User Interface Board (UIB)
POWER SUPPLY BOARD FOR ESEC UIB
P3
This board provides power to the Electronic Surface Element Control (ESEC).
P1 - AC Power Input (L1 and Neutral)
P1
P3 - DC Power Output
Data Sheets
59
INDUCTION COOKTOP ELECTRONIC ERROR (FAULT) CODE DESCRIPTIONS
Error Code - Possible Cause or Condition
Suggested Corrective Action
11- Jammed key.
1) Verify if there is no mechanical interference in the Touch Panel area
(utensil, wire, etc...) Disconnect power, wait 30 seconds and reapply
power. If fault returns: 2) Verify harnesses between the ESEC-UIB and the
Touch Panel. 3) Replace ESEC-UIB. 4) Replace the Touch Panel.
14 - Touch Panel Tail missing
Disconnect power, wait 30 seconds and reapply power. If fault returns: 1)
Verify harnesses between ESEC-UIB and the Touch Panel. 2) Replace
ESEC-UIB. 3) Replace the Touch Panel.
15 - ESEC Self test fail.
1) Check harness going to ESEC-UIB connection. 2) Replace ESEC-UIB.
21- Lin (Local Interconnect Network) error, no 1) Verify the Lin Bus communication harness at ESEC-UIB, P8 connector
communications, shorted bus.
is well connected and not damaged. 2) Replace ESEC-UIB. 3) Replace
Filter Circuit Board.
30/70- AC input voltage too high, Induction Housing 1) Measure the house voltage at the main incoming connections on the
Assembly
Filter Circuit Board, between terminals X1,X2 and X4,X5 the voltage
35/75- AC input voltage too low, Induction Housing should be 240 Volts AC ± 10%. 2) Inspect electrical jumpers from X1 to
Assembly
X2 and X4 to X5. 3) Terminal X6 is your chassis ground wire. 4) If proper
voltage is present, replace the Filter Circuit Board.
31- Internal generator error, sync Induction Housing 1) Verify cables & connections on the Left Side Generator Circuit Board.
Assembly / Left side cooking zones.
2) Replace the Left Side Generator Circuit Board.
32/33- Power Supply defect, Induction Housing
Assembly / Left side cooking zones
1) Test all cables & connections on Filter Circuit Board. 2) Replace the
Filter Circuit Board. 3) Replace the Left Side Generator Circuit Board.
34- Internal generator error, communication,
Induction Housing Assembly / Left side cooking
zones.
1) Check cable between Filter Circuit Board, X12 connector and Left Side
Generator Circuit Board, X10 connector. 2) Replace Left Side Generator
Circuit Board. 3) Replace Filter Circuit Board.
36- Communication error, Induction Housing Assembly 1) Verify communication harness between ESEC-UIB, P9 connector and
/ Left side cooking zones
Filter Circuit Board, X14/X20 connectors. 2) Verify communication harness
going between Filter Circuit Board, connector X12 and Left Side Generator
Circuit Board, connector X10. Replace if defective. 3) Replace Filter Circuit
Board. 4) Replace Left Side Generator Circuit Board. 5) Replace ESECUIB.
37- Heat sink temperature sensor break, Induction 1) Replace Left Side Generator Circuit Board.
Housing Assembly / Left side cooking zones
39- Configuration mismatch between the ESEC-UIB 1) Disconnect power, wait 30 seconds and reapply power. If fault returns:
and the Induction Housing Assembly.
2) Activate simultaneous both right front and right rear On/Off keys for 5
seconds (approx.), the error code should be replace by "8.8". 3) When
"8.8" are shown on both left and right displays, release right side On/Off
keys simultaneous active both left side front and rear On/Off keys for 5
seconds (approx.). 4) Displays should the show walking dashes when the
re configuration is executing. When displays turn off, the unit is ready to
operate. 5) If the reconfiguration described in steps 2 to 4 did not resolve
the problem, replace the induction generator housing in the cooktop.
51- Inductor temperature sensor break (LF).
52- Inductor temperature sensor break (LR).
54- Inductor temperature sensor break (RR).
55- Inductor temperature sensor break (RF).
1) Verify element temperature sensor is correctly connect to the good
Induction Housing Assembly connector (refer to wiring diagram). 2) Replace
Inductor if temperature sensor resistor value is not approximately 1000
ohms (blue wires) at room temperature. 3) Replace associated Generator
Circuit Board.
61- LF Inductor temperature sensor too hot.
62- LR Inductor temperature sensor too hot.
64- RR Inductor temperature sensor too hot.
65- RF Inductor temperature sensor too hot.
1) Verify cooktop ventilation is correct (airway & fan). 2) Verify Inductor
white isolation material is complete and cover the whole Inductor. 3) Verify
Inductor temperature sensor is correctly connected to the Induction House
Assembly. 4) Replace Inductor if temperature sensor resistor value is not
approximately 1000 ohms (blue wires) at room temperature. 5) Replace
associated Generator Circuit Board.
71- Internal generator error. Sync, Induction Housing
Assembly / Right side cooking zones.
1) Check all cables and connectors on the Right Side Generator Circuit
Board, replace if defective. 2) Replace the Right Side Generator Circuit
Board.
60
Data Sheets
INDUCTION COOKTOP ELECTRONIC ERROR (FAULT) CODE DESCRIPTIONS (continued)
Error Code - Possible Cause or Condition Suggested Corrective Action
72/73- Power Supply defect. Induction Housing
Assembly / Right side cooking zones.
1) Test all cables & connections on Filter Circuit Board. 2) Replace the Filter
Circuit Board. 3) Replace the Right Side Generator Circuit Board.
74- Internal generator error. Communication,
Induction Housing Assembly / Right side cooking
zones.
1) Check cable between Filter Circuit Board, connector X13 and the Right Side
Generator Circuit Board, connector X10. 2) Replace the Filter Circuit Board. 3)
Replace the Right Side Generator Circuit Board.
76- Communication error. Induction Housing
Assembly / Right side cooking zones.
1) Verify communication harness between ESEC-UIB P9 connector and Filter
Circuit Board X20/X14, replace if damaged. 2) Verify communication harness
going between Filter Circuit Board, connector X13 and Right Side Generator
Circuit Board, X10 connector. Replace if defective. 3) Replace Filter Circuit Board.
4) Replace the Right Side Generator Circuit Board. 5) Replace ESEC-UIB.
77- Heat sink temperature sensor break,
Induction Housing Assembly / Right side cooking
zones.
1) Replace the Right Side Generator Circuit Board.
ADDITIONAL INDUCTION COOKTOP ERROR (FAULT) CONDITIONS
Symptom or Failure
Control display
Possible cause or condition
Suggested corrective action
Pan does not heat up.
Normal operation
Pan too small for proper pan
detection and only works with low
power.
Use larger pan or this pan on a smaller cooking
zone. Refer to owners guide for proper pan
selection.
Red circle does not
light or is flashing
and pan does not
heat.
Pan not detected.
Check whether the pots or pans are suitable for
induction. Refer to owners guide for proper pan
selection.
Induction Coil not correctly
connected or Induction Coil open.
Check the coil wire terminal connections. Ensure
that they are properly connected and tightened.
Test continuity of coil (should be less than 1
ohm).
Distance between coil and glass
ceramic too large.
Check whether the coil is properly positioned and
touching the glass cooktop surface.
Individual buttons
None
cannot be used or
cannot always be used.
1. Test cables & connections.
2. Touch Panel defective.
3. ESEC-UIB defective.
1) Follow instructions for proper use of touch controls.
2) Verify harness going between ESEC-UIB J4
and Touch Panel J3 connectors (16 pins). Replace
if defective or damaged.
3) Verify there is no mechanical interference close
to the Touch Panel (wires, utensils, etc...)
4) Replace ESEC-UIB
5) Replace Touch Panel
Cooking power too
low or shuts down
prematurely.
None
Fluids spilled or object lying on
Touch Panel keypads.
Clean up spills or remove objects. Restart cooktop
in normal manner.
Normal operation
Ventilation slots obstructed.
Clean up spills or remove objects. Restart cooktop
in normal manner.
Unsuitable pots (bottom bent).
Follow owners guide for proper pan selection.
Distance between coil and glass
ceramic too large.
Check whether the glass ceramic was pushed
down when being screwed in position and the coil
has been correctly positioned.
Fan does not start.
1) When setting a cooking phase >0, the fan runs
at a slow speed. If not, check the fan for foreign
objects, remove these where appropriate. 2) If
necessary, replace fan. 3) Replace the Filter
Circuit Board.
Oven Cooling Fan does not
operate.
1) Check oven cooling fan for correct operation
when cooktop zones are heating. If necessary,
replace fan.
61
Data Sheets
INDUCTION COOKTOP ELECTRONIC ERROR (FAULT) CODE DESCRIPTIONS (continued)
Symptom or Failure
Control display
Possible cause or condition
Suggested corrective action
Steady "HE" in display
when cooking zone is
cold and switched off.
"HE"
Temperature sensor defect.
1) Test coil RTD approx. 1K ohms at room
temperature. Replace coil if resistance is not
correct. 2) Replace generator circuit board.
Cooktop does not
initialize/operate.
Blank
No Display
No Beep
Unit not powered
- Verify unit installation.
Defective ESEC power supply.
1) Measure voltage at the power supply input
P1 pins 1&4 should be 120VAC. Verify harness
if voltage is not present. 2) Measure voltage at
power supply output P3 pins 1&2 should app.
8VDC. Replace ESEC power supply if voltage is
not present. 3) Measure voltage at power supply
output P3 pins 1&3 should be app. 16VDC. Replace
ESEC power supply if voltage is not present.
Defective ESEC-UIB.
Replace ESEC-UIB.
INDUCTION HOUSING ASSEMBLY
X12
X10
X9
X6
X5
X4
X3
X17
X11
X2
X1
X21
Large Filter
Circuit Board
X14
X6
X8
X9
X7
X13
X7
X5
X1
X2
X10
X7
X8
X4
X2
X1
Right Side Generator
Circuit Board
X4
Left Side Generator
Circuit Board
X9
X5
X8
X6
X10
62
Data Sheets
Oven Control 3165165xx
Power supply board 3165352xx
pin 1 = gnd
P8
pin 2 = gnd
power supply
pin 3 not used
input for control
pin 4 = V_LED2 (8.5 VDC ±2.5VDC)
board LED display
pin 5 = V_LED2 (8.5 VDC ±2.5VDC)
pin 1 = gnd
pin 2 = gnd
pin 3 not used
pin 4 = V_LED2 (8.5 VDC ±2.5VDC)
pin 5 = V_LED2 (8.5 VDC ±2.5VDC)
P2
power supply
output
pin 1 = 120VAC in
P1
pin 2 not used
line voltage
pin 3 not used
input
pin 4 = neutral
Conv Fan and Light Control upper oven
P2
Communication
pin 1 not used
pin 1 not used
pin 3 = gnd
pin 4 = power (5VDC ±1VDC)
pin 3 = gnd
pin 4 = power (5VDC ±1VDC)
pin 5 not used don't connect
pin 6 not used
pin 2 = Communication (0 - 5VDC)
pin 2 = Communication (0 - 5VDC)
pin 1 = upper oven probe
P1
Main Oven Probe
pin 2= upper oven probe
Main oven probe
P20
pin 1 = lower oven probe
Mini-Oven Oven pin 2 = lower oven probe
Probe
pin 3 not used
Mini-oven probe
P18
Meat Probe
P10
Switch sense
upper oven
P1
Comm and
power input
P2 Triac
output
L2
Neutral
pin 1 = Oven light(s) control
pin 2 not used
pin 3 = Neutral
pin 4 not used
pin 5 = L1
pin 6 not used
pin 7 = convection fan control
pin 1 = MDL switch
pin 2 = rack sense
pin 3 = door switch
pin 4 not used
pin 5 = sense return (common)
L1
Conv fan
Neutral
MDL switch
rack sense switch
door switch
Oven Relay Board
pin 1 = gnd
pin 2 not used
pin 3 = V_UR (16 VDC ±5VDC)
pin 4 not used
pin 5 = sync signal
Fast-on Connectors
J2
Power supply
output
(L2 in )
(L2 out)
pin 1 not used
pin 2 = MDL relay
pin 3 not used
pin 4 = Main Oven DLB relay
pin 5 = Main Oven Conv element relay
pin 6 = Main Oven Bake element relay
pin 7 = Main Oven Broil element relay
pin 8 not used
pin 9 = wiggler stimulus
pin 1 not used
pin 2 = MDL
pin 3 not used
J5
pin 4 = Main Oven DLB relay
Relay control
pin 5 = Main Oven Conv element relay input - main
pin 6 = Main Oven Bake element relay
oven
pin 7 = Main Oven Broil element relay
pin 8 not used
pin 9 = wiggler stimulus
pin 1 not used
pin 2 not used
pin 3 = Cooling fan high relay
pin 4 = Cooling fan low relay
pin 5 not used
pin 6 not used
pin 7 not used
pin 8 = PWM relays
pin 1 not used
pin 2 not used
pin 3 = Cooling fan high relay
pin 4 = Cooling fan low relay
pin 5 not used
pin 6 not used
pin 7 not used
pin 8 = PWM relays
all relay control: 3.3VDC = relay closed. 0V = relay open
P13
Relay control
output to relay
board - cooling
fans
Neutral
Neutral
meat probe
pin 1 = meat probe
pin 2 = meat probe
pin 3 not used
pin 4 not used
pin 1 = gnd
P16
pin 2 not used
Power supply
pin 3 = V_UR (16 VDC ±5VDC)
input for control
pin 4 not used
board
pin 5 = sync signal
P9
Relay control
output to relay
board - main oven
Oven lights
all relay control: 3.3VDC = relay closed. 0V = relay open
pin 1 not used
pin 2 = mini-oven Bake element relay
P11
pin 3 not used
Relay control
pin 4 = mini-oven DLB relay
output to relay
pin 5 not used
board - mini-oven
pin 6 not used
pin 7 not used
all relay control: 3.3VDC = relay closed. 0V = relay open
J6
Relay control
input - cooling
fans
pin 1 not used
pin 2 = mini-oven Bake element relay
J7
pin 3 not used
Relay control
pin 4 = mini-oven DLB relay
input- mini-oven
pin 5 not used
pin 6 not used
pin 7 not used
L2 in )
(L2 out
P5
P9
P7
P11
P3
P1
L1
Upper Bake element
Upper Broil element
Upper Conv element
L2
P6
P10
L1
mini-oven Bake element
P18
P2
L2
TH2
TH1,2,3 are safety thermodisks
pin 1 = Neutral
J3
pin 2 not used
120VAC pin 3 = L1
output for pin 4 not used
MDL and pin 5 = MDL
cooling fan pin 6 not used
Main oven pin 7 = Cooling fan low speed
pin 8 = Cooling fan high speed
J4
pin 1 = Neutral
120VAC pin 2 not used
input for pin 3 = L1
transformer
Neutral
L1
MDL
Neutral
Cooling fan
Neutral
TH1
L1
Glass Touch panel
P3 (20 pins)
Keyboard
P7 (30 pins)
Touch panel LEDs
J1
J2
ESEC30
pin 1 = LIN comm
P9
pin 2 not used
Communication
pin 3 = gnd
J2 (24 pins)
Displays
J3 (24 pins)
Displays
J4
J5
J4 (16 pins)
Keyboard
J3
Power Supply 316435703
pin 1 = gnd
P6
pin 2 not used
Power supply
pin 3 = V_UR (16 VDC ±5VDC)
input from relay
pin 4 not used
board
pin 5 = sync signal
P3
Programming
header
P8
to
Induction System
Communication
pin 1 = gnd
pin 2 not used
pin 3 = V_UR (16 VDC ±5VDC)
pin 4 not used
pin 5 = sync signal
pin 1 not used
pin 2 not used
pin 3 not used
pin 4 not used
pin 5 not used
pin 6 not used
Pin 1 = Not Used
Pin 2 = Not Used
Pin 3 = LIN Data
Pin 4 = Signal Ground
Right Side Generator Circuit Board
X20/X14
LIN
communication
4 pins header
Gnd
X5
X4
X3
X2
X1
L2
X6 = Power
X9 = Power (Shortest wire)
X4 = Temp. Sensor (2 wires)
X7 = Power
L1
L2
Neutral
C C C
Chassis
Left Side Generator Circuit Board
Neutral
L2
Chassis
L1
Not Connected
X5 = Temp. Sensor (2 wires)
X8 = Power (Shortest wire)
Wire Harness, Capacitors
(Some Models)
pin 1 = neutral
pin 2 not used
pin 3 = L2
To Support Plate
Induction Housing
Pin 4 = Not Used
Pin 3 = Not Used
Pin 2 = LIN Data
Pin 1 = Signal Ground
J1
120VAC input
P3
Power supply
output
Induction Surface Elements
4
RR 145mm
inductor
4
RF 260mm
inductor
X6 = Power
X5 = Temp. Sensor (2 wires)
X8 = Power (Shortest wire)
4
LR 180mm
inductor
X9 = Power (Shortest wire)
X4 = Temp. Sensor (2 wires)
X7 = Power
4
LF 210mm
inductor
Disassembly
63
1. How to access the control panel area.
NOTE: Always turn the house breaker or fuses to the off position, or unplug the unit from the wall outlet before
working on the unit.
Note: It is suggested to always remove the oven door prior
to working on the unit. This will lighten the unit and prevent
damaging the unit and the oven door assembly.
1.1 Fully open the oven door and locate hinge lock
lever.
1.2 After locating the hinge lock lever, pull it to the lock
position as shown.
1.3 Pull the oven door up at roughly 45° as shown; this
will lock the oven door hinges, and pull the oven door out
of its hinge receptacles and away from the unit.6
64
Disassembly
1.4 Gently pull the unit out of its cutouts.
1.5 Remove the 2 screws from the decorative side
panel.
IMPORTANT: If ever you need to replace the left hand
side trim, it is imperative to remove the name plate off
the trim and to glue it back on the new trim or store
it in a safe place.
1.6 Pull out the drawer and pull the lower end of this
decorative side panel frontward, lift the top up and remove
from the unit.
1.7 Remove the 6 screws from the control panel as
shown.
NOTE: The far left and right hand screws are #1 square
bit. (Robertson)
1.8 Gently pull the control panel down and off of the
unit.
Disassembly
65
1.9 Remove the 2 screws that hold the front of the burner
box to the upper side panel.
You will locate these 2 screws after removing the left and
right hand side decorative side panels.
(One screw on each side as shown)
1.10 Unplug the 3 “idiot proof” quick connections from
under the control panel.
NOTE: Do not unplug the blue and white “A” connection
can stay plugged.
1.11 Remove the 3 screws that hold the front of the burner
box to the center trim.
1.12 Pull the cooktop and console up (at the front) and pull it 6” toward you in order to unlock
it from its 2 anchorage point at the back of the burner box.
View of cooktop locked
View of the cooktop unlocked
66
Disassembly
1.13 By doing so, you will access the Molex quick connector
that you will disconnect.
1.14 Remove the complete burner box and console
assembly out of the unit and flip is upside down making
sure to protect the customers table or countertop and for
sure, the face of the cooktop.
NOTE: You can access the Electronic Oven Control, power
supply and UIB by doing so or simply by leaving the cooktop
in place and working on it looking upwards.
2. Control panel’s components identification and replacement
View of the Electronic Oven Control
2.1 Remove 2 flex connectors (AB)
2.2 Remove 10 quick connectors (1 / 10)
*
2.3 Remove 6 screws (circles)
*
There are only 5 visible screws: you will need to remove
the power supply that is over the EOC (2 screws) which
is over this 6th screw.
Disassembly
2.4 Remove the 2 screws that hold the power supply that
is over the EOC
2.5 Remove the hidden 6th screw that hold the EOC
NOTE: Both power supplies have 2 screws and 2 quick
connectors.
User Interface Board (UIB) for the surface elements.
2.6 Remove 3 flex connectors (1 2 3)
2.7 Remove 3 quick connectors (A B C)
2.8 Remove 4 screws that hold the UIB.
3. Automated door light switch (plunger) & Door lock assembly.
3.1 Gently pull on the automated door light switch and
remove from the unit.
3.2 Remove the 2 wires.
With the oven door locked
3.3 Remove the right hand side screw.
3.4 Loosen the left hand side screw and with the screwdriver
still in the left hand side screw, slide the door lock assembly
to the left.
With the oven door unlocked.
3.5 Follow steps 1.1 through 1.14 in order to have access
to the door lock assembly service panel.
67
68
Disassembly
3.6 Follow section 1. in order to remove the cooktop section
from the range
3.7 Unplug the blue and white quick connection and the
2 orange wires.
4. Induction cooktop.
4.1 Follow section 1. in order to remove the cooktop section
from the range.
IMPORTANT: The cooktop stays on its upright side. Do not flip
upside down to access the inner cooktop components.
4.2 Remove the 2 screws that hold the cooktop at the
rear.
(One bracket on each LH & RH side)
4.3 Remove the front center screw located under the control
paned dead center.
4.4 Lift and remove the main top from the burner box.
Disassembly
4.5 Lift the insulation, locate service panel screw and remove
it. Remove the service panel.
4.6 Lift the second layer of insulation and unplug the small
blue wire then unscrew the 2 large wires.
4.7 Remove element from its supports.
NOTE: You will need a #20 torque screwdriver for these
screws.
IMPORTANT: When removing more than one induction
element, refer to the wiring diagram in order to wire the
proper element to the proper induction output.
4.8 Remove the 12 springs, lift and remove the 1st layer
of insulation.
4.9 Remove the 12 screws (1 to 12) and the one ground
wire nut (A).
69
70
Disassembly
4.10 Lift the middle panel by pulling on the induction element
rear pin guide.
4.11 Pull the black plastic of the sub frame console away
at the center (L&H sides) of the burner box in order to lift
and clear the middle panel.
4.12 Insert a flat heat screwdriver between the burner box
and the middle panel in order to lift and clear the black
plastic of the sub frame console (L&H sides).
4.13 Complete the removal of this center panel.
Disassembly
4.14 Lift and remove the inner insulation.
4.15 Lift and remove the side insulation.
4.16 Unplug the white wire from the induction housing X14
terminal.
NOTE: This white wire comes through the hole located on
the RH side of the induction housing.
4.17 View of this white wire that runs under the burner box
and is screwed at its Magnetic Core to the front portion of
the burner box.
71
72
Disassembly
4.18 IMPORTANT: When replacing the housing assembly,
make sure that the 2 cooper jumpers have been reintroduced at position 1 & 2 and 4 & 5.
4.19 When placing the housing assembly back into the
burner box, align the housing with the lift-up tab at the
bottom of the burner box as shown.
5. Cooling fan and safety thermostat.
5.1 Follow section 1. in order to remove the cooktop
section from the range.
5.2 Remover the 2 wires.
5.3 Turn the cooling fan counterclockwise and remove it
from its slotted area.
5.4 When installing the new cooling fan, properly align
the 5 circled slotted areas and turn the cooling fan clock
wise.
Disassembly
73
5.5 Remove the 2 wires and the 2 screws that hold the
safety thermostat.
6. Halogen light socket, hinge receptacle and oven rack sensor
NOTE: Always turn the house breaker or fuses to the off position, or unplug the unit from the wall outlet before
working on the unit.
6.1 Remove the oven door and the decorative side panel
as shown in section 1.1 through 1.6
6.2 Pull the unit out of its cutouts.
6.3 Remove the 9 screws which hold the left or right hand
side panel.
6.4 Pull the insulation up and locate the right hand side
halogen light socket.
6.5 Press the push-pins in, in order to remove the halogen
light socket
74
Disassembly
6.6 Pull the insulation up and locate the left hand side
halogen light socket and the oven rack sensor.
6.7 Gently pull the 2 wires off the oven rack sensor.
6.8 Remove the 1 screw that holds the oven rack swivel
arm to the outer side of the oven liner.
6.9 Remove oven and ladder rack as shown in section
7.1 through 7.42
NOTE: This screw is located on the rear of the upper ladder
rack bracket; inner side of the oven liner.
6.10 Remove the 2 screws which hold the hinge
receptacle.
6.11 Locate hinge receptacle from the side and remove
from the back of the front frame
Disassembly
75
6.12 Push the insulation back into its original emplacement
making sure that it’s properly tucked in behind the lower
panels.
6.13 Upon replacing the side panel, make sure that it will
be inserted between the frame and the upper side panel
as shown.
7. Oven racks, ladder racks and halogen light cover and lens
NOTE: Always turn the house breaker or fuses to the off position, or unplug the unit from the wall outlet before
working on the unit.
7.1 Remove the oven door as shown in section 1.1
through 1.3
7.2 Pull the oven rack all the way out
76
Disassembly
7.3 Lift the oven rack up from both sides in order to free
the glide from the ladder racks.
Note: There is another “L” shape bracket at the back of
the glide that needs to be lifted upwards…
5.41 To remove the ladder rack from the oven liner, push the
ladder racks up in order to free them from their holders.
View of the ladder rack in its holder.
7.42 View of the ladder rack out and ready to be removed
from its holder.
IMPORTANT: Oven and ladder racks have to be removed
from the oven in self-clean mode.
7.5 Gently pull on the light cover in order to have access
to the halogen lamp.
Disassembly
77
7.6 Gently pull on the halogen lamp in order to remove it
from its socket.
IMPORTANT
Upon installing a new halogen lamp into its socket, the
halogen lamp manufacturer suggests not to touch the
lamp with your bare hands.
8. Meat probe
NOTE: Always turn the house breaker or fuses to the off position, or unplug the unit from the wall outlet before
working on the unit.
8.1 Unscrew the two screws which hold the meat probe
receptacle to the upper portion of the oven liner.
NOTE: In order to facilitate the removal of the meat probe
receptacle, you may remove the oven racks.
8.2 Gently pull the meat probe receptacle down and
remove the two wires from the meat probe receptacle.
Note: There is long enough wire in order to replace the
meat probe receptacle without removing the unit from
its cutouts.
78
Disassembly
8.3 Unscrew the nut which hold the meat probe receptacle
to its mounting panel
9. Oven temperature sensor.
NOTE: Always turn the house breaker or fuses to the off position, or unplug the unit from the wall outlet before
working on the unit.
7.1 Remove the 2 screws which hold the oven temperature
sensor to the oven liner.
NOTE: In order to facilitate the removal of the oven
temperature sensor, you may remove the oven racks.
9.2 Gently pull the oven temperature sensor out.
NOTE: There is long enough wire in order to replace the
oven temperature sensor without removing the unit from
its cutouts.
Disassembly
79
10. Broil element
NOTE: Always turn the house breaker or fuses to the off position, or unplug the unit from the wall outlet before
working on the unit.
10.1 Remove the 4 screws from the broil element
NOTE: In order to facilitate the removal of the broil
element, you may remove the oven racks.
10.2 Pull the broil element out and unplug the two blue
wires.
NOTE: There is long enough wire in order to service
by the front without having to move the unit out of its
cutouts.
IMPORTANT: Gently push the broil element back in
place taking care not to pinch the wires between the
oven cavity and the broil element.
11. Convection element, motor and cooling fan.
NOTE: Always turn the house breaker or fuses to the off position, or unplug the unit from the wall outlet before
working on the unit.
11.1 Remove the 3 screws that hold the convection fan
cover to the back of the oven liner
NOTE: In order to facilitate the removal of the convection
fan cover, you may remove the oven racks.
80
Disassembly
11.2 Remove the 3 screws which hold the convection
element to the back of the oven liner.
11.3 Pull the convection element out and unplug the two
orange wires.
NOTE: There is long enough wire in order to service by the
front without having to move the unit out of its cutouts.
IMPORTANT: Gently push the convection element back in
place taking care not to pinch the wires between the oven
cavity and the convection element.
11.4 Remove the convection fan cover as shown in section
11.1
11.5 Hold the convection fan with one hand and unscrew
the nut with a pair of pliers.(clockwise)
11.6 Remove the convection fan.
Note: Be careful, there is a small washer on the shaft
behind the fan.
IMPORTANT: Do not remove the 2 screws on the left and
right and side of the convection motor shaft, they hold the
oven liner to the back side of the unit.
Disassembly
11.7 Remove the 4 screws from the convection motor and
remove from the unit.
Important: The #4 screw holds the convection motor
mounting plate.
11.8 Remove the rubber washer from the convection
shaft.
11.9 Properly align the mounting holes from the mounting
plate and the convection motor. From the front side of the
convection motor…
…and from the back side of the convection motor.
81
82
Disassembly
11.10 Make sure that the rubber washer is properly installed;
laying flat on the convection motor mounting plate.
11.11 Pull the unit out and remove the back cover.
11.12 Remove the 2 screws which hold the cooling fan in
place.
11.13 Pull the cooling fan away from the unit and remove
the 3 wires.
Disassembly
83
12. Units back view and components…
1 Cooling fan
2 Broil element
3 Safety thermostat
4 Oven temperature sensor
5 Cooktop relay board
6 Convection motor
7 Triac
8 Oven relay board
9 Convection element
10 Terminal block
11 Hidden bake element
12 Mini oven temperature sensor
13 Mini oven light socket
14 Mini oven element
13. Hidden bake and mini oven element
NOTE: Always turn the house breaker or fuses to the off position, or unplug the unit from the wall outlet before
working on the unit.
13.1 Pull the mini oven drawer out and remove the 4 screws
(3 screws on each side, screws 1 & 2 are visible here and
the 3rd one is closer to the back) from its left and right hand
side glides the remove the drawer body.
NOTE: The glides will be completely removed from the
drawer assembly.
84
Disassembly
13.2 Remove the 10 screws from the lower front frame and
remove the front frame from the unit.
13.3 Remove the 2 screws that hold the side of the mini
oven to the frame of the unit
These screws are located one on each side in front of the
drawer glide.
13.4 Remove the 2 screws from the mini oven bake
element
13.5 Remove the 2 screws (one on each side) of the lower
back side of the mini oven.
Disassembly
13.6 Remove the 3 screws from under the back panel of
the mini oven.
13.7 Remove the wires from the mini oven sensor, mini oven
light and mini oven element.
13.8 Insert these wired between the upper and lower frame
as shown.
13.9 Pull the back panel off from the mini oven starting by
pulling the lower portion away as shown.
85
86
Disassembly
13.10 Remove the 2 screws (one on each side) that hold
the side wall of the mini oven to the bottom brackets.
13.11 Pull the mini oven out from the back of the unit as
shown.
NOTE: Only the side and top portion will move out
13.12 Remove the main back cover and remove the hidden
bake element wires.
Refer to section 12. Item 11 for its location.
13.13 Remove the 3 screws from under the front portion of
the hidden bake cover.
13.14 After having removed these 3 screws, the hidden
bake element will lower itself as shown.
Disassembly
87
13 15 Remove the four screws that hold the hidden bake
element to its service panel.
14. Mini oven light and glides
NOTE: Always turn the house breaker or fuses to the off position, or unplug the unit from the wall outlet before
working on the unit.
14.1 Remove the mini oven drawer as shown in section
13.1
14.2 Locate the spring clip holder, move it either to the left
or right hand side, remove the light cover and replace the
light bulb.
14.3 Remove the mini oven drawer as shown in section
13.1
14.4 Remove the 1 screw which holds the trim to the inner
portion of the mini oven.
14.5 Slide the glide out and pull on it in order for the glide
to “unlock” from its bracket mounting system.
88
Disassembly
15. Mini oven drawer assembly
15.1 Pull and remove the mini oven drawer out as shown
in section 13.1
15.2 Remove the 7 screws that hold the drawer to the front
panel assembly.
15.3 Remove the 6 screws from the upper trim, turn the
mini oven door and also remove the 6 ones from the lower
trim.
15.4 Remove the 2 screws which hold the mini oven door
handle.
15.5 Pull the mini oven door apart.
Disassembly
15.6 Remove the 5 screws that hold the inner mini oven
door liner to the inner glass frame assembly.
15.7 Pull the 2 sections apart in order to access the inner
door glass and frame.
15.8 Apply pressure (squeeze) on the spring clip of the mini
oven door gasket in order to remove it.
15.9 Upon installing the mini oven door back together,
notice the way that the oven door handle screw spacer has
to be installed.
NOTE: Small hole towards the liner side and large hole
towards the handle side.
89
90
Disassembly
16. Main oven door assembly
16.1 Remove the oven door as shown in section 1.1 through
1.3
16.2 Remove the 2 screws that hold the oven door
handle.
16.3 Remove the center screw of the lower trim; the one
closest from the oven door glass.
16.4 Remove the 10 screws that hold the front decorative
glass assembly; 4 at the top and 3 on each of the left and
right hand side.
IMPORTANT: Upon installing the decorative glass assembly
back on the door, remember that the smallest screw goes
on the lower left and ring hand side through the side and
lower trim as well as into the hinge assembly.
16.5 Pull the decorative glass assembly off of the oven
door.
Disassembly
16.6 Remove the 3 screws that hold the lower trim.
16.7 The side screw being already removed, remove the 1
screw left on the lower hinge.
16.8 Turn the oven door upside down and remove the screw
that holds the oven door hinge to the inner door liner.
16.9 Remove the 9 screws that hold the inner door baffle.
91
92
Disassembly
16.10 Once the inner baffle has been removed, remove
the 4 screws that hold the inner door glass pack assembly
in place.
16.11 Remove the glass holders and insulation.
16.12 Remove the 2nd inner glass from the glass pack
assembly.
16.13 Remove the inner glass pack frame.
Disassembly
16.14 Remove the first inner door glass.
16.15 In order to remove the oven door gasket, refer to
section 15.8
Refer to section 15.9 in order to properly install the oven
door handle screw spacer
93