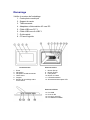
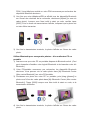
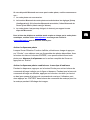
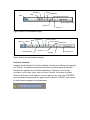
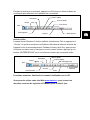
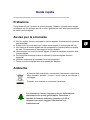
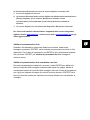
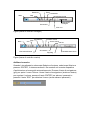
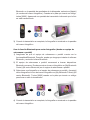
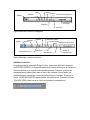
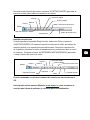
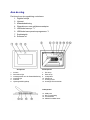
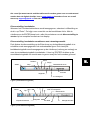
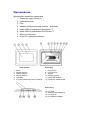
1
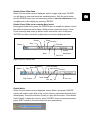
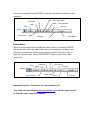
Quick-Guide
---------------------------------------------------------------------
Foreword
Many thanks for buying this product. We have invested much time and effort in its
development in order that you may enjoy many years trouble-free with your digital
photo frame.
Safety Notice
1. Do not drop, puncture or disassemble the digital photo frame, otherwise the
warranty will be voided.
2. Avoid all contact with water and dry hands before using.
3. Do not expose the photo frame to high temperature or leave it in direct sunlight.
Doing so may damage it.
4. Use the photo frame with care. Avoid pressing hard on it.
5. For your own safety, avoid using the photo frame when there is a storm or
lightning.
6. Use only accessories supplied by the manufacturer.
7. Keep the photo frame out of the reach of infants.
Environment
Do not throw the appliance away with the normal household
waste at the end of its life, but hand it at an official collection
point for recycling.
By doing this you will help to preserve the environment.
To support the green concept, we print only this quick
guide. Please refer to the electronic manual in the
accessory CD for more operational instructions.
Getting Started
Check the Package content
1. Digital Photo Frame
2. Frame Stand
3. Remote Control
4. AC to DC switching Power Adapter
5. USB cable to PC *1
6. USB cable to Pen Driver *1
7. Quick Guide
8. Software CD
Front Panel
1.
2.
3.
4.
5.
6.
Screen
Adorning
Remote sensor
Front frame
Stand
Front-rear frame button
Rear Panel
7.
8.
9.
10.
11.
12.
Esc button
Enter button
Speaker
Circle button
Power LED
Power/LED switch
Bottom Panel
13.
14.
15.
16.
USB port
DC 5V jack
CF card port
SD/MS Pro/MMC port
Using memory card
The digital photo frame supports USB flash drive, CF, SD, MMC, MS and MS
Pro.
After Power On
The digital photo frame can automatically do the picture slide show from the
memory card /USB stick or internal memory after power on.
You can also choose calendar, picture, music, movie file list as the start up
interface. The Start interface shown on screen is according to the “Start-up
Setup” setting.
When you choose a memory card or USB or internal memory and press
“ENTER”. The function select screen displayed.
1. Image
2. Music
3. Movie
4. File
5. Setup
About the Bluetooth feature:
1. The Bluetooth function is set to ON by system default.
2. The supported Bluetooth profile is OPP (Object Push Profile):
Bluetooth
Standard
EDR 2.0, Class II (CSR)
Frequency
Profiles
2.4GHz
OPP (Object Push profile)
3. How to turn Bluetooth on/off – Go to the [Setup] settings -> select the
[Bluetooth] item -> select [On] or [Off].
Using Bluetooth to send photos – from cell phone or PDA
1) Select a photo on your cell phone or PDA, and then choose to send the
photo via [Bluetooth] function (for detailed procedures please refer to your
phone/PDA user guides). Your cell phone or PDA will start to search for
nearby Bluetooth devices.
2) After your phone/PDA has displayed all Bluetooth devices on the search
result screen, select [Aiptek] (the name of the photo frame). When
prompted to enter a code, please key in [0000]. Then a transmission
screen will display, indicating the photo is being transmitted.
3) After the transmission is completed, the photo will display on the screen of
the photo frame.
Using Bluetooth to send photos – from PC or laptop
1) Make sure your PC or laptop is Bluetooth enabled. (This may require
installing your Bluetooth software and plugging in your Bluetooth dongle.)
2) Your PC/laptop will start to search for nearby Bluetooth devices. You can
find the photo frame in [My Bluetooth Center] on your PC/laptop.
3) Select a photo on your PC or laptop, and then [drag] the photo to the photo
frame icon in [My Bluetooth Center]. Key in [0000] when prompted to enter
a code and the transmission will take place.
4) After the transmission is completed, the photo will display on the screen of
the photo frame.
If the photo frame is not found by your Bluetooth device, please make sure:
1. The photo frame is powered on.
2. The Bluetooth function of the photo frame is enabled in the [Setup] settings.
(If the Bluetooth function is enabled, the Bluetooth icon in the [Card Select]
screen will light up.)
3. The photo frame is not far or blocked from your Bluetooth device.
For the list of mobile phones tested and supported by the digital photo frame,
please visit www.aiptek.eu or send e-mail to support@aiptek.eu for the latest
update.
Enable Photo Slide Show
When Function select screen displayed, select “Image” and press “ENTER”,
you will have an overview about the available photos. With the circle button
and the ENTER button you can select any photo to start the slideshow on the
complete size of the display by pressing “ENTER”.
Enable Photo Slide show combine Mood music
During photo slide show, press the ENTER button to enable the picture control
bar which is shown as below figure. While picture control bar shown, Press
Circle button(Up and down) to switch music control bar, user could press
“ENTER” at music control bar to play back music when display pictures.
Zoom
Previous
Rotate
Stop
Status
File Info
Picture
Resolution
Next
View 3×3
Figure (picture control bar)
Status
Time
Stop
Play/ Pause
Previous
Fast backward
Fast forward
File Info
Next
ID3 tag
Play mode
Figure (music control bar)
Enable Music
When Function select screen displayed, select “Music” and press “ENTER”,
system will search music files in the current memory equipment and play them
automatically. Press Circle button (Down) to open Volume menu. Circle button
(Left & Right) to adjust the volume, press “ENTER” button to save parameters,
press “ESC” button to close the menu(not save parameters).
During music playing, Press ENTER to use the control bar to perform control
operation.
Fast Backward
Previous
Fast Forward
Stop
Time
File Info
Status
Play/ Pause
Play Mode
ID3 tag
Enable Movie
When Function select screen displayed, select “Movie” and press “ENTER”,
the system will search the video files in the current memory equipment and
play them automatically. During movie playing, press Circle button (Up) to
open the volume menu. Press “ENTER/ESC” button to open/close video
control bar.
Previous
Time
Fast Backward
Fast Forward
File Info
Stop
Status
Play/ Pause
Next
Zoom
Function
Advanced function: Please see the user manual in CD.
You could visit our website http://www.aiptek.eu to find the latest version
of firmware and e-manual for update.
Troubleshooting
1. How to start/turn off a picture slideshow?
Switch on the POWER button on the rear side. The default start-up setting is
to play the picture slideshow with MP3 as background music.
The photo slideshow can be turned off by using the PAUSE function in
picture control bar.
During the photo auto slideshow, press the ‘ENTER’ button to display the
picture control bar.
Press ‘ENTER’ again to stop the slideshow in a certain picture.
To change the start-up setting, press ESC button to find the SETUP in
FUNCTION SELECT mode (Please refer the details to the quick guide and
e-manual in CD-R).
2. How to display only one favourite picture?
Step1. Go to FUNCTION SELECT mode.
Step2. Use ‘Left’ button to choose FILE. Press ENTER to open the folder.
Step3. Select the memory card source.
Step4. Choose the ‘Pictures’ folder and press ENTER
Step5. Use UP/Down button to select the picture you want to show and
press ENTER. The picture will be display in full screen. You could
also use Right/Left button to change the picture.
Schnellanleitung
---------------------------------------------------------------------
Einleitung
Vielen Dank für den Kauf dieses Produktes. Wir haben viel Zeit und Mühe in die
Entwicklung gesteckt, damit Sie viele Jahre lang Freude an Ihrem digitalen
Fotorahmen haben werden.
Sicherheitshinweise
1.
2.
3.
4.
5.
6.
7.
Lassen Sie den Fotorahmen nicht fallen, beschädigen und zerlegen Sie das
Gerät nicht, andernfalls erlischt die Gewährleistung.
Vermeiden Sie jeglichen Kontakt des Gerätes mit Wasser und trocknen Sie
sich die Hände ab, bevor Sie es verwenden.
Setzen Sie den Fotorahmen keinen hohen Temperaturen und direkter
Sonneneinstrahlung aus. Dies kann das Gerät beschädigen.
Verwenden Sie den Fotorahmen mit Sorgfalt. Drücken Sie nicht fest darauf.
Verwenden Sie den Fotorahmen zu Ihrer eigenen Sicherheit nicht bei
Gewittern oder Blitzschlag.
Verwenden Sie ausschließlich vom Hersteller angebotenes Zubehör.
Bewahren Sie den Fotorahmen außerhalb der Reichweite von Kindern auf.
Umgebung
Entsorgen Sie das Gerät am Ende seiner Einsatzzeit nicht mit
dem regulären Hausmüll; bringen Sie das Gerät zu einer
öffentlichen Recycling-Sammelstelle.
Dadurch leisten Sie einen Beitrag zum Schutz unserer Umwelt.
Zur Unterstützung des Umweltschutzes drucken wir nur
diese Kurzanleitung. Weitere Anweisungen zur Bedienung
finden Sie im elektronischen Handbuch auf der
Zubehör-CD.
Erste Schritte
Überprüfen Sie den Lieferumfang:
1. Digitaler Fotorahmen
2. Aufsteller
3. Fernbedienung
4. Schaltnetzteil (Wechselstrom Æ Gleichstrom)
5. USB-Kabel zum PC-Anschluss (1 x)
6. USB-Kabel zum Anschluss von USB Stick (1 x)
7. Schnellanleitung
8. Software-CD
Vorderseite
1.
2.
3.
4.
5.
6.
Bildschirm
Zierrahmen
Empfänger der Fernbedienung
Äußerer Rahmen
Aufsteller
Rahmenfreigabetaste
Rückseite
7.
8.
9.
10.
Esc-Taste
Eingabetaste
Lautsprecher
Richtungstasten
(Aufwärts/Abwärts/Links/Rechts)
11. Betrieb-LED
12. Ein-/Aus- und LED-Schalter
Unterseite
13.
14.
15.
16.
USB-Port
Netzteilanschluss (Gleichspannung, 5 V)
CF-Kartensteckplatz
SD/MS Pro/MMC-Steckplatz
Speicherkarten verwenden
Unterstützt USB-Flash-Laufwerke und CF-, SD-, MMC-, MS- und MS
Pro-Speicherkarten.
Nach dem Einschalten
Nach dem Einschalten kann der digitale Fotorahmen die Inhalte von
Speicherkarten/USB- oder interner Speicher automatisch in einer Diaschau
anzeigen.
Sie können auswählen, ob nach dem Einschalten ein Kalender, Bilder, Musik,
Videos oder eine Dateiliste angezeigt werden. Die nach dem Einschalten
angezeigten Inhalte hängen von der Einstellung Start-Einstellungen ab.
Wenn Sie eine Speicherkarte, USB- oder interner Speicher wählen und die
Eingabetaste drücken, wird der Funktionsauswahl-Bildschirm angezeigt.
(1) Bild
(2) Musik
(3) Video
(4) Dateimanager
(5) Einstellungen
Hinweise zur Bluetooth-Funktion:
1. Die Bluetooth-Funktion ist per Systemvorgabe eingeschaltet.
2. Das Bluetooth-Profil OPP (Object Push Profile) wird unterstützt:
Bluetooth
Standard
EDR 2.0, Klasse II (CSR)
Frequenz
Profile
2,4 GHz
OPP (Object Push Profile)
3. So schalten Sie Bluetooth ein und aus: Rufen Sie die [Einstellungen]
auf -> wählen Sie [Bluetooth] -> wählen Sie [Ein] oder [Aus].
Fotos per Bluetooth senden - vom Mobiltelefon oder PDA
1) Wählen Sie ein Foto auf Ihrem Mobiltelefon oder PDA, starten Sie
anschließend die Übertragung per [Bluetooth]. (Detaillierte Hinweise dazu
finden Sie in der Anleitung zu Ihrem Mobiltelefon oder PDA.) Ihr
Mobiltelefon oder PDA beginnt mit der Suche nach Bluetooth-Geräten in
der Nähe.
2) Wenn Ihr Telefon/PDA sämtliche gefundenen Bluetooth-Geräte im
Suchergebnisse-Bildschirm anzeigt, wählen Sie [Aiptek] (den Namen des
Bilderrahmens). Geben Sie [0000] ein, wenn Sie nach einem Sicherheitscode
gefragt werden. Anschließend wird ein Übertragungsbildschirm dargestellt
und zeigt die Übertragung des Fotos an.
3) Nach Abschluss der Übertragung wird das Foto auf dem Bildschirm des
Bilderrahmens angezeigt.
Fotos per Bluetooth senden - vom PC oder Notebook
1) Sorgen Sie dafür, dass Ihr PC oder Notebook Bluetooth-fähig ist. (Dazu
müssen Sie eventuell Bluetooth-Software installieren und Ihr
Bluetooth-Dongle anschließen.)
2) Ihr PC oder Notebook beginnt mit der Suche nach Bluetooth-Geräten in der
Nähe. Sie finden Ihren Bilderrahmen in der [Bluetooth-Umgebung] Ihres
PCs oder Notebooks.
3) Wählen Sie ein Foto am PC oder Notebook, ziehen Sie das Foto
anschließend mit der Maus auf das Bilderrahmensymbol in der
[Bluetooth-Umgebung]. Geben Sie [0000] ein, wenn Sie nach einem
Sicherheitscode gefragt werden; die Übertragung beginnt.
4) Nach Abschluss der Übertragung wird das Foto auf dem Bildschirm des
Bilderrahmens angezeigt.
Falls der Bilderrahmen nicht von Ihrem Bluetooth-Gerät gefunden werden sollte,
überzeugen Sie sich von Folgendem:
1. Der Bilderrahmen ist eingeschaltet.
2. Die Bluetooth-Funktion des Bilderrahmens wurde in den [Einstellungen]
aktiviert. (Wenn die Bluetooth-Funktion aktiviert ist, wird das
Bluetooth-Symbol im [Kartenauswahl]-Bildschirm angezeigt.
3. Der Bilderrahmen befindet sich in der Nähe Ihres Bluetooth-Gerätes,
zwischen den beiden Geräten befinden sich keine Hindernisse.
Eine Liste mit Mobiltelefonen, die erfolgreich auf Zusammenarbeit mit dem
digitalen Bilderrahmen getestet wurden, finden Sie unter www.aiptek.eu. Sie
können auch eine eMail an support@aiptek.eu schicken; Sie erhalten dann die
neusten Aktualisierungen.
Foto-Diaschau starten
Im Funktionsauswahl-Bildschirm wählen Sie „Bilder“ aus und drücken die
Eingabetaste; eine Übersicht über die vorhandenen Bilder wird angezeigt.
Anschließend können Sie mit den Richtungstasten das Bild auswählen, mit
dem die Diaschau beginnen soll. Zum Starten drücken Sie die Eingabetaste.
Foto-Diaschau mit Begleitmusik starten
Drücken Sie bei laufender Diaschau die Eingabetaste: Die Bildsteuerungsleiste
(siehe nachstehende Abbildung) wird angezeigt. Bei angezeigter
Bildsteuerungsleiste können Sie mit den Aufwärts-/Abwärtstasten zur
Musiksteuerungsleiste umschalten. Hier können Sie Musik abspielen, während
gerade Bilder angezeigt werden.
Drehen
Status
Zoom
Rückwärts
Stopp
Dateiinfo anzeigen
Bildauflösung
Vorwärts
3 x 3-Ansicht
Abbildung: Bildsteuerungsleiste
Status
Zeit
Stopp
Rückwärts
Wiedergabe/Pause
Schneller Rücklauf
Schneller Vorlauf
Dateiinfo
Vorwärts
ID3-Tag
Wiedergabemodus
Abbildung: Musiksteuerungsleiste
Musik starten
Im Funktionsauswahl-Bildschirm wählen Sie „Musik“ und drücken die
Eingabetaste. Das System sucht nach Musikdateien auf dem angeschlossenen
Speichermedium und spielt diese automatisch ab. Mit der Abwärtstaste öffnen
Sie das Lautstärke-Menü. Mit den Links-/Rechtstasten stellen Sie die
gewünschte Lautstärke ein, mit der Eingabetaste speichern Sie die Einstellung,
mit der Esc-Taste schließen Sie das Menü, ohne die Einstellung zu speichern.
Bei laufender Musikwiedergabe können Sie durch Drücken der Eingabetaste
eine Steuerungsleiste einblenden; hier stehen Ihnen verschiedene
Wiedergabeoptionen zur Verfügung.
Schneller Rücklauf
Rückwärts
Schneller Vorlauf
Stop
Dateiinfo
Zeit
Status
Wiedergabe/Pause
Vorwärts
ID3-Tag
Wiedergabemodus
Video starten
Im Funktionsauswahl-Bildschirm wählen Sie „Video“ und drücken die
Eingabetaste. Das System sucht nach Videodateien auf dem angeschlossenen
Speichermedium und spielt diese automatisch ab. Bei laufender
Videowiedergabe können Sie mit der Aufwärtstaste das Lautstärke-Menü
öffnen; die Bedienung erfolgt wie oben beschrieben. Mit der
Eingabe-/Esc-Taste können Sie die Videosteuerungsleiste einblenden.
Rückwärts
Zeit
Stopp
Schneller Rücklauf
Schneller Vorlauf
Dateiinfo anzeigen
Status
Funktionsauswahl
Wiedergabe/Paus
Vorwärts
Zoom
Erweiterter Funktionsumfang: Bitte lesen Sie die Bedienungsanleitung
auf der CD.
Bitte besuchen sie unsere Internetseite http://www.aiptek.eu . Dort finden
sie das letzte Firmware Update und das Handbuch.
Fehlerbehebung
1. Diashow starten/ausschalten
Schalten Sie das Gerät auf der Rückseite über die Taste POWER ein.
Standardmäßig wird beim Start des Geräts die Diashow mit einer
Hintergrundmusik (MP3-Datei) abgespielt (Standardstarteinstellung).
Die Diashow lässt sich über die Funktion PAUSE in der Bildsteuerleiste
ausschalten.
Drücken Sie während der Diashow die ENTER-Taste, um die Bildsteuerleiste
anzuzeigen.
Drücken Sie die ENTER-Taste erneut, um die Diashow bei einem bestimmten
Bild anzuhalten.
Drücken Sie zum Ändern der Starteinstellung die ESC-Taste, und wählen Sie
im Modus FUNKTIONSAUSWAHL die Option SETUP aus. (Weitere
Informationen finden Sie in der Kurzanleitung und im Handbuch auf der CD.)
2. Nur ein Bild anzeigen
Schritt 1: Gehen Sie in den Modus FUNKTIONSAUSWAHL.
Schritt 2: Wählen Sie mit Hilfe der Taste „Links“ die Option DATEI aus.
Drücken Sie ENTER, um den Ordner zu öffnen.
Schritt 3: Wählen Sie die Speicherkartenquelle aus.
Schritt 4: Wählen Sie den Ordner „Bilder“ aus, und drücken Sie ENTER.
Schritt 5: Wählen Sie mit Hilfe der Tasten „Oben/Unten“ das gewünschte Bild
aus, und drücken Sie ENTER. Das Bild wird als Vollbild angezeigt.
Sie können zum Wechseln des Bildes auch die Tasten
„Rechts/Links“ verwenden.
Guide rapide
---------------------------------------------------------------------
Avant-propos
Merci beaucoup pour l'achat ce de produit. Nous avons investi beaucoup de
temps et d'efforts dans son développement afin de vous assurer des années
d'utilisation sans problème pour votre cadre photo numérique.
Avis de Sécurité
1. Ne faites pas tomber, ne perforez pas et ne démontez pas le cadre photo
numérique, autrement la garantie serait annulée.
2. Évitez tout contact avec de l'eau et séchez les mains avant utilisation.
3. N'exposez pas cet appareil à des températures élevées et ne le laissez pas
sous la lumière directe du soleil. Ceci pourrait l'endommager.
4. Utilisez le cadre photo avec soin. Évitez d'exercer de trop fortes pressions
dessus.
5. Pour votre propre sécurité, évitez d'utiliser le cadre photo quand il y a un
orage ou du tonnerre.
6. Utilisez seulement les accessoires fournis par le fabricant.
7. Tenez le cadre photo hors de la portée des enfants en bas âge.
Environnement
Ne jetez pas l'appareil avec les déchets ménagers en fin de vie,
mais remettez le à un point de collecte officiel pour recyclage.
Ce faisant, vous aidez à préserver l'environnement.
Pour protéger l’environnement, nous n’imprimons que ce
guide rapide. Veuillez vous référer au manuel électronique
du CD accessoire pour davantage d’instructions sur
l’utilisation.
Démarrage
Vérifiez le contenu de l'emballage
1. Cadre photo numérique
2. Support du cadre
3. Télécommande
4. Adaptateur d'alimentation AC vers DC
5. Câble USB vers PC *1
6. Câble USB vers clé USB *1
7. Guide rapide
8. CD avec logiciels
Panneau avant
1.
2.
3.
4.
5.
6.
Écran
Décoration
Recepteur de télécommande
Cadre avant
Support
Bouton de verrouillage cadre
avant-arrière
Panneau arrière
7.
8.
9.
10.
11.
12.
Bouton Echap
Bouton Entrée
Haut-parleur
Bouton circulaire
LED d’alimentation
Alimentation/Interrupteur LED
Panneau inférieur
13.
14.
15.
16.
Port USB
Prise 5V DC
Port pour carte SD
Port SD/MS Pro/MMC
Utilisation de la carte mémoire
Le cadre photo numérique prend en charge: les cle’s USB, les cartes : CF,
SD, MMC, MS et MS Pro.
Après mise sous tension
Le cadre photo numérique peut effectuer automatiquement un diaporama à
partir de la carte mémoire/de la clé USB ou mémoire interne après mise sous
tension.
Vous pouvez également choisir entre calendrier, image, musique, film et liste
de fichiers comme interface de démarrage. L'interface de démarrage affichée
à l'écran dépend du réglage “Config. de démarrage”.
Lorsque vous choisissez une carte mémoire ou une mémoire USB ou mémoire
interne et appuyez sur “ENTRÉE”, l'écran Sélection Fonction s'affiche.
(1) Image
(2) Musique
(3) Film
(4) Gestionnaire fichiers
(5) Setup
A propos de la fonction Bluetooth :
1. La fonction Bluetooth est réglé par défaut sur ON (MARCHE) au
niveau du système.
2. Le profil Bluetooth pris en charge et OPP (Object Push Profile ou
Profil Objet Push) :
Bluetooth
Standard
EDR 2.0, Classe II (CSR)
Fréquence
Profils
2.4GHz
OPP (Profil Objet Push)
3. Comment activer/désactiver Bluetooth – Allez dans les réglages
[Setup (Configuration)] -> choisissez l'élément [Bluetooth] ->
choisissez [On (Marche)] ou [Off (Arrêt)].
Utiliser Bluetooth pour envoyer des photos – d'un téléphone mobile ou
d'un PDA
1) Choisissez une photo sur votre téléphone mobile ou sur votre PDA, Puis
choisissez d'envoyer la photo via la fonction [Bluetooth] (pour la procédure
détaillée, veuillez vous référer aux guides d'utilisation de votre téléphone /
PDA). Votre téléphone mobile ou votre PDA commence par rechercher les
dispositifs Bluetooth alentours.
2) Une fois que votre téléphone/PDA a affiché tous les dispositifs Bluetooth
sur l'écran des résultats de la recherche, choisissez [Aiptek] (le nom du
cadre photo). Lorsque vous êtes invité à saisir un code, veuillez taper
[0000]. Puis un écran de transmission s'affiche, indiquant que la photo est
en train d'être transmise.
3) Une fois la transmission terminée, la photo s'affiche sur l'écran du cadre
photo.
Utiliser Bluetooth pour envoyer des photos – d'un ordinateur PC ou
portable
1) Assurez-vous que votre PC ou portable dispose de Bluetooth activé. (Ceci
peut nécessiter d'installer votre logiciel Bluetooth et de brancher votre clé
Bluetooth.)
2) Votre PC/portable commence par rechercher les dispositifs Bluetooth
alentours. Vous pouvez voir le cadre photo dans [My Bluetooth Center
(Mon centre Bluetooth)] sur votre PC/portable.
3) Choisissez une photo sur votre PC ou portable, puis [drag (glissez)] la
photo vers l'icône du cadre photo dans [My Bluetooth Center (Mon centre
Bluetooth)]. Tapez [0000] lorsque vous êtes invité à saisir un code, et la
transmission s'effectue.
4) Une fois la transmission terminée, la photo s'affiche sur l'écran du cadre
photo.
Si votre dispositif Bluetooth ne trouve pas le cadre photo, veuillez vous assurer
que :
1. Le cadre photo est sous tension.
2. La fonction Bluetooth du cadre photo est activée dans les réglages [Setup
(Configuration)]. (Si la fonction Bluetooth est activée, l'icône Bluetooth de
l'écran [Card Select (Choix carte)] s'allume.)
3. Le cadre photo n'est pas trop éloigné, ni obstrué, par rapport à votre
dispositif Bluetooth.
Pour la liste des téléphones mobiles testés et pris en charge par le cadre photo
numérique, veuillez visiter www.aiptek.eu ou envoyer un courriel à
support@aiptek.eu pour la dernière mise-à-jour.
Activer le diaporama photo
Lorsque l'écran Sélection Fonction s'affiche, sélectionnez Image et appuyez
sur “ Entrée”, vous obtenez une vue d'ensemble des photos disponibles. Avec
le bouton circulaire et le bouton ENTRÉE, vous pouvez sélectionner toute
photo pour démarrer le diaporama sur la surface complète de l'écran en
appuyant sur “Entrée”.
Activer le diaporama photo combiné avec la musique d'ambiance
Pendant le diaporama, appuyez sur le bouton Entrée pour activer la barre de
commande d'image indiquée sur la figure ci-dessous. Pendant que la barre de
commande d'image est affichée, appuyez sur le bouton circulaire (en haut et
en bas) pour passer à la barre de commande de musique, l'utilisateur peut
alors appuyer sur “ENTRÉE” dans la barre de commande de musique pour lire
la musique pendant l'affichage des images.
Rotation
Zoom
Précedent
Stop
État
Affich Infos fichier
Résolution image
Suivant
Vue 3×3
Figure (barre de commande image)
État
Durée
Stop
Lecture/Pause
Précédent
Retour rapide
Avance rapide
Infos fichier
Suivant
Tag ID3
Mode lecture
Figure (barre de commande musique)
Activer la musique
Lorsque l'écran Sélection Fonction s'affiche, sélectionnez Musique et appuyez
sur “Entrée”, le système recherche les fichiers musicaux dans la mémoire
actuelle de l'appareil et les lit automatiquement. Appuyez sur le bouton
circulaire ( vers le bas ) pour ouvrir le menu Volume. Le bouton circulaire
(Gauche & Droite) sert à régler le volume, appuyez sur le bouton “ENTRÉE”
pour enregistrer les paramètres, appuyez sur le bouton “ECHAP” pour fermer
le menu (sans enregistrer les paramètres).
Pendant la lecture de la musique, appuyez sur Entrée pour utiliser la barre de
commande pour effectuer une opération de commande,
Retour rapide
Précédent
Durée
Avance rapide
Stop
Infos fichier
État
Lecture/pause
Mode lecture
Tag ID3
Activer le film
Lorsque l'écran Sélection Fonction s'affiche, sélectionnez Film et appuyez sur
“ Entrée”, le système recherche les fichiers vidéo dans la mémoire actuelle de
l'appareil et les lit automatiquement. Pendant la lecture d'un film, appuyez sur
le bouton circulaire (vers le haut) pour ouvrir le menu Volume. Appuyez sur le
bouton “ENTRÉE/ECHAP” pour ouvrir/fermer la barre de commande vidéo.
Précédent
Durée
État
Stop
Retour rapide
Avance rapide
Affichage infos
Commutation
fonctions
Suivant
Lecture/pause
Zoom
Fonctions avancées: Veuillez lire le manuel d'utilisation sur le CD.
Vous pourriez visiter notre site Web www.aiptek.eu pour trouver les
dernières versions de logiciels et E-Manuel pour la mise à jour.
Dépannage
1. Comment démarrer/arrêter un diaporama ?
Appuyez sur le bouton MARCHE/ARRÊT situé à l’arrière. Par défaut, la lecture
du diaporama démarre avec un fichier MP3 en musique de fond.
Le diaporama peut être arrêté à l’aide de la fonction PAUSE dans la barre de
commande de l’image.
Pendant le diaporama, appuyez sur la touche « OK » pour afficher la barre de
commande.
Appuyez à nouveau sur « OK » pour arrêter le diaporama sur une photo
spécifique.
Pour modifier le réglage de démarrage, appuyez sur le bouton ÉCHAP pour
accéder à la CONFIGURATION en mode SELECTION DE FONCTION
(Veuillez consulter le guide de démarrage rapide et le manuel électronique du
CD-R pour en savoir plus).
2. Comment afficher sa photo favorite ?
Étape1. Basculez en mode SELECTION DE FONCTION.
Étape2. Avec le bouton « Gauche », choisissez FICHIER. Appuyez sur OK
pour ouvrir le dossier.
Étape3. Sélectionnez la source de la carte mémoire.
Étape4. Sélectionnez le dossier « Images » et appuyez sur OK.
Étape5. Utilisez le bouton Haut/Bas pour choisir une image et appuyez sur OK.
La photo s’affiche en plein écran. Vous pouvez utiliser le bouton
Droite/Gauche pour changer de photo.
Guida rapida
---------------------------------------------------------------------
Prefazione
Congratulazioni per l’acquisto di questo prodotto. Abbiamo investito molto tempo
ed energie nel suo sviluppo per far sì che vi godiate per molti anni senza problemi
la vostra cornice digitale.
Avviso per la sicurezza
1. Non far cadere, forare o smontare la cornice digitale, diversamente la garanzia
sarà annullata.
2. Evitare tutti i tipi di contatto con l’acqua ed asciugarsi le mani prima dell’uso.
3. Non esporre la cornice digitale ad alte temperature o lasciarla alla luce diretta
del sole. Diversamente si danneggia la cornice digitale.
4. Usare sempre con cura la cornice digitale. Evitare di esercitare pressioni sulla
cornice digitale.
5. Per la propria sicurezza evitare di utilizzare la cornice digitale durante i
temporali.
6. Utilizzare solamente gli accessori forniti dal produttore.
7. Tenere la cornice digitale fuori della portata dei bambini.
Ambiente
Al termine della sua durata, non smaltire l’attrezzatura insieme ai
rifiuti domestici, portarla – invece – ad un centro di raccolta per il
riciclaggio.
Facendo così aiuterete a conservare l’ambiente.
Per dimostrare il nostro impegno a favore dell’ambiente
stampiamo solo questa guida rapida. Consultare il
manuale in formato elettronico presente nel CD in
dotazione per avere maggiori informazioni sul
funzionamento.
Preparazione
Controllare i contenuti della confezione.
1. Cornice digitale
2. Base della cornice
3. Telecomando
4. Adattatore di corrente CA/CC
5. 1 cavo USB per il collegamento al PC
6. 1 cavo USB per il collegamento alla penna (PEN Drive)
7. Guida rapida
8. CD software
Pannello frontale
1.
2.
3.
4.
5.
6.
Schermo
Cornice decorative
Ricevitore del telecomando
Cornice frontale
Base
Tasto di sblocco cornice decorativa
frontale
Pannello posteriore
7.
8.
9.
10.
11.
12.
Tasto Esc
Tasto Enter
Altoparlante
Tasto di navigazione
LED alimentazione
Interruttore alimentazione/LED
Pannello inferiore
13.
14.
15.
16.
Porta USB
Connettore CC 5V
Porta scheda CF
Porta scheda SD/MS Pro/MMC
Uso della scheda memoria
La cornice digitale supporta unità USB Flash, schede CF, SD, MMC e MS Pro.
Dopo l’accensione
La cornice digitale può eseguire automaticamente la presentazione delle
immagini contenute nella scheda memoria /USB stick o memoria interna
subito dopo l’accensione.
Si può anche scegliere di mostrare il calendario o l’elenco file immagini,
musica, film come interfaccia d’avvio. L’interfaccia d’avvio mostrata sullo
schermo dipende dall’impostazione eseguita nel menu “Imp. accensione”.
Quando si sceglie una scheda memoria o una memoria USB o memoria
interna, premere “ENTER”. È visualizzata la schermata Selezione funzione.
(1) Immagine
(2) Musica
(3) Film
(4) Gestione file
(5) Impostazione
Informazioni sulla funzione Bluetooth:
1. La funzione Bluetooth è impostata su ON per impostazione predefinita
del sistema.
2. Il profilo Bluetooth supportato è OPP (Object Push Profile):
Bluetooth
Standard
EDR 2.0, Classe II (CSR)
Frequenza
Profili
2,4GHz
OPP (Object Push profile)
3. Come attivare/disattivare il Bluetooth – Andare sulle impostazioni in
[Setup] (Imposta) -> selezionare [Bluetooth] -> selezionare [On]
oppure [Off].
Uso del Bluetooth per inviare foto dal cellulare o dal PDA
1) Selezionare una foto sul cellulare o sul PDA, quindi scegliere di inviarla
mediante la funzione [Bluetooth] (per la procedura dettagliata fare
riferimento ai manuali utente del cellulare /PDA). Il cellulare o il PDA
inizieranno a cercare i dispositivi Bluetooth nelle vicinanze.
2) Una volta che il cellulare/PDA ha visualizzato tutti i dispositivi Bluetooth
sulla schermata dei risultati della ricerca, selezionare [Aiptek] (il nome della
cornice digitale). Quando viene chiesto di inserire un codice, digitare [0000].
Quindi apparirà una schermata di trasmissione, ad indicare il processo in
corso.
3) Una volta completata la trasmissione, la foto apparirà sullo schermo della
cornice digitale.
Uso del Bluetooth per inviare foto da PC o notebook
1) Accertarsi che il PC o il notebook siano abilitati Bluetooth. (Ciò può
richiedere l’installazione del software Bluetooth e l’inserimento della chiave
hardware Bluetooth).
2) Il PC/notebook inizierà a cercare i dispositivi Bluetooth nelle vicinanze. La
cornice digitale può essere trovata in [My Bluetooth Center] (Il mio centro
Bluetooth) nel PC/notebook.
3) Selezionare una foto sul PC o sul notebook, quindi [drag] (Trascina) per
trascinare la foto sull’icona della cornice digitale in [My Bluetooth Center] (Il
mio centro Bluetooth). Digitare [0000] al momento della richiesta di inserire
un codice e avverrà la trasmissione.
4) Una volta completata la trasmissione, la foto apparirà sullo schermo della
cornice digitale.
Se il dispositivo Bluetooth non trova la cornice digitale, accertarsi che:
1. La cornice digitale sia accesa.
2. La funzione Bluetooth della cornice digitale sia abilitata nelle impostazioni in
[Setup] (Imposta). (Se la funzione Bluetooth è abilitata, l’icona
corrispondente nella schermata [Card Select] (Selezione scheda) si
illumina).
3. La cornice digitale non sia lontana dal dispositivo Bluetooth o bloccata.
Per l'elenco dei telefoni cellulari testati e supportati dalla cornice fotografica
digitale, visitare www.aiptek.eu o inviare una e-mail a support@aiptek.eu per gli
ultimi aggiornamenti.
Abilitare la presentazione foto
Quando è visualizzata la schermata Selezione funzione, selezionare
Immagine e premere “ENTER”, sarà mostrata una panoramica di tutte le foto
disponibili. Con il tasto di navigazione ed ENTER si può selezionare qualsiasi
foto, premere “ENTER” per avviare la presentazione delle immagini a
schermo intero.
Abilitare la presentazione foto combinata a musica
Durante la presentazione delle foto, premere il tasto ENTER per abilitare la
barra di controllo delle immagini mostrata nella figura che segue. Mentre è
visualizzata la barra di controllo delle immagini, premere il tasto di navigazione
(su e giù) per passare alla barra di controllo musica; premere “ENTER” nella
barra di controllo musica per riprodurre la musica mentre sono visualizzate le
immagini.
Rotazione
Zoom
Precedente
Stato
Stop
Mostra info file
Successivo
Risoluzione
mmagine
View 3×3
Figura (barra di controllo immagini)
Stato
Ora
Stop
Esecuzione/Pausa
Precedente
Indietro veloce
Avanti veloce
Info file
Successivo
Tag ID3g
Modalità esecuzione
Figura (barra di controllo musica)
Abilitare la musica
Quando è visualizzata la schermata Selezione funzione, selezionare Musica e
premere “ENTER”, il sistema cercherà i file musicali nel corrente dispositivo
d’archiviazione e la eseguirà automaticamente. Premere il tasto di navigazione
(giù) per aprire il menu Volume. Usare il tasto di navigazione (sinistra e destra)
per regolare il volume, premere il tasto “ENTER” per salvare i parametri e
premere il tasto “ESC” per chiudere il menu (senza salvare i parametri).
Durante l’esecuzione musicale, premere ENTER per usare la barra di controllo
ed eseguire le regolazioni.
Indietro veloce
Precedente
Avanti veloce
Stop
Ora
Info file
Stato
Esecuzione/pausa
Modalità esecuzione
Tag ID3
Abilitare i film
Quando è visualizzata la schermata Selezione funzione, selezionare Film e
premere “ENTER”.
Il sistema cercherà i file video nel corrente dispositivo d'archiviazione e li
eseguirà automaticamente. Durante l’esecuzione del filmato, premere il tasto
di navigazione (su) per aprire il menu Volume. Premere il tasto “ENTER/ESC”
per aprire/chiudere la barra di controllo video.
Precedente
Ora
Stato
Stop
Indietro veloce
Avanti veloce
Mostra info file
Successivo
Esecuzione/pausa
Zoom
Cambio funzione
Funzioni avanzate: Fare riferimento al Manuale dell’utente contenuto nel
CD.
Potreste visitare il nostro Web site www.aiptek.eu per trovare l'ultima
versione dei firmware ed e-manuale per l'aggiornamento.
Risoluzione dei problemi
1. Come si avvia/arresta una presentazione delle immagini?
Attivare il pulsante ALIMENTAZIONE sul retro. Per impostazione predefinita,
all'avvio la presentazione delle immagini viene eseguita con MP3 come
musica di sfondo.
La presentazione delle foto può essere arrestata utilizzando la funzione
PAUSA disponibile dalla barra di controllo delle immagini control bar.
Durante la presentazione automatica delle foto, premere il pulsante "ENTER"
per visualizzare la barra di controllo delle immagini.
Premere nuovamente "INVIO" per arrestare la presentazione in
corrispondenza di una determinata immagine.
Per modificare l'impostazione di avvio predefinita, premere il pulsante ESC per
accedere alla funzione IMPOSTAZIONE in modalità SELEZIONE FUNZIONE
(fare riferimento alla guida rapida e al manuale elettronico disponibili sul
CD-R).
2. Come è possibile visualizzare solo una immagine preferita?
Passaggio 1. Accedere alla modalità SELEZIONE FUNZIONE.
Passaggio 2. Utilizzare il pulsante "Sinistra" per scegliere FILE. Premere
INVIO per aprire la cartella.
Passaggio 3. Selezionare la scheda di memoria di origine.
Passaggio 4. Scegliere la cartella "Immagini" e premere INVIO
Passaggio 5. Utilizzare il pulsante Su/Giù per selezionare l'immagine
desiderata e premere INVIO. L'immagine verrà visualizzata a
tutto schermo. È possibile utilizzare anche il pulsante
Destra/Sinistra per cambiare immagine.
Guía rápida
---------------------------------------------------------------------
Prólogo
Gracias por comprar este producto. Hemos invertido mucho tiempo y esfuerzo
en su desarrollo para que pueda disfrutar durante muchos años del marco digital
para fotografías sin ningún problema.
Aviso de seguridad
1.
2.
3.
4.
5.
6.
7.
No deje caer, perfore ni desmonte el marco fotográfico digital; si lo hace, la
garantía quedará invalidada.
Evite que entre en contacto con el agua y séquese las manos antes de
utilizar el producto.
No exponga el marco fotográfico a altas temperaturas ni lo deje donde
incida sobre él la luz directa del sol. Si lo hace, el producto puede resultar
dañado.
Utilice el marco fotográfico con cuidado. No ejerza una fuerza excesiva
sobre él.
Por su propia seguridad, no utilice el marco fotográfico cuando haya
tormenta o rayos.
Utilice únicamente accesorios especificados por el fabricante.
Mantenga el marco fotográfico fuera del alcance de los niños.
Medio ambiente
No arroje el aparato a la basura doméstica convencional al final
de su período de vida útil. Debe depositarlo en un punto limpio
oficial para su reciclaje.
De esta forma ayudará a conservar el medio ambiente.
En apoyo a los esfuerzos para conservar el
medioambiente, imprimimos solamente esta guía rápida.
Por favor, consulte el manual electrónico en el CD
accesorio para más instrucciones operacionales.
Procedimientos iniciales
Compruebe el contenido del paquete
1. Marco digital para fotografías
2. Pie del marco
3. Mando a distancia
4. Adaptador de alimentación conmutado de CA a CC
5. Cable USB al PC x1
6. Cable USB al Pen Drive x1
7. Guía rápida
8. CD de software
Panel frontal
1.
2.
3.
4.
5.
6.
Pantalla
Marco decorativo
Receptores de sensor
Marco frontal
Pie
Botón para desmontar o cambiar del
marco
Panel posterior
7.
8.
9.
10.
11.
12.
Botón Escape (ESC)
Botón Aceptar (ENTER)
Altavoz
Botón de control de desplazamiento
LED de encendido
Conmutador de LED/alimentación
Panel inferior
13.
14.
15.
16.
Puerto USB
Conector de 5V CC
Puerto para tarjetas CF
Puerto para tarjetas SD, MS Pro y MMC
Usar la tarjeta de memoria
El marco digital para fotografías admite unidades USB flash y tarjetas CF, SD,
MMC y MS PRO.
Después del encendido
El marco digital para fotografías puede realizar una presentación fácilmente a
partir de la tarjeta de memoria o la unidad USB o memoria interna después de
encenderse. También puede elegir las opciones de calendario, imágenes,
música, películas y lista de archivos en la interfaz de inicio. La interfaz de
inicio mostrada en la pantalla responde a la opción definida en el parámetro
“Configuración de inicio”.
Cuando elija una tarjeta de memoria o una memoria USB o memoria interna y
presione “ACEPTAR”(ENTER), aparecerá la pantalla Elegir función.
(1) Imagen
(2) Música
(3) Filme
(4) Administrador de archivos
(5) Configuración
Información sobre la función Bluetooth:
1. El sistema ACTIVA la función Bluetooth de forma predeterminada.
2. El perfil Bluetooth admitido es OPP (Object Push Profile):
Bluetooth
Norma
EDR 2.0, Clase II (CSR)
Frecuencia
Perfiles
2,4 GHz
OPP (Object Push Profile)
3. Para activar y desactivar la función Bluetooth, vaya a [Setup]
(Configuración), seleccione el elemento [Bluetooth] y, a continuación,
elija [On] (Activar) u [Off] (Desactivar).
Usar la función Bluetooth para enviar fotografías (desde el teléfono móvil
o la unidad PDA)
1) Seleccione una fotografía del teléfono móvil o de la unidad PDA y elija la
opción de enviar dicha fotografía mediante la función [Bluetooth]. Para
obtener los procedimientos detallados, consulte las guías de usuario de los
dispositivos mencionados. El teléfono móvil o la unidad PDA iniciará la
búsqueda de los dispositivos Bluetooth cercanos.
2) Cuando el teléfono o la unidad PDA haya mostrado todos los dispositivos
Bluetooth en la pantalla de resultados de la búsqueda, seleccione [Aiptek]
(el nombre del marco fotográfico). Cuando se le pida que inserte un código,
teclee [0000]. Aparecerá una pantalla de transmisión indicando que la foto
se está transmitiendo.
3) Cuando la transmisión se complete, la fotografía se mostrará en la pantalla
del marco fotográfico.
Usar la función Bluetooth para enviar fotografías (desde un equipo de
sobremesa o portátil)
1) Asegúrese de que el equipo de sobremesa o portátil cuenta con la
funcionalidad Bluetooth. Para ello, puede que tenga que instalar el software
Bluetooth y enchufar la llave Bluetooth.
2) El equipo de sobremesa o portátil comenzará a buscar dispositivos
Bluetooth cercanos. Puede encontrar el marco fotográfico en [My Bluetooth
Center] (Mi centro Bluetooth) en el equipo de sobremesa o portátil.
3) Seleccione una fotografía en el equipo de sobremesa o portátil y [arrastre]
dicha fotografía al icono del marco fotográfico en [My Bluetooth Center] (Mi
centro Bluetooth). Teclee [0000] cuando se le pida que inserte un código
para llevar a cabo la transmisión.
4) Cuando la transmisión se complete, la fotografía se mostrará en la pantalla
del marco fotográfico.
Si el dispositivo Bluetooth no encuentra el marco fotográfico, asegúrese de
que:
1. El marco fotográfico está encendido.
2. La función Bluetooth del marco fotográfico está habilitada en el elemento
[Setup] (Configuración). Si la función Bluetooth está habilitada, el icono
Bluetooth de la pantalla [Card Select] (Seleccionar tarjeta) se iluminará.
3. El marco fotográfico no está alejado del dispositivo Bluetooth o bloqueado.
Para obtener una lista de teléfono móviles comprobados y admitidos por el
marco digital para fotografías, visite la página Web www.aiptek.eu o envíe un
correo electrónico a support@aiptek.eu para obtener las actualizaciones más
recientes.
Habilitar la presentación de diapositivas de las fotografías
Cuando aparezca la pantalla Elegir función, elija Imagen y presione
“ACEPTAR”(ENTER). Obtendrá información general sobre las fotografías
disponibles. Con los botones de desplazamiento y “ACEPTAR”(ENTER) puede
seleccionar cualquier foto para iniciar la presentación de diapositivas a
tamaño completo de la pantalla. Cuando esté listo, presione
“ACEPTAR”(ENTER).
Habilitar la presentación de diapositivas de las fotografías con música de
fondo
Durante la presentación de diapositivas de las fotografías, presione el botón
“ACEPTAR”(ENTER) para habilitar la barra de control de imágenes que se
muestra en la figura siguiente. Mientras la barra de control de imágenes se
muestra en pantalla, presione el botón de desplazamiento (arriba y abajo) para
cambiar a la barra de control de música. El usuario puede presionar
“ACEPTAR”(ENTER) en la barra de control de música para reproducir música
mientras se muestran imágenes.
Zoom
Girar
Estado
Anterior
Detener
Información del archivo
Resolución de
la imagen
Siguiente
Vista 3×3
Figura Barra de control de imágenes
Estado
Detener
Tiempo
Reproducir/Pausa
Anterior
Retroceso rápido
Avance rápido
Información del archivo
Siguiente
Etiqueta ID3
Modo de
reproducción
Figura Barra de control de música
Habilitar la música
Cuando aparezca la pantalla Elegir función, seleccione Música y presione
“ACEPTAR”(ENTER), el sistema buscará archivos de música en el equipo de
memoria actual y los reproducirá automáticamente. Presione el botón de
desplazamiento (abajo) para abrir el menú de volumen. Use el botón de
desplazamiento (izquierda y derecha) para ajustar el volumen. Presione el
botón “ACEPTAR”(ENTER) para guardar los parámetros. Presione el botón
“ESCAPE”(ESC) para cerrar el menú sin guardar los parámetros.
Durante la reproducción de música, presione “ACEPTAR”(ENTER) para usar la
barra de control para realizar la operación de control.
Retroceso rápido
Anterior
Avance rápido
Detener
Tiempo
Información del archivo
Estado
Reproducir/Pausa
Modo de reproducción
Etiqueta ID3
Habilitar las películas
Cuando aparezca la pantalla Elegir función, seleccione Filme y presione
“ACEPTAR”(ENTER). El sistema buscará los archivos de vídeo del equipo de
memoria actual y los reproducirá automáticamente. Durante la reproducción
de la película, presione el botón de desplazamiento (arriba) para abrir el menú
de volumen. Presione el botón “ACEPTAR/ESCAPE”(ENTER/ESC) para abrir
o cerrar la barra de control de vídeo.
Anterior
Tiempo
Estado
Detener
Retroceso rápido
Avance rápido
Información del archivo
Siguiente
Reproducir/Pausa
Zoom
Cambiar función
Función avanzada: consulte el manual del usuario que encontrará en el
CD.
Usted podría visitar nuestro Web site www.aiptek.eu para encontrar la
versión más última de software y e-manual para la actualización.
Resolución de problemas
1. ¿Cómo iniciar y detener una presentación de imágenes?
Pulse el botón de alimentación situado en la parte posterior. La configuración
de inicio predeterminada es la reproducción de la presentación de imágenes
con música de fondo en formato MP3.
La presentación de fotografías se puede detener mediante la función de pausa
de la barra de control de imagen.
Durante la presentación automática de fotografías, pulse el botón ‘INTRO’
para visualizar la barra de control de imagen.
Vuelva a pulsar ‘INTRO’ para detener la presentación en una imagen
determinada.
Para cambiar la configuración de inicio, pulse el botón ESC para buscar la
opción CONFIGURAR en el modo SELECCIÓN DE FUNCIÓN (para obtener
más información consulte la guía rápida y el manual electrónico del CD-R).
2. ¿Cómo mostrar únicamente una imagen favorita?
Paso 1. Vaya al modo SELECCIÓN DE FUNCIÓN.
Paso 2. Utilice el botón ‘Izquierda’ para seleccionar ARCHIVO. Pulse INTRO
para abrir la carpeta.
Paso 3. Seleccione el origen de la tarjeta de memoria.
Paso 4. Seleccione la carpeta ‘Imágenes’ y pulse INTRO.
Paso 5. Utilice el botón de arriba y abajo para seleccionar la imagen que
desee visualizar y pulse INTRO. La imagen se mostrará en modo de
pantalla completa. También puede utilizar el botón de derecha e
izquierda para cambiar la imagen.
Snelstartgids
---------------------------------------------------------------------
Voorwoord
Hartelijk bedankt voor uw aankoop van dit product. Wij hebben bij de ontwikkeling tijd
noch inspanningen gespaard zodat u jarenlang probleemloos kunt genieten van uw
digitale fotolijst
Veiligheidsrichtlijnen
1.
2.
3.
4.
5.
6.
7.
Laat de digitale fotolijst niet vallen, prik er geen gaten in of demonteer het
apparaat niet, anders vervalt de garantie.
Vermijd elk contact met water en droog uw handen voordat u het apparaat
gebruikt.
Stel de fotolijst niet bloot aan hoge temperaturen of direct zonlicht. Als u dit toch
doet, kan de lijst beschadigd raken.
Ga voorzichtig om met de fotolijst. Zorg dat u er niet hard op drukt.
Voor uw veiligheid is het af te raden de fotolijst te gebruiken bij storm of onweer.
Gebruik uitsluitend accessoires die door de fabrikant zijn geleverd.
Houd de fotolijst buiten het bereik van kleine kinderen.
Milieu
Gooi het apparaat aan het einde van zijn levensduur niet weg met
het normale huishoudelijke afval, maar geef het af bij een officieel
inzamelpunt voor recycling.
Hierdoor draagt u bij tot de bescherming van het milieu.
Om het groene milieuconcept te ondersteunen, hebben wij alleen
deze snelgids gedrukt. Raadpleeg de elektronische handleiding
op de bijgeleverde cd voor meer instructies over het gebruik.
Aan de slag
De inhoud van de verpakking controleren
1. Digitale fotolijst
2. Lijstvoet
3. Afstandsbediening
4. Wisselstroom-naar-gelijkstroomadapter
5. USB-kabel naar pc *1
6. USB-kabel naar penstuurprogramma *1
7. Snelstartgids
8. Software-cd
Voorpaneel
1.
2.
3.
4.
5.
6.
Scherm
Decoratieve lijst
ontvangtoestel van de afstandsbediening
Voorkant lijst
Voetstuk
Lijstontgrendelingsknop
Achterpaneel
7.
8.
9.
10.
11.
12.
Esc-knop
Enter-knop
Luidspreker
Cirkelknop
Voedings-LED
Voeding/LED-schakelaar
Onderpaneel
13.
14.
15.
16.
USB-poort
DC 5V-aansluiting
CF-kaartsleuf
SD/MS Pro/MMC-sleuf
De geheugenkaart gebruiken
Ondersteunt USB-flashstation, CF, SD, MMC, MS en MS PRO.
Na het inschakelen
Na het inschakelen kan de digitale fotolijst automatisch een diavoorstelling weergeven
vanaf de menukaart/USB-stick of intern geheugen.
U kunt ook een kalender, foto, muziek, film of bestandslijst selecteren als de
opstartinterface. De opstartinterface die op het scherm wordt weergegeven, is
afhankelijk van de instelling "Start instellen".
Wanneer u een geheugenkaart, USB of intern geheugen kiest en op "ENTER" drukt,
wordt het scherm voor de functieselectie weergegeven.
(1) Foto
(2) Muziek
(3) Film
(4) Bestandsbeheer
(5) Instelling
Over de Bluetooth-functie:
1. De Bluetooth-functie is door het systeem standaard ingesteld op ON (AAN).
2. Het ondersteunde Bluetooth-profiel is OPP (Object Push Profile):
Bluetooth
Standaard
Frequentie
Profielen
EDR 2.0, Klasse II (CSR)
2,4GHz
OPP (Object Push-profiel)
3. Bluetooth in/uitschakelen – Ga naar de [Setup] (Instelling) -> selecteer het
item [Bluetooth] -> selecteer [On] (Aan) of [Off] (Uit).
Bluetooth gebruiken om foto's te verzenden - van een mobiele telefoon of PDA
1) Selecteer een foto op uw mobiele telefoon of PDA en kies vervolgens om de foto
via de functie [Bluetooth] te verzenden (raadpleeg de handleiding van uw
telefoon/PDA voor gedetailleerde informatie over de procedures). Uw mobiele
telefoon of PDA start met het zoeken van Bluetooth-apparaten in de buurt.
2) Nadat uw telefoon/PDA alle Bluetooth-apparaat op het scherm met de
zoekresultaten heeft weergegeven, selecteert u [Aiptek] (de naam van de fotolijst).
Typ [0000] wanneer u wordt gevraagd een code in te voeren. Daarna wordt een
verzendscherm weergegeven waarop de foto die wordt verzonden, is aangegeven.
3) Nadat het verzenden is voltooid, wordt de foto weergegeven op het scherm van de
fotolijst.
Bluetooth gebruiken om foto's te verzenden - van pc of laptop
1) Controleer of uw pc of laptop Bluetooth ondersteunt. (Hiervoor kan het nodig zijn de
Bluetooth-software te installeren en uw Bluetooth-dongle aan te sluiten).
2) Uw pc/laptop start het zoeken van Bluetooth-apparaten in de buurt. U kunt de
fotolijst terugvinden in [My Bluetooth Center] (Mijn Bluetooth-centrum) op uw
pc/laptop.
3) Selecteer een foto op uw pc of laptop en [sleep] de foto vervolgens naar het
pictogram van de fotolijst in [My Bluetooth Center] (Mijn Bluetooth-centrum). Typ
[0000] wanneer u wordt gevraagd een code in te voeren. De verzending wordt
uitgevoerd.
4) Nadat het verzenden is voltooid, wordt de foto weergegeven op het scherm van de
fotolijst.
Als de fotolijst niet wordt gevonden door uw Bluetooth-apparaat, moet u het volgende
controleren:
1. Is de fotolijst ingeschakeld?
2. Is de Bluetooth-functie van de fotolijst ingeschakeld in [Setup] (Instelling)? (Als de
Bluetooth-functie is ingeschakeld, licht het Bluetooth-pictogram in het scherm
[Card Select] (Kaartselectie) op.
3. Bevindt de fotolijst zich niet te ver van of is het niet geblokkeerd voor uw
Bluetooth-apparaat?
Als u een lijst wenst van de mobiele telefoons die werden getest voor en ondersteund
worden door de digitale fotolijst, kunt u www.aiptek.eu bezoeken of ons een e-mail
sturen op support@aiptek.eu voor de recentste update.
Diavoorstelling inschakelen
Wanneer het Functieselectiescherm wordt weergegeven, selecteert u Afbeelding en
drukt u op "Enter". Zo krijgt u een overzicht van de beschikbare foto's. Met de
cirkelknop en de ENTER-knop kunt u elke foto selecteren om de diavoorstelling te
starten op het complete formaat van het display.
Diavoorstelling inschakelen combineren met stemmingsmuziek
Druk tijdens de diavoorstelling op de Enter-knop om de beeldbesturingsbalk in te
schakelen zoals weergegeven in de onderstaande figuur. Druk terwijl de
beeldbesturingsbalk wordt weergegeven op de cirkelknop (omhoog en omlaag) om
naar de muziekbesturingsbalk te schakelen. U kunt op "ENTER" drukken op de
muziekbesturingsbalk om muziek weer te geven terwijl de foto's worden getoond.
Zoom
Draaien
Vorige
Stop
Status
Bestandsinfo tonen
Volgende
Fotoresolutie
3×3 weergave
Figuur (beeldbesturingsbalk)
Status
Tijd
Stop
Afspelen/Pauzeren
Vorige
Snel terugspoelen
Snel vooruitspoelen
Bestandsinfo
Volgende
Figuur (muziekbesturingsbalk)
ID3-label
Weergavemodus
Muziek inschakelen
Selecteer Muziek terwijl het Functieselectiescherm wordt weergegeven. Het systeem
zal de muziekbestanden in het huidige geheugenmedium zoeken en ze automatisch
afspelen. Druk op de cirkelknop (omlaag) om het menu Volume te openen. Gebruik de
cirkelknop (links en rechts) om het volume te regelen. Druk op de "ENTER"-knop om
de parameters op te slaan of druk op knop "ESC" om het menu te sluiten (en de
parameters niet op te slaan).
Druk tijdens de muziekweergave op Enter om de besturingsbalk voor de bediening te
openen.
Snel terugspoelen
Vorige
Snel vooruitspoelen
Stop
Tijd
Bestandsinfo
status
Afspelen/pauzeren
Weergavemodus
ID3-label
Film inschakelen
Selecteer Film wanneer het Functieselectiescherm is weergegeven en druk op "Enter".
Het systeem zal de videobestanden op de huidige geheugenmedia zoeken en ze
automatisch afspelen. Druk tijdens het afspelen van een film op de cirkelknop (omhoog)
om het menu Volume te openen. Druk op de knop "ENTER/ESC" om de
videobesturingsbalk te openen/sluiten.
Vorige
Tijd
Stop
Snel terugspoelen
Snel vooruitspoelen
Bestandsinfo tonen
Status
Volgende
Afspelen/pauzere
Zoom
Functieschakelaar
Geavanceerde functie: raadpleeg de handleiding op de cd.
Uw kunt onze webpagina http://www.aiptek.eu bezoken om de laatste firmware
update en de handleiding te vinden.
Problemen oplossen
1. Zo zet u een fotoweergave aan/uit.
Zet de AAN/UIT-knop aan de achterkant uit. Bij de default opstartinstellingen wordt de
fotoweergave afgespeeld met MP3 als achtergrondmuziek.
U kunt de fotoweergave uitzetten met de PAUZE-functie in de fototaakbalk.
Druk tijdens de automatische fotoweergave op de knop ‘ENTER’ om de fototaakbalk
weer te geven.
Druk nogmaals op ‘ENTER’ om de fotoweergave tijdens een bepaalde foto te stoppen.
U verandert de opstartinstellingen door op de knop ESC te drukken. Nu verschijnt de
SETUP-functie in de modus FUNCTION SELECT. (Voor meer informatie, zie de
beknopte handleiding en de e-handleiding op de cd-rom).
2. Zo geeft u slechts een favoriete foto weer.
Stap 1. Ga naar de modus FUNCTION SELECT.
Stap 2. Druk op de knop ‘Links’ om FILE te kiezen. Druk op ENTER om de map te
openen.
Stap 3. Selecteer de bron van de geheugenkaart.
Stap 4. Kies de map ‘Foto's’ en druk op ENTER.
Stap 5. Selecteer met de pijlknoppen ‘naar boven’ en ‘naar beneden’ de foto die u wilt
weergeven en druk op ENTER. De foto wordt weergegeven op volledig
scherm U kunt ook de pijlknoppen ‘rechts’ en ‘links’ gebruiken om een andere
foto weer te geven.
Guia de consulta rápida
---------------------------------------------------------------------
Introdução
Obrigado por ter comprado este produto. Investimos muito tempo e esforço no seu
desenvolvimento para que possa desfrutar da su quadro digital por muitos anos e
sem problemas.
Normas de segurança
1.
2.
3.
4.
5.
6.
7.
Não deixe ao quadro digital cair e não a fure ou desmonte; caso contrário a
garantia perde a validade.
Evite todo o contacto com a água e seque as mãos antes de utilizar o dispositivo.
Não exponha ao quadro digital a temperaturas elevadas e não a deixe exposta à
luz solar directa. Se o fizer, pode danificar ao quadro digital.
Tenha cuidado ao utilizar quadro digital. Evite exercer pressão sobre o corpo da
mesma.
Para sua segurança, evite utilizar ao quadro digital durante tempestades ou
trovoadas.
Utilize apenas os acessórios fornecidos pelo fabricante.
Mantenha ao quadro digital fora do alcance das crianças.
Condições ambientais
Não elimine ao quadro digital deitando-a fora juntamente com o
lixo doméstico quando esta atingir o fim da sua vida útil. Em vez
disso, entregue-a num ponto de recolha oficial para que esta
possa ser reciclada.
Desta forma, estará a contribuir para a protecção do ambiente.
Por forma a apoiar as questões ambientais, imprimimos
apenas este guia de consulta rápida. Por favor consulte o
manual electrónico no CD acessório para mais informações
relativas à utilização.
Introdução
Verifique o conteúdo da embalagem
1. Quadro digital
2. Suporte para Quadro Digital
3. Telecomando
4. Transformador AC/DC
5. Cabo USB para ligação ao PC x1
6. Cabo USB para ligação à Pen Drive x1
7. Guia de consulta rápida
8. CD com o software
Painel frontal
1.
2.
3.
4.
5.
6.
Ecrã
Quadro decorativo
Receptores de encomendas
Quadro frontal
Suporte
Botão da quadro digital
Painel traseiro
7.
8.
9.
10.
11.
12.
Botão Esc
Botão Enter
Altofalante
Botão de navegação
LED de alimentação
Botão de alimentação/LED
Painel inferior
13.
14.
15.
16.
Porta USB
Tomada de entrada d.c. de 5 V
Porta para cartão de memória CF
Porta para cartões de memória SD/MS
Pro/MMC
Utilização do cartão de memória
Ao quadro digital é compatível com unidades USB flash e com cartões de
memória, CF, SD, MMC e MS PRO.
Depois de ligar ao quadro digital
Após a sua activação, este quadro digital pode apresentar automaticamente as
suas fotos sob a forma de uma apresentação de diapositivos a partir do cartão de
memória/USB stick ou Memória interna.
Pode também definir a interface que quer ver aquando do arranque podendo
optar entre o calendário, ficheiros de imagem, de música, de vídeo ou ver a lista
de ficheiros. A interface mostrada depende da opção que tenha escolhido na
definição “Startup Set” (Configurar arranque).
Depois de escolher um cartão de memória ou uma unidade USB ou Memória
interna prima “ENTER”. O ecrã Escolher função é apresentado.
(1) Imagem
(2) Música
(3) Filme
(4) Gestor de ficheiros
(5) Configurar
Acerca da capacidade Bluetooth:
1. Por predefinição, a função Bluetooth encontra-se definida para ON
(Activar).
2. O perfil Bluetooth suportado é o perfil OPP (Object Push Profile, perfil
de envio de objectos):
Bluetooth
Norma
Frequência
Perfis
EDR 2.0, Classe II (CSR)
2,4 GHz
OPP (Object Push profile)
3. Como activar/desactivar a função Bluetooth – vá até [Setup]
(Configurar) -> seleccione o item [Bluetooth] (Bluetooth) -> seleccione
[On] (Activar) ou [Off] (Desactivar).
Utilização da função Bluetooth para enviar fotos – a partir de telemóvel ou
agenda electrónica
1) Seleccione uma foto no seu telemóvel ou na sua agenda electrónica e depois
envie a foto através da função [Bluetooth] (Bluetooth) (para obter mais
informações consulte o guia de utilizador do seu telemóvel/da sua agenda
electrónica). O seu telemóvel ou agenda electrónica começa a procurar os
dispositivos Bluetooth existentes nas proximidades.
2) Depois do telemóvel/da agenda electrónica ter mostrado todos os
dispositivos Bluetooth no ecrã dos resultados de pesquisa, seleccione a
opção [Aiptek] (Aiptek) (nome da moldura). Quando lhe for pedido um código,
utilize o código [0000]. O ecrã de transmissão é mostrado como sinal de que
a foto está a ser enviada.
3) Após concluída a transmissão, a foto será mostrada no ecrã da moldura.
Utilização da função Bluetooth para enviar fotos – a partir de um PC ou
laptop
1) Certifique-se de que o seu PC ou laptop está activado para a função
Bluetooth. (Isto pode implicar a instalação do software Bluetooth e a ligação
ao dongle Bluetooth.)
2) O seu PC/laptop começa a procurar os dispositivos Bluetooth existentes nas
proximidades. Pode encontrar a moldura na opção [My Bluetooth Center] (O
meu centro Bluetooth) no seu PC/laptop.
3) Seleccione uma foto no PC ou laptop e depois [arraste] a foto para o ícone da
moldura na opção [My Bluetooth Center] (O meu centro Bluetooth). Introduza
o código [0000] quando tal lhe for pedido para que a transmissão seja
iniciada.
4) Após concluída a transmissão, a foto será mostrada no ecrã da moldura.
Se a moldura não for encontrada pelo dispositivo Bluetooth, certifique-se de que:
1. A moldura está ligada.
2. A função Bluetooth da moldura se encontra activada na opção [Setup]
(Configurar) (Se a função Bluetooth estiver activada, o ícone Bluetooth no
ecrã [Card Select] (Seleccionar placa) é realçado.)
3. A moldura não está longe do seu dispositivo Bluetooth ou bloqueada.
Para obter a lista de telemóveis que foram testados e que são suportados pela
moldura digital, visite o site www.aiptek.eu ou envie uma mensagem de correio
electrónico para o endereço support@aiptek.eu para obter a actualização mais
recente.
Activar a função de apresentação das fotos como diapositivos
Quando vir o ecrã Escolher função, seleccione a opção Imagem e prima o botão
“ENTER”. Desta forma, poderá ver as imagens disponíveis. Utilize o botão de
navegação e o botão ENTER para seleccionar a foto pretendida e dar início à
apresentação de diapositivos em ecrã inteiro premindo novamente o botão
“ENTER”.
Activar a função de apresentação das fotos como diapositivos com um
fundo musical
Durante a apresentação das fotos, prima o botão “ENTER” para activar a barra
de controlo das imagens mostrada na figura em baixo. Quando esta barra for
mostrada, prima o botão de navegação (para cima e para baixo) para activar a
barra de controlo da reprodução de música. Quando esta barra for mostrada
prima o botão ENTER para activar a reprodução de música ao mesmo tempo
que as fotos são mostradas.
Zoom
Rodar
Estado
Anterior
Parar
Mostrar info do ficheiro
Imagem
Seguinte
Resolução
Ver 3×3
Figura (barra de controlo das imagens)
Estado
Parar
Duração
Reproduzir/Pausa
Anterior
Recuar
Avançar
Info do ficheiro
Seguinte
Etiqueta ID3
Modo de reprodução
Figura (barra de controlo da música)
Activar a reprodução de música
No ecrã Escolher função, escolha a opção Música e prima o botão “ ENTER”. O
sistema irá procurar os ficheiros de música existentes na memória
reproduzindo-os automaticamente. Prima o botão de navegação (para baixo)
para aceder ao menu Volume. Utilize o botão de navegação (para a esquerda e
para a direita) para ajustar o volume, prima o botão “ENTER” para guardar a
definição e prima o botão “ESC” para fechar o menu (o botão “ESC” não guarda
as definições).
Durante a reprodução de música, prima o botão “ENTER” para utilizar a barra de
controlo para controlar a função em curso.
Recuar
Anterior
Avançar
Parar
Info do ficheiro
Duração
Estado
Reproduzir/Pausa
Modo de
reprodução
Etiqueta ID3
Activar a reprodução de filmes
No ecrã Escolher função, seleccione a opção Filme e prima o botão “ ENTER”,
O sistema irá procurar os ficheiros de vídeo guardados na memória e
reproduzi-los automaticamente. Durante a reprodução dos ficheiros de vídeo,
prima o botão de navegação (para cima) para aceder ao menu Volume. Prima o
botão “ENTER/ESC” para abrir/fechar a barra de controlo da função de
reprodução de vídeo.
Anterior
Duração
Estado
Parar
Recuar
Avançar
Seguinte
Reproduzir/Pausa
Zoom
Mostrar info do ficheiro
Comutador de função
Funções avançadas: Consulte o manual do utilizador incluído no CD.
Você poderia visitar nosso Web site www.aiptek.eu para encontrar a
versão a mais atrasada dos firmware e e-manual para o update.
Resolução de Problemas
1. Como iniciar/parar uma exibição de imagens?
Ligue o botão ALIMENTAÇÃO que se encontra de lado na parte de trás. A
configuração pré-definida de arranque é a de reproduzir a exibição de imagens
com música de fundo MP3.
A exibição de fotos pode ser parada usando a função PAUSA na barra de
controlo da imagem.
Durante a exibição automática das fotos, prima a tecla "ENTER" para que seja
exibida a barra de controlo de imagem.
Prima novamente ‘ENTER’ para parar a exibição numa determinada imagem.
Para alterar a configuração de arranque, prima a tecla ESC para encontrar
CONFIGURAÇÃO no modo SELECCIONAR FUNÇÃO (Consulte as
especificações no guia rápido e no manual electrónico no CD-R).
2. Como apresentar apenas uma imagem preferida?
Passo 1. Vá para o modo SELECCIONAR FUNÇÃO
Passo 2. Use a tecla "Esquerda" para escolher FICHEIRO. Prima ENTER para
abrir a pasta.
Passo 3. Seleccione o cartão de memória fonte.
Passo 4. Escolha a pasta "Imagens" e prima ENTER
Passo 5. Use a tecla Para cima/baixo para seleccionar a imagem que pretende
mostrar e prima ENTER. A imagem será apresentada em ecrã total.
Pode também usar a tecla Direita/Esquerda para alterar a imagem.
Skrócona instrukcja
---------------------------------------------------------------------
Wstęp
Dziękujemy za zakupienie tego produktu. Poświęciliśmy wiele czasu i wysiłku w
opracowanie ramki do zdjęć cyfrowych, która może służyć bezawaryjnie przez wiele
lat.
Uwaga dotycząca bezpieczeństwa
1. Nie należy upuszczać, nakłuwać lub rozbierać ramki do zdjęć cyfrowych, w
przeciwnym razie nastąpi unieważnienie gwarancji.
2. Należy unikać kontaktu z wodą i przed użyciem należy wysuszyć ręce.
3. Nie należy narażać ramki do zdjęć na wysoką temperaturę lub pozostawiać ją
bezpośrednio na słońcu. Może to spowodować jej uszkodzenie.
4. Podczas używania ramki należy zachować ostrożność. Należy unikać mocnego
naciskania ramki.
5. Dla własnego bezpieczeństwa należy unikać ramkę do zdjęć podczas burzy lub
wyładowań atmosferycznych.
6. Należy używać wyłącznie akcesoriów dostarczonych przez producenta.
7. Ramkę do zdjęć należy trzymać poza zasięgiem dzieci.
Środowisko naturalne
Nie należy wyrzucać urządzenia po jego zużyciu z odpadami
domowymi, ale w celu recyklingu należy go przekazać do
oficjalnych punktów zbiórki.
Przyczynia się to do ochrony środowiska naturalnego.
Ponieważ popieramy ideę oszczędzania zasobów
naturalnych, w wersji drukowanej przekazujemy wyłącznie
tę instrukcję. Dalsze instrukcje działania można uzyskać w
podręczniku elektronicznym na pomocniczym dysku CD.
Wprowadzenie
Sprawdzenie zawartości opakowania
1. Ramka do zdjęć cyfrowych
2. Podstawka ramki
3. Pilot
4. Adapter przełączania prąd zmienny - prąd stały
5. Kabel USB do podłączenia komputera *1
6. Kabel USB do podłączania Pen Drivera *1
7. Skrócona instrukcja
8. Dysk CD z oprogramowaniem
Panel przedni
1.
2.
3.
4.
5.
6.
Ekran
Ramka ozdobna
Odbiornik Pilota
Ramka przednia
Podstawa
Przycisk odblokowania ramki przedniej
Panel tylny
7.
8.
9.
10.
11.
12.
Przycisk Esc
Przycisk Enter
Głośnik
Okrągły przycisk
Dioda LED zasilania
Przełącznik zasilania/LED
Panel dolny
13.
14.
15.
16.
Port USB
Gniazdo prądu stałego 5V
Port karty CF
Port SD/MS Pro/MMC
Używanie karty pamięci
Ramka do zdjęć cyfrowych obsługuje napęd USB flash, CF, SD, MMC, MS i MS
PRO.
Po włączeniu
Ramka do zdjęć cyfrowych może po włączeniu zasilania automatycznie
wyświetlić pokaz slajdów z karty pamięci/pamięci USB lub Pamięć wewnętrzny.
Po uruchomieniu można także wybrać kalendarz, obraz, muzykę, film, listę
plików. Interfejs widoczny na ekranie po uruchomieniu zależy od ustawień
“Ustawienia StartUp”.
Po wybraniu karty pamięci lub pamięci USB albo Pamięć wewnętrzny i
naciśnięciu “ENTER”, wyświetlany jest ekran Wybór funkcji.
(1) Obraz
(2) Muzyka
(3) Film
(4) Menedżer plików
(5) Ustawienia
O funkcji Bluetooth:
1. Funkcja Bluetooth jest domyślnie ustawiona przez system na ON
(Włączona).
2. Obsługiwany profil Bluetooth to OPP (Object Push Profile):
Bluetooth
Standard
Częstotliwość
Profile
EDR 2.0, Class II (CSR)
2,4GHz
OPP (Object Push profile)
3. Jak włączyć/wyłączyć Bluetooth - Przejdź do ustawień [Setup
(Instalacja)] -> wybierz element [Bluetooth] -> wybierz [On (Włącz)] lub
[Off (Wyłącz)].
Używanie Bluetooth do wysyłania zdjęć - z telefonu komórkowego lub
PDA
1) Wybierz zdjęcie w telefonie komórkowym lub PDA, a następnie wybierz
wysłanie zdjęcia poprzez funkcję [Bluetooth] (szczegółowe procedury
zawierają instrukcje obsługi telefonu/PDA). Telefon komórkowy lub PDA
uruchomi wyszukiwanie pobliskich urządzeń Bluetooth.
2) Po wyświetleniu przez telefon/PDA na ekranie wyszukiwania wszystkich
urządzeń Bluetooth, wybierz [Aiptek] (nazwa ramki do zdjęć). Po pojawieniu
się polecenia wprowadzenia kodu, wprowadź [0000]. Następnie
wyświetlony zostanie ekran transmisji, wskazując transmisję zdjęcia.
3) Po zakończeniu transmisji, zdjęcie zostanie wyświetlone na ekranie ramki
do zdjęć.
Używanie Bluetooth do wysyłania zdjęć - z komputera PC lub laptopa
1) Upewnij się, że komputer PC lub laptop ma włączone Bluetooth. (Może to
wymagać instalacji oprogramowania Bluetooth i podłączenia klucza
Bluetooth.)
2) Komputer PC/laptop rozpocznie wyszukiwanie pobliskich urządzeń
Bluetooth. Ramkę zdjęć można znaleźć w opcji [My Bluetooth Center (Moje
centrum Bluetooth)] w komputerze PC/laptop.
3) Wybierz zdjęcie w komputerze PC lub laptop, a następnie [przeciągnij]
zdjęcie na ikonę ramki do zdjęć w opcji [My Bluetooth Center (Moje centrum
Bluetooth)]. Po pojawieniu się polecenia, wprowadź [0000] w celu
wprowadzenia kodu i wykonania transmisji.
4) Po zakończeniu transmisji, zdjęcie zostanie wyświetlone na ekranie ramki
do zdjęć.
Jeśli ramka do zdjęć nie zostanie odnaleziona przez urządzenie Bluetooth,
upewnij się że:
1. Włączone jest zasilanie ramki do zdjęć.
2. Funkcja Bluetooth ramki do zdjęć jest włączona w ustawieniach [Setup
(Instalacja)]. (Jeśli funkcja Bluetooth jest włączona, zaświeci się ikona
Bluetooth na ekranie [Card Select (Wybór karty)].)
3. Ramka do zdjęć nie jest zablokowana lub nie znajduje się zbyt daleko od
urządzenia Bluetooth.
W celu uzyskania listy telefonów komórkowych sprawdzonych i obsługiwanych
przez cyfrową ramkę do zdjęć, odwiedź stronę sieci web www.aiptek.eu lub
wyślij wiadomość e-mail do support@aiptek.eu w celu uzyskania najnowszej
aktualizacji.
Włączenie pokazu slajdów ze zdjęciami
Po wyświetleniu ekranu Wybór funkcji, wybierz Obraz i naciśnij “Enter”, po
czym pojawi się opis dostępnych zdjęć. Przyciskiem okrągłym i przyciskiem
ENTER można wybrać dowolne zdjęcie, aby uruchomić pokaz slajdów w
pełnym rozmiarze, poprzez naciśnięcie “Enter”.
Włączenie pokazu slajdów zdjęć w połączeniu z nastrojową muzyką
Podczas pokazu slajdów naciśnij przycisk Enter, aby włączyć pasek sterowania
obrazem, zgodnie z ilustracją poniżej. Po wyświetleniu paska sterowania
obrazem, naciśnij okrągły przycisk (w górę i w dół), aby przełączyć pasek
sterowania muzyką, użytkownik może nacisnąć “ENTER” na pasku sterowania
muzyką w celu wyświetlenia obrazów.
Zoom
Obrót
Zatrzymaj
Stan
Poprzedni
Pokaż informacje o pliku
Rozdzielczość
obrazu
Następny
Widok 3×3
Rysunek (pasek sterowania obrazem)
Stan
Zatrzymaj
Czas
Odtwarzaj/Pauza
Poprzedni
Szybkie przewijanie do tyłu
Szybkie przewijanie do przodu
informacje o pliku
Następny
Znacznik ID3
Tryb odtwarzania
Rysunek (pasek sterowania muzyką)
Włączenie muzyki
Po wyświetleniu ekranu Wybór funkcji, wybierz Muzyka i naciśnij “ Enter”,
system wyszuka pliki z muzyką w aktualnie używanej pamięci i automatycznie
je odtworzy. Naciśnij okrągły przycisk (W dół), aby otworzyć Głośność.
Wyreguluj okrągłym przyciskiem głośność (w lewo i w prawo), naciśnij przycisk
“ENTER”, aby zapisać parametry, naciśnij przycisk “ESC”, aby zamknąć menu
(bez zapisywania parametrów).
Naciśnij Enter podczas odtwarzania muzyki w celu sterowania,
Szybkie przewijanie do tyłu
Poprzedni
Szybkie przewijanie do przodu
Zatrzymaj
Czas
Informacje o pliku
Stan
Odtwarzaj/pauza
Tryb odtwarzania
Znacznik ID3
Włączenie filmu
Po wybraniu ekranu Wybór funkcji, wybierz Film i naciśnij “Enter”, system
wyszuka pliki video w aktualnie używanej pamięci i odtworzy je automatycznie.
Podczas odtwarzania filmu, naciśnij okrągły przycisk (W górę), aby otworzyć
menu głośności. Naciśnij przycisk “ENTER/ESC”, aby otworzyć/zamknąć
pasek sterowania video.
Czas
Stan
Odtwarzaj/pauza
Poprzedni
Zatrzymaj
Szybkie przewijanie do tyłu
Szybkie przewijanie do przodu
Pokaż informacje o pliku
Następny
Przełącznik funkcji
Zoom
Zaawansowana funkcja: Patrz informacje w podręczniku użytkownika na
dysku CD.
Żeby znaleźć ostatnie wersję firmware i instrukcja obsługi wy możecie
odwiedzać naszo strone internetowe na www.aiptek.eu.
Rozwiązywanie problemów
1. Rozpoczynanie/ wyłączanie pokazu slajdów
Naciśinij przycisk włączania zasilania zlokalizowany z tyłu urządzenia.
Domyślnym ustawieniem rozruchowym jest uruchamianie pokazu slajdów z
wykorzystaniem plików MP3 jako muzyki w tle.
Pokaz slajdów można wyłączyć za pomocą funkcji wstrzymania (PAUSE) na
pasku sterowania obrazami.
W trakcie automatycznego pokazu slajdu naciśnij przycisk ENTER, żeby
wyświetlić pasek sterowania obrazami.
Ponownie naciśnij przycisk ENTER, żeby zatrzymać pokaz slajdów na
dowolnym obrazie.
Żeby zmienić ustawienia rozruchowe, naciśnij przycisk ESC, żeby odnaleźć
funkcję SETUP (Konfiguracja) w trybie FUNCTION SELECT (Wybór funkcji)
(szczegółowe informacje są zawarte w podręcznym poradniku i instrukcji
elektronicznej na płycie CD).
2. Wyświetlanie jednego ulubionego obrazu
Punkt 1. Przejdź do trybu FUNCTION SELECT (Wybór funkcji).
Punkt 2. Użyj przycisku strzałki w lewo, żeby wybrać element FILE (Plik).
Naciśnij klawisz ENTER, aby otworzyć folder.
Punkt 3. Wybierz źródło karty pamięci.
Punkt 4. Wybierz folder Pictures (Obrazy) i naciśnij klawisz ENTER
Punkt 5. Za pomocą strzałek w górę/dół wybierz obraz do wyświetlenia i
naciśnij klawisz ENTER. Obraz zostanie wyświetlony w trybie
pełnoekranowym. Można również zmieniać obraz za pomocą
przycisku strzałki w lewo/ w prawo.