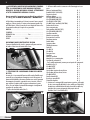
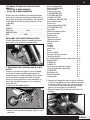
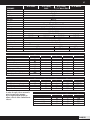
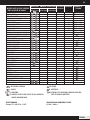
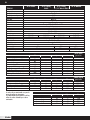
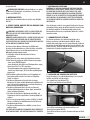
1
1
USE AND MAINTENANCE MANUAL
UTILISATION ET L’ENTRETIEN
USO Y MANTENIMIENTO
BEDIENUNGS UND WARTUNG
ITALIANO
INDICE
1- ISTRUZIONE PER IL MONTAGGIO PRIMA DELLA MESSA
IN PISTA
2- TRASPORTO DEL VEICOLO
3- OPERAZIONI DA SVOLGERSI PRIMA DELLA MESSA IN
PISTA DELLA MINICROSS/MINIMOTARD
4- RODAGGIO DEL VEICOLO
5- SPEGNIMENTO DEL MOTORE
6- GUIDA SICURA: CONDIZIONI D'USO DELLA MINICROSS/
MINIMOTARD
7- MANUTENZIONE, INTERVENTI E REGOLAZIONI
8- ISPEZIONE E CONTROLLI DI MESSA A PUNTO E
PREPARAZIONE GARA
9- CARATTERISTICHE TECNICHE
10- RICAMBISTICA
11- RIMESSAGGIO
12- FORMAZIONE E INFORMAZIONE
PREMESSA
ALL'INTERNO DI QUESTO MANUALE VENGONO SEGNALATI, ANCHE
RIPETENDOCI, GLI EVENTI PERICOLOSI A CUI PRESTARE PARTICOLARE
ATTENZIONE E LE AVVERTENZE DA SEGUIRE PER UN CORRETTO UTILIZZO DELLA MINICROSS /MINIMOTARD. PER QUANTO RIGUARDA LA
MANUTENZIONE DEL MOTORE NON VENGONO DATE INDICAZIONI SPECIFICHE; TALI OPERAZIONI SUL MOTORE DOVRANNO ESSERE ESEGUITE
IN OFFICINE SPECIALIZZATE.
Vi preghiamo di leggere attentamente questo libretto d'uso e manutenzione prima di mettervi alla guida del Vostro veicolo. Questo manuale
contiene informazioni importanti che vi aiuteranno ad evitare a Voi
stessi, a cose e persone spiacevoli rotture, lesioni personali gravi e incidenti anche mortali. La perfetta messa a punto e la totale conoscenza
del Vostro veicolo prima della partenza assicura sicurezza e tranquillità
per godere fino a fondo il piacere della Vostra guida in fuoristrada.
AVVERTIMENTO IMPORTANTE
QUESTA MOTOCICLETTA È STATA DISEGNATA SOLO PER USO COMPETITIVO. È VIETATO L'UTILIZZO SU OGNI TIPO DI STRADA PUBBLICA.
LE LEGGI VIGENTI PERMETTONO L'USO DI QUESTA MOTOCICLETTA SOLO
IN GARE ORGANIZZATE O AVVENIMENTI SPORTIVI SU PISTE CHIUSE E
PRIVATE E ALLA PRESENZA DI ENTI PREPOSTI ALLA SICUREZZA
(AUTOAMBULANZA, VIGILI DEL FUOCO, ECC).
DIVIETO DI TRASPORTO DI PASSEGGERI E/O COSE
SOLO PILOTA SENZA PASSEGGERO. Questa minicross/minimotard è
stata disegnata per l'uso col solo pilota.
RICORDA. L'uso di questo veicolo da parte di minori di anni 18 deve
avvenire sempre sotto la tutela di persone adulte e competenti.
page 14
page 26
página 39
seite 52
LEGGERE QUESTO MANUALE CON ATTENZIONE.
All'interno del manuale vengono segnalate particolari situazioni
relative a pericoli, eventi e situazioni pericolosi dovuti all'uso e alla
manutenzione della minicross/minimotard: ai sensi del punto 3 della
Norma UNI EN 1050:1998 sono così definiti:
DANNO: Lesione fisica e/o danno alla salute o ai beni.
EVENTO PERICOLOSO: evento che può causare danno.
Prima di qualsiasi utilizzo della minicross/minimotard o operazione di
manutenzione sulla minicross/minimotard stessa assicurarsi di aver
ben compreso quanto prescritto nel manuale prestando particolare
attenzione alle fasi segnalate con il simbolo di
EVENTO
PERICOLOSO o AVVERTENZA.
IMPORTANTE. Questo manuale deve essere considerato una parte
permanente della minicross/minimotard e deve rimanere con essa
qualora venisse rivenduta.
AL NUOVO PROPRIETARIO
Scegliendo una minicross/minimotard Polini come vostra nuova
motocicletta siete entrati a far parte di una distinta famiglia di
proprietari e piloti di motociclette.
AVVERTENZA. La minicross/minimotard Polini è una motocicletta da corsa ad alte prestazioni che utilizza tutti gli ultimi ritrovati della
tecnologia per motocross. Questa minicross/minimotard deve essere
utilizzata in gara solo da piloti esperti.
Questo nuovo modello è stato disegnato in modo da essere il più competitivo possibile. Il motocross è comunque uno sport fisico che richiede di
più che una buona motocicletta. Per ottenere buoni risultati è necessario
essere in buone condizioni fisiche ed essere un pilota abile. Per ottenere
i migliori risultati possibili, allenarsi diligentemente per il condizionamento fisico ed esercitarsi di frequente. Lo scopo di questo manuale consiste nell'aiutarvi ad ottenere la massima soddisfazione possibile dalla
vostra minicross/minimotard Polini, soddisfazione ottenuta tramite le
prestazioni della motocicletta stessa ed i successi ottenuti in gara.
UTILIZZO DI DISPOSITIVI DI PROTEZIONE E PRESCRIZIONI
DI SICUREZZA
1- La gran parte dei decessi per incidenti motociclistici sono dovuti a
ferite al capo. Indossare SEMPRE il casco OMOLOGATO.
Utilizzare ginocchiera e para gomiti (certificati ai sensi del norma
EN 1621-1/1997). Utilizzare abiti protettivi o tute. Utilizzare
calzature chiuse e idonee con suola resistente alle abrasioni.
2- Il sistema di scarico diviene estremamente caldo durante l'uso e
rimane tale per un certo tempo anche dopo. Non toccare mai le
parti calde del sistema di scarico. Indossare abiti che coprano
completamente le gambe.
3- Non indossare abiti larghi che si possano impigliare nelle leve di
comando, nei poggia piedi, nella catena di trasmissione o nelle ruote.
4- Rispettare la natura.
ITALIANO
2
1. ISTRUZIONE PER IL MONTAGGIO PRIMA DELLA MESSA
IN PISTA
La moto che vi si presenterà all'apertura della scatola d'imballo non è
pronta all'uso ma parzialmente smontata per motivi di trasporto. Al
momento del disimballo si dovranno effettuare una serie di operazioni
di montaggio e di controllo, seguendo le nostre istruzioni, al fine di
poter ottenere il prodotto nella sua giusta conformazione e pronto
all'uso. Per una migliore funzionalità di montaggio vi consigliamo di
procedere nel seguente ordine:
1- Togliere la moto dalla scatola (foto 1).
2- All'interno della scatola è contenuto un kit di montaggio così composto:
Minicross/minimotard Polini
N. 1
Rondella 6X18X1 (UNI 6593)
N. 4
Fascetta in plastica
N. 1
Molla per pedana
N. 2
Vite TCEI M8X20 (UNI 5931)
N. 6
Vite TCEI M8X40 (UNI 5931)
N. 2
Vite TB M6X16 (ISO 7380)
N. 4
Vite M8X18 (per cavalletto) (ISO 7380)
N. 1
Pedana destra/sinistra
N. 2
Perno ruota anteriore
N. 1
Dado autoblocc. M8 (UNI 7473)
N. 4
Vite TCEI M8X30 (UNI 6593)
N. 4
Cavallotto manubrio
N. 2
Manubrio con paracolpi
N. 1
Ruota anteriore con disco
N. 1
Parafango anteriore
N. 1
Pedale cambio
N. 1
Supporto pedane
N. 1
Tabella portanumero
N. 1
Dado M5
N. 2
Vite M5x10
N. 2
Vite M5x30
N. 1
Passacavo freno
N. 1
Cavalletto
N. 1
Molla per cavalletto
N. 1
Manuale d'uso e manutenzione
N. 1
Certificato di conformità CE
N. 1
- Per il modello minimotard, saranno presenti questi altri componenti:
Rondella 6x13x1,5
N. 2
Vite M6x20 TCEI
N. 2
Vite M8x65 TCEI
N. 4
Copri pedana superiore destra/sinistra
N. 2
Copri pedana inferiore destra/sinistra
N. 2
Vite M5x20 TPSEI
N. 2
Pomello laterale Ø35
N. 2
Bussola per pomello Ø35
N. 2
Distanziale manubrio
N. 2
3- Iniziate con il montaggio dell'ammortizzatore posteriore, utilizzando
la vite a testa esagonale M10x40 e le due rondelle con il dado M10,
lasciando una rondella dal lato del dado ed una dal lato della vite;
particolari che troverete già montati nella propria sede nel
forcellone (foto 2) (vedi tabella 9.1).
01
02
AVVERTENZA. MODIFICHE DELLA MINICROSS/MINIMOTARD O LA RIMOZIONE DI PARTI ORIGINALI POSSONO
RENDERE IL VEICOLO INSICURO O ILLEGALE. OTTEMPERARE
A TUTTE LE NORMATIVE NAZIONALI E LOCALI.
Questo motociclo è progettato per un pilota di peso inferiore
a: 100 Kg. PER IL MODELLO MINICROSS e MINIMOTARD
La Polini Motori raccomanda per la Vostra sicurezza di avere sempre il
meglio per il Vostro veicolo e di esigere esclusivamente ricambi originali Polini Motori. Al fine di conoscere la vera identità del Vostro veicolo annotate da subito qui di seguito le sue generalità:
MODELLO: .........................................................................................
CILINDRATA: ......................................................................................
PNEUMATICI: Ant. ................................... Post. ..................................
N.TELAIO: ..........................................................................................
CODICE: ......................................... PESO: .........................................
UBICAZIONE CODICE IDENTIFICATIVO VEICOLO
Il numero identificativo del veicolo è stampato nella parte anteriore
del telaio sul lato destro del canotto dello sterzo.
ITALIANO
3
4- Allargare le pastiglie del freno della pinza anteriore aiutandosi ad
esempio con una chiave inglese.
facendo passare il cavo del freno nella apposita guida.
06
EVENTO PERICOLOSO. Dopo il montaggio delle pinze premere
ripetutamente la leva del freno al manubrio ed il pedale freno per
permettere l'accostamento delle pastiglie al disco. Prima di usare il
veicolo accertarsi del perfetto funzionamento dell'impianto frenante.
5- Procedete con il montaggio della ruota anteriore utilizzando
l'apposito perno (foto 3).
6- Infilare il perno ruota e chiudere con chiave dinamometrica (vedi
tabella 9.1) (foto 4).
7- Chiudere il bullone di fissaggio del perno con chiave dinamometrica
(vedi tabella 9.1) (foto 5).
03
10- Tagliare la fascetta d'imballaggio della pompa del freno anteriore.
Montare ora il manubrio fissandolo alla forcella tramite i due
appositi cavallotti e le quattro viti a testa cilindrica con esagono
incassato M8X30 (vedi tabella 9.1) (foto 7).
11- Smontare il comando dell'acceleratore, infilare il filo come nella
foto 8, e richiudere il coperchietto (vedi paragrafo 7.7).
07
04
08
05
12- Posizionare la leva del freno anteriore fissando il cavallotto con le
apposite viti (foto 9) (vedi paragrafo 7.9).
09
8- Procedere al gonfiaggio del pneumatico ant. - post. (vedi paragrafo
7.10)
ANTERIORE
POSTERIORE
Minicross 1,3 BAR - 18,9 PSI
1,3 BAR - 18,9 PSI
Minimotard 1,5 BAR - 21,8 PSI
1,8 BAR - 26,1 PSI
9- Montare il parafango con le 4 apposite viti e rondelle in dotazione
TB M6X16 (foto 6). Montare la tabella porta numero e il passacavo
ITALIANO
4
13- Montare il pulsante di massa e fissare con fascetta sul manubrio
(foto 10).
14- Posizionare la leva della frizione e con il registro regolare la corsa
a vuoto della leva come desiderate (foto 11) (vedi paragrafo 7.8)
molla in dotazione (foto 14).
14
10
EVENTO PERICOLOSO. Vi consigliamo di eliminare il cavalletto
nelle competizioni perchè potrebbe essere pericoloso e contundente.
11
18- Posizionare la leva del cambio (foto 15).
19- Riempire il serbatoio di carburante (vedi paragrafo 7.14).
20- Controllare il livello olio motore (vedi paragrafo 7.3).
21- Solo per minimotard montare: i copripedane, i paramanubrio e i
paraforcelloni sull'asse ruota posteriore (foto 16) che trovate in
dotazione.
15
15- Procedere al montaggio del portapedane al motore con le 4 viti
M8X20. Fissarlo poi al telaio con 2 viti M8X20 e 2 dadi autoblock
(foto 12).
16- Montare le pedane come nella foto 13, con viti M8X40 e dadi
autoblock.
12
16
13
17- Montare il cavalletto utilizzando la vite M8X18 per fissarlo, e la
ITALIANO
RICORDA. Una regolare manutenzione come descritta nel manuale e
un controllo prima di utilizzare il veicolo sono essenziali. Se occorre un
intervento di manutenzione straordinaria o si rendono necessarie delle
riparazioni rivolgetevi al Vostro concessionario POLINI MOTORI. A causa
del continuo sviluppo di questi veicoli e dei diversi aggiornamenti tecnici
durante la progettazione, in alcuni casi potrebbero rilevarsi discordanze
tra il veicolo effettivo, le illustrazioni ed il testo di questo manuale. I
particolari originali che la POLINI MOTORI fornisce come ricambio sono
dello stesso materiale ed hanno subìto il medesimo ciclo dei pezzi che
costituiscono la Vostra minicross/minimotard. Garanzie queste di una
maggiore durata e di un funzionamento ottimale del Vostro veicolo. Le
raccomandiamo di esigere sempre ricambi originali POLINI MOTORI.
5
2. TRASPORTO DEL VEICOLO
Per un corretto e sicuro trasporto del veicolo dal luogo del rimessaggio
alla pista in cui verrà utilizzato è necessario:
- Accertarsi che il serbatoio sia vuoto per evitare possibili perdite;
- Posizionare la minicross/minimotard su un piano orizzontale del
mezzo con cui verrà effettuato il trasporto;
- Posizionare la minicross/minimotard sul cavalletto e fissandola
mediante cinghie o funi assicurarsi che durante il trasferimento resti
sempre in posizione verticale.
AVVERTENZA. Non effettuare mai il trasporto della moto con il
serbatoio della benzina pieno o con le parti di scarico o del motore
calde.
3. OPERAZIONI DA SVOLGERSI PRIMA DELLA MESSA IN
PISTA DELLA MINICROSS/MINIMOTARD.
1- Aprire il rubinetto della benzina posto sotto il serbatoio sulla
posizione “ON” (foto 17).
2- Prima della messa in moto controllare che il motore sia in folle
(foto 18, marcia N).
17
AVVERTENZA. Accelerare e decelerare con una rotazione dolce
della manopola di comando per evitare che la moto abbia movimenti
bruschi con conseguente perdita di controllo del veicolo.
AVVERTENZA. È fatto obbligo verificare che il motore si arresti
tramite il pulsante rosso di massa posto sul manubrio prima di porsi
alla guida del veicolo.
AVVERTENZA. Le successive operazioni di rodaggio devono
essere svolte da persone maggiori di 14 anni e comunque sotto la
tutela di persona adulta e competente.
ON
18
2°
N
1°
3- Se il motore è freddo aiutare l'accensione sollevando la leva dello
starter sul carburatore (foto 19).
AVVERTENZA. Quando il motore è caldo riabbassare lo starter
dell'aria avendo cura di evitare il contatto con il motore stesso.
4- Bloccare la ruota posteriore per mezzo del comando del freno.
EVENTO PERICOLOSO. La ruota posteriore se non è a contatto
con il suolo o non è bloccata dal freno girerà ed il contatto accidentale
con la stessa può provocare gravi lesioni personali.
4. RODAGGIO DEL VEICOLO
OFF
4°
STARTER ARIA
5- Tenendo la manopola dell'acceleratore al minimo, posizionare la
leva del pedale dell'avviamento verso l'esterno ed avviare il veicolo
ruotando energicamente il pedale verso il suolo.
6- Sistemare la leva del pedale di avviamento verso il carter motore in
posizione di marcia. Portare il motore a temperatura normale di
esercizio tenendolo al minimo per qualche minuto.
AVVERTENZA. Le sucessive operazioni di questo paragrafo
devono essere svolte da persone maggiori di 14 anni e comunque
sotto la tutela di persona adulta e competente.
3°
19
1- Per ottimizzare l'assestamento del motore e della trasmissione al
primo funzionamento e preservare da subito l'affidabilità è
indispensabile un breve rodaggio.
AVVERTENZA. Per la prima messa in strada del Vostro veicolo e
per eseguire un completo rodaggio, raccomandiamo due ore di
avviamento a bassa erogazione di potenza del motore.
Attenersi alle precauzioni di seguito elencate:
2- Una volta acceso il motore farlo girare al minimo fino al
raggiungimento della normale temperatura di esercizio.
3- Durante la fase di rodaggio procedete sempre ad un'andatura
costante: MAI ACCELERARE BRUSCAMENTE.
4- Anche se a basso regime di rotazione, cercate di evitare tratti di
percorso particolarmente prolungati e impegnativi che possono
provocare un eccessivo surriscaldamento del motore.
5- Dopo avere rispettato tutte queste precauzioni durante il rodaggio
del veicolo, consigliamo di rivolgervi a un concessionario Polini
Motori per un'assistenza post-rodaggio ovvero per la rimozione del
gruppo termico, per il controllo dello stato di deterioramento di:
candela, testa, pistone, cilindro e per provvedere alla sostituzione di
ITALIANO
6
candela e olio della trasmissione.
EVENTO PERICOLOSO. Dopo il rodaggio è importante controllare il serraggio dei dadi della testa. Spesso dopo il rodaggio si possono allentare (vedi tabella 9.1).
5. SPEGNIMENTO DEL MOTORE
Per spegnere la minicross/minimotard è sufficiente premere il pulsante
di massa posizionato sul manubrio (foto 10).
6. GUIDA SICURA: CONDIZIONI D'USO DELLA MINICROSS/
MINIMOTARD
AVVERTENZA. L'UTILIZZO DELLA MINICROSS/MINIMOTARD NEL
CASO DI PILOTA MINORE DI 18 ANNI VA SEMPRE EFFETTUATO SOTTO
LA SORVEGLIANZA DI UN ADULTO.
AVVERTENZA. L'UTILIZZO DELLA MINICROSS/MINIMOTARD NEL
CASO DI PILOTA MINORE DI 14 ANNI DEVE AVVENIRE PREVIA
ISTRUZIONE DA PARTE DI UN ADULTO SUL CORRETTO UTILIZZO DEL
MEZZO E DEI DISPOSITIVI DI PROTEZIONE SECONDO QUANTO INDICATO NEL PRESENTE MANUALE.
La guida della minicross/minimotard POLINI richiede precauzioni speciali per salvaguardare l'incolumità stessa del guidatore. Prima di
usare la vostra minicross/minimotard si rammentano i seguenti punti:
1- Molti incidenti sono dovuti all'inesperienza del pilota.
2- Guidate sempre con entrambe le mani sul manubrio.
3- Indossare abbigliamento protettivo idoneo:
- Portare sempre il casco INTEGRALE;
- Munirsi di guanti, ginocchiere e para-gomiti conformi alla norma
EN 1621-1 / 1997;
- Indossare tute o comunque indumenti protettivi.
- Utilizzare calzature chiuse e idonee alla condizioni ambientali.
4- L'utilizzo della minicross/minimotard deve avvenire esclusivamente
in luoghi o circuiti comunque privati. È fatto l'impiego su strade
pubbliche.
5- La minicross/minimotard non è dotata di apparato di illuminazione
autonomo, il suo impiego, quindi, deve avvenire in condizioni di
buona visibilità in zone aree private comunque adeguatamente
illuminate (anche con illuminazione artificiale).
6- La minicross/minimotard non è stata progettata per essere utilizzata
in condizioni climatiche avverse quali pioggia, grandine, vento forte,
neve e fondi sdrucciolevoli.
7- È vietato l'utilizzo della minicross/minimotard in stato di ebbrezza,
sotto l'effetto di stupefacenti o in situazioni di non completa lucidità
mentale.
8- E' fatto divieto l'utilizzo a piloti con peso superiore a: 100 Kg per il
modello minicross e 100 Kg per il modello minimotard.
9- L'utilizzo della minicross/minimotard è riservato esclusivamente ad
un solo utilizzatore.
È VIETATO L'UTILIZZO SENZA AVER LETTO ATTENTAMENTE IL MANUALE
DI USO E MANUTENZIONE.
7. MANUTENZIONE, INTERVENTI E REGOLAZIONI
ATTENZIONE. LE OPERAZIONI DI MANUTENZIONE DEVONO ESSERE
EFFETTUATE ESCLUSIVAMENTE DA PERSONE ADULTE E COMPETENTI.
ITALIANO
QUALORA LE OPERAZIONI INDICATE NEI SUCCESSIVI PUNTI DEL
MANUALE NON FOSSERO CHIARE ALL'UTENTE, O IL VEICOLO ABBIA
BISOGNO DI MANUTENZIONE STRAORDINARIA, SI CONSIGLIA DI CONSULTARE PERSONALE SPECIALIZZATO DEI RIVENDITORI O CONCESSIONARI POLINI MOTORI,CHE SOSTITUIRANNO I PARTICOLARI DETERIORATI
ESCLUSIVAMENTE CON RICAMBI ORIGINALI. ATTENERSI SCRUPOLOSAMENTE A QUANTO INDICATO NEI SUCESSIVI PUNTI DEL MANUALE.
Le manutenzioni e gli interventi necessari per una messa a punto ottimale del veicolo sono da intendersi come controlli quotidiani prima
della messa in moto dello stesso. La frequenza della manutenzione ed
il tipo di intervento sono dettati dalle tabelle 8.1 e 8.2.
7.1 RIMOZIONE E RIMONTAGGIO DELLA SELLA
Svitare la vite e sollevare leggermente la sella per poi sfilarla verso la
direzione del parafango posteriore (foto 20). Per rimontare la sella
bisogna infilare il gancio anteriore della sella nella vite posta sul
serbatoio della benzina e calzare la sella nell'inserto sul telaio.
Una volta riposizionata la sella, serrarla nuovamente con la vite.
20
7.2 RIMOZIONE E PULIZIA DEL FILTRO ARIA
Una delle cause dello scarso rendimento del motore è una conseguenza dovuta alle cattive condizioni del filtro aria.
Per la pulizia procedere nel seguente modo:
- Staccare la sella (vedi paragrafo 7.1)
- Estrarre il coperchio della cassetta filtro (foto 21).
21
- Rimuovere il filtro dell'aria e lavarlo in acqua calda con sapone
neutro (foto 22).
- Dopo averlo sciacquato e strizzato, umidificarlo con olio per filtri.
AVVERTENZA. Nel caso il filtro presenti una forte concentrazione di polvere oltre alle impurità, sostituitelo immediatamente con uno
nuovo.
7
22
24
TAPPO OLIO
AVVERTENZA. La mancata pulizia del filtro dell'aria può soffocare il motore causando un calo delle prestazioni. Un filtro deteriorato
può invece facilitare l'immissione nel motore di particelle di polvere
accelerando il normale deterioramento di fasce e cilindro e pistone.
25
7.3 CONTROLLO LIVELLO OLIO MOTORE
Mettere il veicolo in posizione di marcia.
- Togliere il tappo di livello posto sul carter laterale (foto 23).
- Verificare che il livello dell'olio sia compreso tra il livello massimo
(MAX) e minimo (MIN). Non scendere mai al di sotto del livello
minimo. Il rabbocco d'olio dal livello minimo al massimo è di 50 gr.
23
LIVELLO MAX.
LIVELLO MIN.
EVENTO PERICOLOSO. La ruota posteriore se non è a contatto
con il suolo o non è bloccata dal freno girerà ed il contatto accidentale
con la stessa può provocare gravi lesioni personali.
7.6 REGOLAZIONE DELLA VITE DELL'ARIA
Per ottenere migliori prestazioni fuori dal minimo.
- Se il motore ha difficoltà uscendo da una curva (miscela ricca),
svitare la vite dell'aria.
- Se il motore si imballa uscendo da una curva (miscela povera),
avvitare la vite dell'aria (foto 26).
26
7.4 CAMBIO OLIO MOTORE
EVENTO PERICOLOSO. Lo svitamento del tappo dell'olio a
motore caldo può provocare gravi ustioni personali. Svitare il tappo
dopo essersi assicurati di operare a motore freddo.
VITE ARIA
Mettere la moto in posizione di marcia.
- Togliere il tappo di livello posto nella parte inferiore del carter (foto
24) e lasciare uscire l'olio.
- Non disperdere l'olio esausto nell'ambiente ma consegnarlo alla
stazione ecologica per lo smaltimento.
- Riavvitare il tappo di scarico. Immettere 600 grammi di olio per
motore tipo SAE 20W50. Utilizzare solo olio motore altamente
detergente classificato di servizio API SF o SG.
7.5 REGOLAZIONE DEL MINIMO
La regolazione del minimo si deve effettuare a motore caldo.
Lasciando girare il motore in marcia N, con la manopola dell'acceleratore chiusa,avvitare o svitare la vite posta sulla parte destra del carburatore fino ad avere un numero dei giri del motore più basso possibile,
ma costante (foto 25).
AVVERTENZA. La vite di regolazione è molto vicina al gruppo
termico. Attenzione a non ustionarsi quando la si regola.
7.7 COMANDO DELL'ACCELERATORE
Controllare che la manopola dell'acceleratore sia sempre ben funzionante ed il cavo del comando del gas misuri un gioco di 3-5 mm. Se il
gioco è superiore, mettere a punto la vite che si trova sul carburatore
o sul comando del gas (foto 27).
AVVERTENZA. La mancanza di questi controlli sull'erogazione
ITALIANO
8
possono provocare seri danni al veicolo e come conseguenza incidenti
gravi.
27
3/5 mm.
manualmente sulla vite del perno del pompante sulla pompa del freno
e, trovata la giusta taratura del pilota, serrare il controdado posto sullo
stesso filetto del perno (foto 29). Controllare visivamente le pastiglie
attraverso la ruota per determinarne l'usura. Se una delle pastiglie
fosse usurata in qualsiasi punto fino ad uno spessore di 1 mm, sostituire entrambe le pastiglie. Accertarsi che non vi siano perdite di liquido.
Controllare se tubi e giunti presentano segni di deterioramento e crepe.
29
5/10 mm.
7.8 REGOLAZIONE FRIZIONE
Nel caso la regolazione del registro della leva della frizione (foto 11)
non soddisfi pienamente la vostra posizione di guida, potete migliorare
ulteriormetente la regolazione della leva agendo sulla vite di registro
“1” (foto 28) situata sotto il coperchio carter frizione.
3
28
2
1
AVVERTENZA. Lubrificare frequentemente con grasso l'albero di
comando della frizione “2” per impedire eventuali grippamenti dello
stesso. Rimuovere il coperchio carter frizione e la relativa guarnizione,
smontare l'albero togliendo il piolo di fermo “3” e ingrassare
abbondantemente.
7.9 IMPIANTO FRENANTE A COMANDO IDRAULICO E
PASTIGLIE FRENO
Questo modello possiede un freno a disco idraulico anteriore ed uno
posteriore. Quando le pastiglie si usurano, il livello del liquido dei freni
cala. Perciò, il livello del liquido freni e l'usura delle pastiglie devono
essere controllati periodicamente.
AVVERTENZA. Quando si aggiunge liquido per freni, accertarsi
che il serbatoio sia orizzontale prima di rimuovere il tappo onde evitare di versare il liquido stesso.
AVVERTENZA. Il tubo freno mal posizionato o a contatto con parti in
movimento può vanificare l'azione frenante causando anche gravi incidenti. L'impianto frenante necessita di un periodo di assestamento per
ottenere il massimo della sua efficienza. Prima di considerare il sistema ben assestato occorre effettuare almeno un centinaio di frenate,
agendo con accortezza, e quindi procedere con un'ulteriore regolazione di messa a punto e con un controllo del serraggio delle viti.
Per regolare la corsa del pedale del freno posteriore occorre agire
ITALIANO
VITE REGOLAZIONE
EVENTO PERICOLOSO. Utilizzare esclusivamente olio per
impianti freno idraulici DOT 4 prelevato da confezioni integre.
AVVERTENZA. Il liquido impiegato nell'impianto frenante, oltre
a danneggiare le parti verniciate, è dannosissimo a contatto degli occhi
e della pelle. In caso di incidente consultare un medico. E' buona
norma sostituire l'olio dell'impianto frenante ogni due anni.
NON DISPERDERE L'OLIO ESAUSTO NELL'AMBIENTE.
AVVERTENZA. Periodicamente, in funzione dell'utilizzo e delle
condizioni atmosferiche, pulire la pinza del freno con un getto d'aria
compressa, e controllare l'usura del materiale d'attrito delle pastiglie
freno; quando lo spessore del materiale è inferiore ad 1 mm.,provvedere alla sostituzione.
AVVERTENZA. Non effettuare la registrazione dei freni con i dischi
ancora caldi.
EVENTO PERICOLOSO. Dopo la sostituzione delle pinze premere ripetutamente la leva del freno al manubrio ed il pedale freno per
permettere l'accostamento delle pastiglie al disco. Prima di usare il
veicolo accertarsi del perfetto funzionamento dell'impianto frenante.
7.10 PRESSIONE DEI PNEUMATICI
Controllare frequentemente la pressione dei pneumatici e regolare se
necessario. La rilevazione della pressione di gonfiaggio dei pneumatici
va effettuata a gomme fredde. Tenete presente che la pressione può
variare a seconda delle condizioni della pista e del peso del pilota.
ANTERIORE
POSTERIORE
Minicross 1,3 BAR - 18,9 PSI
1,3 BAR - 18,9 PSI
Minimotard 1,5 BAR - 21,8 PSI
1,8 BAR - 26,1 PSI
AVVERTENZA. La pressione ottimale dei pneumatici varia a
seconda del peso del pilota, della temperatura atmosferica e del tipo di
fondo su cui si gareggia.
7.11 CATENA DELLA TRASMISSIONE
La catena per la moto è un organo di tale importanza da meritare una
cura ed una manutenzione particolare:
9
EVENTO PERICOLOSO. Evitare di impigliare le dita tra la
catena e la corona.
1- Controllare la tensione della catena. La moto deve essere tenuta in
posizione verticale e non ci devono essere pressioni sulla moto.
Controllare la tensione alla posizione illustrata nella foto 30.
Verificare che la distanza riportata in foto 35/39 mm sia corretta,
altrimenti eseguire come segue la regolazione della catena (foto 31).
Per rimuovere impurità si può utilizzare del gasolio e per la
lubrificazione raccomandiamo un lubrificante spray che consente di
diminuire notevolmente l'usura e di migliorare il rendimento della
trasmissione.
4- Nel caso si debba rimuovere la catena dal veicolo ricordatevi che la
clip della maglia principale va inserita con le estremità chiuse della
“U” rivolte verso il senso di marcia (foto 33).
33
30
31
A
1
3
2
- Allentare il dado dell'assale posteriore “3”
- Allentare i controdadi “1” e ruotare il bullone di registro “2” in senso
antiorario per diminuire il lasco o in senso orario per aumentarlo.
Allineare i bordi posteriori delle piastre dell'assale e controllare su
entrambi i lati del forcellone la distanza “A” dal forcellone alla piastra.
- Stringere il dado dell'assale posteriore “3” (tabella 9.1) (foto 32):
32
- Ricontrollare il lasco della catena e regolare se necessario.
- Allentare leggermente il bullone di registro “2” in senso antiorario
fino a che non tocca la piastra dell'assale. Stringere quindi il
controdado “1” tenendo fermo il bullone di registro con una chiave.
2- Verificare ad ogni regolazione lo stato di usura di corona e pignone
e controllare eventuali giochi o eccessive impuntature.
3- La catena va sempre lubrificata anche dopo il lavaggio della moto.
EVENTO PERICOLOSO. Non montare mai una catena di trasmissione nuova su pignone e corona notevolmente usurati e viceversa. Un allineamento scorretto della ruota provoca un'usura abnorme e
compromette la stabilità del mezzo.
EVENTO PERICOLOSO.Se la catena si rompe o si sgancia dalle
ruote dentate può arrotolarsi sul pignone e bloccare la ruota posteriore
causando gravi incidenti e lesioni personali.
7.12 REGOLAZIONE AMMORTIZZATORE POSTERIORE
L'ammortizzatore che trovate montato è già regolato con tarature
standard.
MANUTENZIONE:
1- Controllare se la molla risulta rotta o collassata.
2- Controllare che la sospensione funzioni senza alcun problema
facendosaltare su e giù la parte del veicolo posteriore.
3- Controllare se l'albero dell'ammortizzatore è piegato o se vi sono
perdite di olio.
4- Spingere la ruota posteriore lateralmente per controllare se le
boccole del forcellone sono usurate. Se vi fosse un movimento
laterale sostituire le boccole.
7.13 REGOLAZIONE FORCELLA ANTERIORE
La forcella che trovate installata sul veicolo nuovo è già regolata con
tarature standard.
MANUTENZIONE:
1- Accertarsi che i parapolvere non siano sporchi di fango e polvere.
2- Controllare se vi sono segni di perdite di olio. I parapolvere
danneggiati devono essere sostituiti prima di utilizzare il veicolo.
3- Prima di utilizzare il veicolo eseguire sempre un veloce controllo di
funzionamento della forcella spingendola su e giù con il freno
anteriore azionato.
7.14 CARBURANTE
Utilizzare benzina per automobili con un numero di ottani alla pompa
da 96 a 100 o più ottani. Se il motore batte in testa cambiare marche
di benzina differenti o con un numero di ottani diverso.
Capacità serbatoio 3 litri.
ITALIANO
10
7.15 FILTRO CARBURANTE
Il filtro del carburante si trova nel rubinetto sul lato inferiore del
serbatoio. Lo sporco accumulato nel filtro del carburante impedisce il
flusso dello stesso al carburatore. La manutenzione del filtro deve
perciò essere eseguita frequentemente.
MANUTENZIONE:
1- Scaricare il carburante dal serbatoio in un recipiente idoneo per
liquidi estremamente infiammabili.
2- Rimuovere il rubinetto dal serbatoio per mezzo delle due viti.
3- Lavare il filtro con acqua e sapone neutro. Asciugare possibilmente
al sole.
4- Rimontare il rubinetto del serbatoio in ordine inverso prestando
attenzione che la guarnizione sia posizionata correttamente.
EVENTO PERICOLOSO. La benzina è estremamente infiammabile ed esplosiva. Eseguire questa operazione in un area ben ventilata
e a motore spento. Non fumare, non produrre e non utilizzare fiamme
o scintille nell'aria dove la benzina viene scaricata o dove viene eseguito il rifornimento.
7.16 PULIZIA VEICOLO
Prima di procedere al lavaggio del veicolo è necessario proteggere
dall'acqua le seguenti parti:
- Comando della trasmissione.
- Comando dei freni
- Presa dell'aria e filtro dell'aria
- Bocchettone del silenziatore
Non indirizzare direttamente il getto d'acqua su:
- Mozzi ruota
- Perno forcelle
- Canotto dello sterzo
- Pinze freno
- Cappuccio della candela.
A lavaggio ultimato, procedere a lubrificare tutti i punti qui sopra
elencati, avviare il motore e farlo girare per qualche minuto.
AVVERTENZA. Effettuare le operazioni di pulizia a motore
freddo.
AVVERTENZA. Non usare solventi od alcool per la pulizia delle
plastiche. Usare esclusivamente acqua e sapone o gli appositi shampoo.
AVVERTENZA. Prima di mettersi in moto verificare la perfetta
efficienza dalla frenata.
ITALIANO
8. ISPEZIONE E CONTROLLI DI MESSA A PUNTO E
PREPARAZIONE GARA
AVVERTENZA. LE OPERAZIONI INDICATE AI PUNTI 8.1 E 8.2
DEVONO ESSERE EFFETTUATE ESCLUSIVAMENTE DA PERSONE ADULTE E
COMPETENTI.
8.1 CONTROLLI QUOTIDIANI: DA EFFETTUARE SEMPRE
PRIMA DI METTERSI ALLA GUIDA
- Olio del motore: nessuna perdita, livello corretto.
- Carburatore: acceleratore flessibile che scorra regolarmente libero da
impuntature.
- Tappo del serbatoio carburante: verificare serraggio.
- Filtro dell'aria e scatola filtro: filtro libero da impurità e scatola pulita
dalla polvere.
- Freni: guaine libere da strozzature e pinze ripulite dal fango.
- Sella: agganciata nel suo incastro e vite bloccata.
- Catena: pulita da fango, lubrificata e controllo tensione.
- Pignone: libero di girare da sassi e polvere.
- Manubrio: canotti di bloccaggio ben serrati.
- Pneumatici: controllo pressione.
- Forcella anteriore: controllo e pulitura.
- Sterzo: controllo gioco serraggio canotto.
11
8.2 CONTROLLI PERIODICI:
DA EFFETTUARSI PRIMA DI OGNI
GARA E DOPO IL RIMESSAGGIO
CATENA DI TRASMISSIONE
PIGNONE E CORONA
RULLO DELLA CATENA
PARACATENA-SLITTACATENA
REGOLAZIONE FRENI
PINZA FRENO
PASTIGLIE FRENI
COMANDO ACCELERATORE
CAVI DI COMANDO ACCELERATORE
FILTRO ARIA
PRESSIONE GONFIAGGIO PNEUMATICI
CUSCINETTI MOZZI RUOTE
TIRAGGIO RAGGI RUOTE
OLIO MOTORE
GIOCO CANOTTO DELLO STERZO
CUSCINETTI STERZO
FORCELLE ANTERIORI
FORCELLONE POSTERIORE
TUBO ALIMENTAZIONE
FILTRO BENZINA
GIOCO VALVOLE
CARBURATORE
CANDELA
CAPPUCCIO CANDELA
IMPIANTO ELETTRICO
IMPIANTO DI SCARICO
SILENZIATORE
GRUPPO TERMICO
PISTONE
SEGMENTO
CARTER MOTORE
ALBERO MOTORE
CUSCINETTI BANCO
SERIE CUSCINETTI MOTORE
FRIZIONE
DADI-BULLONI-ELEMENTI FISSAGGIO
ISPEZIONE - PULIZIA - REGOLAZIONE Frequenza Riferimento
DOPO 1
DOPO 3
DOPO 9 sostituzione paragrafo
GARA 1 ORA GARE 3 ORE GARE 9 ORE
6 ore
7.11
9 ore
7.11
6 ore
F
18 ore
6 ore
7.9
7.9
7.9
7.7
7.7
7.2
7.10
18 ore
3 ore
AVVISI
PERICOLI
EP (punto 7.11)
EP(punto 7.11)+M
A (punto 7.9)
A (punto 7.9)
A (punto 7.9)
A (punto 7.7)
A(punto 7.7)+M
A (punto 7.2)
A (punto 7.10)
M
7.3
7.13
M
M
M
18 ore
7.15
EP (punto 7.15)
M
6 ore
18 ore
36 ore
18 ore
36 ore
18 ore
18 ore
36 ore
18 ore
18 ore
9 ore
M
M
M
M
M
M
M
M
M
: ISPEZIONARE O REGOLARE
EP: SEGNALAZIONE DI EVENTO PERICOLOSO COME DA MANUALE
: PULIZIA
A: SEGNALAZIONE DI AVVERTENZA COME DA MANUALE
: LUBRIFICAZIONE
M: PERICOLO: LE OPERAZIONI DI SOSTITUZIONE DEVONO ESSERE
F: PULIRE IL FILTRO DOPO OGNI MANCHE IN CONDIZIONI
SVOLTE DA PERSONALE COMPETENTE
AMBIENTALI POLVEROSE
CANDELA STANDARD
Champion Z9Y - NGK C7HSA - LG A7TC
GIOCO VALVOLE ASPIRAZIONE E SCARICO
0,15 MM. / 0,006 in
ITALIANO
12
9. CARATTERISTICHE
TECNICHE
Motore
Raffreddamento
Alesaggio e corsa
Cilindrata
Rapporto di compressione
Carburatore
Accensione
Alimentazione
Candela
Avviamento
Frizione
Telaio
Freno anteriore
Freno posteriore
Pneumatico anteriore
Pneumatico posteriore
Trasmissione
Sospensione anteriore
Sospensione posteriore
Capacità serbatoio
Peso
Altezza sella
Interasse
XP 4T CROSS
2,50x12”
2,75x10”
XP 4T Racing
XP 4T Racing
CROSS
14”/12” Wheels CROSS
monocilindrico 4T
aria
52,4x49,5
107
9,6:1
Mikuni 22
elettronica
benzina verde
Champion Z9Y - NGK C7HSA - LG A7TC
kick starter
multidisco in bagno d'olio a comando manuale
in acciaio
idraulico Ø 200
idraulico Ø 150
2,50x12”
60/100-14”
2,75x10”
80/100-12”
4 marce
forcella idraulica Ø33
monoammortizzatore idraulico
3 litri
60 Kg.
62,7 Kg.
725 mm.
775 mm.
1061 mm.
1113 mm.
XP 4T MOTARD
90/90-10”
90/90-10”
60 Kg.
725 mm.
1061 mm.
9.1 TABELLA COPPIE DI SERRAGGIO MINUTERIA TELAIO E CICLISTICA
N.m
M
50
Perno ruota anteriore
M12
20
Bullone di fissaggio perno anteriore
M8
20
Viti fissagio manubrio
M8
60
Perno ruota posteriore
50
Perno motore-forcellone
M14
25
Perno motore anteriore
M12
20
Viti piastra sup. e inf. forcella
M8
10
Viti dischi freno
M6
80
Dado canotto dello sterzo
M20
6
Ghiera regolatore canotto sterzo
Kgf.m
5
2
2
6
5
2,5
2
1
8
0,6
Lbf.t
37
14,8
14,8
44,40
37
18,5
14,8
7,4
59,2
4,44
frena filetto
TABELLA COPPIE DI SERRAGGIO MINUTERIA MOTORE N.m / Lbf . ft
M
N.m
Dadi della testa
M6
10
Dado albero motore lato frizione
M12
60
Dado albero motore lato accensione
M8
27
Dado ingranaggio condotto
18
Candela
10
Kgf.m
1
6
2,7
1,8
1
Lbf.t
7,40
44,4
19,98
13,32
7,40
frena filetto
N.m
6
10
25
45
55
Kgf.m
0,6
1
2,5
4,5
5,5
Lbf.t
4,44
7,40
18,50
33,30
40,70
I valori di coppia sopraelencati sono per i punti
di serraggio più importanti.
Se una certa coppia non è elencata, utilizzare
gli standard forniti di seguito.
ITALIANO
LOCTITE 242
LOCTITE 270
LOCTITE 242
VALORI DI COPPIA STANDARD
Bullone e dado da 5 mm
Bullone e dado da 6 mm
Bullone e dado da 8 mm
Bullone e dado da 10 mm
Bullone e dado da 12 mm
13
10. RICAMBISTICA
Si raccomanda di utilizzare sempre ricambi originali POLINI MOTORI.
EVENTO PERICOLOSO. L'utilizzo di ricambistica non originale
può pregiudicare il corretto funzionamento della minicross/
minimotard nonché la sicurezza dell'utente stesso alla guida della
minicross/minimotard.
11. RIMESSAGGIO
Il rimessaggio del veicolo qualora si ritenga di non usare la minicross/
minimotard per un periodo prolungato di tempo comporta:
- lo svuotamento del serbatoio della benzina può avvenire
semplicemente scollegando temporaneamente la cannetta di
adduzione del combustibile dalla parte del rubinetto.
Dotarsi di contenitore per liquidi infiammabili e dopo aver aperto il
rubinetto lasciare defluire il combustibile.
AVVERTENZA. Non fumare e non usare fiamme libere durante
l'operazione di svuotamento del serbatoio.
12. FORMAZIONE E INFORMAZIONE
Per un corretto uso della minicross/minimotard è necessario leggere
attentamente il manuale ed attenersi scrupolosamente alle indicazioni.
Si deve porre particolare attenzione ai punti del presente manuale evidenziati con i simboli di EVENTO PERICOLOSO e AVVERTENZA.
Nel caso di utilizzo da parte di minore di 14 anni sarà opportuno
istruire il giovane pilota sui rischi derivanti da un uso improprio della
minicross/minimotard ed informarlo sul corretto uso dei dispositivi di
sicurezza da adottare sempre come il casco e altri indumenti di
protezione come meglio indicato nel paragrafo 6. GUIDA SICURA:
CONDIZIONI D'USO DELLA MINICROSS/MINIMOTARD. Se ne sconsiglia
l'uso ai minori non in grado di condurre una bicicletta.
È comunque opportuno che il giovane pilota venga istruito alle
principali nozioni di guida da parte di una persona competente.
Per esempio i minori di 14 anni saranno avvertiti sui pericoli derivanti
dagli organi in movimento o dalle parti calde della minicross/
minimotard. Ai minori di 14 anni sarà inoltre fatto divieto di svolgere
le operazioni di manutenzione indicate nel capitolo 7.
ITALIANO
14
ENGLISH
CONTENTS
1- INSTRUCTIONS FOR THE ASSEMBLY OF THE BIKE BEFORE
RIDING IT.
2- VEHICLE CARRIAGE
3- OPERATIONS BEFORE RIDING THE MINICROSS/
MINIMOTARD
4- RUNNING IN
5- ENGINE SWITCHING OFF
6- SAFE DRIVING: MINICROSS/MINIMOTARD USING
CONDITIONS
7- MAINTENANCE, SERVICING AND RULES
8- INSPECTIONS, CHECKING AND RACE PREPARATION
9- TECHNICAL FEATURES
10- SPARE PARTS
11- GARAGING
12- TRAINING AND INFORMATION
INTRODUCTION
INSTRUCTIONS MAY BE REPEATED A NUMBER OF TIMES IN THE COURSE
OF THIS MANUAL. THIS HAS BEEN DONE PURPOSEFULLY TO EMPHASISE
THE IMPORTANCE OF CERTAIN OPERATIONS AND THE NEED TO BEAR
SAFETY CONSTANTLY IN MIND. ALL ENGINE MAINTENANCE MUST BE
REFERRED TO A SPECIALIST DEALER.
Read this use and maintenance manual carefully throughout before
riding your new motorcycle. This manual contains important information that will help you to avoid unnecessary damages to the vehicle and
serious or even fatal injury to yourself to other persons and things. To
ensure care-free and satisfying riding you must get to know your new
motorcycle thoroughly and set it up correctly before you start riding.
IMPORTANT NOTICE
THIS MOTORCYCLE HAS BEEN DESIGNED AND MANUFACTURED
EXCLUSIVELY FOR COMPETITION USE. IT IS ILLEGAL TO RIDE IT ON
PUBLIC ROADS. APPLICABLE LEGISLATION PERMITS THE USE OF THIS
MOTORCYCLE ONLY IN ORGANISED COMPETITIONS OR CLOSED AND
PRIVATE TRACKS AND WITH THE PRESENCE OF SECURITY FORCES
(AMBULANCE, FIREMEN, ETC).
NO CARRY PASSENGERS AND/OR THINGS
PILOT ONLY, NO PASSENGER. This minicross / minimotard has been
designed and manufactured for use by the pilot only.
REMEMBER
People under 18 must always be supervised by an adult or qualified
people when riding this motorcycle.
READ THIS MANUAL CAREFULLY.
This text identifies special situations that could cause dangerous events
coming from the wrong usage of the minicross/minimotard or its
servicing. In accordance with point 3 of Rule UNI EN 1050:1998 these
situations are indicated as follows:
DAMAGE: injury and /or damages to health or to means.
DANGEROUS EVENT: an event that could cause an injury.
ENGLISH
Every time, before using the minicross/minimotard or before servicing
it be sure to have well understood what written in this manual, being
careful to the phases signed with the symbols
DANGER or
WARNING.
IMPORTANT: this manual is an integral part of the motorcycle and
must accompany it if it is sold or transferred to a new owner or keeper.
WELCOME NOTICE. By purchasing a Polini minicross/minimotard
you have become one of a large family of satisfied Polini motorcycle
owners and riders.
WARNING. This Polini minicross/minimotard is a high performance
competition motorcycle and incorporates the latest motocross race
technology. It must only be used in competitive racing by expert riders.
This new Polini minicross/minimotard model has been designed to
perform as competitively as possible. Motocross is nevertheless a
physical sport and winning requires more than just a good motorcycle.
To achieve good results you must be in good physical condition and be
a skilful motorcycle rider. The best results are achieved by riders who
exercise regularly to keep in peak physical form and who practise
their motorcycling skills frequently. The purpose of this manual is to
help you get the greatest satisfaction possible from you new Polini
minicross/minimotard motorcycle, both from the performance of the
machine itself and from success in competitions.
PERSONAL PROTECTIVE EQUIPMENT AND SAFETY SUGGESTIONS
1- Most deaths in motorcycling are caused by head injuries. ALWAYS
wear the HOMOLOGATED helmet. Wear knee guards and
elbow guards (certificated in accordance with Rule EN 1621-1 /
1997). Use well protective clothes or suits. Use close and suitable
boots with sole resistant to abrasion.
2- The exhaust system becomes extremely hot during use and may
remain so for quite some time afterwards. Do not touch any parts
of the exhaust system. Always wear clothes that completely cover
your legs.
3- Do not wear loose or flowing clothing. This can become entangled in
the control levers, kick-start lever, footrests, chain or wheels.
4- Respect the environment.
WARNING. MODIFICATIONS TO OR THE REMOVAL OF
ORIGINAL PARTS FROM THIS MINICROSS / MINIMOTARD
MAY CAUSE IT TO BECOME UNSAFE OR ILLEGAL. ALWAYS
COMPLY WITH ALL LOCAL AND NATIONAL LAWS,
REGULATIONS AND SAFETY STANDARDS.
THIS MOTORCYCLE HAS BEEN DESIGNED FOR A PILOT WHO
WEIGHTS LESS THAN:
- 100 Kg. FOR THE MINICROSS MODEL
- 100 Kg. FOR THE MINIMOTARD MODEL
For your own safety and for the best performance of your motorcycle,
always insist on genuine Polini Motori spare parts for all repairs. In
order to keep track of your bike, make a note here of its specifications:
15
MODEL: .............................................................................................
ENGINE CAPACITY: .............................................................................
TYRES: FRONT ..................................... REAR ....................................
FRAME NUMBER: ..............................................................................
IDENTITY CODE: ................................. WEIGHT .................................
LOCATION OF VEHICLE IDENTITY CODE
The motorcycle's identity code is stamped on the front of the frame or
on the right hand side of the steering head.
1- INSTRUCTIONS FOR THE ASSEMBLY OF THE BIKE BEFORE
RIDING IT.
When you first open the crate you will see that the motorcycle is not
ready for use, but has been partly disassembled for reasons of packing
and transport. Carefully unpack all the parts from the crate and
proceed as instructed below to check and assemble your motorcycle for
use. The following instructions give the most practical order for
assembling the various parts of your motorcycle.
1- Remove the motorcycle from the crate (photo 1).
01
HANDLEBAR CLAMP
HANDLEBAR WITH FOAM ROLL
FRONT WHEEL WITH DISK
FRONT MUDGUARD
GEAR PEDAL
FOOTREST SUPPORT
NUMBER PLATE
M5 NUT
M5X10 SCREW
M5X30 SCREW
BRAKE FAIRLEAD
STAND
STAND SPRING
USE AND MAINTENANCE MANUAL
EC CONFORMITY STATEMENT
- For the Minimotard model, you will find:
6X13X1,5 WASHER
TCEI M6X20 SCREW
TCEI M8X65 SCREW
TOP RIGHT/LEFT FOOTREST COVER
BOTTOM RIGHT/LEFT FOOTREST COVER
SCREW M5X20 TPSEI
SIDE BALL GRIP Ø 35
BALL GRIP BUSH Ø 35 6X10X7
HANDLEBAR SPACER
No. 2
No. 1
No. 1
No. 1
No. 1
No. 1
No. 1
No. 2
No. 2
No. 1
No. 1
No. 1
No. 1
No. 1
No. 1
No. 2
No. 2
No. 4
No. 2
No. 2
No. 2
No. 2
No. 2
No. 2
3- Fit the rear shock-absorber, using the M10x40 hex head bolt, two
M10.5 spacers, two washers and the M10 nut. Fit one of the
washers at the bolt head and the other at the nut. The nut, bolt,
spacers and washers are pre-fitted to the mounting on the swinging
arm (photos 2) (see schedule 9.1).
4- Open the front calliper brake disk pads using an adjustable wrench
02
2- Remove all the parts needed to reassemble the motorcycle from the
crate:
No. 1
POLINI MINICROSS/MINIMOTARD
6X18X1 WASHER (UNI 6593)
No. 4
PLASTIC TIE
No. 1
FOOTREST SPRING
No. 2
M8x20 TCEI SCREW (UNI 5931)
No. 6
M8x40 TCEI SCREW (UNI 5931)
No. 2
M6x16 TB SCREW (ISO 7380)
No. 4
M8x18 TB SCREW (for the stand) (ISO 7380)
No. 1
RIGHT /LEFT FOOTREST
No. 2
FRONT WHEEL SPINDLE
No. 1
M8 SELF-LOCKING NUT (UNI 7473)
No. 4
M8x30 TCEI SCREW (UNI 6593)
No. 4
DANGER: After assembling the callipers press again and again
the brake level placed on the handlebar and the brake pedal in order
to make the pads closed to the disk. Before using the vehicle be sure
the brakes works perfectly.
5- Fit the front wheel using the special spindle (photo 3).
6- Push the spindle right through the wheel and tighten with a torque
wrench (see section 9.1) (photo 4).
7- Tighten the spindle locking bolt with a torque wrench (see section
9.1) (photo 5).
ENGLISH
16
8- Inflate the front and rear tyres (see section 7.10)
FRONT
REAR
Minicross
1,3 BAR - 18,9 PSI
1,3 BAR - 18,9 PSI
Minimotard 1,5 BAR - 21,8 PSI
1,8 BAR - 26,1 PSI
and the four Allen bolts M8X30 (See section 9.1) (photo 7).
11- Remove the throttle control cover and fit the cable as shown in
photo 8. Re-fit the cover (see section 7.7).
07
03
08
04
05
12- Fit the front brake lever and secure the lever bracket with the
screws provided (photo 9) (See section 7.9)
13- Fit the engine stop button and fix it to the handlebar with its
mounting clamp (photo 10).
09
9- Fit the front mudguard with the 4 washers and TB M6X16 screws
provided (photo 6). Fit the front number plate inserting the brake
cable in its special slide.
10
06
10- Cut the transport tie securing the front brake pump. Fit the
handlebar and fix it to the top fork with the two handlebar clamps
ENGLISH
14- Fit the clutch lever and adjust the travel of the lever as you prefer
using the regulator (photo 11) (See section 7.8).
15- Fit the footrest support first on the engine with the four Allen
17
screws M8X20 and then on the chassis with 2 M8X20 screws and 2
self-locking nuts (photo 12).
11
19- Fill the fuel tank (see section 7.14).
20- Check the engine oil level (see section 7.3).
21- For Minimotard only: apply the protections on the footrests,
handlebar, forks and on the wheel (photo 16).
15
12
16
16- Fit the footrests like shown in photo 13, with M8X40 screws and
self-locking nuts.
17- Fit the stand using the M8X18 screw to fasten it and the spring
provided (photo 14).
13
14
REMIND. Always ensure that the motorcycle has been efficiently
serviced and check it over before riding it. Take your motorcycle to an
authorised POLINI MOTORI dealer for all major servicing and repair.
Because of the manufacturer's policy of continuous development, and
because of constant innovations in technology, your motorcycle may
differ in some details from that described in the illustrations and text
in this manual. Original POLINI MOTORI spare parts are always made
from the same materials and in the same way as the parts originally
fitted to your minicross/minimotard motorcycle.
Always insist on original POLINI MOTORI spare parts. Their use
ensures a longer life and improved efficiency for your motorcycle.
2. VEHICLE CARRIAGE
To proceed with a correct and safety carriage of the vehicle from the
garaging to the track it is necessary:
- Be sure that the tank is empty in order to avoid petrol dripping;
- Place the minicross/minimotard on a horizontal flat on the vehicle
you will use to transport the bike;
- Place the minicross/minimotard on the stand, fix it with belts and
ropes being sure it always stays in vertical position during the carriage.
WARNING. Never transport the bike with the engine full of
petrol or with the muffler or other parts hot.
3. OPERATIONS BEFORE RIDING THE MINICROSS/
MINIMOTARD
DANGER. We suggest you to remove the stand during
competitions as it could be dangerous and bruising.
18- Fit the gear lever (photo 15).
WARNING. Starting from this paragraph on all the operations
must be carried out by people over 14 and always under the
supervision of a competent and adult person.
ENGLISH
18
1- Turn the fuel tap located under the fuel tank to “ON” position
(photo 17).
2- Before starting the engine put the gear in neutral position (photo
18, gear N).
3- If the engine is cold, lift the choke lever on the carburettor (photo
19).
17
OFF
grip to avoid the motorcycle could jump forwards, causing you to lose
control.
WARNING. Before you begin riding the motorcycle, check that the
engine stops pressing the red stop button placed on the handlebar.
4. RUNNING IN
WARNING. The running in operations must be done by people
over 14 and always under the supervision of an adult or qualified
people.
1- Run your new motorcycle in as instructed below to ensure that the
engine and transmission bed in correctly and to ensure continuous
reliability in future.
ON
3°
4°
18
2°
N
1°
19
AIR STARTER
WARNING. The first time you ride your new motorcycle, ride for
about two hours at low engine speeds to ensure that it runs in
correctly. Also respect the following precautions:
2- Once the engine starts, leave it idle until it warms up to normal
temperature.
3- During the running in period, always ride at constant speeds.
AVOID RAPID ACCELERATION.
4- Even when riding at low engine speeds, avoid extended difficult
sections of road or track that could cause the engine to become very
hot.
5- Once you have run in your motorcycle following all these instructions,
take it to a Polini Motori dealer for its post-running-in service. Apart
from a change of spark plug and engine oil, this service also
includes the disassembly of the cylinder to check on the condition of
the spark plug, cylinder head, the piston and barrel.
DANGER. After the running in it is important to check the
tightening of the head's nuts. Often they can be loosen after the
running-in period (see schedule 9.1)
5. ENGINE SWITCHING OFF
Switch the minicross/minimotard off by pressing the button placed on
the handlebar (Photo 10).
WARNING. Lower the starter lever again as soon as the engine
starts to warm up, avoiding to touch the engine.
4- Lock the rear brake to prevent the rear wheel from spinning.
DANGER. The rear wheel will spin if it is not in contact with the
ground or locked by the brake. Accidental contact with a spinning
wheel can cause serious personal injuries.
5- Leave the throttle at a minimum. Pivot the kick-start lever outwards
and push energetically downwards with your foot to start the engine.
6- Return the kick-start lever to its rest position. Leave the engine idle
for a few minutes to warm it up.
WARNING. Accelerate and decelerate gentling rotating the hand
ENGLISH
6. SAFE DRIVING: CONDITIONS OF USE OF THE MINICROSS/
MINIMOTARD
WARNING. PEOPLE UNDER 18 MUST ALWAYS BE SUPERVISED BY
AN ADULT OR QUALIFIED PEOPLE WHEN RIDING THIS MINICROSS/
MINIMOTARD.
WARNING. BEFORE RIDING THIS MINICROSS/MINIMOTARD PEOPLE
UNDER 14 MUST ALWAYS BE INSTRUCTED BY AN ADULT ABOUT THE
CORERECT USE OF THE VEHICLE AND INFORMED ABOUT THE
PROTECTION EQUIPMENTS ACCORDING TO THE PRESENT MANUAL.
Driving a POLINI minicross/minimotard requires special cautions to
safeguard the rider safety. Before using your minicross/minimotard
we remind you that:
1- Most accidents are caused by rider's inexperience.
2- Always ride with both the hands on the handlebar
19
3- Use well protective clothes:
- always wear the FULL-FACE helmet.
- Wear gloves, knee guards and elbow guards, certificated in
accordance with rule EN 1621-1 /1997).
- Wear suits or well protective clothes.
- Use suitable boots.
4- The use of this minicross/minimotard is exclusively permitted in
closed tracks or private places. It is strictly forbidden to use it on
public roads.
5- The minicross/minimotard doesn't have any lightening devices. So
it must be used in conditions of good visibility and always in private
areas good lightening (even with artificial lightening).
6- This minicross/minimotard has not been designed to be used in
unfavourable weather conditions such as rain, hail, strong wind,
snow or slippery roads.
7- It is strictly forbidden to ride the minicross/minimotard drunk, drug
addict or in conditions of no clearness of mind.
8- It is strictly forbidden to ride this minicross/minimotard to people
who weight more than:
- 100 kg for the minicorss model
- 100 kg for the minimotard model
9- This minicross/minimotard has been designed for one pilot only.
USE THE MINICROSS/MINIMOTARD ONLY AFTER CAREFULLY READING
THE USE AND MAINTENANCE MANUAL.
7.2 REMOVING AND CLEANING THE AIR FILTER
Dirty air filters are one of the most common causes of poor engine
performance. Proceed as follows to clean the air filter.
- Remove the seat (see section 7.1).
- Remove the cover from the filter box (photo 21).
- Remove the air filter and wash it in hot water with neutral soap
(photo 22)
- Rinse the filter and squeeze it dry, then dampen it with oil for filters.
21
22
7. SERVICING: OPERATIONS AND ADJUSTMENTS
ATTENTION. THE SERVICING OPERATIONS MUST BE DONE BY ADULT
AND QUALIFIED PEOPLE ONLY. IF THE VEHICLE NEEDS SPECIAL SERVICING OR IF THE INSTRUCTIONS MENTIONED BELOW RESULT UNCLEAR,
WE SUGGEST YOUR ASKING FOR SPECIALISTS AT POLINI MOTORI RETAILERS OR WHOLESALERS, WHO WILL REPLACE THE DETERIORATED PARTS
ONLY WITH ORIGINAL SPARE PARTS. CAREFULLY FOLLOW WHAT
DESCRIBED BELOW.
Maintenances and servicing necessary for the best set up of your vehicle
should be done regularly, or on all occasions before you start riding.
Refer to the servicing tables in sections 8.1 and 8.2 below for the
frequency with which the various service operations must be performed.
7.1 REMOVING AND FITTING THE SEAT
Unscrew the seat lock. Lift the seat gently and slide it out rearwards,
towards the mudguard (photo 20). To refit the seat, engage the front
seat catch with the catch on the fuel tank and push the seat on to the
frame members. Once the seat is firmly in position, lock it in place
screwing the seat lock.
WARNING. If the filter becomes clogged with fine dust as well as
normal dirt, replace it with a new one.
WARNING. Dirty air filters choke the engine and cause poor
performance. Torn or broken filters can allow dirt to enter the engine
and cause rapid deterioration of the piston rings and barrel.
7.3 CHECKING THE ENGINE OIL LEVEL
Stand the motorcycle upright.
- Remove the oil level cap from the side gearbox casing (photo 23).
- Check that the oil reaches a level between the maximum (MAX)
level and the minimum (MIN) one .Check the oil level never goes
under the minimum level. The oil topping up from the minimum to
the maximum level is 50gr.
23
20
MAX. LEVEL
MIN. LEVEL
ENGLISH
20
tion not to burn oneself while adjusting it.
7.4 CHANGING THE ENGINE OIL
26
DANGER. Risk of burns! Wait for the engine to cool before removing the oil drain screw.
Stand the motorcycle upright.
- Remove the oil drain screw from the bottom of the gearbox casing
(photo 24) and leave the old oil drain out.
- Do not throw spent oil into the environment. Dispose of it correctly
through authorised collection points.
- Screw the drain screw back in. Add 600 grams of “SAE 20W50”
engine oil. Only employ highly detergent engine oil classified for
service API SF or SG.
24
AIR SCREW
7.7 ADJUSTING THE THROTTLE CONTROL AND CABLE
Make sure that the accelerator grip operates smoothly and that the
play in the throttle cable measures 3-5 mm. If play exceeds this
measurement, reduce play by screwing out the adjuster on the top of
the carburettor (photo 27) or on the throttle grip.
27
3/5 mm.
OIL CAP
7.5 ADJUSTING ENGINE IDLING SPEED
Warm up the engine before adjusting the idling speed. Leave the
engine idle in neutral gear with the throttle closed. Turn the idle speed
adjustment screw on the right hand side of the carburettor in or out to
achieve the lowest engine speed possible without running becoming
irregular (for some minutes) (photo 25).
25
WARNING. Do not make repairs whenever necessary can lead to
serious personal accidents and serious damage to the motorcycle.
7.8 ADJUSTING THE CLUTCH
Should the clutch adjustment with the clutch lever (photo 11) be
insufficient, it is possible to screw the adjuster “1” (photo 28) located
under the cover of the clutch casing.
3
28
2
DANGER. The rear wheel will spin if it is not in contact with the
ground or locked by the brake. Accidental contact with a spinning
wheel or tyre can cause serious personal injuries.
7.6 ADJUSTING THE AIR SCREW
The air screw can be adjusted in order to obtain better performance
when the bike is out of idling speed.
- If the engine has difficulty in curve (rich mixture) unscrew the air
screw.
- If the engine has difficulty in curve (poor mixture) screw the air
screw (photo 26).
WARNING. The adjusting screw is near the cylinder. Pay atten-
ENGLISH
1
WARNING. Often lubricate the clutch shaft “2” in order to avoid
it to grip while the casing moves. Generously lubricate the part after
disassembling it by removing the pin “3”.
7.9 HYDRAULIC BRAKES SYSTEM AND BRAKE PADS
This model is provided with a front and a rear hydraulic brake. When
the brake pads wear, the brake fluid level goes down. Therefore,
21
periodically check the brake fluid level and the wear of the brake pads
Minimotard 1,5 BAR - 21,8 PSI
WARNING. When you add brake fluid, make sure that the tank is
in horizontal position before removing the cap to avoid spilling the fluid.
WARNING. Incorrectly positioned brake lines can be damaged by
contact with moving parts, leading to serious accidents. The braking
system must also be run in before it achieves maximum efficiency.
Apply the brakes at least one hundred times before considering them
to be fully efficient. Proceed with great caution throughout this period.
At the end of this period, adjust the brakes and also check that all the
fixing bolts are tight.
WARNING. Tyres pressure varies according to the weight of the
rider, type of track and the temperature of both the atmosphere and
asphalt.
In order to adjust the travel of the rear brake pedal turn the pivot
screw placed on the brake pump and, once suited the stature of the
rider, close the nut placed on the pivot thread (photo 29). Check the
conditions of the pads friction material. When the thickness of the
material is inferior to 1 mm, change it. Be sure there is no oil leak.
Check if tubes and connections are worn or with cracks.
1,8 BAR - 26,1 PSI
7.11 TRANSMISSION CHAIN
The final drive chain is an extremely important component and
deserves special care and regular servicing.
DANGER. When working on the chain, take care not to jam your
fingers between the chain and sprocket.
1- Check the chain tension with the motorcycle standing upright and
with no pressure on the suspensions. Measure chain movement at
the position shown in photo 30. Chain movement must be 35-39
mm. If necessary, proceed as follows to adjust the chain tension
(photo 31).
30
29
5/10 mm.
ADJUSTING SCREW
31
DANGER. Use only DOT 4 hydraulic brake fluid from clean new
containers.
WARNING. Brake fluid is highly corrosive to paintwork and can
cause injury if it comes into contact with the eyes or skin. Consult a
doctor immediately in case of accident. Change the brake fluid every
two years.
DO NOT THROW SPENT BRAKE FLUID INTO THE ENVIRONMENT.
WARNING. As required by use and weather conditions, regularly
clean the brake callipers using a jet of compressed air. Check the conditions of the pads friction material; when the thickness of the material
is inferior to 1 mm, change it.
WARNING. Do not adjust the brake when discs are still hot
DANGER: After changing the callipers press again and again the
brake level placed on the handlebar and the brake pedal in order to
make the pads closed to the disk. Before using the vehicle be sure the
brakes work perfectly.
7.10 TYRE PRESSURES
Check tyre pressure frequently and adjust as necessary. Always
measure tyre pressure when the tyres are cold. Keep in mind that the
tyre pressure can change depending on the track's conditions and on
the rider's weight.
FRONT
REAR
Minicross
1,3 BAR - 18,9 PSI
1,3 BAR - 18,9 PSI
A
1
3
2
- Loosen the nut “3” on the rear wheel spindle.
- Loosen the lock nuts “1” and turn the adjuster “2” anti-clockwise to
tighten or clockwise to slacken the chain. Make sure that the edges
of the spindle plates are perpendicular to the swing arm and
measure distance “A” between the swing arm and the plates.
Make sure that distance “A” is the same on both sides.
- Tighten the rear spindle nut “3” (see schedule 9.1) (photo 32).
- Measure the chain movement again and repeat the adjustment
procedure if necessary.
- Gently turn the adjuster “2” to bring it into firm contact with the axle
plates. Hold the adjusters firmly with a spanner and tighten the lock
nut “1”.
2- Whenever you check chain tension, also check the chain and the
front and rear sprockets for wear or damage.
ENGLISH
22
32
3- Always lubricate the chain after washing the motorcycle. Dirty chains
can be cleaned with diesel fuel. A good quality chain lube spray
reduces chain wear and improves the efficiency of the transmission.
4- If you need to remove or change the chain, remember to replace
the clip on the split link with the closed end facing in the direction
of travel (photo 33).
33
DANGER. Never fit a new chain to worn sprockets or vice-versa.
Incorrect wheel alignment not only causes rapid chain and sprocket
wear but also affects the handling and control of the motorcycle.
DANGER. Loose, worn or badly aligned chains can break or come off
the sprockets. If this occurs the chain can jam the rear wheel and cause
accidents with serious personal injury and damage to the motorcycle.
7.12 ADJUSTING THE REAR SHOCK
The shock is set up in the factory with standard adjust.
SERVICING:
1- Check the spring for damage or wear.
2- Bounce the rear of the motorcycle up and down and check that the
rear suspension functions smoothly.
3- Check that the shock rod is perfectly straight and that there are no
oil leaks around it.
4- Push the rear wheel sideways to check for play in the swinging arm
bushings. Replace the bushings immediately any play is detected.
7.13 ADJUSTING THE FRONT FORK
The front fork is set up in the factory with standard adjust.
SERVICING:
1- Check that the fork seals are clean and free from oil, dust and dirt.
2- Check the legs for oil leaks. Replace damaged fork seals before
using the motorcycle.
3- Before riding the vehicle, apply the front brake and bounce the
front of the motorcycle up and down to check that the front fork is
functioning smoothly.
ENGLISH
7.14 FUEL
Only use car petrol with an octane rating of 96 to 100 or more. In
case of pre-ignition (knocking) try a different brand of fuel or a
higher octane rating. Fuel tank capacity is 3 litres.
7.15 FUEL FILTER
The fuel filter is incorporated in the fuel tap under the tank. As dirt
builds up in the filter it gradually impedes the flow of fuel to the
carburettor. For this reason the filter must be cleaned regularly.
SERVICING
1- Drain the fuel out of the tank into a clean petrol can.
2- Unscrew the two fixing screws and remove the fuel tap from the
tank.
3- Wash the filter in water with neutral soap. Leave the filter dry, in
the sun if possible.
4- Replace the fuel tap on the tank, making sure that the seal is
correctly seated.
DANGER. Petrol is extremely inflammable and petrol vapour can
explode easily. Only drain the tank in a well ventilated area and with
the engine switched off. Refrain from smoking and avoid all naked
flames or sparks while draining fuel or refuelling.
7.16 WASHING THE MOTORCYCLE
Cover the following parts to prevent water from entering before
washing your motorcycle:
- the throttle control
- the brakes control
- the air intake and filter
- the exhaust hole.
Avoid directing jets of water directly on to the following parts:
- the wheel hubs
- the swinging arm pivot
- the steering head
- the brake callipers
- the spark plug hood.
On completion of washing, lubricate the above parts as necessary then
start the engine and leave it run for a few minutes.
WARNING. Clean the vehicle when engine is cold.
WARNING. Never use solvents or alcohol to clean the plastic parts.
Use only water and soap or the appropriate detergent.
WARNING. Make sure that the brakes are fully efficient before you
start riding the motorcycle.
8. INSPECTIONS, CHECKING AND RACE PREPARATION
WARNING. THE SERVICING OPERATIONS DESCRIBED IN POINTS
8.1 AND 8.2 MUST BE DONE BY ADULT AND QUALIFIED PEOPLE ONLY
8.1 DAILY CHECKS: TO BE PERFORMED ALWAYS BEFORE
RIDING THE MOTORCYCLE
- Engine oil: check for leaks; check oil level.
- Carburettor: check that the throttle cable operates smoothly and
without sticking.
- Fuel filler cap: check for tightness.
23
- Air filter and filter box: check that filter and box are free from dust
and dirt.
- Brakes: check that the brakes lines are not kinked or pinched and
that the callipers are clean.
- Seat: check that the seat is correctly fitted and locked in place.
- Chain: check that the chain is free from caked mud and that it is well
8.2 REGULAR CHECKS: TO BE
PERFORMED BEFORE EACH RACE
AND AFTER
CHAIN
SPROCKETS AND GEARS
CHAIN SLIDE
CHAIN GUARD - CHAIN SLIDE
BRAKES
BRAKE CALIPER
BRAKE PADS
THROTTLE CONTROL
THROTTLE CABLES
AIR FILTER
TYRE PRESSURE
WHEEL BEARINGS
SPOKES
ENGINE OIL
STEERING HEAD ACTION
STEERING HEAD BEARINGS
FRONT FORKS
REAR FORK
FUEL LINE
FUEL FILTER
VALVES PLAY
CARBURETTOR
SPARK PLUG
SPARK PLUG HOOD
ELECTRICAL SYSTEM
EXHAUST
SILENCER
CYLINDER HEAD PISTON AND BARREL
PISTON
PISTON RING
ENGINE CASING
CRANKSHAFT
MAIN BEARINGS
ALL ENGINE BEARINGS
CLUTCH
NUTS, BOLTS, FIXINGS
INSPECTION - CLEANING - ADJUSTMENT REPLACEAFTER 1 RACE AFTER 3 RACE AFTER 9 RACE
MENT
1 HOUR
3 HOURS
9 HOURS FREQUENCY
6 hours
9 hours
6 hours
F
: INSPECT/ADJUST
: CLEAN
: LUBRICATE
F: IN DUSTY RACE CONDITIONS, CLEAN THE AIR FILTER AFTER
EVERY HEAT.
STANDARD SPARK PLUG
Champion Z9Y - NGK C7HSA - LG A7TC
lubricated and correctly tensioned.
- Sprockets: check that the sprockets is free from dirt and stones.
- Handlebars: check that the handlebar clamp bolts are tight.
- Tyres: check the tyres pressure.
- Front fork: check functioning and cleanliness.
- Steering: check the steering head for play.
18 hours
6 hours
MANUAL
SECTION
7.11
7.11
D (point 7.11)
D(point 7.11)+C
7.9
7.9
7.9
7.7
7.7
7.2
7.10
W (point 7.9)
W (point 7.9)
W (point 7.9)
W (point 7.7)
W(point 7.7)+C
W (point 7.2)
W (point 7.10)
C
18 hours
3 hours
DANGER (D)
WARNING (W)
7.3
7.13
C
C
C
18 hours
7.15
D (point 7.15)
C
6 hours
18 hours
36 hours
18 hours
36 hours
18 hours
18 hours
36 hours
18 hours
18 hours
9 hours
C
C
C
C
C
C
C
C
C
D: DANGER, NOTICE OF DANGEROUS SITUATION, AS EXPLAINED
IN THE MANUAL
W: NOTICE OF WARNING, AS EXPLAINED IN THE MANUAL
C: CAUTION, THE REPLACING OPERATIONS MUST BE DONE BY
QUALIFIED PEOPLE ONLY
EXHAUST AND INTAKE VALVE PLAY
0,15 MM. / 0,006 in
ENGLISH
24
9 TECHNICAL
SPECIFICATIONS
Engine
Cooling system
Bore and stroke
Displacement
Compression ratio
Carburettor
Ignition
Fuel
Spark plug
Starting
Clutch
Frame
Front brake
Rear brake
Front tyre
Rear tyre
Transmission
Front suspension
Rear suspension
Fuel tank capacity
Empty weight
Seat height
Wheelbase
XP 4T CROSS
2.50x12”
2.75x10”
XP 4T Racing
XP 4T Racing
CROSS
14”/12” Wheels CROSS
single cylinder four stroke
air
52.4x49.5
107
9.6:1
mikuni 22
electronic
unleaded fuel
Champion Z9Y - NGK C7HSA - LG A7TC
kick-start
centrifugal clutch in oil bath
steel
ø 200mm
ø 150mm
2.50x12”
60/100-14”
2.75x10”
80/100-12”
4 gears
hydraulic fork ø 33
hydraulic monoshock
3 litres
60 kgs
62,7 kgs
725 mm
775mm
1061 mm
1113mm
XP 4T MOTARD
90/90-10
90/90-10
60 kgs
725mm
1061mm
9.1 TIGHTENING TORQUE VALUES FOR FRAME AND CHASSIS
N.m
M
50
Front wheel spindle
M12
20
Front wheel spindle locking bolt
M8
20
Handlebar fixing screws
M8
60
Rear wheel spindle
50
Engine/swinging arm bolt
M14
25
Front engine mounting bolt
M12
20
Top and bottom fork plates
M8
10
Brake disk bolts
M6
80
Steering head nut
M20
6
Steering head adjustment ring nut
Kgf.m
5
2
2
6
5
2,5
2
1
8
0,6
Lbf.t
37
14,8
14,8
44,40
37
18,5
14,8
7,4
59,2
4,44
locking compound
TIGHTENING TORQUE VALUES FOR ENGINE N.m/Lfb.ft
M
Cylinder head nuts
M6
Crankshaft nut, clutch side
M12
Crankshaft nut, ignition side
M8
Driven shaft nut
Spark plug
Kgf.m
1
6
2,7
1,8
1
Lbf.t
7,40
44,4
19,98
13,32
7,40
locking compound
STANDARD TIGHTENING TORQUE VALUES
N.m
5 mm nuts and bolts
6
6 mm nuts and bolts
10
8 mm nuts and bolts
25
10 mm nuts and bolts
45
12 mm nuts and bolts
55
Kgf.m
0,6
1
2,5
4,5
5,5
Lbf.t
4,44
7,40
18,50
33,30
40,70
The torque values listed in the tables above
cover the most important nuts and bolts on the
motorcycle.
Apply the following standard tightening torque
values to all nuts and bolts not listed above.
ENGLISH
N.m
10
60
27
18
10
LOCTITE 242
LOCTITE 270
LOCTITE 242
25
10. SPARE PARTS
Always use genuine POLINI MOTORI parts
DANGER. The use of no genuine parts could jeopardise the
working of the minicross/minimotard and the safety of the rider.
11. GARAGING
If you will not use the minicross/minimotard for a long period, it is
important to follow some suggestions before garaging it:
- empty the petrol tank detaching the petrol hose from the tap. Keep a
container for inflammable fluids, open the tap and leave the petrol
draining.
WARNING. Refrain from smoking and avoid all naked flames or
sparks where petrol is being drained.
12. TRAINING AND INFORMATION
For a right usage of this minicross/minimotard it is necessary to read
this manual carefully and follow all the indications. You have to give
particular attention to the parts underlined with the symbols DANGER
and WARNING. Before riding this motorcycle people under 14 must
always be instructed about the risks coming from an illegitimate use of
the minicross/ minimotard and informed about the use of protection
equipments that must be always used, helmet and protective clothes as
better described in section 6. SAFE DRIVING: CONDITIONS OF USE OF
THE MINICROSS/MINIMOTARD We do not recommend the use of the
minicross/minimotard to children not able to ride a bicycle. Anyway it
is important that a qualified person teaches the young rider the knowledge of driving. For example people under 14 must be advised about
the dangers coming from the parts in movement or the hot parts of the
minicross/minimotard. Furthermore for people under 14 it is forbidden to make maintenance operations shown in section 7.
ENGLISH
26
FRANÇAIS
INDEX
1- INSTRUCTION POUR LE MONTAGE AVANT LA MISE EN
PISTE
2- TRANSPORT DU VEHICULE
3- OPERATIONS A SUIVRE AVANT LA MISE EN PISTE DE LA
MINICROSS/MINIMOTARD
4- RODAGE DU VEHICULE
5- COUPURE DU MOTEUR
6- CONDUITE FIABLE: CONDITIONS D'USAGE DE LA
MINICROSS/MINIMOTARD
7- MAINTENANCE, INTERVENTIONS D'ENTRETIEN ET
REGLAGES
8- INSPECTION ET CONTROLS DE MISE AU POINT ET
PREPARATION POUR LA COMPETITION
9- CARACHTERISTIQUES TECHNIQUES
10- PIECES DE RECHANGE
11- REMISAGE
12- FORMATION ET INFORMATION
INTRODUCTION
CETTE NOTICE INDIQUE, MEME PLUS D'UNE FOIS, LES EVENEMENTS
DANGEREUX AUXQUELS IL FAUT PRETER ATTENTION ET LES AVERTISSEMENTS A SUIVRE POUR UN ENTRETIEN CORRECT DE LA MINICROSS/
MINIMOTARD. EN CE QUI CONCERNE LA MAINTENANCE DU MOTEUR ON
NE VOUS DONNE PAS D'INDICATIONS SPECIFIQUES PARCE QU'ELLES
DOIVENT ETRE SUIVIES PAR DES CONCESSIONAIRES SPECIALISES.
Nous vous prions de lire attentivement cette notice d’utilisation et
d’entretien avant de vous mettre au guidon de votre véhicule car elle
contient des informations qui vous aideront à éviter à vous-mêmes, à
d’autres personnes ou aux choses qui vous entourent de regrettables
accidents (ruptures, lésions personnelles graves et même accidents
mortels). Seules une mise au point parfaite et une connaissance totale
de votre véhicule, avant de vous mettre en selle, pourront vous assurer sécurité et tranquillité, et vous permettre de conduire votre moto
tout terrain en jouissant à fond de ses performances.
AVERTISSEMENT IMPORTANT
CE VEHICULE A ÉTÉ DESSINÉ ET FABRIQUÉ UNIQUEMENT POUR LES
COMPETITIONS. IL EST INTERDIT DE L'UTILISER SUR VOIE PUBLIQUE.
LES LOIS EN VIGUEUR PERMETTENT L'UTILISATION DE CE VEHICULE
SEULEMENT QUE LORS DE COMPETITIONS ORGANISEES OU EVENEMENTS
SPORTIFS SUR PISTE FERMEES ET PRIVEES ET SOUS LES AUSPICES DES
ORGANISMES POUR L'ASSISTANCE (AMBULANCE,POMPIERS,POLICE,ETC.)
INTERDITION DE TRANSPORT DE PERSONNE ET/OU CHOSES
PILOTE SEUL, SANS PASSAGER. Ce véhicule a été conçu pour n'être
utilisé que par le pilote.
A BIEN SE RAPPELER. L'utilisation de ce véhicule aux moins de 18
ans doit toujours avenir sous l'auspice de personnes adultes et compétentes.
LIRE ATTENTIVEMENT CETTE NOTICE.
Dans cette notice on signale des situations particulières référées aux
FRANÇAIS
dangers, événements et situations de danger qui peuvent être causés
par l'usage et la maintenance de la minicross/ minimotard: selon le
point 3 de la Norme UNI EN 1050 : 1998 ils sont ici définis:
DOMMAGE: lésion physique et/ou dommage à la santé ou aux biens.
DANGER: événement qui peut provoquer de dommages
Avant chaque utilisation de la minicross/minimotard ou opération de
maintenance sur la moto, s'assurer d'avoir bien compris ce qu'il est
indiqué par cette notice, en faisant attention aux phases indiquées par
le symbole de
DANGER ou ATTENTION.
IMPORTANT. Cette notice doit être considérée comme partie
intégrante de la minicross/minimotard et doit toujours l'accompagner
en cas de revente.
AU NOUVEAU PROPRIETAIRE. Quand vous choisissez une minicross/minimotard Polini comme nouvelle moto, vous entrez à faire partie d'une famille bien distincte de propriétaires et de pilotes de motos.
ATTENTION. La minicross/minimotard Polini est une moto de
course à hautes performances qui utilise toutes les dernières trouvailles
de la technologie pour moto cross. Cette minicross/minimotard ne doit
être utilisée qu'en compétition et uniquement par des coureurs experts.
Ce nouveau modèle a été conçu en vue de devenir le plus performant
possible. Le motocross est de toute façon un sport physique qui ne
demande pas seulement une bonne moto. Pour obtenir de bons résultats, il faut que le pilote soit habile et en parfaites conditions physiques. Pour atteindre les meilleures performances possibles, il devra
s'entraîner sérieusement et fréquemment pour préparer son physique.
Le but de cette notice est de vous aider à tirer un maximum de satisfaction de votre minicross/minimotard Polini, satisfaction obtenue à
travers les performances de la moto même et les succès remportés au
cours des compétitions.
ACCESSOIRES DE PROTECTION ET PRESCRIPTIONS DE
SECURITE
1- La plupart des décès par accidents de moto sont dus à des blessures
à la tête. Portez TOUJOURS un casque HOMOLOGUE'. Portez
également genouillère et coudière (certifiés selon la norme EN
1621-1 / 1997). Utilisez des vêtements de protection, des chaussures fermés et appropriées et avec semelle résistante aux abrasions.
2- Le système d'échappement devient extrêmement chaud durant
l'usage et reste encore ainsi pendant un certain temps. Ne touchez
jamais les parties chaudes de l'échappement. Portez un pantalon
qui couvre entièrement vos jambes.
3- Ne portez pas de vêtements larges pouvant se prendre dans les
commandes, dans les repose-pied, dans la chaîne de transmission
ou dans les roues.
4- Respectez la nature.
ATTENTION. TOUTE MODIFICATION APPORTÉE A LA
MINICROSS/MINIMOTARD, TOUTE ELIMINATION DE PIECES
D'ORIGINE POURRONT PRIVER CE VEHICULE DE SA
SECURITÉ OU RENDRE SON USAGE ILLEGAL. RESPECTEZ
TOUTES LES REGLEMENTATIONS NATIONALES ET LOCALES.
27
CETTE MOTO A ÉTÉ CONÇUE POUR UN PILOTE PESANT
MOINS DE:
- 100 Kg POUR LE MODELE MINICROSS
- 100 Kg POUR LE MODELE MINIMOTARD
Pensant à votre sécurité, Polini Motori vous recommande de toujours
chercher ce qu'il y a de mieux pour votre moto et d'exiger exclusivement des pièces de rechange d'origine Polini Motori. Pour connaître la
véritable identité de votre véhicule, notez dès maintenant ci-dessous
ses généralités:
MODELE: ............................................................................................
CYLINDREE: .......................................................................................
PNEUS: Avant .................................... Arrière ....................................
NUMERO DE CHASSIS: ........................................................................
CODE: ......................................... POIDS: ..........................................
EMPLACEMENT CODE D'IDENTIFICATION DU VEHICULE
Le numéro d'identification du véhicule est estampillé dans la partie
avant du châssis sur le côté droit de la colonne de direction.
1. INSTRUCTIONS POUR LE MONTAGE AVANT DE LA MISE
EN PISTE
La moto qui se présentera à vous quand vous ouvrirez l'emballage
n'est pas prête à l'usage mais partiellement démontée pour des
exigences de transport. Au moment du déballage, on devra effectuer
une série d'opérations de montage et de contrôle, en suivant nos
instructions, afin que le produit trouve sa juste conformation et soit
prêt à l'usage. Pour faciliter le montage, nous vous conseillons de
procéder de la sorte:
1- Retirez la moto de l'emballage (photo 1).
01
N. 1
- Minicross/minimotard Polini
- Rondelle 6X18X1(UNI 6593)
N. 4
- Bride en plastique
N. 1
- Ressort pour repose-pied
N. 2
- Vis TCEI M8X20 (UNI 5931)
N. 6
- Vis TCEI M8X40 (UNI 5931)
N. 2
- Vis TB M6X16 (ISO 7380)
N. 4
- Vis M8X18 (pour guidon) (ISO 7380)
N. 1
- Repose-pied droit/ gauche
N. 2
- Axe roue avant
N. 1
- Ecrou auto-bloquant M8 (UNI 7473)
N. 4
- Vis TCEI M8X30 (UNI 6593)
N. 4
- Pontet guidon
N. 2
- Guidon avec protections anti-chocs
N. 1
- Roue avant avec disque
N. 1
- Garde-boue avant
N. 1
- Pedale transmission
N. 1
- Support pour repose-pied
N. 1
- Plaquette du numéro
N. 1
- Ecrou M5
N. 2
- Vis M5X10
N. 2
- Vis M5X30
N. 1
- gaine de frein
N. 1
- Bequille
N. 1
- Ressort pour bequille
N. 1
- Notice pour l'utilisation et l'entretien
N. 1
- Certifié de conformité CE
N. 1
Pour le modèle minimotard, les pièces présents sont les suivants:
- Rondelle 6X13X1,5
N. 2
- Vis M6X20 TCEI
N. 2
- Vis M8X65 TCEI
N. 4
- Couvre repose-pied supérieur droite/gauche
N. 2
- Couvre repose-pied inférieur droite/gauche
N. 2
- Vis M5X20 TPSEI
N. 2
- Boule latérale Ø35
N. 2
- Douille pour boule Ø35
N. 2
- Entretoise guidon
N.2
3- Commencez par le montage de l'amortisseur arrière, en utilisant la
vis à tête à six pans M10x40, et les deux rondelles avec écrou M10,
en plaçant une rondelle du côté de l'écrou et l'autre du côté de la
vis; vous trouverez ces pièces déjà montées dans leurs logements
respectifs sur la fourche (photo 2) (voir tableau 9.1).
4- Elargissez les plaquettes du frein de la pince avant à l'aide d'une
clef anglaise.
02
2- Contrôlez les pièces nécessaires au montage du véhicule se trouvant
dans la boîte:
FRANÇAIS
28
DANGER. Après le montage des pinces, pressez plusieurs fois, le
levier du frein au guidon et la pédale du frein pour permettre le rapprochement des plaquettes au disque. Avant d’utiliser le véhicule, assurez-vous du parfait fonctionnement du système de freinage.
pontets prévus à cet effet et des quatre vis à tête cylindrique à 6 pans
creux M8x30 (voir tableau 9.1) (photo 7).
06
5- Procédez au montage de la roue avant à l'aide de l'axe
spécialement prévu à cet effet (photo 3).
6- Enfilez l'axe de la roue et serrez à l'aide d'une clé
dynamométrique (voir tableau 9.1) (photo 4).
7- Serrez le boulon de fixation de l'axe à l'aide de la clé
dynamométrique (voir tableau 9.1) (photo 5).
03
07
04
11- Démontez la commande du gaz, introduisez le fil comme l'indique
la photo 8 et refermez le couvercle (voir paragraphe 7.7).
12- Positionnez le levier du frein avant en fixant le pontet à l'aide des
vis spéciales (photo 9). (voir paragraphe 7.9).
08
05
09
8- Procédez au gonflage du pneu avant - arrière (voir paragraphe
7.10).
AVANT
ARRIERE
Minicross 1,3 BAR – 18,9 PSI
1,3 BAR – 18,9 PSI
Minimotard 1,5 BAR – 21,8 PSI
1,8 BAR – 26,1 PSI
9- Montez le garde-boue à l'aide des 4 vis spéciales et des rondelles
fournies TB M6X16 (photo 6). Montez le tableau porte numéro en
faisant passer le câble du frein dans la guide spéciale.
10- Coupez la bride d'emballage de la pompe du frein avant. Montez
maintenant le guidon en le fixant à la fourche à l'aide de deux
FRANÇAIS
13- Montez le bouton de masse et fixez-le à l'aide d'une bride sur le
guidon (photo 10).
14- Positionnez le levier de l’embrayage et réglez à l’aide de la
rosette la course du levier comme Vous préférez (photo 11) (voir
29
paragraphe 7.8).
compétitions parce qu’il pourrait être dangereux et contondant.
10
11
14
18- Positionnez le levier du changement de vitesse (photo 15).
15
15- Montez le support pour le repose-pieds sur le moteur avec les
quatre vis M8X20. Fixez-le ensuite sur le châssis avec deux vis
M8X20 et avec deux écrous autobloquants (photo 12).
16- Montez les repose-pieds comme montré en photo 13, avec vis
M8X40 et écrous autobloquants.
12
19- Faire le plein de carburant (voir paragraphe 7.14).
20- Contrôlez le niveau d’huile du moteur (voir paragraphe 7.3).
21- Seulement pour minimotard montez: les pare-repose-pieds; les
pare-guidon; les pare-fourches prévues à cet effet sur l’axe de la
rue arrière (photo 16).
16
13
17- Montez le béquille en utilisant le vis M8X18 pour le fixer et le
ressort prévu a cet effet (photo 14).
A BIEN SE RAPPELER. Il est essentiel de procéder à un entretien
régulier et au contrôle du véhicule avant l’usage. S’il est nécessaire
d’entreprendre une intervention de maintenance ou si des réparations
s’imposent, adressez-vous à votre revendeur POLINI MOTORI.
Suite au développement constant de ces véhicules et aux différentes
mises à jour techniques en phase de conception, on pourrait relever
dans certains cas quelques discordances entre le véhicule effectif, les
illustrations et le texte de cette notice. Les pièces d’origine que POLINI
MOTORI fournit comme pièces de rechange sont dans le même
matériau que celles de votre minicross/minimotard et elles ont subi le
même cycle de fabrication. Pour votre véhicule, ce sont là des
garanties de longue durée de vie et de fonctionnement optimal.
Nous vous recommandons de toujours exiger des pièces de rechange
d’origine POLINI MOTORI.
DANGER. On vous conseille de démonter le béquille dans les
FRANÇAIS
30
2. TRANSPORT DU VEHICULE.
Pour un correct et sur transport du véhicule du lieu du remisage à la
piste il faut:
- S'assurer que le réservoir soit vide pour éviter des pertes;
- Positionner la minicross/minimotard sur un plan horizontal du
véhicule que va effectuer le transport;
- Positionner la minicross/minimotard sur la béquille en la fixant
avec des courroies ou cordes et s'assurer que pendant le transport
elle reste toujours en position verticale.
ATTENTION. N'effectuer jamais le transport de la moto avec le
réservoir de l'essence plein ou avec les parties d'échappement ou du
moteur chaudes.
3. OPERATIONS A SUIVRE AVANT LA MISE EN PISTE DE LA
MINICROSS/MINIMOTARD
1- Ouvrez le robinet d’essence placé sous le réservoir en position
‘’ON’’ (photo 17).
2- Avant du démarrage contrôlez que le moteur soit au point mort
(photo 18, vitesse N).
17
OFF
DANGER. La rue arrière continuera à tourner si elle n'est pas en
contact avec le sol ou si elle n'est pas bloquée par le frein. Tout contact
accidentel avec cette roue qui tourne peut provoquer de graves lésions
aux personnes.
ATTENTION. Evitez d'ouvrir ou de fermer brusquement
l'accélérateur car la moto bondirait en avant et vous risqueriez de
perdre le contrôle de votre véhicule.
ATTENTION. Il est obligatoire de contrôler si le moteur s'arrête bien
par l'intermédiaire du bouton rouge de masse placé sur le guidon
avant de vous mettre en selle.
4. RODAGE DU VEHICULE
ATTENTION. Les opérations indiquées pour le rodage doivent
être suivies par personne avec plus que 14 ans et toujours sous
l'auspice de personne adulte et compétente.
ON
4°
STARTER AIR
5- En maintenant la manette du gaz au minimum, mettez le câble
d'allumage par friction en traction et tirez sur la poignée de
démarrage en exerçant une force constante.
6- Mettez le levier de la pédale de démarrage vers le carter moteur en
position de marche. Portez le moteur à la température d'exercice
normale en le tenant pendant quelques minutes au ralenti.
ATTENTION. Les opérations indiquées dans ce paragraphe
doivent être suivies par personne avec plus que 14 ans et toujours
sous l'auspice de personne adulte et compétente.
3°
19
18
1- Pour optimiser l'ajustement du moteur et de la transmission au
premier usage et afin de préserver dès le début la fiabilité de votre
moto, il est indispensable que vous procédiez à un rodage de courte
durée.
2°
N
1°
3- Si le moteur est froid, facilitez l’allumage en soulevant la poussette
du starter placé sur le carburateur (photo 19).
ATTENTION. Quand le moteur est chaud, rabaissez le starter en
faisan attention à éviter tout contact avec le moteur.
4- Bloquer la rue arrière à l’aide de la commande du frein.
FRANÇAIS
ATTENTION. La première fois que vous conduirez votre véhicule,
pour effectuer un rodage complet, nous recommandons de rouler
pendant deux heures à bas régime. Prenez les précautions indiquées
ci-dessous:
2- Une fois le moteur allumé, faites-le tourner au ralenti jusqu'à ce
qu'il atteigne la température d'exercice normale.
3- En phase de rodage, roulez toujours à une vitesse constante.
N'ACCELEREZ JAMAIS BRUSQUEMENT.
4- Même si vous roulez en bas régime, essayez d'éviter des parcours
trop longs et trop durs; cela pourrait provoquer une excessive
surchauffe du moteur.
5- Quand vous aurez terminé le rodage de votre véhicule en prenant
toutes les précautions voulues, nous vous conseillons de vous
adresser à un revendeur Polini Motori pour une assistance après
31
rodage, comme par exemple le retrait du groupe thermique et le
contrôle de l'état d'usure de la bougie, de la culasse, du piston, du
cylindre. Nous vous recommandons en outre de faire changer la
bougie et vidanger l'huile du moteur.
DANGER. Après le rodage il est important de contrôler le serrage
des écrous de la culasse. Souvent après le rodage ils peuvent se
desserrer (voir tableau 9.1) .
5. COUPURE DU MOTEUR
Pour arrêter la minicross/minimotard il suffit d'appuyer le bouton de
masse placé sur le guidon (photo 10).
7. MAINTENANCE, INTERVENTIONS D'ENTRETIEN ET
REGLAGES
AVERTISSEMENT. LES OPERATIONS DE MAINTENANCE DOIVENT ETRE
EFFECTUEES EXCLUSIVEMENT PAR PERSONNE ADULTES ET COMPETENTES.
AU CAS OU LES OPERATIONS INDIQUEES DANS LES SUIVANTS POINTS
DE LA NOTICE NE SONT PAS CLAIRES OU SI UNE INTERVENTION EXTRAORDINAIRE S'IMPOSE, ON CONSEILLE DE CONSULTER DES REVENDEURS
OU CONCESSIONAIRES POLINI MOTORI QUI REPLACERONT LES PIECES
DETERIORES EN UTILISANT EXCLUSIVEMENT DES PIECES DE RECHANGE
D'ORIGINE. SUIVRE ATTENTIVEMENT LES INDICATIONS DE LA NOTICE.
6. CONDUITE FIABLE: USAGE DE LA MINICROSS/
MINIMOTARD
On entend par opérations d'entretien et interventions nécessaires à
une mise au point optimale du véhicule, les contrôles journaliers avant
la mise en marche du véhicule. La fréquence des opérations d'entretien
et le type d'intervention sont indiqués dans les tableaux 8.1 et 8.2.
ATTENTION. L'USAGE DE LA MINICROSS/MINIMOTARD EN CASE
DE PILOTE AVEC MOINS QUE 18 ANS DOIT TOUJOURS S'EFFECTUER
SOUS L'AUSPICE DE PERSONNE ADULTE.
ATTENTION. L'USAGE DE LA MINICROSS/MINIMOTARD EN CAS OU LE
PILOTE AURAIS MOINS QUE 14 ANS DOIT TOUJOURS S'EFFECTUER EN
PRESENCE D'UNE PERSONNE ADULTE QUI LE GUIDERA SUR UNE CORRECTE UTILISATION DU VEHICULE ET DES DISPOSITIFS DE PROTECTION
COMME INDIQUE PAR LA PRESENTE NOTICE.
7.1 RETRAIT ET REMONTAGE DE LA SELLE
Dévisser la vis, soulevez légèrement la selle et enlevez-la en tirant
dans la direction du garde-boue arrière (photo 20). Pour remonter la
selle, enfilez le crochet avant de cette dernière dans la vis placée sur le
réservoir d'essence. Encastrez bien la selle dans son logement sur le
châssis. Une fois positionnée correctement, fixez-la en serrant la vis.
La conduite d'une minicross/minimotard POLINI nécessite de mesures
spéciales pour la sauvegarde de l'intégrité du conducteur. Avant d'utiliser votre minicross/minimotard, on vous rappelle les points suivants:
1- Beaucoup d'accidents sont dus à l'inexpérience du pilote.
2- Conduisez toujours avec les deux mains sur le guidon.
3- Portez de vêtements de protection adaptes :
- Portez toujours un casque INTEGRALE;
- Munissez-vous de gants, genouillères et coudière conformes à la
Norme EN 1621-1 / 1997;
- Portez de vêtements de protection;
- Utilisez chaussures closes et adaptes aux conditions de vie.
4- L'usage de la minicross/minimotard doit se passer seulement sur
piste ou circuits privés. Il est interdit sur la voie publique.
5- La minicross/minimotard n'est pas pourvue d'un système d'éclairage
autonome, son usage doit avenir donc en conditions de bonne
visibilité,dans endroits privés et bien illuminées (même avec
illumination artificielle).
6- La minicross/minimotard n'a pas été projetée pour usage en
conditions climatiques malheureuses comme par exemple pluie,
grêle, vent fort, neige et chaussée glissante.
7- Il est interdit d'utiliser la minicross/minimotard en état d'ébriété,
sous les effets de stupéfiants ou en cas de non complète lucidité
d'esprit.
8- Il est interdit d'utiliser la moto à pilotes d'un poids supérieur à: 100
Kg. pour le modèle minicross et 100 Kg pour le modèle minimotard.
9- La minicross/minimotard a été conçu pour n'être utilisé que par le
pilote.
20
7.2 RETRAIT ET NETTOYAGE DU FILTRE A AIR
L'une des causes du bas rendement d'un moteur peut être attribuée
aux mauvaises conditions du filtre à air.
Pour le nettoyer, procédez de la façon suivante:
- Enlevez la selle (voir paragraphe 7.1).
- Retirez le couvercle de la boîte filtre (photo 21).
- Sortez le filtre à air et lavez-le à l'eau chaude et au savon neutre
(photo 22).
- Après l'avoir rincé et essoré, imprégnez-le d'huile pour filtres.
21
IL EST INTERDIT D'UTILISER LA MINICROSS/MINIMOTARD SANS AVOIR
LU ATTENTIVEMENT LA NOTICE D'UTILISATION ET D'ENTRETIEN.
FRANÇAIS
32
22
24
BOUCHON HUILE
ATTENTION. Si le filtre présente une forte concentration de
poussière, en plus des impuretés, remplacez-le immédiatement par un
filtre neuf.
ATTENTION. Un filtre d'air sale peut fatiguer le moteur et causer une
baisse de performances. Un filtre abîmé peut au contraire permettre
l'entrée de nombreuses particules de poussière dans le moteur, ce qui
accélère la détérioration normale des logements et du cylindre.
7.3 CONTROLE DU NIVEAU D'HUILE DU MOTEUR
Mettez le véhicule en position de marche.
- Enlevez le bouchon du niveau d'huile placé sur le carter latéral
(photo 23).
- Vérifiez si le niveau de l'huile est compris entre le niveau maximum
(MAX) et le minimum (MIN). Il ne doit jamais être au dessus du
niveau minimum ; le rejointoiement de l’huile du niveau minimum
au maximum est de 50 g.
7.5 REGLAGE DU RALENTI
Le réglage du ralenti doit être effectué quand le moteur est chaud.
Laissez tourner le moteur en vitesse N, la manette du gaz fermée;
tournez dans un sens ou dans l’autre la vis qui se trouve sur la droite
du carburateur jusqu’à ce que le nombre de tours du moteur soit le
plus bas possible, tout en restant constant (photo 25).
DANGER. La rue arrière continuera à tourner si elle n'est pas en
contact avec le sol ou si elle n'est pas bloquée par le frein. Tout contact
accidentel avec cette roue qui tourne peut provoquer de graves lésions
aux personnes.
25
23
NIVEAU MAX.
7.4 CHANGEMENT HUILE DE LA TRANSMISSION
7.6 REGLAGE DE LA VIS DE L’AIR
Pour obtenir meilleures performances hors du ralenti.
- Si le moteur a difficultés en sortant des virages (mélange riche),
dévissez la vis de l’air.
- Si le moteur s’emballe en sortant des virages (mélange pauvre),
vissez la vis de l’air (photo 26).
DANGER. Dévisser le bouchon de l'huile quand le moteur est
chaud peut provoquer de graves brûlures aux personnes. Dévissez-le
seulement après avoir bien vérifié que le moteur est froid.
ATTENTION. La vis de réglage se trouve très proche au groupe
cylindre-piston. Faites attention a ne pas Vous brûler pendant le réglage.
NIVEAU MIN.
Mettez la moto en position de marche.
- Enlevez le bouchon du niveau d'huile placé dans le bas du carter
(photo 24) et laissez couler l'huile.
- Ne déversez jamais l'huile de vidange n'importe où, mais utilisez les
containers réservés à la récupération des huiles usées.
- Revissez le bouchon de vidange. Verser dans le réservoir 600
grammes d'huile pour moteur type SAE 20W50. Utiliser uniquement
huile moteur hautement détergent avec classification de service API
SF ou SG.
FRANÇAIS
26
VIS AIR
33
7.7 COMMANDE DE L’ACCELERATEUR
Contrôlez si la manette de la commande du gaz fonctionne bien et si le
câble de la commande du gaz a bien un jeu de 3–5 mm. Si le jeu est
supérieur, mettez au point la vis qui se trouve sur le carburateur ou
sur la commande du gaz (photo 27).
pour s'ajuster et donner le maximum de son efficacité. Avant de décider si le système est parfaitement efficace, il est bon d'effectuer au
moins une centaine de coups de freins, en opérant avec prudence, et
procéder ensuite à un autre réglage de mise au point et à un contrôle
du serrage des vis.
ATTENTION.Un manque de contrôles journaliers et d’opérations
de maintenance peut provoquer de sérieux dommages au véhicule ou
des accidents graves.
Pour régler la course de la pédale du frein arrière, desserrer la vis du
piston qui se trouve sur la pompe du frein et, une fois que vous avez
trouvé le réglage qui convient le mieux au pilote, serrer le contreécrou placé sur le même filet de l'axe (photo 29). Contrôler aussi
l'état d'usure des plaquettes et si son épaisseur est inférieure à 1 mm,
pourvoir au remplacement. Assurez-vous qu’il n’y ait pas de pertes de
liquide et contrôlez si les tuyaux et les joints présentent des signes de
détérioration ou crevasses.
27
3/5 mm.
29
5/10 mm.
7.8 REGLAGE DE L’EMBRAYAGE
Si le réglage du levier de l’embrayage (photo 11) ne satisfait pas
complètement Votre position de guide, Vous pouvez l’améliorer encore
en agissant sur la vis de réglage “1” (photo 28) placée dessus du couvercle du carter de l’embrayage.
3
28
2
1
ATTENTION. Graissez fréquemment l’arbre de commande de
l’embrayage “2” au fin d’éviter qu’il puisse gripper. Enlevez le couvercle du carter de l’embrayage et son joint, démontez l’arbre en enlevant le goujon d’arrêt “3” et graissez abondamment.
7.9 SYSTEME DE FREINAGE A COMMANDE HIDRAULIQUE ET
PLAQUETTES FREIN
Ce modèle possède un frein à disque hydraulique avant et un arrière.
Quand les plaquettes sont usagées, le niveau du liquide des freins se
baisse. Pour cette raison contrôlez toujours bien le niveau du liquide
des freins et l’usure des plaquettes.
ATTENTION. Quand vous ajoutez le liquide pour les freins,
assurez-vous bien que le réservoir soit horizontal avant d’enlever le
bouchon pour éviter de pertes de liquide.
ATTENTION. Un flexible de frein mal placé ou en contact avec les
parties en mouvement peut annuler l'action freinante et causer de
graves accidents. Le circuit de freinage a besoin d'un certain temps
VIS REGLAGE
DANGER. N'utilisez que de l'huile pour systèmes de freinage
hydrauliques DOT 4 prélevée dans des confections intactes.
ATTENTION. Le liquide utilisé dans le circuit de freinage, endommage les parties vernies ou peintes et est très dangereux s'il entre en
contact avec les yeux ou avec la peau. En cas d'accident, consulter un
médecin. Il est bon de changer l'huile du circuit de freinage tous les
deux ans. DEBARRASSEZ-VOUS DE L'HUILE DE VIDANGE DANS LES
CONTAINERS RESERVES A LA RECUPERATION DES HUILES USEES.
ATTENTION. Périodiquement, en fonction de l'usage, du parcours
et des conditions atmosphériques, vous devrez nettoyer la pince avec
un jet à air comprimé. Contrôler aussi l'état d'usure des plaquettes et
si son épaisseur est inférieure à 1 mm, pourvoir au remplacement.
ATTENTION. N'effectuer jamais le réglage des freins quand les
disques sont encore chauds.
DANGER. Après le remplacement des pinces presser le levier du
frein au guidon et la pédale du frein pour permettre le rapprochement
des plaquettes au disque. Avant d’utiliser le vehicule, assurez-vous
bien du parfait fonctionnement du système de freinage.
7.10 PRESSION DES PNEUS
Contrôlez fréquemment la pression des pneus et réglez si nécessaire. Il
faut toujours mesurer la pression de gonflage quand les pneus sont
froids. Rappelez que la pression des pneus peut changer selon les
conditions de la piste et le poids du pilote.
AVANT
ARRIERE
Minicross 1,3 BAR – 18,9 PSI
1,3 BAR – 18,9 PSI
Minimotard 1,5 BAR – 21,8 PSI
1,8 BAR – 26,1 PSI
FRANÇAIS
34
ATTENTION. La pression optimale des pneus varie selon le poids
du pilote, de la température atmosphérique et du type de fond sur
lequel on conduit.
7.11 CHAINE DE TRANSMISSION
La chaîne pour moto est un organe tellement important qu’il mérite un
soin et un entretien particuliers:
de réduire considérablement l'usure et d'améliorer les performances
de la transmission.
4- Si pour quelque raison vous devez enlever la chaîne, rappelez-vous
bien que le clip du maillon principal doit toujours être inséré avec
les extrémités fermées du ”U” tournées dans le sens de la marche
(photo 33).
32
DANGER. Ne mettez jamais vos doigts entre la chaîne et la
couronne.
1- Contrôlez la tension de la chaîne. La moto doit être en position
verticale et ne subir aucune pression. Contrôlez la tension dans la
position illustrée sur la photo 30. Vérifiez si la distance de 35/39
mm indiquée sur la photo est bien respectée, sinon procédez comme
suit au réglage de la chaîne (photo 31).
30
33
31
A
1
3
2
- Desserrez l’écrou de l’essieu arrière “3”
- Desserrez les contre-écrous “1” et tourner le boulon de réglage “2”
dans le sens contraire des aiguilles d’une montre pour diminuer le
jeu ou dans le sens des aiguilles d’une montre pour l’augmenter.
Alignez les bords arrière des plaques de l’essieu et contrôlez sur les
deux côtés de la fourche la distance “A” qui sépare la fourche de la
plaque.
- Serrez l’écrou de l’essieu arrière “3” (voir tableau 9.1) (photo 32):
- Contrôlez de nouveau le jeu de la chaîne et réglez si nécessaire.
- Desserrez légèrement le boulon de réglage “2” dans le sens contraire
des aiguilles d’une montre jusqu’à ce qu’il ne touche plus la plaque
de l’essieu. Serrez ensuite les contre-écrou “1” en immobilisant le
boulon de réglage à l’aide d’une clé.
2- Vérifier à chaque réglage l’état d’usure de la couronne et du pignon.
3- La chaîne doit toujours être graissée, même après le lavage de la
moto. Pour enlever les impuretés, utilisez du gasoil et pour le
graissage on conseille un lubrifiant en bombe aérosol qui permettra
FRANÇAIS
DANGER. Ne montez jamais une chaîne de transmission neuve
sur un pignon et une couronne très usés et vice versa.
Un mauvais alignement de la roue entraînera une usure excessive et
compromettra la stabilité de la moto.
DANGER. Si la chaîne se casse ou se décroche des roues dentées, elle
peut aller s'enrouler sur le pignon et bloquer la roue arrière, causant
ainsi de graves accidents et des lésions aux personnes.
7.12 TARAGE DE L'AMORTISSEUR ARRIERE
L’amortisseur que Vous trouverez installé est déjà taré avec des réglages standard.
ENTRETIEN:
1- Contrôlez le ressort, qu’il ne soit ni cassé, ni trop détendu.
2- Contrôlez que la suspension fonctionne sans aucun problème en
faisant rebondir plusieurs fois l’arrière du véhicule.
3- Contrôlez l’arbre de l’amortisseur, qu’il ne soit pas plié et qu’il n’y
ait pas de fuites d’huile.
4- Poussez latéralement la roue arrière pour vérifier si les douilles de
la fourche ne sont pas trop usées. En cas de mouvement latéral,
remplacez les douilles.
7.13 REGLAGE DE LA FOURCHE AVANT
La fourche avant que vous trouverez installée sur le véhicule neuf est
déjà tarée selon des réglages standard.
ENTRETIEN :
1- Assurez-vous que les pare poussière soient propres et qu’ils ne
soient pas pleins de boue ou de poussière.
35
2- Contrôlez qu’il n’y ait pas de traces de fuites d’huile.
Les pare poussière endommagés devront être remplacés avant
d’utiliser le véhicule.
3- Avant de vous mettre en selle, effectuez toujours un contrôle rapide
du fonctionnement de la fourche. Poussez-la vers le haut et vers le
bas tout en serrant le frein avant.
7.14 CARBURANT
Utilisez de l’essence pour auto avec un nombre d’octanes à la pompe
de 96 à 100 octanes ou plus. Si le moteur cogne, essayez une autre
marque d’essence ou une essence ayant un nombre d’octanes différent. Capacité du réservoir: 3 litres.
7.15 FILTRE CARBURANT
Le filtre du carburant se trouve dans le robinet au bas du réservoir.
Les saletés qui s’y accumulent empêchent au carburant d’affluer au
carburateur. L’entretien du filtre doit donc être très fréquent.
ENTRETIEN :
1- Videz le carburant du réservoir dans un bidon à essence.
2- Enlevez le robinet du réservoir en retirant les deux vis.
3- Lavez le filtre avec de l’eau et du savon neutre. Séchez au soleil si
possible.
4- Remontez le robinet du réservoir en suivant l’ordre inverse et en
faisant bien attention à ce que la garniture soit bien en place.
8. INSPECTION ET CONTROLES DE MISE AU POINT PREPARATION A LA COMPETITION
ATTENTION. LES OPERATIONS INDIQUEES AUX POINTS 8.1 ET
8.2 DOIVENT ETRE SUIVIES PAR PERSONNE ADULTE ET COMPETENTE.
8.1 CONTROLES JOURNALIERS: A TOUJOURS EFFECTUER
AVANT DE SE METTRE AU GUIDON DE LA MOTO
- Huile de la transmission: aucune fuite, niveau correct.
- Carburateur: accélérateur flexible glissant librement sans frottements.
- Bouchon du réservoir carburant: vérifier le serrage.
- Filtre à air et boîte filtre: filtre sans impuretés et boîte sans poussière.
- Freins: gaines sans étranglements et pinces propres, sans boue.
- Selle: enclenchée dans son logement et vis serrée à fond.
- Chaîne : propre, sans boue, graissée et contrôle tension.
- Pignon: tournant librement, sans cailloux ni poussière.
- Guidon: manchons de blocage bien serrés.
- Pneus: contrôle pression.
- Fourche avant: contrôle et nettoyage.
- Direction: contrôle du jeu serrage manchon.
ATTENTION. L’essence est extrêmement inflammable et explosive. Effectuez cette opération dans une zone bien ventilée et le moteur
éteint. Ne fumez pas, ne produisez aucune flamme, aucune étincelle
dans l’air là où vous viderez l’essence, ni là où vous ferez le plein.
7.16 NETTOYAGE DU VEHICULE
Avant de procéder au lavage de la moto, protégez contre l’eau les parties
ci-dessous:
- Commande de la transmission
- Commande du frein
- Prise d’air et filtre de l’air
- Tube de fuite du silencieux
N’orientez pas directement le jet d’eau sur :
- Moyeux de roue
- Pivot des fourches
- Colonne de la direction
- Pinces du frein
- Capuchon de bougie
Quand le lavage est terminé, procédez au graissage de tous les points
cités ci-dessus, mettez le moteur en marche et faites le tourner pendant quelques minutes.
ATTENTION. Effectuez les opérations de nettoyage à moteur
froid.
ATTENTION. N'utilisez pas de solvants ou d'alcool pour nettoyer la
bulle en plexiglas. Utilisez exclusivement de l'eau et du savon ou des
shampooings spéciaux.
ATTENTION. Avant de vous mettre en selle, vérifiez si le freinage est
parfait.
FRANÇAIS
36
INSPECTION - NETTOYAGE - REGLAGE Fréquence Référence AVERTISSEMENTS
8.2 CONTROLES PERIODIQUES A
DANGERS
EFFECTUER AVANT CHAQUE COURSE APRES 1COUR- APRES 3 COUR- APRES 9 COUR- remplace- au paragraSE 1 HEURE SES 3 HEURES SES 9 HEURES
ment
phe
ET APRES PERIODE D'ARRET
6 heures
7.11
EP (point 7.11)
CHAINE DE TRANSMISSION
9 heures
7.11
EP(point 7.11)+M
PIGNON ET COURONNE
ROULEAU DE LA CHAINE
PARE-CHAINE- PATIN DE GUIDE CHAINE
7.9
A (point 7.9)
REGLAGE FREINS
7.9
A (point 7.9)
PINCE FREIN
6 heures
7.9
A (point 7.9)
PLAQUETTES FREINS
7.7
A (point 7.7)
COMMANDE GAZ
18 heures
7.7
A(point 7.7)+M
CABLES DE COMMANDE GAZ
F
6 heures
7.2
A (point 7.2)
FILTRE AIR
7.10
A (point 7.10)
PRESSION GONFLAGE PNEUS
18 heures
M
ROULEMENTS MOYEUX ROUES
TIRAGE RAYONS DE ROUES
3 heures
7.3
HUILE MOTEUR
M
JEU COLONNE DE LA DIRECTION
7.13
M
ROULEMENTS DIRECTION
M
FOURCHES AVANT
FOURCHE ARRIERE
18 heures
TUYAU D'ALIMENTATION
7.15
EP (point 7.15)
FILTRE ESSENCE
JEU CLAPETS
M
CARBURATEUR
6 heures
BOUGIE
18 heures
CAPUCHON BOUGIE
M
CIRCUIT ELECTRIQUE
36 heures
M
SYSTEME D'ECHAPPEMENT
18 heures
SILENCIEUX
36 heures
M
GROUPE THERMIQUE
18 heures
M
PISTON
18 heures
M
SEGMENT DE PISTON
M
CARTER MOTEUR
36 heures
M
VILEBREQUIN
18 heures
M
ROULEMENTS DE SUPPORT
18 heures
M
SERIE ROULEMENTS MOTEUR
9 heures
EMBRAYAGE
ECROUS -BOULONS-ELEMENTS DE FIXATION
: INSPECTER OU REGLER
EP: INDICATION DE DANGER COMME PAR LA NOTICE
: NETTOYAGE
A: INDICATION D'ATTENTION COMME PAR LA NOTICE
: GRAISSAGE
M: AVERTISSEMENT: LES OPERATIONS DE REMPLACEMENT
F: NETTOYER LE FILTRE APRES CHAQUE MANCHE EN
DOIVENT ETRE EFFECTUEES PAR PERSONNE COMPETENTE
MILIEU POSSIEREUX
BOUGIE STANDARD
Champion Z9Y - NGK C7HSA - LG A7TC
FRANÇAIS
JEU CLAPETS ASPIRATION ET ECHAPPEMENT
0,15 MM. / 0,006 in
37
9. CARACTERISTIQUES
TECHNIQUES
Moteur
Refroidissement
Alésage et course
Cylindrée
Rapport de compression
Carburateur
Allumage
Alimentation
Bougie
Démarrage
Embrayage
Châssis
Frein avant
Frein arrière
Pneu avant
Pneu arrière
Transmission
Suspension avant
Suspension arrière
Capacité réservoir
Poids
Hauteur selle
Entraxe
XP 4T CROSS
XP 4T Racing
XP 4T Racing
CROSS
14”/12” Wheels CROSS
Monocylindrique 4T
air
52,4x49,5
107
9,6 :1
Mikuni 22
Electronique
Essence verte
Champion Z9Y - NGK C7HSA - LG A7TC
Kick starter
Multidisque en bain d'huile à commande à main
En acier
Hydraulique Ø 200
Hydraulique Ø 150
2,50x12"
60/100-14"
2,75x10"
80/100-12"
4 vitesses
fourche hydraulique Ø 33
mono amortisseur hydraulique
2,50x12"
2,75x10"
XP 4T MOTARD
90/90-10"
90/90-10"
3 litres
60 Kg.
725 mm
1061 mm
62,7 Kg
775 mm
1113 mm
60 Kg
725 mm
1061 mm
9.1 TABLEAU DES COUPLES DE SERRAGE DE LA VISSERIE DU CHASSIS ET DE LA PARTIE-CYCLE
N.m
Kgf.m
Lbf.t
M
50
5
37
Axe roue avant
M12
20
2
14,8
Boulon de fixation axe avant
M8
20
2
14,8
Vis de fixation guidon
M8
60
6
44,40
Axe roue arriere
50
5
37
Axe moteur -fourche
M14
25
2,5
18,5
Axe moteur avant
M12
20
2
14,8
Vis plaque sup. et inf. fourche
M8
10
1
7,4
Vis disques frein
M6
80
8
59,2
Ecrou colonne de la direction
M20
6
0,6
4,44
Bague reglage colonne de la direction
TABLEAU DES COUPLES DE SERRAGE DE LA VISSERIE MOTEUR N.m / Lbf . ft
M
N.m
Kgf.m
Ecrous de la culasse
M6
10
1
Ecrou vilebrequin cote embrayage
M12
60
6
Ecrou vilebrequin cote allumage
M8
27
2,7
Ecrou engrenage conduite
18
1,8
Bougie
10
1
Les valeurs de couple ci-dessus concernent les
points de serrage les plus importants.
Pour les couples ne figurant pas dans ces
tableaux, utiliser les valeurs standard fournies
ci-dessous.
frein-filet
LOCTITE 242
Lbf.t
7,40
44,4
19,98
13,32
7,40
LOCTITE 270
LOCTITE 242
Kgf.m
0,6
1
2,5
4,5
5,5
Lbf.t
4,44
7,40
18,50
33,30
40,70
frein-filet
VALEURS DE COUPLES STANDARD
Boulon et ecrou de 5 mm
Boulon et ecrou de 6 mm
Boulon et ecrou de 8 mm
Boulon et ecrou de 10 mm
Boulon et ecrou de 12 mm
N.m
6
10
25
45
55
FRANÇAIS
38
10. PIECES DE RECHANGE
On vous recommande de toujours exiger exclusivement des pièces de
rechange d'origine POLINI MOTORI.
DANGER. L'usage des pièces non POLINI peut compromettre le
bon fonctionnement de la Minicross/minimotard et la sûreté du pilote.
11. REMISAGE
En cas d'arrêt prolongé de votre minicross/minimotard, il est conseillé
de:
- vidanger le réservoir de l'essence en déconnectant la durite coté
robinet. Utilisez un récipient pour liquides inflammables et après
avoir ouvert le robinet videz-y le combustible.
ATTENTION. Durant l'opération de vidange du réservoir ne
fumez pas et n'utilisez pas de flammes libres.
FRANÇAIS
12. FORMATION ET INFORMATION
Pour un entretien correct de la minicross/minimotard, il faut lire
attentivement cette notice et en suivre attentivement les indications.
En particulier, il faut faire beaucoup d'attention aux points marqués
par les symboles de DANGER et d' ATTENTION. Dans cas d'usage
par personne de moins que 14 ans, il est opportun d'instruire le jeune
pilote sur les risques dérivants par l'usage de la minicross/minimotard
et l'informer sur la correcte utilisation des dispositifs de sécurité à
toujours adopter comme le casque et les autres vêtements de protection mieux indiqués au paragraphe 6 CONDUITE FIABLE: USAGE DE LA
MINICROSS/MINIMOTARD. On en déconseille l'usage par des enfants
pas encore aptes de conduire une bicyclette. Il faut toujours que le
jeune pilote soit instruit aux principaux notions de conduite par une
personne compétente. Par exemple le moins de 14 ans sera averti des
dangers dérivant par les organes en mouvement ou les parties
chaudes de la minicross/minimotard. Au moins de 14 ans il est en plus
interdit d'effectuer les opérations d'entretien indiquées au chapitre 7.
39
ESPAÑOL
SITUACIÓN PELIGROSA: situación que puede causar daños
ÍNDICE
1- INSTRUCCIONES IMPORTANTES ANTES DE LA PUESTA DE
LA MINICROSS/ MINIMOTARD EN EL CIRCUITO
2- TRANSPORTE DEL VEHÍCULO
3- OPERACIONES ANTES DE LA PUESTA DE LA
MINICROSS/MINIMOTARD EN EL CIRCUITO
4- RODAJE DEL VEHÍCULO
5- APAGAMIENTO DEL MOTOR
6- GUÍA SEGURA: CONDICIONES DE USO DE LA
MINICROSS/ MINIMOTARD
7- MANTENIMIENTO, INTERVENCIONES Y REGLAJES
8- INSPECCIÓN, CONTROLES Y PREPARACIÓN CARRERA
9- CARACTERÍSTICAS TÉCNICAS
10- RECAMBIOS
11- PUESTA EN GARAJE
12- FORMACIÓN Y INFORMACIÓN
Antes de utilizar la mincross/minimotard o hacer manutención sobre
esta, estar seguros que haya entendido todo lo que está escrito en este
manual, poniendo atención particular a las situaciones señaladas con el
símbolo di
PELIGRO o ADVERTENCIA.
PREMISA
MUCHAS DE LAS INDICACIONES SE REPITEN VARIAS VECES EN LOS
DIVERSOS PÁRRAFOS. SE HA HECHO ASÍ EXPROFESO PARA ENFATIZAR
SU IMPORTANCIA Y LA ATENCIÓN A LOS PELIGROS. NO SE DAN ESPECIFICAS INFORMACIONES SOBRE LAS OPERACIONES DE MANTENIMIENTO
DEL MOTOR QUE EN NINGÚN CASO DEBEN AFRONTARSE SIN ACUDIR A
UN TALLER ESPECIALIZADO.
Les rogamos leer atentamente este manual de uso y mantenimiento
antes de conducir el vehículo. Este manual contiene informaciones muy
importantes que ayudarán a evitar desagradables roturas, lesiones
personales graves y accidentes incluso mortales. Una perfecta puesta a
punto y un conocimiento completo del vehículo antes de salir dan
seguridad y tranquilidad a la hora de disfrutar a fondo del placer de la
conducción.
ADVERTENCIA IMPORTANTE
ESTE VEHÍCULO HA SIDO DISEÑADO ÚNICAMENTE PARA COMPETICIÓN.
ESTÁ PROHIBIDO SU USO EN EL SUELO PÚBLICO. LA LEGISLACIÓN
ACTUAL PERMITE EL USO DE ESTE VEHÍCULO SOLAMENTE EN COMPETICIONES ORGANIZADAS O EN ACONTECIMIENTOS DEPORTIVOS EN PISTA
CERRADA BAJO LOS AUSPICIOS DE LAS AUTORIDADES LOCALES (AMBULANCIA, BOMBEROS, POLICIA ECC).
DIVIETO DE TRANSPORTE PASAJERO Y/O COSAS
SÓLO PARA PILOTO SIN PASAJERO. Esta minicross/minimotard ha sido
diseñado para ser usada únicamente por el piloto.
RECUERDA
El uso de este vehículo por parte de niños menores de 18 años siempre se debe hacer bajo la tutela de personas adultas y competentes.
LEER ATENTAMENTE ESTE MANUAL
En este manual se hace referencia a situaciones particulares de peligro, eventos y situaciones peligrosas debidas al uso y manutención de
la minicross/minimotard. En sentido del punto 3 de la Ley UNI EN
1050:1998:
DAÑO: lesión física y/o daño a la salud o a cosas.
IMPORTANTE: Este manual debe considerarse parte permanente de
la minicross/minimotard y debe acompañarla en todo cambios de propietario.
AL NUEVO PROPRIETARIO. Elegir una minicross/minimotard
Polini como nueva motocicleta es entrar a formar parte de una
distinguida familia de propietarios y pilotos de motocicletas.
ADVERTENCIA. La minicross/minimotard Polini es una
motocicleta de carreras de altas prestaciones que utiliza las últimas
innovaciones de la tecnología para motocross. Esta minicross/
minimotard debe ser utilizada en carrera sólo por pilotos expertos.
Este nuevo modelo ha sido diseñado para ser lo más competitivo
posible. En todo caso, el motocross como deporte es una actividad física que requiere mucho más que una buena moto. Para obtener buenos resultados, es necesario también estar en buena forma física y ser
un piloto hábil. Para obtener los mejores resultados, es necesario un
buen entrenamiento de las condiciones físicas y la ejercitación frecuente. Este manual tiene por objeto ayudar a obtener de la minicross/
minimotard Polini la máxima satisfacción posible, a través de las prestaciones de la motocicleta y de los éxitos en competición.
USO DE LOS ACCESORIOS DE PROTECCIÓN Y
INFORMACIONES DE SEGURIDAD
1- La mayor parte de las muertes por accidentes de moto se deben a
heridas en la cabeza. Ponerse SIEMPRE el casco
HOMOLOGADO. Utilizar rodilleras y coderas. (Certificados en
sentido de la ley EN 1621-1/1997). Utilizar traje protector o
monos, zapatos cerrados con suela resistente a la abrasión.
2- El sistema de escape se calienta muchísimo durante el uso, y se
mantiene caliente durante un tiempo una vez apagada la moto.
Nunca tocar las partes calientes del sistema de escape. Vestir
prendas que cubran completamente las piernas.
3- Nunca ponerse prendas anchas que puedan enredarse en las
palancas de mando, los apoyos para los pies, la cadena de
transmisión o las ruedas.
4- Respeta la naturaleza.
ADVERTENCIA. CON LA INTRODUCCIÓN DE CAMBIOS EN
LA MINICROSS/MINIMOTARD O LA ELIMINACIÓN DE
PIEZAS ORIGINALES EL VEHÍCULO PUEDE VOLVERSE
INSEGURO O ILEGAL. SIGUE TODAS LAS NORMATIVAS
NACIONALES Y LOCALES.
ESTE VEHÍCULO HA SIDO PENSADO PARA UN PILOTO DE
PESO INFERIOR A:
- 100 Kg. PARA EL MODELO MINICROSS
- 100 Kg. PARA EL MODELO MINIMOTARD
ESPAÑOL
40
Polini Motori aconseja, por razones de seguridad, dar siempre lo mejor
al vehículo y exigir exclusivamente recambios originales Polini Motori.
Para tener claramente identificado el vehículo, tomar nota inmediata
de sus generalidades:
MODELO: ...........................................................................................
CILINDRADA: .....................................................................................
NEUMÁTICOS: Del. ................................... Tras. .................................
NO. CHASIS: .....................................................................................
CÓDIGO: ......................................... PESO .........................................
LOCALIZACIÓN DEL CÓDIGO DE IDENTIFICACIÓN DEL
VEHÍCULO
El número de identificación del vehículo está grabado en la parte
delantera del chasis, en el lado derecho del tubo de la dirección.
1. INSTRUCCIONES IMPORTANTES PARA LA PUESTA A
PUNTO DE LA MOTO
Tal y como aparece cuando se abre el embalaje, la moto no está lista
para su uso, sino parcialmente desmontada para facilitar el transporte.
En el momento de desembalar, deberán efectuarse una serie de operaciones de montaje y de control, siguiendo nuestras instrucciones, para
que el producto adopte su justa conformación y quede listo para el
uso. Para un montaje más funcional, aconsejamos proceder en el
siguiente orden:
1- Sacar la moto de la caja (foto 1).
01
TORNILLO TCEI M8X40 (UNI 5931)
N. 2
TORNILLO TBM6X16 (ISO 7380)
N. 4
TORNILLO M8X18 (Para el caballete) (ISO 7380)
N. 1
ESTRIBO DERECHO/IZQUIERDO
N. 2
PERNO RUEDA DELANTERA
N. 1
TUERCA AUTOBLOQ. M8 (UNI 7473)
N. 4
TORNILLO TCEI M8X30 (UNI 6593)
N. 4
PERNO EN U DEL MANILLAR
N. 2
MANILLAR CON PARACHOQUES
N. 1
RUEDA DELANTERA CON DISCO
N. 1
GUANDABARROS DELANTERO
N. 1
PEDAL DE CAMBIO
N. 1
SOPORTE ESTRIBOS
N. 1
PLACA PORTANUMERO
N. 1
TURCA M5
N. 2
TORNILLO M5X10
N. 2
TORNILLO M5X30
N. 1
GUÍA CABLE DE FRENO
N. 1
CABALLETE
N. 1
MUELLE DE CABALLETE
N. 1
MANUAL DE USO Y MANTENIMIENTO
N. 1
CERTIFICACIÓN DE CONFORMIADAD CE
N. 1
- Para el modelo Minimotard hay:
ARANDELA 6X13X1,5
N. 2
TORNILLO M6X20 TCEI
N. 2
TORNILLO M8X65 TCEI
N. 4
PROTECTOR -ESTRIBO DERECHO/ IZQUIERDO SUPERIOR N. 2
PROTECTOR -ESTRIBO DERECHO/ IZQUIERDO INFERIOR N. 2
TORNILLO M5X20 TPSEI
N. 2
POMITO LATERAL Ø35
N. 2
BUJE POMITO Ø35
N. 2
SEPARADOR MANILLAR
N. 2
3- Comenzar montando el amortiguador trasero, utilizando el tornillo
de cabeza hexagonal M10x40 y las dos arandelas con la tuerca M10,
dejando una arandela del lado de la tuerca y una del lado del
tornillo; estas piezas aparecerán ya montadas en su sitio en el
horquillón (foto 2) (Ver tabla 9.1).
4- Separar las pastillas de freno de la pinza delantera, por ejemplo
ayudandose con una llave inglesa.
02
2- Controlar la presencia de los productos necesarios para el montaje
dentro de la caja:
MINICROSS/MINIMOTARD POLINI
N. 1
N. 4
ARANDELA 6X18X1 (UNI 6593)
ABRAZADERA DE PLÁSTICO
N. 1
MUELLE PARA ESTRIBO
N. 2
TORNILLO TCEI M8X20 (UNI 5931)
N. 6
ESPAÑOL
PELIGRO. Después de montar las pinzas apretar varias veces la
maneta del freno puesta en el manillar y el pedal del freno para
acercar las pastillas al disco. Antes de utilizar el vehículo estar seguros
que los frenos funccionen perfectamente.
41
5- Montar la rueda delantera utilizando el perno correspondiente
(foto 3).
6- Introducir el perno de la rueda y la tuerca. Cerrar con llave
dinamométrica (ver tabla 9.1) (foto 4).
06
03
07
04
08
7- Cerrar el espárrago de sujeción del perno con una llave
dinamométrica (ver tabla 9.1) (foto 5).
05
09
8- Inflar los neumáticos delanteros y traseros (ver párrafo 7.10).
DELANTERO
TRASERO
Minicorss 1,3 BAR - 18,9 PSI
1,3 BAR - 18,9 PSI
Minimotard 1,5 BAR - 21,8 PSI
1,8 BAR - 26,1 PSI
9- Montar el guardabarros con los 4 tornillos y arandelas TB M6X16
correspondientes (foto 6). Montar la placa portanúmeros pasando el
cable de freno por la guía correspondiente.
10- Quitar la abrazadera de embalaje de la bomba del freno
delantero. Montar ahora el manillar fijándolo a la horquilla con los
dos pernos en U y los cuatro tornillos de cabeza cilíndrica con
hexágono interior M8X30 (ver tabla 9.1) (foto 7).
11- Desmontar el mando del gas, introducir el cable como se ve en la
foto 8 y cerrar la tapa (ver apartado 7.7).
12- Colocar la palanca de freno delantera fijando el perno en U con
los tornillos correspondientes (foto 9) (Ver párrafo 7.9).
13- Montar el interruptor de apagado y fijarlo con la abrazadera en el
manillar (foto 10).
14- Colocar la maneta del embrague con la regulación deseada (foto
11) (ver párrafo 7.8).
15- Proceder al montaje del soporte de estribos al motor usando los 4
tornillos M8X20. Fijarlo después al chasis con 2 tornillos M8X20 y
2 tornillos autoblocantes M8X20 (foto 12).
16- Montar los estribos según foto 13, con tornillos M8X40 y tuercas
autoblocantes.
ESPAÑOL
42
10
14
11
15
12
21- Sólo para las minimotard montar: los protectores de estribos, el
protector del manillar y los protectores de la horquilla en los ejes
de la rueda (foto 16) que se encuentran en la paquete.
16
13
17- Montar el caballete utilizando el tornillo M8X18 para fijarlo
montando el muelle correspondiente (foto 14).
PELIGRO. Aconsegamos desmontar el cabellete durante las
carreras para evitar situaciones peligrosas o daños
18- Colocar la palanca del cambio (foto 15)
19- Llenar el déposito de carburante (ver párrafo 7.14)
20- Controlar el nivel del aceite en el motor (ver párrafo 7.3)
ESPAÑOL
RECUERDA. Es esencial someter el vehículo a una revisión de
mantenimiento y de control antes de utilizarlo, como describido en
este manual. Si fuesen necesarias actuaciones de mantenimiento o
reparaciones, dirigirse al concesionario POLINI MOTORI. Debido a que
estos vehículos se están mejorando constantemente y a las actualizaciones técnicas del diseño efectuadas, en algunos casos podrían notarse
diferencias entre el vehículo recibido, las ilustraciones y el texto de
este manual. Las piezas de recambio originales de POLINI MOTORI
están hechas con los mismos materiales y han pasado por el mismo
ciclo de producción que las piezas que componen la minimoto. Todo
ello garantiza al vehículo mayor duración y el mejor funcionamiento.
Aconsejamos exigir siempre recambios originales POLINI MOTORI.
2. TRASPORTE DE VEHÍCULO
Para un correcto y seguro transporte del vehíclo desde el garaje hasta
el circúito donde se utilizará es necesario:
- Estar seguros que el depósito esté vacio para evitar salida de líquido
- Colocar la minicross/minimotard sobre una superficie plana del
vehículo que se utilzará para trasportar la moto.
- Colocar la minicross/minimotard en el caballete y, fijandola con
43
correas o cables, asegurarse que durante el transporte quede en
posición vertical.
4- Inmovilizar la rueda trasera con el mando del freno.
ADVERTENCIA. Nunca trasportar la moto con el depósito lleno
de gasolina o con el escape o el motor caliente
3. OPERACIONES ANTES DE LA PUESTA DE LA
MINICROSS/MINIMOTARD EN EL CIRCUITO
ADVERTENCIA. Todas las operaciones siguientes deben estar
realizadas por personas mayores de 14 años y de todas forma bajo la
supervisión de una persona adulta y competente.
1- Abrir el grifo de la gasolina situado bajo el depósito llevándolo a la
posición “ON” (foto n.17).
2- Antes de arrancar el motor, comprobar que esté en punto muerto
(foto 18, cambio N).
17
PELIGRO. Si no está en contacto con el suelo o inmovilizada con
el freno, la rueda trasera girará. El contacto accidental con una rueda
girando puede causar graves lesiones personales.
5- Manteniendo el puño del gas al mínimo, llevar la palanca del pedal
de arranque hacia afuera y encender el vehículo girando
enérgicamente el pedal hacia el suelo.
6- Situar la palanca de arranque en posición de marcha. Llevar el
motor a temperatura de funcionamiento manteniéndolo arrancado
durante unos minutos.
ADVERTENCIA . Evitar abrir y cerrar bruscamente el acelerador,
porque la moto saltará repentinamente hacia adelante y se corre el
riesgo de perder el control del vehículo.
ADVERTENCIA. Antes de ponerse en marcha, controlar que el motor
se pare mediante el interruptor rojo de apagado situado en el manillar.
4. RODAJE DEL VEHÍCULO
ADVERTENCIA. Todas las operaciones siguientes deben estar
realizadas por personas mayores de 14 años y de todas formas bajo la
supervisión de una persona adulta y competente.
OFF
ON
3°
4°
1- Para optimizar el asentamiento del motor y de la transmisión la
primera vez que se hace funcionar y preservar desde el mismo
comienzo su fiabilidad, es indispensable un breve rodaje.
18
2°
N
1°
3- Si el motor está frío, ayudar al encendido moviendo hacia arriba la
palanca del estárter sobre el carburador (foto 19).
19
STARTER AIRE
ADVERTENCIA. La primera vez que se saca a la pista el vehículo,
y para que el rodaje sea completo, aconsejamos 2 horas de recorrido a
un régimen de revoluciones bajo. Seguir estrictamente las precauciones
que se indican a continuación.
2- Una vez encendido el motor, hacerlo funcionar al mínimo hasta que
alcance la temperatura de ejercicio normal.
3- Durante la fase de rodaje, mantener siempre la misma velocidad:
NUNCA ACELERAR BRUSCAMENTE.
4- Incluso a pocas revoluciones, tratar de evitar los tramos particularmente largos y difíciles, que puedan provocar un calentamiento
excesivo del motor.
5- Después del período de rodaje respetando todas estas medidas de
precaución, aconsejamos dirigirse a un concesionario Polini Motori
para la asistencia post-rodaje, como desmontar el grupo térmico y
controlar el estado de deterioro de: bujía, culata, pistón, cilindro, así
como para cambiar la bujía y el aceite de la trasmisión.
PELIGRO. Después del rodaje es importante controlar la rosca de
las tuercas de la culata. Porían aflojarse después del rodaje (ver
párrafo 9.1)
5. APAGAR EL MOTOR
Para parar la minicross/minimotard es suficiente pulsar el botón rojo
de paro situado sobre el manillar (foto 10).
ADVERTENCIA. Cuando el motor esté caliente, bajar de nuevo el
estárter del aire evitando el contacto con el motor.
ESPAÑOL
44
6. GUÍA SEGURA: CONDICIONES DE USO DE LA
MINICROSS/ MINIM0TARD
ADVERTENCIA. SI EL PILOTO ES MENOR DE 18 AÑOS, LA
MINICROSS/MINIMOTARD DEBERÁ USARSE SIEMPRE BAJO LA
VIGILANCIA DE UN ADULTO.
ADVERTENCIA. SI EL PILOTO ES MENOR DE 14 AÑOS, ANTES DE
UTILIZAR LA MINICROSS/MINIMOTRAD DEBERÁ SER INSTRUIDO POR
UN ADULTO EN LO QUE SE REFIERE AL USO CORRECTO DEL VEHÍCULO Y
DE LOS DISPOSITIVOS DE PROTECCIÓN CONFORME A LAS INDICACIONES
RECOGIDAS EN ESTE MANUAL.
En la conducción de la minicross/minimotard POLINI deben tomarse
precauciones especiales para asegurar la protección del piloto. Antes
de usar la minicross/minimotard, hay que tener presentes los
siguientes puntos:
1- Muchos accidentes se deben a la falta de experiencia del piloto.
2- Siempre hay que conducir con las dos manos en el manillar.
3- Hay que vestir prendas de protección adecuadas:
- Llevar siempre el casco INTEGRAL;
- Usar guantes, rodilleras y coderas conformes a la norma EN
1621-1 / 1997;
- Usar monos o, en todo caso, prendas protectoras.
- Utilizar calzado cerrado adecuado a las condiciones
medio-ambientales.
4- La minicross/minimotard debe usarse exclusivamente en lugares o
circuitos privados. Está prohibido su uso en suelos públicos.
5- La minicross/minimotard no cuenta con ningún dispositivo autónomo
de iluminación; por lo tanto, debe usarse en condiciones de buena
visibilidad, en zonas privadas adecuadamente iluminadas (luz
natural o artificial).
6- La minicross/minimotard no ha sido proyectada para su uso en
condiciones climáticas adversas, como lluvia, granizo, vientos
fuertes, nieve y pistas deslizantes.
7- Se prohíbe el uso de la minicross/minimotard en estado de ebriedad,
bajo el efecto de estupefacientes o en situaciones de lucidez mental
disminuida.
8- Se prohíbe el uso a pilotos con un peso superior a:
- 100 Kg. PARA EL MODELO MINICROSS
- 100 Kg. PARA EL MODELO MINIMOTARD
9- En la minicross/minimotard sólo puede montar una persona.
SE PROHÍBE SU USO SIN HABER LEÍDO ATENTAMENTE EL MANUAL DE
USO Y MANTENIMIENTO.
7. MANTENIMIENTO, INTERVENCIONES Y REGLAJES
cotidianos antes de poner en marcha el vehículo. La frecuencia y el
tipo de operaciones de mantenimiento se indican en las tablas 8.1 y
8.2.
7.1 DESMONTAR Y VOLVER A MONTAR EL SILLÍN
Destornillar el tornillo y levantar ligeramente el sillín y sacarlo en
dirección al guardabarros trasero (foto 20). Para montarlo de nuevo
introducir el gancho delantero del sillín en el tornillo situado sobre el
depósito de gasolina, y calzar el sillín en el enganche del chasis. Una
vez colocado, apretarlo mediante el tornillo.
20
7.2 LIMPIEZA Y CAMBIO DEL FILTRO DE AIRE
Una de las causas de escaso rendimiento del motor es el filtro de aire
en malas condiciones. Para su limpieza proceder como se indica a
continuación:
- Desmontar el sillín (ver apartado 7.1)
- Sacar la tapa de la caja del filtro (foto 21).
- Quitar el filtro del aire y limpiarlo en agua caliente con jabón neutro
(foto 22).
- Después de enjuagarlo y retorcerlo, humedecerlo con aceite para
filtros.
21
22
ATENCIÓN. LAS OPERACIONES DE MANTENIMIENTO DEBEN SER REALIZADAS EXCLUSIVAMENTE POR PERSONAS ADULTAS Y COMPETENTES.
EN CASO DE DUDA CON RESPECTO A LAS OPERACIONES QUE SE INDICAN
SEGUIDAMENTE EN EL MANUAL, SE ACONSEJA AL USUARIO CONSULTAR
AL PERSONAL ESPECIALIZADO DE LOS DISTRIBUIDORES O CONCESIONARIOS DE POLINI MOTORI. ATENERSE ESCRUPULOSAMENTE A LOS
PUNTOS QUE SE INDICAN A CONTINUACIÓN EN EL MANUAL.
Las operaciones de mantenimiento y las intervenciones necesarias para
una idónea puesta a punto del vehículo deben considerarse controles
ESPAÑOL
ADVERTENCIA. Si el filtro presentase, además de las impurezas,
45
una fuerte concentración de polvo, sustituirlo inmediatamente con uno
nuevo.
ADVERTENCIA. La falta de limpieza del filtro de aire puede ahogar
el motor y causar el descenso de sus prestaciones. Un filtro deteriorado
puede facilitar la entrada en el motor de partículas de polvo, acelerando el deterioro normal de los segmentos, del cilindro y del pistón.
número de revoluciones del motor más bajo posible, pero constante
(foto 25).
25
7.3 CONTROL DEL NIVEL DE ACEITE DEL MOTOR
Poner el vehículo en posición de marcha.
- Quitar el tapón de nivel situado en el cárter lateral (foto 23).
- Verificar que el nivel de aceite se encuentre situado entre el nivel
máximo (MAX) y el nivel mínimo (MIN). Nunca usar la moto por
debajo el nivel mínimo. La diferencia entre el nivel mínimo y
máximo es de 50 gr.
23
PELIGRO. Si no está en contacto con el suelo o inmovilizada con
el freno, la rueda trasera girará. El contacto accidental puede causar
graves lesiones personales.
7.6 REGULACIÓN DEL TORNILLO DE AIRE
Para obterner mejores prestaciones.
- Si el motor tiene dificultades a la salida de una curva (mezcla rica),
aflojar el tornillo de aire.
- Si el motor tiene dificultades a la salida de una curva (mezcla
pobre), apretar el tornillo del aire (foto 26)
NIVEL MAX
NIVEL MIN
26
7.4 CAMBIO DE ACEITE DEL MOTOR
PELIGRO. Desenroscar el tornillo de vaciado del aceite con el
motor caliente puede causar graves quemaduras. Desenroscar el
tornillo de vaciado asegurandose que el motor esté frio.
TORNILLO AIRE
Poner la moto en posición de marcha.
- Quitar la tapa de nivel situada en la parte inferior del cárter (foto
24) y dejar salir el aceite.
- No vaciar el aceite de desecho en el medio ambiente, llevarlo a un
centro de recogida para su eliminación.
- Reapretar la tuerca de desagüe. Rellenar con 600 gramos de aceite
para motor “SAE 20W50”. Utilizar solamente aceite de motor
altamente detergente con especificaciones API SF o SG.
24
ADVERTENCIA. El tornillo de regulación está muy cerca del
motor. Se debe prestar atención para no quemarse.
7.7 MANDO DEL ACELERADOR
Controlar que el puño del mando del acelerador funcione siempre
bien, y que el cable del mando del gas deje un juego de 3-5 mm.
Si el juego fuera superior, ajustar el tornillo situado sobre el
carburador o sobre el mando del gas (foto 27).
27
3/5 mm.
TAPA ACEITE
7.5 REGULACIÓN DEL MÍNIMO
La regulación del mínimo se debe efectuar con el motor caliente.
Dejando funcionar el motor, con el puño del acelerador cerrado, apretar
o aflojar el tornillo de la parte derecha del carburador hasta obtener el
ESPAÑOL
46
ADVERTENCIA. No efectuar estos controles cotidianos y operaciones extraordinarias de mantenimiento puede ser causa de graves
daños para el vehículo, así como de accidentes graves.
7.8 REGULACIÓN DEL EMBRAGUE.
En el caso de que la situación de la maneta de embrague (foto 11) no
satisface plenamente la posición de conducción, se puede mejorar
posteriormente actuando sobre el tornillode registro “1” (foto 28)
situado debajo del protector del carter de embrague.
3
28
los ojos y con la piel. En caso de accidente, consultar a un médico. Es
buena regla cambiar el aceite del sistema de frenado cada dos años.
NO VACIAR EL ACEITE DE DESECHO EN EL MEDIO AMBIENTE.
ADVERTENCIA. Periódicamente, y en función del uso y de las condiciones atmosféricas, limpiar la pinza del freno con un chorro de aire
comprimido, y controlar el desgaste del material de fricción de las
pastillas de los frenos; cuando el grosor del material es inferior a
1mm, susituirlas
ADVERTENCIA. Nunca manipular los frenos cuando los discos están
calientes
29
2
5/10 mm.
1
TORNILLO DE REGULACIÓN
ADVERTENCIA. Lubricar frecuentemente con grasa la leva inferior del embrague “2” para impedir eventuales gripajes del mismo.
Retirar la tapa del cárter de embrague y la correspondiente junta,
desmontar la leva retirando el frenillo “3” y engrasar frecuentemente.
7.9 REGULACIÓN DEL SISTEMA DE FRENADO A MANDO
HIDRÁULICO Y PASTILLAS DE FRENO
Este modelo tiene un freno a disco hidráulico delantero y trasero. Si las
pastillas están dañadas, el nivel del líquido de los frenos baja. Por eso,
tienen que controlar periódicamente el nivel del líquido de los frenos y
las pastillas.
ADVERTENCIA. Cuando se añade líquido para frenos, cincerarse
que el depósito esté en posición orizontal antes de sacar la tapa para
no vaciar el líquido.
ADVERTENCIA. El tubo de freno no correctamente situado o en contacto con partes en movimiento puede anular la acción de frenado y
causar además accidentes graves. El sistema de frenado necesita un
período de asentamiento para dar el máximo de eficiencia. Antes de
considerar el sistema bién asentado, hay que efectuar al menos cien
frenazos, obrando con prudencia, y proceder entonces a otra regulación de puesta a punto y a un control del apriete de los tornillos.
El recorrido del pedal de freno trasero se regula a mano mediante el
tornillo del perno del émbolo situado sobre la bomba del freno. Tras
haber hallado el reglaje más adecuado para el piloto, apretar la contratuerca situada en la rosca del perno (foto 29). Controlar el desgaste
de las pastillas. Cuando el grosor del material es inferior a 1mm, susituirlas. Estar seguros que no hay salida de líquido. Controlar que tubos
y juntas no estén dañados.
PELIGRO. Utilizar exclusivamente aceite para sistemas de freno
hidráulicos DOT 4 procedente de envases sin usar.
ADVERTENCIA. El líquido empleado en el sistema de frenado,
además de dañar las piezas pintadas, es muy dañino en contacto con
ESPAÑOL
PELIGRO. Después de montar las pinzas apretar varias veces la
maneta del freno puesta en el manillar y el pedal del freno para
acercar las pastillas al disco. Antes de utilizar el vehículo estar seguros
que los frenos funccionen perfectamente.
7.10 PRESIÓN DE LOS NEUMÁTICOS
Controlar frecuentemente la presión de los neumáticos y regular si es
necesario. La medida de la presión de inflado de los neumáticos se
hace con las cubiertas frías. La presión de los neumáticos varía según
el tipo de circuito y el peso del piloto.
DELANTERO
TRASERO
Minicorss 1,3 BAR - 18,9 PSI
1,3 BAR - 18,9 PSI
Minimotard 1,5 BAR - 21,8 PSI
1,8 BAR - 26,1 PSI
ADVERTENCIA. La presión de los neumáticos varía según el peso
del piloto, la temperatura atmosférica, el tipo de circuito y de asfalto.
7.11 CADENA DE TRANSMISIÓN
La cadena de la moto es un órgano tan importante que merece unos
cuidados y una atención especial.
PELIGRO. No pillarse los dedos entre la cadena y la corona.
1- Controlar el tensado de la cadena. La moto debe mantenerse en
posición vertical, sin soportar ningún tipo de presiones. Controlar el
tensado en la posición ilustrada en la foto 30. Comprobar que la
distancia indicada en la foto (35/39 mm) sea correcta. De no ser
así, regular la cadena como se indica a continuación (foto 31).
- Aflojar la tuerca del eje trasero “3”
47
30
eslabón principal debe introducirse con los extremos cerrados de la
“U” hacia el sentido de la marcha (foto 33).
33
31
A
PELIGRO. Nunca montar una cadena de transmisión nueva sobre
piñón y corona muy desgastados, o a la inversa.
La incorrecta alineación de la rueda provoca un desgaste anormal y
repercute desfavorablemente en la estabilidad del vehículo.
PELIGRO. Si la cadena se rompe o se desengancha de las ruedas dentadas, puede enrollarse sobre el piñón y bloquear la rueda trasera,
causando graves accidentes y lesiones personales.
1
3
2
- Aflojar las contratuercas “1” y girar el perno de regulación “2” en
sentido contrario a las agujas del reloj para tensarla o en sentido
contrario para aflojarla. Alinear los bordes traseros de las placas del
eje y controlar en ambos lados del horquillón la distancia “A” entre
el mismo y la placa.
- Apretar la tuerca del eje trasero “3” (ver tabla 9.1) (foto 32):
32
- Controlar de nuevo el tensado de la cadena y regular si fuera
necesario.
- Aflojar ligeramente el perno de registro “2” en sentido contrario a
las agujas del reloj hasta que toque la placa del eje. Apretar entonces
la contratuerca “1” inmovilizando con una llave el perno de ajuste.
2- Comprobar a cada regulación el desgaste de la corona y del piñón.
La cadena, además, no debe presentar juegos, rigidez excesiva o
eslabones gripados.
3- La cadena debe lubricarse siempre bien, incluso después de lavar la
moto. Para eliminar impurezas se puede utilizar gasóleo. Para
lubricarla aconsejamos un lubricante en spray, que permite una
notable disminución del desgaste y la mejora del rendimiento de la
transmisión.
4- Si hubiera que desmontar la cadena, recuérdese que el clip del
7.12 REGULACIÓN DEL AMORTIGUADOR TRASERO
El amortiguador instalado en el vehículo nuevo está ya regulado con
ajustes estándar.
MANTENIMIENTO:
1- Controlar que el muelle no esté roto o no haya perdido la fuerza;
2- Controlar que la suspensión funcione sin problemas; para ello, hacer
saltar arriba y abajo la parte trasera del vehículo.
3- Controlar que el eje del amortiguador no esté doblado y que no
haya pérdidas de aceite.
4- Empujar la rueda trasera en sentido lateral para controlar el
desgaste de los bujes del horquillón. Si se produjese un movimiento
lateral, cambiar los bujes.
7.13 REGULACIÓN DE LA HORQUILLA DELANTERA
La horquilla instalada en el vehículo nuevo está ya regulada con
ajustes estándar.
MANTENIMIENTO:
1- Asegurarse de que los guardapolvos estén limpios, sin barro ni
polvo.
2- Controlar que no haya señal de pérdidas de aceite. Los guardapolvos
estropeados deben cambiarse antes de utilizar el vehículo.
3- Antes de utilizar el vehículo, hacer siempre un rápido control del
funcionamiento de la horquilla empujándola hacia arriba y hacia
abajo con el freno delantero accionado.
7.14 CARBURANTE
Utilizar gasolina para automóviles de 96 a 100 octanos, o superior. Si
se produjera martilleo de válvulas, probar con gasolinas de distintas
marcas o con un octanaje distinto. Capacidad del depósito 3 litros.
7.15 FILTRO DEL CARBURANTE
El filtro del carburante está en el grifo del lado inferior del depósito.
La suciedad acumulada en el filtro del carburante impide que éste
fluya hacia el carburador. Por consiguiente, el mantenimiento del filtro
ESPAÑOL
48
debe hacerse con frecuencia.
MANTENIMIENTO:
1- Vaciar el combustible del depósito en un recipiente para gasolina.
2- Desmontar la tapa del depósito quitando los dos tornillos.
3- Lavar el filtro con agua y jabón neutro. Secar, de ser posible al sol.
4- Montar de nuevo el grifo del depósito invirtiendo el orden y prestar
atención a que la guarnición quede en la posición correcta.
PELIGRO. La gasolina es extremadamente inflamable y explosiva.
Efectuar esta operación en una zona bien ventilada y con el motor
apagado. No fumar ni generar llamas o chispas en el aire allí donde se
descarga la gasolina o se llena el depósito.
7.16 LIMPIEZA DEL VEHÍCULO
Antes de lavar el vehículo es necesario proteger del agua las siguientes
partes:
- Mando de la transmisión.
- Mando de los frenos
- Toma de aire y filtro de aire
- Boca del silenciador
No dirigir el chorro de agua directamente contra:
- Cubos de la rueda
- Perno de las horquillas
- Tubo de la dirección
- Pinzas de freno
- Capuchón de la bujía.
Después del lavado, lubricar todos los puntos que se acaban de mencionar, encender el motor y hacerlo funcionar durante unos minutos.
ADVERTENCIA. Limpiar la moto con el motor frio.
ADVERTENCIA. No utilizar disolventes o alcohol para limpiar la
cúpula en plexiglás. Utilizar exclusivamente agua y jabón o los
champús más adecuados.
ADVERTENCIA. Antes de ponerse en marcha, comprobar que los
frenos funcionen perfectamente.
ESPAÑOL
8. INSPECCIÓN Y CONTROL DE PUESTA A PUNTO Y
PREPARACIÓN PARA LA COMPETICIÓN
ADVERTENCIA: TODAS LA OPERACIONES INDICADAS EN LOS
PUNTO 8.1 Y 8.2 DEBEN CUMPLIRSE EXCLUSIVAMENTE POR
PERSONAS ADULTAS Y COMPETENTES.
8.1 CONTROLES DIARIOS: DEBEN HACERSE SIEMPRE ANTES
DE PONERSE EN MARCHA
- Aceite del motor: no hay pérdidas, el nivel es el correcto.
- Carburador: acelerador flexible que se deslice regularmente, sin
rigideces.
- Líquido refrigerante: no hay pérdidas, el nivel es el correcto, apriete
de las abrazaderas.
- Tapa del depósito de carburante: comprobar el apriete.
- Filtro del aire y caja del filtro: filtro sin impurezas y caja limpia de
polvo.
- Frenos: vainas sin estrangulamientos y pinzas limpias de barro.
- Sillín: enganchado en su punto de encastre y tornillo bloqueado.
- Cadena: limpia, sin barro y lubricada. Control del tensado.
- Piñón: gira libremente, sin piedras ni polvo.
- Manillar: tubos de bloqueo bien apretados.
- Neumáticos: control de la presión.
- Horquilla delantera: control y limpieza.
- Dirección: control del juego y del apriete del tubo.
49
8.2 CONTROLES PERIÓDICOS: DEBEN INSPECCIÓN - LIMPIEZA - REGULACIÓN Frecuencia APARTADO
HACERSE ANTES DE CADA CARRERA después de 1 después de 3 después de 9 sustitución
carrera 1 hora carreras 3 horas carreras 9 horas
Y TRAS LA PUESTA EN GARAJE
6 horas
7.11
CADENA DE TRANSMISIÓN
9 horas
7.11
PIÑÓN Y CORONA
RODILO DE LA CADENA
CUBRECADENA-DESLIZADOR DE CADENA
7.9
REGULACIÓN DE LOS FRENOS
7.9
PINZA DEL FRENO
6 horas
7.9
PASTILLAS DE LOS FRENOS
7.7
MANDO DEL GAS
18 horas
7.7
CABLES DE MANDO DEL GAS
F
6 horas
7.2
FILTRO DE AIRE
7.10
PRESIÓN DE INFLADO DE LOS NEUMÁTICOS
18 horas
COJINETES DE LOS CUBOS DE LAS RUEDAS
TENSADO DE LOS RADIOS DE LAS RUEDAS
3 horas
7.3
ACEITE DEL MOTOR
JUEGO DEL TUBO DE DIRECCIÓN
7.13
COJINETES DE DIRECCIÓN
HORQUILLAS DELANTERAS
HORQUILLÓN TRASERO
18 horas
TUBO DE ALIMENTACIÓN
7.15
FILTRO DE GASOLINA
JUEGO VÁLVULAS
CARBURADOR
6 horas
BUJÍA
18 horas
CAPUCHÓN DE LA BUJÍA
SISTEMA ELÉCTRICO
36 horas
SISTEMA DE ESCAPE
18 horas
SILENCIADOR
36 horas
GRUPO TÉRMICO
18 horas
PISTÓN
18 horas
SEGMENTO
CÁRTER DEL MOTOR
36 horas
EJE MOTOR
18 horas
COJINETES DE BANCADA
18 horas
SERIE DE COJINETES DE MOTOR
9 horas
EMBRAGUE
TUERCAS-PERNOS-ELEMENTOS DE FIJACIÓN
ANUNCIO DE
PELIGRO
EP (punto 7.11)
EP(punto 7.11)+M
A (punto 7.9)
A (punto 7.9)
A (punto 7.9)
A (punto 7.7)
A(punto 7.7)+M
A (punto 7.2)
A (punto 7.10)
M
M
M
M
EP (punto 7.15)
M
M
M
M
M
M
M
M
M
M
: INSPECCIONAR O REGULAR
EP: PELIGRO
: LIMPIEZA
A: ADVERTENCIA
: LUBRICACIÓN
M: ATENCIÓN: ESTAS OPERACIONES DEBEN REALIZARSE POR
F: LIMPIAR EL FILTRO DEL AIRE DESPUÉS DE CADA CARRERA EN
PARTE DE PERSONAS COMPETENTES
LUGARES CON MUCHO POLVO
BUJÍA STANDARD
Champion Z9Y - NGK C7HSA - LG A7TC
JUEGO VÁLVULAS ADMISIÓN Y ESCAPE
0,15 MM. / 0,006 in
ESPAÑOL
50
9.CARACTERÍSTICAS
TÉCNICAS
Motor Polini
Refrigeración
Diámetro interior y carrera
Cilindrada
Relación de compresión
Carburador
Encendido
Alimentación
Bujía
Arranque
Embrague
Chasis
Freno delantero
Freno trasero
Neumático delantero
Neumático trasero
Transmisión
Suspensión delantera
Suspensión trasera
Capacidad depósito
Peso en vacío
Altura del sillín
Distancia entre ejes
XP 4T CROSS
2.50x12”
2.75x10”
XP 4T Racing
XP 4T Racing
CROSS
14”/12” Wheels CROSS
monociíndrico de 4 tiempos
aire
52,4x49,5
107
9,6:1
Mikuni 22
electrónico
gasolina verde
Champion Z9Y - NGK C7HSA - LG ATC
kick starter
centrífugo en baño de aceite
de acero
hidráulico ø 200 mm
hidráulico ø 150 mm
2.50x12”
60/100-14”
2.75x10”
80/100-12”
4 marchas
horquilla hidráulica ø 33 mm
monoamortiguador hidráulico
3 litros
60 kg
62,7
725 mm
775mm
1061 mm
1113mm
9.1 TABLA DE PARES DE APRIETE PIEZAS DEL CHASIS Y PARTE CICLISTA
N.m
M
50
Perno rueda delantera
M12
20
Espárrago de fijación perno delantero
M8
20
Tornillos de fijación manillar
M8
60
Perno rueda trasera
50
Perno motor-horquillón
M14
25
Perno motor delantero
M12
20
Tornillos placa sup. e inf. horquilla
M8
10
Tornillos discos de freno
M6
80
Tuerca caña de dirección
M20
6
Virola regulador caña de dirección
Kgf.m
5
2
2
6
5
2,5
2
1
8
0,6
Lbf.t
37
14,8
14,8
44,40
37
18,5
14,8
7,4
59,2
4,44
TABLA DE PARES DE APRIETE PIEZAS MOTOR N.m / Lbf . ft
M
Tuercas de la culata
M6
Tuerca eje motor lado embrague
M12
Tuerca eje motor lado encendido
M8
Tuerca engranaje conducido
Bujía
Kgf.m
1
6
2,7
1,8
1
Lbf.t
7,40
44,4
19,98
13,32
7,40
N.m
6
10
25
45
55
Kgf.m
0,6
1
2,5
4,5
5,5
Los valores de par mencionados son para los
puntos de apriete más importantes.
Si un determinado par no aparece en la lista,
utilizar los valores estándar que se dan a
continuación.
ESPAÑOL
N.m
10
60
27
18
10
XP 4T MOTARD
90/90-10”
90/90-10”
60kg
725mm
1061mmS
sellador líquido
para roscas
LOCTITE 242
sellador líquido
para roscas
LOCTITE 270
LOCTITE 242
VALORES DE PAR ESTÁNDAR
Perno y tuerca de 5 mm
Perno y turca de 6 mm
Perno y tuerca de 8 mm
Perno y tuerca de 10 mm
Perno y tuerca de 12 mm
Lbf.t
4,44
7,40
18,50
33,30
40,70
51
10. RECAMBIOS
Aconsejamos utilizar siempre recambios originales POLINI Motori.
PELIGRO. El uso de recambios no originales puede ser perjudicial
para el buen funcionamiento de la minicross/
minimotard, así como para la seguridad del usuario que la conduce.
11. PUESTA EN GARAJE
La puesta en garaje del vehículo, en caso de que se deje de usar la
minimoto durante un período de tiempo prolongado, requiere:
- el vaciado del depósito de la gasolina separando el tubo de la
gasolina del grifo. Traer un contenedor para líquidos inflamables y
abrir el grifo dejando salir la gasolina
ADVERTENCIA. No fumar ni generar llamas o chispas en el aire
cuando se vacia el depósito.
12. FORMACIÓN E INFORMACIÓN
Para un uso correcto de la minimoto, es necesario leer atentamente el
manual y atenerse escrupulosamente a las indicaciones. Se debe
prestar particular atención a los puntos de este manual señalados con
los símbolos de PELIGRO y ADVERTENCIA.
En caso de uso por parte de un menor de 14 años, será conveniente
instruir al joven piloto sobre los riesgos derivados de un uso indebido
de la minicross/minimotard, e informarle acerca del uso correcto de
los dispositivos de seguridad que se deben adoptar siempre, como el
casco y demás prendas protectoras indicadas en el apartado 6. GUÍA
SEGURA: CONDICIONES DE USO DE LA MINICROSS/MINIMOTARD.
No se aconseja su uso a menores que no sepan andar en bicicleta.
Es siempre conveniente que el joven piloto reciba de una persona
competente las nociones fundamentales de conducción.
Por ejemplo, los menores de 14 años deben ser advertidos de los
peligros derivados de los órganos en movimiento o de las partes
calientes de la minicross/minimotard. A los menores de 14 años se les
prohibirá además efectuar las operaciones de mantenimiento indicadas
en el capítulo 7.
ESPAÑOL
52
DEUTSCH
INHALTSVERZEICHNIS
1- MONTAGEANLEITUNG VOR DER BENUTZUNG
2- TRANSPORT DES MOTORRADS
3- HANDHABUNG VOR DEM ANLASSEN DES MINICROSS/
MINIMOTARDS
4- EINFAHREN DES FAHRZEUGS
5- MOTORENAUSSETZER
6- SICHERES FAHREN: HINWEISE FÜR DEN GEBRAUCH VOM
MINICROSS/MINIMOTARDS
7- WARTUNG UND EINSTELLUNG
8- INSPEKTION, FEINEINSTELLUNG UND VORBEREITUNG
FÜR WETTRENNEN
9- TECHNISCHE DATEN
10- ERSATZTEILE
11- AUSSERBETRIEBNAHME
12- EINWEISUNG UND INFORMATION
HINWEIS
VIELE ANWEISUNGEN WERDEN BEWUSST MEHRMALS IN DEN
VERSCHIEDENEN ABSCHNITTEN WIEDERHOLT, UM DIE BEDEUTUNG DER
WARN- UND GEFAHRENHINWEISE ZU UNTERSTREICHEN. DIE WARTUNG
DES MOTORS DARF AUSSCHLIESSLICH VON EINER ENTSPRECHEND
QUALIFIZIERTEN WERKSTATT DURCHGEFÜHRT WERDEN.
Bevor Sie mit Ihrem Motorrad losfahren, sollten Sie unbedingt diese
Bedienungs- und Wartungsanleitung lesen. Das Handbuch enthält
wichtige Informationen die dazu beitragen, leichte und schwere
Sach- und Personenschäden und Unfälle - auch mit Todesfolge - zu
vermeiden. Für ein sicheres Fahren ist es unverzichtbar, dass Sie Ihr
Fahrzeug vorher korrekt einstellen und gut kennen lernen. Nur so
können Sie das Fahren im Gelände so richtig genießen.
WICHTIGE HINWEISE
DIESES MOTORRAD WURDE AUSSCHLIESSLICH FÜR DEN EINSATZ IN
WETTRENNEN ENTWORFEN UND HERGESTELLT. DAS FAHREN AUF
ÖFFENTLICHEN STRASSEN IST VERBOTEN! LAUT GELTENDER
GESETZGEBUNG IST DER GEBRAUCH DIESES MOTORRADS
AUSSCHLIESSLICH BEI ORGANISIERTEN WETTRENNEN UND
SPORTVERANSTALTUNGEN AUF GESCHLOSSENEN- UND PRIVATEN
PISTEN ERLAUBT, DIE VON DEN ZUSTÄNDIGEN BEHÖRDEN GENEHMIGT
WORDEN SIND (AMBULANZ, FEUERWEHR, usw.)
Vorschrift UNI EN 1050:1998 sind diese Situationen wie folgt bestimmt:
SCHÄDEN: physische Verletzung und / oder Schäden verursacht an
Gesundheit oder Gütern
GEFÄHRLICHES EREIGNIS: das Ereignis, das einen Schaden
verursachen kann
Vor dem Gebrauch oder der Wartung des Minicross/Minimotards, muss
das vorliegende Handbuch aufmerksam gelesen werden. Beachten Sie
die Passagen, welche mit den Symbolen
GEFÄHRLICHES
EREIGNIS oder VORSICHT gekennzeichnet sind.
WICHTIG: Dieses Handbuch gehört zum minicross/Minimotard und
muss auch beim Weiterverkauf beim Fahrzeug bleiben.
FÜR DEN NEUEN BESITZER. Sie haben sich für den Kauf eines
Minicross/Minimotards von Polini entschieden und gehören damit jetzt
auch zur Familie der Motorradfahrer und Motorradbesitzer.
VORSICHT! Das Minicross / Minimotard Polini ist ein
leistungsstarkes Motorrad für Wettrennen, bei dessen Konstruktion die
neueste Motocross-Technologie angewendet wurde. Dieses Minicross /
Minimotard darf deshalb bei Rennen nur von erfahrenen
Motorradfahrern gefahren werden!
Mit diesem neuen Modell wurde ein sehr leistungsstarkes Motorrad
entwickelt. Um gute Ergebnisse zu erzielen, muss sich der Fahrer in
ausgezeichneter körperlicher Form befinden und außerdem über
großes Geschick beim Fahren verfügen. Wer zu den Gewinnern zählen
will, der muss deshalb regelmäßig Fitnesstraining betreiben und mit
dem Motorrad trainieren. Wir möchten, dass Sie mit Ihrem Minicross /
Minimotard Polini so richtig zufrieden sind. Das Handbuch hilft Ihnen
dabei, die besten Leistungen mit dem Motorrad zu erzielen und so die
Voraussetzungen für die Erfolge bei Wettrennen zu schaffen.
PERSONEN- UND SACHTRANSPORTE SIND VERBOTEN.
NUR FÜR FAHRER OHNE BEIFAHRER. Dieses Minicross / Minimotard
wurde nur für einen Fahrer entworfen.
BITTE BEACHTEN
DIESES FAHRZEUG DARF NUR VON VOLLJÄHRIGEN ODER KINDERN
UNTER AUFSICHT EINES ERFAHRENEN ERWACHSENEN BENÜTZT WERDEN!
PERSÖNLICHE SCHUTZAUSRÜSTUNG UND SICHERHEITSVORSCHRIFTEN
1- Die meisten tödlichen Verletzungen bei Motorradunfällen sind
Kopfverletzungen. Deshalb beim Fahren IMMER einen
HOMOLOGIERTEN STURZHELM tragen! Beim Fahren sollten
möglichst auch Knie- und Ellbogenschoner (bescheinigt laut
Vorschrift EN 1621-1 / 1997) getragen werden. Tragen Sie
Motorradkleidung, geschlossene Schuhe mit abreibbeständiger Sohle.
2- Der Auspuff wird beim Fahren sehr heiß und bleibt auch nach
Abstellen vom Motorrad noch für eine gewisse Zeit heiß. Auf keinen
Fall die heißen Teile vom Auspuff berühren. Verbrennungsgefahr!
Motorradkleidung tragen, die die Beine vollständig bedecken!
3- Auf keinen Fall weite Kleidungsstücke tragen, die sich an den
Hebeln, den Fußrastern, der Antriebskette oder den Rädern
verfangen können!
4- Schützt eure Umwelt!
DAS VORLIEGENDE HANDBUCH MUSS AUFMERKSAM
DURCHGELESEN WERDEN!
Das Handbuch nennt besondere Situationen bezüglich Gefahren,
gefährlichen Ereignissen und Situationen, verursacht durch die
Bedienung und Wartung des Minicross/Minimotards: Laut Punkt 3,
VORSICHT! VERÄNDERUNGEN AM MINICROSS/MINIMOTARD
SOWIE DIE ENTFERNUNG VON ORIGINALTEILEN KÖNNEN DEN SICHEREN
GEBRAUCH DES FAHRZEUGES BEEINTRÄCHTIGEN UND ILLEGAL SEIN.
ALLE ÖRTLICHEN UND NATIONALEN VORSCHRIFTEN MÜSSEN BEACHTET
WERDEN!
DEUTSCH
53
DIESES MOTORRAD WURDE ENTWICKELT FÜR FAHRER MIT
GEWICHT UNTER:
- 100 Kg. FÜR MODELL MINICROSS
- 100 Kg. FÜR MODELL MINIMOTARD
Damit Ihre Sicherheit nicht beeinträchtigt wird, sollten Sie ausschließlich
Originalersatzteile von Polini Motori verwenden, die auch das Beste für
Ihr Motorrad sind. Zu Informationszwecken und um das Bestellen von
Ersatzteilen zu vereinfachen, tragen Sie bitte hier die Daten Ihres
Motorrads ein:
MODELL: ...........................................................................................
HUBRAUM: .......................................................................................
REIFEN: Vorne .................................... Hinten ...................................
FAHRGESTELLNUMMER: .....................................................................
CODE: ....................................... GEWICHT: .......................................
POSITION DER FAHRGESTELLNUMMER
Die Fahrgestellnummer Ihres Fahrzeugs ist vorne am Fahrgestell auf
der rechten Seite des Lenkerschafts eingeprägt.
1. MONTAGEANLEITUNG VOR DER BENUTZUNG
Das Motorrad wird für den Transport teilweise zerlegt und muss vor
Gebrauch erst wieder korrekt zusammen gebaut werden. Nach dem
Auspacken sind deshalb eine Reihe von Kontrollen und
Montagearbeiten erforderlich. Für eine korrekte Montage ist es
wichtig, dass Sie sich genau an unsere Montageanleitung halten.
Gehen Sie beim Zusammenbauen des Motorrads bitte wie folgt vor:
1- Das Motorrad auspacken (Bild 1).
01
FEDER FÜR FUSSRASTE
2 STK.
SCHRAUBE TCEI M8X20 (UNI 5931)
6 STK.
SCHRAUBE TCEI M8X40 (UNI 5931)
2 STK.
SCHRAUBE TB M6X16 (ISO 7380)
4 STK.
SCHRAUBE M8X18 (für Ständer) (ISO 7380)
1 STK.
RECHTE / LINKE FUSSRASTE
2 STK.
STECKACHSE VORDERRAD
1 STK.
SELBSTSICHERNDE MUTTER M8 (UNI 7473)
4 STK.
SCHRAUBE TCEI M8X30 (UNI 6593)
4 STK.
BÜGELSCHRAUBE LENKER
2 STK.
LENKER MIT HANDPROTEKTOREN
1 STK.
VORDERRAD MIT SCHEIBE
1 STK.
VORDERES SCHUTZBLECH
1 STK.
SCHALTHEBEL
1 STK.
FU_RASTERTRÄGER
1 STK.
NUMMERNTAFEL
1 STK.
MUTTER M5
2 STK.
SCHRAUBE M5X10
2 STK.
SCHRAUBE M5X30
1 STK.
BREMSEKABELFÜHRUNG
1 STK.
SEITENSTÄNDER
1 STK.
FEDER FÜR SEITENSTÄNDER
1 STK.
BEDIENUNGS- UND WARTUNGSHANDBUCH
1 STK.
CE ÜBEREINSTIMMUNGSZEUGNIS
1 STK.
-Für das Minimotard Modell, finden Sie diese anderen Ersatzteilen:
UNTERLAGSSCHEIBE 6x13x1,5
2 STK.
SCHRAUBE TCEI M6X20
2 STK.
SCHRAUBE TCEI M8X65
4 STK.
FUßRASTERSCHUTZ UNTEN RECHTS/LINKS
2 STK.
FUßRASTERSCHUTZ OBEN RECHTS/LINKS
2 STK.
SCHRAUBE TPSEI M5X20
2 STK.
SEITENKUGELGRIFF Ø 35
2 STK.
KUGELGRIFFBUCHSE Ø 35
2 STK.
LENKERDISTANZSTÜCK
2 STK.
3- Zuerst den hinteren Stossdämpfer montieren und dazu die
Sechskantschraube M 10x40 und die beiden Unterlegscheiben mit
der Mutter M10 verwenden. Dabei kommt eine Unterlegscheibe auf
die Seite der Mutter und eine auf die Seite der Schraube. Die Teile
befinden sich bereits vormontiert am Federbein (Bild 2) (siehe
Tabelle 9.1).
4- Die Bremsbeläge der vorderen Zange abrücken, mit der Hilfe eines
Zahnschlüssels.
02
2- Im Karton finden Sie alle für die Montage notwendigen Teile:
MINICROSS/MINIMOTARD POLINI
1 STK.
UNTERLEGSCHEIBE 6X18X1 (UNI 6593)
4 STK.
PLASTIKSCHELLE
1 STK.
GEFÄHRLICHES EREIGNIS. Nach der Montage der Bremssättel
unbedingt Bremshebel am Lenker wiederholt betätigen um die
DEUTSCH
54
Bremsbeläge in die richtige Position zu bringen. Bevor Sie das
Fahrzeug starten kontrollieren Sie die Funktion der Bremsen.
oberen Gabelbrücke befestigen (siehe Tabelle 9.1) (Bild 7).
06
5- Das Vorderrad montieren und dazu die entsprechende Steckachse
verwenden (Bild 3).
6- Die Steckachse einsetzen und mit einem Drehmomentesschlüssel
anziehen (siehe Tabelle 9.1) (Bild 4).
03
07
04
11- Den Gasdrehgriff abmontieren, den Gaszug wie auf Bild 8
anbringen und den Griff wieder verschließen (siehe Abb. 7.7).
12- Den Hebel der Vorderbremse anbringen und den Bügelbolzen mit
den dazugehörenden Schrauben befestigen (Bild 9) (siehe Abb.
7.9).
7- Die Klemmschraube der Steckachse mit einem
Drehmomentesschlüssel anziehen (siehe Tabelle 9.1) (Bild 5).
08
05
09
8- Den Vorderreifen und den Hinterreifen aufpumpen (siehe Kap. 7.10)
VORNE
HINTEN
Minicross 1,3 BAR - 18,9 PSI
1,3 BAR - 18,9 PSI
Minimotard 1,5 BAR - 21,8 PSI
1,8 BAR - 26,1 PSI
9- Das Schutzblech mit den 4 Schrauben und den dazugehörigen TB
M6X16 Unterlegscheiben montieren (Bild 6). Die Nummerntafel
montieren und die Bremsleitung in den dazugehörigen Sitz
einstecken.
10- Das Verpackungsband der Pumpe der Vorderbremse abschneiden.
Dann den Lenker montieren und ihn dazu mit den beiden
Bügelschrauben und den vier Inbusschrauben M8x30 an der
DEUTSCH
13- Den Killschalter montieren und mit der Schelle am Lenker
befestigen (Bild 10)
55
10
14- Den Hebel der Kupplung anbringen und mit der Einstellschraube
den Hub des Hebels einstellen (Bild 11) (siehe Abb. 7.8)
15- Den Fußrasterträger mit den 4 Schrauben M8X20 an den Motor
montieren. Danach den Träger mit 2 Schrauben M8X20 und 2
selbstsichernden Muttern am Rahmen befestigen (Bild 12).
14
GEFÄHRLICHES EREIGNIS! Es wird empfohlen den
Seitenständer während der Wettrennen zu entfernen, da dies sehr
gefährlich sein kann!
18- Den Schalthebel anbringen (Bild 15).
15
11
12
19- Das Motorrad tanken (siehe Abb. 7.14).
20- Prüfen Sie den Motorölstand (siehe Abb. 7.3).
21- Nur für Minimotard: die beiliegenden Fußrasteschutz, die
Handprotektoren des Lenkers und die Gabelprotektoren an die
hinten Radachse (Bild 16).
16
16- Die Fußraster wie auf Bild 13 mit Schrauben M8X40 und
selbstsichernden Muttern montieren.
13
17- Den Seitenständer mit der Schraube M8X18 und der mitgelieferten
Feder befestigen (Bild 14).
ALLGEMEINE INFORMATIONEN
Eine regelmäßige Wartung und eine Kontrolle vor Gebrauch des
Fahrzeuges sind von entscheidender Bedeutung. Wenn Wartungs- oder
Reparaturarbeiten anfallen, wenden Sie sich bitte an Ihren POLINI
MOTORI Vertragshändler. Diese Fahrzeuge werden ständig weiter
entwickelt und es können auch bei der Planung noch technische
Veränderungen durchgeführt werden. Deshalb kann es vorkommen,
dass das eigentliche Fahrzeug, die Illustrationen und der Text in diesem
Handbuch in einigen Fällen nicht ganz übereinstimmen.
Die von POLINI MOTORI gelieferten Originalersatzteile bestehen aus
dem gleichen Material und der gleichen Fertigung wie die Teile Ihres
Minicross. Dadurch wird eine längere Lebensdauer und ein optimales
Funktionieren Ihres Motorrades garantiert. Es wird empfohlen,
DEUTSCH
56
ausschließlich Originalersatzteile von POLINI MOTORI zu verwenden.
2. TRANSPORT DES MOTORRADS
Für einen sicheren und richtigen Transport des Motorrads zur Piste
bitte beachten:
- Prüfen, dass den Tank leer ist, um Flüssigkeitsverlust zu vermeiden;
- Den Ständer auf die Waagrechte des Transportsmittels stellen;
- Das Minicross / Minimotard auf den Ständer stellen und es durch
Gurten oder Seile fixieren. Beachten, dass das Minicross/
Minimotards während dem Transport immer steht.
versehentliche Berühren vom drehenden Rad kann zu schweren
Verletzungen führen!
19
Luft Starter
VORSICHT Nie das Motorrad mit vollem Kraftstoffbehälter oder
heißem Auspuff- und Motorenteilen transportieren.
3. HANDHABUNG VOR DER BENUTZUNG DES MINICROSS/
MINIMOTARDS
VORSICHT Die folgenden Phasen dieses Abschnitts dürfen nur
von Personen älter als 14 Jahren oder unter Aufsicht eines
Erwachsenen gemacht werden.
1- Den Benzinhahn unter dem Tank auf ON stellen (Bild 17).
2- Bevor der Benutzung, prüfen Sie, dass der Motor im Position “
neutral” ist (Bild 18, Gang “N”)
17
5- Den Gasdrehgriff auf ein Minimum stellen, den Kickstarter nach
außen klappen und das Motorrad durch energisches herab Treten
des Kickstarts starten.
6- Der Kickstarter wieder zum Motorgehäuse einklappen
(Fahrstellung). Den Motor auf optimale Betriebstemperatur im
Standgas erwärmen.
VORSICHT. Den Gasdrehgriff nicht heftig auf- oder zudrehen, da
das Motorrad sonst nach vorne schnellen kann und die Gefahr besteht,
dass der Fahrer die Kontrolle über das Fahrzeug verliert.
VORSICHT. Vor dem Losfahren muss kontrolliert werden, ob sich der
Motor durch betätigen des Killschalter abschalten lässt.
4. EINFAHREN VOM FAHRZEUG
OFF
VORSICHT. Die folgenden Einfahrensphasen dieses Abschnitts
dürfen nur von Personen älter als 14 Jahren oder unter Aufsicht eines
Erwachsenen durchgeführt werden.
ON
3°
4°
18
2°
N
1°
2- Wenn der Motor kalt ist, Choque anheben (Bild 19).
VORSICHT. Wenn der Motor warm ist, den wieder Choque
absenken. Den Motor nicht anfassen.
4- Das Hinterrad durch das betätigen der Hinterradbremse blockieren.
GEFÄHRLICHES EREIGNIS. Das Hinterrad dreht sich, wenn es
nicht auf dem Boden steht oder mit der Bremse blockiert wird. Das
DEUTSCH
1- Um das Einlaufen des Motors und vom Antrieb bei Inbetriebnahme
des Motorrades zu optimieren und einen zuverlässigen
Fahrzeugbetrieb zu garantieren, ist ein kurzes Einfahren von
entscheidender Bedeutung.
VORSICHT. Bei der ersten Fahrt mit Ihrem Motorrad und für ein
komplettes Einfahren ist eine zweistündige Fahrt mit niedriger
Drehzahl nötig. Die unten aufgeführten Sicherheitsvorschriften müssen
eingehalten werden.
2- Sobald der Motor gestartet wurde, den Motor mit der kleinster
Drehzahl laufen lassen, bis er die optimale Betriebstemperatur
erreicht hat.
3- Beim Einfahren mit gleichmäßiger Geschwindigkeit fahren.
AUF KEINEN FALL SCHNELL BESCHLEUNIGEN.
4- Auch beim Fahren mit niedriger Drehzahl sollten lange und zu
schwierige Strecken vermieden werden, die zu einer übermäßig
starken Erhitzung vom Motor führen könnte.
5- Nach dem Einfahren und dem beachten der oben genannten Hinweise,
wenden Sie sich am besten an Ihren Polini Motori Händler zur
Durchführung einer Inspektion, bei der die Antriebe ausgebaut
werden und der Zustand von Zündkerze, Zylinderkopf, Kolben und
Zylinder kontrolliert und eventuell Zündkerze und Getriebeöl
57
ausgewechselt wird.
GEFÄHRLICHES EREIGNIS. Nach dem Einfahren ist es wichtig
die Muttern des Zylinderkopfes zu kontrollieren. Sie können sich
lockern. (siehe Tabelle 9.1).
5. MOTORENAUSSETZER
Um den Motor auszuschalten drücken Sie auf den roten Killschalter
(Bild 10)
6. SICHERES FAHREN: HINWEISE FÜR DEN GEBRAUCH VOM
MINICROSS/MINIMOTARD
VORSICHT: MINDERJÄHRIGE UNTER 18 JAHREN DÜRFEN NUR
UNTER DER AUFSICHT EINES ERWACHSENEN MIT DEM MINICROSS /
MINIMOTARD FAHREN.
VORSICHT: MINDERJÄHRIGE UNTER 14 JAHREN DUERFEN NUR NACH
EINER GRÜNDLICHEN EINFÜHRUNG UND MIT VORGESCHRIEBENER
SCHUTZAUSRÜSTUNG NACH VORGABE DER VORLIEGENDER ANLEITUNG
MIT DEM MINICROSS/MINIMOTARD FAHREN.
Das Fahren mit dem Minicross/Minimotard von POLINI macht
besondere Vorsichtsmaßnahmen zum Schutz des Fahrers erforderlich.
Folgende Hinweise müssen vor dem Gebrauch des Minicross/
Minimotard unbedingt beachtet werden:
1- Viele Unfälle sind auf die Unerfahrenheit des Fahrers
zurückzuführen.
2- Beim Fahren der Lenker immer mit beiden Händen festhalten.
3- Beim Fahren die geeignete persönliche Schutzausrüstung tragen:
- Immer einen STRUZHELM tragen!
- Immer Handschuhe, Knieschützer und Ellenbogenschützer tragen,
die der Norm EN 1621-1/1997 entsprechen.
- Einen Motorradanzug oder geeignete Schutzkleidung tragen.
- Geschlossene Schuhe tragen, die für die Witterungsbedingungen
geeignet sind.
4- Mit dem Minicross/Minimotard darf nur auf Privatgelände und
Rennstrecken gefahren werden. Das Fahren auf öffentlichen
Straßen ist verboten!
5- Das Minicross/Minimotard verfügt nicht über eine eigene
Beleuchtung. Das Fahren mit dem Minimotorrad ist deshalb nur bei
guter Sicht und auf Privatgelände mit ausreichender Beleuchtung
(auch künstlicher Beleuchtung) erlaubt.
6- Das Minicross/Minimotard eignet sich nicht zum Fahren bei
schlechten Wetterbedingungen wie Regen, Hagel, starkem Wind,
Schnee und glattem Untergrund.
7- Das Fahren mit dem Minicross/Minimotard nach Alkohol- und
Drogenkonsum oder bei eingeschränkter Zurechnungsfähigkeit ist
verboten!
8- Für Personen mit einem Gewicht von mehr als 100 Kg. Für Modell
Minicross und 100 Kg. für Modell Minimotard ist das Fahren mit
dem Minimotorrad verboten.
9- Das Minicross/Minimotard darf ausschließlich von einer Person
gefahren werden.
DAS FAHREN MIT DEM MINICROSS/MINIMOTARD OHNE GRÜNDLICHES
LESEN VOM BEDIENUNGS- UND WARTUNGSHANDBUCH IST VERBOTEN!
7. WARTUNG UND EINSTELLUNG
ACHTUNG. DIE WARTUNGSHANDLUNGEN DÜRFEN NUR VOM ERFAHRENEN ERWACHSENEN GEMACHT WERDEN. WENN DIE FOLGENDEN
BESCHRIEBENEN ABSCHNITTEN NICHT VERSTÄNDLICH SIND, ODER
WENN DAS MOTORRAD AUßERORDENTLICHE WARTUNG ERFORDERT,
WENDEN SIE AN DIE FACHKRÄFTE BEI DER POLINI MOTORI VERKÄUFER
ODER HÄNDLERN, DIE NUR ORIGINALE ERSATZTTEILEN VERWENDEN.
DIE FOLGENDEN PUNKTEN DES HANDBUCH SORGFÄLTIG DURCHLESEN
UND BEFOLGEN.
Unter der Wartung und den für eine optimale Einstellung des Fahrzeugs
notwendigen Arbeiten werden die täglichen Kontrollen vor dem Starten
des Motorrads empfohlen. Die Wartungsabstände und die Art der
Wartungsarbeiten können den entsprechenden Tabellen 8.1 und 8.2
entnommen werden.
7.1 ABMONTIEREN DER SITZBANK
Die Schraube abschrauben. Die Sitzbank leicht anheben und in
Richtung vom hinteren Schutzblech abziehen (Bild 20). Um die
Sitzbank wieder anzubringen, muss der vordere Haken der Sitzbank in
die Schraube auf dem Tank gesteckt werden. Dann die Sitzbank in den
Rahmen einsetzen. Sobald die Sitzbank richtig positioniert ist, muss die
Sitzbank durch di Schraube festgehalten werden.
20
7.2 AUSBAUEN UND REINIGEN VOM LUFTFILTER
Eine der Ursachen für eine schlechte Motorleistung ist ein verstopfter
Luftfilter. Den Luftfilter wie folgt reinigen:
- Die Sitzbank lösen (siehe Abschnitt 7.1).
- Den Deckel vom Filterfach entfernen (Bild 21).
21
- Den Luftfilter herausnehmen und mit warmem Wasser und
Neutralseife auswaschen (Bild 22)
- Den Luftfilter mit Wasser ausspülen, abtrocknen und dann mit Filteröl
befeuchten.
DEUTSCH
58
22
24
Öldeckel
VORSICHT. Sollte der Filter eine große Menge Staub und andere
Verunreinigungen enthalten, muss er durch einen neuen ersetzt werden.
VORSICHT. Ein verschmutzter Luftfilter beeinträchtigt die
Luftversorgung des Motors und dadurch auch die Motorleistung. Wenn
ein abgenutzter Luftfilter nicht ausgewechselt wird, können
Staubpartikel in den Motor gelangen und den normalen Verschleiß von
Kolbenring und Zylinder beschleunigen.
7.5 EINSTELLEN VOM LEERLAUF
Der Leerlauf wird bei warmem Motor eingestellt. Den Motor bei
geschlossenem Gasdrehgriff laufen lassen und die Reglerschraube
rechts am Vergaser auf- bzw. zudrehen, bis die Drehzahl vom Motor so
niedrig wie möglich und gleichzeitig regelmäßig ist (Bild 25).
25
7.3 KONTROLLE DES ÖLSTANDES AM MOTOR
Das Motorrad in Fahrtstellung bringen.
- Den Deckel der Ölstandsanzeige an der seitlichen Verkleidung lösen
(Bild 23).
- Kontrollieren, ob das Öl zwischen Höchstölstand (MAX) und
Tiefstölstand (MIN) steht. Auf keinen Fall unten Tiefstölstand gehen.
Die Einfüllung vom Tiefstölstand zur Tiefstölstand ist von 50 gr.
23
Hochstand
Tiefststand
7.4 ÖLWECHSEL AM MOTOR
GEFÄHRLICHES EREIGNIS. Den Öldeckel auf keinen Fall
aufdrehen, solange der Motor noch warm ist. Verbrennungsgefahr!
Das Motorrad in Fahrtstellung bringen.
- Den Ölablassdeckel unten an der Verkleidung abschrauben (Bild 24)
und das Öl ablassen.
- Das Altöl nicht wegschütten! Altöl muss umweltgerecht bei einer
Sammelstelle für Sondermüll entsorgt werden.
- Den Ablassdeckel wieder aufschrauben. 600 g Motoröl für
automatische Übertragungen “Typ SAE 20W50” einfüllen.
Ausschließlich Öl der Güteklasse API SF oder SG benutzen
GEFÄHRLICHES EREIGNIS. Das Hinterrad dreht sich, wenn es
nicht auf dem Boden steht oder mit der Bremse blockiert wird.
Das versehentliche Berühren vom drehenden Rad kann zu schweren
Verletzungen führen.
7.6 EINSTELLEN DER LUFTSCHRAUBE
Die Luftschraube muss eingestellt werden um bessere Leistung aus
dem Leerlauf heraus zu erreichen.
- Bei schlechter Gasannahme (zu fettes Gemisch) die Luftschraube
weiter herausdrehen.
- Die Luftschraube hineindrehen wenn der Motor nur sehr langsam
wieder in die Leerlaufdrehzahl zurück geht (zu mageres Gemisch)
(Bild 26).
26
Luftschraube
VORSICHT. Die Regelschraube ist neben der Antriebeinheit.
Verbrennungsgefahr!
DEUTSCH
59
7.7 GASDREHGRIFF
Sicherstellen, dass der Gasdrehgriff immer gut funktioniert und dass
der Gaszug ein Spiel von 3-5 mm hat. Wenn das Spiel größer ist, muss
es an der Reglerschraube eingestellt werden, die sich am Vergaser
oder am Gasdrehgriff befindet (Bild 27).
27
3/5 mm.
stark beeinträchtigt werden, was zu schweren Unfällen führen kann!
Um den optimalen Wirkungsgrad zu erreichen, benötigt die
Bremsenanlage eine gewisse Einfahrzeit, in der die Bremsen mit
Umsicht mindestens hundert Mal betätigt werden sollten. Anschließend
ist eine weitere Feineinstellung der Bremsen und eine Kontrolle vom
Anzug der Schrauben notwendig.
Zum Einstellen vom Lauf des hinteren Bremspedals muss an der
Schraube gedreht werden, die sich am Stift vom Pumpenelement der
Bremsenpumpe befindet. Sobald die Bremse für den Fahrer optimal
eingestellt ist, die Gegenmutter auf dem Gewindestift anziehen (Bild
29).Prüfen Sie visuell die Abnutzung Ihrer Bremsbeläge durch das
Rad. Sind die Bremsbeläge auch nur an einem Punkt auf weniger als
1mm abgenutzt, sollten Sie beide Beläge ersetzen. Sicherstellen, dass
keine Bremsflüssigkeit aus undichten Stellen austritt. Kontrollieren, Sie
die Bremsschläuche und die Fuge auf Risse oder angegriffene Stellen.
29
VORSICHT. Wenn die hier beschriebenen täglichen Kontrollen
und die außerordentlichen Wartungen nicht korrekt durchgeführt
werden, kann es zu schweren Schäden am Fahrzeug und zu schweren
Unfällen kommen.
7.8 EINSTELLUNG DER KUPPLUNG
Wenn die Kupplungseinstellung (Bild 11) nicht befriedigend ist, können
Sie diese durch die Einstellschraube (1) unter dem
Kupplungsverkleidungsdeckel (Bild 28) weiter einstellen.
3
5/10 mm.
Regulierungsschraube
28
GEFÄHRLICHES EREIGNIS! Er dürfen ausschließlich Öl für
hydraulische Bremsenanlagen DOT 4 verwendet werden. Es darf nur Öl
aus ungeöffneten Packungen verwendet werden!
2
1
VORSICHT. Die Kupplungswelle (2) regelmäßig mit Fett schmieren, damit sie nicht fest frisst. Dazu den Kupplungsverkleidungsdeckel
samt Dichtung, die Welle und den Stift (3) abmontieren und alles
schmieren.
7.9. EINSTELLUNG DER HYDRAULISCHEN BREMSENANLAGE
UND DER BREMSBELÄGEN
Dieses Modell ist mit einer hydraulischen Vorder- und Hinterbremse
ausgestattet. Sind die Bremsbeläge abgenutzten, senkt den Stand der
Bremsflüssigkeit. Aus diesem Grund muss auch die Abnutzung der
Bremsbeläge periodisch kontrolliert werden.
VORSICHT. Überprüfen Sie bei der Zugabe der Bremsflüssigkeit
zuerst, dass der Tank waagerecht zum Boden ist um ein Vergießen der
Flüssigkeit zu vermeiden
VORSICHT. Wenn der Bremsschlauch schlecht platziert ist oder
mit drehenden Teilen in Berührung kommt, kann die Bremswirkung
VORSICHT. Die in der Bremsenanlage enthaltene Bremsflüssigkeit
beschädigt nicht nur die lackierten Teile, sondern ist auch
gesundheitsschädlich und darf nicht mit Augen oder Haut in Berührung
gebracht werden. Bei Unfällen bitte umgehend einen Arzt aufsuchen.
Die Bremsflüssigkeit sollte alle zwei Jahre ausgewechselt werden.
ALTÖL NICHT WEGSCHÜTTEN, SONDERN UMWELTGERECHT ENTSORGEN!
VORSICHT. Die Bremszange regelmäßig mit Druckluft sauber
machen. Wie oft die Bremszange sauber gemacht werden muss, hängt
von den Witterungsbedingungen und dem Gebrauch ab, der vom
Motorrad gemacht wird. Den Verschleiß des Reibungsmateriales von
der Bremsbelägen prüfen. Wann die Dicke des Reibungsmateriales
unter 1mm ist, wechseln Sie die Bremsbelägen aus.
VORSICHT. Die Einstellung der Bremsenanlage mit heißen
Bremsscheiben nicht machen
GEFÄHRLICHES EREIGNIS. Nach der Montage der Bremssättel
unbedingt Bremshebel am Lenker wiederholt betätigen um die
Bremsbeläge in die richtige Position zu bringen. Bevor Sie das
Fahrzeug starten kontrollieren Sie die Funktion der Bremsen.
7.10 REIFENDRUCK
Den Reifendruck häufig kontrollieren und gegebenenfalls regulieren.
Der Reifendruck muss bei kalten Reifen gemessen werden. Der
Reifendruck variiert je nach Gewicht vom Fahrer und Rennstrecke.
DEUTSCH
60
VORNE
Minicross 1,3 BAR - 18,9 PSI
Minimotard 1,5 BAR - 21,8 PSI
HINTEN
1,3 BAR - 18,9 PSI
1,8 BAR - 26,1 PSI
32
VORSICHT. Der Reifendruck variiert je nach Gewicht vom Fahrer,
Rennstrecke, Luft- und Asphalttemperatur.
7.11 ANTRIEBSKETTE
Die Antriebskette vom Motor ist sehr wichtig und macht deshalb eine
besondere Pflege und Wartung erforderlich.
GEFÄHRLICHES EREIGNIS. Nicht mit den Fingern zwischen
Kette und Zahnkranz fassen!
1- Die Kettenspannung kontrollieren. Das Motorrad muss senkrecht
stehen und es darf kein Druck auf das Motorrad ausgeübt werden.
Die Kettenspannung an der auf Bild 30 angegebenen Stelle
kontrollieren. Kontrollieren, ob der auf dem Bild angegebene
Abstand von 35/39 mm eingehalten wird. Anderenfalls die Kette
einstellen (Bild 31).
30
2- Beim Kettenspannen immer den Abnutzungsgrad von Zahnkranz
und Ritzel kontrollieren.
3- Die Kette muss immer geschmiert werden, auch nach dem Waschen
des Motorrads. Verschmutzungen müssen mit Diesel entfernt
werden. Zum pflegen der Kette sollte Schmierspray verwendet
werden, das den Verschleiß deutlich reduziert und den
Wirkungsgrad vom Antrieb erhöht.
4- Sollte die Kette ersetz werden, bitte beachten, dass der Klipp vom
Kettenschloss so eingesetzt werden muss, dass die geschlossene
Seite vom “U” in Laufrichtung der Kette zeigt (Bild 33).
33
31
A
1
3
2
- Die Mutter der Hinterachse “3” lösen.
- Die Gegenmuttern “1” lösen und den Kettenspanner “2” gegen den
Uhrzeigersinn drehen, um den Durchhang zu verkleinern, bzw. im
Uhrzeigersinn, um den Durchhang zu vergrößern. Die Hinterränder
der Achsenplatten ausrichten und auf beiden Seiten der Radgabel den
Abstand “A” zwischen Radgabel und Platte kontrollieren.
- Die Mutter der Hinterachse “3” anziehen (Siehe Tabelle 9.1) (Bild 32)
- Die Spannung der Kette erneut kontrollieren und die Kette
gegebenenfalls nochmals nachspannen.
- Den Kettenspanner “2” langsam gegen den Uhrzeigersinn
aufdrehen, bis er die Achsenplatte berührt. Dann den Kettenspanner
mit einem Schraubenschlüssel festhalten und gleichzeitig die
Gegenmutter “1” anziehen.
DEUTSCH
GEFÄHRLICHES EREIGNIS. Auf keinen Fall eine neue Kette auf
deutlich abgenutztem Ritzel und Zahnkranz montieren und umgekehrt.
Wenn das Rad nicht korrekt ausgerichtet ist, kommt es zu übermäßigem Verschleiß und die Stabilität vom Fahrzeug wird beeinträchtigt.
GEFÄHRLICHES EREIGNIS. Wenn die Kette reißt oder von den
Zahnrädern springt, kann sie sich um das Ritzel wickeln und das
Hinterrad blockieren. Dadurch kann es zu schweren Unfällen und
Verletzungen kommen!
7.12 EINSTELLUNG HINTERES STOSSDÄMPFERS
Der am neuen Fahrzeug montierte Stossdämpfer wurde bereits mit
den Standardwerten eingestellt.
WARTUNG:
1- Kontrollieren, ob die Feder defekt oder ausgeleiert ist.
2- Kontrollieren, ob die Aufhängung problemlos funktioniert und dazu
das Fahrzeug hinten hochfedernd lassen.
3- Kontrollieren, ob die Stossdämpferwelle verbogen ist und ob Öl aus
undichten Stellen austritt.
4- Seitlich gegen das Hinterrad drücken um zu kontrollieren, ob die
Lager der Gabel abgenutzt sind. Wenn sich eine seitliche Bewegung
feststellen lässt, müssen die Lager ausgewechselt werden.
61
7.13 EINSTELLUNG VORDERE RADGABEL
Die am neuen Fahrzeug montierte Radgabel wurde bereits mit den
Standardwerten eingestellt.
WARTUNG:
1- Sicherstellen, dass die Staubdeckel sauber und nicht mit Schlamm
oder Staub verschmutzt sind.
2- Kontrollieren, ob Öl aus undichten Stellen austritt. Beschädigte
Staubdeckel müssen vor Gebrauch des Fahrzeugs ausgewechselt
werden.
3- Vor dem Losfahren sollte die vordere Radgabel immer kurz
kontrolliert werden. Die Radgabel dazu bei angezogener
Handbremse hochfedernd lassen.
7.14 KRAFTSTOFF
Benzin für Autos mit einer Oktanzahl an der Pumpe von 96-100 oder
mehr verwenden. Wenn der Motor klopft, eine andere Benzinmarke
oder eine andere Oktanzahl verwenden. Fassungsvermögen vom Tank:
3 Liter.
7.15 KRAFTSTOFFFILTER
Der Kraftstofffilter befindet sich im Benzinhahn unten am Tank. Wenn
der Filter verschmutzt ist, wird dadurch der Benzinfluss behindert. Der
Filter muss deshalb häufig kontrolliert werden!
WARTUNG:
1- Den Kraftstoff aus dem Tank in einen Benzinkanister ablassen.
2- Den Benzinhahn vom Tank abmachen und dazu die beiden
Schrauben aufdrehen.
3- Den Filter mit Wasser und Neutralseife waschen. Am Besten an der
Sonne trocknen lassen.
4- Den Benzinhahn wieder am Tank anbringen und dabei darauf
achten, dass die Dichtung richtig sitzt.
VORSICHT. Diese Handlungen nur mit kaltem Motor durchführen.
VORSICHT. Das Plastikstücke auf keinen Fall mit Lösungsmitteln
oder Alkohol sauber machen. Ausschließlich Wasser, Seife oder
Autoshampoos verwenden.
VORSICHT. Vor dem Losfahren die Bremsen auf ihre
Funktionstüchtigkeit hin überprüfen!
8. INSPEKTION, FEINEINSTELLUNG UND VORBEREITUNG
FÜR WETTRENNEN
VORSICHT. DIE HANDLUNGEN WIE IN DER PUNKTEN 8.1 UND
8.2 DÜRFEN NUR VOM ERFAHRENEN ERWACHSENEN DURCHEFÜHRT
WERDEN.
8.1 TÄGLICHE KONTROLLEN: MÜSSEN IMMER VOR DEM
LOSFAHREN DURCHGEFÜHRT WERDEN
- Motoröl: keine undichten Stellen, Ölstand kontrollieren ;
- Vergaser: flexibler Gasdrehgriff, der sich frei drehen lässt;
- Tankdeckel: fest zugedreht;
- Luftfilter und Filtergehäuse: Filter sauber und Gehäuse staubfrei;
- Bremsen: Bremsbacken lassen sich frei bewegen, Zangen frei von
Schmutz;
- Sitzbank: eingehakt, sitzt richtig in der Position, ist mit der Schraube
blockiert;
- Kette: frei von Schmutz, abgeschmiert, Kettenspannung kontrolliert;
- Ritzel: dreht sich frei, nicht mit Steinen oder Staub verschmutzt;
- Lenker: Blockierschäfte gut angezogen;
- Reifen: Reifendruck kontrollieren;
- Vordere Radgabel: kontrollieren und reinigen;
- Lenkung: Spiel vom Schaft kontrollieren.
GEFÄHRLICHES EREIGNIS. Benzin ist hochgradig entflammbar
und explosiv! Den Kraftstofffilter deshalb nur an einem gut belüfteten
Standort und bei abgeschaltetem Motor ausbauen! In den Bereichen, in
denen Benzin umgefüllt oder Fahrzeuge getankt werden, sind
Rauchen, offenes Feuer und Funken streng verboten!
7.16 REINIGEN DES FAHRZEUGS
Vor dem reinigen des Motorrads müssen folgende Teile vor Wasser
geschützt werden:
- Gasdrehgriff
- Bremshebel
- Luftansaugöffnung und Luftfilter
- Stutzen vom Auspufftopf
Den Wasserstrahl nicht auf folgende Teile richten:
- Radnaben
- Radgabelbolzen
- Lenkerschaft
- Bremszangen
- Zündkerzenstecker
Nach dem Waschen müssen alle oben genannten Stellen geschmiert
werden. Danach den Motor starten und einige Minuten lang laufen
lassen.
DEUTSCH
62
INSPKTION - REINIGUNG - REGELUNG
ERSATZ.
8.2 REGELM. KONTROLLEN: VOR
NACH 1
NACH 3
NACH 9 HÄUFIGKEIT
JEDEM WETTRENNEN UND NACH
LÄNGERER AUSSERBETRIEBNAHME WETTR. 1 H WETTR. 3 H WETTR. 9 H
6 stunden
ANTRIEBSKETTE
9 stunden
RITZEL UND ZAHNKRANZ
KETTENROLLE
KETTENSCHUTZ-KETTENSCHLITTEN
BREMSEN EINSTELLEN
BREMSZANGE
6 stunden
BREMSBELÄGE
GASDREHGRIFF
18 stunden
GASZUG
F
6 stunden
LUFTFILTER
REIFENDRUCK
18 stunden
LAGER RADNABEN
SPEICHENSPANNUNG RÄDER
3 stunden
MOTORÖL
SPIEL LENKERSCHAFT
LAGER LENKUNG
VORDERE RADGABEL
HINTERE RADGABEL
18 stunden
KRAFTSTOFFSCHLAUCH
KRAFTSTOFFFILTER
VENTILSPIEL
VERGASER
6 stunden
ZÜNDKERZE
18 stunden
ZÜNDKERZENSTECKER
ELEKTRISCHE ANLAGE
36 stunden
AUSPUFF
18 stunden
AUSPUFFTOPF
36 stunden
ZYLINDER
18 stunden
KOLBEN
18 stunden
KOLBENRING
MOTORGEHÄUSE
36 stunden
ANTRIEBSWELLE
18 stunden
HAUPTLAGER
18 stunden
LAGERSERIE MOTOR
9 stunden
KUPPLUNG
MUTTERN-SCHRAUBENBOLZEN-BEFESTIGUNGSELEMENTE
KAPITEL
7.11
7.11
7.9
7.9
7.9
7.7
7.7
7.2
7.10
VORSICHT GEFÄHRLICHES
EREIGNIS
GE (punkt 7.11)
GE(punkt 7.11)+M
V (punkt 7.9)
V (punkt 7.9)
V (punkt 7.9)
V (punkt 7.7)
V(punkt 7.7)+M
V (punkt 7.2)
V (punkt 7.10)
M
7.3
M
M
M
7.13
7.15
GE (punkt 7.15)
: KONTROLLIEREN ODER EINSTELLEN
GE: GEFÄHRLICHES EREIGNIS WIE IM HANDBUCH
: REINIGEN
V: VORSICHT WIE IM HANDBUCH
: ABSCHMIERUNG
G: GEFAHR: DIE REPARATUREN DÜRFEN NUR VON
F: DEN LUFTFILTER NACH JEDEM RENNEN AUF STAUBIGER
VERTRAGSHÄNDLERN DURCHGEFÜHRT WERDEN
PISTE SAUBER MACHEN.
STANDARD ZÜNDKERZE
Champion Z9Y - NGK C7HSA - LG A7TC
DEUTSCH
ABLASS- UND EINLASSVENTILSPIEL
0,15 MM. / 0,006 in
G
G
G
G
G
G
G
G
G
G
63
9. TECHNISCHE DATEN
Motor
Kühlung
Bohrung und lauf
Hubraum
Verdichtungsverhältnis
Vergaser
Zündung
Kraftstoff
Zündkerze
Zündung
Kupplung
Rahmen
Vordere bremse
Hintere bremse
Vorderreifen
Hinterreifen
Antrieb
Vordere aufhängung
Hintere aufhängung
Fassungsvermögen tank
Leergewicht
Höhe sitzbank
Achsabstand
XP 4T CROSS
2,50x12“
2,75x10“
XP 4T Racing
XP 4T Racing
CROSS
14”/12” Wheels CROSS
Einzylinder 4T
Luft
52,4x49,5
107
9,6:1
Mikuni 22
Elektronisch
Bleifreies Benzin
Champion Z9Y - NGK C7HSA - LG A7TC
Kick Starter
Mechanisch betätigte Mehrscheiben Ölbadkupplung
aus Stahl
Hydraulisch Ø 200
Hydraulisch Ø150 mm
2,50x12“
60/100-14“
2,75x10“
80/100-12“
4 Speed
hydraulische Radgabel Ø 33 mm
einstellbarer hydraulische Stossdämpfer
3 Liter
60 Kg.
62,7 Kg.
725 mm.
775 mm.
1061 mm.
1113 mm.
XP 4T MOTARD
90/90-10“
90/90-10“
60 Kg.
725 mm.
1061 mm.
9.1 TABELLE ANZUGSDREHMOMENT KLEINTEILE RAHMEN UND RÄDER
N.m
M
50
Vorderer radbolzen
M12
20
Befestigungsschraube vorderer bolzen
M8
20
Befestigungsschrauben lenker
M8
60
Hinterer radbolzen
50
Bolzen motor-radgabel
M14
25
Vorderer motor bolzen
M12
20
Schrauben obere / untere gabel platte
M8
10
Schrauben bremsscheibe
M6
80
Mutter lenkerschaft
M20
6
Stellmutter lenkerschaft
Kgf.m
5
2
2
6
5
2,5
2
1
8
0,6
Lbf.t
37
14,8
14,8
44,40
37
18,5
14,8
7,4
59,2
4,44
gewinde-verschluss
TABELLE ANZUGSDREHMOMENT KLEINTEILE MOTOR N.m / Lbf . ft
M
N.m
Muttern zylinderkopf
M6
10
Mutter antriebswelle seite kupplung
M12
60
Mutter antriebswelle seite zündung
M8
27
Mutter angetriebenes rad
18
Zündkerze
10
Kgf.m
1
6
2,7
1,8
1
Lbf.t
7,40
44,4
19,98
13,32
7,40
gewinde-verschluss
In den Tabellen oben sind die
Anzugsdrehmomente der wichtigsten Teile
aufgeführt. Bei Teilen, deren
Anzugsdrehmomente nicht aufgerührt sind,
halten Sie sich bitte an folgende Standards:
LOCTITE 242
LOCTITE 270
LOCTITE 242
STANDARD-ANZUGSDREHMOMENTE
Schraubenbolzen und muttern mit 5 mm
Schraubenbolzen und muttern mit 6 mm
Schraubenbolzen und muttern mit 8 mm
Schraubenbolzen und muttern mit 10 mm
Schraubenbolzen und muttern mit 12 mm
N.m
6
10
25
45
55
Kgf.m
0,6
1
2,5
4,5
5,5
Lbf.t
4,44
7,40
18,50
33,30
40,70
DEUTSCH
64
10. ERSATZTEILE
Es dürfen nur Originalersatzteile von POLINI Motori verwendet werden.
GEFÄHRLICHES EREIGNIS. Durch die Verwendung von nicht
originalen Ersatzteilen können die Funktionsweise vom Minicross /
Minimotard und die Sicherheit vom Fahrer beeinträchtigt werden!
11. AUSSERBETRIEBNAHME
Wenn das Minimotorrad für längere Zeit außer Betrieb genommen
wird, wie folgt vorgehen:
- Um den Benzintank zu leeren, vorübergehend der Benzinschlauch
des Kraftstoffs in Richtung des Hahns abtrennen. Den Kraftstoff aus
dem Tank in einen Benzinkanister ablassen.
VORSICHT Während des leeren des Tankes genügend abstand
von Feuer und das Rauchen unterlassen.
12. EINWEISUNG UND INFORMATION
Für einen korrekten Gebrauch vom Minicross / Minimotard müssen
das Handbuch aufmerksam gelesen und die darin enthaltenen
Anweisungen strikt beachtet werden. Besonders aufmerksam müssen
die Punkte im vorliegenden Handbuch gelesen werden, die mit den
Symbolen GEFÄHRLICHES EREIGNIS und VORSICHT
gekennzeichnet sind Wenn das Minimotorrad von Minderjährigen unter
14 Jahren gefahren wird, muss der jungendliche Fahrer über die
Gefahren informiert werden, die bei einem unsachgemäßen Gebrauch
vom Minimotorrad entstehen, sowie über die persönliche
Schutzausrüstung, die immer getragen werden muss, wie der
Motorradhelm und die Schutzkleidung. Nähere Informationen hierzu
können Kapitel 6 SICHERES FAHREN: HINWEISE FÜR DEN GEBRAUCH
VOM MINICROSS/ MINIMOTARD entnommen werden. Minderjährige,
die nicht Fahrrad fahren können, dürfen nicht mit dem Minimotorrad
fahren. Jugendliche Fahrer sollten in jedem Fall von einer
kompetenten Person in die Grundregeln für ein sicheres Fahren
eingewiesen werden. Minderjährige unter 14 Jahren müssen auf die
Gefahren durch drehende oder heiße Teile vom Minimotorrad
hingewiesen werden. Die in Kapitel 7 angegebenen Wartungsarbeiten
dürfen nicht von Minderjährigen unter 14 Jahren durchgeführt
werden.
- Caratteristiche tecniche ed estetiche possono essere soggette a modifiche
senza preavviso.
- Specifications and esthetic characteristics are subject to be changed
without notice.
- Caracteristiques techniques et esthetiques peuvent être modifiées sans
préavis.
- Las caracteristicas tecnicas y esteticas están sujetas a modificaciones sin
previo aviso.
- Technische und ästhetische Merkmale können ohne vorherige
Benachrichtung geändert werden.
DEUTSCH
PI 304
TRASMISSIONE PRIMARIA XP 4T 110 c.c.
Per il montaggio del kit trasmissione primaria, è necessario smontare completamente il motore per sostituire l'albero primario del cambio con il nuovo albero, avente l'estremità adatta al calettamento del nuovo gruppo frizione. Durante lo smontaggio, porre la massima attenzione al posizionamento dei vari rasamenti interposti tra gli ingranaggi. Rimontare i vari ingranaggi seguendo la
sequenza inversa a quella seguita allo smontaggio; rimontare i segeer tra gli ingranaggi, facendo attenzione a non allargarli eccessivamente durante il calettamento e verificando poi che siano
correttamente montati nelle loro sedi. Lubrificare abbondantemente l'accoppiamento albero/ingranaggi per evitare grippaggi degli stessi al primo riavvio del motore. Assemblati i carter centrali,
iniziare con il montaggio del pignone primario (28) sull'albero motore, utilizzando il distanziale standard (STD), (disegno A). Utilizzare l'apposita rondella di sicurezza dentellata (29), facendo
attenzione che le tre alette entrino nelle scanalature dell'ingranaggio (28); chiudere lo speciale dado in dotazione (30) alla coppia di 150 Nm (15 kg m), piegare le alette della rondella di sicurezza (29) in corrispondenza degli intagli sul dado (30). Montare il distanziale sagomato (34), sull'albero primario (33) facendo attenzione che copi correttamente gli spazi presenti sul carter
motore; procedere poi con il cuscinetto reggispinta (35) ed i distanziali (36-37) seguendo lo schema indicato sul disegno. Completare con la campana frizione (4) ed il distanziale (38). Oliare leggermente i dischi della frizione prima del montaggio. Posizionare le quattro molle frizione (8) nel loro alloggiamento, appoggiare lo spingidisco (7) e chiudere progressivamente in modo uniforme
le quattro viti (9) M6 alla coppia di 10 Nm (1 kg m). Inserire l'alberino comando frizione (11) nell'alloggiamento sul carter (1) ruotandolo leggermente per favorire l'inserimento dell'OR (12);
montare la vite di fermo (13) umettandola leggermente con frenafiletti (disegno B). Montare all'interno del suo alloggiamento sul coperchio frizione (1) il puntalino di spinta (10), controllando
che appoggi contro la spinetta presente sull'alberino di comando della frizione (11); verificare il movimento del puntalino ruotando l'alberino comando frizione. Montare il coperchio frizione sul
motore usando le apposite spine di centraggio (39) (disegno C). Sostituire il distanziale motore (disegno D) con il fermafilo frizione (32), che si alloggia all'interno del telaio sulla vite di fissaggio
del motore, orientando il foro in direzione della levetta frizione (14). Assemblare la levetta frizione (14) e la relativa molla (17); montare il nuovo cavo frizione e chiudere il morsetto in una
posizione tale che rimanga un gioco di circa 4/8 mm sulla leva di comando. Eseguire la regolazione finale del gioco leva 4/6 mm, agendo sul registro leva sul manubrio. Montare la molla (21) e
il filtro dell'olio (19) con il foro centrale rivolto verso l'esterno posizionando gli anelli OR di tenuta (22-23-25) sull'apposito distanziale (20) (disegno C). Ricordiamo che tutti i componenti in
movimento devono essere lubrificati prima del montaggio. Riempire il carter con 0.85 l. di olio motore sintetico di buona qualità (vedere il manuale di manutenzione della moto); il coperchio
frizione è dotato di una spia di livello, il livello max corrisponde alla linea rossa all'interno dell'oblò d'ispezione; non lasciare mai scendere il livello sotto il bordo inferiore dell'oblò.
É inoltre fondamentale alla prima accensione dopo il rimontaggio, che il motore ruoti qualche minuto al minimo per far si che l'olio motore abbia il tempo di riempire il filtro e quindi raggiungere la pressione ottimale di funzionamento. Se viene usato il freno posteriore con comando meccanico (44), è necessario saldare la boccola fermaguaina in dotazione (45) sull'attacco portapedane
(disegno E). Smontare la staffa portapedane dal motore prima di eseguire la saldatura, in modo da evitare che la scarica elettrica della saldatrice possa danneggiare l'apparato elettronico della
motocicletta (accensione e centralina).
Coppie di serraggio raccomandate: Viti M6 - 10 Nm
Dado albero motore M14x1.25 - 150 Nm
Vite fissaggio motore M10 - 50 Nm
POS. DESCRIZIONE ARTICOLO
1 CARTER
2 DISCO FRIZIONE GUARNITO
3 DISCO IN ACCIAIO
4 CAMPANA FRIZIONE
5 MOZZO FRIZIONE
6 SPINGIDISCO
7 SPINGIDISCO FRIZIONE
8 MOLLA FRIZIONE
9 VITE TCEI M6 X 25
10 PUNTALINO
11 ALBERINO COMANDO FRIZIONE
12 OR114 d=11,11 s=1,78 NBR70
13 VITE TSPEI M6X14
14 LEVETTA FRIZIONE
15 VITE TCEI M5 X 25
16 DADO M5 AUTOBL.
Q.tà
1
5
4
1
1
1
1
4
4
1
1
1
1
1
1
1
POS. DESCRIZIONE ARTICOLO
Q.tà
17 MOLLA LEVA FRIZIONE
1
18 COPERCHIETTO FILTRO OLIO
1
19 FILTRO OLIO
1
20 DISTANZIALE ADATTATORE FILTRO OLIO
1
21 MOLLA FILTRO OLIO
1
22 OR2056 d=14,00 s=1,78 NBR70
1
23 OR2081 d=20,35 s=1,78 NBR70
1
24 VITE TCBEI M6 X 14
2
25 OR 3150 d=37,77 s=2,62 VITON70
1
26 TAPPO OLIO
1
27 OR
1
28 PIGNONE PRIMARIO
1
29 RONDELLA SAGOMATA FERMA DADO ALBERO MOT. 1
30 DADO COMPLETO ALBERO MOTORE
1
31 MOLLA A TAZZA PER DADO ALBERO MOTORE
1
32 FERMACAVO FRIZIONE
1
POS. DESCRIZIONE ARTICOLO
Q.tà
33 ALBERO PRIMARIO CAMBIO
1
34 DISTANZIALE ESTERNO ALBERO PRIMARIO
1
35 GABBIA ASSIALE A RULLINI AXK1730
1
36 RALLA PER REGGISPINTA AS1730
1
37 DISTANZIALE
1
38 DISTANZIALE
1
39 SPINA DI CENTRAGGIO
2
40 GUARNIZIONE COPERCHIO FRIZIONE
1
41 GUARNIZIONE CENTRALE CARTER MOTORE
1
42 VITE TCEI M6 X30 ZINCATA
7
43 VITE TCEI M6 X70 ZINCATA
1
44 PEDALE FRENO
1
45 FERMAFILO FRENO CARTER TRASM. PRIM.
1
46 TRASMISSIONE FLESSIBILE COMANDO FRIZIONE
1
47 MORSETTO PER TRASMISSIONE FLESSIBILE
1
48 ANELLO IN NYLON BIANCO PER TRASM. FLESSIBILE 1
- - - MAIN TRANSMISSION XP 4T 110 c.c. - - To mount the main transmission kit you first need to remove the engine completely in order to replace the main gear shaft with the new shaft whose end is splined for the new gear unit.
Make a note of the exact position of the various shims between the gears when removing the engine. Return each gear in the reverse order; return the snap rings between the gears taking care
not to expand them too much when keying these and then check that they fit into their seats properly. Lubricate the shaft/gear coupling generously to avoid the risk of the gears seizing when the
engine starts again. Having assembled the central sump, fit the primary pinion (28) on the engine shaft using the standard spacer (STD), (drawing A). Use the toothed safety washer provided
(29), making sure that the three tongues enter the grooves on the gears (28); tighten the special nut provided (30) with 150 Nm torque (15 kg m), fold the tongues on the safety washers (29)
into the notches on this nut (30). Fit the shaped spacer (34) on the main shaft (33), making sure that it covers the spaces on the engine casing properly; then add the thrust bearing (35) and the
spacers (36-37) following the instructions on the drawing. Complete assembly with the clutch container (4) and the spacer (38). Sparingly oil the clutch discs before mounting these.
Place the four clutch springs (8) in their seat, then the disc pusher (7) and finally tighten all four M6 screws (9) in turn with 10 Nm torque (1 kg m). Fit the clutch drive shaft (11) in its seat in the
casing (1), turning it slightly to make it easier to fit the OR (12); add the set screw (13), having first applied a little glue (drawing B). Fit the thrust cap (10) in its seat in the clutch cover (1),
making sure that it sits properly against the pin on the clutch drive shaft (11); check that the cap moves properly by turning the clutch drive shaft. Secure the clutch cover on the engine using the
centring pins provided (39) (drawing C). Replace the engine spacer (drawing D) with the clutch cable stop (32), which sits inside the chassis on the engine fixing screw, turning the hole so that it
faces the direction of the clutch lever (14). Mount the clutch lever (14) and spring (17); fit the new clutch cable and then close the clamp so that there's about 4-8 mm clearance for the drive
lever. Tune the lever clearance (4-6 mm), using the lever control on the handlebars. Fit the spring (21) and oil filter (19), making sure that the central hole faces the outside and place the ORs
(22-23-25) on the relevant spacer (20) (drawing C). Please note that all moving parts must be lubricated before being assembled. Fill the oil sump with 0.85 l good quality synthetic engine oil
(see bike maintenance manual); the clutch cover is fitted with an oil level with a red line for the max level inside the inspection window. Never let the oil level drop below the bottom edge of this
window. You must also let the engine idle for a few minutes the first time you start it after reassembling all the parts to ensure that the engine oil fills the filter and so reaches its optimal
working pressure. If the rear brake is mechanically controlled (44), you need to weld the sheathing bush provided (45) onto the footboard fitting (drawing E). Remove the footboard rod from the
engine before welding to avoid the risk that the electrical charge of the welding machine damages the electronics on the bike (ignition and gearcase).
M14x1.25 engine shaft nut - 150 Nm
M10 engine fixing screw - 50 Nm
Recommended tightening torques: M6 screws - 10 Nm
POS. ITEM DESCRIPTION
1 SUMP
2 CLUTCH DISC WITH GASKET
3 STEEL DISC
4 CLUTCH CONTAINER
5 CLUTCH HUB
6 DISC PUSHER
7 CLUTCH DISC PUSHER
8 CLUTCH SPRING
9 M6 X 25 ALLEN SCREW
10 CAP
11 CLUTCH DRIVE SHAFT
12 OR 114 11,11X1,78 NBR70
13 M6X14 FLATHEAD SCREW
14 CLUTCH LEVER
15 M5 X 25 ALLEN SCREW
16 SELF-LOCKING M5 NUT
Qty
1
5
4
1
1
1
1
4
4
1
1
1
1
1
1
1
POS. ITEM DESCRIPTION
17 CLUTCH LEVER SPRING
18 OIL FILTER COVER
19 OIL FILTER
20 OIL FILTER ADJUSTMENT SPACER
21 OIL FILTER SPRING
22 OR 2056 14,00 X 1,78 NBR70
23 OR 2081 20,35 X 1,78 NBR70
24 M6 X 14 SOCKET HEAD SCREW
25 OR 3150 37,77 X 2,62 VITON70
26 OIL CAP
27 OR
28 PRIMARY PINION
29 SHAPED ENGINE SHAFT STOP NUT SPRING
30 COMPLETE ENGINE SHAFT NUT
31 BELLEVILLE WASHER FOR ENGINE SHAFT NUT
32 CLUTCH CABLE STOP
Qty
1
1
1
1
1
1
1
2
1
1
1
1
1
1
1
1
POS. ITEM DESCRIPTION
Qty
33 MAIN GEAR SHAFT
1
34 MAIN SHAFT EXTERNAL SPACER
1
35 AXIAL ROLLER CAGE AXK1730
1
36 FIFTH WHEEL AS1730
1
37 SPACER
1
38 SPACER
1
39 CENTRING PIN
2
40 CLUTCH COVER GASKET
1
41 ENGINE COVER CENTRAL GASKET
1
42 GALVANISED M6 X30 ALLEN SCREW
7
43 GALVANISED M6 X70 ALLEN SCREW
1
44 BRAKE PEDAL
1
45 MAIN TRANSMISSION COVER BRAKE CABLE STOP
1
46 FLEXIBLE CLUTCH DRIVE TRANSMISSION
1
47 CLAMP FOR FLEXIBLE TRANSMISSION
1
48 WHITE NYLON RING FOR FLEXIBLE TRANSMISSION 1
- - - TRANSMISSION PRIMAIRE XP 4T 110 c.c. - - Pour le montage du kit transmission primaire, on devra démonter entièrement le moteur pour remplacer l'arbre primaire de la boîte de vitesses par le nouvel arbre dont l'extrémité s'adapte au
calage du nouveau groupe embrayage. Durant le montage, faire très attention à la position des différents rasages interposés entre les engrenages. Remonter les différents engrenages dans l'ordre
inverse du démontage. Remonter les bagues seegers entre les engrenages en faisant bien attention à ne pas trop les ouvrir pendant le calage et en vérifiant si elles sont correctement montées
dans leurs sièges. Lubrifier abondamment l'accouplement arbre/engrenages, afin d'éviter le grippage de ces derniers au premier redémarrage du moteur. Une fois les carters centraux en place,
commencer à monter le pignon primaire (28) sur le vilebrequin à l'aide de l'entretoise standard (STD), (dessin A). Utiliser la rondelle de sécurité dentelée (29), en faisant attention à ce que les
trois ailettes entrent bien dans les cannelures de l'engrenage (28); serrer l'écrou spécialement fourni (30) au couple de 150 Nm (15 kg m), plier les ailettes de la rondelle de sécurité (29) en face
des crans sur l'écrou (30). Monter l'entretoise façonnée (34), sur l'arbre primaire (33) en faisant attention qu'elle corresponde exactement aux espaces présents sur le carter moteur; continuer
ensuite avec le palier de butée (35) et les entretoises (36-37), comme l'indique le schéma du dessin. Compléter le montage par la cloche embrayage (4) et l'entretoise (38). Graisser légèrement
les disques de l'embrayage avant le montage. Positionner les quatre ressorts embrayage (8) dans leur logement, poser le plateau de pression (7) et serrer progressivement et uniformément les
quatre vis (9) M6 au couple de 10 Nm (1 kg m). Introduire l'arbre de commande de l'embrayage (11) dans son logement sur le carter (1) en le tournant légèrement pour que la bague O-ring
(12) entre bien; monter la vis de blocage (13) en l'humectant légèrement de freine-filets (dessin B). Monter l'embout de butée (10) à l'intérieur de son siège sur le couvercle embrayage (1) et
contrôler qu'il appuie contre la goupille de l'arbre de commande de l'embrayage (11); vérifier le mouvement de l'embout en tournant l'arbre de commande de l'embrayage. Monter le couvercle
de l'embrayage sur le moteur à l'aide des goujons de centrage (39) réservés à cet effet (dessin C). Remplacer l'entretoise moteur (dessin D) par le serre-câble embrayage (32) en le plaçant à
l'intérieur du châssis sur la vis de fixation du moteur et en orientant le trou en direction du levier embrayage (14). Assembler le levier embrayage (14) et le ressort relatif (17); monter le nouveau
câble de l'embrayage et bloquer le serre-câble de façon à ce qu'il reste un jeu d'environ 4/8 mm sur le levier de commande. Procéder au réglage final du jeu du levier 4/6 mm en intervenant
sur le réglage de la manette du guidon. Monter le ressort (21) et le filtre à huile (19), le trou central tourné vers l'extérieur, en plaçant les bagues O-ring d'étanchéité (22-23-25) sur l'entretoise
(20) réservée à cet effet (dessin C). Il faut rappeler que tous les composants en mouvement doivent être lubrifiés avant d'être montés. Remplir le carter de 0.85 l d'huile moteur synthétique de
bonne qualité (voir manuel de maintenance de la moto). Le couvercle de l'embrayage est équipé d'un voyant de niveau; le niveau maximum correspond à la ligne rouge à l'intérieur du hublot
d'inspection; ne jamais laisser descendre le niveau au dessous du bord inférieur du hublot. Il est en outre fondamental, au premier allumage après le remontage, que le moteur tourne quelques
minutes au minimum, pour faire en sorte que l'huile moteur ait le temps de remplir le filtre et d'atteindre la pression de fonctionnement optimale. Si on utilise le frein arrière à commande mécanique (44), on devra souder le serre gaine fourni (45) sur l'attache support des repose-pied (dessin E). Démonter le support repose-pied du moteur avant de souder, de façon à éviter que la
décharge électrique de la soudeuse ne puisse endommager l'appareillage électronique de la moto (allumage et centrale).
Couples de serrage recommandés: Vis M6 - 10 Nm
Ecrou vilebrequin M14x1.25 - 150 Nm
Vis de fixation moteur M10 - 50 Nm
POS. DESCRIPTION DE L'ARTICLE
1 CARTER
2 DISQUE EMBRAYAGE GARNI
3 DISQUE EN ACIER
4 CLOCHE EMBRAYAGE
5 MOYEU EMBRAYAGE
6 PLATEAU DE PRESSION
7 PLATEAU DE PRESSION EMBRAYAGE
8 RESSORT EMBRAYAGE
9 VIS TCEI M6 X 25
10 EMBOUT
11 ARBRE DE COMMANDE EMBRAYAGE
12 OR114 11,11 X 1,78 NBR70
13 VIS TSPEI M6X14
14 LEVIER EMBRAYAGE
15 VIS TCEI M5 X 25
16 ECROU M5 AUTOBL.
Q.té
1
5
4
1
1
1
1
4
4
1
1
1
1
1
1
1
POS. DESCRIPTION DE L'ARTICLE
17 RESSORT LEVIER EMBRAYAGE
18 COUVERCLE FILTRE A HUILE
19 FILTRE A HUILE
20 ENTRETOISE ADAPTATEUR FILTRE A HUILE
21 RESSORT FILTRE A HUILE
22 OR2056 14,00 X 1,78 NBR70
23 OR2081 20,35 X 1,78 NBR70
24 VIS TCBEI M6 X 14
25 OR 3150 37,77 X 2,62 VITON70
26 BOUCHON HUILE
27 OR
28 PIGNON PRIMAIRE
29 RONDELLE FAÇONNEE DE BLOCAGE ECROU VILEBREQUIN
30 ECROU COMPLET VILEBREQUIN
31 RONDELLE BELLEVILLE POUR ECROU VILEBREQUIN
32 SERRE-CABLE EMBRAYAGE
Q.té
1
1
1
1
1
1
1
2
1
1
1
1
1
1
1
1
POS. DESCRIPTION DE L'ARTICLE
33 ARBRE PRIMAIRE BOITE A VITESSES
34 ENTRETOISE EXTERIEURE ARBRE PRIMAIRE
35 CAGE AXIALE A AIGUILLES AXK1730
36 PLAQUETTE D'ATTELAGE POUR PALIER DE BUTEE AS1730
37 ENTRETOISE
38 ENTRETOISE
39 GOUJON DE CENTRAGE
40 GARNITURE COUVERCLE EMBRAYAGE
41 GARNITURE CENTRALE CARTER MOTEUR
42 VIS TCEI M6 X30 ZINGUEE
43 VIS TCEI M6 X70 ZINGUEE
44 PEDALE FREIN
45 SERRE-CABLE FREIN CARTER TRANSM. PRIM.
46 TRANSMISSION FLEXIBLE COMMANDE EMBRAYAGE
47 SERRE-CABLE POUR TRANSMISSION FLEXIBLE
48 ANNEAU EN NYLON BLANC POUR TRANSM.FLEXIBLE
Q.té
1
1
1
1
1
1
2
1
1
7
1
1
1
1
1
1
- - - TRANSMISIÓN PRIMARIA XP 4T 110 c.c. - - Para el montaje del kit de transmisión primaria, es necesario desmontar completamente el motor para sustituir el eje primario del cambio con el nuevo eje, cuyo extremo está adaptado para
ensamblar el nuevo grupo de embrague. Durante el desmontaje, prestar la máxima atención a la posición de las láminas de ajuste interpuestas entre los engranajes. Montar de nuevo los engranajes invirtiendo el orden seguido en las operaciones de desmontaje; montar los seeger entre los engranajes, prestando atención a no ensancharlos excesivamente durante el ensamblado y asegurándose de que queden montados correctamente en sus alojamientos. Lubricar en abundancia el acoplamiento eje/engranajes para evitar el gripaje de los mismos en el momento de encender de
nuevo el motor. Una vez ensamblados los cárteres centrales, comenzar con el montaje del piñón primario (28) en el eje motor, utilizando el separador estándar (STD), (diseño A). Utilizar la arandela de seguridad dentada (29), prestando atención a que las tres aletas entren en las ranuras del engranaje (28); apretar la tuerca especial servida de serie (30) con un par de 150 Nm (15 kg
m), doblar las aletas de la arandela de seguridad (29) de modo que se correspondan con las entalladuras de la tuerca (30). Montar el separador perfilado (34) en el eje primario (33) prestando
atención a que cubra correctamente los espacios existentes en el cárter del motor; montar entonces el cojinete de empuje (35) y los separadores (36-37) siguiendo el esquema indicado en el diseño. Completar con la campana de embrague (4) y el separador (38). Engrasar ligeramente los discos del embrague antes del montaje. Colocar los cuatro muelles del embrague (8) en su alojamiento, apoyar el plato de presión (7) y apretar progresiva y uniformemente los cuatro tornillos (9) M6 con un par de 10 Nm (1 kg m). Introducir el eje de accionamiento del embrague (11) en
el alojamiento del cárter (1) girándolo ligeramente para favorecer la introducción del OR (12); montar el tornillo de bloqueo (13) humectándolo ligeramente con sellador de roscas (diseño B).
Montar dentro de su alojamiento en la tapa del embrague (1) la espiga de empuje (10), controlando que se apoye contra la clavija del eje de accionamiento del embrague (11); controlar el movimiento de la espiga girando el eje de accionamiento del embrague. Montar la tapa del embrague en el motor utilizando las clavijas de centrado (39) (diseño C). Sustituir el separador del motor
(diseño D) con el retén del cable del embrague (32), que se aloja en el interior del bastidor sobre el tornillo de sujeción del motor, orientando el orificio en dirección a la palanca de embrague
(14). Ensamblar la palanca de embrague (14) y su resorte (17); montar el nuevo cable de embrague y cerrar la mordaza en una posición que deje un juego aproximado de 4/8 mm en la palanca de accionamiento. Efectuar la regulación final del juego de la palanca de 4/6 mm, mediante el regulador de la palanca en el manillar. Montar el resorte (21) y el filtro del aceite (19) con el
orificio central vuelto hacia fuera, colocando los anillos OR de estanqueidad (22-23-25) en el separador correspondiente (20) (diseño C). Recordamos que todos los componentes en movimiento
deben ser lubricados antes del montaje. Llenar el cárter con 0.85 l. de aceite sintético de buena calidad para motores (ver el manual de mantenimiento de la moto); la tapa del embrague lleva un
indicador de nivel. El nivel máximo corresponde a la línea roja dentro de la mirilla de inspección; nunca dejar que el nivel descienda por debajo del borde inferior de la mirilla.
Es además fundamental, en el momento de encender por primera vez después del montaje, dejar que el motor funcione al mínimo durante unos minutos, de modo que el aceite del motor tenga
tiempo de llenar el filtro y, de ese modo, alcanzar la presión ideal de funcionamiento. Si se utiliza el freno trasero con accionamiento mecánico (44), es necesario soldar el casquillo pasacables
servido de serie (45) al enganche de soporte del apoyapiés (diseño E). Desmontar el estribo de soporte apoyapiés del motor antes de efectuar la soldadura, para así evitar que la descarga eléctrica de la soldadora pueda causar daños en el aparato electrónico de la motocicleta (encendido y centralita).
Pares de apriete recomendados: Tornillos M6 - 10 Nm
Tuerca eje motor M14x1.25 - 150 Nm
Tornillo de sujeción motor M10 - 50 Nm
POS. DESCRIPCIÓN DEL ARTÍCULO
1 CÁRTER
2 DISCO DE EMBRAGUE CON GUARNICIÓN
3 DISCO DE ACERO
4 CAMPANA DE EMBRAGUE
5 CUBO DEL EMBRAGUE
6 PLATO DE PRESIÓN
7 PLATO DE PRESIÓN DEL EMBRAGUE
8 RESORTE DEL EMBRAGUE
9 TORNILLOS TCEI M6 X 25
10 ESPIGA
11 EJE DE ACCIONAMIENTO EMBRAGUE
12 OR114 11,11 X 1,78 NBR70
13 TORNILLO TSPEI M6X14
14 PALANCA DE EMBRAGUE
15 TORNILLO TCEI M5 X 25
16 TUERCA M5 AUTOBL.
Cant.
1
5
4
1
1
1
1
4
4
1
1
1
1
1
1
1
POS. DESCRIPCIÓN DEL ARTÍCULO
Cant.
17 RESORTE DE LA PALANCA DEL EMBRAGUE
1
18 TAPA DEL FILTRO DEL ACEITE
1
19 FILTRO DEL ACEITE
1
20 SEPARADOR ADAPTADOR FILTRO DE ACEITE
1
21 RESORTE FILTRO DE ACEITE
1
22 OR2056 14,00 X 1,78 NBR70
1
23 OR2081 20,35 X1,78 NBR70
1
24 TORNILLO TCBEI M6 X 14
2
25 OR 3150 37,77 X 2,62 VITON70
1
26 TAPA DEL ACEITE
1
27 OR
1
28 PIÑÓN PRIMARIO
1
29 ARANDELA PERFILADA BLOQUEO TUERCA EJE MOTOR 1
30 TUERCA COMPLETA EJE MOTOR
1
31 ARANDELA BELLEVILLE PARA TUERCA EJE MOTOR
1
32 SUJETA-CABLES EMBRAGUE
1
POS. DESCRIPCIÓN DEL ARTÍCULO
Cant.
33 EJE PRIMARIO CAMBIO
1
34 SEPARADOR EXTERNO EJE PRIMARIO
1
35 JAULA AXIAL DE RODILLOS AXK1730
1
36 TEJUELO PARA COJINETE DE EMPUJE AS1730
1
37 SEPARADOR
1
38 SEPARADOR
1
39 CLAVIJA DE CENTRADO
2
40 GUARNICIÓN TAPA DEL EMBRAGUE
1
41 GUARNICIÓN CENTRAL CÁRTER MOTOR
1
42 TORNILLO TCEI M6 X30 GALVANIZADO
7
43 TORNILLO TCEI M6 X70 GALVANIZADO
1
44 PEDAL DE FRENO
1
45 RETÉN DEL CABLE DE FRENO CÁRTER TRANSM. PRIM. 1
46 TRANSMISIÓN FLEXIBLE ACCIONAMIENTO EMBRAGUE 1
47 MORDAZA PARA TRANSMISIÓN FLEXIBLE
1
48 ANILLO DE NYLON BLANCO PARA TRANSM.FLEXIBLE 1
- - - HAUPTANTRIEB XP 4T 110 ccm - - Zur Montage vom Satz mit dem Hauptantrieb muss der Motor komplett ausgebaut werden, um die Hauptantriebswelle vom Getriebe durch die neue Welle zu ersetzen, die über ein geeignetes
Ende für die Verbindung mit der neuen Kupplung verfügt. Beim Ausbauen muss besonders gut auf die Positionierung der verschiedenen Ausgleichsscheiben geachtet werden, die sich zwischen den
Zahnrädern befinden. Beim Einbauen der verschiedenen Zahnräder in umgekehrter Reihenfolge wie beim Ausbauen vorgehen. Die Seeger-Ringe wieder zwischen die Zahnräder einsetzen und
dabei darauf achten, dass sie bei der Verbindung nicht zu stark ausgeweitet werden. Sicherstellen, dass die Ringe korrekt in ihren Sitzen montiert sind. Die Verbindung Welle-Zahnräder reichlich
schmieren, um das Festfressen beim ersten Starten vom Motor zu vermeiden. Die zentralen Gehäuse anbringen und dann mit der Montage vom Hauptritzel (28) auf der Antriebswelle beginnen.
Dazu das Standardabstandstück (STD) verwenden (Abbildung A). Die gezahnte Sicherheitsunterlegscheibe (29) einsetzen und dabei darauf achten, dass die drei Laschen in den Nuten vom
Getriebe (28) zu sitzen kommen. Die mitgelieferte Spezialmutter (30) mit einem Drehmoment von 150 Nm (15 kg m) anziehen und die Laschen der Sicherheitsunterlegscheibe (29) auf Höhe der
Rillen an der Mutter (30) umbiegen. Das geformte Abstandstück (34) an der Hauptantriebswelle (33) anbringen und dabei darauf achten, dass es den vorhandenen Raum am Motorgehäuse korrekt abdeckt. Dann mit dem Axialdrucklager (35) und den Abstandstücken (36-37) weitermachen und dabei wie auf der Abbildung zu sehen vorgehen. Mit der Kupplungsglocke (4) und dem
Abstandstück (38) die Montage beenden. Die Kupplungsscheiben vor der Montage leicht ölen. Die vier Kupplungsfedern (8) in ihren Sitz einsetzen, den Drücker (7) ansetzen und nach und nach
die vier M6 Schrauben (9) gleichmäßig mit einem Drehmoment von 10 Nm (1 kg m) anziehen. Die Kupplungswelle (11) in ihren Sitz am Gehäuse (1) einsetzen und dabei leicht drehen, um das
Einsetzen der O-Ring Dichtung (12) zu erleichtern. Die Feststellschraube (13) montieren und dazu etwas Schraubensicherung auf das Gewinde geben (Abbildung B). Den Druckstift (10) in seinen
Sitz im Kupplungsdeckel (1) montieren und dabei kontrollieren, ob er gegen die kleine Buchse an der Kupplungswelle (11) drückt. Die Bewegung vom Druckstift prüfen und dazu die
Kupplungswelle drehen. Den Kupplungsdeckel am Motor montieren und dazu die entsprechenden Zentrierstifte (39) verwenden (Abbildung C). Das Abstandstück vom Motor (Abbildung D) durch
die Klemme vom Kupplungsdraht (32) ersetzen, die im Fahrgestell auf der Befestigungsschraube vom Motor untergebracht wird. Dabei das Loch so ausrichten, dass es zum Kupplungshebel (14)
zeigt. Den Kupplungshebel (14) und die entsprechende Feder (17) zusammenbauen. Das neue Kupplungskabel montieren und die Klemme so schließen, dass ein Spiel von ca. 4/8 mm am Hebel
bleibt. Die Endeinstellung vom Hebelspiel auf 4/6 mm durchführen und dazu den Regler vom Hebel am Lenker verstellen. Die Feder (21) und den Ölfilter (19) so montieren, dass das zentrale
Loch nach außen zeigt. Dabei die O-Ring Dichtungen (22-23-25) auf das entsprechende Abstandstück (20) setzen (Abbildung C). Bitte beachten, dass alle beweglichen Teile vor der Montage
geschmiert werden müssen. Das Gehäuse mit 0,85 l synthetischem Motoröl guter Qualität füllen (siehe Wartungshandbuch Motor). Der Kupplungsdeckel verfügt über eine Ölstandsanzeige. Der
maximale Ölstand ist durch die rote Linie am Kontrollglas gekennzeichnet. Der Ölstand darf auf keinen Fall unter den unteren Rand vom Kontrollglas sinken. Beim ersten Einschalten vom Motor
nach dem Zusammenbauen muss darauf geachtet werden, dass der Motor sich einige Minuten lang mit niedrigster Drehzahl dreht, damit das Motoröl den Filter füllen und der optimale
Betriebsdruck erreicht werden kann. Wenn die Hinterradbremse mit mechanischer Steuerung (44) benützt wird, muss die mitgelieferte Buchse der Hüllenhalterung (45) an der Fußrastenhalterung
angeschweißt werden (Abbildung E). Vor dem Schweißen die Fußrastenhalterung vom Motor abmontieren, damit die elektronische Ausrüstung vom Motorrad (Zündung und Steuerung) nicht durch
den Schweißstrom beschädigt werden kann.
Empfohlene Anzugdrehmomente: M6 Schrauben - 10 Nm
Mutter Antriebswelle M14x1.25 - 150 Nm
Befestigungsschraube Motor M10 - 50 Nm
Nr.
1
2
3
4
5
6
7
8
9
10
11
12
13
14
15
16
BESCHREIBUNG ARTIKEL
GEHÄUSE
KUPPLUNGSSCHEIBE MIT DICHTUNG
STAHLSCHEIBE
KUPPLUNGSGLOCKE
KUPPLUNGSNABE
DRÜCKER
DRÜCKER KUPPLUNG
FEDER KUPPLUNG
SCHRAUBE TCEI M6 X 25
STIFT
KUPPLUNGSWELLE
O-RING DICHTUNG 114 11,11 X1,78 NBR70
SCHRAUBE TSPEI M6X14
KUPPLUNGSHEBEL
SCHRAUBE TCEI M5 X 25
MUTTER M5 SELBSTBLOCKIEREND
Menge
1
5
4
1
1
1
1
4
4
1
1
1
1
1
1
1
Nr.
17
18
19
20
21
22
23
24
25
26
27
28
29
30
31
32
Menge
BESCHREIBUNG ARTIKEL
1
FEDER KUPPLUNGSHEBEL
1
DECKEL ÖLFILTER
1
ÖLFILTER
1
PASSSTÜCK ÖLFILTER
1
FEDER ÖLFILTER
1
O-RING DICHTUNG 2056 14,00X1,78 NBR70
1
O-RING DICHTUNG 2081 20,35X1,78 NBR70
2
SCHRAUBE TCBEI M6 X 14
1
O-RING DICHTUNG 3150 37,77X2,62 VITON70
1
ÖLDECKEL
1
O-RING DICHTUNG
1
HAUPTRITZEL
GEFORMTE UNTERLEGSCHEIBE BLOCKIERUNG MUTTER VON ANTRIEBSWELLE 1
1
KOMPLETTE MUTTER ANTRIEBSWELLE
1
TELLERFEDER FÜR MUTTER ANTRIEBSWELLE
1
KLEMME KUPPLUNGSDRAHT
Nr.
33
34
35
36
37
38
39
40
41
42
43
44
45
46
47
48
BESCHREIBUNG ARTIKEL
HAUPTWELLE GETRIEBE
EXTERNES ABSTANDSTÜCK HAUPTWELLE
AXIALER ROLLENKÄFIG AXK1730
SPURPLATTE AXIALDRUCKLAGER AS1730
ABSTANDSTÜCK
ABSTANDSTÜCK
ZENTRIERSTIFT
DICHTUNG KUPPLUNGSDECKEL
ZENTRALE DICHTUNG MOTORGEHÄUSE
SCHRAUBE TCEI M6 X30 VERZINKT
SCHRAUBE TCEI M6 X70 VERZINKT
BREMSPEDAL
KLEMME BREMSDRAHT GEHÄUSE HAUPTANTRIEB
FLEXIBLER ANTRIEB KUPPLUNGSSTEUERUNG
KLEMME FÜR FLEXIBLEN ANTRIEB
WEISSER NYLONRING FÜR FLEXIBLEN ANTRIEB
Menge
1
1
1
1
1
1
2
1
1
7
1
1
1
1
1
1
A
33
34
36
4
6
2x5
3x4
35
STD
28 29
31
37 sp.0,5
5
30
8x4
38 sp.3
9x4
7
B
C
14
16
15
12
17
40
11
32
26
27
21
13
43
19
20 22
39x2
10
23
42x7
25
18
1
D
32 - FERMACAVO FRIZIONE - CLUTCH CABLE STOP - SERRE-CABLE EMBRAYAGE
SUJETA-CABLES EMBRAGUE - KLEMME KUPPLUNGSDRAHT
E
SALDARE - WELD - SOUDER - SOLDAR - SCHWEISSEN
44
45
24x2
PI 319
ISTRUZIONI DI MONTAGGIO TESTA 4V
Il kit della testa 4V deve essere montato esclusivamente con i nostri kit cilindro 4V (cod. 119.0090 e 119.0092). POS.
DENOMINAZIONE
1
TESTA 4V COMPLETA DI VALVOLE, ALBERO CAMME, BILANCERI
Per il montaggio del cilindro e del pistone 4V fare riferimento alle istruzioni contenute nel kit cilindro.
1A TESTA 4V
Prima di procedere con il montaggio definitivo della testa si consiglia di controllare:
1B ALBERO A CAMME COMPLETO DI CUSCINETTI
• l'altezza di squish - con la guarnizione di base da 0,5 mm. deve essere compreso tra 0,9 e 1 mm.
1C BILANCERE ASPIRAZIONE COMPLETO DI REGISTRI
1D BILANCERE SCARICO COMPLETO DI REGISTRI
• il gioco delle valvole - per l' aspirazione deve essere 0,1 mm, per lo scarico 0,15 mm.
1E VALVOLA SCARICO
Smontare il gruppo termico originale e togliere il tendicatena. Inserire le spine di centraggio (14) nel cilindro e
1F VALVOLA ASPIRAZIONE
sistemare la guarnizione di testa (9A).
1G RONDELLA INFERIORE MOLLA
Inserire la testa nei prigionieri, mettere le 4 rondelle di rame (9G) e serrare a pacco con i dadi ciechi in dotazione
1H PARAOLIO VALVOLA
1I MOLLA VALVOLA
(15). Per finire di bloccare la testa al cilindro bisogna montare anche una delle viti M6x30 (13).
1J SCODELLINO SUPERIORE MOLLA
Procedere con il montaggio della catena e della corona distribuzione (2) sull'albero a camme (1B) usando n.3
1K SEMICONO
viti M5x10 (10). Prestare la massima attenzione alla corretta fasatura della distribuzione.
1L SPINOTTO
Con l'albero motore in PMS e dopo il montaggio del tendicatena, la tacca sulla corona deve puntare il riferimento
1M VITE TPSEI M5X10
2
CORONA CATENA DISTRIBUZIONE
sulla testa (vedi foto nelle istruzioni del kit cilindro). Per alcuni tipi di motore la corona potrebbe rimanere
3
COPERCHIO CATENA
spostata di 2-3° in avanti nel senso di marcia senza che ciò comprometta le prestazioni del kit.
4
COPERCHIO PASSAGGIO OLIO
Montare il coperchio catena (3) con l'o-ring (9D) usando le viti m5x16 (12).
5
COPERCHIO VALVOLE SCARICO
Montare il coperchio passaggio olio (4) e la guarnizione (9F) usando le viti M5x12 (11).
6
COPERCHIO VALVOLE ASPIRAZIONE
7
COLLETTORE ASPIRAZIONE
Attenzione: di regola la guarnizione (9F) dovrebbe avere n.2 fori in corrispondenza degli spinotti dei bilanceri.
8
CANDELA NGK CR9E
Se la vostra guarnizione dovesse avere solo un foro, assicurarsi di montarla in modo che questo foro coincida con
9
SERIE GUARNIZIONI
lo spinotto lato scarico.
9A GUARNIZIONE TESTA SP. 0,5
Strappare i due o-ring (9E) e montarli ciascuno con il suo coperchio valvole (5) e (6) usando n.4 viti M5x10 (10).
9B GUARNIZIONE SCARICO 33,5X26X3,5
9C GUARNIZIONE ASPIRAZIONE SP. 3
Inserire la guarnizione (9B) nel condotto di scarico. Montare il collettore di aspirazione (7) con n.2 guarnizioni
9D OR 3243 VITON (61,6X2,62)
(9C) usando n.2 viti M6x30 (13). Montare la candela (8).
9E COPPIA OR COPERCHI VALVOLE
Coppie di serraggio raccomandate:
9F GUARNIZIONE PASSAGGIO OLIO
9G RONDELLA RAME PRIGIONIERI
- dadi prigionieri (15) - 0,8 kg.m
10
VITE TCEI M5X10
- viti testa/cilindro e collettore aspirazione (13) - 0,8 kg.m
11
VITE TCEI M5X12
- viti coperchi (10), (11) e (12) - 0,4 kg.m
12
VITE TCEI M5X16
13
14
15
- - - 4V HEAD ASSEMBLING INSTRUCTIONS - - The 4V head kit must only be installed using our 4V cylinder kit (code 119.0090 and code 119.0092).
See the instructions in the cylinder kit for details of how to install the 4V cylinder and piston.
Before installing the head, check:
• the squish height - this should be between 0.9 and 1 mm with the standard 0.5 mm gasket.
• the valve clearance - suction: 0.1 mm; exhaust: 0.15 mm.
Remove the original thermal unit and remove the chain stretcher.
Insert the centring pins (14) in the cylinder and fit the head gasket (9A).
Insert the head in the clasps, add the 4 copper washers (9G) and then tighten the pack with the cap nuts
provided (15). You also need to use one of the M6x30 screws (13) to secure the head to the cylinder.
Fit the chain and transmission crown (2) on the cam shaft (1B) using 3 M5x10 screws (10).
Make sure that the transmission crown is properly timed. With the engine shaft at its top dead centre and
having fitted the chain stretcher, the notch on the transmission crown should be in line with the marking on the
head (see the photos in the cylinder kit instructions). With some engines, you'll find that the transmission crown
may be 2-3° off-centre (forwards): this does not affect the performance of the kit.
Fit the chain guard (3) using the O-ring (9D) and the M5x16 screws (12). Fit the oil guard (4) and the gasket
(9F) using the M5x12 screws (11).
Caution: the gasket (9F) should normally have 2 holes in line with the equaliser pins. If your gasket has only
one hole, make sure that you fit it so that the hole is in line with the pin on the exhaust side.
Break the two O-rings (9E) and fit, together with the valve covers (5) and (6) using 4 M5x10 screws (10).
Fit the gasket (9B) on the exhaust pipe.
Fit the suction manifold (7) using two gaskets (9C) and 2 M6x30 screws (13). Fit the spark plug (8).
Recommended tightening torque:
- clasp nuts (15) - 0.8 kg.m
- screws for head/cylinder and suction manifold (13) - 0.8 kg.m
- guard screws (10), (11) and (12) - 0.4 kg.m
POS.
1
1A
1B
1C
1D
1E
1F
1G
1H
1I
1J
1K
1L
1M
2
3
4
5
6
7
8
9
9A
9B
9C
9D
9E
9F
9G
10
11
12
13
14
15
VITE TCEI M6X30
SPINA CENTRAGGIO TESTA
DADO FLANGIATO M6 CIECO
Q.TA
1
1
1
1
1
2
2
4
4
4
4
8
2
2
1
1
1
1
1
1
1
1
1
1
2
1
1
1
4
7
3
2
3
2
4
NAME
4V HEAD COMPLETE WITH VALVES, CAM SHAFT AND EQUALISERS
4V HEAD
CAM SHAFT COMPLETE WITH BEARINGS
SUCTION EQUALISER COMPLETE WITH REGISTERS
EXHAUST EQUALISER COMPLETE WITH REGISTERS
EXHAUST VALVE
SUCTION VALVE
BOTTOM SPRING WASHER
OIL GUARD VALVE
VALVE SPRING
TOP SPRING CAP
HALF CONE
PIN
M5X10 SOCKET HEAD SCREW
TRANSMISSION CHAIN CROWN
CHAIN GUARD
OIL GUARD
EXHAUST VALVE COVER
SUCTION VALVE COVER
SUCTION MANIFOLD
NGK CR9E SPARK PLUG
GASKET SET
HEAD GASKET (0.5 THICK)
EXHAUST GASKET (33.5X26X3.5)
SUCTION GASKET (3 THICK)
VITON 3243 OR (61.6X2.62)
PAIR OF VALVE COVER ORs
OIL GASKET
COPPER CLASP WASHER
M5X10 ALLEN SCREW
M5X12 ALLEN SCREW
M5X16 ALLEN SCREW
M6X30 ALLEN SCREW
HEAD CENTRING PIN
FLANGED M6 CAP NUT
QTY
1
1
1
1
1
2
2
4
4
4
4
8
2
2
1
1
1
1
1
1
1
1
1
1
2
1
1
1
4
7
3
2
3
2
4
DENOMINATION
- - - INSTRUCTIONS POUR LE MONTAGE DE LA CULASSE 4V - - - POS.
1
CULASSE 4V AVEC SES SOUPAPES, ARBRES A CAMES ET CULBUTEURS
Le kit de la culasse 4V doit être monté exclusivement à l'aide de nos kits cylindre 4V (code 119.0090 et code
1A CULASSE 4V
119.0092). Pour le montage du cylindre et du piston 4V, se reporter aux instructions contenues dans le kit
1B ARBRE A CAMES AVEC SES ROULEMENTS
cylindre.
1C CULBUTEUR D'ASPIRATION AVEC REPERES DE CALAGES
1D CULBUTEUR D'ECHAPPEMENT AVEC REPERES DE CALAGES
Avant de procéder au montage définitif de la culasse, on conseille de contrôler :
1E SOUPAPE D'ECHAPPEMENT
• La hauteur de squish - avec la garniture de base de 0,5 mm, doit être comprise entre 0,9 et 1 mm.
1F SOUPAPE D'ASPIRATION
• Le jeu des soupapes - pour l'aspiration doit être de 0,1 mm, pour l'échappement de 0,15 mm.
1G RONDELLE INFERIEURE RESSORT
Démonter le groupe thermique d'origine et retirer le tendeur de chaîne.
1H PARE-HUILE SOUPAPE
1I RESSORT SOUPAPE
Introduire les goupilles de centrage (14) dans le cylindre et mettre la garniture de la culasse (9A) en place.
1J RONDELLE D'APPUI SUPERIEURE
Introduire la culasse dans les goujons, mettre les 4 rondelles de cuivre (9G) et serrer le tout à l'aide des écrous
1K DEMI-CONE
borgnes fournis (15). Pour finir de bloquer culasse et cylindre, on devra également monter l'une des vis M6x30
1L AXE
(13). Procéder au montage de la chaîne et de la couronne de distribution (2) sur l'arbre à cames (1B) à l'aide des
1M VIS TPSEI M5X10
2
COURONNE CHAINE DE DISTRIBUTION
3 vis M5x10 (10). Faire bien attention à ce que le calage de la distribution soit correct.
3
COUVERCLE CHAINE
Une fois le vilebrequin en PMS et le tendeur de chaîne monté, le cran de la couronne doit se situer en face du
4
COUVERCLE PASSAGE D'HUILE
repère qui se trouve sur la culasse (voir photo des instructions du kit cylindre).
5
COUVERCLE SOUPAPES D'ECHAPPEMENT
Pour certains types de moteur, la couronne pourrait être décalée de 2-3°
6
COUVERCLE SOUPAPES D'ASPIRATION
7
COLLECTEUR D'ASPIRATION
en avant dans le sens de marche, sans que cela ne compromette les performances du kit.
8
BOUGIE NGK CR9E
Monter le couvercle de chaîne (3) avec l'o-ring (9D) en utilisant les vis m5x16 (12).
9
SERIE DE GARNITURES
Monter le couvercle de passage d'huile (4) et la garniture (9F) à l'aide des vis M5x12 (11).
9A GARNITURE CULASSE EP. 0,5
9B GARNITURE ECHAPPEMENT 33,5X26X3,5
Attention: en règle générale, la garniture (9F) devrait avoir 2 trous en face des axes de culbuteurs. Si votre
9C GARNITURE ASPIRATION EP. 3
garniture n'a qu'un trou, lors du montage, faire en sorte que ce trou coïncide avec l'axe côté échappement.
9D OR 3243 VITON (61,6X2,62)
Détacher les deux o-rings (9E) et les monter chacun sur son couvercle de soupapes (5) et (6) à l'aide de 4 vis
9E PAIRE OR COUVERCLES SOUPAPES
M5x10 (10). Insérer la garniture (9B) dans le tuyau d'échappement. Monter le collecteur d'aspiration (7) avec 2
9F GARNITURE PASSAGE D'HUILE
9G RONDELLE CUIVRE GOUJONS
garnitures (9C) en utilisant 2 vis M6x30 (13). Monter la bougie (8).
10
VIS TCEI M5X10
Couples de serrage recommandés:
11
VIS TCEI M5X12
- goujons (15) - 0,8 kgm
12
VIS TCEI M5X16
- vis culasse/cylindre et collecteur d'aspiration (13) - 0,8 kgm
13
VIS TCEI M6X30
14
GOUPILLE CENTRAGE TETE
- vis couvercles (10), (11) et (12) - 0,4 kgm
ECROU BORGNE A BRIDE M6
Q.TE
1
1
1
1
1
2
2
4
4
4
4
8
2
2
1
1
1
1
1
1
1
1
1
1
2
1
1
1
4
7
3
2
3
2
4
- - - INSTRUCCIONES DE MONTAJE CULATA 4V - - El kit de culata 4V debe montarse exclusivamente con nuestros kit para cilindro 4V (cód. 119.0090 y cód.
119.0092). Para el montaje del cilindro y del pistón 4V, consultar las instrucciones contenidas en el kit
cilindro.
Antes de proceder al montaje definitivo de la culata, se aconseja controlar:
• La altura de squish - con la junta de base de 0,5 mm deberá estar comprendida entre 0,9 y 1 mm.
• el juego de las válvulas - para la aspiración debe ser de 0,1 mm, para el escape 0,15 mm.
Desmontar el grupo térmico original y quitar el tensacadenas.
Introducir las clavijas de centrado (14) en el cilindro y ajustar la junta de culata (9A).
Introducir la culata en los espárragos, poner las 4 arandelas de cobre (9G) y apretar homogéneamente con las
tuercas ciegas servidas de serie (15). Para acabar de fijar la culata al cilindro, es necesario montar también uno
de los tornillos M6x30 (13).
Montar entonces la cadena y la corona de distribución (2) en el eje de excéntricas (1B) usando 3 tornillos M5x10
(10). Prestar la máxima atención al ajuste de fase de la distribución. Con el eje motor en el PMS, y después de
haber montado el tensacadenas, la muesca en la corona debe señalar hacia la referencia en la culata (ver foto
en las instrucciones del kit cilindro). En algunos tipos de motor, la corona podría quedar desplazada 2-3º hacia
adelante en el sentido de la marcha, sin que ello comprometa las prestaciones del kit.
Montar la tapa de la cadena (3) con el o-ring (9D) usando los tornillos m5x16 (12).
Montar la tapa para el paso del aceite (4) y la junta (9F) usando los tornillos M5x12 (11).
Atención: por lo general, la junta (9F) debería tener 2 orificios coincidiendo con las espigas de los balancines.
Si su junta tuviera un solo orificio, asegúrese de montarla de manera que dicho orificio coincida con la espiga del
lado de escape.
Separar los dos o-ring (9E) y montar cada uno de ellos con su tapa de válvulas (5) y (6) usando 4 tornillos
M5x10 (10). Colocar la junta (9B) en el conducto de escape. Montar el colector de aspiración (7) con 2
guarniciones (9C) usando 2 tornillos M6x30 (13). Montar la bujía (8).
Pares de apriete recomendados:
- tuercas espárragos (15) - 0,8 kg.m
- tornillos culata/cilindro y colector de aspiración (13) - 0,8 kg.m
- tornillos tapas (10), (11) y (12) - 0,4 kg.m
DENOMINACIÓN
CULATA 4V CON VÁLVULAS, EJE DE EXCÉNTRICAS Y BALANCINES
CULATA 4V
EJE DE EXCÉNTRICAS CON COJINETES
BALANCÍN DE ASPIRACIÓN CON REGISTROS
BALANCÍN DE ESCAPE CON REGISTROS
VÁLVULA DE ESCAPE
VÁLVULA DE ASPIRACIÓN
ARANDELA INFERIOR MUELLE
RETÉN DE ACEITE VÁLVULA
MUELLE VÁLVULA
CAZOLETA SUPERIOR MUELLE
SEMICONO
ESPIGA
TORNILLOS TPSEI M5X10
CORONA CADENA DE DISTRIBUCIÓN
TAPA CADENA
TAPA PASO DE ACEITE
TAPA VÁLVULAS DE ESCAPE
TAPA VÁLVULAS DE ASPIRACIÓN
COLECTOR DE ASPIRACIÓN
BUJÍA NGK CR9E
JUEGO GUARNICIONES
JUNTA DE CULATA ESP. 0,5
JUNTA DE ESCAPE 33,5X26x3,5
JUNTA DE ASPIRACIÓN ESP. 3
OR 3243 VITON (61,6X2,62)
PAR OR TAPAS VÁLVULAS
JUNTA PASO DE ACEITE
ARANDELA COBRE ESPÁRRAGOS
TORNILLO TCEI M5X10
TORNILLO TCEI M5X12
TORNILLO TCEI M5X16
TORNILLO TCEI M6X30
CLAVIJA DE CENTRADO CULATA
TUERCA EMBRIDADA M6 CIEGA
CANT
1
1
1
1
1
2
2
4
4
4
4
8
2
2
1
1
1
1
1
1
1
1
1
1
2
1
1
1
4
7
3
2
3
2
4
15
POS.
1
1A
1B
1C
1D
1E
1F
1G
1H
1I
1J
1K
1L
1M
2
3
4
5
6
7
8
9
9A
9B
9C
9D
9E
9F
9G
10
11
12
13
14
15
- - - MONTAGEANLEITUNG KOPF 4V - - Der Satz Kopf 4V kann ausschließlich mit unserem Satz Zylinder 4V (Code 119.0090 und Code 119.0092)
montiert werden. Nähere Informationen zur Montage vom Zylinder und Kolben 4V können der Montageanleitung
entnommen werden, die dem Zylindersatz beiliegt.
Vor der endgültigen Montage vom Kopf sollten folgende Kontrollen durchgeführt werden:
• Höhe vom Squish - mit der Grunddichtung 0,5 mm muss dieser zwischen 0,9 und 1 mm liegen.
• Spiel der Ventile - zum Ansaugen muss das Spiel 0,1 mm betragen, zur Ausgabe 0,15 mm.
Die Original-Wärmeeinheit ausbauen und den Kettenspanner abnehmen.
Die Zentrierungsstifte (14) in den Zylinder stecken und die Zylinderkopfdichtung (9A) positionieren.
Den Kopf auf die Stiftschrauben setzen, die 4 Unterlegscheiben aus Kupfer (9G) einsetzen und das Paket mit den
mitgelieferten Hutmuttern (15) verschrauben. Um den Zylinderkopf vollständig zu blockieren, muss auch eine
der M6x30 Schrauben (13) angeschraubt werden.
Dann die Kette und den Kranz vom Ventiltrieb (2) auf der Nockenwelle (1B) montieren und dazu 3 M5-10
Schrauben (10) verwenden. Bei der Montage muss besonders auf die richtige Einstellung vom Ventiltrieb geachtet
werden. Mit der Antriebswelle in OTP und nach der Montage vom Kettenspanner muss die Markierung am Kranz
auf die Bezugsmarkierung am Kopf zeigen (siehe Foto in der Montageanleitung vom Zylindersatz).
Bei einigen Motortypen kann es vorkommen, dass der Kranz 2-3° in Laufrichtung verschoben ist.
Dadurch werden die Leistungen vom Satz aber nicht beeinträchtigt.
Die Kettenabdeckung (3) und die O-Ring Dichtung (9D) montieren und dazu die M5x16 Schrauben (12)
verwenden. Die Abdeckung vom Öldurchlauf (4) und die Dichtung (9F) mit den M5x12 Schrauben (11) anbringen.
Achtung: Normalerweise müssen 2 Löcher der Dichtung (9F) mit den Bolzen vom Kipphebel übereinstimmen.
Sollte die Dichtung nur ein Loch aufweisen, muss sie so montiert werden, dass das Loch mit dem Bolzen an der
Ausgabeseite übereinstimmt. Die beiden O-Ring Dichtungen (9E) abreißen und zusammen mit dem jeweiligen
Ventildeckel (5) und (6) mit 4 M5x10 Schrauben (10) montieren. Eine Dichtung (9B) in das Abgasrohr einsetzen.
Den Ansaugsammler (7) mit 2 Dichtungen (9C) und 2 B6x30 (13) Schrauben montieren.
Die Zündkerze (8) montieren.
Empfohlene Anzugsdrehmomente:
- Muttern Stiftschrauben (15) - 0,8 kg.m
- Schrauben Kopf/Zylinder und Ansaugsammler (13) - 0,8 kg.m
- Schrauben Abdeckungen (10), (11) und (12) - 0,4 kg.m
POS.
1
1A
1B
1C
1D
1E
1F
1G
1H
1I
1J
1K
1L
1M
2
3
4
5
6
7
8
9
9A
9B
9C
9D
9E
9F
9G
10
11
12
13
14
15
BEZEICHNUNG
MENGE
KOPF 4V KOMPLETT MIT VENTILEN, NOCKENWELLE UND KIPPHEBELN 1
KOPF 4V
1
NOCKENWELLE KOMPLETT MIT LAGERN
1
KIPPHEBEL ANSAUGUNG KOMPLETT MIT REGISTERN
1
KIPPHEBEL AUSGABE KOMPLETT MIT REGISTERN
1
ABGASVENTIL
2
ANSAUGVENTIL
2
UNTERE UNTERLEGSCHEIBE FEDER
4
ÖLABDICHTUNG VENTIL
4
VENTILFEDER
4
OBERER FEDERTELLER
4
HALBKEGEL
8
BOLZEN
2
SCHRAUBE TPSEI M5X10
2
KRANZ KETTE VENTILTRIEB
1
ABDECKUNG KETTE
1
ABDECKUNG ÖLDURCHLAUF
1
DECKEL ABGASVENTILE
1
DECKEL ANSAUGVENTILE
1
ANSAUGSAMMLER
1
ZÜNDKERZE NGK CR9E
1
SERIE DICHTUNGEN
1
DICHTUNG KOPF DICKE 0,5
1
DICHTUNG AUSGABE 33,5X26X3,5
1
DICHTUNG ANSAUGUNG DICKE 3
2
O-RING 3243 VITON (61,6X2,62)
1
ZWEI O-RINGE VENTILDECKEL
1
DICHTUNG ÖLDURCHLAUF
1
UNTERLEGSCHEIBE KUPFER STIFTSCHRAUBEN
4
SCHRAUBE TCEI M5X10
7
SCHRAUBE TCEI M5X12
3
SCHRAUBE TCEI M5X16
2
SCHRAUBE TCEI M6X30
3
ZENTRIERUNGSSTIFT KOPF
2
GEFLANSCHTE HUTMUTTER M6
4
13
8
7
14
6
9C
9E
9A
11
4
9F
15
1C
9G
13 2
1F
9D
1A
3
1B
5
9E
9B
10
1L
1
1D
1I
1J
1K
1E
1H
1G
10
1M
12