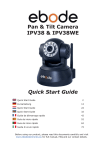
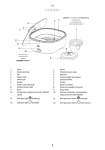
1
IP Vision 38
Pan & Tilt IP Camera IPV38 / IPV38WE
Quick Start Guide (Using Internet Explorer Browser)
User guide
Bedienungsanleitung
Gebruiksaanwijzing
Användermanual
Guide utilisateur
Guía del usario
Manual do utilizador
Manuale per l’utente
6-8-2012
2
14
25
36
47
58
69
80
1
IPV38 / IPV38WE
User Guide
Conformity of Use
For carefree and safe use of this product, please read this manual and safety information
carefully and follow the instructions. The unit is registered as a device that does not cause
or suffer from radio-frequency interference. It is CE approved and it conforms with the Low
Voltage Directory. The safety and installation instructions must be observed. Technical
manipulation of the product or any changes to the product are forbidden, due to security
and approval issues. Please take care to set up the device correctly - consult your user
guide. Young children should use the device only under adult supervision. No guarantee or
liability will be accepted for any damage caused due to incorrect use of the equipment
supplied, other than indicated in this owner’s manual.
SAFETY WARNINGS
•
•
•
•
•
To prevent short circuits, this product (except if specified for outdoor usage) should only
be used inside and only in dry spaces. Do not expose the components to rain or
humidity.
Only connect the adapter to the mains after checking whether the mains voltage is the
same as the values on the rating labels. Never connect an adapter or power cord
when it is damaged. In that case, contact your supplier. If there is any danger of a
thunderstorm, it is a good precaution to unplug the power supply from the mains
network in order to protect it from lightning. The same applies if the system is to be out
of action for any length of time.
Avoid strong mechanical tear and wear, extreme ambient temperatures, strong
vibrations and atmospheric humidity.
Do not disassemble any part of the product: the device contains live parts and no
user-serviceable parts are inside. The product should only be repaired or serviced by
qualified and authorized service personnel. Defected pieces must be replaced by
original (spare) parts.
Batteries: keep batteries out of the reach of children. Dispose of batteries as chemical
waste. Never use old and new batteries or different types of batteries together.
Remove the batteries when you are not using the system for a longer period of time.
When inserting batteries be sure the polarity is respected. Make sure that the batteries
are not short circuited and are not disposed in fire (danger of explosion).
In case of improper usage or if you have opened, altered and repaired the product
yourself, all guarantees expire. The supplier does not accept responsibility in the case of
improper usage of the product or when the product is used for purposes other than
specified. The supplier does not accept responsibility for additional damage other than
covered by the legal product responsibility.
6-8-2012
2
IPV38 / IPV38WE
1. Introduction
Thank you for purchasing this ebode product. With this product you can access your
camera's live video feed from your web browser or through software on your computer, your
tablet, or your smart phone.
2. Set Contents
IP Camera
Quick Setup Guide
CD
Mounting bracket
Wi-Fi Antenna
Power Supply
Network Cable
3. Setting up the device
Step 1: Hardware Installation
You need to set up your camera using a network cable (wired) first, before you can use it
wirelessly, so let’s start with plugging in the network cable. Plug one end of the network cable
into the camera, and the other end into an empty port of your router/switch/modem.
Install the Wi-Fi antenna. Plug the power adaptor into the camera and into an AC outlet.
Please note that your power supply will fit both the AC outlet and the Audio Output, please
make sure you put it in the AC outlet, or your IP camera will not be powered.
6-8-2012
3
IPV38 / IPV38WE
Step 2: Software Installation
Install the IP Camera Tool:
Insert the CD into the laptop/computer and click “IPCamSetup.exe”.
See the two pictures on the next page on where to find IPCamSetup.exe.
6-8-2012
4
IPV38 / IPV38WE
After following all steps of the installation, the icon “IP Camera Tool” will appear on your
desktop.
6-8-2012
5
IPV38 / IPV38WE
If you are using MS Windows Internet Explorer, you will also need the ActiveX software app.
Please take the following steps to install the software app. See the following pictures where to
find the software.
ActiveX: Click “Appinstall.exe”—“Next”—“Install”—“Finish”.
6-8-2012
6
IPV38 / IPV38WE
WARNING: You might get a
Windows Security Alert Popup. It
will ask you to choose a setting
for the firewall. Please make sure
you choose the ‘UNBLOCK’
option. Your IP camera will not
work without unblocking the
firewall settings. If the Firewall is
not Unblocked there will be no
Live Video from the camera!
Step 3: Real-time Video Demonstration
Login: Double click “IP Camera Tool” icon on your desktop, look for the IP address, choose
the one for your camera, double click to go to IE login interface. It may take a few minutes
before the IP address appears in the list.
Default username: admin
Password: no password, leave blank
6-8-2012
7
IPV38 / IPV38WE
Choose the language.
Choose the Sign In mode:
For IE (Internet Explorer) browser: choose ActiveX mode.
For Safari, Firefox, Google chrome browser: Chose Server Push Mode or VLC mode.
For Mobile phone: Chose sign in mobile phone mode.
Important:
If there is no picture shown in your Internet Explorer Web Browser
If using IE (Internet Explorer) browser to connect to the camera for the first time, and there is
no image displayed, there will be an ActiveX prompt in the top of the screen (see next
pictures), please click the prompt and choose Run Add-on, refresh the IE browser, and login
to the camera again, then you should be able to see live video.
Reminder:
Did you install the Appinstall.exe file from the CD from step 2?
If not you might have some certificate error in your web browser when trying to log in to the
camera. Install the Appinstall.exe and please try to login again. If the Appinstal.exe didn`t
work please take the next step.
6-8-2012
8
IPV38 / IPV38WE
6-8-2012
9
IPV38 / IPV38WE
If there is an image please skip the following step
If there is still no live video after you run ActiveX, please try to enable the ActiveX options of
Internet Explorer security settings, please take these steps:
Close your computer’s Firewall.
Change the ActiveX settings, open “Internet Explorer” browser and select “Tools” > “Internet
Options” > “Security”> “Custom Level” > “ActiveX control and Plug-ins”, all the ActiveX
options should be set to be “Enable”: Especially:
Enable: Download unsigned ActiveX controls
Enable: Initialize and script ActiveX controls not marked as safe
Enable: Run ActiveX controls and plug-ins
6-8-2012
10
IPV38 / IPV38WE
In Addition: you can also click “start” menu->“Internet Explorer”, choose “Internet Options
to enter Security setting. If there is still no image, please close your anti-virus software, and
then try steps 1 & 2 again. Please make sure that you unblocked the firewall when prompted
during step 2 (see WARNING) . If not, check your Firewall software that the camera is not
blocked.
Step 4: How to use your camera wireless
You should set up your camera using a network cable (wired) first before you can use it
wirelessly. (See Hardware Installation).
Make sure your router is a wireless router.
Make sure the Wi-Fi antenna is installed.
Determine if there is encryption for the WLAN of your router, if there is encryption, note the key
on paper, we will need it in the next steps. (Encryption is a term used for Password and type of
wireless security)
Login to the camera, click “Network”>”Wireless Lan Settings”>”Scan”, please scan 2 times,
then you will find your WLAN in the list. If there are multiple wireless Networks in the list, make
sure you choose the right one, picking the wrong one will prevent the camera from working.
Your Network name should be on the bottom of your router. Please note that the Network
name could be changed by the installer of your router.
If there is no encryption (Password/Security), just click “Submit”, if there is an encryption,
please input the following fields, then click “Submit”.
Encryption can be found on the bottom of the router or in the manual of the router. Please
note that the Encryption could also be changed by the installer of the router.
Steps explained:
Using Wireless Lan: check the box
SSID: is the name of the wireless router.
Network type: can also be found behind the SSID name in the Wireless Lan list.
Encryption: can also be found behind the SSID name in the Wireless Lan list, this is only the
type of encryption used, the password of your Wireless Lan can be found on the bottom of
your router if installed professional, you might also ask the person who installed your wireless
router for the correct password.
6-8-2012
11
IPV38 / IPV38WE
After clicking submit, wait about 30 seconds, the camera will reboot, then unplug the
network cable. In most cases you will need to login to the camera again. You can use the
“IPCamera Tool” from step 3 for this or enter the Camera`s IP address in your web browser.
In case you cannot find the IP Camera after 30 seconds rebooting please wait a little longer.
If you still cannot find your Camera using the IPCamera Tool, there might be used a wrong
type of Encryption or Password. Please also check that you selected the right SSID since the
camera might also pick up more signals from other routers. Maybe from your neighbors?
To view the camera’s image from outside the network, for example at work, school or at your
friends or family’s house, you need to setup some additional settings found in the full manual.
Please go to step 3.6 UPnP Settings to set this up. Important: please make sure you reconnect
your camera with your router via the network cable, before you start the UPnP setup.
There is a full version of the manual on the CD that comes with your camera, but we suggest
you go to www.ebodeelectronics.eu for the latest version of the manual. We update this
manual regularly.
For more details, support, FAQ and the full version of the manual
or the “up to date” version of this Quick Start Guide,
please visit our website at www.ebodeelectronics.eu.
6-8-2012
12
IPV38 / IPV38WE
Compatible Apps for mobile devices
Recently we introduced our own ebode app for the IP camera. With this
app you can remotely view and control your ebode IP camera from
your iPad®, iPhone® or iPod Touch®, wherever you are*.
Go to the App Store to download the IPVision App (€3,99)
FEATURES
- View the live video feed of your cameras
- Control the cameras in all 8 directions (if supported by the camera)
- Motion detection (only for cameras that support it): send mail on motion detection, set
sensitivity, Quickly enable/disable the alarm
- Zoom in and out on the image by pinching (even when your camera doesn't support zoom)
- Fullscreen by rotating the device to a landscape position
- Fullscreen controls
- Swipe in fullscreen view to select another camera, this only works when not zoomed in
(double tap to zoom to 100%)
- Take snapshots and save it to your camera roll
- Adjust brightness/contrast
- Mirror and flip is taken into account (so the controls will still work intuitively, even when the
camera is mounted to a ceiling for example)
- Change camera resolution
- Adjust brightness and contrast
- Multiple camera support (up to 144 cameras)
- Mosaic view for showing 4 cameras (in landscape) and 6 cameras (in portrait)
simultaneously
- Swipe in mosaic view to view more other cameras
- Possibility to lock PTZ controls and/or rotation
- iOS 4 tested and supported
- Taking full advantage of retina display on iPhone 4
SUPPORTED CAMERAS
Please note that this app is ONLY compatible with ebode MJPEG cameras, cameras of other
brands are not supported.
*** NOTE THAT NOT ALL FEATURES WILL WORK WITH ALL CAMERA MODELS ***
*3G or wireless network connection required. For use outside your home network you'll need
to setup port forwarding on your router, see the FAQ.
Also there is a free App available: The CamViewer from John McKerrell
6-8-2012
13
IPV38 / IPV38WE
Bedienungsanleitung
Konformitätserklärung
Bitte lesen Sie diese Bedienungsanleitung und Sicherheitsinformationen für eine sorgenfreie
und sichere Anwendung dieses Produktes. Das Gerät ist als Apparat registriert, welches keine
Radio-Funkfrequenzen stört und auch von diesen nicht gestört wird. Es ist CE-bestätigt und
erfüllt
die
Niederspannungsvorschriften.
Die
Bedienungsanleitung
und
die
Sicherheitsinformationen müssen beachtet werden. Technische Manipulationen oder
jegliche Veränderungen des Produktes sind aus Gründen der Sicherheit und der
Konformitätserklärung verboten. Bitte beachten Sie die korrekte Anwendung des Produktes –
lesen Sie die Bedienungsanleitung. Kleinkinder sollten dieses Gerät nur unter Aufsicht von
Erwachsenen benutzen. Es wird keine Garantie oder Haftung für Schäden übernommen, die
durch eine über diese Bedienungsanleitung hinausgehende inkorrekte Bedienung des
Gerätes entstehen.
SICHERHEITSWARNUNGEN
•
Um Kurzschlüsse zu vermeiden, darf dieses Produkt (außer wenn explizit für den
Außenbereich spezifiziert) nur im Innenbereich und an trockenen Orten verwendet
werden. Setzen Sie dieses Gerät nicht dem Regen oder Feuchtigkeit aus.
•
Schließen Sie den Netzstecker nur an die Stromversorgung an, wenn Sie sich vergewissert
haben, dass die Spannung der Stromversorgung den Werten des Netzteils entspricht.
Verwenden Sie nie einen Stromstecker oder ein Stromkabel, wenn diese beschädigt sind.
In diesen Fällen setzen Sie sich mit Ihrem Händler in Verbindung. Im Falle eines Gewitters
ist es empfehlenswert, das Netzteil vom Stromnetz zu trennen, um dieses vor einem
Blitzschlag zu schützen. Dies ist auch bei längerem Nichtgebrauch empfehlenswert.
•
Vermeiden Sie starken Zug und Druck, extreme Umgebungstemperaturen, starke
Erschütterungen und hohe Luftfeuchtigkeit.
•
Zerlegen Sie kein Teil dieses Produktes: Dieses Gerät enthält gefährliche Spannungen
und keine vom Anwender reparierbare Bestandteile. Dieses Produkt sollte nur von
qualifizierten und autorisierten Personen repariert und instandgesetzt werden. Defekte
Teile müssen durch Original (Ersatz-) Teile ersetzt werden.
•
Batterien: Halten Sie Batterien außer Reichweite von Kindern. Entsorgen Sie Batterien als
chemischen Abfall. Verwenden Sie niemals alte Batterien oder unterschiedliche Typen
von Batterien. Entfernen Sie die Batterien, wenn Sie das System für eine längere Zeit nicht
benutzen. Beachten Sie beim Einsetzen der Batterien die korrekte Polarität. Stellen Sie
sicher, dass die Batterien nicht kurzgeschlossen sind und diese im Feuer entsorgt werden
(Explosionsgefahr).
Im Falle unsachgemäßer Anwendung, oder wenn Sie das Produkt geöffnet, verändert oder
selbst repariert haben, erlischt jegliche Garantie. Der Hersteller übernimmt keine
Verantwortung im Falle einer unsachgemäßen Anwendung oder wenn das Produkt für
andere Zwecke als die genannten eingesetzt wird. Der Hersteller übernimmt keine
Verantwortung für zusätzlichen Schaden, der über eine Produkthaftung hinausgeht.
1. Einleitung
Vielen Dank für den Kauf des ebode IP Vision. Mit diesem Produkt können Sie auf Live-Bilder
Ihrer Kamera über Ihren Web-Browser oder Software auf Ihrem Computer, Ihrem Tablet oder
Ihrem Smartphone zugreifen.
6-8-2012
14
IPV38 / IPV38WE
Nachdem die Kamera konfiguriert ist, können Sie über jede dieser Methoden zugreifen:
1. Benutzen Sie das IPcam-Setup-Programm auf der beiliegenden CD und klicken Sie auf Ihre
Kamera
2. Wenn Sie die Live-Bilder Ihrer Kamera betrachten, können Sie die Web-Adresse unter Ihren
Favoriten speichern. Sie können dann die gespeicherte Favoriten-Adresse immer wieder
benutzen, ohne das Set-up-Programm ausführen zu müssen.
3. Geben Sie in Ihrem Web-Browser die IP-Adresse Ihrer Kamera als neue Web-Adresse ein.
4. Um einen eigenen Namen wie „'mylivingroom.dyndyns“ zu verwenden, lesen Sie in der
Gebrauchsanleitung, wie Dynamic DNS verwendet werden können.
5. Um auf Ihre Kamera über das Internet oder über ein Handy via 3G/4G zuzugreifen,
benutzen Sie die Software oder lesen Sie in der Gebrauchsanleitung, wie Ihr Router zur
Port-Weiterleitung konfiguriert werden kann.
2. Inhalt
Drahtlose IP-Kamera
Quick Setup Guide
CD
Befestigungshalterung
Wi-Fi Antenna
Gleichstrom-Netzteil
Netzwerk Kabel
3. Installation
Schritt 1: Hardware Installation
Bevor die Kamera kabellos benutzt werden kann, muss sie unter Benutzung eines
Netzwerk-Kabels konfiguriert werden, also lasst uns mit dem Einstecken des Netzwerkkabels
starten. Verbinden Sie das Netzwerkkabel mit der Kamera, das andere Ende an einen freien
Port des Router / Switch.
Installieren Sie die Wi-Fi-Antenne. Verbinden Sie das Netzteil mit der Kamera. Beachten Sie,
dass der Adapter sowohl in den Eingang (rechts) und in den Eingang (links) passt, stellen Sie
sicher das sie diese richtig anschliessen, da sonst die Kamera keinen Strom bekommt.
6-8-2012
15
IPV38 / IPV38WE
Schritt 2: Software Installation
Installieren Sie die IP Kamera Tool:
Legen Sie die CD in den Laptop/Computer und klicken Sie auf “IPCamSetup.exe”.
Siehe die beiden folgenden Bildern, wo Sie IPCamSetp.exe finden.
6-8-2012
16
IPV38 / IPV38WE
Nachdem Sie alle Schritte der Installation, erscheint das Icon “IP Camera Tool” auf dem
Desktop.
6-8-2012
17
IPV38 / IPV38WE
Wenn Sie Windows verwenden, müssen Sie auch das ActiveX-Software App. Installieren.
Führen Sie zur Installation die folgenden Schritte aus. Die 2 folgenden Bilder zeigen, wo Sie die
richtigen Dateien finden können:
ActiveX: Click “Appinstall.exe”—“Next”—“Install”—“Finish”.
6-8-2012
18
IPV38 / IPV38WE
Warnung: Es könn ein Windows
Security Alert Popup erscheinen.
DiesesrPopup fragt Sie nach
Ihrer Firewall-Einstellung. Achten
Sie
darauf,
das
Sie
die
"Blockierung aufheben"-Option
waehlen.
Ihre
IP-Kamera
wird anders nicht funktionieren.
Schritt 3: Konfiguratonsanleitung
Login: Doppelklicken Sie auf das “IP Camera Tool” Icon auf dem Desktop, suchen Sie die
IP-Adresse, wählen Sie eine Kamera und doppelklicken Sie darauf, um zum IE Login Interface
zu gelangen. Es kann einige Minuten dauern, bevor die IP-Adresse in der Liste erscheint.
Standard–Benutzername: admin
Passwort: kein Passwort, bitte freilassen
6-8-2012
19
IPV38 / IPV38WE
Wählen Sie die Sprache
Wählen Sie den Betriebsmodus:
IE (Internet Explorer) Browser: Wählen Sie den ActiveX Modus.
Safari, Firefox, Google Chrome Browser: Server Push Modus/VLC Modus
Mobiltelefon: Geben Sie den Mobiltelefon Modus ein.
Wichtig!:
ActiveX Einstellungen für Internet Explorer Browser
Wenn Sie einen IE Browser benutzen, um die Kamera das erste Mal anzuschließen, ist es
möglich, dass auf dem Bildschirm kein Bild erscheint (siehe folgende Bilder).Klicken Sie dann
auf die ActiveX Anzeige und wählen Sie Run Add-on, aktualisieren Sie das IE Interface und
melden Sie die Kamera wieder an und Sie sehen das Live-Video.
Zur Erinnerung:
Haben Sie die appinstall.exe-Datei von der CD installiert, wie in den vorherigen Schritten
beschrieben?
Wenn Sie dies (noch) nicht getan haben, erhalten Sie ein Fehlermeldung auf Ihrem Bildschirm,
wenn Sie die Kamera anmelden.
6-8-2012
20
IPV38 / IPV38WE
6-8-2012
21
IPV38 / IPV38WE
Wenn Sie ein Bild haben, können Sie diesen Schritt überspringen.
Falls nach der ActiveX Ausführung immer noch kein Live-Video zu sehen ist, versuchen Sie
bitte, die ActiveX Optionen der IE Sicherheitseinstellungen zu aktivieren. Führen Sie hierzu die
folgenden Schritte durch:
Heben Sie den Firewall Ihres Computers auf. Ändern Sie die ActiveX Einstellungen, “IE”
browser > “Tool” > “Internet Options” > Security”> “Custom Level” > “ActiveX control and
Plug-ins”, alle ActiveX Optionen sollten mit “Enable” markiert sein, insbesondere:
Enable: Download unsigned ActiveX controls
Enable: Initialize and script ActiveX controls not marked as safe
Enable: Run ActiveX controls and plug-ins
Wenn es immer noch kein Bild gibt, schließen Sie bitte Ihre Antivirus-Software und versuchen
6-8-2012
22
IPV38 / IPV38WE
Sie dann Schritt 1 und 2 nochmal. Bitte stellen Sie sicher, dass Ihre Firewall Schritt 2 nicht
blockiert (siehe vorherige Warnung). Wenn Sie es nicht bereits getan haben, überprüfen Sie,
ob Ihre Firewall-Software die Kamera blockiert.
Schritt 4: Drahtlose Einstellungen vornehmen
Bevor die Kamera kabellos benutzt warden kann, muss sie unter Benutzung eines
Netzwerk-Kabels konfiguriert werden (s. Hardware-Installation)
1. Vergewissern Sie sich, dass der Router drahtlos ist.
2. Vergewissern Sie sich, dass die Wi-Fi Antenne installiert ist.
3. Überprüfen Sie, ob es eine Verschlüsselung des WLAN-Routers gibt. Wenn es eine
Verschlüsselung gibt, bewahren Sie diese auf, wir benötigen sie in den nächsten Schritten.
(Encryption/Verschlüsselung ist ein Begriff für Passwörter und verschiedene Arten von
Wireless-Sicherheit).
4. Melden Sie die Kamera an und klicken Sie auf “Network”>”Wireless Lan Settings”>”Scan”.
Scannen Sie bitte zweimal. Danach finden Sie das WLAN in der Liste und wählen dasjenige
aus, das Sie benutzen.
5. Wenn es keine Verschlüsselung gibt, klicken Sie einfach auf “Submit”, und wenn eine
Verschlüsselung vorliegt, machen Sie die folgenden Eingaben in den Feldern und klicken
dann auf “Submit”.
Wireless LAN verwenden: aktivieren Sie das Kontrollkästchen
SSID ist der Name des WLAN-Routers.
Netzwerk-Typ: Hinter dem SSID-Namen in der Wireless-LAN-Liste zu finden.
Verschlüsselung: Wird auch hinter dem SSID-Namen in der Liste Wireless Lan gefunden. Dies ist
die Art der Verschlüsselung, die verwendet wird. Das Passwort Ihres Wireless LAN ist an der
Unterseite des Routers zu finden, wenn er professionell installiert ist. Ansonsten fragen Sie die
Person, die den Router installiert hat, nach dem richtigen Passwort.
6-8-2012
23
IPV38 / IPV38WE
6. Warten Sie ca. 30 Sekunden, bis die Kamera neu startet, und ziehen Sie dann das
Netzwerkkabel ab. In den meisten Fällen müssen Sie sich erneut anmelden auf der Kamera.
Sie können das Tool in Schritt 3 verwenden oder die IP-Adresse der Kamera in Ihren Browser
eingeben.
Wenn Sie nach einem Neustart nach 30 Sekunden die Kamera noch nicht finden können,
warten Sie bitte ein wenig länger. Wenn Sie die Kamera dann immer noch nicht finden
können, nutzen Sie das IP-Kamera-Werkzeug, es wurde wahrscheinlich eine falsche Art von
Verschlüsselung oder ein falsches Passwort verwendet. Bitte stellen Sie sicher, dass Sie die
richtige SSID verwenden, u.U. holt sich die Kamera andere Signale vom Router. Vielleicht die
Ihres Nachbarn?
Um Bilder von der Kamera außerhalb des Netzes anzuzeigen, wie z.B. von der Arbeit, der
Schule oder bei Freunden zu Hause, werden Sie einige zusätzliche Optionen benötigen.
Weitere Informationen finden Sie im Handbuch. Durch Schritt 3,6 UPnP-Einstellungen können
Sie das ändern. Wichtig: Achten Sie auf den Anschluss der Kamera an den Router über das
Netzwerkkabel, bevor Sie die UPnP-Einstellung starten!
Es ist eine vollständige Version des Handbuchs auf der CD enthalten, aber wir beraten Sie
gerne auf unserer Website www.ebodeelectronics.eu auf der Suche nach der neuesten
Version des Handbuchs. Wir aktualisieren es regelmäßig.
Kompatibel App für mobile Gerätes:
Kürzlich haben wir unser eigenes ebode App für das IP-Kamera eingeführt. Mit dieser App
können Sie anzeigen und steuern Ihre ebode IP-Kamera von Ihrem iPad ®, iPhone ® oder
iPod Touch ®, wo immer Sie sind (Eine Übersicht aller Features finden Sie auf Seite 13).
Gehen Sie zum App Store, um die IPVision App (3,99 €) herunterladen.
Auch gibt es eine kostenlose App zur Verfügung: Die CamViewer von John McKerrell.
Für mehr Details sehen Sie bitte in der kompletten Gebrauchsanleitung nach unter:
www.ebodeelectronics.eu.
6-8-2012
24
IPV38 / IPV38WE
Gebruiksaanwijzing
Gebruiksvoorschrift
Lees voor een zorgeloos en veilig gebruik van dit product deze handleiding en de
veiligheidsinformatie zorgvuldig door en volg deze op. Dit apparaat is gefabriceerd en
goedgekeurd in overeenstemming met de CE-richtlijnen. Raadpleeg voor correct gebruik
deze gebruikershandleiding. Technische veranderingen of andere aanpassingen van het
product zijn niet toegestaan om redenen van veiligheid en keuringen. Om een juiste
installatie te waarborgen dient u de gebruikershandleiding goed door te nemen.
Gebruik van dit apparaat door kinderen alleen onder toezicht van een volwassene. Dit
apparaat moet worden gebruikt volgens de aanwijzingen in deze handleiding en is niet
geschikt voor andere doeleinden.
SAFETY WARNINGS
Om kortsluiting te voorkomen, dient dit product (tenzij anders aangegeven)
uitsluitend binnenshuis gebruikt te worden, en alleen in droge ruimten. Stel de
componenten niet bloot aan regen of vocht.
•
Sluit de netadapter pas op het lichtnet aan nadat u hebt gecontroleerd of de
netspanning overeenkomt met de waarde die op de typeplaatjes is aangegeven.
Sluit een netadapter of netsnoer nooit aan wanneer deze beschadigd is. Neem in dat
geval contact op met uw leverancier. Om schade door blikseminslag te voorkomen,
moeten de apparaten bij onweer van het net losgekoppeld worden. Hetzelfde geldt
wanneer het product voor lange tijd niet gebruikt wordt.
•
Vermijd overmatige mechanische slijtage en schade, extreme temperaturen, sterke
vibraties en hoge luchtvochtigheid.
•
Het product nooit openmaken: de apparatuur bevat onderdelen waarop
levensgevaarlijke spanning staat, en er zijn geen onderdelen die zelf vervangen
kunnen worden. Laat reparatie of service alleen over aan deskundig personeel.
Defecte onderdelen enkel en alleen vervangen met originele (reserve) onderdelen.
•
Batterijen: houd batterijen buiten bereik van kinderen. Lever batterijen in als klein
chemisch afval. Gebruik nooit oude en nieuwe batterijen of verschillende typen
batterijen door elkaar. Verwijder de batterijen wanneer u het systeem langere tijd niet
gebruikt. Let bij het inleggen van de batterijen op de polariteit (+ / -): verkeerd
inleggen kan explosiegevaar opleveren.
Bij oneigenlijk gebruik, zelf aangebrachte veranderingen of reparaties, komen alle
garantiebepalingen
te
vervallen.
De
leverancier
aanvaardt
geen
productaansprakelijkheid bij onjuist gebruik van het product of door gebruik anders dan
waarvoor het product is bestemd. De leverancier aanvaardt geen aansprakelijkheid voor
volgschade anders dan de wettelijke productaansprakelijkheid.
•
1. Introductie
Bedankt voor uw aankoop van dit ebode product. Met dit product heeft u toegang tot de
live video feed van uw camera die aangesloten is op uw web browser of via software op uw
computer, tablet of smart phone.
Als de camera éénmaal geconfigureerde is, heeft u toegang to uw camera via één van
onderstaande methodes:
6-8-2012
25
IPV38 / IPV38WE
1. Gebruik het IPcam setup programma op de bijgesloten CD en klik op uw camera
2. Als u de beelden op uw camera aan het bekijken bent, dan kunt u het web adres opslaan
onder favorieten. Dan kunt u deze gebruiken zonder elke keer het IPcam setup programma
op te starten.
3. Typ het IP adres van uw camera in uw web browser als een nieuw web adres
4. Voor een gebruiksvriendelijke naam, zoals ‘mylivingroom.dyndyns.org’ kunt u in de
volledige handleiding meer informatie vinden over het configureren van uw camera met
dynamische DNS.
5. Om uw camera via het Internet te bekijken, of met een mobiele telefoon via een 3G/4G
connectie, kunt u de software gebruiken, of in de handleiding kijken hoe u uw router en
poort forwarding kunt instellen.
2. Kit inhoud
Draadloze IP Camera
Quick Start Guide
CD
Bevestigingssteun
Wi-Fi Antenna
Voedingsadapter
Netwerk Kabel
3. Het apparaat instellen
Stap 1: Hardware Installatie
Volg de onderstaande instructies stap voor stap om de camera te installeren. U moet eerst
uw camera met de netwerkkabel (bedraad dus) installeren, voordat u deze draadloos kunt
gebruiken. Sluit het ene uiteinde van de netwerkkabel aan op de camera en het andere
uiteinde op een lege poort op uw kabel/ADSL modem of netwerk router / switch.
Installeer de Wi-Fi antenne. Sluit de voedingsadapter aan op de camera en stop de adapter
in het stopcontact. Let op, de voedingsadapter past in zowel de AC Outlet (rechts) als in de
Audio Out (links), let erop dat u deze juist aansluit, anders zal de camera geen stroom krijgen.
6-8-2012
26
IPV38 / IPV38WE
Stap 2: Software Installatie
Installeer de IP Camera Tool:
Plaats de CD in de laptop/computer en klik op “IPCamSetup.exe”
Zie de 2 afbeeldingen op de volgende pagina waar u “IPCamSetup.exe”kunt vinden.
6-8-2012
27
IPV38 / IPV38WE
Nadat alle stappen van de installatie zijn doorlopen, zal het icoontje “ÏP Camera Tool” op het
bureaublad worden getoond.
6-8-2012
28
IPV38 / IPV38WE
Als u Windows gebruikt, heeft u ook de ActiveX software app nodig. Neem de volgende
stappen om dit te installeren. De 2 afbeeldingen hieronder laten zien waar u de juiste
bestanden kunt vinden.
ActiveX: Click “Appinstall.exe”—“Next”—“Install”—“Finish”.
6-8-2012
29
IPV38 / IPV38WE
Waarschuwing:
Er kan een Windows Security Alert Popup
verschijnen. Deze popup vraagt u een
setting voor uw firewall te kiezen. Let erop
dat u de ‘Blokkering opheffen’ optie kiest.
Uw IP camera zal anders niet werken.
Stap 3: Real-time Video Demonstratie
Login: Dubbelklik op het “IP Camera Tool” icoontje op uw bureaublad, kijk naar het IP adres,
en kies degene voor uw camera. Dubbelklik op het icoontje om naar de IE login interface te
gaan. Het kan een paar minuten duren voordat het IP adres in de lijst verschijnt.
Standaard gebruikersnaam: admin
Wachtwoord: geen wachtwoord, dit veld leeg laten
6-8-2012
30
IPV38 / IPV38WE
Kies de gewenste taal.
Kies één van de volgende opties:
Voor Internet Explorer browsers kies ActiveX modus
Voor Safari, Firefox, Google Chrome browser, kies Server Push Mode of VLC modus.
Voor mobiele telefoons, kies mobile phone modus.
Belangrijk:
Als de Internet Explorer (IE) browser geen beeld laat zien
Als u een IE browser gebruikt om de camera voor de eerste keer aan te sluiten, en er is geen
beeld, dan is er een ActiveX melding bovenaan uw scherm (zie volgende afbeeldingen). Klik
op de melding en kies ‘Run Add-on’, dan kunt u de IE browser verversen (klik F5). Daarna kunt
u opnieuw inloggen op de camera, en zou u live video moeten zien.
Herinnering:
Heeft u het Appinstall.exe bestand van de CD geïnstalleerd, zoals in de vorige stappen
beschreven staat?
Als u dit (nog) niet gedaan heeft, kunt u een error in uw scherm krijgen wanneer u probeert in
te loggen op de camera.
6-8-2012
31
IPV38 / IPV38WE
6-8-2012
32
IPV38 / IPV38WE
Als u wel beeld heeft kunt u deze stap overslaan.
Als u nog steeds geen live beeld heeft nadat de update is uitgevoerd, dan kunt u de Active
X opties aanzetten van uw Internet Explorer beveiligingsinstellingen. Dat doet u op de
volgende manier:
Sluit uw computer’s Firewall.
Verander de ActiveX settings, open een IE browser en kies ‘Tools’ > ‘Internet Options’ >
‘Security’ > ‘Custom Level’ > ‘ActiveX control and Plug-ins’. Alle ActiveX opties zouden op
‘enable’ moeten staan. Vooral:
Enable: Download unsigned ActiveX controls
Enable: Initialize and script ActiveX controls not marked as safe
Enable: Run ActiveX controls and plug-ins
6-8-2012
33
IPV38 / IPV38WE
Als u nu nog steeds geen beeld heeft, sluit dan uw anti-virus software, en probeer stap 1 en 2
nogmaals. Zorg er aub voor dat u de firewall blokkering heeft opgeheven in stap 2 (zie de
eerdere waarschuwing). Als u dit niet gedaan heeft, check dat uw Firewall software de
camera niet blokkeert.
Stap 4: De camera draadloos gebruiken
U moet eerst uw camera via de netwerkkabel installeren, voordat u deze draadloos kunt
gebruiken (zie hardware installatie).
Zorg ervoor dat u een draadloze router heeft en dat de Wi-Fi antenne geïnstalleerd is.
Kijk of er een encryptie is voor de WLAN van uw router, als die er is, noteer dan de ‘key’, we
hebben deze nodig bij de volgende stappen. (Encryptie is een term die gebruikt worden
voor wachtwoorden en verschillende typen van draadloze beveiliging).
Login op de camera, klik ‘Network’ > ‘Wireless Lan Settings’ > ‘Scan’, scan 2 keer, dan ziet u
de WLAN lijst. Als er meerdere WLAN zijn, zorg ervoor dat u dan de juiste kiest. Als er geen
encryptie is, dan klikt u op ‘Sumbit’, als er wel een encryptie is, dan voert u de de volgende
velden in en klikt u daarna op ‘submit’.
Using Wireless Lan: vink de box aan
SSID: is de naam van de draadloze router.
Network type: kan gevonden worden achter de SSID naam in de Wireless Lan lijst.
Encryption: kan ook gevonden worden achter de SSID naam in de Wireless Lan lijst, dit is het
type encryptie wat gebruikt wordt, het wachtwoord van uw Wireless Lan kan gevonden
worden op de onderkant van de router, als deze professioneel geïnstalleerd is. Anders kunt u
de persoon die de router geïnstalleerd heeft vragen om het juiste wachtwoord.
6-8-2012
34
IPV38 / IPV38WE
Wacht nu 30 seconden, de camera zal opnieuw opstarten, daarna kunt u er de
netwerkkabel uit halen.
In de meeste gevallen moet u opnieuw inloggen op de camera. U kunt hiervoor de
IPCamera tool uit stap 3 gebruiken of het IP adres van de camera intypen in uw browser.
Indien u de camera na 30 seconden rebooten nog niet kunt vinden, graag nog wat langer
geduld. Als u daarna de camera nog steeds niet kunt vinden met de IP Camera Tool, dan is
er wellicht een verkeerd type van Encryptie of Wachtwoord gebruikt. Zorg er aub voor dat u
de juiste SSID geselecteerd heeft, omdat de camera ook andere signalen zou kunnen
oppikken van de router. Wellicht van uw buren?
Om de beelden van de camera buiten het netwerk te bekijken, bijvoorbeeld op uw werk,
school, of bij vrienden thuis, moet u nog wat extra opties instellen. Meer informatie hierover
kunt u vinden in de handleiding. Via stap 3.6 UPnP Settings kunt u dit instellen. Belangrijk: zorg
ervoor dat u de camera weer verbind met uw router via de netwerk kabel, voordat u begint
met het instellen van de UPnP.
Er staat een volledige versie van de handleiding op de bijgeleverde CD, maar we adviseren
u graag om op onze site www.ebodeelectronics.eu te kijken voor de laatste versie van de
handleiding. We updaten deze regelmatig.
Compatibele Apps:
Onlangs hebben we onze eigen ebode App voor de IP-camera geïntroduceerd. Met deze
App kunt u uw ebode IP camera bekijken en bedienen vanaf uw iPad ®, iPhone ® of iPod
Touch ®, waar u ook bent* (voor een overzicht van alle features, kijkt u op pagina 13).
Ga naar de App Store om de IPVision App (€ 3,99) te downloaden.
Ook is er een gratis app beschikbaar: De CamViewer van John McKerrell
Voor meer details kunt u de complete handleiding raadplegen,
welke te vinden is op onze website www.ebodeelectronics.eu.
6-8-2012
35
IPV38 / IPV38WE
Användermanual
För bästa avnvändning
För att du ska ha störst möjliga nytta av denna produkt och för att du ska kunna använda
den på ett säkert sätt är det viktigt att du läser igenom den här manualen och är särskilt
noga med säkerhetsinstruktionerna. Enheten är registrerad som en enhet som inte orsakar
störningar på radiosändningar. Den är CE godkänd och följer de krav som finns för
lågspänningsprodukter. Alla instruktioner, särskilt gällande säkerhet och installation, måste
följas. Teknisk manipulation av produkten, eller andra ändringar, är förbjudna eftersom det
äventyrar din säkerhet samt kräver tillstånd. Se till så att du ställer in enheten på rätt sätt –
instruktioner finns i denna manual. Unga barn ska bara använda enheten under en vuxen
persons överseende. Garantin kommer inte att gälla om skada uppstår i samband med
felaktig användning av enheten, så använd den bara så som anges i manualen.
SÄKERHETSFÖRESKRIFTER.
För att förhindra kortslutning är det viktigt att produkten (om ej annat anges) bara
används inomhus och på torra platser. Utsätt inte enheten för regn eller fukt.
•
Anslut enbart adaptern till ett eluttag efter att du kollat så att elstandarden i ditt hem
överensstämmer med specifikationerna på etiketten. Anslut aldrig en adapter eller en
elsladd som är skadad. Om sladd eller adapter tagit skada, vänd dig till din
återförsäljare. Vid åska och storm bör du koppla från enheten från elnätet för att
skydda mot blixtnedslag. Samma sak gäller om du inte ska använda enheten under
lång tid, koppla från den.
•
Undvik starka stötar och mekaniskt slitage samt extrema temperaturer. Samma sak
gäller för vibrationer och hög luftfuktighet.
•
Plocka aldrig isär någon del av enheten. Inuti finns hög spänning och det finns inget
underhåll som du kan utföra själv. Enheten ska enbart repareras av kvalificerad
personal som är godkänd av tillverkaren. Måste delar bytas ut så ska de bytas ut till
originaldelar.
•
Adaptern: Anslut bara adaptern till ett eluttag efter att du kollat så att elstandarden i
ditt hem/kontor överensstämmer med specifikationerna på produkten. Anslut aldrig
enheten då sladden eller adaptern är skadad. Om skada uppstått, kontakta din
återförsäljare.
•
Batterier: håll batterierna utom räckhåll för barn. Återvinn batterierna i närmaste
batteriholk. Använd aldrig gamla batterier eller batterier av olika märken/typer
tillsammans. Ta ur batterierna då du inte ska använda enheten under lång tid. Då du
sätter i batterierna ska du se till så att polerna ligger rätt. Se till så att batterierna inte
kortsluter och att de inte kommer i kontakt med öppna lågor (de kan explodera).
Vid felaktig användning, om enheten har alternerats eller reparerats av okvalificerad
personal så gäller inte garantin längre. Tillverkaren och återförsäljaren tar inget som helst
ansvar om produkten har använts på annat sätt än vad som anges i manualen.
Återförsäljaren tar inget som helst ansvar för skador som inte täcks specifikt av garantin.
•
1. Inledning
Tack för att du köpa ebode-produkt. Med denna produkt kan du komma åt din kameras
livevideo-feed från din webbläsare eller genom programvara på din dator, din tablett eller
din smartphone.
6-8-2012
36
IPV38 / IPV38WE
1. Använd installationsprogrammet IPcam på den medföljande CD-skivan och klicka på
kameran.
2. Då du kan titta på kamerans livevideo kan du spara webbadressen som en favorit. Sedan
kan du använda den sparade favoriten utan att du varje gång behöver använda
installationsprogrammet IPcam.
3. I din webbläsare skriver du IP-adressen för din kamera som en ny webbadress.
4. För att använda ett eget namn som "mylivingroom.dyndyns.org", se bruksanvisningen om
hur man konfigurerar kameran för att använda dynamisk DNS.
5. För att se kameran över nätet, eller från en mobiltelefon via en 3G/4G-anslutning, ska du
använda programvaran, eller läs bruksanvisningen om hur du kan konfigurera din router för
portforwarding.
2. Innehåll Installation
IP-kamera
Snabbinstallationsguide
CD
Monteringsfäste
Wi-Fi Antenn
Strömförsörjning
Nätverkskabel
3. Installation av enheten
Steg 1: Installation av maskinvara
Du måste installera din kamera med en nätverkskabel (ej trådlöst) först, innan du kan försöka
använda den trådlöst. Anslut den ena änden av nätverkskabeln till kameran och den andra
ändeni en tom port till din router/switch/modem.
Installera Wi-Fi-antennen. Anslut nätadaptern till kameran och till ett vägguttag. Observera
att strömförsörjningen passar både vägguttaget och Audio Out, se till att du sätter den i
vägguttaget, eller din IP-kameran kommer inte att drivas.
6-8-2012
37
IPV38 / IPV38WE
Nätverkskabel
Nätverks
kabel
Router/switch
Steg 2: Installation av programvara
Installera IP Camera Tool:
Sätt in CD den laptop / computer och klicka på “IPCamSetup.exe”.
Se de 2 bilderna på nästa sida där du kan hitta “IPCamSetup.exe”.
6-8-2012
38
IPV38 / IPV38WE
Efter att ha följt alla steg i installationen, kommer ikonen “IP Camera Tool” visas på skrivbord.
6-8-2012
39
IPV38 / IPV38WE
Om du använder Windows, behöver du även ActiveX programmet app. Ta följande steg för
att installera detta. De 2 bilderna nedan visar var du hittar de rätta filerna.
ActiveX: Klicka på “Appinstall.exe”—“Next”—“Install”—“Finish”.
6-8-2012
40
IPV38 / IPV38WE
VARNING: Du kommer att få en
Windows Security Alert Popup.
Den kommer att fråga dig att
välja en inställning för firewall. Se
till att du väljer "UNBLOCK"
alternativet.
Din
IP-kamera
fungerar inte utan avlastning
firewall inställningarna.
Steg 3: Demonstration av realtidsvideo
Inloggning: Dubbelklicka på ikonen “IP Camera Tool” på skrivbordet, leta efter IP-adressen,
välj ett för din kamera, dubbelklicka för att gå till gränssnittet IE inloggning. Det kan ta några
minuter innan IP-adressen visas i listan.
Standard användarnamn: admin
Lösenord: Inget lösenord, lämna tomt
6-8-2012
41
IPV38 / IPV38WE
Välj språk.
Välj läge.
För Internet Explorer-webbläsaren: välj ActiveX-läge.
För Safari, Firefox, Google Chrome webbläsarna: Välj läget "Server Push" eller VLC-läge.
För Mobiltelefon: Välj läge "Logga in mobiltelefon".
Viktigt:
Om ingen bild visas i Internet Explorer (IE)-webbläsaren
Om du använder IE webbläsaren för att ansluta till kameran för första gången, och det visas
ingen bild, kommer det att finnas en ActiveX-prompt i den övre delen av skärmen (se nästa
bild), klicka på prompten och välj Kör Add-on, uppdatera IE webbläsaren och logga in på
kameran igen, därefter kommer du att kunna se livevideo.
Påminnelse:
Har du installerat Appinstall.exe filen från CD-skivan från föregående steg?
Om inte kanske du har några certifikat fel i din webbläsare när du försöker logga in på
kameran.
6-8-2012
42
IPV38 / IPV38WE
6-8-2012
43
IPV38 / IPV38WE
Om du har en bild nu, snälla hoppa över följande steg
Om det fortfarande inte visas livevideo när du har kört ActiveX, försöker du aktivera
ActiveX-alternativen i IE-säkerhetsinställningar, genom att utföra följande steg:
Stäng datorns brandvägg.
Ändra inställningarna för ActiveX, öppna “IE”-webbläsare och välj “Tools” > “Internet
Options” > “Security”> “Custom Level” > “ActiveX control and Plug-ins”; alla
ActiveX-alternativ ska ställas in till “Enable”: Speciellt:
Enable (Aktivera): Download unsigned ActiveX controls (Hämta osignerade
ActiveX-kontroller):
Enable (Aktivera): Initiera och kör skript på ActiveX-kontroller som inte är säkra
Enable (Aktivera): Run ActiveX controls and plug-ins (kör ActiveX-kontroller och
plugin-program):
6-8-2012
44
IPV38 / IPV38WE
Om det finns fortfarande inte visas någon bild, stänger du ditt antivirusprogram och försöker
sedan steg 1 och 2 igen. Se till att du oblockerade Firewall när du blir uppmanad i steg 2 (se
varning). Om inte, kontrollera i din Firewall att kameran inte är blockerad.
Steg 4: Hur du använder din kamera trådlöst
Du måste installera din kamera med en nätverkskabel (ej trådlöst) först, innan du kan försöka
använda den trådlöst. (Se Installation av maskinvara).
Kontrollera att din router är en trådlös router.
Kontrollera att Wi-Fi antennen har installerats.
Kontrollera om det finns kryptering för WLAN för din router; om det finns kryptering ska du
anteckna nyckeln, Vi kommer att behöva det i nästa steg. (Kryptering är en term som
används för Password och typ av trådlös säkerhet).
Logga in till kameran, klicka på “Network”>”Wireless Lan Settings”>”Scan”, vänligen skanna 2
ggr, så kommer du att hitta WLAN i listan. Om det finns flera trådlösa nätverk, måste du välja
den rätta.
Om det inte finns kryptering, klickar du bara på “Submit”, om det finns en kryptering, anger
du följande fält och klickar sedan på “Submit”.
Using Wireless Lan: kryssa i rutan
SSID: är namnet på den trådlösa routern.
Network type: kan också hittas bakom SSID namnet i Wireless Lan listan.
Encryption: kan också hittas bakom SSID namnet i Wireless Lan listan, detta är bara den typ
av kryptering används kan lösenordet för ditt trådlösa Lan finns på undersidan av routern om
installerat professionell, kan du också fråga personen som installerade den trådlösa routern
för rätt lösenord.
6-8-2012
45
IPV38 / IPV38WE
Vänta ca 30 sekunder, kameran kommer att startas om, dra sedan ut nätverkskabeln.
I de flesta fall måste du logga in på kameran igen. Du kan använda IPCamera verktyg från
steg 3 för detta eller in i kameran `s IP-adress i din webbläsare.
Om du inte hittar IP-kamera efter 30 sekunder vid omstart vänta lite längre.
Om du fortfarande inte hittar kameran med hjälp av IPCamera Tool, kan det användas en fel
typ av kryptering eller lösenord. Se till att du valt rätt SSID Eftersom kameran kan också plocka
upp fler signaler från andra router. Kanske från dina grannar?
För att visa kamerans bild från utanför nätverket, till exempel på jobbet, skolan eller på dina
vänner eller familj hus, måste du ställa in några fler inställningar som finns i den fullständiga
manualen. Gå till steg 3,6 UPnP Inställningar för att ställa upp detta. Viktigt: Se till att du
ansluter kameran till din router via nätverkskabel, innan du startar UPnP setup.
Det finns en fullständig version av manualen på cd-skivan som medföljer kameran, men vi
föreslår att du går till www.ebodeelectronics.eu den senaste versionen av manualen. Vi har
uppdaterat detta regelbundet.
Kompatibla Apps för mobila enheter
Nyligen har vi infört en egen ebode app för IP-kameran. Med denna applikation kan du se
och styra din ebode IP-kamera från din iPad ®, iPhone ® eller iPod Touch ®, var du än är *
(kolla sidan 13 för en översikt över alla funktioner).
Gå till App Store för att ladda ner IPVision App (3,99 €).
Det finns också ett gratis program tillgängligt: Den CamViewer från John McKerrell
För mer information kan du läsa den fullständiga bruksanvisningen på
www.ebodeelectronics.eu.
6-8-2012
46
IPV38 / IPV38WE
Guide utilisateur
Utilisation
Pour une utilisation correcte et sans danger de ce produit, veuillez lire attentivement ce
manuel et suivre ses instructions. Ce produit est conforme aux normes en vigueur et au
marquage CE. Toute manipulation technique du produit ou tout changement du produit
sont interdits en raison des normes de sécurité et de conformité. Veuillez installer
correctement le produit - pour ce faire, consultez le guide d’utilisation. Ne pas laisser les
enfants utiliser ce produit sans la surveillance d’un adulte. Aucune garantie ou
responsabilité ne sera accepté en cas d'usage incorrect de l'équipement ou différent de
celui expliqué dans ce guide utilisateur.
Précaution de sécurité:
Pour éviter tous risques de court circuit, ce produit doit être utilisé à l'intérieur
uniquement. Evitez de l'utiliser dans des locaux très humides. N'exposez pas les
produits à la pluie ou à l'humidité.
•
Utilisez uniquement l'adaptateur secteur fourni avec le produit. Avant de le relier au
secteur vérifiez bien que la tension secteur correspond à celle inscrite sur le l'étiquette
de l'adaptateur secteur. N'utilisez jamais un adaptateur ou câble secteur lorsqu'il est
endommagé: contactez votre revendeur. En cas d'orage, débranchez votre appareil
du secteur, faites de même si vous n'envisagez pas d'utiliser votre équipement pour
une longue période.
•
Evitez les contraintes mécaniques, les températures extrêmes, les chocs, les vibrations
ainsi que les atmosphères humides.
•
Afin de réduire le risque d’électrocution, ne démontez aucun élément du kit de
transmission. Aucun composant du kit ne peut faire l’objet d’une réparation par
l’utilisateur. Si vous versez du liquide sur le récepteur, débranchez-le du secteur, afin
d’éviter tout risque d’électrocution ou d’incendie, et consultez un technicien qualifié.
•
Batteries: Gardez les batteries hors de portés des enfants. Utilisez uniquement les
batteries fournies avec ce kit. Enlevez les batteries lorsque vous n'utilisez pas le produit
pendant une longue période. Ne jetez pas les batteries au feu. Conformément aux
lois en vigueur, les batteries ne peuvent être jetées avec les ordures ménagères de la
Maison. Veuillez rapporter vos batteries dans un des points de collecte proche de
chez vous.
La garantie constructeur ne saurait être invoquée en cas de dommage causé par une
utilisation incorrecte ou inappropriée de ce kit, de même si vous avez ouvert, modifié ou
réparé ce produit. Le constructeur ne saurait accepter la responsabilité pour des
dommages additionnels autres que ceux couverts par la garantie légale.
•
1. Introduction
Merci d'avoir acheté le produit ebode. Avec ce produit vous pouvez accéder au flux vidéo
de votre camera en direct depuis votre navigateur Internet ou un logiciel sur votre ordinateur,
votre tablette ou votre smartphone.
Une fois que vous avez configuré votre caméra, vous pouvez y accéder de plusieurs façons :
1. Utilisez le programme d’installation IPcam fourni sur le CD et cliquez sur votre camera.
2. Une fois que vous regardez la vidéo en direct de votre camera, vous pouvez enregistrer
l’adresse web comme un favori. Ensuite, vous pouvez utiliser ce favori sans utiliser le logiciel
IPcam à chaque fois.
6-8-2012
47
IPV38 / IPV38WE
3. Dans votre navigateur web, tapez l’adresse IP de votre camera comme une nouvelle
adresse web.
4. Pour utiliser un nom convivial comme « mylivingroom.dyndyns.org », voir le manuel
d’utilisation pour savoir comment configurer votre caméra pour utiliser un DNS dynamique.
5. Pour voir votre camera sur Internet, ou à partir d’un téléphone cellulaire à travers une
connexion 3G/4G, utilisez le logiciel, ou consultez votre manuel d’utilisation pour configurer
votre routeur pour la redirection de port.
2. Contenu de la boîte
Caméra IP
Guide Rapide
CD
Support de montage
Antenne Wi-Fi
Adaptateur de courant
Câble de réseau
3. Installation
Étape 1: Installation du matériel
Vous devez configure votre camera via un câble réseau (filaire) d’abord, avant d’essayer de
l’utiliser sans fil. Branchez le câble réseau sur la caméra ainsi que sur votre
routeur/switch/modem.
Installer l´antenne Wifi. Branchez l´adaptateur de courant sur la caméra. Veuillez noter que
votre alimentation s'adaptera à la fois à la prise secteur et à la sortie audio, veuillez donc
vous assurer de bien la mettre dans la prise secteur, ou votre caméra IP ne sera pas alimenté.
6-8-2012
48
IPV38 / IPV38WE
Etape 2: Installation du Logiciel
Installez IP Camera Tool
Insérez le CD dans le laptop / ordinateur et cliquez sur “IPCamSetup.exe”.
Regardez les 2 images sur la page suivante pour comment procéder.
6-8-2012
49
IPV38 / IPV38WE
Ensuite, l’icône sera affichée sur le bureau automatiquement.
6-8-2012
50
IPV38 / IPV38WE
Si vous utilisez Windows, vous aurez également besoin du logiciel ActiveX app. Veuillez suivre
les étapes suivantes pour l’installer. Les 2 images ci-dessous illustrent où trouver les bons
fichiers.
ActiveX: Double cliquez “Appinstall.exe”—“Next”—“Install”—“Finish”.
6-8-2012
51
IPV38 / IPV38WE
AVERTISSEMENT: C’est possible
que vous obtiendrez un fenêtre
d’alerte de sécurité Windows. Il
vous sera demandé de choisir
un réglage pour le pare-feu.
Veuillez vous assurer de choisir
l'option
«débloquer».
Votre
caméra IP ne fonctionnera pas
sans débloquer les paramètres
de pare-feu.
Etape 3: Guide de Configuration
Ouverture de Session: Double cliquez sur l´icône “IP Camera Tool” sur le bureau, recherche
l’adresse IP, choisissez celle de votre caméra, double cliquez pour accéder à l’interface de
connexion IE. Il peut nécessiter quelques minutes avant que l'adresse IP apparaisse dans la
liste.
Nom d’utilisateur par défaut: admin
Mot de passe: aucun mot de passe.
6-8-2012
52
IPV38 / IPV38WE
Choisissez la langue.
Choisissez le mode de travail (work mode)
Navigateur Internet Explorer: choisir Mode ActiveX .
Navigateurs Safari, Firefox, Google Chrome: Mode Serveur push/VLC mode.
Téléphone Mobile: Inscrivez-vous en mode téléphone mobile
Important:
Paramètres ActiveX pour navigateur Internet Explorer (IE)
Si vous utiliser le navigateur IE pour connecter l’appareil pour la 1ère fois, il n´y aura peut-être
pas d’image affichée, il y aura un message ActiveX dans le haut de l’écran (voir images
suivantes). Veuillez cliquer sur le message et choisissez Run Add-on (Exécuter Add-on),
actualisez l’interface IE, et connectez vous sur la caméra vous verrez la vidéo en direct.
Rappel:
Avez-vous installé le fichier Appinstall.exe à partir du CD et des étapes précédentes ?
Si ce n’est pas le cas, vous pourriez avoir quelques erreurs de certificat dans votre navigateur
lorsque vous essayez de vous connecter à la caméra.
6-8-2012
53
IPV38 / IPV38WE
6-8-2012
54
IPV38 / IPV38WE
Si vous avez une image maintenant, vous pouvez passer cette étape.
S´il n´y a toujours pas de vidéo en direct après avoir exécuté ActiveX, veuillez essayez
d´activer les options ActiveX des paramètres de sécurité d´Internet Explorer. Veuillez suivre les
étapes suivantes.
Fermer le firewall (pare-feu) de votre ordinateur.
Changer les paramètres de ActiveX, “IE” browser > “Outils” > “Options Internet” > “Securité”>
“Personnaliser le niveau” > “Contrôles ActiveX et Plug-ins”, toutes les options ActiveX mis à
“Activer”: en particulier:
Activer: Télécharger les contrôles ActiveX non signés
Activer: Contrôle d’initialisation et de script ActiveX non marqués comme sécurisés
Activer: Exécuter les contrôles ActiveX et les plug-ins
6-8-2012
55
IPV38 / IPV38WE
S’il n’y a toujours pas d’image, s’il vous plaît fermer votre logiciel anti-virus, et ensuite essayez
de nouveau l’étape 1 & 2. Veuillez vous assurer que vous avez débloqué votre pare-feu
comme demandé lors de l’étape 2 (voir AVERTISSEMENT). Si non, vérifiez votre logiciel
pare-feu que la camera n’est pas bloquée.
Etape 4: Comment configurer les paramètres sans fil
Vous devez configure votre camera via un câble réseau (filaire) d’abord, avant d’essayer de
l’utiliser sans fil. (Voir Installation du matériel).
Assurez-vous que le routeur est un routeur sans fil.
Assurez-vous que l’antenne Wifi est installée.
Déterminez s’il y a cryptage du réseau local sans fil du routeur, s’il y a cryptage, notez la clé,
nous en aurons besoin dans les prochaines étapes. (Le cryptage est un terme utilisé pour le
mot de passe et le type de sécurité sans fil).
Connexion de la caméra, cliquez sur “Réseau”> “ Paramètres LAN sans fil “> “Scan”, scanner
2 fois, puis vous trouverez le WLAN de la liste. S'il ya plusieurs WLAN, assurez-vous de choisir la
bonne.
S’il n’y a pas de cryptage, il suffit de cliquer sur «Soumettre».
S’il y a cryptage, s’il vous plaît entrez le champ ci-dessous, puis cliquez sur «Soumettre».
Using Wireless Lan: cochez la case.
SSID: c’est le nom du routeur sans fil.
Network type: peut aussi se trouver derrière le nom du SSID dans la liste Wireless Lan.
Encryption: peut également être trouvé derrière le nom de SSID dans la liste Wireless Lan, ce
n'est que le type de cryptage utilisé, le mot de passe de votre LAN sans fil peut être trouvé sur
le dessous de votre routeur, vous pouvez également demander à la personne qui a installé
votre routeur sans fil pour le mot de passe correct.
6-8-2012
56
IPV38 / IPV38WE
Attendez environ 30 secondes, redémarrez l’appareil, puis débranchez le câble réseau. Dans
la plupart des cas, vous devrez vous connecter de nouveau à la camera. Vous pouvez
utiliser l’outil IPCamera de l’étape 3, ou entrez l’adresse IP de la camera dans votre
navigateur.
Dans le cas où vous ne trouvez pas la caméra IP après 30 secondes, veuillez redémarrer et
attendre un peu plus longtemps.
Si vous ne trouvez toujours pas votre Camera en utilisant l'outil IPCamera, il pourrait être utilisé
un mauvais type de cryptage ou mot de passe. Assurez-vous que vous avez sélectionné le
bon SSID car la caméra peut également recevoir des signaux d’autres routeurs. Peut-être de
vos voisins?
Pour voir l'image de la caméra de l'extérieur du réseau, par exemple au travail, à l'école ou
de chez vos amis ou famille, vous devez configurer certains paramètres supplémentaires que
vous trouverez dans le manuel complet. S'il vous plaît passez à l'étape 3.6 UPnP Settings à
mettre en place. Important: s'il vous plaît assurez-vous que vous vous reconnectez votre IP
camera avec votre routeur via le câble réseau, avant de commencer la configuration UPnP.
Il existe une version complète du manuel sur le CD fourni avec votre caméra, mais nous vous
suggèrons d'aller à www.ebodeelectronics.eu pour la dernière version du manuel. Nous
l’actualisons régulièrement.
Apps compatibles pour les appareils mobiles
Récemment, nous avons présenté notre application ebode pour la caméra IP. Avec cette
application, vous pouvez visualiser et contrôler votre caméra IP à partir de votre iPad®,
iPhone® ou iPod Touch®, où que vous soyez * (s'il vous plaît consulter la page 13 pour un
aperçu de toutes les fonctions).
Aller à l'App Store pour télécharger l'App IP Vision (€ 3,99).
Il ya aussi une application gratuite disponible: Le CamViewer de John McKerrell
Pour plus de détails, veuillez consulter le manuel utilisateur complet sur
www.ebodeelectronics.eu.
6-8-2012
57
IPV38 / IPV38WE
CONTENIDOS
Condiciones de uso
Para un uso sin problemas y seguro de este producto lea cuidadosamente este manual y
la información de seguridad, y siga las instrucciones. La unidad está registrada como
dispositivo que no provoca ni padece interferencias de radiofrecuencia. Tiene
aprobación CE y cumple con la Directriz de Bajo Voltaje. Deben seguirse las instrucciones
de seguridad e instalación. Se prohíbe la manipulación técnica del producto, así como
cualquier modificación del mismo, por motivos de seguridad y certificación. Asegúrese de
configurar correctamente el dispositivo – consulte su guía del usuario. Los niños pequeños
deben usar el dispositivo bajo supervisión de adultos. No se aceptará garantía o
responsabilidad alguna por daños causados por un uso incorrecto del equipo, distinto al
indicado en este manual del propietario.
ADVERTENCIAS DE SEGURIDAD.
Para evitar cortocircuitos, este producto (salvo si está especificado para uso en
exterior) debe usarse en el interior, exclusivamente en lugares secos. No exponga los
componentes a la lluvia ni la humedad.
•
Conecte el adaptador a la corriente solamente después de comprobar si la tensión
de corriente es igual que los valores de las etiquetas indentificadoras. No conecte
nunca un adaptador o cable de alimentación si está dañado. En tal caso, póngase
en contacto con su proveedor. Si existe riesgo de tormenta, es una precaución
conveniente desconectar la alimentación de la red eléctrica para proteger el
producto de rayos. Esto también es aplicable si el sistema va a estar sin funcionar
durante cierto tiempo.
•
Evite el desgaste mecánico extremo, las temperaturas ambientales extremas, las
vibraciones fuertes y la humedad atmosférica.
•
No desmonte ninguna pieza del producto: el dispositivo tiene piezas cargadas, y no
hay piezas reparables por el usuario en el interior. El producto sólo debe ser reparado
o mantenido por personal de servicio cualificado y autorizado. Las piezas
defectuosas deben ser cambiadas por piezas de recambio originales.
•
Baterías: mantenga las baterías lejos del alcance de los niños. Deseche las baterías
como residuos químicos. No use nunca baterías viejas y nuevas, ni distintos tipos de
baterías conjuntamente. Saque las baterías cuando no use el sistema durante un
periodo prolongado de tiempo. Cuando introduzca baterías, asegúrese de respetar
la polaridad. Asegúrese de que las baterías no se cortocircuiten ni se desechen en el
fuego (peligro de explosión).
En caso de uso inadecuado, o si ha abierto, alterado o reparado el producto usted
mismo, las garantías quedan invalidadas. El proveedor no acepta responsabilidad alguna
en caso de uso inadecuado del producto, o cuando el producto sea usado para fines
distintos a los especificados. El proveedor no acepta responsabilidad alguna por daños
adicionales distintos a los cubiertos por la responsabilidad legal del producto.
•
1. Introducción
Gracias por haber comprado el producto ebode. Este producto le permitirá acceder al
video en directo de la cámara, desde cualquier navegador web o también desde un
software instalado en su ordenador, Tablet o Smartphone.
6-8-2012
58
IPV38 / IPV38WE
Una vez tenga la cámara configurada, podrá acceder a ella por los siguientes medios:
1. Utilice el programa de configuración IPCAM incluido en el CD.
2. Una vez esté visualizando el video en directo recogido por la cámara, podrá guardar la
dirección IP como favorito, no teniendo así que utilizar IPCAM en sucesivas ocasiones.
3. Escriba en su navegador web la dirección IP de la cámara, como si fuera una nueva
dirección.
4. Para usar un nombre fácil de identificar tal como “misalón.dyndns.org”, revise el manual
de usuario en el apartado relativo a configuración de DNS dinámicas.
5. Para ver su cámara desde Internet, o desde su teléfono móvil vía 3G/4G, use el software o
revise el manual para la configuración de puertos en su router.
2. Contenido
Cámara IP
Guía Rápida
CD
Soporte de montaja
Antena Wi-Fi
Adaptador de corriente DC
Cable de red
3. Setting up the device
Paso 1: Instalación del Hardware
Necesitará configurar su cámara usando un cable de red local, antes de poder utilizarla con
comunicación Wifi. Conecte el cable de red a la cámara y el router / switch / modem.
Instalar la antena Wi-Fi. Enchufe el adaptador de corriente a la cámara. Por favor tenga en
cuenta que su fuente de alimentación se ajustará tanto a la salida de corriente como a la
salida de audio. Asegúrese de ponerla en la salida de corriente o de lo contrario su cámara
IP no recibirá alimentación.
6-8-2012
59
IPV38 / IPV38WE
Paso 2: Instalación del Software
Instalar la IP Camera Tool
Inserte el CD en el laptop / PC y haga clic en “IPCamSetup.exe”.
Fíjese en las 2 imágenes de la siguiente página donde se puede encontrar
“IPCamSetup.exe”.
6-8-2012
60
IPV38 / IPV38WE
Después, el icono aparecerá en el escritorio.
6-8-2012
61
IPV38 / IPV38WE
Si usted está usando Windows, también necesitará el software ActiveX app. Siga los
siguientes pasos para instalarlo. Las imágenes de abajo muestran cómo localizar los ficheros
correctos.
ActiveX: Haga doble clic en “Appinstall.exe” - “Siguiente” - “Instalar” - “Finalizar”.
6-8-2012
62
IPV38 / IPV38WE
ADVERTENCIA: Es posible que
usted reciba un Popup de alerta
de seguridad de Windows. Le
pedirá que seleccione una
configuración para el firewall.
Asegúrese de que selecciona la
opción
DESBLOQUEAR.
Su
cámara IP no funcionará sin
desbloquear el firewall.
Paso 3: GUIA DE CONFIGURACIÓN
Registrarse: Haz doble clic en el icono “IP Camera Tool” en el escritorio, buscar la dirección IP,
elija la de su cámara, haga doble clic para ir al inicio de sesión del interfaz del IE. Pasarán
algunos minutos antes de que la cámara IP aparezca en la lista.
Nombre de usuario por defecto: admin
Contraseña: sin contraseña, deje en blanco
6-8-2012
63
IPV38 / IPV38WE
Elija el idioma.
Seleccionar el modo de trabajo:
Navegador Internet Explorer: seleccionar el modo ActiveX.
Navegadores Safari, Firefox, Google chrome: Servidor modo push/VLC modo.
Teléfono móvil: Firmar en el modo de teléfono móvil.
Importante
Parámetros ActiveX para navegador Internet Explorer
Si utiliza el navegador Internet Explorer para conectar la cámara por primera vez, tal vez no
hay imagen en pantalla, habrá un control ActiveX del sistema, en la parte superior de la
pantalla (ver siguientes imágenes), por favor haga clic en el símbolo del sistema y seleccione
Ejecutar Run Add-on, volver a cargar la interfaz de IE, y registrar la cáma-ra de nuevo, a
continuación, se verá el video en directo.
Recordatorio
Instaló el fichero Appinstall.exe del CD en los pasos previos?. Si no es así, deberían aparecer
errores de certificado en el buscador cuando intenta entrar en la cámara.
6-8-2012
64
IPV38 / IPV38WE
6-8-2012
65
IPV38 / IPV38WE
Si lo que tiene ahora es una imagen, descarte el siguiente paso.
Si todavía no existe un video en directo después de ejecutar ActiveX, por favor trate de
habilitar las opciones de ActiveX de la configuración de seguridad de IE por favor, haga los
siguientes pasos:
Cerrar el firewall de su PC.
Cambiar los parámetros de ActiveX , “IE” navegador > “Tool” > “Internet Options” >
“Security”> “Custom Level” > “ActiveX control and Plug-ins”, todas las opciones ActiveX
establecida como “Enable”: Especialmente:
Enable (permitir): Download unsigned ActiveX controls
Enable (permitir): Initialize and script ActiveX controls not marked as safe
Enable (permitir): Run ActiveX controls and plugins
6-8-2012
66
IPV38 / IPV38WE
Si aún no existe una imagen, por favor, cierre el software anti-virus, y luego intentar el paso 1
y 2 de nuevo. Asegúrese de que ha desbloqueado el firewall durante el paso 2 (vea AVISOS).
Si no, verifique en el software de su firewall que la cámara no ha sido bloqueada.
Paso 4: Configuraciones inalámbricas
Necesitará configurar su cámara usando un cable de red local, antes de poder utilizarla con
comunicación Wifi. (Revise el apartado instalación de hardware).
Asegúrese que el router es inalámbrico.
Asegúrese que la antena Wi-Fi esta instalada.
Asegúrese de que si existe cifrado de la WLAN del router, si existe cifrado, mantenga la tecla,
La necesitaremos en los siguientes pasos. (Encriptación es un término usado en claves y tipos
de seguridad inalámbrica.
Iniciar la sesión de la cámara, haga clic en “red “> “Wireless Lan Settings “> “Buscar”, por
favor, exploración dos veces, luego se encuentra la WLAN de la lista. Si hay varias WLAN,
asegúrese de elegir la correcta.
Si no hay cifrado, haga clic en “Enviar”.
Si hay cifrado, por favor, introduzca los siguientes campos, a continuación, haga clic en
“Enviar”.
Usando la red inalámbrica: verifique la caja
SSID es el nombre del router inalámbrico
Tipo de red: puede también encontrarse detrás del SSID en la lista de redes inalámbricas.
Encriptación: puede también encontrarse detrás del SSID en la lista de redes informáticas.
Este es solo el tipo de encriptación utilizado. La clave de su red inalámbrica puede
encontrarla en la parte de abajo del router. Si se lo instaló un profesional, también puede
consultarle a él sobre este tema.
6-8-2012
67
IPV38 / IPV38WE
Espere unos 30 segundos, reinicie la cámara, a continuación, desconecte el cable de red.
En la mayoría de los casos tendrá que entrar nuevamente en la cámara. Puede utilizar la
herramienta IPcamera del paso 3 o introducir en su navegador la dirección de la cámara IP.
En caso de que no pueda localizar la cámara IP tras pasar 30 segundos desde el reinicio, por
favor espere un poco más. Si aún así no consigue localizar la cámara por medio de la
herramienta IPcamera, es posible que haya utilizado un tipo de encriptación o clave
erróneos. Asegúrese de haber seleccionado el SSID correcto ya que la cámara podría
obtener mayor señal de otros routers, por ejemplo el de alguno de sus vecinos.
Para ver la imagen de la cámara desde fuera de la red, por ejemplo desde su oficina,
colegio o casa de familiares, necesitará configurar algunos parámetros adicionales
detallados en el manual completo. Por favor, vaya al paso 3.6 UpnP Settings para configurar
esta opción. Importante: por favor, asegúrese de volver a conectar la cámara con el router
mediante el cable de red, antes de iniciar la configuración de UPnP.
Existe una versión completa de este manual en el CD que viene junto con la cámara pero le
sugerimos visitar la web www.ebodeelectronics.eu para obtener la versión más actualizada.
Se actualiza de forma regular.
Apps compatibles:
Recientemente hemos introducido nuestra aplicación ebode para la cámara IP. Con esta
aplicación se puede ver y controlar su cámara IP ebode de su iPad ®, iPhone ® o iPod ®
Touch, donde quiera que estés * (consulte la página 13 para una visión general de todas las
funciones).
Ir a la App Store para descargar la aplicación IPVision (€ 3,99).
También hay una aplicación disponible gratuitamente: CamViewer de John McKerrell
Para más información, verifique el manual de usuario completo en nuestra web
www.ebodeelectronics.eu
6-8-2012
68
IPV38 / IPV38WE
Manual do utilizador
Conformidade de utilizaçäo
Para uma utilização segura deste equipamento, por favor leia este manual e siga as
instruções de instalação. Os equipamentos estão registados como equipamentos que
não causam ou sofrem problemas relacionados com interferências electromagnéticas.
Possui certificação CE e está conforme de acordo com o regulamento de baixa tensão.
As instruções de instalação e segurança devem ser lidas antes de iniciar a instalação.
Qualquer manipulação ou alteração não autorizada ao produto é proibida por razões de
segurança. Por favor tenha o cuidado de configurar os equipamentos correctamente –
consulte o manual de utilizador. Os equipamentos não devem ser manuseados por
crianças pequenas sem a supervisão de um adulto. Se verificarem danos provocados por
uso incorrecto ou outros tipos de utilização não referido no manual, os equipamentos
perdem a garantia e não serão assumidas quaisquer responsabilidades sobre o mesmo.
AVISOS DE SEGURANÇA
De forma a prevenir cuto-circuitos, este produto (excepto se for especificado para
ser utilizado em exterior) deve apenas ser utilizado em locais de interior secos. Não
exponha os componentes à chuva ou humidade.
•
Inspeccione o adaptador de alimentação antes de o ligar à rede eléctrica.
Certifique-se que este é compatível com a rede eléctrica do local onde o pretende
ligar. Nunca ligue um adaptador ou cabo de alimentação que apresente danos,
caso isto aconteça contacte o seu fornecedor. Se ocorrer o risco de trovoada, como
precaução desligue o equipamento da tomada. O mesmo se aplica previr que não
vai utilizar o equipamento durante muito tempo.
•
Evite esforços mecânicos, temperaturas extremas, vibrações fortes e humidade
atmosférica elevada.
•
Não desmonte qualquer componente do equipamento: o equipamento não possui
peças reaproveitáveis. O equipamento apenas deve ser reparado ou assistido por
técnicos qualificados e pessoal autorizado. Peças defeituosas devem ser substituídas
por peças originais.
•
Baterias: mantenha as baterias afastadas do alcance de crianças. Coloque as
baterias gastas num pilhão. Nunca misture baterias usadas com baterias novas ou
misture diferentes tipos de bateria. Remova as baterias se previr que o equipamento
irá ficar inactivo por muito tempo. Ao inserir as baterias certifique-se que respeita a
polaridade das mesmas. Certifique-se que as baterias não são curto-circuitadas e
que não são lançadas ao fogo (risco de explosão).
Caso se prove que o equipamento foi aberto, alterado ou reparado por técnicos não
qualificados, todas as garantias expiram. O fornecedor não se responsabiliza por danos
causados por má utilização do equipamento ou quando este é utilizado para outros fins
não indicados pelo fabricante. O fornecedor não se responsabiliza por danos não
cobertos pela responsabilidade legal do produto.
•
1. Intodução
Obrigado por adquirir este produto ebode. Parabéns pela aquisição do ebode produto.
Com este produto consegue aceder à sua câmara em tempo real a partir do seu browser
de internet ou através de software no seu computador, tablet ou smartphone.
6-8-2012
69
IPV38 / IPV38WE
Assim que a câmara estiver configurada, pode aceder-lhe utilizando um dos seguintes
métodos:
1. Utilize o software de configuração IP cam incluído no CD e clique sobre a sua câmara.
2. Assim que conseguir visualizar as imagens capturadas ao vivo pela sua câmara, pode
gravar o link de acesso nos seus favoritos. De futuro quando pretender aceder à câmara
pode usar esse link sem ser necessário executar o IPcam.
3. No seu browser web, introduza o IP da sua câmara como um endereço web.
4. Para utilizar um endereço mais simpes de decorar, por exemplo “aminhasala.dyndns.org”,
consulte o manual de forma a configurar a sua câmara para utilizar DNS dinâmico.
5. Para visualizar as imagens da sua câmara através da Internet ou através de um telemóvel
com ligação 3G/4G, utilize o software ou consulte o manual acerca do encaminhamento
de portas de comunicação.
2. Contenuto
Câmara IP
Alimentador DC
Suporte de montagem
Antena Wi-Fi
CD
Quick Setup Guide
Cabo de rede
3. Installazione
Passo 1: Instalação Hardware.
Deve configurar a câmara utilizando o cabo de rede fornecido antes de activar as
comunicações. Plugar a outra extremidade em qualquer saída do roteador Wifi.
Instalar a antena wi-fi. Plugar o cabo de rede na camera. Ligue a camera na energia ( ela
fará uma checagem automática virando por 30 segundos). Por favor tenha em atenção
que a fonte de alimentação encaixa nos terminais de AC e Audio Out, certifique-se que o
encaixa apenas no terminal AC ou a sua câmara não será alimentada.
6-8-2012
70
IPV38 / IPV38WE
Passo 2: Instalação Software
Instalação IP Camera Tool:
Insira o CD para o laptop/computador e clique em “IPCamSetup.exe”.
Ver nas duas figuras seguintes onde voc&e encontrar “IPCamSetup.exe”.
6-8-2012
71
IPV38 / IPV38WE
Depois, do “IP Camera Tool” ícone aparecerá em seu desktop.
6-8-2012
72
IPV38 / IPV38WE
Se você estiver usando Windows, é necessário possuir o software ActiveX app. Por favor siga
os seguintes passos para instalar. As duas imagens seguintes mostram onde encontrar os
ficheiros correctos.
ActiveX: Click “Appinstall.exe”—“Next”—“Install”—“Finish”.
6-8-2012
73
IPV38 / IPV38WE
Aviso: Irá pode receber uma
mensagem popup de alerta de
segurança do Windows. A
mensagem vai pedir para
configurar a firewall. Por favor
certifique-se que escolhe a
opção “desbloquear”. A sua
câmara não funcionará se as
comunicações
não
forem
desbloqueadas.
Passo 3: Real-time Video Demonstração.
Login: Após abrir o IP Camera Tool aparecerá o endereço de IP de sua câmera, dê um
clique duplo no endereço irá solicitar usuário e senha, o usuário será ‘’ admin ‘’ e a senha
não deve ser preenchida, ou seja, deixe em branco. O endereço IP pode demorar alguns
minutos até aparecer na lista.
Default username: admin
Password: não preencher. deixe em branco
6-8-2012
74
IPV38 / IPV38WE
Escolha o idioma
Escolha o navegador
1ª Opção ActiveX Mode para quem utiliza o navegador Internet Explorer
2ª opção para Safari, FireFox ou Google Chrome
3ª Telefones Celulares Clique em Sign in de acordo com seu navegador.
Importante:
Se não for mostrada qualquer imagem no Browser do Internet Explorer
Se ao usar o IE (Internet Explorer) para conectar à camera pela primeira vez, não aparecer
imagem, irá aparecer uma notificação do ActiveX no topo do ecrã (como pode ver nas
seguitnes imagens), por favor clique na notificação e escolha Run Add-on, faça actualizar
no IE e login na camera novamente, depois deverá ser capaz de visualizar o vídeo.
Lembrete:
Instalou o ficheiro Appinstall.exe que estava no CD, nos passos anteriores?
Se não instalou, deverá ter alguns problemas relacionados com o certificado no Browser,
quando tentar fazer login na camera.
6-8-2012
75
IPV38 / IPV38WE
6-8-2012
76
IPV38 / IPV38WE
Se já consegue visualizar uma imagem, ignore o seguinte passo.
Se ainda não há um vídeo ao vivo depois de executar ActiveX, por favor, tente habilitar as
opções de configurações de ActiveX de segurança do IE, por favor os passos a seguir:
1. Fechar o firewall do seu computador
2.
Alterar as configurações do ActiveX, "IE" browser> "ferramentas"> "Opções da Internet">
"Segurança"> "Nível personalizado"> "ActiveX e controle de plug-ins ", todas as opções de
ActiveXdefinido para ser" Enable ": Especialmente:
Enable: Baixar controles ActiveX não assinados
Enable: Inicializar e executar scripts de controles ActiveX não marcados como seguros
Enable: Executar controles ActiveX e plug-ins
6-8-2012
77
IPV38 / IPV38WE
Se ainda não há imagem, por favor, feche o software anti-vírus e tente o passo 1 e 2
novamente. Por favor, certifique-se que desbloqueou a Firewall durante o passo 2 (ver
Aviso). Se não, verifique na Firewall se a camera não está bloqueada.
Passo 4: Como definir as Configurações Wireless
Deve configurar a câmara utilizando o cabo de rede fornecido antes de activar as
comunicações. (Ver instalação do hardware)
1. Verifique se o roteador é um roteador sem fio.
2. Certifique-se que a antena Wi-Fi instalada.
3. Certifique-se se existe criptografia da WLAN do roteador, se houver criptografia,
mantenha a tecla, iremos necesitar disto nos próximos passos. (Encriptação é um termo
utilizado para palavra-chave e tipo de Segurança sem fios).
4. Acesso a câmera, clique em "Rede"> "ConfiguraçõesWireless Lan"> "Scan", por favor scan
2 vezes, então você vai encontrar o WLAN na lista. Se há múltiplas WLAN, certifique-se de
escolher o caminho certo.
5. Se não houver nenhuma criptografia, basta clicar em "Enviar", se existe a criptografia, por
favor insira os seguintes campos, clique em "Enviar".
Usando a rede Wireless: verifique a caixa
SSID: nome do router wireless.
Tipo de rede: pode ser encontrado atrás do SSID na lista de redes sem fios.
Encriptação: pode ser encontrada atrás do SSID na lista de redes sem fios, apenas para o
tipo de encriptação utilizada, a palavra-chave da sua rede sem fios pode ser encontrada
em baixo do router, se for instalado por profissionais, deverá perguntar à pessoa responsável
pela palavra-chave.
6-8-2012
78
IPV38 / IPV38WE
6. Aguarde cerca de 30 segundos, a câmera irá reiniciar,em seguida, desconecte o cabo
de rede.
Na maioria dos casos será necessário fazer login na Camera novamente. Pode utilizar a
ferramenta IP da Camera do passo 3 ou inserir o IP da Camera no browser.
Caso não consiga encontrar o IP da Camera depois de 30 seg, por favor reinicie e aguarde.
Se mesmo assim não encontrar a Camera usando a ferramenta IP da Camera, deve de
estar a usar o tipo de encriptação errado ou a palavra-chave errada. Por favor, certifique-se
que escolheu o correcto SSID pois a Camera pode captar mais sinais de outros routers.
Talvez de vizinhos.
Para ver a imagem da Camera de for a da rede, por exemplo no trabalho, escola, ou casa
de amigos, necessita de configurar alguns parâmetros, como é explicado no manual
complete. Por favor, vá para o passo 3.6 UpnP Settings para configurar isso. Importante: por
favor, certifique-se reconecte a câmera com o roteador através do cabo de rede, antes de
começar a configuração UPnP.
Existe uma versão complete do manual no CD que vem com a Camera, mas sugerimos que
vá a www.ebodeelectronics.eu para obter a versão mais recente. Actualizamos os manuais
regularmente.
Apps compatíveis:
Recentemente, lançamos nossos app ebode para a câmera IP. Com esse aplicativo você
pode visualizar e controlar a sua câmera IP ebode de seu iPad ®, iPhone ® ou iPod Touch ®,
onde você estiver * (consulte a página 13 para uma visão geral de todos os recursos).
Ir para a App Store para baixar o App IP Vision (€ 3,99).
Também há um aplicativo gratuito disponível:CamViewer de John McKerrell
Para mais iformações consulte o manual de instalação complete disponível em
www.ebodeelectronics.eu.
6-8-2012
79
IPV38 / IPV38WE
Manuale per l’utente
Conformitä d’uso
Per un utilizzo corretto e sicuro di questo prodotto, si prega leggere attentamente questo
manuale e le informazioni di sicurezza, e di seguire le istruzioni riportate. L’unità è registrata
come dispositivo immune da interferenze a radiofrequenza. Ha ottenuto l’approvazione e
il marchio CE ed è conforme alle Direttive di Bassa Tensione (Low Voltage Directory). Le
istruzioni d’installazione e di sicurezza devono essere osservate. Qualsiasi modifica tecnica
o intervento sul prodotto sono proibiti, per motivi di conformità alle norme di sicurezza.
Prestare molta attenzione all’installazione corretta del dispositivo - consultare questo
Manuale utente. I minori possono utilizzare il prodotto esclusivamente sotto la supervisione
di un adulto. Nessuna garanzia o responsabilità saranno imputabili al produttore per
qualsiasi danno causato da un uso non corretto del dispositivo fornito, diverso da quanto
indicato in questo Manuale utente.
PRECAUZIONI DI SICUREZZA
Per prevenire cortocircuiti, questo prodotto (a meno che non sia specificato l’uso in
esterni) dev’essere utilizzato solo all’interno di ambienti asciutti. Non esporre i
componenti a pioggia o umidità.
•
Collegare l’adattatore di corrente alla rete elettrica solo dopo aver verificato che il
valore della tensione di rete sia identico a quanto riportato sull’etichetta del prodotto.
Non collegare mai un adattatore o un cavo di alimentazione, se danneggiati. In
questo caso, contattare il rivenditore. Onde evitare possibili danni causati dai fulmini,
è buona norma e precauzione staccare il cavo di alimentazione dalla presa di
corrente durante i temporali. La stessa cautela si applica in caso di assenza
prolungata da casa.
•
Evitare forti sollecitazioni meccaniche, elevate temperature ambientali, forti vibrazioni
e umidità atmosferica.
•
Non disassemblare qualsiasi parte del prodotto: il dispositivo contiene parti sotto
tensione e non contiene al suo interno parti soggette a manutenzione da parte
dell’utente. Il prodotto deve essere riparato o manutenuto esclusivamente da parte
di personale tecnico qualificato e autorizzato. Componenti difettosi devono essere
sostituiti utilizzando ricambi originali.
•
Batterie: tenere le batterie fuori dalla portata dei bambini. Smaltire le batterie
trattandole come rifiuti chimici. Non utilizzare mai insieme batterie nuove ed usate o
tipi diversi di batterie. Togliere le batterie quando il sistema rimarrà inutilizzato per un
lungo periodo di tempo. Durante l’inserimento delle batterie, rispettarne la corretta
polarità. Assicurarsi che le batterie non vengano cortocircuitate e che non siano
gettate nel fuoco (pericolo di esplosione).
In caso di uso improprio o se il prodotto è stato aperto, alterato e riparato personalmente,
decade qualsiasi garanzia sul prodotto. Il produttore declina qualsiasi responsabilità per i
danni derivanti da un utilizzo improprio del prodotto o da utilizzo diverso da quanto
previsto e specificato. Il produttore declina qualsiasi responsabilità per danni
consequenziali, a eccezione della responsabilità civile sul prodotto.
•
1. Introduzione
Grazie mille per aver acquistato il prodotto ebode. Con questo prodotto è possibile
accedere a video live della fotocamera dal proprio browser web o tramite il software sul
computer, la tavoletta, o il vostro smart phone.
6-8-2012
80
IPV38 / IPV38WE
Una volta configurata la camara, è possibile accedere alla camera da uno dei seguenti
metodi:
1. Utilizzare il programma di installazione IPcam sul CD incluso e fare clic sulla camera.
2. Una volta che si sta visualizzando video in diretta della camera, è possibile salvare l'indirizzo
Web come preferito. Quindi è possibile utilizzare che ha salvato preferito senza utilizzare il
programma di installazione IPcam ogni volta.
3. Nel browser Web, digitare l'indirizzo IP della vostra camera come un nuovo indirizzo web.
4. Per usare un nome come 'mylivingroom.dyndyns.org', consultare il manuale del
proprietario per come configurare la camera per l'utilizzo di DNS dinamico.
5. Per vedere la camera su Internet, o da un telefono cellulare tramite una connessione
3G/4G, utilizzare il software, o consultare il manuale d'uso per configurare il router per il port
forwarding.
2. Contenuto del kit
Telecamera di rete IP Wireless
Quick Setup Guide
CD
Staffa die montaggio
Antenna Wi-Fi
Alimentatore DC
Cavo di rete
3. Installazione del sistema
Passo 1: Installazione Hardware
Si consiglia di impostare la fotocamera utilizzando un cavo di rete (cablata), prima è
possibile utilizzarlo in modalità wireless. Collegare il cavo di rete nella telecamera, collegare
l’altro capo del cavo al router/switch.
Montare l’antenna Wi-Fi. Collegare l’alimentatore alla telecamera (usare solo l’alimentatore
fornito). Perfavore notate che il terminale dell'alimentatore può inserirsi sia nell'attacco di
alimentazione che in quello Audio Out, quindi assicuratevi di collegarlo a quello di
alimentazione altrimenti la telecamera IP non sarà alimentata.
6-8-2012
81
IPV38 / IPV38WE
Passo 2: Installazione Software
Installare IP Camera Tool:
Inserire il CD nel laptop / computer e fare clic su “IPCamSetup.exe”.
Vedere le 2 foto nella pagina successiva su dove si possono trovare “IPCamSetup.exe”.
6-8-2012
82
IPV38 / IPV38WE
Dopo aver eseguito queste operazioni, apparirà la seguente icona sul desktop:
6-8-2012
83
IPV38 / IPV38WE
Se si utilizza Windows, sarà necessario anche l'applicazione software ActiveX. Si prega di
prendere le seguenti operazioni per installare questo. Le 2 immagini qui sotto mostrano dove
trovare i file giusti.
ActiveX: Cliccare “Appinstall.exe”—“Next”—“Install”—“Finish”.
6-8-2012
84
IPV38 / IPV38WE
ATTENZIONE: Potrebbe apparire
un Pop di Avviso di Windows
Security. Vi sarà richiesto di
scegliere un parametro per il
firewall. Assicuratevi di scegliere
l'opzione "SBLOCCA". La vostra
telecamera IP non funzionerà
senza sbloccare il firewall.
Passo 3: Visione dal Vivo
Login: Doppio click sull’icona “IP Camera Tool” presente sul desktop, ricercare l’indirizzo IP,
selezionare quello della propria telecamera, Doppio click per accedere alla videata di IE
login. Possono essere necessari alcuni minuti prima che l'indirizzo IP compaia nella lista.
Username: admin
Password: nessuna password, lasciare in bianco
6-8-2012
85
IPV38 / IPV38WE
Scegliere la lingua.
Selezionare la scelta desiderata in base alla modalità di visione utilizzata:
- Per Internet Explorer browser: scegliere ActiveX .
- Per i server Safari, Firefox, Google chrome browser: premere Server push mode/ VLC mode.
- Per Mobile phone: Premere sign in mobile phone mode.
Importante:
Problema di visi one con Ac tiv eX Settings per il browser Internet Explorer (IE)
Se si usa IE browser per collegarsi alla telecamera per la prima volta, è possible che non ci sia
l’immagine a video, in questo caso cliccare sul ‘prompt e scegliere di attivare Run Add-on,
riattivare l’interfaccia IE, quindi effettuare nuovamente il login della telecamera per vedere
le immagini dal vivo.
Reminder:
Avete installato il file dal CD Appinstall.exe dai passaggi precedenti?
Se non si potrebbe avere qualche errore di certificato nel browser quando si cerca di
accedere alla telecamera.
6-8-2012
86
IPV38 / IPV38WE
6-8-2012
87
IPV38 / IPV38WE
Se avete è un'immagine ormai, saltare il passaggio seguente.
Se non si vede l’immagine neanche dopo avere lanciato l’applicativo ActiveX, provare a
disabilitare l’opzione ActiveX nella configurazione di sicurezza di IE seguendo la modalità
seguente:
1. Chiudere il firewall presente nel computer.
2. Modificare la configurazione ActiveX:
“IE” browser > “Tool” > “Internet Options” > “Security”> “Custom Level” > “ActiveX control
and Plug-ins” : abilitare tutte le opzioni ActiveX : “Enable”. Specialmente:
ABILITA/Enable: Scarica controlli ActiveX senza firma
ABILITA/Enable: Scarica controlli ActiveX giudicati non sicuri
ABILITA/Enable: Lancia I controlli e I plug-ins ActiveX
6-8-2012
88
IPV38 / IPV38WE
Se ancora non si vedono le immagini, disattivare l’antivirus e ritornare nuovamente allo passo
1 e 2. Si prega di assicurarsi che si sbloccato il firewall quando viene richiesto durante la fase
2 (vedi avviso). In caso contrario, controllare il software Firewall che la fotocamera non è
bloccato.
Passo 4: Come configurare la connessione Wireless
Si consiglia di impostare la fotocamera utilizzando un cavo di rete (cablata), prima è
possibile utilizzarlo in modalità wireless. (Vedere Installazione Hardware).
1. Assicurarsi che il router sia wireless.
2. Assicurarsi che l’antenna sia fissata alla telecamera.
3. Verificare se il collegamento con il router richiede una chiave di sicurezza, si prega di
scrivere in giù, ci servirà nelle fasi successive. (La crittografia è un termine usato per la
password e il tipo di sicurezza wireless)
4. Login per accedere alla telecamera, cliccare “Network”>”Wireless Lan Settings”>”Scan”,
effettuare 2 volte la scannerizzazione, quindi verrà rilevata la connessione WLAN nella lista,
selezionare quella relativa al router in uso.
5. Se la connessione non è protetta cliccare semplicemente su “Submit”, se invece c’è una i
seguenti campi inserirla a cliccare su “Submit”.
Using Wireless Lan: la casella
SSID: è il nome del router wireless.
Network type: si possono trovare anche dietro il nome SSID nell'elenco Wireless Lan.
Encryption: si possono trovare anche dietro il nome SSID nell'elenco Wireless Lan, questo è
solo il tipo di crittografia utilizzato, la password della vostra Lan Wireless può essere trovato sul
fondo del router se installato professionale, si potrebbe anche chiedere alla persona che ha
installato il router wireless per la password corretta.
6-8-2012
89
IPV38 / IPV38WE
6. Attendere circa 30 secondi, la telecamera si riavvierà, a quel punto togliere il cavo di rete.
Nella maggior parte dei casi sarà necessario per accedere al nuovo la telecamera. È
possibile utilizzare lo strumento IPCamera dal punto 3 per questo o inserire l'indirizzo IP della
telecamera `s nel tuo browser.
Nel caso in cui non riesci a trovare la telecamera IP 30 secondi dopo il riavvio si prega di
attendere un po 'più a lungo.
Se ancora non riesci a trovare la telecamera utilizzando lo IPCamera tool, potrebbe essere
utilizzato un tipo sbagliato di crittografia o Password. Si prega di assicurarsi di aver selezionato
il SSID giusto, perché la telecamera potrebbe anche raccogliere un maggior numero di
segnali da altri router. Forse dai tuoi vicini?
Per visualizzare l'immagine della telecamera dall'esterno della rete, per esempio a lavoro, a
scuola o dai vostri amici o la casa di famiglia, è necessario configurare alcune impostazioni
aggiuntive presenti nel manuale completo. Si prega di passare al punto 3.6 UpnP Settings per
impostare questa funzione. Importante: assicurati di ricollegare la telecamera con il router
tramite il cavo di rete, prima di iniziare l'installazione UPnP.
Esiste una versione completa del manuale sul CD fornito con la fotocamera, ma vi
suggeriamo di andare a www.ebodeelectronics.eu per l'ultima versione del manuale.
Abbiamo aggiornato regolarmente.
Apps compatibili:
Recentemente abbiamo introdotto la nostra applicazione ebode per la camera IP. Con
questa applicazione è possibile visualizzare e controllare la camera IP dal tuo iPad ®,
iPhone® o iPod Touch ®, ovunque voi siate * (si prega di controllare la pagina 13 per una
panoramica di tutte le funzioni).
Vai alla App Store per scaricare l'App IP Vision (3,99 €).
Inoltre vi è un applicazione gratuita disponibile: CamViewer da John McKerrell
Per maggiori dettagli consultare il manuale d'uso completo in www.ebodeelectronics.eu.
6-8-2012
90
IPV38 / IPV38WE
DECLARATION OF CONFORMITY
Hereby, ebode declares that this IPV38 / IPV38WE is in compliance with the essential
requirements and other relevant provisions of the following Directives:
1) Directive 1999/5/EC of the European Parliament and of the Council of 9 March 1999 on
radio equipment and telecommunications terminal equipment and the mutual
recognition of their conformity
2) Directive 2004/108/EC of the European Parliament and of the Council of 15 December
2004 on the approximation of the laws of the Member States relating to electromagnetic
compatibility
3) Directive 2006/95/EC of the European Parliament and of the Council of 12 December
2006 on the harmonization of the laws of Member States relating to electrical equipment
designed for use within certain voltage limits
4) Directive 2002/95/EC of the European Parliament and of the Council of 27 January 2003
on the restriction of the use of certain hazardous substances in electrical and electronic
equipment
5) Directive 2005/32/EC of the European Parliament and of the Council of 6 July 2005
establishing a framework for the setting of eco design requirements for energy-using
Technical data and copies of the original Declaration of Conformity are available and
can be obtained from ebode electronics: PB 25, NL-4264ZG, the Netherlands.
User Information for Consumer Products Covered by EU Directive 2002/96/EC on Waste
Electric and Electronic Equipment (WEEE)
This document contains important information for users with regards to the proper disposal
and recycling of ebode products. Consumers are required to comply with this notice for all
electronic products bearing the following symbol:
Environmental Information for Customers in the European Union
European Directive 2002/96/EC requires that the equipment bearing this
symbol on the product and/or its packaging must not be disposed of with
unsorted municipal waste. The symbol indicates that this product should be
disposed of separately from regular household waste streams.
It is your responsibility to dispose of this and other electric and electronic equipment via
designated collection facilities appointed by the government or local authorities. Correct
disposal and recycling will help prevent potential negative consequences to the
environment and human health.
For more detailed information about the disposal of your old equipment, please contact
your local authorities, waste disposal service, or the shop where you purchased the
product.
6-8-2012
91
IPV38 / IPV38WE
DECLARATION OF CONFORMITY TO R&TTE DIRECTIVE 1999/5/EC
for the European Community, Switzerland, Norway, Iceland and Liechtenstein
Product category: general consumer (category 3).
English: This equipment is in compliance with the essential requirements and other relevant
provisions of the European R&TTE Directive 1999/5/EC
Deutsch [German]: Dieses Gerät entspricht den grundlegenden Anforderungen und den
weiteren entsprechenden Vorgaben der Richtlinie 1999/5/EU.
Nederlands [Dutch]: Dit apparaat voldoet aan de essentiële eisen en andere van
toepassing zijnde bepalingen van de Richtlijn 1999/5/EC.
Svenska [Swedish]: Denna utrustning står I överensstämmelse med de väsentliga
egenskapskrav och övriga relevanta bestämmelser som framgår av direktiv 1999/5/EG.
Français [French]: Cet appareil est conforme aux exigences essentielles et aux autres
dispositions pertinentes de la Directive 1999/5/EC
Español [Spanish]: Este equipo cumple con los requisitos esenciales asi como con otras
disposiciones de la Directiva 1999/5/CE.
Português [Portuguese]: Este equipamento está em conformidade com os requisitos
essenciais e outras provisões relevantes da Directiva 1999/5/EC.
Italiano [Italian]: Questo apparato é conforme ai requisiti essenziali ed agli altri principi
sanciti dalla Direttiva 1999/5/CE.
Norsk [Norwegian]: Dette utstyret er i samsvar med de grunnleggende krav og andre
relevante bestemmelser i EU-direktiv 1999/5/EF.
Suomi [Finnish]:Tämä laite tÿttää direktiivin 1999/5/EY olennaiset vaatimukset ja on siinä
asetettujen muiden laitetta koskevien määräysten mukainen.
Dansk [Danish]: Dette udstyr er i overensstemmelse med de væsentlige krav og andre
relevante bestemmelser i Direktiv 1999/5/EF.
Polski [Polish]: Urządzenie jest zgodne z ogólnymi wymaganiami oraz szczególnymi
warunkami okreslonymi Dyrektywą UE: 1999/5/EC
6-8-2012
92
IPV38 / IPV38WE
NOTES
6-8-2012
93
IPV38 / IPV38WE
www.ebodeelectronics.eu
6-8-2012
94
IPV38 / IPV38WE