1
A 240 Combo / A 340 Combo
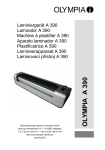
Laminiergerät
/DPLQLHUJHUlWPLW5ROOHQVFKQHLGHU
mit Rollenschneider
Laminator with Trimmer
3ODVWL¿HXVHDYHFPDVVLFRWjODPHGHFRXSHURWDWLYH
Plastifieuse avec massicot
3ODVWL¿FDWULFHFRQWDJOLHULQDDUXOOR
à lame de coupe rotative
$SDUDWRODPLQDGRUFRQFRUWDGRUGHURGLOORV
Plastificatrice
con taglierina a rullo
0iTXLQDGHSODVWL¿FDUFRPFRUWDGRUGHURORV
/DPLQHHUDSSDUDDWPHWUROVQLMGHU
Aparato laminador
con cortador de rodillos
/DPLQiWRUVNRWRXRYRXH]DNRX
Máquina de plastificar
com cortador de rolos
Lamineerapparaat
met rolsnijder
Laminátor
s kotouþovou Ĝezaþkou
Bedienungsanleitung .....................3
OLYMPIA A 245 Combo
A 240 Combo / A 340 Combo
/DPLQDWRUZLWK7ULPPHU
Operating Instructions .................23
Mode d’emploi .............................41
Manuale d’uso .............................59
Manual de instrucciones..............77
Manual de instruções ..................95
Gebruiksaanwijzing ...................113
Návod k obsluze ........................131
Olympia Business Systems Vertriebs GmbH
Zum Kraftwerk 1 D-45527 Hattingen
http://www.olympia-vertrieb.de
2O\PSLD%XVLQHVV6\VWHPV9HUWULHEV*PE+
(01.12.2010)
=XP.UDIWZHUNā'+DWWLQJHQ
+DWWLQJ
ZZZRO\PSLDYHUWULH
ULH
HEGH
2
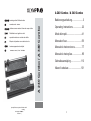
1
A 240 Combo / A 340 Combo
Laminiergerät
mit Rollenschneider
2
3
4
5
6
Bedienungsanleitung
7
8
9
10
11
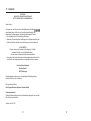
Wichtige Sicherheitshinweise............................................................... 5
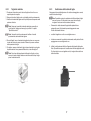
1.1 Sicherheitshinweise Laminiergerät ............................................ 5
1.2 Sicherheitshinweise Rollenschneider ........................................ 6
Haftungsausschluss ............................................................................. 7
Bestimmungsgemäßer Gebrauch ........................................................ 7
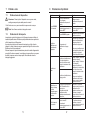
Bedienelemente.................................................................................... 8
4.1 Funktionsschalter und Anzeigeelemente ................................... 9
4.2 Schneidekopf.............................................................................. 9
Inbetriebnahme................................................................................... 10
Bedienung .......................................................................................... 11
6.1 Laminiergerät ........................................................................... 11
6.1.1 Heißlaminieren............................................................. 11
6.1.2 Kaltlaminieren .............................................................. 12
6.1.3 Folienstau beseitigen ................................................... 13
6.2 Rollenschneider ....................................................................... 14
6.2.1 Schnittbild wählen ........................................................ 14
6.2.2 Material schneiden....................................................... 15
6.2.3 Schneidekopf auswechseln ......................................... 16
Reinigung & Pflege............................................................................. 17
7.1 Gerät von außen reinigen ........................................................ 17
7.2 Transportwalzen reinigen......................................................... 17
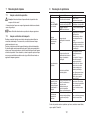
Problembehandlung ........................................................................... 18
Technische Daten............................................................................... 19
Entsorgungshinweis ........................................................................... 20
Garantie .............................................................................................. 21
[DEUTSCH]
06.2011
3
Ɣ
1
Wichtige Sicherheitshinweise
Um ein zuverlässiges Arbeiten mit dem Gerät zu gewährleisten, beachten
Sie bitte Folgendes:
Ɣ
Lesen Sie diese Anweisungen bitte sorgfältig durch und beachten Sie
sie bei der Handhabung Ihres Geräts.
Ɣ
Bewahren Sie die Bedienungsanleitung für die zukünftige Benutzung
auf.
Ɣ
Stellen Sie das Gerät vor der Verwendung auf einem ebenen und
stabilen Arbeitsplatz auf.
1.1
Ɣ
Ɣ
Ɣ
Ɣ
Ɣ
Ɣ
Ɣ
Ɣ
Ɣ
Ɣ
Ɣ
Ɣ
Ɣ
Ɣ
Sicherheitshinweise Laminiergerät
Vermeiden Sie Beschädigungen des Netzsteckers oder Netzkabels.
Netzkabel nie verdrillen. Das Gerät bei beschädigtem Netzkabel oder
Netzstecker nicht in Betrieb nehmen.
Verwenden Sie das Gerät nicht in der Nähe von heißen Oberflächen
oder in feuchter Umgebung und schützen Sie es vor direkter
Sonneneinstrahlung und starker Staubeinwirkung.
Ziehen Sie vor dem Reinigen des Geräts immer den Netzstecker.
Verwenden Sie keine Lösungsmittel oder aggressive Reinigungsmittel.
Metallische Gegenstände können nicht laminiert werden.
Kindern ist der Aufenthalt im Arbeitsbereich des betriebsbereiten Geräts
nicht gestattet.
Ziehen Sie bei Nichtbenutzung des Geräts den Netzstecker.
Schalten Sie das Gerät immer sofort aus, wenn ein strenger Geruch
entsteht oder das Gerät nicht in Betrieb ist.
Berühren Sie den Netzstecker nicht mit feuchten Händen.
Stellen Sie sicher, dass der Ein-/Aus-Schalter in Position OFF ist, bevor
das Laminiergerät an das Stromnetz angeschlossen wird.
Führen Sie nur dafür vorgesehene Laminierfolien in das Gerät ein,
siehe Kapitel “Technische Daten”. Zu groß gewählte Laminierfolien
können Folienstaus verursachen.
Laminieren Sie keine hitzeempfindlichen Materialien mit diesem Gerät,
wie z. B. Thermopapier.
Beim Laminieren von feuchten Dokumenten erzielen Sie schlechte
Laminierergebnisse.
Verwenden Sie beim Heißlaminieren keine Laminierfolien, die für das
Kaltlaminieren vorgesehen sind. Das Gerät, die Laminierfolien und das
Dokument werden dabei beschädigt.
Schneiden Sie keine Laminierfolien zu. Die entstehenden Schnittkanten
können Folienstaus verursachen.
5
Ɣ
1.2
Ɣ
Ɣ
Ɣ
Ɣ
Ɣ
Ɣ
Ɣ
Ɣ
Ɣ
Ɣ
Ɣ
Ɣ
Halten Sie lose Teile von Bekleidung, Krawatten, Schmuck, langes Haar
oder andere lose Gegenstände von dem Laminiereinzug fern.
Verletzungsgefahr!
Das Gerät darf nur in trockenen, geschlossenen Räumen benutzt
werden.
Sicherheitshinweise Rollenschneider
Fassen Sie das Gerät beim Bewegen oder Wegstellen auf keinen Fall in
der Nähe des Schneidekopfs an. Die Messer des Schneidekopfs sind
scharf. Verletzungsgefahr!
Bedienen Sie das Gerät mit zwei Händen.
Halten Sie lose Teile von Bekleidung, Krawatten, Schmuck, langes Haar
oder andere lose Gegenstände von dem Rollenschneider fern.
Verletzungsgefahr!
Das Gerät ist nur für das Schneiden von Papier, Karten, Fotopapier und
Laminierfolien vorgesehen.
Entfernen Sie vor dem Schneiden eventuell vorhandene Heft- sowie
Büroklammern vom Dokument.
Die Messer dürfen weder geschmiert noch geschliffen werden.
Ist der Schneidekopf oder das Gehäuse des Schneidekopfs beschädigt,
darf das Gerät nicht betrieben werden.
Ist der Messerschutz nicht richtig eingesetzt, darf das Gerät nicht
betrieben werden.
Achten Sie darauf, dass Sie Ihre Finger beim Austausch des
Schneidekopfs nicht schneiden. Vermeiden Sie grundsätzlich Kontakte
mit den Messern.
Halten Sie das Gerät für Kinder unzugänglich.
Kinder oder Minderjährige dürfen das Gerät nur unter Aufsicht eines
Erwachsenen betreiben.
Das Gerät ist nicht für das Schneiden von Fingernägeln vorgesehen.
6
2
Haftungsausschluss
4
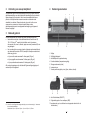
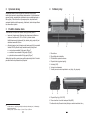
Bedienelemente
Wir übernehmen keine Garantie für die Richtigkeit der Informationen, die
sich auf technische Eigenschaften sowie die hier vorliegende
Dokumentation beziehen. Das in dieser Dokumentation beschriebene
Produkt und ggf. dessen Zubehör unterliegen einer ständigen Verbesserung
und Weiterentwicklung. Aus diesem Grund behalten wir uns das Recht vor,
Komponenten, Zubehör, technische Spezifikationen sowie die hier
vorliegende Dokumentation des Produkts ohne vorherige Ankündigung
jederzeit zu ändern.
3
1
2
3
1
3
4
Bestimmungsgemäßer Gebrauch
Dieses Laminiergerät mit Rollenschneider darf nur verwendet werden für:
Ɣ
das Laminieren mit Heißlaminierfolien und Kaltlaminierfolien mit einer
Laminierfolienstärke von 80, 100 und 125 mic1, wobei die
Gesamtdicke der zu laminierenden Dokumente (Fotos, Bilder, Karten,
Papier usw.) bei maximal 0,6 mm liegen darf
Ɣ
das Zuschneiden von Papier, Karten, Fotopapier und Laminierfolien mit
einer maximalen Größe von DIN A3, wobei das zu schneidende
Material nicht dicker sein darf als
Ɣ
im geraden Schnitt maximal 3 Blatt Papier (80 g/m2)
Ɣ
im Wellenschnitt maximal 3 Blatt Papier (80 g/m2)
Ɣ
im Perforationsschnitt maximal 3 Blatt Papier (80 g/m2)
Jede andere Verwendung gilt als nicht bestimmungsgemäß. Eigenmächtige
Veränderungen oder Umbauten sind nicht zulässig.
5
7
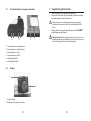
1
2
3
4
5
6
7
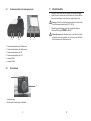
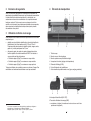
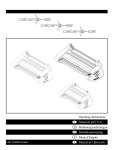
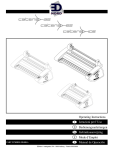
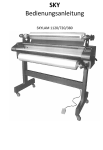
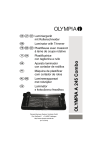
6
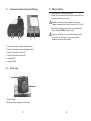
Schneidekopf
Schneideleiste/Führungsschiene
Andruckleiste mit Fingerschutz
Funktionsschalter (Temperaturregelung)
Anzeigeelemente (LEDs)
Laminiereinzug
Visuelle Positionshilfen in cm (Linien, Winkel, Skala)
8
8
9
9
8
9
10
Ein-/Aus-Schalter (ON / OFF)
Stauentriegelungsschieber (ABS)
10 (FNHQUXQGHU$QGHU5FNVHLWHGHU*HUlWHEH¿QGHWVLFKGHU(FNHQUXQGHU
1
mic oder micron = Eine aus dem englischen Sprachraum stammende Bezeichnung für ein
Mikrometer (m). 1 Mikrometer ist ein Tausendstel Millimeter.
Beispiele: 80 m = 0,08 mm. 100 m = 0,1 mm. 125 m = 0,125 mm.
7
8
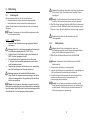
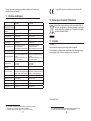
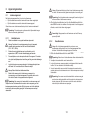
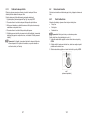
4.1
Funktionsschalter und Anzeigeelemente
5
Ɣ
1
Ɣ
Inbetriebnahme
Platzieren Sie das Gerät auf einer stabilen und ebenen Oberfläche.
Stellen Sie sicher, dass der Ein-/Aus-Schalter in der Position OFF ist,
bevor das Laminiergerät an das Stromnetz angeschlossen wird.
2
Achtung: Prüfen Sie, ob die Spannungsangabe des Geräts mit der
Ihres Stromnetzes übereinstimmt (230 V, 50 Hz).
3
Ɣ
4
5
1
3 Stecken Sie den Netzstecker in eine gut zugängliche Standardsteckdose. 'LH$Q]HLJHPOWEROHXFKWHWURW
Die Anzeige POWER leuchtet blau.
Sicherheitshinweis: Die Steckdose muss in der Nähe des Geräts
angebracht und leicht zugänglich sein. Sie können somit im Notfall
das Gerät schnell vom Stromnetz trennen.
1
1 Funktionsschalterstellung
)XQNWLRQVVFKDOWHUVWHOOXQJIU.DOWODPLQLHUHQ
2
3
3
4
5
bei Laminierfolien mit einer Dicke von 100 oder 125 mic2
)XQNWLRQVVFKDOWHUVWHOOXQJIU+HLODPLQLHUHQ
Funktionsschalterstellung
)XQNWLRQVVFKDOWHUVWHOOXQJIU21
bei
Laminierfolien mit einer Dicke von 60 oder 80 mic2
)XQNWLRQVVFKDOWHUVWHOOXQJIU2))
Funktionsschalterstellung
für
das Kaltlaminieren
$Q]HLJH5($'<
Anzeige
POWER
$Q]HLJH32:(5
Anzeige READY
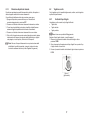
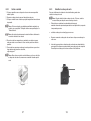
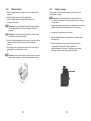
4.2
Schneidekopf
1
2
1
2
2
Verstellsicherung
Drehknopf zur Einstellung des Schnittbilds
mic = Eine aus dem englischen Sprachraum stammende Bezeichnung für ein Mikrometer
(m). 1 Mikrometer ist ein Tausendstel Millimeter.
9
10
6
Bedienung
6.1
Vorsicht: Die austretende Laminierfolie ist nach dem Laminieren sehr
heiß und weich. Gehen Sie deshalb mit dem laminierten Produkt
vorsichtig um!
Laminiergerät
Mit dem Laminiergerät können Sie heiß und kalt laminieren:
Ɣ
Beim Heißlaminieren wird die Laminierfolie zusammengeklebt.
Ɣ
Beim Kaltlaminieren wird die Laminierfolie zusammengepresst.
Stimmen Sie die Auswahl der Laminiermethode auf das zu laminierende
Material ab.
Hinweis: Thermopapier und Ultraschallbilder beispielsweise sollten
nur kalt laminiert werden!
6.1.1
6. :HQQ6LHPLWGHP/DPLQLHUHQIHUWLJVLQGVWHOOHQ6LHGHQ)XQNWLRQVVFKDO
Wenn Sie mit dem Laminieren fertig sind, stellen Sie den
WHUUHFKWVLQGLH3RVLWLRQCOLDXQG]LHKHQ6LHGHQ1HW]VWHFNHUDXVGHU
Funktionsschalter an der rechten Geräteoberseite in die Position COLD
und ziehen Sie den Netzstecker aus der Steckdose. Lassen Sie das
6WHFNGRVH/DVVHQ6LHGDV*HUlWDENKOHQEHYRU6LHHVJJIZHJVWHOOHQ
Gerät abkühlen, bevor Sie es ggf. wegstellen.
Vorsicht: Das Gerät ist nach dem Laminieren sehr heiß!
Verletzungsgefahr!
Heißlaminieren
Das Laminiergerät
kann
den Funktionsschalter,
einen Schiebeschalter,
1
Schließen Sie
das über
Stromkabel
an eine gut zugängliche
Standardmit zwei
Temperaturstufen
betrieben werden, die auf vier
steckdose
an.
Laminierfolienstärken abgestimmt sind:
Achtung: Prüfen Sie, ob die Spannungsangabe des Gerätes mit der
Ɣ
60 oder 80 mic3
Ihres Stromnetzes
übereinstimmt (220 - 240 V, 50 Hz).
100 oder 125 mic3
Ɣ
2
Schalten Sie den Ein/Aus-Schalter an der rechten Geräteseite ein:
1. Stellen
Siedie
dengrüne
Funktionsschalter
der rechten Geräteoberseite auf die
„+27“,
Anzeigelampean
leuchtet
verwendete Laminierfolienstärke ein. Das Laminiergerät heizt
3 selbstständig
Der Antriebsmotor
für
die
Transportrollen
an. Nach etwa
bis zur benötigten Temperatur. läuft
Währenddessen
blinkt die
3 - 5 Minuten
die korrekte Betriebstemperatur erreicht und die
Anzeige
READY ist
orange.
grüne Anzeigelampe leuchtet.
2. Der Antriebsmotor für die Transportwalzen läuft an.
4
Legen Sie das Laminiergut in die Folientasche so ein, dass allseitig
3. Nach etwa 5 Minuten ist die korrekte Betriebstemperatur erreicht und die
etwa 3 bis 5 mm Abstand vom Folienrand vorhanden ist.
Anzeige READY leuchtet dauerhaft.
Achtung:
Sie
Heißlaminierfolien.
4. Legen
Sie dasVerwenden
Laminiergut
in ausschließlich
die Laminierfolie
so ein, dass allseitig etwa
5 mmSie
Abstand
vomzusammen
Laminierfolienrand
vorhanden ist.
5 3 bis
Führen
die Folie
mit dem Laminiergut
in den Einführschlitz des Laminiergerätes ein. Die geschlossene Seite der Folie ist
Hinweis: Verwenden Sie für das Heißlaminieren ausschließlich
hierbei
zuerst einzuführen.
Heißlaminierfolien.
Hinweis:
Um
ein Falten der
Laminierfolie
zu vermeiden
darf
5. Führen
Sie die
Laminierfolie
zusammen
mit dem
Laminiergut
mitnie
derdie
offene
Seite der Laminierfolie
den Einführschlitz
geschlossenen
Seite zuerstzuerst
in deninLaminiereinzug
ein.des
DerLaminiergerätes Laminiervorgang
einführt werden. Beim
der Folie bitte die Anweisungen am EinerfolgtEinführen
automatisch.
führschlitz beachten. Der Laminiervorgang erfolgt automatisch.
Hinweis: Um ein Falten der Laminierfolie zu vermeiden, darf die
offene Seite der Laminierfolie niemals zuerst in den Laminiereinzug
eingeführt werden. Beim Einführen der Laminierfolie beachten Sie
bitte die Anweisungen am Laminiereinzug.
3
Hinweis: Zum Ebnen beschweren Sie das laminierte Produkt mit
einem Buch oder einem anderen schweren, ebenen Gegenstand.
6.1.2
Kaltlaminieren
Achtung: Haben Sie das Laminiergerät kurz vorher zum
Heißlaminieren eingesetzt, müssen Sie das Laminiergerät abkühlen
lassen. Die Abkühldauer beträgt etwa 30 Minuten.
6WHOOHQ6LHGHQ)XQNWLRQVVFKDOWHUUHFKWVLQGLH3RVLWLRQCOLD
1. Stellen
Sie den Funktionsschalter an der rechten Geräteoberseite in die
Position COLD.
Hinweis: Verwenden Sie für das Kaltlaminieren ausschließlich
Kaltlaminierfolien.
2. Entfernen Sie die Schutzfolie von der Laminierfolie.
3. Legen Sie das Laminiergut in die Laminierfolie so ein, dass allseitig etwa
3 bis 5 mm Abstand vom Laminierfolienrand vorhanden ist.
4. Führen Sie die Laminierfolie zusammen mit dem Laminiergut mit der
geschlossenen Seite zuerst in den Laminiereinzug ein. Der
Laminiervorgang erfolgt automatisch.
Hinweis: Um ein Falten der Laminierfolie zu vermeiden, darf die
offene Seite der Laminierfolie niemals zuerst in den Laminiereinzug
eingeführt werden. Beim Einführen der Laminierfolie beachten Sie
bitte die Anweisungen am Laminiereinzug.
mic oder micron = Eine aus dem englischen Sprachraum stammende Bezeichnung für ein
Mikrometer (m). 1 Mikrometer ist ein Tausendstel Millimeter.
Beispiele: 60 m = 0,06 mm. 80 m = 0,08 mm. 100 m = 0,1 mm. 125 m = 0,125 mm.
11
12
6.1.3
Folienstau beseitigen
Um Folienstaus schnell zu beseitigen, ist das Gerät mit einem
Stauentriegelungsschieber ausgerüstet.
Wenn die Laminierfolie blockiert, gehen Sie folgendermaßen vor:
1. Schalten Sie das Gerät aus: Stellen Sie den Ein-/Aus-Schalter in die
Position OFF.
2. Stellen Sie den Stauentriegelungsschieber ganz nach links.
3. Halten Sie das Laminiergerät fest und ziehen Sie die Laminierfolie
zusammen mit dem Laminiergut aus dem Laminiereinzug.
4. Stellen Sie den Stauentriegelungsschieber zurück nach rechts.
5. Reinigen Sie die Transportwalzen von Ablagerungen und Kleberesten,
indem Sie ein gefaltetes Blatt Papier in den Laminiereinzug einführen,
siehe Kapitel „Transportwalzen reinigen”.
Hinweis: Falls sich Folienstaus ständig wiederholen oder sich
gestaute Folie nicht mehr aus dem Laminiergerät ziehen lässt,
wenden Sie sich bitte an unsere Hotline (siehe Garantie).
6.2
Rollenschneider
Mit dem Rollenschneider können Papier, Karten, Fotopapier und
Laminierfolien zugeschnitten werden.
6.2.1
Schnittbild wählen
Der Rollenschneider ist mit drei verschiedenen Schnittbildern ausgestattet:
Ɣ
Gerader Schnitt
Ɣ
Wellenschnitt
Ɣ
Perforationsschnitt
Hinweis: Die Messer befinden sich in einem geschützten Gehäuse.
Wählen Sie das Schnittbild aus, welches Sie benötigen, siehe Bild 1:
1. Ziehen Sie die Verstellsicherung am Schneidekopf nach oben in die
Position OPEN.
2. Drehen Sie den Drehknopf zur Einstellung des Schnittbilds, bis sich das
Symbol des gewünschten Schnittbilds oben befindet.
3. Drücken Sie die Verstellsicherung am Schneidekopf nach unten in die
Position LOCK.
Bild 1
(Abbildung ähnlich)
13
14
6.2.2
Material schneiden
1. Platzieren Sie das Gerät mit dem Schneidekopf nach oben auf einer
stabilen und ebenen Oberfläche.
2. Schieben Sie den Schneidekopf an eine Seite der Führungsschiene.
3. Legen Sie das zu schneidende Material an die gewünschte Position unter
die transparente Andruckleiste.
Hinweis: Beachten Sie die zulässige Menge zu schneidenden
Materials, siehe Kapitel “Bestimmungsgemäßer Gebrauch” oder
Kapitel “Technische Daten”.
Hinweis: Die visuellen Positionshilfen erleichtern es Ihnen, das zu
schneidende Material korrekt auszurichten.
4. Halten Sie das zu schneidende Material mit einer Hand gut fest, so dass
es nicht verrutschen kann, während Sie schneiden. Andernfalls kann es
zu Ungenauigkeiten kommen.
5. Zum Schneiden drücken Sie den Schneidekopf nach unten und ziehen
diesen entlang der Führungsschiene bis zur anderen Seite,
siehe Bild 2.
Hinweis: Um eine fehlerhafte Schnittkante zu vermeiden, führen Sie
den Schneidekopf nicht zurück, sondern entfernen Sie nach dem
Schneiden das eingelegte Material.
6.2.3
Schneidekopf auswechseln
Wenn die Messer des Rollenschneiders beschädigt oder abgenutzt sind,
muss der Schneidekopf getauscht werden.
Hinweis: Es kann nur der komplette Schneidekopf ausgetauscht
werden. Zum Erwerb eines neuen Schneidekopfs wenden Sie sich
bitte an unsere Hotline.
1. Drehen
Sie den roten Drehknopf am Ende der Führungsschiene um 90 º
(QWIHUQHQ6LHGLH(QGNDSSHGHU)KUXQJVVFKLHQHDXVGHU*UXQGSODWWHLQ
nach
rechts oder links und ziehen Sie die Führungsschiene aus dem
GHP6LHVLHDPXQWHUHQ(QGHOHLFKWQDFKLQQHQJHGUFNWQDFKREHQ
Gerät.
VFKLHEHQ
2. Ersetzen Sie den alten Schneidekopf durch einen neuen.
(UVHW]HQ6LHGHQDOWHQGXUFKHLQHQQHXHQ6FKQHLGHNRSI
3. Schieben
Sie die Führungsschiene wieder in das Gerät und drehen Sie
den roten Drehknopf um 90 º nach rechts oder links.
6FKLHEHQ6LHGLH)KUXQJVVFKLHQHZLHGHULQGLH*UXQGSODWWHXQGVHW]HQ
6LHGDEHLGHQQHXHQ6FKQHLGHNRSIDXI
6WHFNHQ6LHGLH(QGNDSSHYRQREHQDXIGLHgIIQXQJDP(QGHGHU)KUXQJV
VFKLHQH+LQZHLV(VNDQQQXUGHUNRPSOHWWH6FKQHLGHNRSIDXVJHWDXVFKW
ZHUGHQ=XP(UZHUEHLQHVQHXHQ6FKQHLGHNRSIVZHQGHQ6LHVLFKELWWHDQ
GLHWHOHIRQLVFKH+RWOLQH
Bild 3
Bild 2
15
16
7
7.1
Reinigung & Pflege
8
Gerät von außen reinigen
Problembehandlung
Problem
Der Netzstecker steckt nicht
richtig in der Steckdose.
Achtung: Ziehen Sie vor dem feuchten Reinigen des Geräts immer
den Netzstecker!
Reinigen Sie das Gehäuse mit einem in milder Seife und klarem Wasser
getränkten, leicht feuchten Tuch.
Anzeige POWER
leuchtet nicht.
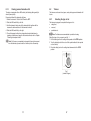
7.2
Transportwalzen reinigen
Der Ein-/Aus-Schalter steht
in der Position OFF.
Anzeige POWER ist defekt.
Hinweis: Verwenden Sie keine Lösungsmittel oder aggressive
Reinigungsmittel.
Ablagerungen und Klebereste an den Transportwalzen können das Lami$EODJHUXQJHQXQG.OHEHUHVWHDQGHQ7UDQVSRUWZDO]HQN|QQHQGDV/DPLQLHU
nierergebnis beeinflussen. Darum müssen die Transportwalzen in
HUJHEQLVEHHLQÀXVVHQ'DUXPPVVHQGLH7UDQVSRUWZDO]HQSHULRGLVFK
regelmäßigen Abständen gereinigt werden:
QDFKGHU%HQXW]XQJJHUHLQLJWZHUGHQ
+LHU]XHLQJHIDOWHWHV%ODWW3DSLHULQGHQ(LQIKUVFKOLW]HLQIKUHQ.OHEHUHVWH
1. Stellen Sie den Funktionsschalter auf 100/125 mic.
ZHUGHQYRPDXVWUHWHQGHQ3DSLHUPLWJHQRPPHQ'HQ9RUJDQJPHKUPDOV
2. Warten Sie, bis die Anzeige READY dauerhaft leuchtet.
ZLHGHUKROHQ9RUGHPIHXFKWHQ5HLQLJHQGHV*HUlWHVLPPHUGHQ1HW]VWH
3. Führen Sie ein gefaltetes Blatt Papier in den Laminiereinzug ein.
FNHU]LHKHQ)DOOVHUIRUGHUOLFKNDQQGDV*HKlXVHPLWHLQHPLQPLOGHU6HLIH
4. Wiederholen Sie den Vorgang mit einem neuen Blatt Papier so lange, bis
XQGNODUHP:DVVHUJHWUlQNWHQ7XFKJHUHLQLJWZHUGHQ9HUZHQGHQ6LHNHLQH
auf dem Papier keine Ablagerungen oder Klebereste mehr zu sehen
/|VXQJVPLWWHORGHUDJJUHVVLYH5HLQLJXQJVPLWWHO
sind.
Diagnose & Ursache
Die laminierte Folie
ist nicht vollständig
durchsichtig.
Die Laminiertemperatur war
zu niedrig.
Die Laminierfolie ist nicht
gerade in den
Laminiereinzug geführt
worden.
Folienstau
Die Laminierfolie ist zu groß.
Gerät funktioniert
nach längerem
Betrieb nicht mehr
oder stoppt
während des
Betriebs.
Ist die Oberfläche des Geräts
warm? Dann hat vermutlich
der Überhitzungsschutz das
Laminiergerät automatisch
ausgeschaltet.
Transportwalzen
laufen nicht.
Steckt der Netzstecker in der
Steckdose?
Steht der Ein-/Aus-Schalter
in der Position ON?
Abhilfe
Stecken Sie den
Netzstecker richtig in die
Steckdose.
Stellen Sie den Ein-/AusSchalter in die Position ON.
Wenden Sie sich an unsere
Hotline.
Stellen Sie sicher, dass Sie
das Gerät bei Verwendung
dickerer Laminierfolien
ausreichend lange
aufwärmen lassen.
Laminieren Sie dieselbe
Laminierfolie erneut, um
das Laminierergebnis zu
verbessern.
Siehe Kapitel “Folienstau
beseitigen”.
Siehe Kapitel
“Transportwalzen reinigen”.
Führen Sie die Laminierfolie
gerade und mit der
geschlossen Seite zuerst in
den Laminiereinzug.
Benutzen Sie nur
Laminierfolien in der
angegebenen Größe, siehe
Kapitel “Technische Daten”.
Warten Sie dann ca.
30 Minuten und probieren
Sie noch einmal, zu
laminieren. Wenn das Gerät
wieder nicht funktioniert,
wenden Sie sich an unsere
Hotline.
Falls das Problem weiter
besteht, wenden Sie sich
an unsere Hotline.
Falls das Problem nicht behoben werden konnte, wenden Sie sich an
unsere Hotline, siehe Kapitel “Garantie”.
17
18
9
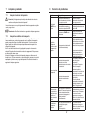
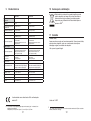
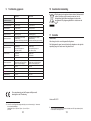
Technische Daten
A 240 Combo
10 Entsorgungshinweis
A 245 Combo
Dieses Symbol (die durchgestrichene Abfalltonne) bedeutet,
dass dieses Produkt nach der Lebenszeit zu einem für den
Endanwender verfügbaren Rücknahme- oder getrennten
Sammelsystem gebracht werden soll. Dieses Symbol gilt nur in
den Staaten des EWR53.
A 340 Combo
Heiß- und Kaltlaminiergerät
Heiß- und Kaltlaminiergerät
Maximale
0D[LPDOH/DPLQLHUEUHLWH
Laminierbreite:
PP
240 mm
PP
Laminiergeschwindigkeit:
/DPLQLHUJHVFKZLQGLJNHLW
PPSUR0LQXWH
60, 80, 100 und 125
mic4
XQGPLF
300 mm pro Minute
PPSUR0LQXWH
Aufwärmdauer:0LQXWHQ
$XIZlUPGDXHU
5 Minuten
Für Laminierfolienstärken:
)U/DPLQLHUIROLHQVWlUNHQ
XQGPLF
0LQXWHQ
/('32:(5URW
Anzeigeelemente:
$Q]HLJHHOHPHQWH
/('32:(5URW
LED POWER (blau)
/('5($'<JUQ
LED READY (orange)
6WDXHQWULHJHOXQJVVFKLHEHU
6WDXHQWULHJHOXQJVVFKLHEHU
Im
Lieferumfang
enthaltene
3
Stück
DIN
A5
%HVRQGHUH0HUNPDOH
.HLQH%ODVHQELOGXQJ
.HLQH%ODVHQELOGXQJ
Laminierfolien: $XWRPDWLVFKH$EVFKDOWXQJEHLhEHUKLW]XQJ
3 Stück DIN A6 $XWRPDWLVFKH$EVFKDOWXQJEHLhEHUKLW]XQJ
Besondere Merkmale:
Stauentriegelungsschieber
Papierschneider
Keine Blasenbildung
5ROOHQVFKQHLGHUPLWZlKOEDUHQ
5ROOHQVFKQHLGHUPLWZlKOEDUHQ
Automatische Abschaltung
bei Überhitzung
6FKQLWWELOGHUQXQG9HUVWHOOVLFKHUXQJ
6FKQLWWELOGHUQXQG9HUVWHOOVLFKHUXQJ
%HVRQGHUH0HUNPDOH
9LVXHOOH3RVLWLRQVKLOIHQLQFP
9LVXHOOH3RVLWLRQVKLOIHQLQFP
Papierschneider
/('5($'<JUQ
/LQLHQ:LQNHO6NDOD
/LQLHQ:LQNHO6NDOD
Besondere Merkmale:
*HUDGHU6FKQLWW
Rollenschneider mit
3 wählbaren
*HUDGHU6FKQLWW
Schnittbildern und:HOOHQVFKQLWW
Verstellsicherung
3HUIRUDWLRQVVFKQLWW
Visuelle Positionshilfen in cm
(Linien, Winkel, Skala)
0D[LPDOHV)RUPDW
$
A3
Wählbare Schnittbilder:
Gerader Schnitt *HUDGHU6FKQLWW%ODWW3DSLHUJP
*HUDGHU6FKQLWW%ODWW3DSLHUJP
0D[LPDOH6FKQLWWOHLVWXQJ
:HOOHQVFKQLWW%ODWW3DSLHUJP
:HOOHQVFKQLWW%ODWW3DSLHUJP
Wellenschnitt
3HUIRUDWLRQ%ODWW3DSLHUJP
3HUIRUDWLRQ%ODWW3DSLHUJP
Perforationsschnitt
)DUEH
VFKZDU]VLOEHU
VFKZDU]VLOEHU
Maximales Format:
DIN A4
:lKOEDUH6FKQLWWELOGHU
:HOOHQVFKQLWW
3HUIRUDWLRQVVFKQLWW
$EPHVVXQJHQ%[7[+
[[PP
Maximale Schnittleistung:
*HZLFKW
NJ
6SDQQXQJVYHUVRUJXQJ
9+]
Farbe:
$XIQDKPHOHLVWXQJ
PD[:$
Gerader Schnitt: [[PP
5 Blatt Papier (80 g/m )
Wellenschnitt: NJ
2 Blatt Papier (80 g/m2)
Perforation:
2
Blatt Papier (80 g/m2)
9+]
schwarz-silber
2
PD[:6$
Abmessungen (B x T x H):
410 x 160 x 80 mm
Gewicht:
1,31 kg
Spannungsversorgung:
230 V, 50 Hz
Aufnahmeleistung:
max. 265 W, 1,2 A
Die Konformität mit den EU-Richtlinien wird durch das
CE-Zeichen bestätigt.
4
mic oder micron = Eine aus dem englischen Sprachraum stammende Bezeichnung für ein
Mikrometer (m). 1 Mikrometer ist ein Tausendstel Millimeter.
Beispiele: 80 m = 0,08 mm. 100 m = 0,1 mm. 125 m = 0,125 mm.
19
53
EWR = Europäischer Wirtschaftsraum, welcher die EU-Mitgliedstaaten plus die Staaten
Island, Liechtenstein und Norwegen umfasst.
20
11 Garantie
AC H T U N G !
W I C H T I G E G AR AN T I E U N T E R L AG E
B I T T E U N B E D I N G T AU F B E W AH R E N !
Lieber Kunde,
wir freuen uns, dass Sie sich für ein Qualitätsprodukt der Marke
entschieden haben. Sollte sich an Ihrem Gerät wider Erwarten ein
technisches Problem ergeben, beachten Sie bitte folgende Punkte:
Ɣ Die Garantiezeit für Ihr Gerät beträgt 24 Monate.
Ɣ Bewahren Sie unbedingt den Kaufbeleg und die Originalverpackung auf.
Ɣ Sollte ein Problem auftreten, rufen Sie bitte zuerst unsere Hotline an:
Ɣ
0180 5 007514
(Kosten aus dem dt. Festnetz bei Drucklegung: 14 ct/Min.,
maximal 42 ct/Min. aus den Mobilfunknetzen)
Oft kann unser Fachpersonal telefonisch weiterhelfen.
Kann jedoch der Fehler telefonisch nicht beseitigt werden, bitten wir Sie,
das Gerät in der Originalverpackung an folgende Anschrift zu senden:
Service-Center Hattingen
Zum Kraftwerk 1
45527 Hattingen
Garantiereparaturen können nur mit beigefügtem Kaufbeleg erfolgen.
Herzlichen Dank für Ihr Verständnis.
Mit freundlichen Grüßen
Ihre Olympia Business Systems Vertriebs GmbH
Verbrauchsmaterial
Sollte der Rollenschneider oder die Schneideleiste abgenutzt sein, wenden
Sie sich bitte an die Hotline.
Version vom 1.6.2011
21
22
1
A 240 Combo / A 340 Combo
Laminator with Trimmer
2
3
4
5
6
Operating Instructions
7
8
9
10
11
Important Safety Information .............................................................. 25
1.1 Safety information, laminator ................................................... 25
1.2 Safety information, trimmer ...................................................... 26
Exemption From Liability .................................................................... 27
Intended Use ...................................................................................... 27
Operating Elements............................................................................ 28
4.1 Function switch and indicator elements ................................... 29
4.2 Cutting head ............................................................................. 29
Starting Up.......................................................................................... 30
Operation ............................................................................................ 31
6.1 Laminator ................................................................................. 31
6.1.1 Hot laminating .............................................................. 31
6.1.2 Cold laminating ............................................................ 32
6.1.3 Clearing jammed lamination foil................................... 33
6.2 Trimmer .................................................................................... 34
6.2.1 Selecting the type of cut............................................... 34
6.2.2 Cutting material............................................................ 35
6.2.3 Changing the cutting head........................................... 36
Cleaning & Maintenance .................................................................... 37
7.1 Cleaning the exterior of the device........................................... 37
7.2 Cleaning the transport rollers ................................................... 37
Troubleshooting.................................................................................. 38
Technical Data.................................................................................... 39
Disposal .............................................................................................. 40
Warranty ............................................................................................. 40
[ENGLISH]
06.2011
23
24
1
Important Safety Information
Please observe the following to ensure the device is used safely and
functions reliably:
Ɣ
Read this manual thoroughly and observe the instructions and
information in it when operating the device.
Ɣ
Keep this operating manual in a safe place for future reference.
Ɣ
Before starting to use the device, set it down on a level, stable working
base.
1.2
Ɣ
Ɣ
Ɣ
Ɣ
Ɣ
1.1
Ɣ
Ɣ
Ɣ
Ɣ
Ɣ
Ɣ
Ɣ
Ɣ
Ɣ
Ɣ
Ɣ
Ɣ
Ɣ
Ɣ
Ɣ
Ɣ
Safety information, laminator
Prevent damage to the power plug and power cable. Never twist the
power cable. Do not operate the unit if the power cable or power plug is
damaged.
Do not use the device in the vicinity of hot surfaces or in damp
environments and protect it from direct sunlight and dusty conditions.
Disconnect the power plug before starting to clean the unit. Never use
any solvents or aggressive cleaning agents.
Metallic objects cannot be laminated.
Children must not be allowed in the vicinity of the device when it is
ready to operate.
Disconnect the power plug when the device is not in use.
Always switch the unit off immediately if it emits a strong smell or it is
not in operation.
Never touch the power plug with wet hands.
Ensure that the On/Off switch is in the OFF position before connecting
the laminator to the mains power supply.
Only insert lamination foil intended for the device, refer to Chapter
“Technical Data”. Using lamination foil which is too large could lead to
the unit jamming.
Do not laminate heat sensitive materials, such as thermal paper, in the
unit.
Lamination of moist documents produces poor results.
Do not use lamination foil intended for cold lamination for hot lamination.
This could damage the device, lamination foil and document.
Never cut lamination foil to size. The resulting cut edges could cause
the lamination foil to jam.
Keep loose clothing, ties, jewellery, long hair and other loose objects
away from the laminator infeed slot. Risk of injury!
The unit may only be used in dry, indoor rooms.
25
Ɣ
Ɣ
Ɣ
Ɣ
Ɣ
Ɣ
Ɣ
Safety information, trimmer
Do not take hold of the device near the cutting head when moving it or
packing it away. The blades in the cutting head are sharp. Risk of injury!
Use both hands to operate the device.
Keep loose clothing, ties, jewellery, long hair and other loose objects
away from the trimmer. Risk of injury!
The device is only intended for cutting paper, card, photo paper and
lamination foil.
Before cutting, remove any staples or paper clips from the document.
The blades must be neither greased nor ground.
Do not use the device if the cutting head or cutting head housing is
damaged.
The device must not be used if the knife protection is not installed
properly.
Be careful not to cut your fingers when replacing cutting head. Avoid
contact with the knife blades at all times.
Keep the device out of the reach of children.
Children and minors may only use the device under the supervision of
an adult.
The device is not intended to cut fingernails.
26
2
Exemption From Liability
4
Operating Elements
We cannot guarantee that the information which relates to the technical
properties of the product or to the product itself contained in this document is
correct. The product and, where applicable, its accessories, described in this
document are subject to constant improvement and further development.
For this reason, we reserve the right to modify components, accessories,
technical specifications and related documentation of the product described
herein at any time without notice.
1
2
3
1
3
4
3
Intended Use
This laminator with trimmer may only be used for:
Ɣ
lamination using hot lamination foil and cold lamination foil with
lamination foil thicknesses of 80, 100 and 125 mic6, whereby the
total thickness of the document to be laminated (photos, pictures, cards,
paper, etc.) may be maximally 0.6 mm.
Ɣ
cutting paper, card, photo paper and lamination foil with a maximum
size of A3, whereby the material to be cut must not be thicker than
2
Ɣ 3 sheets (80 g/m ) for a straight cut,
2
Ɣ 3 sheets (80 g/m ) for a wave cut,
2
Ɣ 3 sheets (80 g/m ) for a perforation cut.
Any other use is considered unintended use. Unauthorised modifications or
reconstructions are not permitted.
5
7
1
2
3
4
5
6
7
6
Cutting head
Guide rail
Pressing rail with finger protection
Function switch (temperature control)
Indicator elements (LEDs)
Laminator infeed
Visual positioning aids in cm (lines, angles, scale)
8
8
9
6
mic or micron = abbreviation of the word micrometer (m). 1 micrometer is one thousandth
of a millimetre. Examples: 80 m = 0.08 mm. 100 m = 0.1 mm. 125 m = 0.125 mm.
27
9
8
9
10
ON / OFF switch
Anti-blocking slider (for clearing jams)
10 &RUQHUURXQGHU7KHIXQFWLRQIRUURXQGLQJRIIWKHFRUQHUVLVORFDWHGRQWKH
UHYHUVHVLGHRIWKHGHYLFHV
28
4.1
Function switch and indicator elements
5
Ɣ
1
Ɣ
Starting Up
Place the device on a stable, level surface.
Ensure that the On/Off switch is in the OFF position before connecting
the laminator to the mains power supply.
2
Attention: Check that the voltage specifications of the device
correspond to that of your power supply network (230 V, 50 Hz).
3
Ɣ
4
5
1
3 Insert the power plug in an easily accessible, standard power socket.
7KHPOWERLQGLFDWRUOLJKWVXSUHG
The POWER indicator lights up blue.
Safety note: The power socket must be in the immediate vicinity of
the device and easily accessible. This enables you to disconnect the
device from the power supply quickly in an emergency.
1
switch position
1 Function
)XQFWLRQVZLWFKFROGODPLQDWLQJ
2
3
3
4
5
for lamination foil with a thickness of 100 or 125 mic7
)XQFWLRQVZLWFKKRWODPLQDWLQJ
Function switch position
)XQFWLRQVZLWFK21
for
lamination foil with a thickness of 60 or 80 mic2
)XQFWLRQVZLWFK2))
Function
switch position
for
cold lamination
5($'<LQGLFDWRU
POWER
indicator
32:(5LQGLFDWRU
READY indicator
4.2
Cutting head
1
2
1
2
7
Setting lock
Rotating knob to set the type of cut
mic = abbreviation of the word micrometer (m). 1 micrometer is one thousandth of a
millimetre.
29
30
6
Operation
6.1
Caution: The lamination foil is very hot and soft when ejected
following lamination. Therefore, handle the laminated document with
due care!
Laminator
The laminator can complete hot and cold lamination:
Ɣ
In the case of hot lamination, the lamination foil is adhered together.
Ɣ
In the case of cold lamination, the lamination foil is pressed together.
Select the lamination method according to the material to be laminated.
Note: Only cold lamination should be used for thermopaper and
ultrasonic images!
6.1.1
6. :KHQ\RXKDYHFRPSOHWHGWKHODPLQDWLQJWXUQWKHIXQFWLRQVZLWFKWRWKH
When you have completed the laminating process, set the function
switch, located at the top of the device on the right-hand side, to COLD
ULJKWLQWKHCOLDSRVLWLRQDQGUHPRYHWKHPDLQVSOXJIURPWKHZDOOVRFNHW
and remove the power plug from the power socket. Let the device cool
/HWWKHGHYLFHFRROGRZQEHIRUHSDFNLQJLWDZD\IRUH[DPSOH
down before packing it away, for example.
Caution: The device is very hot directly after laminating! Risk of
injury!
Hot laminating
1
Connect
powera cable
an easily
accessible,
standard foil
electrical
Use the
functionthe
switch,
slidingtoswitch,
to select
the lamination
socket.
thickness
you want to process and the laminator automatically activates the
temperature level associated with the corresponding thickness:
Caution: Check that the voltage specifications of the unit correspond
Ɣ
60 or 80 mic8
to that of your power supply network (220 - 240 V, 50 Hz).
100 or 125 mic3
Ɣ
2
Use the on/off switch on the right of the appliance to switch on:
1. Set"+27",
the function
switch,
located
the top of the device on the right-hand
the red
display
lamp at
shows.
side, to the lamination foil thickness being used. The laminator heats up
3
The drive motor for the transport rollers starts up. The correct operating
to the required temperature automatically. The READY indicator flashes
temperature
is reached
about 3-5 minutes and the green display
orange
during the
warm-upafter
phase.
lamp shows.
2. The drive motor for the transport rollers starts up.
4
Insert the document to be laminated in the pouches so that there is a
3. The correct operating temperature is reached after about 5 minutes and
margin of approx. 3 - 5 mm to the edge of the foil on all sides.
the READY indicator lights up green.
Caution:
Only use
intended for
4. Insert
the document
to foil
be laminated
in hot
the laminating.
lamination foil so that there is
of approx.
3 - 5 mm
the edge of
on all sides.
5 a margin
Insert the
foil containing
thetodocument
in the
the foil
laminator's
insertion slot.
Insert the ready closed side of the pouch first.
Note: Only use hot lamination foil for hot laminating.
Note:
prevent the
creasing,
insert in
thethe
5. Guide
theTo
laminating
foil laminating
containing foil
the from
document
to benever
laminated
open
end of the
foil pocket
the insertion
slotThe
of the
laminator
first. When
laminator
infeed
with theinclosed
side first.
laminating
process
occurs
inserting
the foil, observe the instructions on the insertion slot. The laminatautomatically.
ing process occurs automatically.
Note: To prevent the lamination foil from creasing, never feed the
open side of the lamination foil first in the laminator infeed. When
inserting the lamination foil, observe the instructions on the infeed slot.
8
Note: To flatten and smoothen the laminated product, place a book or
similar heavy, flat object on it.
6.1.2
Cold laminating
Attention: If you have just finished using the laminator for hot
laminating, you must let the laminator cool down. It takes about 30
minutes to cool down sufficiently.
1. 7XUQWKHIXQFWLRQVZLWFKWRWKHULJKWLQWKHCOLDSRVLWLRQ
Set the function switch, located at the top of the device on the right-hand
side, to COLD.
Note: Only use cold lamination foil for cold laminating.
2. Remove the protective foil from the lamination foil.
3. Insert the document to be laminated in the lamination foil so that there is
a margin of approx. 3 - 5 mm to the edge of the foil on all sides.
4. Guide the laminating foil containing the document to be laminated in the
laminator infeed with the closed side first. The laminating process occurs
automatically.
Note: To prevent the lamination foil from creasing, never feed the
open side of the lamination foil first in the laminator infeed. When
inserting the lamination foil, observe the instructions on the infeed slot.
mic or micron = abbreviation of the word micrometer (m). 1 micrometer is one thousandth
of a millimetre. Examples: 60 m = 0.06 mm. 80 m = 0.08 mm. 100 m = 0.1 mm. 125 m
= 0.125 mm.
31
32
6.1.3
Clearing jammed lamination foil
The device is equipped with an ABS switch (anti-blocking sliding switch) to
clear foil jams quickly.
Proceed as follows if the lamination foil jams:
1. Switch the device off: Set the On/Off switch to OFF.
2. Slide the ABS switch fully to the left.
3. Hold the laminator firmly and pull the lamination foil together with the
document to be laminated out of the laminator's infeed.
4. Slide the ABS switch fully to the right.
5. Clean the transport rollers of any deposits and residual adhesive by
inserting a folded piece of paper in the laminator infeed, refer to Chapter
"Cleaning the transport rollers".
Note: If foil jams occur repeatedly or jammed foil cannot be removed
from the laminator, please contact our hotline (refer to Guarantee).
6.2
Trimmer
The trimmer can be used to cut paper, card, photo paper and lamination foil
to size.
6.2.1
Selecting the type of cut
The trimmer is equipped to complete three types of cut:
Ɣ
straight cut,
Ɣ
wave cut,
Ɣ
perforation cut.
Note: The blades are accommodated in protective housing.
Select the type of cut you require, see Fig. 1:
1. Pull the setting lock on the cutting head upwards to the OPEN position.
2. Turn the rotating knob for the cut until the symbol related to the required
cut is at the top.
3. Press the setting lock on the cutting head downwards to the LOCK
position.
Fig. 1
(similar to figure)
33
34
6.2.2
Cutting material
6.2.3
1. Place the device on a stable, level surface with the cutting head facing
up.
2. Slide the cutting head to one side of the guide rail
3. Slide the material to be cut under the transparent pressing rail at the
required position.
Note: Observe the permissible quantity of material which may be cut,
refer to Chapter “Intended Use” or “Technical Data”.
Note: The visual positioning aids simplify correct alignment of the
material to be cut.
4. Hold the material to be cut firmly with one hand so that it cannot slip
when cut. Otherwise, the cut may be inaccurate.
5. To complete the cut, press the cutting head down and slide it along the
guide rail to the other side, refer to Fig. 2.
Changing the cutting head
When the blades in the cutting head are damaged or worn, the cutting head
must be replaced.
Note: Only the entire cutting head can be replaced. To obtain a new
cutting head, please telephone our hotline.
5HPRYHWKHHQGFDSRIWKHJXLGHUDLOIURPWKHEDVHSODWHE\SXVKLQJ
1. Turn
the red rotating knob located at the end of the guide rail 90º
LWXSZDUGVDWWKHORZHUHQGDWWKHVDPHWLPHDVSXVKLQJLWLQZDUGVJHQWO\
clockwise
or counterclockwise and pull the guide rail from the device.
2. Replace the old cutting head with a new one
5HSODFHWKHROGFXWWLQJKHDGZLWKDQHZRQH
3. Slide the guide rail back in the device and turn the red rotating knob 90º
back clockwise or counterclockwise.
6OLGHWKHJXLGHUDLOEDFNLQWKHEDVHSODWHDQGLQVWDOOWKHQHZFXWWLQJKHDG
LQWKHSURFHVV
3ODFHWKHHQGFDSIURPDERYHRQWRWKHRSHQLQJDWWKHHQGRIWKHJXLGH
UDLO1RWH2QO\WKHHQWLUHFXWWLQJKHDGFDQEHUHSODFHG7RREWDLQDQHZFXW
WLQJKHDGSOHDVHWHOHSKRQHRXUKRWOLQH
Note: To prevent a faulty cutting edge, do not run the cutting head
back again but remove the cut material directly after completing the
cut.
Fig. 3
Fig. 2
35
36
7
7.1
Cleaning & Maintenance
Cleaning the exterior of the device
8
Troubleshooting
Problem
Attention: Before cleaning the device with a damp cloth, disconnect
the power plug!
Clean the housing using a cloth moistened with clean water with a little mild
soap applied.
POWER indicator
does not light up
The POWER indicator is
defective.
Note: Never use solvents or aggressive cleaning agents.
7.2
Diagnosis & Cause
The power plug is not
plugged into the power
socket properly.
The On/Off witch is set to
OFF.
Cleaning the transport rollers
Deposits and residual adhesive on the transport rollers can influence the
'HSRVLWVDQGUHVLGXDODGKHVLYHRQWKHWUDQVSRUWUROOHUVFDQLQÀXHQFHWKH
results of the laminating process. Therefore, clean the transport rollers at
UHVXOWVRIWKHODPLQDWLQJSURFHVV7KHUHIRUHWKHWUDQVSRUWUROOHUVPXVWEH
regular intervals:
FOHDQHGSHULRGLFDOO\DIWHUXVH
7RGRWKLVLQVHUWDIROGHGSLHFHRISDSHULQWKHLQVHUWLRQVORW5HVLGXDO
1. Set the function switch to 100/125 mic.
DGKHVLYHLVUHPRYHGDQGWDNHQXSE\WKHSDSHUZKHQHMHFWHG5HSHDWWKH
2. Wait until the READY indicator lights up continuously.
SURFHVVVHYHUDOWLPHV
3. Insert a piece of folded paper in the laminator infeed.
'LVFRQQHFWWKHSRZHUSOXJEHIRUHVWDUWLQJWRFOHDQWKHXQLWZLWKDGDPS
4. Repeat the process with a new piece of paper until there are no more
FORWK,IQHFHVVDU\WKHKRXVLQJFDQEHFOHDQHGXVLQJDFORWKPRLVWHQHG
deposits or residual adhesive to be seen on the paper.
ZLWKFOHDQZDWHUZLWKDOLWWOHPLOGVRDSDSSOLHG1HYHUXVHDQ\VROYHQWVRU
DJJUHVVLYHFOHDQLQJDJHQWV
Laminated foil is
not completely
transparent
The laminating temperature
was too low.
The lamination foil was
inserted askew in the
laminator infeed.
Foil jam
The lamination foil is too
large.
The device no
longer works after
a longer period in
operation or stops
during operation
The transport
rollers do not run
Is the surface of the device
hot? If so, the device's
overheating protection has
probably switched the
laminator off automatically.
Is the power plug connected
to the power socket?
Is the On/Off switch is set to
ON?
Solution
Connect the power plug in
the power socket properly.
Set the On/Off switch to ON.
Contact our Hotline.
Ensure that you allow the
device sufficient time to heat
up when using thicker
lamination foil.
Laminate the same foil again
to improve the lamination
result.
Refer to Chapter "Clearing
jammed lamination foil".
Refer to Chapter “Cleaning
the transport rollers”.
Insert the lamination foil in
the laminator infeed straight
and with the closed side first.
Only use lamination foil of the
specified sizes, refer to
Chapter "Technical Data".
Wait for approx. 30 minutes
and try to laminate again. If
the device does not work,
contact our Hotline.
If the problem continues,
contact our Hotline.
If the problem cannot be solved, contact our Hotline; refer to Chapter
“Guarantee”.
37
38
9
Technical Data
A 240 Combo
10 Disposal
A 245 Combo
A 340 Combo
Hot and cold laminator
Hot and cold laminator
Maximum laminating
width:
PP
0D[LPXPODPLQDWLQJZLGWK
For lamination foil
)RUODPLQDWLRQIRLO
DQGPLF
WKLFNQHVVHV thicknesses:
/DPLQDWLQJVSHHG
Laminating
:DUPXSSKDVH
Warm-up
PPSHUPLQXWH
speed:
PLQXWHV
phase:
240 mm
PP
60, 80, 100 and 125
mic9
DQGPLF
PPSHUPLQXWH
300 mm per minute
5 minutes
PLQXWHV
/('32:(5UHG
POWER LED (blue)
/('5($'<JUHHQ
/('5($'<JUHHQ
READY LED (orange)
$%6VZLWFKIRUFOHDULQJMDPV
$%6VZLWFKIRUFOHDULQJMDPV
Lamination foils1REOLVWHULQJ
contained in
3 pieces A5
6SHFLDOIHDWXUHV
1REOLVWHULQJ
$XWRPDWLFVKXWGRZQRQRYHUKHDWLQJ
$XWRPDWLFVKXWGRZQRQRYHUKHDWLQJ
scope of delivery:
3 pieces A6
Trimmer
Special features:
ABS switch (for clearing jams)
No blistering
5HHOWULPPHUVZLWKVHOHFWDEOHW\SHVRIFXW
5HHOWULPPHUVZLWKVHOHFWDEOHW\SHVRIFXW
DQGVHWWLQJORFN
DQGVHWWLQJORFN
Automatic shutdown
on overheating
6SHFLDOIHDWXUHV
9LVXDOSRVLWLRQLQJDLGVLQFP
9LVXDOSRVLWLRQLQJDLGVLQFP
Trimmer
OLQHVDQJOHVVFDOH
OLQHVDQJOHVVFDOH
Indicator
,QGLFDWRUHOHPHQWV
This symbol (crossed out waste bin) indicates that the product
must be returned to an authorised recycling centre or separate
collection point when it has reached the end of its service life.
.
The symbol only applies to states within the EEA 10
/('32:(5UHG
elements:
11 Warranty
In the case of a defect, please return the device together with the receipt and
original packing material to the point-of-sale.
Special features:
6WUDLJKWFXW
Reel trimmers with
3 selectable types of cut
6WUDLJKWFXW
and setting lock :DYHFXW
3HUIRUDWLRQFXW
Visual positioning aids in cm
0D[LPXPVL]H
$
A3
(lines, angles, scale)
6WUDLJKWFXWVKHHWVRISDSHUJP
6WUDLJKWFXWVKHHWVRISDSHUJP
Selectable types
of cut:
Straight cut
:DYHFXWVKHHWVRISDSHUJP
:DYHFXWVKHHWVRISDSHUJP
0D[LPXPFXWWLQJFDSDFLW\
Wave cut 3HUIRUDWLRQVKHHWVRISDSHUJP
3HUIRUDWLRQVKHHWVRISDSHUJP
Perforation cut
&RORXU
%ODFNVLOYHU
%ODFNVLOYHU
Maximum size:
A4
6HOHFWDEOHW\SHVRIFXW
:DYHFXW
3HUIRUDWLRQFXW
'LPHQVLRQV:['[+
[[PP
:HLJKW
NJ
Maximum cutting capacity:
3RZHUVXSSO\
9+]
Colour:
5DWHGLQSXWSRZHU
0D[:$
[[PP
Straight cut: 5 sheets of paper, (80 g/m2)
NJ
Wave cut: 2 sheets
of paper (80 g/m2)
Perforation: 2 sheets
of paper (80 g/m2)
9+]
Black-silver
0D[:6$
Dimensions (W x D x H):
410 x 160 x 80 mm
Weight:
1.31 kg
Power supply:
230 V, 50 Hz
Rated input power:
Max. 265 W, 1.2 A
Conformity of the equipment to the EU directives is confirmed
by the CE symbol.
9
mic or micron = abbreviation of the word micrometer (m). 1 micrometer is one thousandth
of a millimetre. Examples: 80 m = 0.08 mm. 100 m = 0.1 mm. 125 m = 0.125 mm.
39
Version dated 01.12.2010
10
EEA = European Economic Area, which is comprised of the member states of the EU plus
Norway, Iceland and Liechtenstein.
40
1
A 240 Combo / A 340 Combo
Plastifieuse
avec massicot à lame de coupe rotative
2
3
4
5
6
Mode d'emploi
7
8
9
10
11
Consignes de sécurité importantes .................................................... 43
1.1 Consignes de sécurité concernant la plastifieuse.................... 43
1.2 Consignes de sécurité concernant le massicot
à lame de coupe rotative.......................................................... 44
Exclusion de la garantie ..................................................................... 45
Utilisation conforme à son usage ....................................................... 45
Éléments de manipulation .................................................................. 46
4.1 Interrupteur de fonction et éléments d'affichage...................... 47
4.2 Tête de coupe .......................................................................... 47
Mise en service................................................................................... 48
Manipulation ....................................................................................... 49
6.1 Plastifieuse ............................................................................... 49
6.1.1 Plastification à chaud ................................................... 49
6.1.2 Plastification à froid...................................................... 50
6.1.3 Éliminer un bourrage.................................................... 51
6.2 Massicot à lame de coupe rotative .......................................... 52
6.2.1 Sélectionner le profil de coupe .................................... 52
6.2.2 Couper le matériau ...................................................... 53
6.2.3 Remplacer la tête de coupe......................................... 54
Nettoyage & entretien......................................................................... 55
7.1 Nettoyer l'appareil de l'extérieur............................................... 55
7.2 Nettoyer les rouleaux de transport ........................................... 55
Traitement de problèmes ................................................................... 56
Données techniques........................................................................... 57
Remarque concernant l’élimination .................................................... 58
Garantie .............................................................................................. 58
[FRANÇAIS]
06.2011
41
42
1
Consignes de sécurité importantes
Afin de garantir un travail fiable avec l'appareil, veuillez tenir compte des
points suivants :
Ɣ
Veuillez lire attentivement ces instructions et tenez-en compte lorsque
vous manipulez votre appareil.
Ɣ
Conservez le mode d'emploi pour une utilisation future.
Ɣ
Avant d'utiliser l'appareil, posez-le sur une surface de travail plane et
stable.
1.1
Ɣ
Ɣ
Ɣ
Ɣ
Ɣ
Ɣ
Ɣ
Ɣ
Ɣ
Ɣ
Ɣ
Ɣ
Ɣ
Ɣ
Consignes de sécurité concernant la plastifieuse
Évitez que la fiche secteur ainsi que le cordon d'alimentation soient
endommagés. Ne jamais torsader le câble de réseau. Ne mettez jamais
la plastifieuse en service si le cordon d'alimentation ou la fiche de
secteur sont endommagés.
N'utilisez jamais l'appareil à proximité de surfaces très chaudes ou dans
un environnement humide et ne le soumettez pas à un ensoleillement
direct ou à une poussière importante.
Retirez toujours la prise de secteur avant de nettoyer de l'appareil.
N'utilisez jamais de solvants ou de produits d'entretien agressifs.
Des objets métalliques ne peuvent pas être plastifiés.
Il est interdit aux enfants de séjourner dans la zone de travail quand
l'appareil est prêt à fonctionner.
Retirez la fiche de secteur quand vous ne vous servez pas de la
machine.
Débranchez toujours immédiatement l’appareil quand une forte odeur
se fait sentir ou quand l’appareil n'est pas en service.
Ne touchez jamais la fiche de secteur avec des mains humides.
Assurez-vous que l'interrupteur Marche/Arrêt est en position OFF avant
de brancher la plastifieuse sur le réseau.
Introduisez uniquement dans l'appareil des feuilles à plastifier prévues à
cet effet, voir chapitre “Données techniques”. Des feuilles trop grandes
peuvent provoquer des bourrages.
Ne plastifiez pas avec cet appareil des matériaux sensibles à la chaleur
comme par ex. le papier photosensible.
Vous obtiendrez de mauvais résultats si vous plastifiez des documents
humides.
N'utilisez pas, pour la plastification à chaud, des feuilles à plastifier
prévues pour la plastification à froid. L'appareil, les feuilles à plastifier
ainsi que le document en seraient endommagés.
Ne coupez pas les feuilles à plastifier. Les arêtes de coupe formées
peuvent provoquer un bourrage.
43
Ɣ
Ɣ
1.2
Ɣ
Ɣ
Ɣ
Ɣ
Ɣ
Ɣ
Ɣ
Ɣ
Ɣ
Ɣ
Ɣ
Ɣ
N'approchez pas de la fente d'introduction de la plastifieuse des parties
de vêtement non fermées, des cravates, des bijoux, des cheveux longs
ou d'autres objets non attachés. Risque de blessures !
L'appareil ne doit être utilisé que dans des pièces fermées et sèches.
Consignes de sécurité concernant le massicot à
lame de coupe rotative
Ne saisissez l'appareil en aucun cas près de la tête de coupe pour le
bouger ou le déplacer. Les lames de la tête de coupe sont tranchants.
Risque de blessures !
Maniez l'appareil en vous servant de vos deux mains.
N'approchez pas du massicot des parties de vêtement non fermées,
des cravates, des bijoux, des cheveux longs ou d'autres objets non
attachés. Risque de blessures !
L'appareil est uniquement prévu pour couper du papier, des cartes, du
papier photographique et des feuilles à plastifier.
Retirez les éventuels agrafes et trombones du document avant de
couper celui-ci.
Les lames du massicot ne doivent être ni graissées ni aiguisées.
Si la tête de coupe ou le boîtier de la tête de coupe est endommagé, ne
faites pas fonctionner l'appareil.
Vous ne devez pas faire fonctionner le massicot si la protection de la
lame n'est pas posée correctement.
Lorsque vous remplacez la tête de coupe, veillez à ne pas vous couper
les doigts. Évitez impérativement de toucher les lames.
Faites en sorte que l'appareil ne soit pas accessible aux enfants.
Les enfants ou les mineurs ne doivent utiliser l'appareil que sous la
surveillance d'un adulte.
Ne pas vous servir de l'appareil pour vous couper les ongles.
44
2
Exclusion de la garantie
4
Éléments de manipulation
Nous ne nous portons pas garants de l'exactitude des informations se
rapportant aux propriétés techniques ainsi qu'à la présente documentation.
Le produit décrit dans cette documentation et, le cas échéant, ses
accessoires sont soumis à une amélioration et à un perfectionnement
technique constants. C'est pourquoi nous nous réservons le droit de
modifier, en tout temps et sans avertissement préalable, des composants,
des accessoires, des spécifications techniques ainsi que la présente
documentation de ce produit.
3
1
2
3
1
3
4
Utilisation conforme à son usage
Cette plastifieuse avec massicot à lame de coupe rotative doit être utilisée
uniquement pour :
Ɣ
plastifier avec des feuilles de plastification à chaud et des feuilles de
.
plastification à froid d'une épaisseur de 80, 100 und 125 mic11
L'épaisseur totale des documents à plastifier (photos, images, cartes,
papier etc.) ne doit pas dépasser les 0,6 mm.
Ɣ
découper du papier, des cartes, du papier photographique et des
feuilles à plastifier d'une taille maximale de DIN A3. Le matériau à
couper ne doit pas être plus épais que
2
Ɣ 3 feuilles de papier (80 g/m ) au maximum en coupe droite
2
Ɣ 3 feuilles de papier (80 g/m ) au maximum en coupe ondulée
2
Ɣ 3 feuilles de papier (80 g/m ) au maximum en coupe perforée
Toute autre utilisation est considérée comme non conforme à l'usage. Des
modifications ou transformations arbitraires ne sont pas autorisées.
5
7
1
2
3
4
5
6
7
6
Tête de coupe
Barre de coupe / rails de guidage
Barre de pression avec protection des doigts
Interrupteur de fonction (réglage de la température)
Éléments d'affichage (LEDs)
Fente d'introduction de la plastifieuse
Aides visuelles de positionnement en cm (lignes, angles, graduation)
8
9
8
9
10
8 Interrupteur Marche/Arrêt (ON / OFF)
9 Poussoir de libération de bourrage (ABS)
11
mic ou micron = expression issue des pays de langue anglaise pour désigner un
micromètre (m). 1 micromètre est un millième de millimètre.
Exemples : 80 m = 0,08 mm. 100 m = 0,1 mm. 125 m = 0,125 mm.
45
10 $UURQGLVVHXUG¶DQJOHV/¶DUURQGLVVHXUGHFRLQVVHWURXYHVXUODIDFH
SRVWpULHXUHGHO¶DSSDUHLO
46
4.1
Interrupteur de fonction et éléments d'affichage
5
Ɣ
1
Ɣ
Mise en service
Placez l'appareil sur une surface stable et plane.
Assurez-vous que l'interrupteur Marche/Arrêt est en position OFF avant
de brancher la plastifieuse sur le réseau.
2
Attention : Contrôlez si les données relatives à la tension de
l'appareil correspondent bien à celles de votre réseau (230 V, 50 Hz).
3
Ɣ
4
5
1
3 Mettez la fiche de secteur dans une prise de courant standard facile
d'accès. L'affichage POWER est allumé en rouge.
La prise de courant doit se trouver à proximité de l'appareil et être
facile d'accès. En cas d'urgence, vous pouvez ainsi séparer
rapidement l'appareil du réseau électrique.
1
de l'interrupteur de fonction
1 Position
3RVLWLRQGHOµLQWHUUXSWHXUGHIRQFWLRQSODVWL¿FDWLRQjIURLG
2
3
3
4
5
pour des feuilles à plastifier d'une épaisseur de 100 ou 125 mic 12
3RVLWLRQGHOµLQWHUUXSWHXUGHIRQFWLRQSODVWL¿FDWLRQjFKDXG
Position de l'interrupteur de fonction
3RVLWLRQGHOµLQWHUUXSWHXUGHIRQFWLRQ21
pour
des feuilles à plastifier d'une épaisseur de 60 ou 80 mic 2
3RVLWLRQGHOµLQWHUUXSWHXUGHIRQFWLRQ2))
Position
de l'interrupteur de fonction
pour
la plastification à froid
$I¿FKDJH5($'<
Affichage
POWER
$I¿FKDJH32:(5
Affichage READY
4.2
Tête de coupe
1
2
1
2
12
Sûreté de réglage
Bouton tournant pour le réglage du profil de coupe
mic = abréviation issue des pays de langue anglaise pour désigner un micromètre (m).
1 micromètre est un millième de millimètre.
47
48
6
plastifier, veuillez tenir compte des instructions placées au niveau de
la fente d'introduction de la plastifieuse.
Manipulation
6.1
Plastifieuse
Attention : La feuille à plastifier sortante est très chaude et molle
après la plastification. C'est pourquoi, maniez avec précaution le
produit à plastifier !
La plastifieuse vous permet de plastifier à chaud et à froid :
Ɣ
Lors de la plastification à chaud, la feuille à plastifier est collée.
Ɣ
Dans le cas de la plastification à froid, la feuille à plastifier est pressée.
Remarque : Afin d'aplanir le produit plastifié, posez dessus un livre ou
un autre objet plat et lourd.
Soumettez le choix de la méthode de plastification au matériau à plastifier.
Remarque : Le papier photosensible et les images échographiques
par exemple doivent être plastifiées uniquement à froid !
6.1.1
Plastification à chaud
La plastifieuse
via l'interrupteur
de fonction,
à coulisse,
1
Branchezpeut,
le câble
électrique dans
une priseun
deinterrupteur
courant standard
fafonctionner
avec deux niveaux de température réglés sur quatre épaisseurs
cile d'accès.
de feuille à plastifier :
Contrôlez si les données relatives à la tension de l'appaƔ
60Attention
ou 80 mic:13
reil correspondent bien
à celles de votre réseau (220 - 240 V, 50 Hz).
100 ou 125 mic3
Ɣ
2
Mettre en marche l'interrupteur Marche/Arrêt se trouvant sur le côté
1. Réglez l'interrupteur de fonction, placé sur le côté supérieur droit de
droit de l'appareil: „+27“, la lampe d'affichage rouge s'allume.
l'appareil, sur l'épaisseur de feuille utilisée. La plastifieuse chauffe
3 automatiquement
Le moteur d'entraînement
pourlales
rouleaux de
transport soit
se met
en
jusqu'à ce que
température
nécessaire
obtenue.
marche.
boutl'affichage
de 3 - 5 minutes,
température
de service correcte
Pendant
ce Au
temps,
READYlas'allume
en orange.
est atteinte et la lampe d'affichage verte s'allume.
2. Le moteur d'entraînement des rouleaux de transport démarre.
4
Introduisez le matériau à plastifier dans la poche de plastique de ma3. Au nière
bout d'env.
5 minutes,
la température
service
correcte
à ce que
de tous les
côtés, il y aitde
une
marge
d'env. 3est
à 5atteinte
mm
et l'affichage READY s'allume en permanence.
par rapport au bord de la feuille de plastique.
4. Introduisez le matériau à plastifier dans la feuille à plastifier de manière à
Attention
: N'utilisez
feuilles
à plastifier
ce que,
de tous
les côtés,que
il ydes
ait une
marge
d'env. 3ààchaud.
5 mm par rapport
bord de la feuille
à plastifier.
5 au Introduisez
la feuille
de plastique avec le matériau à plastifier dans la
fente d'introduction de la machine à plastifier. Introduire ici en premier
Remarque : Pour la plastification à chaud, utilisez uniquement des
le côté fermé de la feuille de plastique.
feuilles de plastification à chaud.
5. Introduisez
la feuille
à plastifier avec.#&&*&,-#O.
le produit à plastifier,
côté fermé en
&19->=A1
#(Rb/#-+O.&
)+'.(*&#:(R#(
premier, dans la fente d'introduction
de la plastifieuse. L'opération
de
-+).#,2$'#,&h-b)./+-&
.#&&*&,-#O.(,&
(-R#(
plastification se fait automatiquement.
-+).-#)(&'"#(I(2)'*-,#(,-+.-#)(,)((b,.(#/.
& (-R#(-+).-#)(O.(/).,#(-+).#,2& .#&&*&,-#O.
Remarque : Afin d'éviter que la feuille à plastifer forme un pli,
R)*b+-#)(*&,-# #-#)(, #-.-)'-#O.'(-
n'introduisez jamais en premier le côté ouvert de celle-ci dans la fente
d'introduction de la plastifieuse. Lors de l'introduction de la feuille à
13
6. /RUVTXHYRXVDXUH]WHUPLQpO¶RSpUDWLRQGHODPLQDJHWRXUQH]O¶LQWHUUXSWHXU
Quand vous avez terminé la plastification, mettez l'interrupteur de
GHIRQFWLRQYHUVODGURLWHHQSRVLWLRQCOLDHWUHWLUH]OD¿FKHGHVHFWHXUGH
fonction, placé sur le côté supérieur droit de l'appareil, en position COLD
et retirez la fiche de secteur de la prise de courant. Laissez l'appareil
ODSULVH/DLVVH]OµDSSDUHLOUHIURLGLUDYDQWGHOHGpSODFHUOHFDVpFKpDQW
refroidir avant de le déplacer le cas échéant.
Prudence : L'appareil est très chaud après la plastification ! Risque
de blessures !
6.1.2
Plastification à froid
Attention : Si vous avez utilisé peu auparavant la plastifieuse pour
une plastification à chaud, vous devez la laisser refroidir. La durée de
refroidissement est d'environ 30 minutes.
1.
Tournez líinterrupteur de fonction vers la droite en position
COLD.
Remarque : Pour la plastification à froid, utilisez uniquement des
feuilles de plastification à froid.
2. Retirez la feuille de protection de la feuille à plastifier.
3. Introduisez le matériau à plastifier dans la feuille à plastifier de manière à
ce que, de tous les côtés, il y ait une marge d'env. 3 à 5 mm par rapport
au bord de la feuille à plastifier.
4. Introduisez d'abord la feuille à plastifier avec le produit à plastifier, côté
fermé en premier, dans la fente d'introduction de la plastifieuse.
L'opération de plastification se fait automatiquement.
Remarque : Afin d'éviter que la feuille à plastifer forme un pli,
n'introduisez jamais en premier le côté ouvert de celle-ci dans la fente
d'introduction de la plastifieuse. Lors de l'introduction de la feuille à
plastifier, veuillez tenir compte des instructions placées au niveau de
la fente d'introduction de la plastifieuse.
mic ou micron = expression issue des pays de langue anglaise pour désigner un
micromètre (m). 1 micromètre est un millième de millimètre.
Exemples : 60 m = 0,06 mm. 80 m = 0,08 mm. 100 m = 0,1 mm. 125 m = 0,125 mm.
49
50
6.1.3
Éliminer un bourrage
Afin d'éliminer rapidement des bourrages, l'appareil est équipé d'un poussoir
de libération de bourrage.
Si la feuille à plastifier est bloquée, procédez de la manière suivante :
1. Débranchez l'appareil : mettez l'interrupteur Marche/Arrêt en position
OFF.
2. Poussez le poussoir de libération de bourrage entièrement vers la
gauche.
3. Maintenez fermement la machine à plastifier et tirez la feuille à pastifier
avec le produit à plastifier hors de la fente d'introduction de la
plastifieuse.
4. Faites revenir le poussoir de libération de bourrage vers la droite.
5. Nettoyez les rouleaux de transport en éliminant les dépôts et les restes
de colle. À cet effet, introduisez une feuille de papier pliée dans la fente
d'introduction de la plastifieuse ; voir chapitre „Nettoyer les rouleaux de
transport”.
Remarque : Si les bourrages par les feuilles de plastique se répètent
continuellement ou si la feuille bloquée ne peut plus être retirée de la
machine à plastifier, veuillez vous adresser à notre hotline (voir
garantie).
6.2
Massicot à lame de coupe rotative
Le massicot à lame de coupe rotative vous permet de couper du papier, des
cartes, du papier photographique et des feuilles à plastifier.
6.2.1
Sélectionner le profil de coupe
La lame de coupe rotative est équipée de trois profils.
Ɣ
Coupe droite
Ɣ
Coupe ondulée
Ɣ
Coupe perforée
Remarque : Les lames se trouvent dans un boîtier protégé.
Sélectionnez le profil de coupe dont vous avez besoin, voir fig. 1 :
1. Tirez vers le haut la sûreté de réglage, placée au niveau de la tête de
coupe, pour la mettre en position OPEN.
2. Tournez le bouton tournant pour le réglage du profil de coupe jusqu'à ce
que le symbole du profil de coupe désiré se trouve en haut.
3. Poussez vers le bas la sûreté de réglage, placée au niveau de la tête de
coupe, pour la mettre en position LOCK.
Fig. 1
(Figure semblable)
51
52
6.2.2
Couper le matériau
1. Placez l'appareil, tête de coupe vers le haut, sur une surface stable et
plane.
2. Poussez la tête de coupe sur un côté du rail de guidage.
3. Mettez le matériau à couper en position désirée sous la barre de
pression transparente.
Remarque : Tenez compte de la quantité autorisée de matériau à
couper, voir chapitre “Utilisation conforme à son usage” ou chapitre
“Données techniques”.
Remarque : Les aides visuelles de positionnement vous aident à
aligner correctement le matériau à couper.
4. Tenez fermement d'une main le matériau à couper de manière à ce qu'il
ne puisse pas glisser pendant que vous coupez. Sinon, des inexactitudes
peuvent se produire.
5. Pour couper, appuyez sur la tête de coupe et tirez-la le long du rail de
guidage pour la faire glisser jusqu'à l'autre extrémité, voir fig. 2.
6.2.3
Remplacer la tête de coupe
Lorsque les lames de la tête de coupe sont endommagées ou usées, la tête
de coupe doit être remplacée.
Remarque : La tête de coupe ne peut être remplacée que dans son
ensemble. Pour acheter une nouvelle tête de coupe, veuillez vous
adresser à notre ligne directe.
5HWLUH]OHPERXWGHIHUPHWXUHGXUDLOGHJXLGDJHGHODSODTXHGDVVLVHHQ
1. Tourner
le bouton tournant rouge, placé au bout du rail de guidage, de
90
º vers la droite ou la gauche et tirez le rail de guidage pour l'enlever
OHSRXVVDQWjOH[WUpPLWpLQIpULHXUHYHUVOHKDXWOpJqUHPHQWDSSX\pYHUV
de
l'appareil.
OLQWpULHXU
2. Remplacez l'ancienne tête de coupe par une neuve.
5HPSODFH]O¶DQFLHQQHWrWHGHFRXSHSDUODQRXYHOOH
3. Repoussez
le rail de guidage dans l'appareil et tournez le bouton
tournant rouge de 90 º vers la droite ou la gauche.
5pLQWURGXLVH]OHUDLOGHJXLGDJHGDQVODEDVHHWSRVH]ODQRXYHOOHWrWH
(PERvWH]OHPERXWGHIHUPHWXUHGHSXLVOHKDXWVXUORXYHUWXUHjOH[WUpPLWp
GXUDLOGHJXLGDJH5HPDUTXH/DWrWHGHFRXSHQHSHXWrWUHUHPSODFpHTXH
GDQVVRQHQVHPEOH3RXUHQDFKHWHUXQHQRXYHOOHYHXLOOH]YRXVDGUHVVHUj
ODOLJQHWpOpSKRQLTXHGLUHFWH
Remarque : Afin d'éviter une arête de coupe incorrecte, ne faites pas
revenir la tête, mais retirez le document après la coupe.
Fig. 3
Fig. 2
53
54
7
7.1
Nettoyage & entretien
Nettoyer l'appareil de l'extérieur
Attention : Avant de nettoyer l'appareil avec un chiffon humide,
retirez toujours la fiche de secteur !
Nettoyez le boîtier avec un chiffon légèrement humide trempé dans de l'eau
claire à laquelle vous avez ajouté un savon doux.
8
Traitement de problèmes
Problème
L'affichage
POWER ne
s'allume pas.
Remarque : N'utilisez jamais de solvant ou de produit d'entretien
agressifs.
7.2
Nettoyer les rouleaux de transport
Des dépôts et des restes de colle subsistant sur les rouleaux de transport
'HVGpS{WVHWGHVUHVWHVGHFROOHVXUOHVURXOHDX[GHWUDQVSRUWSHXYHQW
peuvent influencer le résultat de la plastification. C'est pourquoi vous devez
LQÀXHQFHUOHUpVXOWDWGHODSODVWL¿FDWLRQ&µHVWSRXUTXRLOHVURXOHDX[GH
nettoyer les rouleaux de transport à intervalles réguliers :
WUDQVSRUWGRLYHQWrWUHQHWWR\pVSpULRGLTXHPHQWDSUqVOµHPSORL
1. Mettez l'interrupteur de fonction sur 100/125 mic.
$FHWHIIHWLQWURGXLUHXQHIHXLOOHGHSDSLHUSOLpHGDQVODIHQWHGµLQWURGXFWLRQ
/HVUHVWHVGHFROOHVHURQWHPSRUWpVSDUOHSDSLHUVRUWDQW5pSpWHUSOXVLHXUV
2. Attendez que l'affichage READY s'allume en permanence.
IRLVOµRSpUDWLRQ
3. Introduisez une feuille de papier pliée dans la fente d'introduction de la
5HWLUH]WRXMRXUVODSULVHGHVHFWHXUDYDQWGµHIIHFWXHUXQQHWWR\DJHKXPLGH
plastifieuse.
GHOµDSSDUHLO6LQpFHVVDLUHOHERvWLHUSHXWrWUHQHWWR\pDYHFXQVDYRQGRX[
4. Répétez l'opération avec une nouvelle feuille de papier jusqu'à ce que
HWXQFKLIIRQWUHPSpGDQVGHOµHDXFODLUH1µXWLOLVH]MDPDLVGHVROYDQWVRXGH
vous ne puissiez plus voir de dépôts ou de restes de colle sur le papier.
SURGXLWVGµHQWUHWLHQDJUHVVLIV
La feuille plastifiée
n'est pas
parfaitement
transparente
Diagnostic & Cause
La fiche de secteur n'est pas
enfoncée correctement dans
la prise de courant.
L'interrupteur Marche/Arrêt
est en position OFF.
Remède
Introduisez correctement la
fiche dans la prise de
courant.
Mettez l'interrupteur
Marche/Arrêt en position ON.
L'affichage POWER est
défectueux.
Adressez-vous à notre ligne
directe.
La température de
plastification était trop basse.
La feuille à plastifier n'a pas
été introduite de manière
droite dans la fente
d'introduction de la
plastifieuse.
Bourrage
La feuille à plastifier est trop
grande.
55
Assurez-vous que vous
laissez chauffer l'appareil
suffisamment longtemps
quand vous utilisez des
feuilles à plastifier plus
épaisses.
Plastifiez cette même feuille à
plastifier une nouvelle fois
pour améliorer le résultat de
la plastification.
Voir chapitre “Éliminer un
bourrage”.
Voir chapitre “Nettoyer les
rouleaux de transport”.
Introduisez la feuille à
plastifier de manière droite,
côté fermé en premier, dans
la fente d'introduction de la
plastifieuse.
Utilisez uniquement des
feuilles à plastifier de la taille
indiquée, voir chapitre
“Données techniques”.
L'appareil ne
fonctionne plus
après avoir
fonctionné
longtemps ou
s'arrête pendant le
fonctionnement.
La surface de l'appareil estelle chaude? Alors, c'est que
la protection thermique a
vraissemblablement
débranché automatiquement
la plastifieuse.
Attendez alors 30 minutes
environ et essayez une
nouvelle fois de plastifier. Si
l'appareil ne fonctionne pas à
nouveau, adressez-vous à
notre ligne directe.
Les rouleaux de
transport ne
tournent pas.
La fiche de secteur est-elle
dans la prise de courant ?
L'interrupteur Marche/Arrêt
est en position ON?
Si le problème persiste,
adressez-vous à notre ligne
directe.
56
Si vous n'avez pas pu remédier au problème, adressez-vous à notre ligne
directe, voir chapitre “Garantie”.
9
Le signe CE confirme la conformité aux directives de l'UE.
Données techniques
A 240 Combo
A 245 Combo
10 Remarque concernant l’élimination
A 340 Combo
Plastifieuse à chaud et à froid
3ODVWL¿HXVHjFKDXGHWj
froid
Largeur maximale de
/DUJHXUPD[LPDOHGH
plastification : PP
SODVWL¿FDWLRQ
Pour des épaisseurs de feuille
3RXUGHVpSDLVVHXUVGHIHXLOOH HWPLF8
:
9LWHVVHGHSODVWL¿FDWLRQ
PPSDUPLQXWH
Vitesse de plastification
:
'XUpHGHPLVHjFKDXG
PLQXWHV
Durée de mise à chaud :
eOpPHQWVGµDI¿FKDJH
Éléments
240 mm
PP
60, 80, 100 und 125
mic14
8
HWPLF
Ce symbole (la poubelle rayée) signifie que ce produit doit, en
fin de vie, être apporté à un organisme de reprise ou de collecte
séparée disponible à l’utilisateur final. Ce symbole n’est valable
9
.
que dans les états de l’EEE15
PPSDUPLQXWH
300 mm par minute
5 minutes
/('32:(5URXJH
d'affichage
:
/('5($'<YHUW
PLQXWHV
/('32:(5URXJH
(bleue)
/('5($'<YHUW
LED POWER
LED READY (orange)
3RXVVRLUGHOLEpUDWLRQGHERXUUDJH
3RXVVRLUGHOLEpUDWLRQGHERXUUDJH
&DUDFWpULVWLTXHVSDUWLFXOLqUHV
3DVGHIRUPDWLRQGHEXOOHV
Feuilles à plastifier fournies
3 unités DIN A5 3DVGHIRUPDWLRQGHEXOOHV
avec l'appareil &RXSXUHDXWRPDWLTXHHQFDVGHVXUFKDXIIH
:
3 unités DIN A6 &RXSXUHDXWRPDWLTXHHQFDVGHVXUFKDXIIH
Coupeur de papier
Caractéristiques particulières : Poussoir de libération de bourrage
0DVVLFRWjODPHGHFRXSHURWDWLYHj
Pas de formation 0DVVLFRWjODPHGHFRXSHURWDWLYHj
de bulles
SUR¿OVGHFRXSHVpOHFWLRQQDEOHVHWVUHWp
SUR¿OVGHFRXSHVpOHFWLRQQDEOHVHWVUHWp
Coupure automatique
en cas de surchauffe
GHUpJODJH
&DUDFWpULVWLTXHVSDUWLFXOLqUHV GHUpJODJH
$LGHVYLVXHOOHVGHSRVLWLRQQHPHQWHQFP
Coupeur de papier $LGHVYLVXHOOHVGHSRVLWLRQQHPHQWHQFP
OLJQHVDQJOHVJUDGXDWLRQ
Caractéristiques particulières :
11 Garantie
Cher client,
Nous sommes très heureux que vous ayez choisi cet appareil.
En cas de défaut, veuillez retourner l’appareil dans son emballage d’origine
et accompagné du bon d’achat au magasin où vous l’avez acheté.
OLJQHVDQJOHVJUDGXDWLRQ
Massicot à lame de coupe rotative à 3 profils de
&RXSHGURLWH
coupe sélectionnables
et sûreté de réglage
&RXSHRQGXOpH
Aides visuelles de&RXSHSHUIRUpH
positionnement en cm
(lignes, angles, graduation)
0D[LPXPVL]H
$
A3
Profils de coupe
Coupe droite
&RXSHGURLWHIHXLOOHVGHSDSLHUJP
&RXSHGURLWHIHXLOOHVGHSDSLHUJP
0D[LPXPFXWWLQJFDSDFLW\
sélectionnables&RXSHRQGXOpHIHXLOOHVGHSDSLHUJP
:
Coupe ondulée &RXSHRQGXOpHIHXLOOHVGHSDSLHUJP
3HUIRUDWLRQIHXLOOHVGHSDSLHUJP
Coupe perforée 3HUIRUDWLRQIHXLOOHVGHSDSLHUJP
&RORXU
1RLUDUJHQW
1RLUDUJHQW
Format maximal :
DIN A4
6HOHFWDEOHW\SHVRIFXW
'LPHQVLRQV:['[+
Capacité
:HLJKW
&RXSHGURLWH
&RXSHRQGXOpH
&RXSHSHUIRUpH
[[PP
de coupe
maximale :
NJ
3RZHUVXSSO\
Couleur :
5DWHGLQSXWSRZHU
9+]
PD[:$
[[PP
Coupe droite : 5 feuilles
de papier (80 g/m2)
Coupe ondulée : NJ
2 feuilles de papier (80 g/m2)
Perforation :
2 feuilles de papier (80 g/m2)
9+]
Noir-argent
PD[:6$
Dimensions (l x p x h) :
410 x 160 x 80 mm
Poids :
1,31 kg
Alimentation en courant :
230 V, 50 Hz
Puissance électrique :
Max. 265 W, 1,2 A
Version du 01.12.2010
14
8
mic ou micron = expression issue des pays de langue anglaise pour désigner un
micromètre (m). 1 micromètre est un millième de millimètre.
Exemples : 80 m = 0,08 mm. 100 m = 0,1 mm. 125 m = 0,125 mm.
57
15
9 EEE = Espace Économique Européen, comprenant les états membres de l’Union
Européenne plus les états d’Islande, de Norvège et du Liechtenstein.
58
1
A 240 Combo / A 340 Combo
Plastificatrice
con taglierina a rullo
2
3
4
5
6
Manuale d'uso
7
8
9
10
11
Indicazioni di sicurezza importanti...................................................... 61
1.1 Indicazioni di sicurezza relative alla plastificatrice................... 61
1.2 Indicazioni di sicurezza relative alla taglierina a rullo .............. 62
Esclusione di responsabilità ............................................................... 63
Impiego conforme agli usi previsti ...................................................... 63
Elementi di comando .......................................................................... 64
4.1 Interruttore di esercizio ed indicatori ........................................ 65
4.2 Testina di taglio ........................................................................ 65
Messa in funzione............................................................................... 66
Esercizio ............................................................................................. 67
6.1 Plastificatrice ............................................................................ 67
6.1.1 Plastificazione a caldo ................................................. 67
6.1.2 Plastificazione a freddo................................................ 68
6.1.3 Rimozione di pellicole intasate .................................... 69
6.2 Taglierina a rullo....................................................................... 70
6.2.1 Scelta del tipo di taglio ................................................. 70
6.2.2 Taglio del materiale...................................................... 71
6.2.3 Sostituzione della testina di taglio................................ 72
Pulizia e cura ...................................................................................... 73
7.1 Pulizia esterna del dispositivo .................................................. 73
7.2 Pulizia dei rulli di trasporto ....................................................... 73
Risoluzione di problemi ...................................................................... 74
Specifiche tecniche............................................................................. 75
Indicazioni sullo smaltimento.............................................................. 76
Garanzia ............................................................................................. 76
[ITALIANO]
06.2011
59
60
1
Indicazioni di sicurezza importanti
Un utilizzo sicuro del dispositivo richiede l'osservanza di quanto segue:
Ɣ
Leggere attentamente le presenti istruzioni ed osservarle
scrupolosamente durante l'utilizzo del dispositivo.
Ɣ
Conservare le istruzioni per l'uso per gli utilizzi futuri.
Ɣ
Prima dell’esercizio, posizionare il dispositivo in un punto di lavoro fisso
e piano.
1.1
Ɣ
Ɣ
Ɣ
Ɣ
Ɣ
Ɣ
Ɣ
Ɣ
Ɣ
Ɣ
Ɣ
Ɣ
Ɣ
Ɣ
Ɣ
Ɣ
1.2
Ɣ
Indicazioni di sicurezza relative alla plastificatrice
Evitare di danneggiare la spina di alimentazione o il cavo di rete. Non
attorcigliare il cavo di alimentazione. In caso di spina o cavo di
alimentazione danneggiati, non mettere in funzione il dispositivo.
Non utilizzare il dispositivo in prossimità di superfici roventi o in
ambiente umido, proteggerlo dai raggi solari diretti e da ambienti
fortemente polverosi.
Scollegare sempre la spina dalla rete prima di pulire il dispositivo. Non
utilizzare solventi o detergenti corrosivi.
Non è consentita la plastificazione di oggetti metallici.
Tenere lontano i bambini dall'area di lavoro del dispositivo pronto
all'esercizio.
Scollegare la spina dalla rete in caso di inutilizzo del dispositivo.
Spegnere immediatamente il dispositivo non appena si sviluppa un forte
odore o in caso di non utilizzo.
Evitare il contatto della spina di alimentazione con le mani umide.
Assicurarsi che l'interruttore di ON/OFF sia in posizione di OFF prima di
collegare la plastificatrice alla rete elettrica.
Introdurre nel dispositivo solo apposite pellicole di plastificazione, si
veda il capitolo “Specifiche tecniche”. La scelta di pellicole di
plastificazione troppo grandi può causare intasamenti da pellicola.
Evitare di plastificare materiali sensibili al calore come ad es. carta
termica per fax.
In caso di plastificazione di documenti umidi i risultati saranno
insoddisfacenti.
Non usare per la plastificazione a caldo pellicole di plastificazione
previste invece per la plastificazione a freddo. Altrimenti il dispositivo, le
pellicole di plastificazione ed il documento saranno danneggiati.
Non tagliare le pellicole di plastificazione nel tentativo di adattarne le
dimensioni. Gli spigoli di taglio risultanti possono infatti causare un
intasamento da pellicola.
61
Ɣ
Ɣ
Ɣ
Ɣ
Ɣ
Ɣ
Ɣ
Ɣ
Ɣ
Ɣ
Ɣ
Tenere lontano dalla fessura di inserimento della plastificatrice lembi di
indumenti, cravatte, gioielli, capelli lunghi o altri oggetti simili. Pericolo di
lesioni!
Il dispositivo va usato esclusivamente in ambienti chiusi e asciutti.
Indicazioni di sicurezza relative alla taglierina a
rullo
Durante la movimentazione o la conservazione del dispositivo, evitare
assolutamente di avvicinarsi alla testina di taglio. Le lame della testina
di taglio sono affilate. Pericolo di lesioni!
Adoperare il dispositivo con entrambe le mani.
Tenere lontano dalla taglierina a rullo lembi di indumenti, cravatte,
gioielli, capelli lunghi o altri oggetti simili. Pericolo di lesioni!
Il dispositivo è previsto per il taglio di carta, cartoline, carta fotografica e
pellicole di plastificazione.
Prima di procedere al taglio, rimuovere eventuali graffette o clip dal
documento.
Le lame non richiedono alcun intervento di lubrificazione o rettifica.
In caso di danneggiamento della testina di taglio o dell'alloggiamento
della testina di taglio non è consentito utilizzare ulteriormente il
dispositivo.
Con protezione della lama non posizionata correttamente non è
consentito utilizzare ulteriormente il dispositivo.
Fare attenzione a non ledere le dita durante la sostituzione delle lame
della testina di taglio. Evitare in linea generale qualsiasi contatto con le
lame.
Tenere lontano il dispositivo dalla portata dei bambini.
L’utilizzo del dispositivo da parte di bambini o minori è consentito solo
alla presenza di adulti.
Il dispositivo non va adoperato per il taglio delle unghie delle mani.
62
2
Esclusione di responsabilità
4
Elementi di comando
In qualità di costruttore non rispondiamo per l'esattezza delle informazioni
relative alle caratteristiche tecniche e della presente documentazione. Il
prodotto descritto in questa documentazione ed i suoi accessori
eventualmente necessari sono soggetti a continue migliorie e sviluppi.
Pertanto ci riserviamo il diritto di modificare in qualsiasi momento e senza
preavviso alcuno componenti, accessori, specifiche tecniche e la presente
documentazione di prodotto.
1
2
3
1
3
4
3
Impiego conforme agli usi previsti
La presente plastificatrice dotata di taglierina a rullo va utilizzata solo per:
Ɣ
la plastificazione di pellicole di plastificazione a caldo e pellicole di
10,
plastificazione a freddo con uno spessore di 80, 100 e 125 mic 16
tenendo presente che lo spessore totale dei documenti da plastificare
(foto, immagini, cartoline, carta ecc.) non deve superare i 0,6 mm,
Ɣ
il taglio di carta, cartoline, carta fotografica e pellicole di plastificazione
del formato massimo DIN A3, tenendo presente che il materiale da
tagliare non deve presentare uno spessore superiore a
2
Ɣ 3 fogli di carta in caso di taglio diritto (80 g/m ),
2
Ɣ 3 fogli di carta in caso di taglio ondulato (80 g/m ),
2
Ɣ max. 3 fogli di carta in caso di taglio perforato (80 g/m ).
Qualsiasi altro impiego è da ritenersi non conforme alle disposizioni. Non
sono ammesse modifiche o variazioni arbitrarie.
5
7
1
2
3
4
5
6
7
6
Testina di taglio
Sistema a lama/Barra di scorrimento
Profilo pressore con paramano di protezione
Interruttore di esercizio (regolatore della temperatura)
Indicatori (spie LED)
Fessura di inserimento
Dispositivi visivi di posizionamento in cm (linee, angoli, scala)
8
9
8
9
10
Interruttore di accensione/spegnimento (ON/OFF)
Selettore di rimozione intasamenti (ABS)
10 $UURQWRQGDQJROL/RVPXVVDWRUHVLWURYDVXOODWRSRVWHULRUHGHOJOLDSSDUHFFKL
8
9
16
10
mic o micron = espressione in uso nell'area linguistica anglosassone che indica un
micrometro (m). 1 micrometro è un millesimo di millimetro.
Esempi: 80 m = 0,08 mm. 100 m = 0,1 mm. 125 m = 0,125 mm.
63
64
4.1
Interruttore di esercizio ed indicatori
5
Ɣ
1
Ɣ
Messa in funzione
Posizionare il dispositivo su una superficie piana e compatta.
Assicurarsi che l'interruttore di ON/OFF si trovi in posizione di OFF
prima di collegare la plastificatrice alla rete elettrica.
2
Attenzione: Verificare che il valore di tensione richiesto dal
dispositivo coincida con quello della rete elettrica (230 V, 50 Hz).
3
Ɣ
4
5
1
3 Collegare la spina di alimentazione ad una presa elettrica standard ben
accessibile. /¶LQGLFDWRUHPOWERqLOOXPLQDWRGLURVVR
La spia POWER si accende di blu.
Indicazione di sicurezza: La presa deve trovarsi in prossimità del
dispositivo ed essere facilmente accessibile. In caso d'emergenza è
così possibile scollegare rapidamente l'alimentazione elettrica del
dispositivo.
1
dell'interruttore di esercizio
1 Posizione
O¶LQWHUUXWWRUHIXQ]LRQDOHSHUSODVWL¿FD]LRQHDIUHGGR
2
3
3
4
5
per pellicole di plastificazione con uno spessore di 100 o 125 mic 17
O¶LQWHUUXWWRUHIXQ]LRQDOHSHUSODVWL¿FD]LRQHDFDOGR
Posizione dell'interruttore di esercizio
O¶LQWHUUXWWRUHIXQ]LRQDOHSHU21
per
pellicole di plastificazione con uno spessore di 60 o 80 mic 2
O¶LQWHUUXWWRUHIXQ]LRQDOHSHU2))
Posizione
dell'interruttore di esercizio
per
la plastificazione a freddo
6SLD5($'<
Spia
POWER
6SLD32:(5
Spia READY
4.2
Testina di taglio
1
2
1
2
17
Pressino bloccabile
Manopola per l'impostazione del tipo di taglio
mic = espressione in uso nell'area linguistica anglosassone che indica un micrometro (m).
1 micrometro è un millesimo di millimetro.
65
66
6
Esercizio
6.1
Attenzione: La pellicola in uscita dalla plastificatrice è molto calda e
molle. Maneggiare pertanto il prodotto plastificato con cautela!
Plastificatrice
La plastificatrice consente la plastificazione a caldo e a freddo:
Ɣ
Durante la plastificazione a caldo la pellicola di plastificazione è
incollata termicamente.
Ɣ
Durante la plastificazione a freddo la pellicola di plastificazione è invece
sigillata a pressione.
Nota: Per la spianatura del prodotto plastificato si consiglia di
poggiarlo sotto un libro o sotto un altro oggetto piano e pesante.
6. 4XDQGRDYHWHWHUPLQDWRODPLQD]LRQHSRQHWHO¶LQWHUUXWWRUHIXQ]LRQDOH
Una volta conclusa la plastificazione, passare con l' interruttore di
esercizio a destra sul lato superiore del dispositivo in posizione COLD e
DGHVWUDQHOODSRVL]LRQHCOLDHWRJOLHWHODVSLQDGHOODUHWHGDOODSUHVD
scollegare la spina dalla presa di corrente. Lasciare raffreddare il
/DVFLDUHUDIIUHGGDUHLOGLVSRVLWLYRSULPDGLFRQVHUYDUOR
dispositivo prima di conservarlo.
Il metodo di plastificazione da applicare dipende dal materiale da
plastificare.
Nota: Per carta termica per fax e immagini ecografiche si consiglia ad
esempio solo la plastificazione a freddo !
6.1.1
Plastificazione a caldo
Per il comando
plastificatrice
sono previsti
interruttore
di esercizio,
1
Collegaredella
il cavo
di alimentazione
ad una un
presa
di corrente
facilmente
un selettore
scorrevole con due livelli di temperatura per la plastificazione di
accessibile.
quattro spessori di pellicola diversi:
Attenzione: Verificare che il valore di tensione dell'apparecchio corriƔ
60 o 80 mic18
sponda con quello 3della rete elettrica (220 - 240 V, 50 Hz).
100 o 125 mic
Ɣ
2
Accendete l’interruttore inserito/disinserito sul lato destro
1. Scegliere
tramite l'interruttore
esercizio
destra sul lato superiore del
dell’apparecchio:
„HOT“, ladilampada
di asegnalazione
dispositivo
spessore della pellicola di plastificazione utilizzata. La
rossa si lo
illumina.
plastificatrice procede autonomamente al riscaldamento fino a
3
Il motore di azionamento per i rulli trasportatori si avvia. Dopo circa
raggiungere la temperatura richiesta. Durante tale operazione, la spia
3-5 minuti viene raggiunta la temperatura di esercizio corretta e si
READY lampeggia di arancione.
illumina la lampada di segnalazione verde.
2. Il motorino dei rulli di trasporto è avviato.
4
Inserire il foglio da plastificare nella busta in pellicola in modo da ave3. Dopo
circa
il dispositivo
temperatura
re su
tutti5 iminuti
lati una
distanza diraggiunge
circa 3 - 5la
mm
dal bordo. d'esercizio
richiesta e la spia READY si accende in modo permanente.
Attenzione:
Utilizzare
esclusivamente
pellicolediper
plastificazione
4. Posizionare
l'oggetto
da plastificare
nella pellicola
plastificazione
in a
caldo.
modo da lasciare su tutti i lati una distanza di ca. 3 - 5 mm dal bordo
pellicola
di plastificazione.
5 della
Inserire
la pellicola
insieme al foglio da plastificare nella fessura di inserimento della plastificatrice. Inserire per primo il lato chiuso della
Nota: Utilizzare per la plastificazione a caldo soltanto apposite
busta in pellicola.
pellicole per plastificazione a caldo.
Avvertenza:
Per evitare
la piegaturainsieme
della pellicola
di plastificazione
5. Introdurre
la pellicola
di plastificazione
all'oggetto
da plastificare
nonnella
inserire
mai per
primo il latodal
aperto
della busta
in pellicoladinella fessura
fessura
di inserimento
lato chiuso.
La procedura
di inserimento
della
plastificatrice.
Nell'inserimento della pellicola osservare
plastificazione
è svolta
automaticamente.
le istruzioni riportate sulla fessura di inserimento. La procedura di plastificazione avviene automaticamente.
18
Attenzione: Il dispositivo è molto caldo dopo la plastificazione!
Pericolo di lesioni!
6.1.2
Plastificazione a freddo
Attenzione: Se la plastificatrice è stata utilizzata poco prima per una
plastificazione a caldo, è necessario fare raffreddare la plastificatrice
prima di procedere. La durata prevista per il raffreddamento è di ca.
30 minuti.
1. 6SRVWDWHLOWDVWRIXQ]LRQDOHDGHVWUDQHOODSRVL]LRQHCOLD
Passare con l'interruttore di esercizio a destra sul lato superiore del
dispositivo in posizione COLD.
Nota: Utilizzare per la plastificazione a freddo soltanto apposite
pellicole per plastificazione a freddo.
2. Eliminare la pellicola protettiva dalla pellicola di plastificazione.
3. Posizionare l'oggetto da plastificare nella pellicola di plastificazione in
modo da lasciare su tutti i lati una distanza di ca. 3 - 5 mm dal bordo
della pellicola di plastificazione.
4. Introdurre la pellicola di plastificazione insieme all'oggetto da plastificare
nella fessura di inserimento dal lato chiuso. La procedura di
plastificazione è svolta automaticamente.
Nota: Per evitare che la pellicola di plastificazione si pieghi, non
inserire mai per primo il lato aperto della pellicola di plastificazione
nella fessura di inserimento. Osservare in fase di inserimento della
pellicola di plastificazione le istruzioni riportate sulla fessura di
inserimento del dispositivo.
mic o micron = espressione in uso nell'area linguistica anglosassone che indica un
micrometro (m). 1 micrometro è un millesimo di millimetro.
Esempi: 60 m = 0,06 mm. 80 m = 0,08 mm. 100 m = 0,1 mm. 125 m = 0,125 mm.
67
6.1.3
Rimozione di pellicole intasate
Per eliminare rapidamente possibili intasamenti da pellicola, il dispositivo è
dotato di apposito selettore di rimozione intasamenti.
Con pellicola di plastificazione bloccata, procedere come segue:
1. Spegnere il dispositivo: passare allo scopo con l'interruttore di
accensione/spegnimento in posizione OFF.
2. Passare con il selettore di rimozione intasamenti interamente a sinistra.
3. Tenere ferma la plastificatrice ed estrarre la pellicola di plastificazione
assieme all'oggetto da plastificare dalla fessura di inserimento.
4. Passare con il selettore di rimozione intasamenti di nuovo a destra.
5. Pulire i rulli di trasporto rimuovendo eventuali depositi e residui di adesivo
introducendo nella fessura di inserimento della plastificatrice un foglio di
carta piegato, si veda il capitolo „Pulizia dei rulli di trasporto”.
Nota: Nel caso di frequenti intasamenti o non potendo estrarre dalla
plastificatrice la pellicola incastrata, si prega di rivolgersi al nostro
servizio di assistenza telefonica (si veda il tagliando di garanzia).
6.2
Taglierina a rullo
Con la taglierina a rullo è possibile tagliare carta, cartoline, carta fotografica
e pellicole di plastificazione.
6.2.1
Scelta del tipo di taglio
La taglierina a rullo consente tre tipi di taglio differenti:
Ɣ
Taglio diritto
Ɣ
Taglio ondulato
Ɣ
Taglio perforato
Nota: Le lame sono protette dall'alloggiamento.
Scegliere il tipo di taglio richiesto, si veda l'immagine 1:
1. Passare con il pressino bloccabile sulla testina di taglio in alto in
posizione OPEN.
2. Girare la manopola di impostazione del tipo di taglio fino a quando il tipo
di taglio richiesto si trova in alto.
3. Premere il pressino bloccabile sulla testina di taglio in basso in posizione
LOCK.
Figura 1
(figura simile)
69
70
6.2.2
Taglio del materiale
1. Posizionare il dispositivo con la testina di taglio rivolta in alto su una
superficie piana e compatta.
2. Spingere la testina di taglio contro un lato della guida di posizionamento.
3. Introdurre il materiale da tagliare sotto il profilo pressore trasparente nella
posizione richiesta.
Nota: Osservare le quantità di materiale da tagliare consentite, si
veda il capitolo “Impiego conforme agli usi previsti” o il capitolo
“Specifiche tecniche”.
Nota: I dispositivi visivi di posizionamento facilitano il corretto
posizionamento del materiale da tagliare.
4. Durante il taglio, tenere il materiale da tagliare ben fermo con una mano
in modo da evitare che possa scivolare. Altrimenti si possono verificare
delle imprecisioni di taglio.
5. Per tagliare, premere la testina di taglio in basso tirandola lungo la guida
di posizionamento fino a passare dall'altro lato, si veda l'immagine 2.
Nota: Per evitare delle imperfezioni dello spigolo di taglio, non fare
scorrere la testina di taglio indietro ma rimuovere subito dopo il taglio
prima il materiale inserito.
6.2.3
Sostituzione della testina di taglio
Non appena le lame della taglierina a rullo risultano danneggiate o usurate,
sostituire la testina di taglio.
Nota: È possibile compiere la sostituzione dell'intera testina di taglio
come unico pezzo. Per l'acquisto di una nuova testina di taglio,
rivolgersi al nostro servizio di assistenza telefonica.
5LPXRYHWHODFDORWWDHVWHUQDGHOODJXLGDGDOODSLDVWUDGLEDVH
1. Girare
la manopola rossa all'estremità della barra di scorrimento di 90 º a
VSLQJHQGRODYHUVRO¶DOWRWHQHQGRODSUHPXWDOHJJHUPHQWHYHUVR
destra
o sinistra e rimuovere quindi la barra di scorrimento dal
dispositivo.
O¶LQWHUQRDOO¶HVWUHPLWjLQIHULRUH
2. Sostituire la testina di taglio con un pezzo nuovo.
6RVWLWXLUHODWDJOLHULQDDUXOORFRQXQDWDJOLHULQDQXRYD
3. Introdurre
la barra di scorrimento nel dispositivo e girare di nuovo la
manopola rossa di 90 º a destra o a sinistra.
,QWURGXUUHQXRYDPHQWHODJXLGDGLSRVL]LRQDPHQWRQHOODSLDVWUDGLIRQGR
DSSRJJLDQGRYLODQXRYDWDJOLHULQDDUXOOR
,Q¿ODWHODFDORWWDHVWHUQDGDOO¶DOWRVXOO¶DSHUWXUDDOO¶HVWUHPLWjGHOODJXLGD
1RWDÊSRVVLELOHFRPSLHUHVRORODVRVWLWX]LRQHGHOO¶LQWHUDWDJOLHULQDDUXOOR
3HUO¶DFTXLVWRGLXQDQXRYDWDJOLHULQDDUXOORULYROJHUVLDOODQRVWUDOLQHD
WHOHIRQLFDGLUHWWD
Figura 3
Figura 2
71
72
7
7.1
Pulizia e cura
8
Pulizia esterna del dispositivo
Risoluzione di problemi
Problema
Attenzione: Prima di pulire il dispositivo con un panno umido,
scollegare sempre la spina dalla presa di corrente!
Pulire l'involucro con un panno inumidito in sapone neutro e acqua.
Nota: Non utilizzare solventi o detergenti corrosivi.
7.2
La spia POWER
non si accende.
Pulizia dei rulli di trasporto
Incrostazioni e residui di adesivo sui rulli di trasporto possono influire sul
,QFURVWD]LRQLHUHVLGXLGLDGHVLYRVXLUXOOLGLWUDVSRUWRSRVVRQRLQÀXLUHVXO
risultato di plastificazione. Prevedere pertanto la regolare pulizia dei rulli di
ULVXOWDWRGLSODVWL¿FD]LRQH(IIHWWXDUHTXLQGLSHULRGLFDPHQWHXQDSXOL]LDGHL
trasporto:
UXOOLGLWUDVSRUWRGRSROµXWLOL]]D]LRQH
$TXHVWRVFRSRLQVHULUHQHOODIHVVXUDGLLQVHULPHQWRXQIRJOLRGLFDUWD
1. Passare con l'interruttore di esercizio su 100/125 mic.
ULSLHJDWR,UHVLGXLGLDGHVLYRYHQJRQRDVSRUWDWLGDOIRJOLRGLFDUWDLQXVFLWD
2. Attendere fino a quando la spia READY si accende in modo permanente.
5LSHWHUHSLYROWHLOSURFHGLPHQWR
3. Introdurre un foglio di carta piegato nella fessura di introduzione della
6WDFFDUHVHPSUHODVSLQDGLDOLPHQWD]LRQHSULPDGLLQXPLGLUHOµDSSDUHFFKLR
plastificatrice.
SHUSXOLUOR4XDORUDQHFHVVDULRODFXVWRGLDSXzHVVHUHSXOLWDFRQXQSDQQR
4. Ripetere la procedura con un foglio di carta nuovo fino a quando sulla
LQXPLGLWRLQVDSRQHQHXWURHGDFTXDSXOLWD1RQXWLOL]]DUHVROYHQWLR
carta non saranno più visibili incrostazioni o residui di adesivo.
GHWHUJHQWLDJJUHVVLYL
Diagnosi e causa
La spina di alimentazione
non è collegata
correttamente alla presa di
corrente.
L'interruttore di
accensione/spegnimento è in
posizione OFF.
La spia POWER è guasta.
La pellicola
plastificata non è
completamente
trasparente.
La temperatura di
plastificazione è troppo
bassa.
La pellicola di plastificazione
non è stata introdotta in
modo diritto all'interno della
fessura di introduzione della
plastificatrice.
La pellicola si
intasa.
La pellicola di plastificazione
è troppo grande.
Il dispositivo non
funziona più dopo
un utilizzo
prolungato oppure
si ferma durante
l'esercizio.
I rulli di trasporto
non scorrono.
73
La superficie del dispositivo è
calda? È probabile che la
protezione da
surriscaldamento della
plastificatrice abbia
disattivato automaticamente
il dispositivo.
La spina è collegata alla
presa di corrente?
L'interruttore di
accensione/spegnimento è in
posizione ON?
74
Rimedio
Collegare la spina
correttamente alla presa di
corrente.
Passare con l'interruttore di
accensione/spegnimento in
posizione ON.
Rivolgersi al nostro servizio di
assistenza telefonica.
Assicurarsi che il dispositivo
si riscaldi sufficientemente
utilizzando pellicole di
plastificazione più spesse.
Sottoporre a plastificazione la
stessa pellicola un'altra volta
allo scopo di migliorare il
risultato della plastificazione.
Si veda il capitolo “Rimozione
di pellicole intasate”.
Si veda il capitolo “Pulizia dei
rulli di trasporto”.
Introdurre la pellicola di
plastificazione in modo diritto
e con il lato chiuso nella
fessura di introduzione della
plastificatrice.
Utilizzare solo pellicole di
plastificazione del formato
indicato, si veda il capitolo
“Specifiche tecniche”.
Attendere ca. 30 minuti e
riprendere quindi di nuovo la
plastificazione. Se il
dispositivo continua a non
funzionare, si prega di
rivolgersi al nostro servizio di
assistenza telefonica.
Se il problema dovesse
persistere, si prega di
rivolgersi al nostro servizio di
assistenza telefonica.
La conformità con le normative EU è confermata dal marchio
CE.
Se il problema non risultasse rimosso, si prega di rivolgersi al nostro servizio
di assistenza telefonica, si veda il capitolo “Garanzia”.
9
10 Indicazioni sullo smaltimento
Specifiche tecniche
A 240 Combo
Plastificatrice a caldo e a freddo
3ODVWL¿FDWULFHDFDOGRHD
freddo
Larghezza di plastificazione
/DUJKH]]DGLSODVWL¿FD]LRQH
massima:
PDVVLPD
Spessore delle pellicole di
Durata di
'XUDWDGLULVFDOGDPHQWR
plastificazione:
PPDOPLQXWR
riscaldamento:
PLQXWL
Spie:
A 340 Combo
240 mm
PP
6SHVVRUHGHOOHSHOOLFROHGL
11
plastificazione: HPLF
SODVWL¿FD]LRQH
Velocità di
9HORFLWjGLSODVWL¿FD]LRQH
A 245 Combo
PP
60, 80, 100 e 125 mic19
HPLF11
300 mm al minutoPPDOPLQXWR
5 minuti
PLQXWL
/('32:(5URVVR
LED POWER (blu)
/('5($'<YHUGH
LED READY (arancione)
6HOHWWRUHGLULPR]LRQHLQWDVDPHQWL
6HOHWWRUHGLULPR]LRQHLQWDVDPHQWL
3
pz
DIN
A5
La confezione contiene
le
1LHQWHEROOH
1LHQWHEROOH
3DUWLFRODULWj seguenti pellicole di
3 pz DIN A6
6SHJQLPHQWRDXWRPDWLFRLQFDVRGL
6SHJQLPHQWRDXWRPDWLFRLQFDVRGL
VXUULVFDOGDPHQWR
plastificazione: VXUULVFDOGDPHQWR
Taglierina perParticolarità:
carta
Selettore di rimozione intasamenti
Niente bolle
7DJOLHULQDDUXOORFRQWLSLGLWDJOLRD
7DJOLHULQDDUXOORFRQWLSLGLWDJOLRD
VFHOWDHSUHVVLQREORFFDELOH
VFHOWDHSUHVVLQREORFFDELOH
Spegnimento automatico
in caso di
3DUWLFRODULWj
'LVSRVLWLYLYLVLYLGLSRVL]LRQDPHQWRLQFP
surriscaldamento 'LVSRVLWLYLYLVLYLGLSRVL]LRQDPHQWRLQFP
OLQHHDQJROLVFDOD
OLQHHDQJROLVFDOD
Taglierina per carta 7DJOLRGLULWWR
&RXSHGURLWH
6SLH
7LSLGLWDJOLRDVFHOWD
Particolarità:
Questo simbolo (il bidone sbarrato) indica che l’utilizzatore
finale è tenuto a smaltire il presente prodotto alla fine della
rispettiva durata utile attraverso un sistema di recupero o di
raccolta differenziata. Il simbolo vale solo per i paesi membri
.
SEE20
/('32:(5URVVR
/('5($'<YHUGH
11 Garanzia
Caro cliente,
ci congratuliamo con Lei per aver scelto questo apparecchio. In caso di
difetti La preghiamo di ritornare l’apparecchio, completo di imballo originale
e scontrino di acquisto, al punto vendita dove è stato effettuato l’acquisto.
&RXSHRQGXOpH
Taglierina a rullo con
3 tipi di taglio a scelta e
&RXSHSHUIRUpH
pressino bloccabile
)RUPDWRPDVVLPR
$
Dispositivi visivi diA3posizionamento in cm
7DJOLRGLULWWRIRJOLGLFDUWDJP
7DJOLRGLULWWRIRJOLGLFDUWDJP
(linee, angoli, scala)
6SHVVRUHGLWDJOLRPDVVLPR
7DJOLRRQGXODWRIRJOLGLFDUWDJP
7DJOLRRQGXODWRIRJOLGLFDUWDJP
Tipi di taglio a scelta:
Taglio diritto
3HUIRUD]LRQHIRJOLGLFDUWDJP
3HUIRUD]LRQHIRJOLGLFDUWDJP
Taglio ondulato
&RORUH
QHURDUJHQWR
QHURDUJHQWR
Taglio perforato
0LVXUH/[3[+
[[PP
[[PP
Formato massimo:
DIN A4
3HVR
7DJOLRRQGXODWR
7DJOLRSHUIRUDWR
NJ
Spessore di taglio
massimo:
Colore:
NJ
Taglio diritto:
5 fogli di carta (80 g/m2)
Taglio ondulato: 9+]
2 fogli di carta (80 g/m2)
Perforazione:
2 fogli di carta (80 g/m2)
PD[:6$
nero/argento
Misure (L x P x H):
410 x 160 x 80 mm
Peso:
1,31 kg
7HQVLRQHGLDOLPHQWD]LRQH
9+]
$VVRUELPHQWR
PD[:$
11 mic o micron = espressione in uso nell'area linguistica anglosassone che indica un
19
micrometro (m). 1 micrometro è un millesimo di millimetro.
Esempi: 80 m = 0,08 mm. 100 m = 0,1 mm. 125 m = 0,125 mm.
75
Versione del 01.12.2010
20 SEE = Spazio economico europeo comprendente gli stati membri dell’UE oltre a Islanda,
Liechtenstein e Norvegia.
76
1
A 240 Combo / A 340 Combo
Aparato laminador
con cortador de rodillos
2
3
4
5
6
Manual de instrucciones
7
8
9
10
11
Advertencias de seguridad importantes............................................. 79
1.1 Advertencias de seguridad para el aparato laminador ............ 79
1.2 Advertencias de seguridad para el cortador de rodillos........... 80
Exclusión de responsabilidad............................................................. 81
Uso previsto........................................................................................ 81
Elementos de mando.......................................................................... 82
4.1 Interruptor de funcionamiento y elementos de indicación ....... 83
4.2 Cabezal cortador ...................................................................... 83
Puesta en servicio .............................................................................. 84
Manejo ................................................................................................ 85
6.1 Aparato laminador .................................................................... 85
6.1.1 Laminación en caliente ................................................ 85
6.1.2 Laminación en frío ....................................................... 86
6.1.3 Eliminar un atasco de pelíula transparente ................. 87
6.2 Cortador de rodillos.................................................................. 88
6.2.1 Elegir la figura de corte ................................................ 88
6.2.2 Cortar material ............................................................. 89
6.2.3 Sustituir el cabezal cortador ........................................ 90
Limpieza y cuidado............................................................................. 91
7.1 Limpiar el exterior del aparato.................................................. 91
7.2 Limpiar los rodillos de transporte ............................................. 91
Solución de problemas ....................................................................... 92
Datos técnicos .................................................................................... 93
Indicaciones de eliminación ............................................................... 94
Garantía.............................................................................................. 94
[ESPAÑOL]
06.2011
77
78
1
Advertencias de seguridad importantes
Tenga en cuenta los aspectos siguientes a fin de garantizar un trabajo fiable
con el aparato:
Ɣ
Lea las presentes instrucciones detenidamente y tenga las mismas en
cuenta a la hora de manejar el aparato.
Ɣ
Guarde el manual de instrucciones para cualquier utilización posterior.
Ɣ
Coloque el aparato sobre un puesto de trabajo plano y estable antes de
utilizarlo.
1.1
Ɣ
Ɣ
Ɣ
Ɣ
Ɣ
Ɣ
Ɣ
Ɣ
Ɣ
Ɣ
Ɣ
Ɣ
Ɣ
Advertencias de seguridad para el aparato
laminador
Evite cualquier daño de la clavija de red o del cable de red. Jamás se
debe torcer el cable de red. En caso de cualquier daño del cable de red
o de la clavija de red no se debe poner el aparato en servicio.
No utilice el aparato cerca de superficies calientes o en un entorno
húmedo y proteja el mismo frente a la radiación solar directa y fuertes
efectos de polvo.
Antes de limpiar el aparato, siempre debe sacarse la clavija de red. No
utilice disolventes ni agentes de limpieza agresivos.
No se pueden laminar objetos metálicos.
Para niños está prohibida la estancia en el área de trabajo del aparato
en disposición de servicio.
Extraiga la clavija de alimentación cuando no utilice el aparato.
Desconecte el aparato inmediatamente cuando perciba un olor
penetrante o cuando el aparato no se encuentre en servicio.
No entre en contacto con la clavija de alimentación con las manos
húmedas.
Asegúrese de que el interruptor de conectado/desconectado se
encuentre en la posición OFF antes de conectar el aparato laminador a
la red de corriente.
Introduzca sólo las películas transparentes de laminación previstas en
el aparato. Ver el capítulo "Datos técnicos". Unas películas
transparentes de laminación demasiado grandes pueden provocar
atascos de película transparente.
No lamine materiales termosensibles como, por ejemplo, papel térmico,
con este aparato.
La laminación de documentos húmedos conlleva unos resultados de
laminación malos.
Para la laminación en caliente no debe utilizar películas transparentes
de laminación que estén previstas para la laminación en frío. En tal
79
Ɣ
Ɣ
Ɣ
1.2
Ɣ
Ɣ
Ɣ
Ɣ
Ɣ
Ɣ
Ɣ
Ɣ
Ɣ
Ɣ
Ɣ
Ɣ
caso, el aparato, las películas transparentes de laminación y el
documento sufrirían daños.
No corte las películas transparentes de laminación a medida. Los
cantos de corte generados pueden provocar atascos de película
transparente.
Mantenga alejadas de la entrada de laminación las partes sueltas de la
ropa, corbatas, bisutería, pelo largo u otros objetos sueltos. ¡Peligro de
lesiones!
El aparato sólo debe utilizarse en locales cerrados que estén secos.
Advertencias de seguridad para el cortador de
rodillos
Evite entrar en contacto con la zona cercana al cabezal cortador
cuando proceda a mover o guardar el aparato. Las cuchillas del
cabezal cortador están afilados. ¡Peligro de lesiones!
Maneje el aparato siempre con las dos manos.
Mantenga alejadas del cortador de rodillos las partes sueltas de la ropa,
corbatas, bisutería, pelo largo u otros objetos sueltos. ¡Peligro de
lesiones!
El aparato sólo está previsto para cortar papel, tarjetas, papel
fotográfico y películas transparentes de laminación.
Retire todas las grapas y todos los clips del documento antes de
realizar el corte.
Las cuchillas no se deben lubricar ni afilar.
No se debe utilizar el aparato si el cabezal cortador o la carcasa del
cabezal cortador están dañados.
No se debe utilizar el aparato si la protección de las cuchillas no está
insertada correctamente.
Preste atención a no cortar sus dedos al sustituir el cabezal cortador.
Evite cualquier contacto con las cuchillas.
Mantenga el aparato fuera del alcance de los niños.
Los niños o menores de edad sólo deben utilizar el aparato bajo la
supervisión de un adulto.
El aparato no está previsto para cortar las uñas.
80
2
Exclusión de responsabilidad
4
Elementos de mando
No asumimos garantía alguna para la integridad de la información que se
refiere a características técnicas, así como a la presente documentación. El
producto descrito en la presente documentación y, en caso dado, sus
accesorios están sujetos a la mejora continua y al desarrollo ulterior. Por
este motivo, nos reservamos el derecho de modificar en cualquier momento
y sin previa notificación los componentes, accesorios, especificaciones
técnicas, así como la presente documentación del producto.
1
2
3
1
3
4
3
Uso previsto
Este aparato laminador con cortador de rodillos sólo debe ser utilizado para:
Ɣ
La laminación con películas transparentes de laminación en caliente y
películas transparentes de laminación en frío con un espesor de
película transparente de laminación de 80, 100 y 125 mic, no
debiendo superar el espesor total de los documentos a laminar (fotos,
figuras, tarjetas, papel, etc.) los 0,6 mm como máximo
Ɣ
EL corte a medida de papel, tarjetas, papel fotográfico y películas
transparentes de laminación con un tamaño máximo de DIN A3, no
debiendo superar el espesor del material a cortar los valores que
figuran a continuación:
2
Ɣ En corte recto, como máximo 3 hojas de papel (80 g/m )
2
Ɣ En corte ondulado, como máximo 3 hojas de papel (80 g/m )
2
Ɣ En corte de perforación, como máximo 3 hojas de papel (80 g/m )
Cualquier otro uso se considera no conforme al objetivo previsto. Se prohibe
expresamente cualquier modificación o transformación.
5
7
1
2
3
4
5
6
7
6
9
Cabezal cortador
Regleta de corte/riel de guía
Regleta de apriete con protección para los dedos
Interruptor de funcionamiento (regulación de temperatura)
Elementos de indicación (LEDs)
Entrada de laminación
Ayudas de posicionamiento visual en cm (líneas, ángulos, escala)
8
8
9
8
9
10
Interruptor de conectado/desconectado (ON/OFF)
Empujador de desbloqueo de atasco (ABS)
10 5HGRQGHDGRUGHHVTXLQDV3RUODSDUWHSRVWHULRUGHORVHTXLSRVVHHQFXHQWUD
HOUHGRQGHDGRUGHHVTXLQDV
81
82
4.1
Interruptor de funcionamiento y elementos de
indicación
5
Ɣ
Ɣ
1
Puesta en servicio
Posicione el aparato sobre una superficie estable y nivelada.
Asegúrese de que el interruptor de conectado/desconectado se
encuentre en la posición OFF antes de conectar el aparato laminador a
la red de corriente.
2
Atención: Compruebe si la indicación de tensión del aparato coincide
con la de su red de corriente (230 V, 50 Hz).
3
Ɣ
4
5
1
3 Conecte la clavija de alimentación a una caja de enchufe estándar
fácilmente accesible. /DLQGLFDFLyQPOWERVHLOXPLQDGHFRORUURMR
La indicación POWER se ilumina en azul.
Advertencia de seguridad: La caja de enchufe debe encontrarse
cerca del aparato y ser fácilmente accesible. De este modo podrá
separar el aparato rápidamente de la red de corriente en un caso de
emergencia.
1
del interruptor de funcionamiento en caso de películas
1 Posición
,QWHUUXSWRUGHIXQFLRQHVGH/DPLQDFLyQHQIUtR
2
3
3
4
5
transparentes de laminación con un espesor de 100 o de 125 mic 21
,QWHUUXSWRUGHIXQFLRQHVGH/DPLQDFLyQHQFDOLHQWH
Posición del interruptor de funcionamiento en caso de películas
,QWHUUXSWRUGHIXQFLRQHVGH21
transparentes
de laminación con un espesor de entre 60 y 80 mic 2
,QWHUUXSWRUGHIXQFLRQHVGH2))
Posición
del interruptor de funcionamiento
para
la laminación en frío
,QGLFDFLyQ5($'<
Indicación
POWER
,QGLFDFLyQ32:(5
Indicación READY
4.2
Cabezal cortador
1
2
1
2
21
Protección contra desajustes
Botón giratorio para el ajuste de la figura de corte
mic = Una designación procedente del idioma inglés para un micrómetro (m).
1 micrómetro es una milésima de milímetro.
83
84
6
Manejo
6.1
Advertencia: A fin de evitar que la película transparente de
laminación forme pliegues, jamás se debe introducir primero el lado
abierto de la película transparente de laminación en la entrada de
laminación. Al introducir la película transparente de laminación
rogamos que observe las instrucciones en la entrada de laminación.
Aparato laminador
El aparato laminador permite laminar en caliente y en frío:
Ɣ
Durante la laminación en caliente se realiza el pegado de la película
transparente de laminación.
Ɣ
Durante la laminación en frío se realiza el prensado de la película
transparente de laminación.
Atención: La película transparente de laminación saliente está muy
caliente y muy blanda después de la laminación. ¡Por tanto, debe
tratar el producto laminado con sumo cuidado!
Ajuste la selección del método de laminación al material que va a laminar.
Advertencia: ¡Por ejemplo, el papel térmico e imágenes de
ultrasonidos sólo deben laminarse en frío!
6.1.1
Laminación en caliente
El aparato
laminador
puede
utilizarsea mediante
el interruptor
de
1
Conecte
el cable
de corriente
una caja de
enchufe estándar
funcionamiento
un interruptor deslizante con dos niveles de temperatura
fácilmentey accesible.
que están ajustados a los cuatro espesores de película transparente de
Atención: Compruebe si la indicación de tensión del máquina
laminación:
con
22 la de su red de corriente (220 - 240 V, 50 Hz).
Ɣ
60coincide
u 80 mic
3
2Ɣ
Conecte
el interruptor
de ENCENDIDO/APAGADO en el lado derecho
100
ó 125 mic
del equipo: "+27", la lámpara roja de indicación se ilumina.
1. Ajuste el interruptor de funcionamiento en la parte superior derecha del
3 aparato
El motor
de accionamiento
los rodillos
transporte
arranca.El
al espesor
de película para
transparente
de de
laminación
utilizado.
Después
de aprox.
3 a 5 minutos
se ha alcanzado
temperatura
de
aparato
laminador
se calienta
automáticamente
hasta la
alcanzar
la
servicio correcta
y la Durante
lámparaeste
verde
de indicación
se ilumina.
temperatura
necesaria.
proceso,
la indicación
READY
en naranja.
parpadea
C(-+).2&*+).-)&'#(+(&)'*+-#'(-)&'#(#g(
-&'))O.P#,-.(#,-(#*+)P#''(-
''
2. El motor
de accionamiento para los rodillos de transporte arranca.
+,*-)&)+&*&5.&-+(,*+(-(-)),&),&),
3. Al cabo
de aproximadamente 5 minutos se alcanza la temperatura de
servicio
correcta y la indicación READY se ilumina de forma permanente.
@1:/5P:J-#&#P&.,#/'(-*&5.&,-+(,*+(-,
4. Introduzca el producto a laminar en la película transparente de
&'#(#g((&#(-
de tal modo que exista una distancia de aproximadamente 3
laminación
C(-+).2&*&5.&-+(,*+(-$.(-)&*+).-)&'#(+(&
a mm en todos los lados con respecto al borde de la película
+(.+(-+&*+-)&'#()+A&&)++)&
transparente de laminación.
*&5.&-+(,*+(-,+#(-+).#(*+#'+&.!+
Advertencia: Utilice
exclusivamente películas transparentes de
0B1>@1:/5-
#(/#-+&*&!)&*&5.&,-+(,*+(-,
laminación en caliente para la laminación en caliente.
&'#(#g($'_,,#(-+).#+*+#'+)&&)#+-)&
5. Introduzca la película transparente de laminación junto con el producto a
*&5.&,-+(,*+(-,&'#(#g((&+(.+(-+&*+-)
laminar con el lado cerrado por delante en la entrada de laminación. El
&'#()+.+(-&#(-+).#g(&*&5.&-+(,*+(-,(
proceso de laminación se realiza de#!.+((&+(.+(-+A&
forma automática.
-(+(.(-&,#(,-+.#)(,O.
*+),)&'#(#g(,+ )+'.-)'_-#
22
mic o micrón = Una designación procedente del idioma inglés para un micrómetro (m).
1 micrómetro es una milésima de milímetro.
Ejemplos: 60 m = 0,06 mm. 80 m = 0,08 mm. 100 m = 0,1 mm. 125 m = 0,125 mm.
85
Advertencia: Para aplanar el producto laminado puede utilizar un
libro u otro objeto pesado plano.
&XDQGRXVWHGDFDEHFRQODODPLQDFLyQSRQJDHOLQWHUUXSWRUGHIXQFLRQHV
6. Cuando
haya finalizado la laminación, debe poner el interruptor de
funcionamiento
en la parte superior derecha del aparato en la posición
DODGHUHFKDHQODSRVLFLyQCOLD\H[WUDLJDODFODYLMDGHUHGGHOHQFKXIH
COLD
y
sacar la clavija de alimentación de la caja de enchufe. Deje que
'HMHTXHHODSDUDWRVHHQIUtHDQWHVGHJXDUGDUOR
el aparato se enfríe antes de guardarlo.
Atención: ¡El aparato está muy caliente después de la laminación!
¡Peligro de lesiones!
6.1.2
Laminación en frío
Atención: Si se ha utilizado el aparato laminador poco antes para la
laminación en caliente, es necesario dejar que éste se enfríe. El
período de enfriamiento es de aproximadamente 30 minutos.
3RQJDHOLQWHUUXSWRUGHIXQFLRQHVDODGHUHFKDHQODSRVLFLyQCOLD.
1. Ponga
el interruptor de funcionamiento en la parte superior derecha del
aparato en la posición COLD.
Advertencia: Utilice exclusivamente películas transparentes de
laminación en frío para la laminación en frío.
2. Retire la película de protección de la película transparente de laminación.
3. Introduzca el producto a laminar en la película transparente de
laminación de tal modo que exista una distancia de aproximadamente 3
a mm en todos los lados con respecto al borde de la película
transparente.
4. Introduzca la película transparente de laminación junto con el producto a
laminar con el lado cerrado primero en la entrada de laminación. El
proceso de laminación se realiza de forma automática.
Advertencia: A fin de evitar que la película transparente de
laminación forme pliegues, jamás se debe introducir primero el lado
abierto de la película transparente de laminación en la entrada de
laminación. Al introducir la película transparente de laminación
rogamos que observe las instrucciones en la entrada de laminación.
86
6.1.3
Eliminar un atasco de pelíula transparente
El aparato está equipado con un empujador de desbloqueo de atasco a fin
de evitar los atascos de película transparente rápidamente.
Si se bloquea la película transparente de laminación, proceda como sigue:
1. Desconecte el aparato: ponga el interruptor de conectado/desconectado
en la posición OFF.
2. Ponga el empujador de desbloqueo de atasco completamente a la
izquierda.
3. Sujete el aparato laminador y extraiga la película transparente de
laminación junto con el producto a laminar hacia fuera de la entrada de
laminación.
4. Vuelva a poner el empujador de desbloqueo de atasco a la derecha.
5. Limpie los rodillos de transporte de acumulaciones y restos de
pegamento introduciendo una hoja plegada de papel en la entrada de
laminación. Ver el capítulo "Limpiar los rodillos de transporte".
Advertencia: Si los atascos de película transparente se repiten
constantemente o si no es posible sacar la película transparente
atascada del aparato laminador, rogamos que se ponga en contacto
con nuestra línea de asistencia telefónica (ver la garantía).
6.2
Cortador de rodillos
El cortador de rodillos permite acortar a medida papel, tarjetas, papel
fotográfico y películas transparentes de laminación.
6.2.1
Elegir la figura de corte
El cortador de rodillos está equipado con tres diferentes figuras de corte:
Ɣ
Corte recto
Ɣ
Corte ondulado
Ɣ
Corte de perforación
Advertencia: Las cuchillas se encuentran dentro de una carcasa
protegida.
Seleccione la figura de corte necesaria. Ver la figura 1:
1. Tire de la protección contra desajustes en el cabezal cortador hacia
arriba hasta alcanzar la posición OPEN.
2. Gire el botón giratorio para ajustar la figura de corte hasta que el símbolo
de la figura de corte deseada se encuentre arriba.
3. Pulse la protección contra desajustes en el cabezal cortador hacia abajo
a la posición LOCK.
Figura 1
(figura similar)
87
88
6.2.2
Cortar material
6.2.3
1. Posicione el aparato con el cabezal cortador hacia arriba sobre una
superficie estable y nivelada.
2. Acerque el cabezal cortador a un lado del riel de guía.
3. Coloque el material a cortar en la posición deseada debajo de la regleta
de apriete transparente.
Advertencia: Observe el volumen admisible del material a cortar. Ver
el capítulo "Uso previsto" o el capítulo "Datos técnicos".
Advertencia: Las ayudas de posicionamiento visual facilitan la
alineación correcta del material a cortar.
4. Sujete correctamente el material a cortar con una mano mientras realiza
el corte de tal modo que éste no pueda desplazarse. De lo contrario
pueden producirse imprecisiones.
5. Para efectuar el corte, empuje el cabezal cortador hacia abajo y tire del
mismo a lo largo del riel de guía hasta el otro lado.
Ver la figura 2.
Advertencia: Para evitar cualquier canto de corte erróneo, no guíe el
cabezal cortador hacia atrás, sino retire el material colocado después
de haber efectuado el corte.
Sustituir el cabezal cortador
Cuando las cuchillas del cortador de rodillos estén dañadas o gastadas, es
necesario cambiar el cabezal cortador.
1.
2.
3.
Advertencia: Sólo se puede sustituir el cabezal cortador completo.
Para la compra de un nuevo cabezal cortador rogamos que se ponga
en contacto con nuestra línea de asistencia telefónica.
5HWLUHODWDSD¿QDOGHOFDUULOJXtDGHODSODFDEDVHDSUHWiQGROD
Gire
el botón giratorio rojo en el extremo del riel de guía 90 º a la
OLJHUDPHQWHHQHOH[WUHPRLQIHULRUKDFLDGHQWUR\GHVOL]iQGRODKDFLDDUULED
derecha
o a la izquierda y extraiga el riel de guía del aparato.
Sustituya el cabezal cortador antiguo por uno nuevo.
6XVWLWX\DHOFRUWDGRUGHURGLOORVDQWLJXRSRUXQRQXHYR
Vuelva a deslizar el riel de guía al interior del aparato y gire el botón
giratorio rojo 90 º a la derecha o a la izquierda.
9XHOYDDHPSXMDUHOULHOGHJXtDKDFLDODSODFDEDVH\FRORTXHHOFRUWDGRU
GHURGLOORVQXHYR
,QVHUWHODWDSD¿QDOGHVGHDUULEDVREUHODDEHUWXUDDO¿QDOGHOFDUULOJXtD
$GYHUWHQFLD6yORVHSXHGHVXVWLWXLUHOFRUWDGRUGHURGLOORVFRPSOHWR3DUD
ODFRPSUDGHXQQXHYRFRUWDGRUGHURGLOORVURJDPRVTXHVHSRQJDHQ
FRQWDFWRFRQODOtQHDGHDVLVWHQFLDWHOHIyQLFD
Figura 3
Figura 2
89
90
7
7.1
Limpieza y cuidado
8
Limpiar el exterior del aparato
Solución de problemas
Problema
Atención: ¡Extraiga siempre la clavija de alimentación antes de
realizar una limpieza húmeda del aparato!
Limpie la carcasa con un paño ligeramente húmedo empapado con jabón
suave y agua clara.
La indicación
POWER no se
ilumina.
Advertencia: No utilice disolventes o agentes de limpieza agresivos.
7.2
Diagnóstico y causa
La clavija de alimentación no
está correctamente enchufada
en la caja de enchufe.
El interruptor de
conectado/desconectado se
encuentra en la posición OFF.
La indicación POWER está
defectuosa.
Limpiar los rodillos de transporte
Las acumulaciones y los restos de pegamento en los rodillos de transporte
/DVDFXPXODFLRQHV\UHVWRVGHSHJDPHQWRHQORVURGLOORVGHWUDQVSRUWH
pueden repercutir sobre el resultado de laminación. Por este motivo es
SXHGHQUHSHUFXWLUVREUHHOUHVXOWDGRGHODPLQDFLyQ3RUHVWHPRWLYRVH
necesario limpiar los rodillos de transporte periódicamente:
GHEHQOLPSLDUORVURGLOORVGHWUDQVSRUWHSHULyGLFDPHQWHGHVSXpVGHOD
XWLOL]DFLyQGHODSDUDWR
1. Ponga el interruptor de funcionamiento en la posición de 100/125 mic.
$WDO¿QVHGHEHLQWURGXFLUXQDKRMDSOHJDGDGHSDSHOHQODUDQXUDGH
2. Espere hasta que la indicación READY se ilumine de forma permanente.
HQWUDGD(OSDSHOVDOLHQWHDUUDVWUDORVUHVWRVGHSHJDPHQWR(VWHSURFHVR
3. Introduzca una hoja plegada de papel en la entrada de laminación.
VHGHEHUHSHWLUYDULDVYHFHV
4. Repita el operación con una nueva hoja de papel hasta que no
$QWHVGHODOLPSLH]DHQK~PHGRGHODSDUDWRVLHPSUHVHGHEDVDFDUOD
aparezcan más acumulaciones o restos de pegamento sobre el papel.
FODYLMDGHUHG6LIXHUDQHFHVDULRVHSXHGHOLPSLDUODFDUFDVDFRQXQSDxR
HPSDSDGRHQMDEyQVXDYH\DJXDWUDQVSDUHQWH1RXWLOLFHGLVROYHQWHVR
DJHQWHVGHOLPSLH]DDJUHVLYRV
La película
transparente
laminada no está
transparente por
completo.
La temperatura de laminación
ha sido demasiado baja.
La película transparente de
laminación no ha sido
introducida recta en la entrada
de laminación.
Atasco de película
transparente
La película transparente de
laminación es demasiado
grande.
91
El aparato no
funciona al cabo
de un período de
servicio de mayor
duración o se
detiene durante el
servicio.
¿La superficie del aparato está
caliente? Entonces la protección
contra sobrecalentamientos
seguramente ha apagado el
aparato laminador
automáticamente.
Los rodillos de
transporte no
funcionan.
¿La clavija de alimentación está
enchufada a la caja de
enchufe?
¿El interruptor de
92
Solución
Enchufe la clavija de
alimentación correctamente
en la caja de enchufe.
Ponga el interruptor de
conectado/desconectado en la
posición ON.
Póngase en contacto con
nuestra línea de asistencia
telefónica.
Asegúrese de que el aparato
se haya calentado durante
suficiente tiempo si se utilizan
películas transparentes de
laminación de mayor espesor.
Vuelva a laminar la misma
película transparente de
laminación para mejorar el
resultado de laminación.
Ver el capítulo "Eliminar un
atasco de película
transparente".
Ver el capítulo "Limpiar los
rodillos de transporte".
Introduzca la película
transparente de laminación de
forma recta y con el lado
cerrado primero en la entrada
de laminación.
Utilice sólo películas
transparentes de laminación
del tamaño indicado. Ver el
capítulo "Datos técnicos".
Espere unos 30 minutos
aproximadamente y vuelva a
intentar laminar. Si el aparato
de nuevo no funciona,
rogamos que se ponga en
contacto con nuestra línea de
asistencia telefónica.
Si el problema persiste,
rogamos que se ponga en
contacto con nuestra línea de
asistencia telefónica.
conectado/desconectado se
encuentra en la posición ON?
La conformidad con las directivas de la UE queda afirmada
mediante el símbolo CE.
Si no ha sido posible eliminar el problema, rogamos que se ponga en
contacto con nuestra línea de asistencia telefónica. Ver el capítulo
"Garantía".
9
10 Indicaciones de eliminación
Datos técnicos
A 240 Combo
Aparato
laminador
Aparato
laminador
en
fríoy en frío
caliente
A 340 Combo
en caliente y en
0i[LPDDQFKXUDGH
Máxima
ODPLQDFLyQ
anchura
de
PP
laminación:
3DUDORVHVSHVRUHVGH
Para los espesores
de
13
SHOtFXODWUDQVSDUHQWHGH
\PLF
ODPLQDFLyQ película transparente de
laminación:
9HORFLGDGGHODPLQDFLyQ
A 245 Combo
Este símbolo (cubo de basura tachado) significa que después
de finalizar su vida útil, se debe llevar el producto a un sistema
de recogida o reciclaje disponible para el usuario final. Este
.
símbolo sólo es válido en los estados de la EEE24
240 mm
PP
13
60, 80, 100 y 125\PLF
mic23
PPSRUPLQXWR
Velocidad de laminación:
PLQXWRV
300 mm por minuto
PLQXWRV
Período de calentamiento:
/('32:(5URMR
5 minutos
3HUtRGRGHFDOHQWDPLHQWR
(OHPHQWRVGHLQGLFDFLyQ
11 Garantía
PPSRUPLQXWR
/('32:(5URMR
/('5($'<YHUGH
/('5($'<YHUGH
Elementos de indicación:
LED POWER (azul)
(PSXMDGRUGHGHVEORTXHRGHDWDVFR
(PSXMDGRUGHGHVEORTXHRGHDWDVFR
LED
READY
(naranja)
6LQIRUPDFLyQGHEXUEXMDV
6LQIRUPDFLyQGHEXUEXMDV
&DUDFWHUtVWLFDVSDUWLFXODUHV
'HVFRQH[LyQDXWRPiWLFDHQFDVRGH
3 hojas de DIN A5'HVFRQH[LyQDXWRPiWLFDHQFDVRGH
Películas transparentes
de
VREUHFDOHQWDPLHQWR
3 hojas de DIN A6VREUHFDOHQWDPLHQWR
laminación incluidas
en el
volumen de suministro:
Cortador de papel
Características&RUWDGRUGHURGLOORVFRQ¿JXUDVGHFRUWHD
particulares:
Empujador de desbloqueo
de atasco
&RUWDGRUGHURGLOORVFRQ¿JXUDVGHFRUWHD
HOHJLU\SURWHFFLyQFRQWUDGHVDMXVWHV
Sin formación de HOHJLU\SURWHFFLyQFRQWUDGHVDMXVWHV
burbujas
&DUDFWHUtVWLFDVSDUWLFXODUHV
$\XGDVGHSRVLFLRQDPLHQWRYLVXDOHQFP
$\XGDVGHSRVLFLRQDPLHQWRYLVXDOHQFP
Desconexión automática
en caso de
OtQHDViQJXORVHVFDOD
OtQHDViQJXORVHVFDOD
sobrecalentamiento
&RUWHUHFWR
&RUWHUHFWR
Cortador de papel &RUWHRQGXODGR
)LJXUDVGHFRUWHDHOHJLU
&RUWHRQGXODGR
&RUWHGHSHUIRUDFLyQ
Estimado cliente,
nos alegramos de que Usted se haya decidido por este aparato.
En caso de un defecto devuelva el aparato junto con el justificante de
compra y el embalaje original al lugar donde lo ha adquirido.
&RUWHGHSHUIRUDFLyQ
Características particulares:
Cortador de rodillos con 3 figuras de corte a
elegir y protecciónA3contra desajustes
&RUWHUHFWRKRMDVGHSDSHOJP
&RUWHUHFWRKRMDVGHSDSHOJP
Ayudas de posicionamiento
visual en cm
0i[LPDFDSDFLGDGGHFRUWH
&RUWHRQGXODGRKRMDVGHSDSHOJP
&RUWHRQGXODGRKRMDVGHSDSHOJP
(líneas, ángulos, escala)
3HUIRUDFLyQKRMDVGHSDSHOJP
3HUIRUDFLyQKRMDVGHSDSHOJP
Figuras de corte
a elegir:
Corte recto
&RORU
&RORUQHJURSODWD
&RORUQHJURSODWD
Corte ondulado
'LPHQVLRQHV
[[PP Corte de perforación
[[PP
DQFKXUD[IRQGR[DOWXUD
Formato máximo:
DIN A4
3HVR
NJ
NJ
)RUPDWRPi[LPR
$
Máxima capacidad
de corte:
9+]
$OLPHQWDFLyQGHWHQVLyQ
3RWHQFLDGHHQWUDGD
13
23
2
Corte recto:
5 hojas de papel (80 g/m )
9+]
Corte ondulado: 2 hojas de papel (80 g/m2)
&RPRPi[LPR:6$
2 hojas de papel (80 g/m2)
&RPRPi[LPR:$
Perforación:
mic o micrón = Una designación procedente del idioma inglés para un micrómetro (m). 1
micrómetro es una milésima de milímetro.
Ejemplos: 80 m = 0,08 mm. 100 m = 0,1 mm. 125 m = 0,125 mm.
93
Versión del 01.12.2010
24 EEE = Espacio Económico Europeo que incluye los Estados Miembros de la UE más los
Estados de Islandia, Liechtenstein y Noruega.
94
1
A 240 Combo / A 340 Combo
Máquina de plastificar
com cortador de rolos
2
3
4
5
6
Manual de instruções
7
8
9
10
11
Importantes avisos de segurança ...................................................... 97
1.1 Avisos de segurança - Máquina de plastificar ......................... 97
1.2 Avisos de segurança - Cortador de rolos................................. 98
Cláusula de desresponsabilização..................................................... 99
Utilização conforme as especificações .............................................. 99
Elementos de comando.................................................................... 100
4.1 Interruptor de função e indicadores luminosos...................... 101
4.2 Cabeça de corte ..................................................................... 101
Colocação em funcionamento.......................................................... 102
Comando .......................................................................................... 103
6.1 Máquina de plastificar ............................................................ 103
6.1.1 Plastificar a quente .................................................... 103
6.1.2 Plastificação a frio...................................................... 104
6.1.3 Remover uma obstrução de película ......................... 105
6.2 Cortador de rolos ................................................................... 106
6.2.1 Seleccionar a linha de corte ...................................... 106
6.2.2 Cortar o material ........................................................ 107
6.2.3 Substituir a cabeça de corte ...................................... 108
Manutenção & limpeza ..................................................................... 109
7.1 Limpar o exterior do aparelho ................................................ 109
7.2 Limpar os cilindros de transporte........................................... 109
Resolução de problemas.................................................................. 110
Dados técnicos ................................................................................. 111
Avisos para a eliminação ................................................................. 112
Garantia ............................................................................................ 112
[PORTUGUÊS]
06.2011
95
96
1
Importantes avisos de segurança
De modo a garantir um trabalho seguro com a máquina tenha, por favor, em
atenção os seguintes pontos:
Ɣ
Leia atentamente estas instruções e tenha-as em consideração ao
manusear o aparelho.
Ɣ
Deve guardar o manual de instruções para uma consulta posterior.
Ɣ
Antes de utilizá-lo coloque o aparelho num local de trabalho plano e
estável.
1.1
Ɣ
Ɣ
Ɣ
Ɣ
Ɣ
Ɣ
Ɣ
Ɣ
Ɣ
Ɣ
Ɣ
Ɣ
Ɣ
Ɣ
Avisos de segurança - Máquina de plastificar
Evite a danificação da ficha ou do cabo de rede. Nunca torcer o cabo
de rede. A máquina não deve ser utilizada com a ficha ou o cabo de
alimentação danificados.
Não utilize a máquina próximo de superfícies quentes ou em ambiente
húmido e proteja-a de luz solar directa e muito pó.
Antes de efectuar a limpeza do aparelho retire sempre a ficha de rede.
Não utilize dissolventes ou produtos de limpeza agressivos.
Objectos metálicos não podem ser plastificados.
Não é permitida a permanência de crianças na zona de trabalho do
aparelho pronto a ser utilizado.
Ao não utilizar o aparelho retire a ficha de rede.
Desligue sempre imediatamente a máquina quando surgir um cheiro
forte ou se a máquina não estiver a ser usada.
Não toque na ficha com as mãos molhadas.
Assegure-se que o interruptor de ligar/desligar está na posição OFF
(Desligado) antes de ligar a máquina de plastificar à rede eléctrica.
Deve inserir apenas bolsas de plastificar previstas para este aparelho,
veja o capítulo “Dados técnicos”. Bolsas de plastificar seleccionadas
demasiado grandes poderão originar congestionamento de películas.
Não plastifique materiais sensíveis ao calor com esta máquina, como p.
ex. papel térmico.
Ao plastificar documentos húmidos atingirá maus resultados de
plastificação.
Não utilize película de plastificar destinada para a plastificação a frio
para plastificar a quente. A máquina, a película de plastificar e o
documento serão danificados.
Não deve cortar qualquer película de plastificar. Os cantos de corte
resultantes podem originar congestionamentos de películas.
97
Ɣ
Ɣ
1.2
Ɣ
Ɣ
Ɣ
Ɣ
Ɣ
Ɣ
Ɣ
Ɣ
Ɣ
Ɣ
Ɣ
Ɣ
Manter peças de roupa largas, gravatas, joalharia, cabelo comprido ou
outros objectos soltos afastados da abertura de entrada de
plastificação. Risco de ferimento!
A máquina só pode ser utilizada em divisões secas e fechadas.
Avisos de segurança - Cortador de rolos
Ao mover ou arrumar a máquina, em caso algum deve segurar-la perto
da cabeça de corte. As lâminas da cabeça de corte são afiadas. Risco
de ferimento!
Opere o aparelho com ambas as mãos.
Manter peças de roupa largas, gravatas, joalharia, cabelo comprido ou
outros objectos soltos afastados do cortador de rolos. Risco de
ferimento!
O aparelho foi concebido para cortar apenas papel, postais, papel
fotográfico e bolsas de plastificar.
Antes do corte deve retirar eventuais clipes e agrafos do documento.
Não deve lubrificar nem afiar as lâminas.
Não deve utilizar o aparelho com a cabeça de corte ou a caixa da
cabeça de corte danificadas.
Não deve operar o aparelho sem a protecção da lâmina posta
correctamente.
Tenha em atenção que não corte os seus dedos ao substituir a cabeça
de corte. Basicamente, deve evitar qualquer contacto com as lâminas.
Mantenha o aparelho fora do alcance das crianças.
Crianças ou menores devem operar a máquina só na presença de um
adulto.
O aparelho não serve para cortar as unhas.
98
2
Cláusula de desresponsabilização
4
Elementos de comando
Não garantimos a exactidão das informações, que se referem tanto a
características técnicas tal como à documentação aqui presente. O produto
descrito nesta documentação e, pontualmente, os seus acessórios, estão
sujeitos a um aperfeiçoamento e desenvolvimento constantes. Por esse
motivo, reservamos o direito a alterar sem aviso prévio componentes,
acessórios, especificações técnicas bem como esta documentação de
produto aqui presente.
1
2
3
1
3
4
3
Utilização conforme as especificações
Deve utilizar a máquina de plastificar apenas para:
Ɣ
plastificar com películas de plastificar a quente e frio com películas de
, tendo em
plastificar com espessuras de 80, 100 e 125 mic25
consideração que a espessura total dos documentos a plastificar (fotos,
imagens, postais, papel etc.) não deve exceder, no máximo, 0,6 mm
Ɣ
recortar papel, postais, papel de fotografia e bolsas de plastificar com
um tamanho máximo de DIN A3, tendo em consideração que a
espessura do material a ser cortado não deve ser maior do que
2
Ɣ no máximo, 3 folhas de papel (80 g/m ) com corte linear
2
Ɣ no máximo, 3 folhas de papel (80 g/m ) com corte ondular
2
Ɣ no máximo, 3 folhas de papel (80 g/m ) com corte de perfuração
Qualquer utilização diferente conta como não corrente. Não são permitidas
alterações ou remodelações por conta própria.
5
7
1
2
3
4
5
6
7
6
Cabeça de corte
Barra de corte/guia
Barra de pressão com protecção para dedos
Interruptor de função (regulação térmica)
Indicadores luminosos (LED's)
Abertura de entrada de plastificação
Ajudas posicionais visuais em cm (linhas, ângulos, escalão)
8
8
9
25
mic ou micron = uma expressão inglesa para um micrometro (m). 1 micrometro é um
milésimo de um milímetro.
Exemplos: 80 m = 0,08 mm. 100 m = 0,1 mm. 125 m = 0,125 mm.
99
9
8
9
10
Manípulo de ligar/desligar (OFF/ON)
Disp. deslizante de desbloqueio anti-obstrução (ABS)
10 $UUHGRQGDGRUGHFDQWRV1DSDUWHWUDVHLUDGRVDSDUHOKRVHQFRQWUDVHR
DUUHGRQGDGRUGHFDQWRV
100
4.1
Interruptor de função e indicadores luminosos
5
Ɣ
1
Ɣ
Colocação em funcionamento
Coloque o aparelho numa superfície estável e plana.
Assegure-se que o interruptor de ligar/desligar está na posição OFF
(Desligado) antes de ligar a máquina de plastificar à rede eléctrica.
2
Atenção: Verifique se a indicação de tensão da máquina
corresponde à da sua rede eléctrica (- 230 V, 50 Hz).
3
Ɣ
4
5
1
Coloque a ficha numa tomada padrão bem acessível. 2HFUmPOWER
O indicador
DSUHVHQWDOX]YHUPHOKD
luminoso
POWER acende-se azul.
Aviso de segurança: A tomada deve estar perto do aparelho e de
fácil acesso. Assim o aparelho pode ser desligado da rede eléctrica
rapidamente numa emergência.
3 1
do interruptor de função
1 Posição
&RPXWDGRUGHIXQo}HVSODVWL¿FDUDIULR
2
3
3
4
5
com bolsas de plastificar de uma espessura de 100 ou 125 mic 26
&RPXWDGRUGHIXQo}HVSODVWL¿FDUDTXHQWH
Posição do interruptor de função
&RPXWDGRUGHIXQo}HV21
com
bolsas de plastificar de uma espessura de 60 ou 80 mic
&RPXWDGRUGHIXQo}HV2))
Posição
do interruptor de função
para
plastificar a frio
,QGLFDomR5($'<
Indicação
POWER
,QGLFDomR32:(5
Indicação READY
4.2
Cabeça de corte
1
2
1
2
26
Bloqueio anti-ajuste
Manípulo giratório para ajustar a linha de corte
mic = uma expressão inglesa para um micrometro (m). 1 micrometro é um milésimo de
um milímetro.
101
102
6
de plastificar, por favor, tenha em consideração as instruções na
abertura de entrada de plastificação.
Comando
6.1
Máquina de plastificar
Cuidado: a película de plastificar que sai depois da plastificação está
muito quente e mole. Por esse motivo, deve tratar cuidadosamente o
produto plastificado.
Com a máquina de plastificar pode plastificar a quente e frio:
Ɣ
Ao plastificar a quente a película de plastificar é colada.
Ɣ
Ao plastificar a frio a película de plastificar é prensada.
Nota: o produto plastificado pode ser prensado com um livro ou outro
objecto pesado e liso.
Adapte o método de plastificação ao material a ser plastificado.
Aviso: Por exemplo, papel térmico e imagens ecográficas só devem
ser plastificados a frio!
6.1.1
Plastificar a quente
Pode operar
a máquina
plastificar
meio do facilmente
interruptor acessível.
de função, um
1.
Conecte
o cabo a de
uma
tomada por
de corrente
manípulo deslizante, com dois níveis de temperatura, adaptadas a quatro
espessuras
de películas
Atenção:
Verifiquede
seplastificar:
os dados de tensão do aparelho correspondem
27
Ɣ
60 ou
mic
àqueles
da80
sua
rede
eléctrica (220 - 240 V, 50 Hz).
3
100 ou 125 mic
Ɣ
2.
Ligue
o interruptor
localizado
no parte
lado direito
do da
aparelho:
1. Ajuste
o interruptor
deliga/desliga,
função do lado
direito na
superior
„+27“.àAcende-se
máquina
espessura adalâmpada
películavermelha.
de plastificar utilizada. A máquina de
3. plastificar
O motoraquece
de accionamento
dos roletes
transportenecessária.
entra em
automaticamente
até à de
temperatura
funcionamento.
Após 3 a 5READY
minutos,
é atingida a temperatura de
Entretanto
pisca a indicação
a cor-de-laranja.
serviço
e acende-se
a lâmpada
verde. é iniciado.
2. O motor
decorrecta
arranque
para os cilindros
de transporte
4.
Coloque o artigo a ser plastificado na bolsa de película, de modo que
3. Após aproximadamente 5 minutos é atingida a temperatura operacional
restem ao seu redor cerca de 3 a 5 mm até a borda da película.
correcta e o indicador luminoso READY fica permanentemente aceso.
4. Posicione
o objecto
a plastificar na película
depara
plastificar
de maneira
a
Atenção:
Utilize exclusivamente
películas
laminação
a quente.
existir em todo o perímetro aprox. 3 a 5 mm de distância da margem da
de plastificar.
5. película
Introduza
a película juntamente com o artigo a ser plastificado na
fenda
alimentação
plastificadora.
Deve exclusivamente
ser introduzido primeiro
Aviso:dePara
plastificarda
a quente
deve utilizar
películas
odelado
fechado
da película.
plastificar
a quente.
5. Introduza
película
plastificar
juntamente
o objecto
a plastificar
Aviso: aPara
evitardeque
a película
se dobre,com
nunca
introduza
primeiro o
com
o seu lado
fechado
na abertura de
entrada
de plastificação.
ladoprimeiro
aberto da
película
na fenda
de alimentação.
Quando
introduzir
a película,
O
processo
de
plastificação
ocorre
automaticamente.
favor levar em consideração as instruções existentes junto à fenda.
A laminação
realiza-se
Nota: para
evitarautomaticamente.
o dobrar da película de plastificação, o lado aberto
da película de plastificação nunca pode ser introduzido primeiro na
abertura de entrada da máquina de plastificar. Ao introduzir a película
27
6. Ao terminar a plastificação deve colocar o interruptor de função do lado
superior direito na posição COLD e retirar a ficha da tomada. Deixe que
o aparelho arrefeça antes de arrumar-lo.
Cuidado: Após a plastificação o aparelho está quente! Risco de
ferimento!
6.1.2
Plastificação
a frio
3ODVWL¿FDUDIULR
Atenção: Caso tenha utilizado pouco antes a máquina de plastificar
para plastificação a quente, tem de deixar a máquina arrefecer. O
tempo de arrefecimento é de 30 minutos.
1. &RORTXHRFRPXWDGRUGHIXQo}HVjGLUHLWDQDSRVLomRCOLD.
Coloque o interruptor de função do lado direito na parte superior da
máquina na posição COLD.
Aviso: Para plastificar a frio deve utilizar exclusivamente películas de
plastificar a frio.
2. Retire a película de protecção da película de plastificar.
3. Posicione o objecto a plastificar na película de plastificar de maneira a
existir em todo o perímetro aprox. 3 a 5 mm de distância da margem da
película.
4. Introduza a película de plastificar juntamente com o objecto a plastificar
primeiro com o seu lado fechado na abertura de entrada de plastificação.
O processo de plastificação ocorre automaticamente.
Nota: para evitar o dobrar da película de plastificação, o lado aberto
da película de plastificação nunca pode ser introduzido primeiro na
abertura de entrada da máquina de plastificar. Ao introduzir a película
de plastificar, por favor, tenha em consideração as instruções na
abertura de entrada de plastificação.
mic ou micron = uma expressão inglesa para um micrometro (m). 1 micrometro é um
milésimo de um milímetro.
Exemplos: 60 m = 0,06 mm. 80 m = 0,08 mm. 100 m = 0,1 mm. 125 m = 0,125 mm.
103
104
6.1.3
Remover uma obstrução de película
Para remover obstruções por películas o aparelho deve ser equipado com
um dispositivo deslizante de desbloqueio anti-obstrução.
Se a película de plastificar bloquear faça o seguinte:
1. Desligue o aparelho: posicione o interruptor de ligar/desligar em OFF.
2. Coloque o disp. deslizante de desbloqueio anti-obstrução
completamente no lado esquerdo.
3. Segure a máquina de plastificar e puxe a película de plastificar em
conjunto com o objecto a plastificar da abertura de entrada de
plastificação.
4. Coloque o disp. deslizante de desbloqueio anti-obstrução
completamente no lado direito.
5. Limpe os cilindros de transporte de acumulações e restos de cola
introduzindo uma folha de papel dobrado na abertura de entrada de
plastificação, veja o capítulo „Limpar os cilindros de transporte”.
Aviso: Caso os congestionamentos de película se repitam
constantemente ou se a película congestionada já não pode ser
puxada da máquina de plastificar, por favor, contacte a nossa hotline
(ver garantia).
6.2
Cortador de rolos
Pode recortar papel, postais, papel fotográfico e películas de plastificar por
meio do cortador de rolos.
6.2.1
Seleccionar a linha de corte
O cortador de rolos é equipado com três linhas de corte diferentes:
Ɣ
Corte linear
Ɣ
Corte ondular
Ɣ
Corte de perfuração
Aviso: As lâminas encontram-se numa caixa protegida.
Seleccione a linha de corte que necessita, veja a imagem 1:
1. Puxe o bloqueio anti-ajuste na cabeça de corte para cima, até à posição
OPEN.
2. Gire o manípulo giratório para ajustar a linha de corte até a linha de corte
desejada aparecer no topo.
3. Pressione o bloqueio anti-ajuste na cabeça de corte para baixo, até à
posição LOCK.
Imagem 1
(semelhante à apresentação)
105
106
6.2.2
Cortar o material
6.2.3
1. Coloque o aparelho com a cabeça de corte em cima numa superfície
estável e plana.
2. Empurre a cabeça de corte para um lado da barra de guia.
3. Coloque o material a ser cortado na posição desejada em baixo da barra
de pressão.
Aviso: Tenha em atenção a quantidade permitida de material a ser
cortado, veja os capítulos “Utilização conforme as especificações” ou
“Dados técnicos”.
Aviso: As ajudas de posicionamento visuais facilitam o alinhamento
correcto do material a ser cortado.
4. Durante o corte deve segurar bem o material a ser cortado com uma
mão para evitar o seu movimento. Caso contrário pode haver falta de
precisão.
5. Para cortar deve pressionar a cabeça de corte para baixo e puxar-la ao
longo da barra de guia até ao outro lado,
veja a imagem 2.
Aviso: Para evitar um canto de corte defeituoso, por favor, não dirija
a cabeça de corte de volta, mas remova o material colocado após o
corte.
Substituir a cabeça de corte
Em caso de lâminas do cortador de rolos danificadas e gastas deve
substituir a cabeça de corte.
Aviso: Só pode substituir toda a cabeça de corte. Por favor, contacte
a nossa hotline para adquirir uma nova cabeça de corte.
5HWLUHGDEDVHDFREHUWXUDGDH[WUHPLGDGHGDEDUUDJXLD
1. Gire
o manípulo giratório vermelho na ponta da barra de guia por 90 º
para
a esquerda ou a direita e puxe a barra de guia para fora do
PDQWHQGROHYHPHQWHSUHVVLRQDGDSDUDGHQWURDVXDSDUWHLQIHULRUHQTXDQWR
aparelho.
pHPSXUUDGDSDUDFLPD
2. Substitua a cabeça de corte antiga por uma nova.
6XEVWLWXDDFDEHoDGHFRUWHDQWLJDSRUXPDQRYD
3. Empurre
a barra de guia novamente para dentro do aparelho e gire o
manípulo giratório vermelho na ponta da barra de guia por 90 º para a
esquerda
(PSXUUHQRYDPHQWHDFDEHoDGHFRUWHQDEDVHHFRORTXHXPDFDEHoDGH
ou a direita.
FRUWHQRYD
,QVLUDGHFLPDSDUDEDL[RDFREHUWXUDVREUHDDEHUWXUDQDH[WUHPLGDGHGD
EDUUDJXLD1RWD$SHQDVVHSRGHVXEVWLWXLUXPDFDEHoDGHFRUWHFRPSOHWD
3DUDDGTXLULUXPDFDEHoDGHFRUWHQRYDXWLOL]HDOLQKDWHOHIyQLFD
Imagem 3
Imagem 2
107
108
7
7.1
Manutenção & limpeza
Limpar o exterior do aparelho
Atenção: Antes de efectuar a limpeza húmida do aparelho retire
sempre a ficha de rede!
A caixa poderá ser limpa com um pano ligeiramente molhado em sabonete
suave e água limpa.
8
Resolução de problemas
Problema
7.2
Limpar os cilindros de transporte
O manípulo de ligar/desligar
encontra-se na posição OFF.
Resolução
Coloque a ficha
correctamente na tomada.
Coloque o manípulo de
ligar/desligar na posição ON.
O indicador luminoso
POWER está defeituoso.
Por favor, contacte a nossa
hotline.
A ficha não está na tomada.
O indicador
luminoso POWER
não se acende.
Aviso: Não utilize dissolventes ou produtos de limpeza agressivos.
5HVtGXRVHPDWHULDODGHULGRDRVUROHWHVGHWUDQVSRUWHSRGHPLQÀXHQFLDU
Depósitos e resíduos de cola nos cilindros de transporte podem influenciar o
RUHVXOWDGRGDODPLQDomR3RUHVVHPRWLYRRVUROHWHVGHYHPVHUOLPSRV
resultado da plastificação. Por esse motivo, os cilindros de transporte têm
SHULRGLFDPHQWHDSyVRXVR
de ser limpos regularmente:
3DUDLVVRLQWURGX]DXPDIROKDGHSDSHOGREUDGDQDIHQGDGHDOLPHQWDomR
1. Posicione o interruptor de função em 100/125 mic.
2PDWHULDODGHULGRVHUiWUDQVSRUWDGRSHORSDSHO5HSLWDHVVHSURFHGLPHQWR
2. Aguarde até a indição READY está acesa permanentemente.
YiULDVYH]HV'HVFRQHFWDUVHPSUHRFDERGDUHGHHOpFWULFDDQWHVGDOLPSH]D
3. Insira uma folha de papel dobrada na abertura de entrada de
DK~PLGRGRDSDUHOKR&DVRQHFHVViULRDFDL[DGRDSDUHOKRSRGHVHUOLPSD
plastificação.
FRPXPSDQRHPEHELGRHPVDEmRQHXWURHiJXD1mRXWLOL]HVROYHQWHVRX
DJHQWHVGHOLPSH]DDJUHVVLYRV
4. Repita este processo com uma nova folha de papel até não haver mais
acumulações ou restos de cola visíveis nesta folha.
Diagnóstico & Causa
A película
plastificada não é
completamente
transparente.
A temperatura de
plastificação foi demasiado
baixa.
Não inseriu a película de
plastificar de modo linear na
abertura de entrada de
plastificação.
Congestionamento
de película
A película de plastificar é
demasiado grande.
O aparelho já não
funciona após um
período prolongado
ou pára durante a
operação.
Os cilindros de
transporte não
funcionam.
A superfície do aparelho está
quente? Provavelmente a
protecção contra
sobreaquecimento da
máquina de plastificar
desligou-a automaticamente.
A ficha está na tomada?
O manípulo de ligar/desligar
encontra-se na posição
OFF?
Assegure-se que a máquina
pode aquecer-se
suficientemente ao utilizar
bolsas de plastificar mais
grossas.
Plastifique a mesma película
de plastificar novamente, de
modo a melhorar o resultado
de plastificação.
Veja o capítulo “Eliminar
congestionamentos de
película”.
Veja o capítulo “Limpar os
cilindros de transporte”.
Introduza a película de
plastificar de modo linear e
primeiro com o seu lado
fechado na abertura de
entrada de plastificação.
Deve utilizar apenas bolsas
de plastificar do tamanho
indicado, veja o capítulo
“Dados técnicos”.
Espere aprox. 30 minutos e
tente novamente a plastificar.
Caso o aparelho não
funcione, contacte a nossa
hotline.
Caso o problema permaneça,
contacte a nossa hotline.
Se não for possível resolver o problema, por favor, contacte a nossa hotline,
veja o capítulo “Garantia”.
109
110
9
10 Avisos para a eliminação
Dados técnicos
A 240 Combo
Máquina de plastificar
0iTXLQDGHSODVWL¿FDUD
quentefrio
e frio
A 245 Combo
A 340 Combo
240 mm
PP
a quente e
/DUJXUDPi[LPDGH
Largura
SODVWL¿FDomR
máxima
de
PP
plastificação:
3DUDHVSHVVXUDVGHSHOtFXODV
HPLF
Para espessuras
de películas
GHSODVWL¿FDUGH
de
plastificar
de:
9HORFLGDGHGHSODVWL¿FDomR
PPSRUPLQXWR
Velocidade de plastificação:
7HPSRGHDTXHFLPHQWR
PLQXWRV
Este símbolo (o caixote de lixo cruzado) significa que este
produto, depois do seu tempo útil, deve ser devolvido ao
sistema de devolução ou sistema de recolha separada
disponíveis para o utilizador final. Este símbolo aplica-se
.
apenas no EEE29
HPLF
60, 80, 100 e 125 mic28
PPSRUPLQXWR
300 mm por minuto
PLQXWRV
Tempo de aquecimento:
5 minutos
/('32:(5YHUPHOKR
(OHPHQWRVGHLQGLFDomR
/('32:(5YHUPHOKR
/('5($'<YHUGH
/('5($'<YHUGH
Elementos de indicação
LED POWER (azul)
'LVSGHVOL]DQWHGHEORTXHLRDQWLREVWUXomR
'LVSGHVOL]DQWHGHEORTXHLRDQWLREVWUXomR
LED READY (cor-de-laranja)
1mRIRUPDEROKDV
1mRIRUPDEROKDV
&DUDFWHUtVWLFDVHVSHFt¿FDV
Bolsas de plastificar
incluídas
3 unidades à DIN'HVOLJDPHQWRDXWRPiWLFRHPFDVRGH
A5
'HVOLJDPHQWRDXWRPiWLFRHPFDVRGH
VREUHDTXHFLPHQWR
no fornecimento:
3 unidades à DINVREUHDTXHFLPHQWR
A6
Cortador de papel
Características específicas:
Disp. deslizante de bloqueio anti-obstrução
Não forma bolhas&RUWDGRUGHURORVFRPOLQKDVGHFRUWH
&RUWDGRUGHURORVFRPOLQKDVGHFRUWH
VHOHFFLRQiYHLVHEORTXHLRDQWLDMXVWH
VHOHFFLRQiYHLVHEORTXHLRDQWLDMXVWH
Desligamento automático
em caso de
&DUDFWHUtVWLFDVHVSHFt¿FDV
$MXGDVSRVLFLRQDLVYLVXDLVHPFP
sobreaquecimento$MXGDVSRVLFLRQDLVYLVXDLVHPFP
OLQKDVkQJXORVHVFDOmR
OLQKDVkQJXORVHVFDOmR
Cortador de papel &RUWHOLQHDU
&RUWHOLQHDU
11 Garantia
Prezado cliente,
Apraz-nos saber que optou em favor desse aparelho. Caso surja um defeito,
queira devolver o aparelho, junto com o comprovante de compra e a
embalagem original, ao mercado onde adqueriu.
Vale o prazo de garantia legal.
/LQKDVGHFRUWH
Características&RUWHRQGXODU
específicas:
VHOHFFLRQiYHLV
&RUWHGHSHUIXUDomR
Cortador de rolos&RUWHRQGXODU
com 3 linhas de corte
&RUWHGHSHUIXUDomR
seleccionáveis e bloqueio anti-ajuste
)RUPDWRPi[LPR
$
A3
Ajudas posicionais visuais em cm
&RUWHOLQHDUIROKDVGHSDSHOJP
&RUWHOLQHDUIROKDVGHSDSHOJP
(linhas, ângulos, escalão)
3RWrQFLDPi[LPDGHFRUWH
&RUWHRQGXODUIROKDVGHSDSHOJP
&RUWHRQGXODUIROKDVGHSDSHOJP
Linhas de corte3HUIXUDomRIROKDVGHSDSHOJP
Corte linear
3HUIXUDomRIROKDVGHSDSHOJP
seleccionáveis:
Corte ondular
&RU
SUHWRSUDWD
SUHWRSUDWD
Corte de perfuração
0HGLGDV/[3[$
[[PP
[[PP
Formato máximo:
DIN A4
3HVR
NJ
Potência máxima de corte:
NJ
5 folhas de papel (80 g/m2)
papel (80 g/m2)
2 folhas de papel (80 g/m2)
QRPi[:6$
Cor:
Corte linear:
Corte ondular:
Perfuração:
preto, prata
Medidas (L x P x A):
410 x 160 x 80 mm
Peso:
1,31 kg
$OLPHQWDomRGHWHQVmR
9+]
&RQVXPR
QRPi[:$
9+]
2 folhas de
Alimentação de tensão:
230 V, 50 Hz
Consumo
no máx. 265 W, 1,2 A
A conformidade com as directivas da UE é confirmada pelo
símbolo CE.
28
mic ou micron = uma expressão inglesa para um micrometro (m). 1 micrometro é um
milésimo de um milímetro.
Exemplos: 80 m = 0,08 mm. 100 m = 0,1 mm. 125 m = 0,125 mm.
111
111
Versão do 01.12.2010
29
EEE = Espaço Econnómico Europeu, que contém os estados membros da UE plus os estados
Islândia, Lichtenstein e Noruega.
112
1
A 240 Combo / A 340 Combo
Lamineerapparaat met rolsnijder
2
3
4
5
6
Gebruiksaanwijzing
7
8
9
10
11
Belangrijke veiligheidsinformatie ...................................................... 115
1.1 Veiligheidsinformatie lamineerapparaat................................. 115
1.2 Veiligheidsinformatie rolsnijder .............................................. 116
Uitsluiting van aansprakelijkheid ...................................................... 117
Bedoeld gebruik................................................................................ 117
Bedieningselementen ....................................................................... 118
4.1 Functieschakelaar en weergave-elementen .......................... 119
4.2 Snijkop.................................................................................... 119
Apparaat in gebruik nemen .............................................................. 120
Apparaat gebruiken .......................................................................... 121
6.1 Lamineerapparaat .................................................................. 121
6.1.1 Heetlamineren............................................................ 121
6.1.2 Koudlamineren........................................................... 122
6.1.3 Folievastloper verhelpen............................................ 123
6.2 Rolsnijder ............................................................................... 124
6.2.1 Snede kiezen ............................................................. 124
6.2.2 Materiaal snijden........................................................ 125
6.2.3 Snijkop vervangen ..................................................... 126
Apparaat reinigen en verzorgen ....................................................... 127
7.1 Apparaat van buiten reinigen ................................................. 127
7.2 Transportwalsen reinigen....................................................... 127
Problemen verhelpen ....................................................................... 128
Technische gegevens ...................................................................... 129
Gescheiden inzameling .................................................................... 130
Garantie ............................................................................................ 130
[NEDERLANDS]
06.2011
113
114
1
Belangrijke veiligheidsinformatie
Volg de onderstaande aanwijzingen op om er zeker van te zijn dat u het
apparaat op de juiste manier gebruikt:
Ɣ
Lees deze instructies aandachtig door en volg ze op bij het gebruik van
het apparaat.
Ɣ
Bewaar de gebruiksaanwijzing voor toekomstig gebruik.
Ɣ
Plaats het apparaat vóór gebruik op een vlakke en stabiele ondergrond.
1.1
Ɣ
Ɣ
Ɣ
Ɣ
Ɣ
Ɣ
Ɣ
Ɣ
Ɣ
Ɣ
Ɣ
Ɣ
Ɣ
Ɣ
Veiligheidsinformatie lamineerapparaat
Voorkom beschadigingen van de stekker of van het netsnoer. Laat het
netsnoer niet opkrullen. Neem het apparaat niet in gebruik als het
netsnoer of de stekker beschadigd is.
Gebruik het apparaat niet in de buurt van hete oppervlakken of in een
vochtige omgeving en bescherm het tegen directe zonnestraling en
sterke stofbelasting.
Trek vóór het reinigen van het apparaat altijd de stekker uit het
stopcontact. Gebruik geen oplosmiddelen of agressieve
reinigingsmiddelen.
Metalen voorwerpen kunnen niet gelamineerd worden.
Kinderen moeten uit de buurt blijven van een ingeschakeld apparaat.
Als het apparaat niet wordt gebruikt, moet de stekker uit het stopcontact
worden getrokken.
Schakel het apparaat altijd direct uit als u tijdens gebruik een sterk
prikkelende geur ruikt of als het apparaat niet wordt gebruikt.
Raak de stekker nooit aan met vochtige handen.
Overtuig uzelf ervan dat de Aan/Uit-schakelaar op OFF staat voordat u
het lamineerapparaat op het lichtnet aansluit.
Voer alleen geschikte lamineerfolie in het apparaat in, zie de paragraaf
'Technische gegevens'. Te grote lamineerfolie kan tot gevolg hebben
dat de folie vastloopt.
Lamineer met dit apparaat geen hittegevoelige materialen, zoals
thermisch papier.
Bij het lamineren van vochtige documenten bereikt u slechte
lamineerresultaten.
Gebruik bij het heetlamineren geen lamineerfolie die bestemd is voor
koudlamineren. Het apparaat, de lamineerfolie en het document zouden
hierbij beschadigd raken.
Snij lamineerfolie nooit op maat. De snijkanten die hierbij ontstaan
kunnen tot gevolg hebben dat de folie vastloopt.
115
Ɣ
Ɣ
1.2
Ɣ
Ɣ
Ɣ
Ɣ
Ɣ
Ɣ
Ɣ
Ɣ
Ɣ
Ɣ
Ɣ
Ɣ
Houd loszittende delen van kleding, stropdassen, sieraden, lang haar of
andere losse voorwerpen weg van de lamineerinvoer. Kans op
persoonlijk letsel!
Het apparaat mag alleen worden gebruikt in droge, gesloten ruimten.
Veiligheidsinformatie rolsnijder
Pak het apparaat bij het vervoeren of wegzetten in geen geval in de
buurt van de snijkop op. De messen van de snijkop zijn scherp. Kans op
persoonlijk letsel!
Bedien het apparaat altijd met twee handen.
Houd loszittende delen van kleding, stropdassen, sieraden, lang haar of
andere losse voorwerpen weg van de rolsnijder. Kans op persoonlijk
letsel!
Het apparaat is alleen bedoeld voor het snijden van papier, kaarten,
fotopapier en lamineerfolie.
Verwijder vóór het snijden alle nietjes en paperclips uit het document.
De messen mogen niet worden gesmeerd of geslepen.
Als de snijkop of de behuizing van de snijkop beschadigd is, mag het
apparaat niet worden gebruikt.
Als de mesbeveiliging niet op de juiste manier erin gezet is, mag het
apparaat niet worden gebruikt.
Zorg ervoor dat uw vingers bij vervanging van de snijkop geen snijletsel
oplopen. Raak de messen nooit aan.
Houd het apparaat buiten bereik van kinderen.
Kinderen en minderjarigen mogen het apparaat alleen onder toezicht
van een volwassene gebruiken.
Het apparaat is niet bedoeld voor het knippen van vingernagels.
116
2
Uitsluiting van aansprakelijkheid
4
Bedieningselementen
Wij aanvaarden geen enkele aansprakelijkheid voor de juistheid van deze
gebruiksaanwijzing en van de informatie die betrekking heeft op technische
eigenschappen van het product. Het in deze documentatie beschreven
product en de bijbehorende accessoires worden voortdurend verder
ontwikkeld en verbeterd. Daarom behouden wij ons het recht voor om
componenten, accessoires, technische specificaties en deze
gebruiksaanwijzing zonder voorafgaande aankondiging op elk gewenst
moment te wijzigen.
3
1
2
3
1
4
Bedoeld gebruik
5
Dit lamineerapparaat met rolsnijder mag alleen worden gebruikt voor:
Ɣ
het lamineren met heet- en koudlamineerfolie met een dikte van 80,
30, waarbij de totale dikte van de te lamineren
100 of 125 micron18
documenten (foto, menu's, kaarten, papier enzovoort) maximaal 0,6 mm
mag bedragen
Ɣ
het op maat snijden van papier, kaarten, fotopapier en lamineerfolie met
een maximaal formaat van DIN A3, waarbij het te snijden materiaal niet
dikker mag zijn dan
Ɣ bij een rechte snede maximaal 3 vellen papier (80 g/m²)
Ɣ bij een gegolfde snede maximaal 3 vellen papier (80 g/m²)
Ɣ bij een perforatiesnede maximaal 3 vellen papier (80 g/m²)
Alle overige toepassingen zijn niet-bedoeld. Eigenmachtige wijzigingen of
ombouw zijn niet toegestaan.
7
1
2
3
4
5
6
7
6
8
9
micron: Een uit het Engels afkomstige aanduiding voor een micrometer (m). 1 micrometer
is een duizendste millimeter.
Voorbeelden: 80 m = 0,08 mm. 100 m = 0,1 mm. 125 m = 0,125 mm.
Snijkop
Snijlijst/geleidingsrail
Aandruklijst met vingerbescherming
Functieschakelaar (temperatuurregeling)
Weergave-elementen (leds)
Lamineerinvoer
Visuele positioneringshulp in cm (lijnen, hoeken, schaal)
8
18
30
3
9
8
9
10
Aan/Uit-schakelaar (ON/OFF)
Ontgrendelingsschuif voor vastloper (ABS)
10 +RHNDIURQGHU2SGHDFKWHUNDQWYDQGHDSSDUDWHQEHYLQGW]LFKGH
KRHNDIURQGHU
118
4.1
Functieschakelaar en weergave-elementen
5
Ɣ
1
Ɣ
Apparaat in gebruik nemen
Plaats het apparaat op een stabiel en vlak oppervlak.
Overtuig uzelf ervan dat de Aan/Uit-schakelaar op OFF staat voordat u
het lamineerapparaat op het lichtnet aansluit.
2
Let op: Controleer of de voedingsspanning die op het apparaat
vermeld staat overeenkomt met die van het elektriciteitsnet (230 V,
50 Hz).
3
Ɣ
4
Steek de stekker in een goed toegankelijk stopcontact. De
led POWER
+HWPOWER
LQGLFDWLHODPSMHJDDWURRGEUDQGHQ
brandt
blauw.
5
1
3 Veiligheidsinstructie: Het stopcontact moet zich in de buurt van het
apparaat bevinden en goed bereikbaar zijn. U kunt zodoende in geval
van nood het apparaat snel van het lichtnet scheiden.
1
van de functieschakelaar
1 Stand
)XQFWLHVFKDNHODDUYRRU.RXGODPLQHUHQ
2
3
3
4
5
bij lamineerfolie met een dikte van 100 of 125 micron31
)XQFWLHVFKDNHODDUYRRU+HHWODPLQHUHQ
Stand van de functieschakelaar
)XQFWLHVFKDNHODDUYRRU21
bij
lamineerfolie met een dikte van 60 of 80 micron2
)XQFWLHVFKDNHODDUYRRU2))
Stand
van de functieschakelaar
voor
koudlamineren
,QGLFDWLHODPSMH5($'<
Led
POWER
,QGLFDWLHODPSMH32:(5
Led READY
4.2
Snijkop
1
2
1
2
31
Verstelbeveiliging
Draaiknop voor instelling van de snede
micron: Een uit het Engels afkomstige aanduiding voor een micrometer (m). 1 micrometer
is een duizendste millimeter.
119
120
6
Apparaat gebruiken
6.1
Let op: De lamineerfolie die eruit komt is na het lamineren zeer heet
en zacht. Ga daarom met het gelamineerde product voorzichtig om!
Lamineerapparaat
Met het lamineerapparaat kunt u heet en koud lamineren:
Ɣ
Bij het heetlamineren wordt de lamineerfolie aan elkaar vastgelijmd.
Ɣ
Bij het koudlamineren wordt de lamineerfolie samengeperst.
Stem de keuze van de lamineermethode op het te lamineren materiaal af.
Opmerking: Thermisch papier en ultrasoonfoto's bijvoorbeeld mogen
alleen koud worden gelamineerd!
6.1.1
6. $OVXNODDUEHQWPHWODPLQHUHQ]HWXGHIXQFWLHVFKDNHODDUUHFKWVLQGH
Als u met lamineren klaar bent, zet u de functieschakelaar rechtsboven
op hetCOLDHQKDDOWXGHVWHNNHUXLWKHWVWRSFRQWDFW/DDWKHWDSSDUDDW
apparaat in de stand COLD en trekt u de stekker uit het
stand
stopcontact. Laat het apparaat afkoelen, voordat u het indien nodig
DINRHOHQYRRUGDWXKHWLQGLHQQRGLJZHJ]HW
wegzet.
Voorzichtig: Het apparaat is na het lamineren zeer heet! Kans op
persoonlijk letsel!
Heetlamineren
1
Steek de netstekker
in een
bereikbaar stopcontact.
Het lamineerapparaat
kan met
de goed
functieschakelaar,
een schuifschakelaar,
met twee temperatuurniveaus worden gebruikt, die op vier
Let op: Controleer of de voedingsspanning die op het apparaat
lamineerfoliedikten afgestemd zijn:
vermeld staat overeenkomt met die van het elektriciteitsnet
32
Ɣ
60(220
of 80
– micron
240 V, 50 Hz)
3
100
of
125
micron
Ɣ
2
Schakel de aan-/uitschakelaar aan de rechterkant van het
1. Stelapparaat
de functieschakelaar
rechtsboven
op het apparaat
op de gebruikte
aan: „+27“, het
rode indicatielampje
gaat branden.
lamineerfoliedikte in. Het lamineerapparaat warmt zelfstandig tot de
3
De aandrijfmotor voor de transportrollen start. Na ongeveer 3-5 minuten
benodigde temperatuur op. Ondertussen knippert de led READY oranje.
is de juiste bedrijfstemperatuur bereikt en gaat het groene indicatielampje
2. De aan.
aandrijfmotor voor de transportwalsen loopt aan.
ongeveer
minuten is
de juistezodanig
bedrijfstemperatuur
bereikt endat
de aan
led
43. Na Leg
het te 5lamineren
voorwerp
in het lamineerhoesje
READY
brandt3continu.
alle kanten
à 5 mm afstand tot de folierand overblijft.
4. Leg het te lamineren voorwerp zodanig in de lamineerfolie dat aan alle
Let op:
Gebruik
uitsluitend
kanten
3à5
mm afstand
tot deheetlamineerfolies.
rand van de lamineerfolie overblijft.
5
Steek de folie samen met het te lamineren voorwerp in de
Opmerking: Gebruik
het heetlamineren
alleen heetlamineerfolie.
invoeropening
van hetvoor
lamineerapparaat.
De gesloten
kant van de
folie
het eerstsamen
in het apparaat
ingevoerd.
5. Voer
demoet
lamineerfolie
met het teworden
lamineren
document met de
gesloten kant eerst in de lamineerinvoer in. Het lamineerproces verloopt
Opmerking: Om vouwen in de lamineerfolie te voorkomen mag nooit
automatisch.
de open kant van de lamineerfolie als eerste in de invoeropening van het
lamineerapparaat
gestoken.
invoeren van
de folie beslist
Opmerking:worden
Om vouwen
van Bij
de het
lamineerfolie
te voorkomen
mag de
de
instructies
de van
invoeropening
opvolgen.
verloopt
openopkant
de lamineerfolie
nooitHet
als lamineerproces
eerste in de lamineerinvoer
automatisch.
worden ingevoerd. Bij het invoeren van de folie moet u beslist de
instructies op de lamineerinvoer opvolgen.
32
Opmerking: Om het gelamineerde voorwerp plat te maken legt u het
onder een boek of ander zwaar voorwerp.
6.1.2
Koudlamineren
Let op: Als u het lamineerapparaat kort van tevoren voor
heetlamineren hebt gebruikt, moet u het lamineerapparaat laten
afkoelen. De afkoelduur bedraagt ongeveer 30 minuten.
1. Zet
de functieschakelaar rechtsboven op het apparaat in de stand COLD.
=HWGHIXQFWLHVFKDNHODDUUHFKWVLQGHVWDQGCOLD.
Opmerking: Gebruik voor het koudlamineren alleen koulamineerfolie.
2. Verwijder de beschermfolie van de lamineerfolie.
3. Leg het te lamineren voorwerp zodanig in de lamineerfolie dat aan alle
kanten 3 à 5 mm afstand tot de folierand overblijft.
4. Voer de lamineerfolie samen met het te lamineren document met de
gesloten kant eerst in de lamineerinvoer in. Het lamineerproces verloopt
automatisch.
Opmerking: Om vouwen van de lamineerfolie te voorkomen mag de
open kant van de lamineerfolie nooit als eerste in de lamineerinvoer
worden ingevoerd. Bij het invoeren van de folie moet u beslist de
instructies op de lamineerinvoer opvolgen.
micron: Een uit het Engels afkomstige aanduiding voor een micrometer (m). 1 micrometer
is een duizendste millimeter.
Voorbeelden: 60 m = 0,06 mm. 80 m = 0,08 mm. 100 m = 0,1 mm. 125 m =
0,125 mm.
121
122
6.1.3
Folievastloper verhelpen
Om een folievastloper snel te verhelpen is het apparaat met een
ontgrendelingsschuif voor vastlopers uitgerust.
Als de lamineerfolie blokkeert, gaat u als volgt te werk:
1. Schakel het apparaat uit: Zet de Aan/Uit-schakelaar in de stand OFF.
2. Zet de ontgrendelingsschuif voor vastlopers helemaal naar links.
3. Houd het lamineerapparaat vast en trek de lamineerfolie samen met het
te lamineren voorwerp uit de lamineerinvoer.
4. Zet de ontgrendelingsschuif voor vastlopers terug naar rechts.
5. Reinig de transportwalsen van afzettingen en lijmresten, door een
gevouwen vel papier in de lamineerinvoer in te voeren, zie de paragraaf
'Transportwalsen reinigen'.
Opmerking: Als de folie voortdurend vastloopt of vastgelopen folie
niet meer uit het lamineerapparaat kan worden getrokken, neem dan
contact op met onze hotline (zie 'Garantie').
6.2
Rolsnijder
Met de rolsnijder kunnen papier, kaarten, fotopapier en lamineerfolie worden
gesneden.
6.2.1
Snede kiezen
De rolsnijmachine kan drie verschillende sneden maken:
Ɣ
Rechte snede
Ɣ
Gegolfde snede
Ɣ
Perforatiesnede
Opmerking: De messen bevinden zich in een beschermende
behuizing.
Kies het gewenste snijpatroon, zie afb. 1:
1. Trek de verstelbeveiliging aan de snijkop naar boven in de stand OPEN.
2. Draai de knop voor instelling van de snede totdat het symbool voor de
gewenste snede boven staat.
3. Druk de verstelbeveiliging op de snijkop naar onderen in de stand LOCK.
Afb. 1
(afbeelding vergelijkbaar)
123
124
6.2.2
Materiaal snijden
6.2.3
1. Plaats het apparaat met de snijkop naar boven op een stabiel en vlak
oppervlak.
2. Schuif de snijkop naar één kant van de geleidingsrail.
3. Leg het te snijden materiaal op de gewenste plaats onder de
transparante aandruklijst.
Opmerking: Let op de toelaatbare hoeveelheid te snijden materiaal,
zie de paragraaf 'Bedoeld gebruik' en de paragraaf 'Technische
gegevens'.
Opmerking: De visuele positioneringshulp helpt u om het te snijden
materiaal op de juiste manier uit te lijnen.
4. Houd het te snijden materiaal met één hand goed vast, zodat het niet kan
verschuiven terwijl u snijdt. Anders kunnen onnauwkeurigheden
ontstaan.
5. Om te snijden drukt u de snijkop naar onderen en trekt u hem langs de
geleidingsrail tot aan de andere kant, zie afb.
2.
Opmerking: Om een slechte snijkant te voorkomen leidt u de snijkop
niet terug maar verwijdert u na het snijden het geplaatste materiaal.
Snijkop vervangen
Als de messen van de rolsnijder beschadigd of versleten zijn, moet de
snijkop worden vervangen.
Opmerking: Het is alleen mogelijk om de complete rolsnijder te
vervangen. Voor aankoop van een nieuwe snijkop neemt u contact op
met de hotline.
9HUZLMGHUKHWHLQGNDSMHYDQGHJHOHLGHUXLWGHERGHPSODDWGRRUKHWDDQKHW
1. Draai
de rode knop op het einde van de geleidingsrail onder een hoek
RQGHUVWHXLWHLQGHLHWVQDDUELQQHQJHGUXNWQDDUERYHQWHVFKXLYHQ
van
90º rechts- of linksom en trek de geleidingsrail uit het apparaat.
2. Vervang de oude snijkop door een nieuwe.
9HUYDQJGHRXGHUROOHQVQLMGHUGRRUHHQQLHXZH
3. Schuif de geleidingsrail weer in het apparaat en draai de rode knop onder
een hoek van 90º rechts- of linksom.
6FKXLIGHJHOHLGLQJVUDLOZHHULQGHJURQGSODDWHQ]HWKLHUELMGHQLHXZH
UROOHQVQLMGHUHURS
3ODDWVKHWHLQGNDSMHYDQERYHQDIRSGHRSHQLQJDDQKHWXLWHLQGH
YDQGHJHOHLGHU2SPHUNLQJ+HWLVDOOHHQPRJHOLMNRPGH
FRPSOHWHUROOHQVQLMGHUWHYHUYDQJHQ9RRUDDQNRRSYDQHHQQLHXZH
UROOHQVQLMGHUQHHPWXFRQWDFWRSPHWGHWHOHIRQLVFKKRWOLQH
Afb. 3
Afb. 2
125
126
7
7.1
Apparaat reinigen en verzorgen
Apparaat van buiten reinigen
8
Problemen verhelpen
Probleem
Let op: Trek vóór het vochtig reinigen van het apparaat altijd de
stekker uit het stopcontact!
Reinig de behuizing met een in milde zeep en schoon water gedrenkte, licht
vochtige doek.
Led POWER
brandt niet.
Led POWER is defect.
Opmerking: Gebruik geen oplosmiddelen of agressieve
reinigingsmiddelen.
7.2
Transportwalsen reinigen
Aangekoekt materiaal en lijmresten op de transportrollen kunnen het
$DQJHNRHNWPDWHULDDOHQOLMPUHVWHQRSGHWUDQVSRUWUROOHQNXQQHQKHW
lamineerresultaat verslechteren. Daarom moeten de transportrollen
ODPLQHHUUHVXOWDDWYHUVOHFKWHUHQ'DDURPPRHWHQGHWUDQVSRUWUROOHQ
regelmatig worden gereinigd:
UHJHOPDWLJQDJHEUXLNZRUGHQVFKRRQJHPDDNW
+LHUYRRUHHQJHYRXZHQEODGSDSLHULQGHLQYRHURSHQLQJVWHNHQ/LMPUHVWHQ
1. Zet de functieschakelaar op 100/125 micron.
ZRUGHQGRRUKHWHUXLWNRPHQGSDSLHUPHHJHQRPHQ'H]HKDQGHOLQJHQNHOH
2. Wacht totdat de led READY continu brandt.
PDOHQKHUKDOHQ
3. Voer een gevouwen vel papier in de lamineerinvoer in.
9yyUKHWYRFKWLJDIZLVVHQYDQKHWDSSDUDDWDOWLMGGHVWHNNHUXLWKHW
4. Herhaal de procedure met een nieuw vel papier totdat op het papier geen
VWRSFRQWDFWWUHNNHQ,QGLHQQRGLJNDQGHEXLWHQNDQWZRUGHQDIJHZLVWPHW
afzettingen of lijmresten meer zichtbaar zijn.
HHQGRHNGLHLQPLOGH]HHSHQVFKRRQZDWHULVJHGUHQNW*HEUXLNJHHQ
RSORVPLGGHOHQRIDJUHVVLHYHUHLQLJLQJVPLGGHOHQ
Diagnose en oorzaak
De netstekker steekt niet op
de juiste manier in het
stopcontact.
De Aan/Uit-schakelaar staat
in de stand OFF.
De gelamineerde
folie is niet volledig
transparant.
De lamineertemperatuur was
te laag.
De lamineerfolie is niet recht
in de lamineerinvoer geleid.
Folie is
vastgelopen
De lamineerfolie is te groot.
Apparaat werkt na
langer gebruik niet
meer of stopt
tijdens gebruik.
Transportwalsen
lopen niet.
Is de buitenkant van het
apparaat warm? Dan heeft
de beveiliging tegen
oververhitting het
lamineerapparaat
vermoedelijk automatisch
uitgeschakeld.
Zit de netstekker in het
stopcontact?
Staat de schakelaar 'Aan/Uit'
in de stand ON?
Maatregel
Steek de stekker op de juiste
manier in het stopcontact.
Zet de schakelaar 'Aan/Uit' in
de stand ON.
Neem contact op met onze
hotline.
Zorg ervoor dat u het
apparaat bij gebruik van
dikkere lamineerfolie
voldoende lang laat
opwarmen.
Lamineer dezelfde
lamineerfolie nogmaals om
het lamineerresultaat te
verbeteren.
Zie de paragraaf
'Folievastloper verhelpen'.
Zie de paragraaf
'Transportwalsen reinigen'.
Voer de lamineerfolie recht
en met de gesloten kant eerst
in de lamineerinvoer in.
Gebruik alleen lamineerfolie
met het voorgeschreven
formaat, zie de paragraaf
'Technische gegevens'.
Wacht ongeveer 30 minuten
en probeer nogmaals te
lamineren. Als het apparaat
nog steeds niet werkt, wendt
u zich tot onze hotline.
Als het probleem blijft
bestaan, wendt u zich tot
onze hotline.
Als het probleem niet kon worden verholpen, wendt u zich tot onze hotline,
zie de paragraaf 'Garantie'.
127
128
9
Technische gegevens
A 245 Combo
A 240 Combo
Heet- en koudlamineerapparaat
Heet- en
koudlamineerapparaat
Maximale lamineerbreedte:
0D[LPDOHODPLQHHUEUHHGWH
PP
9RRUODPLQHHUIROLHGLNWHQ
HQPLF
240 mm
10 Gescheiden inzameling
A 340 Combo
PP
Lamineersnelheid:
60, 80, 100 en 125
micron33
HQPLF19
300 mm per minuut
Opwarmingsduur:
5 minuten
Voor lamineerfoliedikten:
/DPLQHHUVQHOKHLG
19
PPSHUPLQXXW
2SZDUPLQJVGXXU
PLQXWHQ
Dit pictogram (een doorgekruiste minicontainer) betekent dat dit
product na afloop van zijn levensduur naar een voor de
eindgebruiker beschikbaar inzamelingspunt moet worden
teruggebracht. Dit pictogram geldt alleen in de staten van de
34.
EER
PPSHUPLQXXW
PLQXWHQ
Weergave-elementen:
/('32:(5URRG Led POWER (blauw)
/('32:(5URRG
/('5($'<JURHQH Led READY (oranje)
/('5($'<JURHQH
2QWJUHQGHOLQJVVFKXLIYRRUYDVWORSHU
Bijgeleverde lamineerfolie:
3 stuks DIN A5 2QWJUHQGHOLQJVVFKXLIYRRUYDVWORSHU
%LM]RQGHUHNHQPHUNHQ
*HHQEODDVYRUPLQJ
*HHQEODDVYRUPLQJ
3 stuks DIN A6
$XWRPDWLVFKHXLWVFKDNHOLQJELMRYHUYHUKLWWLQJ $XWRPDWLVFKHXLWVFKDNHOLQJELMRYHUYHUKLWWLQJ
Bijzondere kenmerken:
Ontgrendelingsschuif voor vastloper
Papiersnijder
Geen blaasvorming
5ROVQLMGHUPHWYHUVFKLOOHQGHVQHGHQHQ
5ROVQLMGHUPHWYHUVFKLOOHQGHVQHGHQHQ
Automatische uitschakeling
bij oververhitting
YHUVWHOEHYHLOLJLQJ
YHUVWHOEHYHLOLJLQJ
%LM]RQGHUHNHQPHUNHQ
Papiersnijder
9LVXHOHSRVLWLRQHULQJVKXOSLQFP
9LVXHOHSRVLWLRQHULQJVKXOSLQFP
:HHUJDYHHOHPHQWHQ
11 Garantie
Geachte klant,
Het verheugt ons dat u voor dit apparaat hebt gekozen.
Geef het apparaat in geval van een defect met de kassabon en de originele
verpakking terug in de zaak, waar u het gekocht heeft.
OLMQHQKRHNHQVFKDDO
OLMQHQKRHNHQVFKDDO
Bijzondere kenmerken:
Rolsnijder met 3 verschillende
sneden en
5HFKWHVQHGH
verstelbeveiliging5HFKWHVQHGH
,QVWHOEDUHVQHGHQ
*HJROIGHVQHGH
*HJROIGHVQHGH
Visuele positioneringshulp
in cm
3HUIRUDWLHVQHGH
3HUIRUDWLHVQHGH
(lijnen, hoeken, schaal)
0D[LPDDOIRUPDDW
$
A3
Instelbare sneden:
Rechte snede 5HFKWHVQHGHYHOOHQSDSLHUJPð
5HFKWHVQHGHYHOOHQSDSLHUJPð
Gegolfde snede *HJROIGHVQHGHYHOOHQSDSLHUJPð
0D[LPDOHVQLMFDSDFLWHLW
*HJROIGHVQHGHYHOOHQSDSLHUJPð
3HUIRUDWLHYHOOHQSDSLHUJP
Perforatiesnede 3HUIRUDWLHYHOOHQSDSLHUJP
.OHXU
=ZDUW]LOYHU
=ZDUW]LOYHU
Maximaal formaat:
DIN A4
$IPHWLQJHQE[K[G
Maximale
[[PP
snijcapaciteit:
*HZLFKW
NJ
9RHGLQJVVSDQQLQJ
9+]
2SJHQRPHQYHUPRJHQ
0D[LPDDO:$
Kleur:
Rechte snede: [[PP
5 vellen papier (80 g/m²)
Gegolfde snede: NJ
2 vellen papier (80 g/m²)
Perforatie:
2 vellen papier (80 g/m2)
9+]
Zwart-zilver
0D[LPDDO:6$
Afmetingen (b x h x d):
410 x 160 x 80 mm
Gewicht:
1,31 kg
Voedingsspanning:
230 V, 50 Hz
Opgenomen vermogen:
Maximaal 265 W, 1,2 A
De overeenstemming met de Europese richtlijnen wordt
bevestigd door de CE-markering.
Versie van 01-12-2010
19
33
micron: Een uit het Engels afkomstige aanduiding voor een micrometer (m). 1 micrometer
is een duizendste millimeter.
Voorbeelden: 80 m = 0,08 mm. 100 m = 0,1 mm. 125 m =
0,125 mm.
129
34 EER = Europese Economische Ruimte, die de lidstaten van de EU plus de staten Ijsland,
Liechtenstein en Noorwegen omvat.
130
1
A 240 Combo / A 340 Combo
Laminátor s kotouþovou Ĝezaþkou
Návod k obsluze
DĤOHåLWiEH]SHþQRVWQtXSR]RUQČQt %H]SHþQRVWQtXSR]RUQČQtODPLQiWRU %H]SHþQRVWQtXSR]RUQČQtNRWRXþRYiĜH]DþND 9\ORXþHQt]iUXN\ 3RXåLWtNGDQpPX~þHOX 2YOiGDFtSUYN\ 3ĜHStQDþIXQNFtDNRQWURON\ ěH]QiKODYD 8YHGHQtGRSURYR]X 2EVOXKD /DPLQiWRU /DPLQRYiQt]DWHSOD /DPLQRYiQt]DVWXGHQD 2GVWUDQLWQDNXSHQtIyOLH .RWRXþRYiĜH]DþND =YROLWY]KOHGĜH]X ěH]DWPDWHULiO 9\PČQLWĜH]QRXKODYX ýLãWČQt~GUåED 3ĜtVWURM]HYQČ oþLVWLW 2þLVWLWSRVRXYDFtYiOHþN\ 2GVWUDQČQt]iYDG\ 7HFKQLFNp~GDMH 3RN\Q\NOLNYLGDFL =iUXND [ýESKY]
06.2011
131
132
1
DĤOHåLWiEH]SHþQRVWQtXSR]RUQČQt
Respektujte prosím následující pokyny, aby bylo zaruþeno spolehlivé
zacházení s pĜístrojem:
Ɣ
PozornČ si prosím proþtČWHW\WRSRN\Q\DGRGUåXMWHMHSĜi manipulaci s
Vaším pĜístrojem.
Ɣ
Návod k obsluze uschovejte pro pozdČMãtSRXåLWt
Ɣ
PĜHGSRXåLWtPSRVWDYWHSĜístroj na rovné a stabilní pracovní místo.
Ɣ
Ɣ
Ɣ
Ɣ
Ɣ
Ɣ
Ɣ
Ɣ
Ɣ
Ɣ
Ɣ
Ɣ
Ɣ
Ɣ
Ɣ
%H]SHþQRVWQtXSR]RUQČQtODPLQiWRU
Vyvarujte se poškození zástrþky nebo kabelu. SíĢový kabel nikdy
nepĜekrucujte. NeuvádČjte pĜístroj do provozu v pĜípadČåHMHSRãNR]HQ
síĢový kabel nebo zástrþka.
1HSRXåtYHMWHSĜístroj v blízkosti horkých povrchových ploch ani ve
vlhkém prostĜedí a chraĖte jej pĜed pĜímým sluneþním záĜením a
prachem.
PĜed þištČním pĜtVWURMHYåG\Y\WiKQČte zástrþNX1HSRXåtYHMWHåiGQi
rozpouštČdla ani agresivní þistící prostĜedky.
Kovové pĜedmČty nelze laminovat.
DČWHPQHQtGRYROHQRVH]GUåRYDWYEOt]NRVWLSĜístroje v dobČ jeho
provozu.
PĜLQHSRXåtYiQtSĜístroje vytáhnČte zástrþku.
PĜtVWURMRNDPåLWČ vypnČWHYåG\NG\å]QČj vychází pronikavý zápach
nebo pĜístroj není v provozu.
Nedotýkejte se zástrþky vlhkýma rukama.
PĜed zapojením laminátoru do sítČ se ujistČte, zda je pĜepínaþ Zap./Vyp.
v poloze OFF.
Do pĜístroje zavádČjte pouze laminovací fólie urþené pro tento pĜístroj,
viz odstavec "Technické údaje". VýbČrem pĜíliš velkého formátu fólie
mĤåHWH]SĤsobit nakupení fólie.
Nelaminujte s tímto pĜtVWURMHPåiGQpPDWHULiO\NWHUpMVRXFLWOLYpQD
teplo, jako napĜ. termopapír.
Laminováním vlhkých dokumentĤ dosáhnete jen špatných výsledkĤ.
PĜLODPLQRYiQt]DWHSODQHSRXåtYHMWHODPLQRYDFtIyOLHXUþené k
laminování za studena. Došlo by tak k poškození pĜístroje, laminovací
fólie i dokumentu.
Nikdy nezastĜihávejte laminovací fólie. Vzniklé Ĝezné hrany mohou
zpĤsobit nakupení fólie.
Volné souþásti odČvu, kravaty, šperky, dlouhé vlasy nebo jiné volné
pĜedmČW\XGUåXMWHYGRVWDWHþné vzdálenosti od vstupního otvoru.
Nebezpeþí zranČní!
133
Ɣ
1.2
Ɣ
Ɣ
Ɣ
Ɣ
Ɣ
Ɣ
Ɣ
Ɣ
Ɣ
Ɣ
Ɣ
Ɣ
PĜtVWURMVHVPtSRXåtYDWSRX]HYVXFKêFKX]DYĜHQêFKSURVWRUiFK
Bezpeþnostní upozornČní kotouþová Ĝezaþka
PĜLPDQLSXODFLQHERRGVWDYHQtQHEHUWHSĜtVWURMQLNG\GRUXNRXYREODVWL
ĜH]QpKODY\1RåHĜH]QpKODY\MVRXRVWUp1HEH]SHþt]UDQČní!
PĜtVWURMREVOXKXMWHREČPDUXNDPD
9ROQpVRXþiVWLRGČYXNUDYDW\ãSHUN\GORXKpYODV\QHERMLQpYROQp
pĜHGPČW\XGUåXMWHYGRVWDWHþQpY]GiOHQRVWLRGNRWRXþRYpĜH]DþN\
1HEH]SHþt]UDQČní!
PĜístroj je urþHQSRX]HNĜH]iQtSDStUXNDUHWIRWRSDStUXDODPLQRYDFtFK
IyOLt
PĜHGĜH]iQtPRGVWUDĖWH]GRNXPHQWXSĜtSDGQČVHY\VN\WXMtFtVHãtYDFt
VYRUN\QHERNDQFHOiĜVNpVSRQN\
1RåHVHQHVPtPD]DWDQLEURXVLW
PĜtVWURMQHO]HXYiGČWGRSURYR]XMHOLSRãNR]HQDĜH]QiKODYDQHERNU\W
ĜH]QpKODY\
PĜtVWURMQHO]HSURYR]RYDWWHKG\SRNXGQHQtVSUiYQČQDVD]HQDRFKUDQD
QRåH
'iYHMWHSR]RUDE\VWHVLSĜLYêPČnČ ĜH]QpKODY\QHSRĜH]DOLSUVW\
=iVDGQČVHY\KêEHMWHNRQWDNWĤPVQRåL
=DEUDĖte pĜtVWXSXGČtí k pĜtVWURML
DČWLDQH]OHWLOtVPČjí pĜtVWURMSURYR]RYDWSRX]HSRGGRKOHGHPGRVSČOp
RVRE\
PĜístroj není urþen ke stĜtKiQtQHKWĤ
134
2
Vylouþení záruky
4
Ovládací prvky
NepĜHEtUiPHåiGQRX]iUXNX]DVSUiYQRVWLQIRUPDFtNWHUpVHWêNDMt
WHFKQLFNêFKYODVWQRVWtD]GHSĜHGORåHQpGRNXPHQWDFH9WpWRGRNXPHQWDFL
SRSVDQêYêUREHNUHVSHNWLYHMHKRSĜtVOXãHQVWYtMVRXQHXVWiOH]OHSãRYiQ\D
GiOHY\YtMHQ\=WRKRWRGĤYRGXVLY\KUD]XMHPHSUiYREH]SĜHGFKR]tKR
R]QiPHQtNG\NROLY]PČQLWNRPSRQHQW\SĜtVOXãHQVWYtWHFKQLFNpVSHFLILNDFHL
WXWRGRNXPHQWDFLYêURENX
1
2
3
1
3
3RXåLWtNGDQpPX~þelu
7HQWRODPLQiWRUVNRWRXþRYRXĜH]DþNRXVPtEêWSRXåtYiQSRX]HN
Ɣ
ODPLQRYiQtVODPLQRYDFtPLIyOLHPL]DWHSODDODPLQRYDFtPLIyOLHPL]D
SĜLþHPåFHONRYi
VWXGHQDVWORXãĢNRXRGDPLF35
WORXãĢNDODPLQRYDQêFKGRNXPHQWĤIRWDREUi]N\NDUW\SDStUDWGVPt
GRViKQRXWPD[LPiOQČPP
Ɣ
pĜLĜH]iYiQtSDStUXNDUHWIRWRSDStUXQHERODPLQRYDFtFKIyOLtVPD[LPiOQt
YHOLNRVWt',1$3SĜLþHPåĜH]DQêPDWHULiOQHVPtEêWWOXVWČMãtQHå
Ɣ YURYQpPĜH]XPD[LPiOQČ 3OLVWĤSDStUXJP Ɣ YH]YOQČQpPĜH]XPD[LPiOQČ 3OLVW\SDStUXJP Ɣ YSHUIRUDþQtPĜH]XPD[LPiOQČ 3OLVW\SDStUXJP -DNpNROLYMLQpSRXåLWtVHSRYDåXMH]DSRXåLWtQHRGSRYtGDMtFt~þHOX6YpYROQp
SURYiGČQt]PČQQHERSĜHVWDYHEQHQtSĜtSXVWQp
4
5
7
1
2
3
4
5
6
7
6
ěezná hlava
ěezná lišta/vodící kolejniþka
PĜítlaþná lišta s prstovou ochranou
PĜepínaþ funkcí (regulace teploty)
Kontrolky (LED)
Vstupní otvor laminování
Vizuální pomocné znaþení polohování v cm (linky, úhly, stupnice)
8
8
9
9
8
9
10
PĜepínaþ Zap./Vyp. (ON / OFF)
Posuvné zaĜízení k uvolnČní nakupené fólie (ABS)
10 $REORYDþNDURKĤ1D]DGQtVWUDQČSĜtVWURMĤVHQDFKi]t]DREORYDþURKĤ
35
PLFQHERPLFURQ ]DQJOLþWLQ\SRFKi]HMtFtR]QDþHQtSURPLNURPHWUPPLNURPHWHUMH
MHGQDWLVtFLQDPLOLPHWUX
PĜtNODG\P PPP PPP PP
135
136
4.1
PĜepínaþ funkcí a kontrolky
5
Ɣ
1
Ɣ
Uvedení do provozu
Postavte pĜístroj na stabilní a rovnou plochu.
PĜed zapojením laminátoru do sítČ se ujistČte, zda je pĜepínaþ Zap./Vyp.
v poloze OFF.
2
Pozor: Zkontrolujte, zda se údaj o napČtí na pĜístroji shoduje s
údajem Vaší sítČ (230 V, 50 Hz).
3
Ɣ
4
5
1
3 ZasuĖte zástrþku do lehce dostupné standardní zásuvky. Kontrolka
,QGLNDFHPOWERVYtWtþHUYHQČ
POWER
svítí modĜe.
Bezpeþnostní upozornČní: Zásuvka se musí nacházet v blízkosti
pĜístroje a musí být snadno dostupná. MĤåHWHWDNYQRX]RYpP
pĜípadČ rychle pĜerušit dodávku elektĜiny.
1
pĜepínaþe funkcí
1 Nastavení
)XQNþQtVStQDþODPLQRYiQt]DVWXGHQD
2
3
3
4
5
u laminovacích fólií s tloušĢkou od 100 nebo 125 mic36
)XQNþQtVStQDþODPLQRYiQt]DWHSOD
Nastavení pĜepínaþe funkcí
u)XQNþQtVStQDþ21
laminovacích fólií s tloušĢkou od 60 nebo 80 mic2
)XQNþQtVStQDþ2))
Nastavení
pĜepínaþe funkcí
pro
laminování za studena
.RQWUROND5($'<
Kontrolka
POWER
.RQWUROND32:(5
Kontrolka READY
ěezná hlava
4.2
1
2
1
2
36
Nastavitelná pojistka
Otoþný knoflík k nastavení vzhledu Ĝezu
mic = z angliþtiny pocházející oznaþení pro mikrometr (m). 1 mikrometer je jedna tisícina
milimetru.
137
138
6
6.1
Obsluha
UpozornČní:3RYUFK]DODPLQRYDQpKRYêURENXY\URYQiWH]DWtåHQtP
knihou nebo jiným tČåNêPSORFKêPSĜedmČtem.
Laminátor
S tímto laminátorem mĤåHWHODPLQRYDW]DWHSODL]DVWXGHQD
Ɣ
PĜLODPLQRYiQt]DWHSODEXGHODPLQRYDFtIyOLHVOHSHQD
Ɣ
PĜLODPLQRYiQt]DVWXGHQDEXGHODPLQRYDFtIyOLHVOLVRYiQD
3RNXGMVWHVODPLQRYiQtPKRWRYLQDVWDYWHIXQNþQtVStQDþYSUDYRGRSRORK\
-DNPLOHMVWHKRWRYLVODPLQRYiQtPXYHćWHSĜHStQDþIXQNFtQDSUDYpKRUQt
COLDDY\WiKQČWHVtĢRYRX]iVWUþNX]H]iVXYN\3ĜHG
stranČSĜtVWURMHGRSRORK\COLD
a vytáhnČte zástrþku ze zásuvky. PĜed
SĜtSDGQêPRGVWDYHQtPQHFKWHSĜístroj
vychladnout.
SĜtSDGQêPRGVWDYHQtPQHFKWHSĜtVWURMY\FKODGQRXW
Pozor: PĜtVWURMMHSRODPLQRYiQtYHOPLKRUNê1HEH]SHþí zranČQt
=SĤVREODPLQRYiQt]YROWHSRGOHODPLQRYDQpKRPDWHULiOX
UpozornČní:1DSĜtNODGWHUPRSDStUDXOWUD]YXNRYpREUD]\E\PČO\EêW
ODPLQRYiQ\SRX]H]DVWXGHQD
6.1.1
Laminování za tepla
PĜHStQDþHPIXQNFtDSRVXYQêPSĜHStQDþHPO]HODPLQiWRUSURYR]RYDWYH
1
Proudový kabel p ipojte do snadno p ístupné standardní zásuvky.
GYRXWHSORWQtFKVWXSQtFKNWHUpMVRXSĜL]SĤVREHQ\þW\ĜHPWORXãĢkám
ODPLQRYDFtIyOLH
Pozor: Zkontrolujte,
zda se nap ový údaj na p ístroji shoduje s Vaší
37
Ɣ
QHERPLF
proudovou sítí (220
- 240 V, 50 Hz).
3
QHERPLF
Ɣ
2
=DSQČWH]DStQDþY\StQDþQDSUDYpVWUDQČSĜtVWURMHÄ+27“,
1DVWDYWHSĜHStQDþIXQNFtQDSUDYpKRUQtVWUDQČSĜtVWURMHQDSRXåtYDQRX
VYtWtþHUYHQêLQGLNiWRU
WORXãĢNXODPLQRYDFtIyOLH/DPLQiWRUVHVDPRYROQČ]DKĜtYiQDSRWĜHEQRX
3 WHSORWX0H]LWtPEOLNiNRQWURONDREADY
RozEČKQH se hnací motor pro dopravní
váleþN\ Po cca 3 - 5 minutách
RUDQåRYČ
se dosáhne správné provozní teploty a svítí zelený indikátor.
+QDFtPRWRUSRVRXYDFtFKYiOHþkĤVHVSXVWt
4
Materiál pro laminování YORåWH do fóliové kapsy tak, aby na všech
$VLSRPLQXWiFKMHGRVDåHQRVSUiYQpSURYR]QtWHSORW\DNRQWUROND
stranách byla vzdálenost asi 3 - 5 mm od okraje fólie.
READYQHSĜHWUåLWČVYtWt
0DWHULiOXUþHQêNODPLQRYiQtYORåWHGRODPLQRYDFtIyOLHWDNDE\E\O
Pozor: 3RXåtYHMWH výhradn fólie pro laminování za horka.
5 ]DFKRYiQYãHVWUDQQêRGVWXSDåPPRGRNUDMHODPLQRYDFtIyOLH
Zasu te fólii spole n s laminovaným materiálem do zavád cí
rbiny laminovacího p ístroje. Nejprve dovnit zasu te uzav enou
št
UpozornČní:.ODPLQRYiQt]DWHSODSRXåtYHMWHYêKUDGQČODPLQRYDFt
stranu
fólie.
IyOLHXUþHQpNODPLQRYiQt]DWHSOD
6.1.2
Laminování za studena
Pozor:3RNXGMVWHODPLQiWRUSRXåLOLNUiWFHSĜedtím k laminování za
WHSODPXVtWHMHMQHFKDWY\FKODGQRXW'REDY\FKODGQXWtþiní asi 30
minut.
)XQNþQtVStQDþYSUDYRQDVWDYWHGRSRORK\COLD
1DVWDYWHSĜHStQDþIXQNFtQDSUDYpKRUQtVWUDQČSĜtVWURMHGRSRORK\
COLD.
UpozornČní:.ODPLQRYiQt]DVWXGHQDSRXåtYHMWHYêKUDGQČ
laminovací fólie urþené k laminování za studena.
2. OdstraĖte ochrannou fólii z laminovací fólie.
3. Materiál urþHQêNODPLQRYiQtYORåWHGRODPLQRYDFtIyOLHWDNDE\E\O
]DFKRYiQYãHVWUDQQêRGVWXSDåPPRGRNUDMHODPLQRYDFtIyOLH
4. Laminovací fólii zavećWHVSROXVODPLQRYDQêPPDWHULiOHPGRYVWXSQtKR
otvoru uzavĜHQRXVWUDQRXQDSĜHG/DPLQRYiQtSUREČhne automaticky.
UpozornČní: Laminovací fólie nesmí být nikdy zavedena do
YVWXSQtKRRWYRUXRWHYĜHQRXVWUDQRXQDSĜHGMHQWDNO]H]DEUiQLW
zvrásnČní fólie. PĜi zavádČQtODPLQRYDFtIyOLHGEHMWHSURVtPSRN\QĤ na
YVWXSQtPRWYRUXODPLQRYiQt
Upozorn ní: Pro zamezení záhyb na fólii nesmí být do zavád cí
/DPLQRYDFtIyOLL]DYHćWHVSROXVODPLQRYDQêPPDWHULiOHPGRYVWXSQtKR
št rbiny laminovacího p ístroje nejprve zasunuta otev ená strana
RWYRUXX]DYĜHQRXVWUDQRXQDSĜHG/DPLQRYiQtSUREČKQHDXWRPDWLFN\
laminovací fólie. P i zasouvání fólie GRGUåXMWH prosím pokyny,
UpozornČní:/DPLQRYDFtIyOLHQHVPtEêWQLNG\]DYHGHQDGR
uvedené
na zavád cí št rbin . Laminování probíhá automaticky.
YVWXSQtKRRWYRUXRWHYĜHQRXVWUDQRXQDSĜHGMHQWDNO]H]DEUiQLW
]YUiVQČQtIyOLH3ĜL]DYiGČQtODPLQRYDFtIyOLHGEHMWHSURVtPSRN\QĤ na
YVWXSQtPRWYRUXODPLQRYiQt
Pozor:9\VWXSXMtFtODPLQRYDFtIyOLHMHSR]DODPLQRYiQtYHOPLKRUNiD
mČNNi=DFKi]HMWHSURWRVH]DODPLQRYDQêPYêURENHPRSDWUQČ
37 PLFQHERPLFURQ ]DQJOLþWLQ\SRFKi]HMtFtR]QDþHQtSURPLNURPHWUPPLNURPHWHUMH
MHGQDWLVtFLQDPLOLPHWUX
PĜtNODG\P PPP PPP PPP PP
139
140
6.1.3
Odstranit nakupení fólie
PĜístroj je vybaven posuvným zaĜízením k uvolnČní nakupené fólie za
úþelem rychlého odstranČní nakupení fólie.
Pokud je laminovací fólie zablokovaná, postupujte následovnČ:
1. VypnČte pĜístroj: Nastavte pĜepínaþ Zap./Vyp. do polohy OFF.
2. Posuvné zaĜízení k uvolnČní nakupené fólie posuĖte úplnČ doleva.
'UåWHSHYQČ laminátor a vytáhnČte laminovací fólii spolu s laminovaným
materiálem ze vstupního otvoru.
4. Posuvné zaĜízení k uvolnČní fólie posuĖte zpČt doprava.
5. OþistČte posouvací váleþky od usazenin a zbytkĤOHSLGODWDNåH]DYHGHWH
pĜHORåHQêOLVWSDStUXGRYVWXSQtKRRWYRUXYL]RGVWDYHF2þistit posouvací
váleþN\
UpozornČní: V pĜípadČåHVRXVWDYQČ dochází k nakupení fólie nebo
nelze nakupenou fólii vytáhnout z laminátoru, se prosím obraĢte na
naši horkou linku (viz Záruka).
6.2
Kotouþová Ĝezaþka
S kotouþovou Ĝezaþkou mĤåHWHĜezat papír, karty, fotopapír a laminovací
fólie.
6.2.1
Zvolit vzhled Ĝezu
Kotouþová Ĝezaþka je vybavena tĜemi rĤznými vzhledy Ĝezu:
Ɣ
Rovný Ĝez
Ɣ
ZvlnČný Ĝez
Ɣ
Perforaþní Ĝez
UpozornČní:1RåHMVRXXORåHQ\YRFKUDQQpPSRX]GUX
Zvolte vzhled Ĝezu, který potĜebujete, viz obr. 1:
1. VytáhnČWHQDVWDYLWHOQRXSRMLVWNXQDĜH]QpKODYČ nahoru do polohy
OPEN.
2. OtáþHMWHNQRIOtNNQDVWDYHQtY]KOHGXĜH]XGRNXGVHQHREMHYtV\PERO
SRåDGRYDQpKRY]KOHGXĜezu.
3. StlaþWHQDVWDYLWHOQRXSRMLVWNXQDĜH]QpKODYČ dolĤ do polohy LOCK.
obr. 1
]REUD]HQtSRGREQp
141
142
6.2.2
ěezat materiál
6.2.3
1. Postavte kotouþovou Ĝezaþku Ĝeznou hlavou nahoru na stabilní a rovnou
plochu.
2. ěeznou hlavu zasuĖte na jednu stranu vodící kolejniþky.
3. PĜLORåWHĜH]DQêPDWHULiOGRSRåDGRYDQpSRORK\SRGSUĤsvitnou pĜítlaþnou
lištu.
UpozornČní: MČjte na pamČti pĜtSXVWQpPQRåVWYtĜH]DQpKRPDWHULiOX
YL]RGVWDYHF3RXåLWtNGDQpPX~þHOXQHERRGVWDYHF7HFKQLFNp
~GDMH
UpozornČní:9L]XiOQtSRPRFQp]QDþení polohování Vám usnadní
VSUiYQpSĜLORåHQtĜH]DQpKRPDWHULiOX
4. BČhem ĜH]iQtGUåWHMHGQRXUXNRXĜezaný materiál tak pevnČDE\VH
nemohl vysmeknout. Jinak mĤåHGRMtWNQHSĜesnostem.
5. K Ĝezání stlaþte Ĝeznou hlavu dolĤ a táhnČWHMLSRGpOYRGtFtNROHMQLþN\Då
QDGUXKRXVWUDQXYL]REUi]HN
VymČnit Ĝeznou hlavu
-VRXOLQRåHNRWRXþové ĜH]DþN\SRãNR]HQpQHERRSRWĜHERYDQpMHQXWQp
Y\PČQLWĜH]QRXKODYX
UpozornČní:9\PČQLWO]HSRX]HNRPSOHWQtĜH]QRXKODYX.]DNRXSHQt
nové ĜH]QpKODY\VHSURVtPREUDĢWHQDQDãLKRUNRXOLQNX
2GVWUDĖWHNRQFRYêX]iYČUYRGLFtOLãW\]H]iNODGQtGHVN\WDNåHWODþtWH
2WiþHMWHþHUYHQêNQRIOtNQDNRQFLYRGtFtNROHMQLþN\RGRSUDYDQHER
VSRGQtNRQHFPtUQêPWODNHPVPČUHPGRYQLWĜDSRVRXYiWHKRQDKRUX
GROHYDDY\WiKQČWHYRGtFtNROHMQLþNX]SĜtVWURMH
6WDURXĜH]QRXKODYXQDKUDćWHQRYRX
1DKUDćWHVWDURXNRWRXþRYRXĜH]DþNXQRYRX
=DVXĖWHYRGtFtNROHMQLþNX]SČWGRSĜtVWURMHDRWiþHMWHþHUYHQêNQRIOtNR
GRSUDYDQHERGROHYD
=DVXĖWHYRGtFtNROHMQLþNX]SČWGR]iNODGRYpGHVN\DQDVDćWHSĜLWRP
QRYRXNRWRXþRYRXĜH]DþNX
.RQFRYêX]iYČUQDVDćWHVKRUDQDRWYRUQDNRQFLYRGLFtOLãW\
8SR]RUQČQt/]HY\PČQLWSRX]HNRPSOHWQtNRWRXþRYRXĜH]DþNX
3UR]tVNiQtQRYpNRWRXþRYpĜH]DþN\VHSURVtPREUDĢWHQDWHOKRUNRXOLQNX
UpozornČní: Po dokonþení Ĝezání nesuĖte Ĝeznou hlavu zpČWQêEUå
odstraĖWHYORåHQêPDWHULiODE\QHY]QLNODYDGQiĜezná hrana.
REU
obr. 2
143
144
7
7.1
ýištČní &~GUåED
8
PĜístroj zevnČ oþistit
OdstranČní závady
Závada
Pozor: PĜed þištČním pĜtVWURMHYOKNRXWNDQLQRXYåG\Y\WiKQČte
]iVWUþku!
OþistČte povrch pĜístroje lehce navlhþHQRXWNDQLQRXNUiWFHSRQRĜenou v
mýdlové vodČ.
Kontrolka POWER
nesvítí.
UpozornČní:1HSRXåtYHMWHåiGQiUR]SRXãWČdla ani agresivní þistící
prostĜHGN\
7.2
OþLVWLWSRVRXYDFtYiOHþky
8VD]HQLQ\D]E\WN\OHSLGHOQDSRVRXYDFtFKYiOHþcích mohou ovlivnit
YêVOHGHNODPLQRYiQt3URWRMHQXWQpSRVRXYDFtYiOHþN\SUDYLGHOQČ oþišĢovat.
1. Nastavte pĜepínaþ funkcí na 100/125 mic.
9\þNHMWHGRNXGQHEXGHNRQWURONDREADY nepĜHWUåLWČ svítit.
3. Zavećte do vstupního otvoru pĜHORåHQêOLVWSDStUX
7HQWRSRVWXSRSDNXMWHVSRXåLWtPQRYpKROLVWXSDStUXWDNGORXKRGRNXG
EXGRXQDSDStĜHYLGLWHOQpVWRS\XVD]HQLQD]E\WNĤ lepidel.
Laminovaná fólie
není zcela
prĤhledná.
ZjištČní & pĜíþina
Zástrþka není správnČ
zapojena do zásuvky.
PĜepínaþ Zap./Vyp. není v
poloze OFF.
ěešení
SíĢovou zástrþku zasuĖte
správnČ do zásuvky.
Nastavte pĜepínaþ Zap./Vyp.
do polohy ON.
Kontrolka POWER je
poškozená.
ObraĢte se na naši horkou
linku.
Laminovací teplota byla pĜíliš
nízká.
Laminovací fólie nebyla
zavedena rovnČ do
vstupního otvoru.
Nakupení fólie
Laminovací fólie je pĜíliš
velká.
PĜístroj po delším
SURYR]XMLå
nefunguje nebo se
bČhem provozu
zastavuje.
Posouvací váleþky
se netoþí.
Je povrch pĜístroje teplý?
Pak byl laminátor
pravdČpodobnČ automaticky
vypnut ochranným systémem
proti pĜehĜátí.
Je zástrþka zapojena do
zásuvky?
Je pĜepínaþ Zap./Vyp. v
poloze ON?
UjistČte se, zda jste nechali
pĜístroj pĜLSRXåLWtWOXVWČjší
laminovací fólie
dostateþnČ dlouho
zahĜát.
/DPLQXMWH]QRYXWXWpå
laminovací fólii, abyste
dosáhli lepšího výsledku
laminování.
Viz odstavec "Odstranit
nakupení fólie".
Viz odstavec " Oþistit
posouvací váleþky".
Zavećte laminovací fólii do
vstupního otvoru rovnČ a
uzavĜenou stranou napĜed.
3RXåtYHMWHSRX]HODPLQRYDFt
fólie uvedené velikosti, viz
odstavec "Technické údaje".
Vyþkejte asi 30 minut a pak
zkuste laminovat ještČ
jednou. V pĜípadČåHSĜístroj
opČt nefunguje, se obraĢte na
naši horkou linku.
Pokud závada nadále
pĜetrvává, obraĢte se na naši
horkou linku.
V pĜípadČåHVHQHSRGDĜilo závadu odstranit, se obraĢte na naši horkou
linku, viz odstavec "Záruka".
145
146
9
Technické údaje
A 240 Combo
PĜístroj k laminování
3ĜtVWURMNODPLQRYiQt]D
VWXGHQDL]DWHSOD
za tepla
šíĜkaPP
laminovaného dokumentu:
3URODPLQRYDFtIyOLHV
Pro laminovacíDPLF
fólie s
WORXãĢNRX
tloušĢkou:
5\FKORVWODPLQRYiQt
PP]DPLQXWX
Rychlost laminování:
.RQWURON\
A 245 Combo
A 340 Combo
240 mm
PP
PLQXW
60, 80, 100 a 125DPLF
mic38
/('5($'<]HOHQi
PP]DPLQXWX
300 mm za minutu
11 Záruka
PLQXW
Doba zahĜívání:/('32:(5þHUYHQi5 minut
Kontrolky:
Tento symbol (pĜHãNUWQXWiSRSHOQLFH]QDPHQiåHWHQWR
produkt by mČl koneþQêXåLYDWHOSRXSO\QXWtåLYRWQRVWLRGHY]GDW
k recyklaci do sbČUQpKRGYRUDQHERWĜtGČného odpadu. Tento
.
V\PEROSODWtMHQYHVWiWHFK(+339
za studena i
0D[LPiOQtãtĜND
Maximální
ODPLQRYDQpKRGRNXPHQWX
'RED]DKĜtYiQt
10 Pokyny k likvidaci
LED POWER
/('32:(5þHUYHQi
/('5($'<]HOHQi
(modrá)
3RVXYQp]DĜt]HQtNXYROQČQtQDNXSHQpIyOLH
3RVXYQp]DĜt]HQtNXYROQČQtQDNXSHQpIyOLH
LED READYRUDQåRYi
=YOiãWQt]QDN\
äiGQêYêVN\WEXEOLQ
äiGQêYêVN\WEXEOLQ
/DPLQRYDFtIyOLHREVDåHQpY
3 kusy DIN A5 $XWRPDWLFNpY\StQiQtSĜLSĜHKĜiWt
$XWRPDWLFNpY\StQiQtSĜLSĜHKĜiWt
dodávce:
3 kusy DIN A6
Zvláštní znaky:.RWRXþRYiĜH]DþNDVHYROLWHOQêPLY]KOHG\
Posuvné zaĜízení.RWRXþRYiĜH]DþNDVHYROLWHOQêPLY]KOHG\
k uvolnČní nakupené fólie
äiGQêYêVN\WEXEOLQ
ĜH]XDQDVWDYLWHOQRXSRMLVWNRX
ĜH]XDQDVWDYLWHOQRXSRMLVWNRX
=YOiãWQt]QDN\
Automatické vypínání
pĜi pĜehĜátí
9L]XiOQtSRPRFQp]QDþHQtSRORKRYiQtYFP
9L]XiOQtSRPRFQp]QDþHQtSRORKRYiQtYFP
OLQN\~KO\VWXSQLFH
OLQN\~KO\VWXSQLFH
ěezaþka papíru
ěH]DþNDSDStUX
5RYQêĜH]
9iåHQê]iND]QtN
tČãtQiVåHMVWHVHUR]KRGOLSURWHQWRSĜtVWURM
V pĜtSDGČY]QLNX]iYDG\RGHY]GHMWHSĜtVWURMVSROXVSRNODGQLþQtPGRNODGHP
DRULJLQiOQtPREDOHPYSURGHMQČNGHMVWHSĜtVWURM]DNRXSLOL
5RYQêĜH]
Kotouþová ĜezaþNDVHYROLWHOQêPLY]KOHG\
=YOQČQêĜH]
3HUIRUDFH
Ĝezu a nastavitelnou
pojistkou
0D[LPiOQtIRUPiW
$
Vizuální pomocnéA3znaþení polohování v cm
(linky, úhly, stupnice)
5RYQêĜH]OLVWĤSDStUXJP
5RYQêĜH]OLVWĤSDStUXJP
0D[LPiOQtĜH]QêYêNRQ
=YOQČQêĜH]OLVW\SDStUXJP
=YOQČQêĜH]OLVW\SDStUXJP
Volitelné vzhledy
ĜH]X
5RYQêĜez
3HUIRUDFHOLVW\SDStUXJP
3HUIRUDFHOLVW\SDStUXJP
ZvlnČQêĜez
%DUYD
þHUQRVWĜtEUQi
þHUQRVWĜtEUQi
Perforace
5R]PČU\â[+[9
[[PP DIN A4
[[PP
Maximální formát:
Zvláštní
9ROLWHOQpY]KOHG\ĜH]X
znaky:=YOQČQêĜH]
3HUIRUDFH
+PRWQRVW
NJ
Maximální ĜH]QêYêNRQ
1DSiMHQt
9+]
3ĜtNRQ
PD[:$
Barva:
5RYQêĜez:
ZvlnČQêĜez:
Perforace:
þernostĜíbrná
NJ
5 listĤ
2
papíru (80 g/m )
(80 g/m2)
2 listy papíru (80 g/m2)
2 listy papíru
9+]
PD[:6$
RozmČry (Š x H x V):
410 x 160 x 80 mm
Hmotnost:
1,31 kg
Napájení:
230 V, 50 Hz
PĜíkon:
max. 265 W, 1,2 A
Soulad se smČrnicemi EU potvrzuje znaþení CE.
Verze ze dne 01.12.2010
38
mic nebo micron = z angliþtiny pocházející oznaþení pro mikrometr (m). 1 mikrometer je
jedna tisícina milimetru.
PĜíklady: 80 m = 0,08 mm. 100 m = 0,1 mm. 125 m = 0,125 mm.
147
39 (+3 (YURSVNêKRVSRGiĜVNêSURVWRUNWHUê]DKUQXMHþOHQVNpVWiW\(8DVWiW\1RUVNR
,VODQGD/LFKWHQãWHMQVNR
148
Konformitätserklärung / Declaration of Conformity
Olympia A 240 Combo / A 340 Combo
The manufacturer hereby declares that the equipment complies
GB IE CY with the stipulations defined in the following guidelines and
standards:
DE AT CH Der Hersteller erklärt hiermit, dass das Gerät mit den
Bestimmungen der Richtlinien und Normen übereinstimmt:
FR BE
ES
PT
NL BE
IT CH
CS
2006/95/EEC
2004/108/EEC
Le fabricant déclare par la présente que l’appareil est conforme aux
règlements et normes en vigueur:
Por medio de la presente, el fabricante declara que este aparato
está conforme a lo dispuesto en las directivas y normas vigentes:
O fabricante declara que este aparelho está em conformidade com
as disposições das directivas e normas:
De fabrikant verklaart hierbij dat het apparaat voldoet aan de
bepalingen in de richtlijnen en normen:
Il costruttore dichiara con la presente che la macchina sotto
descritta è conforme alle norme delle direttive:
9êUREFHWtPWRSURKODãXMHåHSĜístroj odpovídá ustanovením
smČrnic a norem:
EN 60950-1:2006+A11:2009
EN 55014-1:2006+A1:2009
EN 55014-2:1997+A1:2001+A2:2008
EN 61000-3-2:2006+A2:2009
EN 61000-3-3:2008
OLYMPIA Business Systems Vertriebs GmbH
Zum Kraftwerk 1
45527 Hattingen
Phone:
0 23 24 / 68 01-0
Fax:
0 23 24 / 68 01-99
E-Mail:
olympia@olympia-vertrieb.de
Hattingen, Dezember 2010
Heinz Prygoda, Managing Director
Ort, Datum
Name und Unterschrift
DoC No.: 3118 / Version 01 / 13.12.2010
149
Diese Bedienungsanleitung dient der Information.
Ihr Inhalt ist nicht Vertragsgegenstand.
Alle angegebenen Daten sind lediglich Nominalwerte. Die beschriebenen
Ausstattungen und Optionen können je nach den länderspezifischen
Anforderungen unterschiedlich sein. Wir behalten uns inhaltliche und
technische Änderungen vor.
150