1
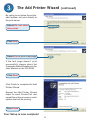
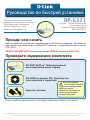
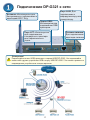
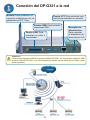
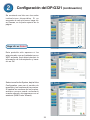
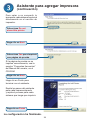
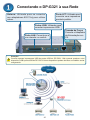
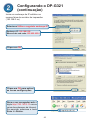
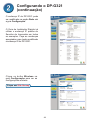
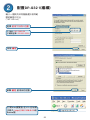
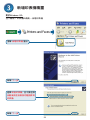
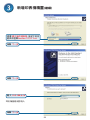
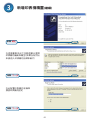
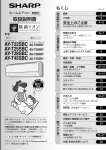
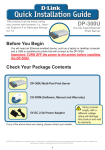
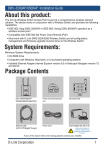
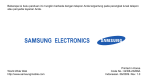
AIRPLUS™ G 802.11G/2.4GHz WIRELESS
MULTI-PORT PRINT SERVER
DP-G321
Quick Installation Guide+
Руководство по быстрой установке+
Guía de Instalación Rápida+
Guia de Instalação Rápida+
快速安裝指南+
Petunjuk Pemasangan Cepat+
DP-G321
AirPlus G 802.11g/2.4GHz
This product can be setup using
any current Web browser, i.e.,
Internet Explorer 6 or Netscape
Navigator 7.0
™
Wireless Multi-Port
Print Server
Before You Begin
You will need an Ethernet-enabled device, such as a laptop or desktop computer and
a USB or LPT printer that will connect to the DP-G321.
IMPORTANT: TURN OFF the power to the printer BEFORE installing the DP-G321
Check Your Package Contents
DP-G321 AirPlus G Wireless Multi-Port Print Server
TM
CD-ROM (Software, Manual and Warranty)
5V DC, 2.5A Power Adapter
Using a power
supply with a
different voltage
rating will damage this
product and void its
warranty.
If any of the above items are missing, please contact your reseller.
©2004 D-Link Systems, Inc. All rights reserved. Trademarks or registered trademarks are the property of their respective holders.
Software and specifications subject to change without notice. DP-G321.06152004
Connecting the DP-G321 to Your Network
LAN Port: Connects
to a router or switch.
Antenna: Used to wirelessly
connect to 802.11b/g adapters.
USB Ports: Used to
connect USB printers.
Power Receptor:
Connects the AC
Power Adapter
LPT Port: Used to
connect a standard
parallel printer.
Warning!
Only attach USB printers to the USB ports of the DP-G321. Do not connect any other USB device
to the DP-G321’s USB port! Other devices may damage the unit and void the warranty.
Connecting the DP-G321 to Your
Network (continued)
Note: Don’t connect the power cord to the DP-G321 until you are advised to do so.
For Mac OS printing, please refer to manual (.pdf) located on the CD-ROM.
A. Insert one end of a straight-through CAT5 Ethernet cable into the DP-G321’s LAN Port.
Connect the other end to an Ethernet port on your gateway or switch.
B. Make sure that your Printer is turned OFF.
C. Attach one end of your printer cable to the appropriate port on the DP-G321 and the
other end to the corresponding port on your printer.
D. Turn ON the printer. Repeat steps B-D for each printer before proceeding to step E.
E. Plug one end of the power adapter into the DP-G321 and the other end into your electric
outlet. The DP-G321 will turn on and begin a self-test.
Configuring the DP-G321
For additional Windows operating system setup or information on the
Web-management interface, refer to the manual located on the CD-ROM.
The factory default IP address of the DP-G321 is 192.168.0.10. The IP address of the
DP-G321 must be in the same range as your network. You can change the IP address
of the DP-G321 to match the IP address scheme of your existing network. To access
the Print Server’s Web configuration interface, assign an IP address on one of the wired
PCs on your network to the same IP scheme as the Print Server.
Go to Start > Right-click on
My Network Places > select Properties >
Right click on the Network Connection
associated with your Network Adapter and
select Properties.
Click Internet Protocol (TCP/IP)
Click Properties
Configuring the DP-G321 (continued)
Input a static IP address in the
same range as the print server.
(192.168.0.xx)
Select Use the following IP address
IP address: 192.168.0.28
Subnet mask: 255.255.255.0
Click OK
Click OK to apply
the new settings
Open your Web browser and
type http://192.168.0.10 into the
URL address box. Then press
the Enter or Return key.
Configuring the DP-G321 (continued)
The IP address of the DP-G321 can
be modified from the Network option
under the Configuration tab.
This Quick Installation Guide will use
the Print Server’s default IP address
in all examples. Make the appropriate
changes if you have modified the DPG321’s IP address.
Click on the Wireless button under
the Configuration tab to view the
wireless settings.
Click Site Survey
Configuring the DP-G321 (continued)
A list of available wireless networks will
appear. If you do not see the network
you are looking for, click Rescan at the
bottom of the page.
Click Select
This screen only appears if you selected
a wireless network with WEP enabled.
If so, you must enter the encryption
information and click OK.
Select the System button under the
Configuration tab to view the Print
Server and Port names. If you change
the names of the ports, please make
note of them as they will be needed
during the Add Printer Wizard.
The Add Printer Wizard
For Windows XP:
Go to the Start menu> Printers and Faxes> Add a Printer
Double-click on the
Add Printer icon
Click Next
Select Local Printer and
uncheck Automatically
detect and install my
Plug an Play printer.
Click Next
The Add Printer Wizard (continued)
Select Create a new port and
choose Standard TCP/IP Port
from the drop-down menu.
Click Next
Click Next
Type 192.168.0.10
The Port Name will fill in automatically.
Click Next
The Add Printer Wizard (continued)
Select Custom
and click the
Settings button
Select LPR
Enter the Port name for the port
the printer is attached to.
Default port names differ with the device MAC ID:
PS-xxxxxx-U1 (for USB Port 1)
PS-xxxxxx-U2 (for USB Port 2)
PS-xxxxxx-P3 (for LPT Port)
Click OK
Click Next
10
The Add Printer Wizard (continued)
Click Finish
In this window, scroll down and select
your printer manufacturer and model.
(If it is not listed, insert the driver
CD or diskette that came with your
printer and click Have Disk.)
Click Next
The printer name and default printer
settings are configured here.
Click Next
11
The Add Printer Wizard (continued)
By opting to not share the printer,
each system will print directly to
the print server.
Select Do not share
this printer
Click Next
Select Yes to print a test page
If the test page doesn’t print
successfully, please check the
Frequently Asked Questions in the
User Manual on the CD-ROM.
Click Next
Click Finish to complete the Add
Printer Wizard.
Repeat the Add Printer Wizard
steps for each Printer/Port and
repeat the entire process on each
system that will be printing.
Click Finish
Your Setup is now complete!
12
Technical Support
You can find software updates and user documentation on the
D-Link website.
Tech Support for customers within Australia:
D-Link Technical Support over the Telephone:
1300-766-868
Monday to Friday 8:00am to 8:00pm EST
Saturday 9:00am to 1:00pm EST
D-Link Technical Support over the Internet:
http://www.dlink.com.au
email:support@dlink.com.au
Tech Support for customers within New
Zealand:
D-Link Technical Support over the Telephone:
0800-900-900
Monday to Friday 8:30am to 8:30pm
Saturday 9:00am to 5:00pm
D-Link Technical Support over the Internet:
http://www.dlink.co.nz
email:support@dlink.co.nz
Technical Support
You can find software updates and user documentation on the
D-Link website.
Tech Support for customers within South
Eastern Asia and Korea:
D-Link South Eastern Asia and Korea Technical Support
over the Telephone:
+65-6895-5355
Monday to Friday 9:00am to 12:30pm, 2:00pm-6:00pm
Singapore Time
D-Link Technical Support over the Internet:
email:support@dlink.com.sg
DP-G321
Это устройство может быть
настроено с помощью любого
Web-браузера, например
Internet Explorer 6 или
Netscape Navigator 7.0
AirPlus™ G Беспроводный
многопортовый
принт-сервер стандарта
802.11g/2.4ГГц
Прежде чем начать
Вам понадобится устройство с поддержкой сети Ethernet, например, портативный
или настольный компьютер, и USB или LPT принтер, который будет подключаться
к DP-G321.
ВАЖНО: ВЫКЛЮЧИТЕ питание принтера ПЕРЕД установкой DP-G321
Проверьте содержимое комплекта
DP-G321 AirPlus G Беспроводный
многопортовый принт-сервер
TM
CD-ROM (содержит ПО, Руководство
пользователя и гарантию)
Адаптер питания
Использование
источника питания
с другим напряжением
питания может
привести к выходу из
строя устройства и
потере гарантии.
Если что-либо из перечисленного отсутствует, обратитесь к вашему поставщику.
©2004 D-Link Systems, Inc. Все права защищены. Торговые марки или зарегистрированные торговые марки являются собственностью их
владельцев. Программное обеспечение и спецификации могут изменяться без уведомления.DP-G321.06152004
Подключение DP-G321 к сети
Антенна: Используется для
беспроводного подключения к
адаптерам 802.11b/g.
Порты USB:
Используется для
подключения USB
принтеров.
Порт LPT: Используется
для подключения
стандартного принтера
для параллельного
порта.
Порт LAN: Для
подключения к
маршрутизатору или
коммутатору.
Разъем питания:
Для подключения
адаптера питания
Осторожно!
Подключайте только USB принтеры к портам USB DP-G321. Не подключайте
какие-либо другие устройства USB к порту USB DP-G321! Это может привести к
повреждению устройства и потере гарантии.
17
Подключение DP-G321 к сети
(продолжение)
Примечание: Не подключайте кабель питания к DP-G321, пока не получите
указание сделать это.
За информацией о печати в Mac OS, пожалуйста, обращайтесь
к руководству (.pdf) на CD-ROM.
A. Подключите один конец прямого кабеля Ethernet категории 5 к порту LAN DP-G321.
Подключите другой конец кабеля к порту Ethernet шлюза или коммутатора.
B. Убедитесь, что питание принтера ВЫКЛЮЧЕНО.
C. Подключите один конец принтерного кабеля к подходящему порту DP-G321, а
другой конец кабеля к соответствующему порту принтера.
D. ВКЛЮЧИТЕ принтер. Повторите шаги B-D для каждого подключаемого принтера,
а затем переходите к шагу E.
E. Подключите адаптер питания к DP-G321 и к розетке сети питания. DP-G321
включится и начнет самотестирование.
Настройка DP-G321
За дополнительной информацией об установке в операционных системах Windows
или Web-интерфейсе управления обращайтесь к руководству на CD-ROM.
По умолчанию IP-адрес DP-G321 равен 192.168.0.10. IP-адрес DP-G321 должен
быть назначен из диапазона адресов Вашей сети. IP-адрес DP-G321 можно
изменить в соответствии со схемой адресации существующей сети. Для получения
доступа к Web-интерфейсу управления принт-сервера, назначьте IP-адрес одному
из проводных ПК сети из того же диапазона, что и адрес принт-сервера.
Нажмите Пуск > Щелкните правой
кнопкой на Сетевое окружение >
выберите Свойства > Щелкните правой
кнопкой на сетевом подключении,
соответствующем вашему сетевому
адаптеру, и выберите Свойства.
Нажмите Протокол Интернета (TCP/IP)
Нажмите Свойства
18
Настройка DP-G321 (продолжение)
Введите статический IP-адрес из
того же диапазона, что и адрес
принт-сервера.
(192.168.0.xx)
Выберите Использовать
следующий IP-адрес
IP-адрес: 192.168.0.28
Маска подсети: 255.255.255.0
Нажмите OK
Нажмите OK, чтобы
новые настройки
вступили в силу
Откройте Web-браузер и
введите http://192.168.0.10
в строке адреса URL. Затем
нажмите Enter или Return.
19
Настройка DP-G321 (продолжение)
IP-адрес DP-G321 можно
изменить в меню Network на
вкладке Configuration.
Во всех примерах данного
Руководства по быстрой
установке используется IP-адрес
принт-сервера, установленный
по умолчанию. Внесите
соответствующие поправки при
изменении IP-адреса DP-G321.
Нажмите кнопку Wireless на вкладке
Configuration, чтобы просмотреть
настройки беспроводной сети.
Нажмите Site Survey
20
Настройка DP-G321 (продолжение)
Появится список доступных
беспроводных сетей. Если Вы не
видите в списке нужную сеть, то
нажмите Rescan внизу страницы.
Нажмите Select
Данное окно появится только в том
случае, если выбрано шифрование
WEP для беспроводной сети. В этом
случае необходимо ввести параметры
шифрования и нажать OK.
Нажмите кнопку System на вкладке
Configuration, чтобы просмотреть
имена принт-сервера и портов. Если
Вы изменили имена портов, то,
пожалуйста, запишите их, поскольку
они понадобятся для М астера
установки принтера.
21
Мастер установки принтера
Для Windows XP:
Выберите меню Пуск> Принтеры и факсы > Установка принтера
Дважды щелкните на значке
Установка принтера
Нажмите Далее
Выберите
Локальный принтер
и снимите флажок
Автоматическое
определение и
установка принтера
“Plug and Play”.
Нажмите Далее
22
Мастер установки принтера
(продолжение)
Выберите Создать новый
порт и выберите Standard
TCP/IP Port из выпадающего
меню.
Нажмите Далее
Нажмите Далее
Введите 192.168.0.10
Поле Имя порта заполнится
автоматически.
Нажмите Далее
23
Мастер установки принтера
(продолжение)
Выберите
Особое и
нажмите кнопку
Параметры
Выберите протокол LPR
Введите имя Порта, к
которому подключен принтер.
Имена портов по умолчанию различаются
в зависимости от MAC ID устройства:
PS-xxxxxx-U1 (для порта USB 1)
PS-xxxxxx-U2 (для порта USB 2)
PS-xxxxxx-P3 (для порта LPT)
Нажмите OK
Нажмите Далее
24
Мастер установки принтера
(продолжение)
Нажмите Готово
В этом окне выберите
производителя принтера и
модель. (Если нет в списке,
то вставьте CD или дискету
с драйвером, которые
поставляются с принтером, и
нажмите Установить с диска.)
Нажмите Далее
Здесь настраиваются имя
принтера и параметры по
умолчанию.
Нажмите Далее
25
Мастер установки принтера
(продолжение)
Если запретить общий доступ к
принтеру, то каждая система будет
отправлять задания на печать
непосредственно на принт-сервер.
Выберите Нет
общего доступа к
этому принтеру
Нажмите Далее
Выберите Да для печати
тестовой страницы
Если тестовая страница не
была успешно напечатана,
пожалуйста, обратитесь к
разделу Часто задаваемые
вопросы Руководства
пользователя на CD-ROM.
Нажмите Далее
Нажмите Готово для завершения
мастера установки принтера.
Выполните все шаги Мастера
установки принтера для каждого
принтера/порта и повторите всю
процедуру на каждой системе,
которая будет печатать через
принт-сервер.
Нажмите Готово
Установка завершена!
26
Техническая поддержка
Обновления программного обеспечения и документация
доступны на Интернет-сайте D-Link.
D-Link предоставляет бесплатную поддержку для клиентов в
течение гарантийного срока.
Клиенты могут обратиться в группу технической поддержки
D-Link по телефону или через Интернет.
Техническая поддержка D-Link:
(095) 744-00-99
Техническая поддержка через Интернет
http://www.dlink.ru
email: support@dlink.ru
Este producto puede configurarse
usando cualquier navegador web
habitual, p. ej., Internet Explorer 6
o Netscape Navigator 7.0
DP-G321
Servidor inalámbrico de
impresión multipuerto
802.11g/2.4 GHz AirPlus™ G
Antes de empezar
Se requiere un dispositivo Ethernet, como un ordenador de sobremesa o portátil y una
impresora LPT o USB que se conectará al DP-G321.
IMPORTANTE: APAGUE la impresora ANTES de instalar el DP-G321
Comprobación del contenido del paquete
Servidor inalámbrico de impresión
multipuerto DP-G321 AirPlusTM G
CD-ROM (software, Manual y garantía)
Adaptador de alimentación 5
V DC, 2.5 A
El uso de
una fuente de
alimentación con
distinto voltaje puede
ser perjudicial y
anular la garantía de
producto.
Si falta alguno de estos componentes, contacte con su proveedor.
©2004 D-Link Systems, Inc. Reservados todos los derechos. Las marcas o marcas registradas son propiedad de los respectivos
titulares. El software y las especificaciones pueden ser modificados sin previo aviso
Conexión del DP-G321 a la red
Antena: Para establecer la
conexión inalámbrica con los
adaptadores 802.11b/g.
Puerto LPT: Para conectar una
impresora estándar en paralelo.
Puertos USB: Para conectar
impresoras USB.
Puerto LAN: Para
conectar un router o
conmutador.
Receptor de
alimentación:
Para conectar
el adaptador de
alimentación AC.
¡Atención!
Conecte sólo impresoras USB a los puertos USB del DP-G321. No conecte otro dispositivo USB
al puerto USB del DP-G321. Los otros dispositivos pueden causar daños en la unidad, y esto
anula la garantía.
29
Conexión del DP-G321 a la red
(continuación)
Nota: No conecte el cable de alimentación al DP-G321 hasta que se le indique.
Para la impresión en Mac OS, consulte el Manual (.pdf) en el CD-ROM.
A. Introduzca un extremo del cable Ethernet CAT5 straight-through en el puerto LAN
del DP-G321. Conecte el otro extremo del cable en un puerto Ethernet del gateway o
conmutador.
B. Asegúrese de que la impresora está APAGADA.
C. Conecte un extremo del cable de impresora en el puerto correspondiente del DP-G321,
y el otro extremo, en el puerto correspondiente de la impresora.
D. APAGUE la impresora. Repita los pasos B-D para cada impresora antes de realizar
el paso E.
E. Conecte un extremo del adaptador de alimentación en el DP-G321, y el otro extremo,
en la base eléctrica. El DP-G321 se encenderá y realizará un auto-test.
Configuración del DP-G321
Si desea más información sobre la configuración del sistema operativo Windows o
sobre la interfaz de gestión basada en web, consulte el Manual, en el CD-ROM.
La dirección IP por defecto del DP-G321 es 192.168.0.10. La dirección IP del DPG321 debe encontrarse en el mismo rango que la red. Puede cambiar la dirección IP
del DP-G321 para que coincida con el esquema de dirección IP de la red existente.
Para acceder a la interfaz de configuración web del servidor de impresión, asigne una
dirección IP en uno de los PC de cable PC de la red, con el mismo esquema IP que
el servidor de impresión.
Vaya a Start > haga clic con el botón de la
derecha en My Network Places > seleccione
Properties > haga clic con el botón de la
derecha en la conexión de red (Network
Connection) asociada con el adaptador de
red y seleccione Properties.
Haga clic en Internet Protocol (TCP/IP)
Haga clic en Properties
30
Configuración del DP-G321 (continuación)
Introduzca una dirección IP estática
del mismo rango que el servidor de
impresión.
Seleccione Use the following IP
address
Dirección IP: 192.168.0.28
Máscara de subred: 255.255.255.0
Haga clic en OK
Haga clic en OK para aplicar los
nuevos parámetros
Abra el navegador web y
escriba http://192.168.0.10
en el cuadro de direcciones
URL. Apriete la tecla Enter o
Return.
31
Configuración del DP-G321 (continuación)
La dirección IP del DP-G321 puede
modificarse desde la opción Network,
en la ficha Configuration.
En todos los ejemplos de esta Guía
rápida de instalación se utiliza la
dirección IP por defecto del servidor
de impresión. Realice los cambios
necesarios si ha modificado la
dirección IP del DP-G321.
Haga clic en el botón Wireless, bajo
la ficha Configuration para ver los
parámetros inalámbricos.
Haga clic en Site Survey
32
Configuración del DP-G321 (continuación)
Se mostrará una lista con las redes
inalámbricas disponibles. Si no
encuentra la red que busca, haga clic
en Rescan, en la parte superior de la
página.
Haga clic en Select
Esta pantalla sólo aparece si ha
seleccionado una red inalámbrica con
WEP activada. Aquí debe introducir la
información de la encriptación y hacer
clic en OK.
Seleccione el botón System, bajo la ficha
Configuration, para ver el servidor de
impresión y los nombres de los puertos.
Si cambia los nombres de los puertos,
anótelos porque puede necesitarlo
cuando agregue una impresora con el
asistente (Add Printer Wizard).
33
Asistente para agregar impresora
En Windows XP:
Vaya al menú Start > Printers and Faxes > Add a Printer
Haga doble clic en el icono
Add Printer
Haga clic en Next
Seleccione Local Printer
y desactive Automatically
detect and install my Plug
an Play printer
Haga clic en Next
34
Asistente para agregar impresora
(continuación)
Seleccione Create a new
port y elija Standard TCP/IP
Port en el menú desplegable
Haga clic en Next
Haga clic en Next
Escriba 192.168.0.10
El nombre del puerto (Port Name) se
rellenará automáticamente.
Haga clic en Next
35
Asistente para agregar impresora
(continuación)
Seleccione Custom y
haga clic en el botón
Settings
Seleccione LPR
Introduzca el nombre del puerto
(Port) para el puerto al que se
encuentra conectada la impresora.
Los nombres de puerto por defecto se diferencian
por el MAC ID:
PS-xxxxxx-U1 (para el puerto 1 USB)
PS-xxxxxx-U2 (para el puerto 2 USB)
PS-xxxxxx-P3 (para el puerto LPT)
Haga clic en OK
Haga clic en Next
36
Asistente para agregar impresora
(continuación)
Haga clic en Finish
Desplácese por esta ventana
y seleccione el fabricante y el
modelo de la impresora. (Si no
figura en la lista, introduzca el CD
con el controlador o el disquete de
la impresora y haga clic en Have
Disk.)
Haga clic en Next
El nombre de la impresora y los
parámetros por defecto de la
impresora se configuran aquí
Haga clic en Next
37
Asistente para agregar impresora
(continuación)
Para optar a no compartir la
impresora, cada sistema imprimirá
directamente en el servidor de
impresión.
Seleccione Do not
share this printer
Haga clic en Next
Seleccione Yes para imprimir
una página de prueba
Si la página de prueba no se
imprime correctamente, vea la
sección “Preguntas frecuentes”
del Manual del usuario, en el
CD-ROM.
Haga clic en Next
Haga clic en Finish para
terminar con el asistente.
Repita los pasos del asistente
para cada impresora/puerto
y repita el proceso para cada
sistema que tenga que imprimir.
Haga clic en Finish
La configuración ha finalizado.
38
Asistencia Técnica
D-Link Latin América pone a disposición de sus clientes, especificaciones,
documentación y software mas reciente a través de nuestro Sitio Web
www.dlinklatinamerica.com
El servicio de soporte técnico tiene presencia en numerosos países de la
Región Latino América, y presta asistencia gratuita a todos los clientes de
D-Link, en forma telefónica e internet, a través de la casilla
soporte@dlink.cl
Soporte Técnico Help Desk Argentina:
Teléfono: 0800-6661442 Lunes a Viernes 09:00 am a 22:00 pm
Soporte Técnico Help Desk Chile:
Teléfono: 800-214422 Lunes a Viernes 08:00 am a 21:00 pm
Soporte Técnico Help Desk Colombia:
Teléfono: 01800-7001588 Lunes a Viernes 07:00 am a 20:00 pm
Soporte Técnico Help Desk Ecuador:
Teléfono: 1800-777 711 Lunes a Viernes 07:00 am a 20:00 pm
Soporte Técnico Help Desk El Salvador:
Teléfono: 800-6137 Lunes a Viernes 06:00 am a 19:00 pm
Soporte Técnico Help Desk Guatemala:
Teléfono: 1800-300 0017 Lunes a Viernes 06:00 am a 19:00 pm
Soporte Técnico Help Desk Panamá:
Teléfono: 0800-560 0193 Lunes a Viernes 07:00 am a 20:00 pm
Soporte Técnico Help Desk Perú:
Teléfono: 0800-52049 Lunes a Viernes 07:00 am a 20:00 pm
Soporte Técnico Help Desk Venezuela:
Teléfono: 0800-1003470 Lunes a Viernes 08:00 am a 21:00 pm
Soporte Técnico Help Desk Perú:
Teléfono: 0800-52049 Lunes a Viernes 07:00 am a 20:00 pm
Este produto pode ser
configurado utilizando qualquer
navegador web atual, como
por ex., Internet Explorer 6 ou
Netscape Navigator 7.0
DP-G321
Servidor de Impressão
Multi-portas 802.11g/2.4GHz
AirPlus™ G
Antes de Você Começar
Você precisará de um dispositivo habilitado para Ethernet, como por exemplo um laptop
ou desktop e uma impressora USB ou LPT que se conectará ao DP-G321.
IMPORTANTE: DESLIGUE a impressora ANTES de instalar o DP-G321
Verifique o Conteúdo da Sua Embalagem
Servidor de Impressão Multi-Portas Wireless
AirPlus G DP-G321
TM
CD-ROM (Software, Manual e Garantia)
Adaptador de Alimentação
de 5V 2.5A CC
A utilização de
uma fonte de alimentação
com uma classe de
tensão diferente pode
danificar este produto e
anular sua garantia.
Se qualquer dos itens acima estiver faltando, favor contatar o seu revendedor.
©2004 D-Link Systems, Inc. Todos os direitos reservados. As marcas comercias ou marcas comerciais registradas são propriedade dos seus
respectivos detentores. Os softwares e especificações estão sujeitos a mudanças sem prévio aviso. DP-G321.06152004
Conectando o DP-G321 à sua Rede
Antena: Utilizada para se conectar
aos adaptadores 802.11b/g sem utilizar
cabos.
Porta LPT: Utilizada para
conectar uma impressora
paralela padrão.
Portas USB: Utilizadas para
conectar impressoras USB.
Porta LAN: Conecta-se a
um roteador ou switch.
Tomada de Força:
Conecta o Adaptador
de Alimentação em
CA
Atenção!
Conecte apenas impressoras USB às portas USB do DP-G321. Não conecte qualquer outro
dispositivo USB à porta USB do DP-G321! Outros dispositivos podem danificar a unidade e anular
sua garantia.
41
Conectando o DP-G321 à sua Rede
(continuação)
Observação: Não conecte o cabo de alimentação ao DP-G321 até que seja orientado
a fazer isto.
Para impressão em Mac OS, favor consultar o manual (.pdf) localizado no CD-ROM.
A. Insira uma extremidade do cabo Ethernet CAT5 direto na Porta LAN do DP-G321.
Conecte a outra extremidade a uma porta Ethernet no seu gateway ou switch.
B. Certifique-se que a sua Impressora esteja DESLIGADA.
C. Conecte uma extremidade do seu cabo de impressora na porta apropriada do
DP-G321 e a outra ponta na porta correspondente na sua impressora.
D. LIGUE a impressora. Repita as etapas B-D para cada impressora antes de ir para a
etapa E.
E. Conecte uma extremidade do adaptador de alimentação no DP-G321 e a outra ponta
na sua tomada elétrica. O DP-G321 irá ligar e iniciar um auto-teste.
Configurando o DP-G321
Para configuração adicional do sistema operacional Windows ou maiores informações sobre
a interface de administração web, consulte o manual localizado no CD-ROM.
O endereço IP padrão de fábrica do DP-G321 é 192.168.0.10. O endereço IP do
DP-G321 deve estar no mesmo intervalo daquele da sua rede. Você pode alterar o
endereço IP do DP-G321 para corresponder ao esquema de endereços IP da sua rede
existente. Para acessar a interface de configuração via web do Servidor de Impressão,
atribua um endereço IP em um dos PCs com fio na sua rede ao mesmo esquema de
endereços IP do Servidor de Impressão.
Vá para Iniciar > Dê um duplo clique
em Meus locais de rede >selecione
Propriedades > Clique com o botão
direito do mouse na Conexão de rede
associada com o seu Adaptador de Rede e
selecione Propriedades.
Clique em Protocolo de Internet (TCP/IP)
Clique em Propriedades
42
Configurando o DP-G321
(continuação)
Insira um endereço de IP estático na
mesma faixa do servidor de impressão.
(192.168.0.xx)
Selecione Utilize o seguinte endereço IP
Endereço IP: 192.168.0.28
Máscara de sub-rede: 255.255.255.0
Clique em OK
Clique em OK para aplicar
as novas configurações
Abra o seu navegador web e
digite http://192.168.0.10 na sua
caixa de endereços de Internet.
Em seguida, pressione a tecla
Enter ou Return.
43
Configurando o DP-G321
(continuação)
O endereço IP do DP-G321 pode
ser modificado na opção Rede sob
a guia Configuração.
O Guia de Instalação Rápida irá
utilizar o endereço IP padrão do
Servidor de Impressão em todos
os exemplos. Faça as mudanças
apropriadas caso tenha modificado
o endereço IP do DP-G321.
Clique no botão Wireless na
guia Configuração para ver as
configurações wireless.
Clique em Site Survey
44
Configurando o DP-G321
(continuação)
Uma lista das redes wireless disponíveis
será exibida. Se você não encontrar a
rede que está procurando, clique em
Rescan na parte inferior da página.
Clique em Selecionar
Esta tela será exibida somente se
você selecionou uma rede wireless
com a opção WEP habilitada. Em
caso afirmativo, você deve inserir as
informações de criptografia e clicar
em OK.
Selecione o botão Sistema na guia
Configuração para ver os nomes do
Servidor de Impressão e Portas. Se
você alterar os nomes das portas,
favor anotá-los uma vez que elas serão
necessárias durante o Assistente para
adicionar impressora.
45
O Assistente para adicionar
impressora
Para o Windows XP:
Vá para o menu Iniciar> Impressoras e aparelhos de fax> Adicionar
uma impressora
Dê um duplo clique no ícone
Adicionar impressora
Clique em Avançar
Select Local Printer and
uncheck Automatically
detect and install my
Plug an Play printer.
Clique em Avançar
46
O Assistente para adicionar
impressora (continuação)
Selecione Criar uma nova porta
e selecione Standard TCP/IP
Port do menu suspenso.
Clique em Avançar
Clique em Avançar
Type 192.168.0.10
O Nome da porta será preenchido
automaticamente.
Clique em Avançar
47
O Assistente para adicionar
impressora (continuação)
Selecione
Personalizado
e clique
no botão
Configurações
Selecione LPR
Insira o nome da Porta para a
porta na qual a impressora está
conectada.
Nomes de portas default diferem do dispositivo
MAC ID:
PS-xxxxxx-U1 (para Porta USB 1)
PS-xxxxxx-U2 (para Porta USB 2)
PS-xxxxxx-P3 (para Porta LPT)
Clique em OK
Clique em Avançar
48
O Assistente para adicionar
impressora (continuação)
Clique em Concluir
Nesta janela, role a tela para baixo e
selecione o fabricante e modelo da
sua impressora. (Caso não esteja
listada, insira o CD ou disquete de
drivers que vem com sua impressora
e clique em Have Disk.)
Clique em Avançar
O nome da impressora e suas
configurações default são configurados
aqui.
Clique em Avançar
49
O Assistente para adicionar
impressora (continuação)
Ao optar por não compartilhar
a impressora, cada sistema irá
imprimir diretamente para o
servidor de impressão.
Selecione Não
compartilhar esta
impressora
Clique em Avançar
Selecione Sim para imprimir
uma página de teste
Se a página de teste não é
impressa com sucesso, favor
verificar as Perguntas Mais
Freqüentes (FAQs) no Manual
do Usuário no CD-ROM.
Clique em Avançar
Clique em Concluir para finalizar
o Assistente para adicionar
impressora.
Repita as etapas do Assistente
para adicionar impressora para
cada Impressora/Porta e repita
todo o processo em cada sistema
que irá imprimir.
Clique em Concluir
Sua configuração está concluída!
50
Suporte Técnico
Você pode encontrar atualizações de software e documentação
de usuário no site da D-Link Brasil www.dlinkbrasil.com.br.
A D-Link fornece suporte técnico gratuito para clientes no Brasil
durante o período de vigência da garantia deste produto.
Suporte Técnico para clientes no Brasil:
Telefone
0800-7014104
Segunda à sexta
Das 8h30 às 18h30
E-mail:
email:suporte@dlinkbrasil.com.br
可以採用目前任何的web
瀏覽器來安裝該產品,
比如, Internet Explorer 6或
Netscape Navigator 7.0
DP-G321
AirPlus™ G 802.11g/2.4GHz
無線多埠列印伺服器
開始之前
您需要一台支援乙太網路的設備,例如一台已連上網路的筆記型電腦或桌上型電腦,
以及一部可連接DP-G321的USB或LPT印表機.
重要: 安裝DP-G321前請關閉印表機的電源.
檢查包裝內容
DP-G321 AirPlusTM G 無線多埠列印伺服器
光碟(含軟體,手冊)
5V DC, 2.5A電源供應器
使用不同電壓等
級的電源會損壞該產
品,並使該產品的保固
無效
如以上物件有任何遺失,請與經銷商聯繫.
©2004版權所有。D-Link與D-Link商標為友訊科技的商標,其他註冊商標分別隸屬該公司所有。最新規格以原廠
通告為準,恕不另行通知。
連接DP-G321與網路
LPT 埠: 用於連接一台標準的
平行埠印表機
天線: 用於與802.11b/g無線網卡的連接.
USB埠: 用於連接USB 印表機
LAN 埠: 連接路由器
或交換器.
電源插頭:
連接交流電源供
應器
警告!
DP-G321的USB埠僅能連接USB印表機,請不要將其他任何USB設備與DP-G321的USB埠連接!
其他設備可能會損壞此機器,並使保固無效.
53
連接DP-G321與網路(繼續)
注意:請先不要將電源線與DP-G321相連,直到安裝步驟通知您接上電源.
關於Mac OS列印,請參閱光碟中的手冊(.pdf).
A. 將一條直線CAT5乙太網路線的一端插入DP-G321的LAN埠中. 再將另外一端插入您的
閘道器或交換機上的乙太網路埠中.
B. 確定您已經關閉了印表機.
C. 將印表機纜線的一端插入DP-G321合適的埠中, 再將另外一端插入印表機相對應的
埠中.
D. 打開印表機.在進行到步驟E之前,對於每台印表機請重複步驟B-D.
E. 將電源供應器的一端插入DP-G321中,再將另外一端與插入電源插座。 DP-G321啟動,
並開始自我偵測.
配置DP-G321
關於web管理介面相關的,Windows作業系統安裝或其他資訊,請參閱光碟中的手冊.
DP-G321的出廠預設IP位址為 192.168.0.10. 該位址必須與您的網路位址處於相同的範
圍中.您可以更改DP-G321的IP位址以便能與現存網路的IP位址設定相匹配。為了能使
用列印伺服器上的Web管理介面,請為您位於有限網路上的電腦分配一個與列印伺服器
相同網段的IP位址。
進入 開始 > 右擊 網路連線 > 選擇 內容 >
按右鍵單擊與網卡相關的網路連線區域連
線, 選擇 內容.
單擊 Internet Protocol (TCP/IP)
單擊 內容
54
配置DP-G321(繼續)
輸入一個與列印伺服器處於相同範
圍的靜態IP位址.
(192.168.0.xx)
選擇 使用下列的IP位置
IP 地址: 192.168.0.28
子網路遮罩: 255.255.255.0
單擊 確定
單擊 確定 啟用新的設置.
打開Web瀏覽器,在URL位址欄
中輸入 http://192.168.0.10或
Return鍵.
55
配置DP-G321(繼續)
在Configuration標籤下從Network選項
中可以更改DP-G321的IP位址.
本快速安裝手冊會在所有的例子中
使用列印伺服器的預設IP位址.如果
您已經更改了DP-G321的IP地址,
請選擇作一些適合的更改.
在Configuration標籤下單擊
Wireless按鈕來檢視無線設置.
單擊 Site Survey
56
配置DP-G321(繼續)
一份可以連線的無線網路清單會顯示出來.
如果沒有看見希望找到的網路設備,在該頁
面的底部單擊Rescan.
單擊 Select
如果選擇支援WEP的無線網路,該視窗
才出現.這樣的話,就必須要輸入加密資
訊,並單擊OK.
選擇Configuration標籤下的System按鈕來
查看列印伺服器和埠名稱.如果更改了埠
的名稱,請注意一下這些名稱,因為在新增
印表機精靈中會用到它們.
57
新增印表機精靈
對於Windows XP:
進入開始 > 印表機和傳真 > 新增印表機
雙擊 新增印表機 圖示
單擊 下一步
選擇本機印表機, 並不要選取
自動偵測並安裝我的隨插即用
印表機.
單擊 下一步
58
新增印表機精靈(繼續)
選擇 建立新的連接埠 ,並從下拉功
能表中選擇Standard TCP/IP Port.
單擊 下一步
單擊 下一步
輸入 192.168.0.10
埠名稱會被自動填入.
單擊 下一步
59
新增印表機精靈(繼續)
選擇 自訂,並單擊
設定 按鈕
選擇 LPR
輸入與印表機相連的埠的名稱.
預設埠名稱根據設備MAC ID而有所不同:
PS-xxxxxx-U1 (用於USB 埠 1)
PS-xxxxxx-U2 (用於USB埠 2)
PS-xxxxxx-P3 (用於 LPT埠)
單擊 確定
單擊 下一步
60
新增印表機精靈(繼續)
單擊 確定
在這個畫面中,向下拉動選單以選擇
印表機的廠商和機型.(如果沒有列出
來,請放入印表機的光碟和磁片)
單擊 下一步
在此配置印表機的名稱和
預設印表機的設定
單擊 下一步
61
新增印表機精靈
(繼續)
選擇不共用印表機,每個系統會直
接列印到列印伺服器上.
選擇 不共用此印表機
單擊 下一步
選擇 是, 列印一張測試頁面.
如果該測試頁面沒有成功列印出
來,請參考光碟上使用手冊中的
Frequently Asked Questions.
單擊 下一步
單擊 ”完成” ,結束新增印表
機精靈.
對每台印表機/埠都重複新增印表
機精靈步驟,在每個將要列印的系
統上重複整個步驟.
單擊 完成
安裝完成!
62
友冠技術支援
台灣地區用戶可以透過我們的網站,電子郵件或電話與
友冠資訊技術支援人員聯絡。
支援服務時間從
週一到週五,上午8:30 a.m. 到 7:00 p.m
Web: http://www.dlinktw.com.tw/
FAQ: http://www.dlinktw.com.tw/support.asp
Email: dssqa@dlinktw.com.tw
Phone: 0800-002-615
如果您是台灣地區以外的用戶,請參考使用手冊
中記載的D-Link 全球各地分公司的聯絡資訊
取得支援服務。
產品維修與保固相關資訊,請參考友冠資訊網頁說明:
http://www.dlinktw.com.tw/suppQuick.asp
DP-G321
Produk ini bisa diseting
menggunakan Web Browser yang
ada sekarang seperti Internet
Explorer 6 atau Netscape
Navigator 7.0
AirPlus™ G 802.11g/2.4GHz
Wireless Multi-Port
Sebelum Memulai
Anda membutuhkan perangkat yang mempunyai kartu jaringan Ethernet seperti sebuah
laptop atau komputer desktop dan sebuah printer dengan port USB atau port LPT yang
akan terhubung ke DP-G321
Penting: Matikan printer sebelum memasangnya ke DP-G321
Periksa Isi Paket Penjualan
DP-G321 AirPlus G Wireless Multi-Port Print Server
TM
CD-ROM yang berisi program, petunjuk
penggunaan dan garansi
5V DC, 2.5A
Power Adapter
Jika isi paket tidak lengkap, harap hubungi penjual.
Menggunakan power
supply yang tegangannya
berbeda dengan power supply
yang termasuk dalam paket ini
dapat menyebabkan kerusakan
dan akan membatalkan garansi
produk ini.
©2004 D-Link Systems, Inc. All rights reserved. Trademarks or registered trademarks are the property of their respective holders. Software and specifications subject to change without notice.
Menghubungkan DP-G321
ke jaringan anda
Antena: Digunakan untuk koneksi secara
nirkabel ke access point/router nirkabel
802.11b/g
Port LAN: Menghubungkan ke
sebuah router atau switch
Port USB: Digunakan untuk menghubungkan
printer yang mempunyai port USB.
Port LPT: Digunakan
untuk menghubungkan
printer yang mempunyai
port paralel standar.
Lubang Power:
Menghubungkan
ke Power
Adapter AC.
Peringatan !
Hanya printer USB yang boleh dihubungkan dengan port USB pada DP-G321. Jangan
menghubungkan perangkat USB lainnya ke port USB, melakukan ini mungkin akan merusakkan
unit, membatalkan garansi dari produk ini.
65
Menghubungkan DP-G321 ke
jaringan anda (Lanjutan)
Catatan: Jangan hidupkan DP-G321 sebelum ada perintah untuk
menghidupkannya.
Untuk mencetak menggunakan Mac OS, silahkan melihat pada manual (.pdf)
yang ada dalam CD-ROM
A. Masukkan salah satu ujung kabel Ethernet CAT5 straight-through ke port LAN pada
DP-G321. Hubungkan ujung satunya lagi ke port Ethernet pada gateway atau switch
anda.
B. Pastikan bahwa Printer anda dalam keadaan OFF.
C. Hubungkan salah satu ujung kabel printer ke port yang sesuai pada DP-G321 dan ujung
satunya lagi ke printer anda
D. Hidupkan printer anda. Ulangi langkah B-D untuk setiap printer sebelum melanjutkan
ke langkah E.
E. Masukkan power adapter ke lubang power pada DP-G321 dan colok power adapter ke
colokan listrik. DP-G321 akan hidup dan mulai melakukan pengetesan internal.
Mengatur DP-G321
Untuk informasi tambahan mengenai seting sistem operasi Windows atau informasi pada
manajemen antar muka berbasiskan web, silahkan melihat pada petunjuk penggunaan
yang ada di CD.
Alamat IP default DP-G321 adalah 192.168.0.10. Untuk dapat terhubung ke printer melalui
DP-G321, DP-G321 harus mempunyai alamat IP yang sama dengan jaringan anda. Anda
dapat mengganti alamat IP dari DP-G321 untuk mencocokkan dengan skema alamat IP
jaringan anda yang ada. Untuk mengakses konfigurasi berbasis web dari print server,
masukkan alamat IP yang satu kelas dengan
print server secara manual pada salah satu PC di
jaringan anda.
Pergi ke Start > Klik Kanan pada My
Network Places > Pilih Properties > Klik
Kanan pada Network Connection yang
terasosiasi dengan kartu jaringan anda dan
pilih Properties
Klik Internet Protocol (TCP/IP)
Klik Properties
66
Mengatur DP-G321 (Lanjutan)
Masukkan alamat IP statis yang
berada dalam kelas yang sama
dengan print server (192.168.0.xx)
Pilih Use the following IP address
IP address: 192.168.0.28
Subnet mask: 255.255.255.0
Klik OK
Klik OK untuk mengaktifkan
konfigurasi alamat IP
Buka Web Browser anda dan
ketik http://192.168.0.10 pada
kotak alamat URL, kemudian
tekan tombol Enter atau Return.
67
Mengatur DP-G321 (Lanjutan)
Alamat IP pada DP-G321 dapat
dimodifikasi pada bagian Network
dibawah menu Configuration.
Petunjuk pemasangan cepat ini
menggunakan alamat IP default
dari print server sebagai contoh.
Silahkan lakukan penyesuaian yang
diperlukan jika anda merubah alamat
IP dari DP-G321.
Klik pada menu Configuration untuk
menampilkan Wireless Settings
yang ada
Klik Site Survey
68
Mengatur DP-G321 (Lanjutan)
Sebuah daftar dari jaringan nirkabel
yang ada akan muncul, jika anda tidak
melihat jaringan yang anda cari maka
klik Rescan pada bagian bawah dari
halaman ini
Klik Select
Halaman ini hanya muncul jika anda
memilih jaringan nirkabel dengan
enkripsi WEP. Jika anda memilihnya
maka anda harus memasukkan
informasi enkripsi dan klik OK
Pilih bagian System pada menu
Configuration untuk melihat nama
dari print server dan nama port. Jika
anda mengganti nama-nama ini maka
catat nama baru yang anda gunakan,
informasi ini akan dibutuhkan pada
saat Wizard menambah printer
69
Wizard menambah printer
Untuk Windows XP:
Pergi ke menu Start > Configuration > Printers and Faxes > Add a Printer
Klik dua kali pada
simbol Add Printer
Klik Next
Pilih Local Printer dan nonaktifkan Automatically
detect and install my Plug
and Play printer
Klik Next
70
Wizard menambah printer
(Lanjutan)
Pilih Create New Port dan pada
bagian menu drop-down, pilih
“Standard TCP/IP Port”
Klik Next
Klik Next
Ketik 192.168.0.10
Nama Port akan otomatis terisi
Klik Next
71
Wizard menambah printer
(Lanjutan)
Pilih Custom
dan klik Settings
Pilih LPR
Masukkan nama port dari port
yang digunakan oleh printer
Nama default port berbeda dengan
MAC ID perangkat:
PS-xxxxxx-U1 (untuk Port 1 USB)
PS-xxxxxx-U2 (untuk Port 2 USB)
PS-xxxxxx-P3 (untuk Port LPT)
Klik OK
Klik Next
72
Wizard menambah printer
(Lanjutan)
Klik Finish
Pada layar ini, cari pada daftar
printer yang anda gunakan (jika
tidak ada maka masukkan CD driver
atau disket yang ada pada paket
penjualan printer anda dan Klik Have
Disk).
Klik Next
Nama printer dan seting printer
default dapat diatur disini.
Klik Next
73
Wizard menambah printer
(Lanjutan)
Dengan memilih tidak membagi
printer, setiap sistem akan
mencetak ke print server secara
langsung.
Pilih Do not share
this printer
Klik Next
Pilih Yes untuk mencetak
halaman test
Jika halaman test tidak tercetak
dengan sukses, silahkan melihat
pada Frequently Asked Questions
pada Petunjuk penggunaan yang
ada pada CD-ROM.
Klik Next
Klik Finish untuk menyelesaikan
Wizard Menambah Printer.
Ulangi langkah Wizard Menambah
Printer untuk setiap printer/port
dan ulangi seluruh proses untuk
setiap sistem yang ingin mencetak
menggunakan print server.
Klik Finish
Setup Anda sudah Selesai !
74
Dukungan Teknis
Update perangkat lunak dan dokumentasi pengguna dapat
diperoleh pada situs web D-Link.
Dukungan Teknis untuk pelanggan:
Dukungan Teknis D-Link melalui telepon:
Tel: +62-21-5731610
Dukungan Teknis D-Link melalui Internet:
Email : support@dlink.co.id
Website : http://support.dlink.co.id
Ver. 2.00(I)
2008/01/08
6DPG321Q.ML2G